Manage Customers
- Customers are the individuals/organizations who have regular demand for your Products. They will place Sales Orders to fulfill their demand
- In this model, each Depot/Sun/Crossdock will have its own separate customer base. Customers who belong to the customer base of a Depot/Sun/Crossdock can only place orders from that Depot/Sun/Crossdock and not from other Depots/Suns/Crossdocks
Locate Customer List
- The Customers are listed on the Partners > Customers tab
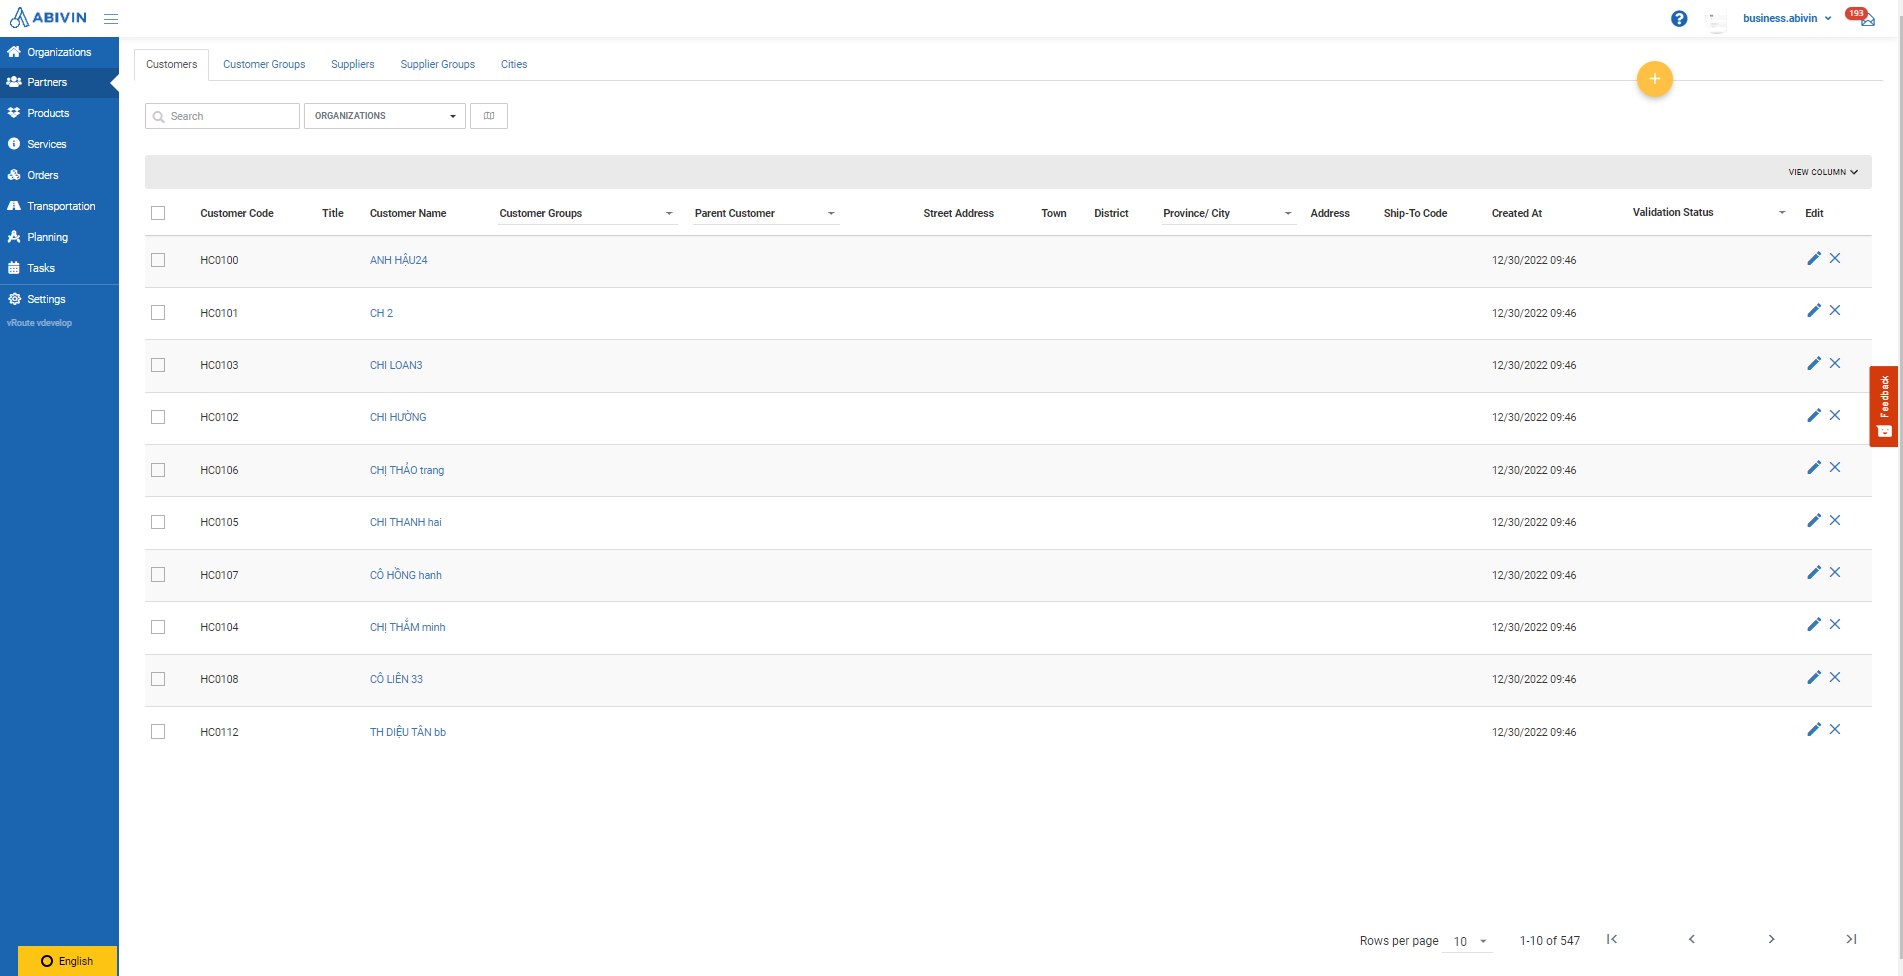
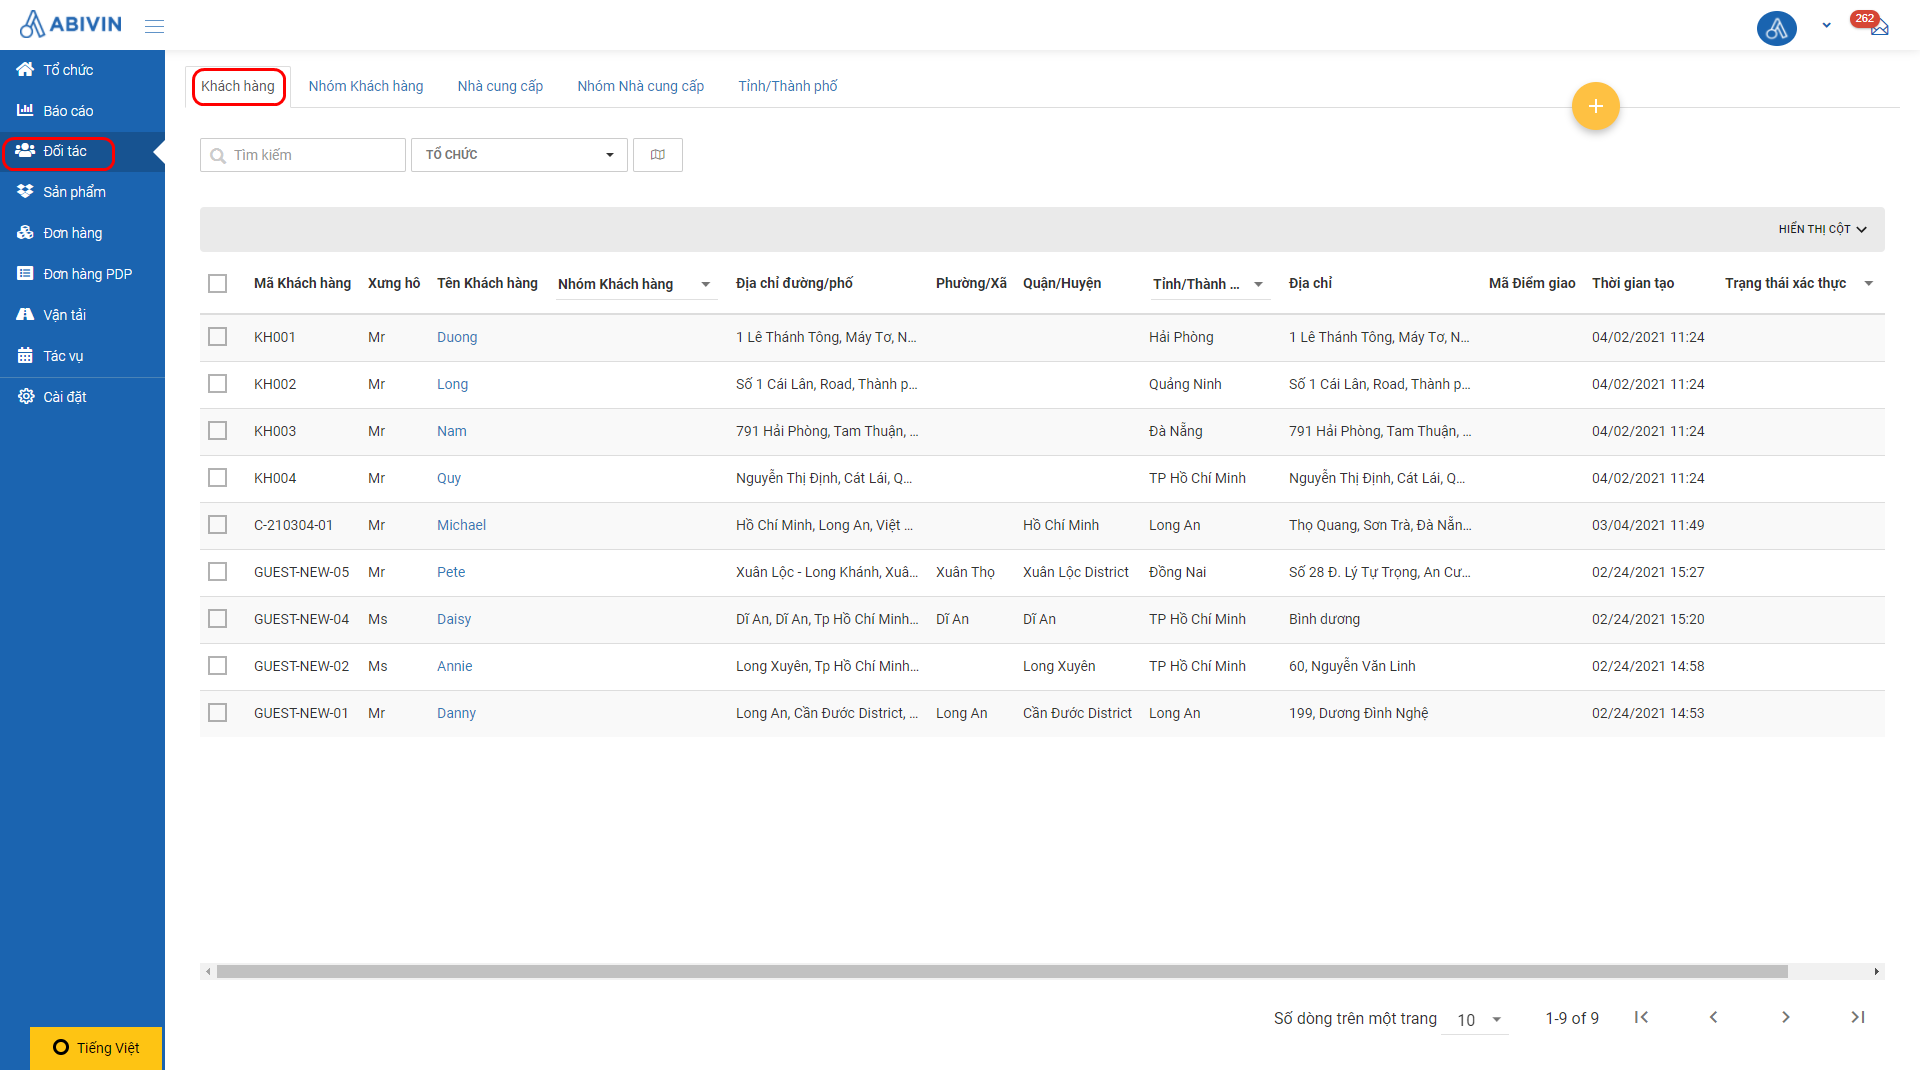
Illustration (Vietnamese)
Create Customers
- You have two methods to create the Customers: Webform and Excel import file
Customer Information Fields
- Below are the information fields of the Customer in this model
Apart from the information fields mentioned below, other information fields can be left blank
- On Web form, the information of a customer is present on two tabs:
Tab title | Tab description |
|---|---|
Basic information of the customer | |
Information in this tab is used for Electronic Proof of Delivery (e-POD) function |
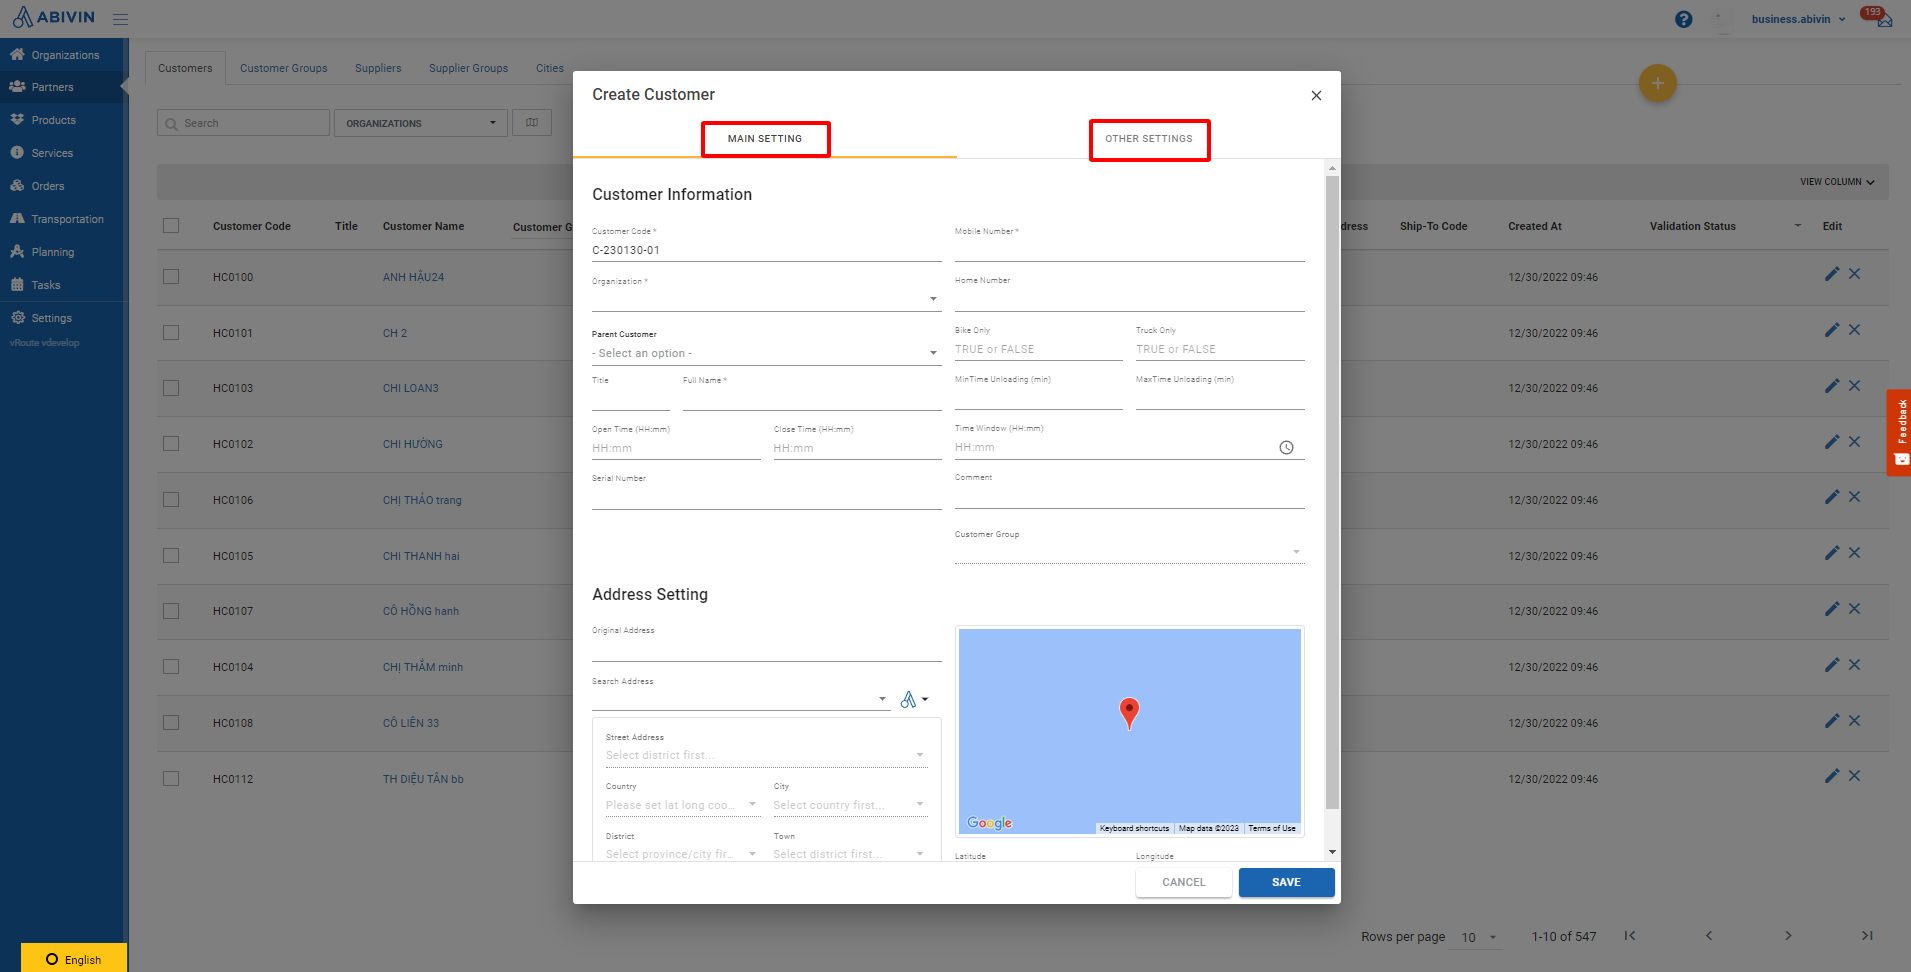
Main Setting
Information field | Description & Input |
|---|---|
Organization (Webform); Organization Code (Excel import file) (Required) | 1. Description: |
Customer Code (Webform); Partner Code (Excel import file) | 1. Description: |
Mobile Number (Webform); Phone Number (Excel import file) | 1. Description: |
Customer Group (Webform); Partner Group Code (Excel import file) | 1. Description: |
Home Number | 1. Description: |
Title | 1. Description: |
Full Name | 1. Description: |
Open Time; Close Time | 1. Description: |
Time window | 1. Description: |
Bike only; Truck only | 1. Description: |
Allow Vehicle Types | This information field will only be visible if the following configuration is enabled: Flexible Vehicle Type |
MinTime Unloading & MaxTime Unloading (Webform); Min Time & Max Time (Excel import file) | 1. Description: |
Lunch time | This information field is no longer used. Leave this cell blank |
Original Address (Webform); Street Address (Excel import file) | 1. Description: |
Latitude; Longitude | 1. Description: |
Search Address | 1. Description: |
Serial Number | This information field is only used in CRM Model |
Comment | 1. Description: |
Other Settings
Email Settings
Information field | Description & Input |
|---|---|
Email (Web form + Excel template) (Optional) | 1. Description: |
CC | 1. Description: |
BCC | 1. Description: |
Sales Area
Information field | Description & Input |
|---|---|
Sales Code (Web form + Excel template) (Optional) | 1. Description: |
MDP | 1. Description: |
Tax Code | 1. Description: |
Invoice Address | 1. Description: |
Ship-to Profile
- This is an exclusive tab for certain user accounts
Information of the customer for different manufacturing warehouses
Read more at the following section: Ship-to Profile
Update customer information
Update single customer using Web form
- Please refer to the CRUD functions article to know the general steps about updating objects in Abivin vRoute
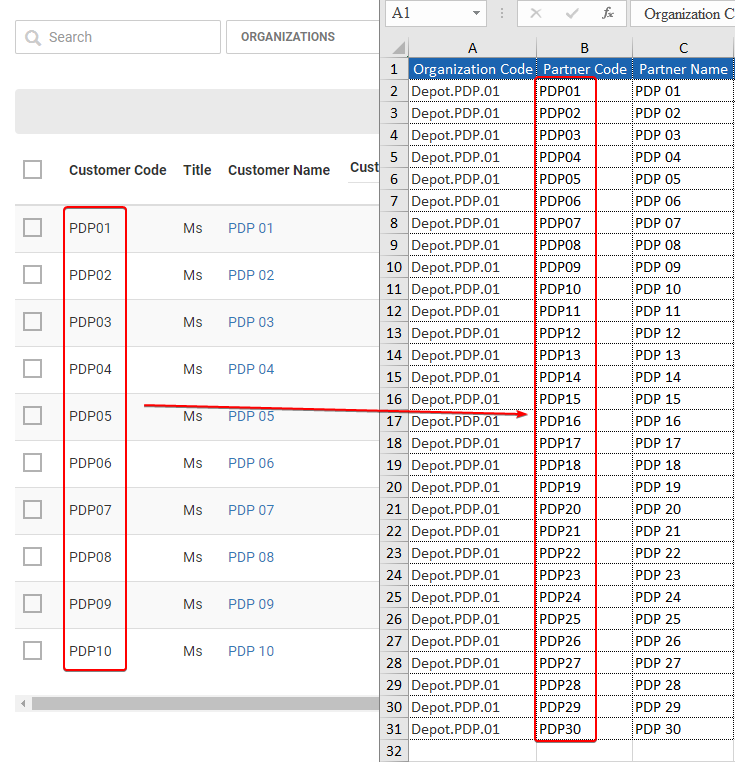
Mass update multiple customers using Excel template
- You can also update multiple Customers at once using the Excel template. To do this, first, you need to copy and paste the Customer Codes of the existing Customers into the Excel template, then input new information into other fields. After that, just upload the Excel template as usual. The system will replace the existing Customer information with the new information in the Excel template
Delete customer
- Please refer to the CRUD functions article to know the general steps about deleting objects in Abivin vRoute
- Note: The system will prevent you from deleting Customers whose Orders (regardless of the Order Date) are in Open; Planned Planning Status. The system will display the following error message:
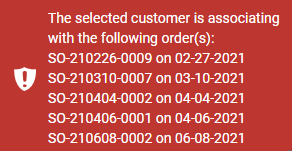
Illustration (English)
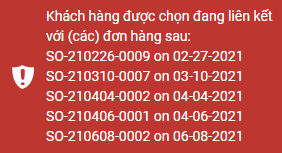
Illustration (Vietnamese)
Export customer list
- Please refer to the CRUD functions article to know the general steps about exporting objects in Abivin vRoute
Search and filter customer
Search customer
- To search for a specific customer, input one of these following attribute of that customer into the search field: Title; Customer Code; Customer Name; Email; Mobile Number
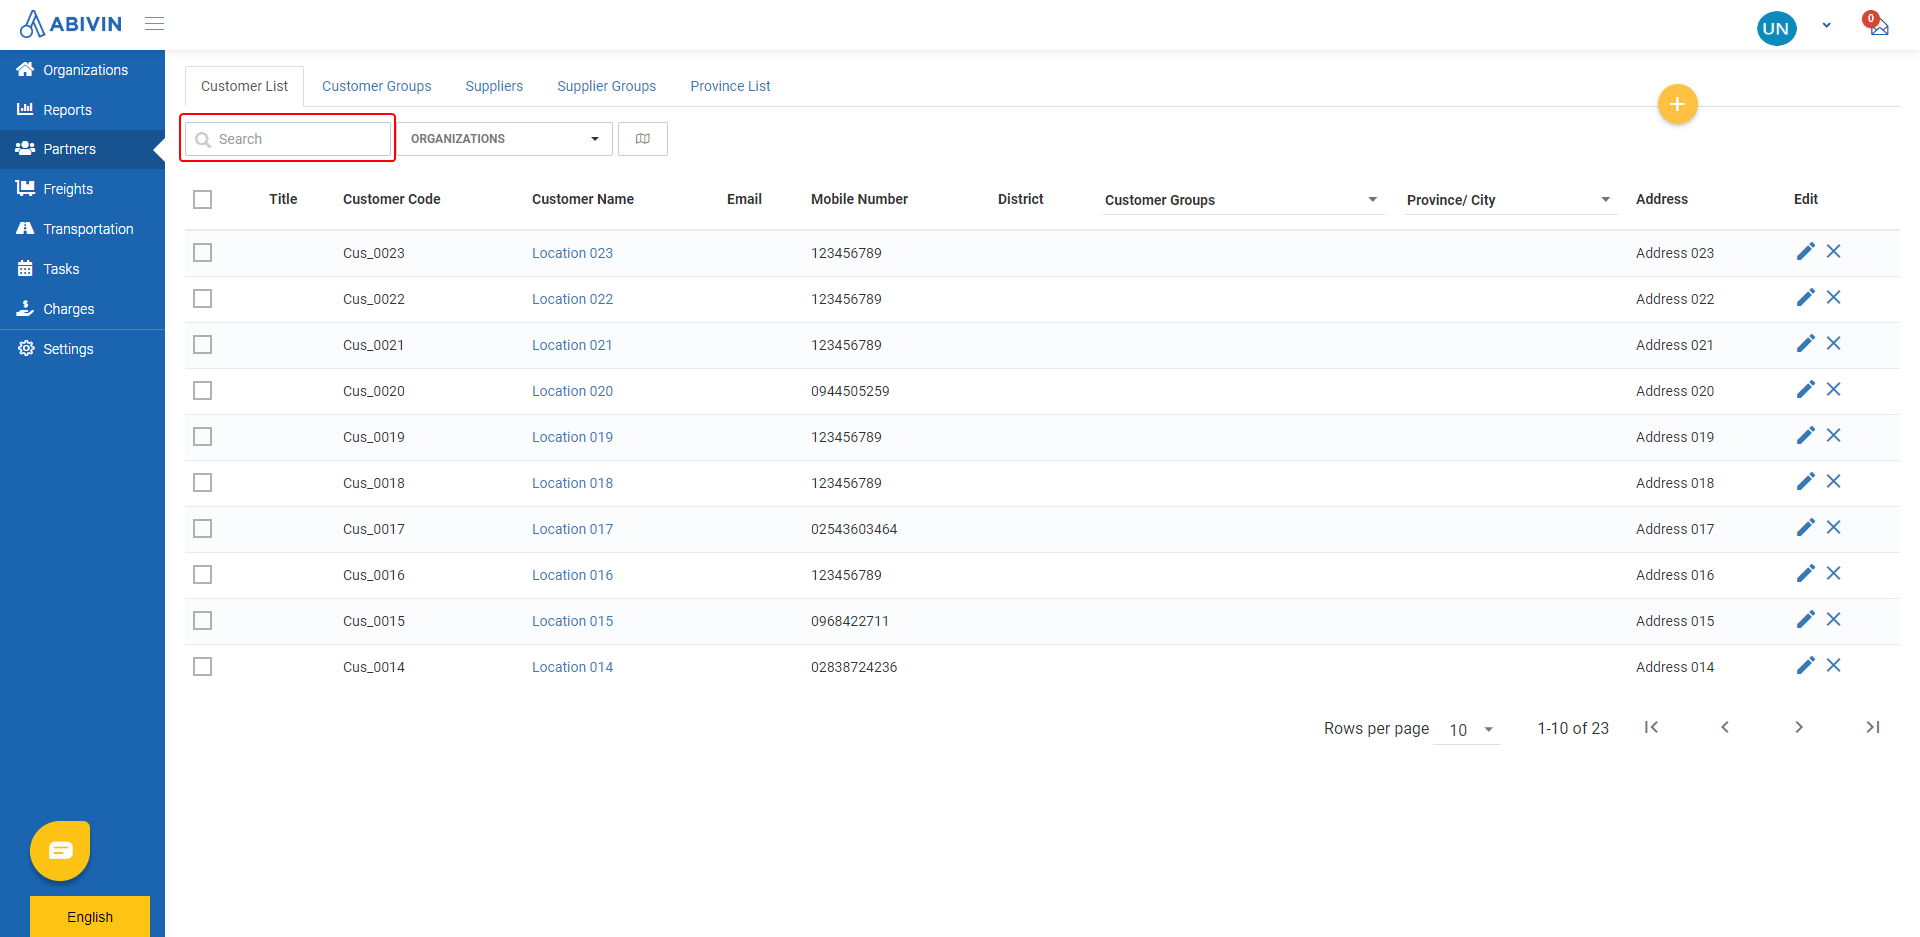
Filter customer by Depot/Sun/Crossdock
- You can filter customers who are under direct management of a specific Depot/Sun/Crossdock by clicking on Organization field, then input the Organization name of that Depot/Sun/Crossdock into the search bar. Customers who are under direct management of that Depot/Sun/Crossdock will show up shortly
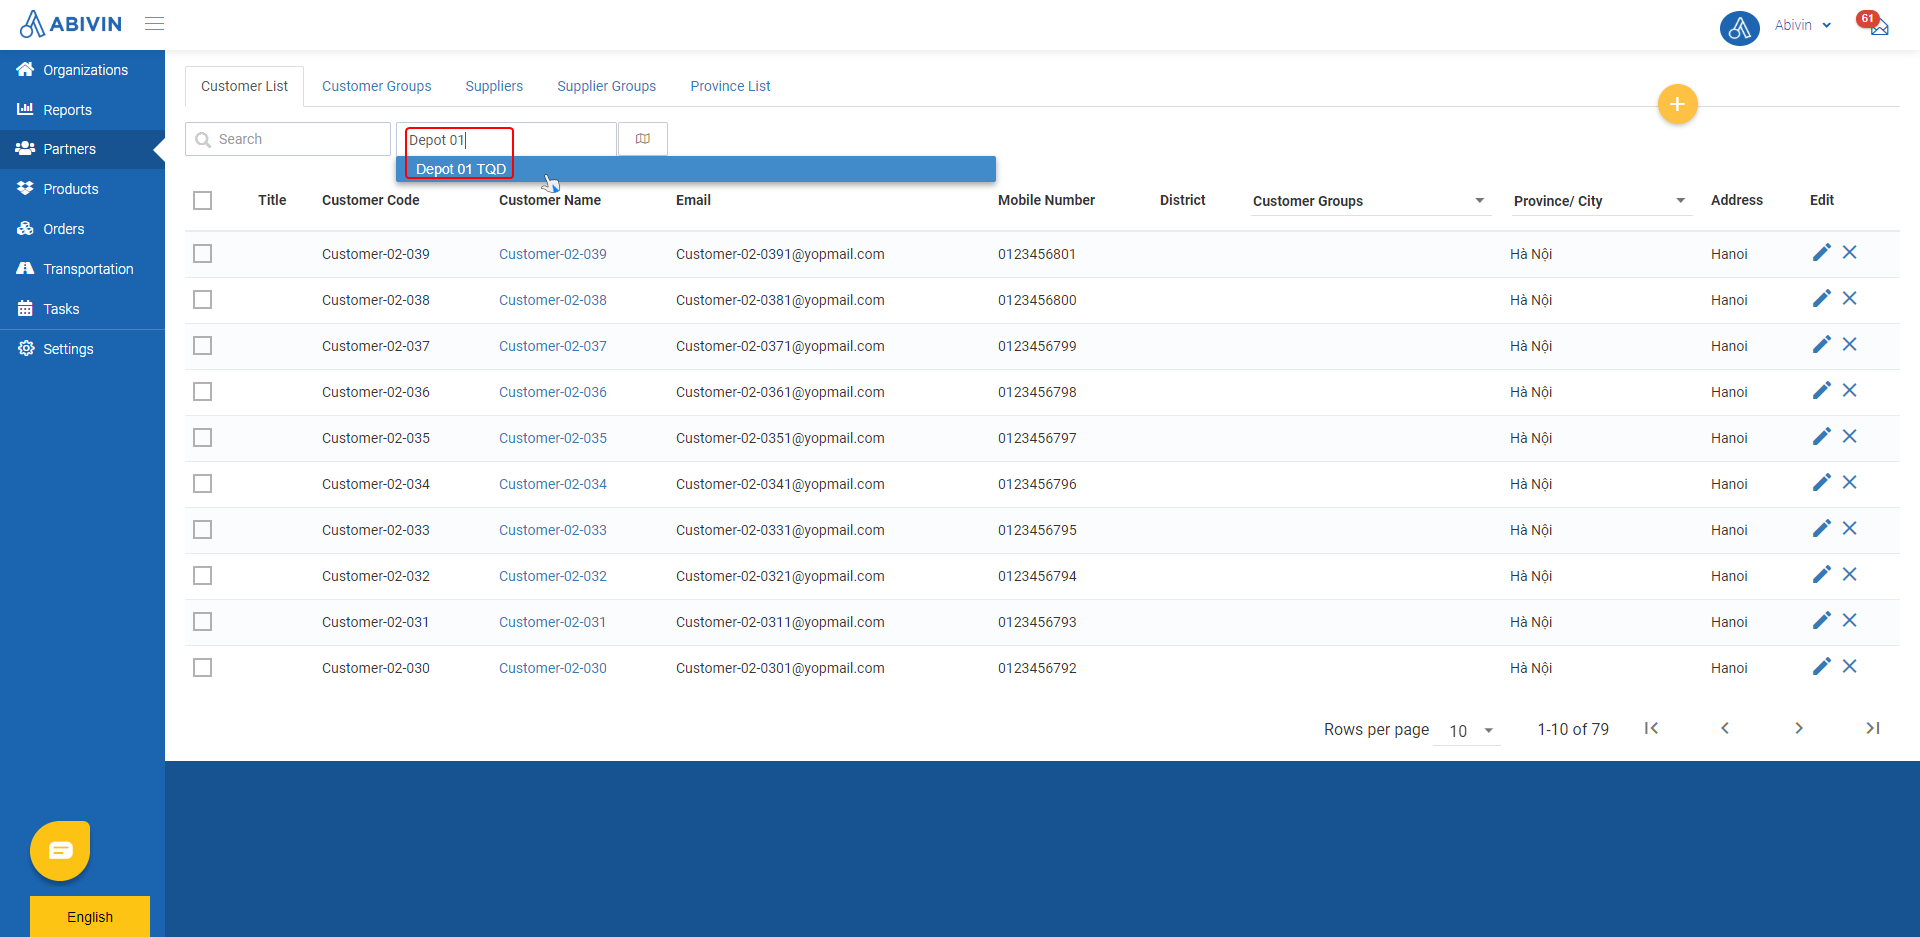
Filter customer by Customer group or Province/City
- You can filter the Customer list to show Customers who belong to the same Customer Group, or locate in the same Province/City by clicking on the corresponding column title, then select the Customer group or Province/City from the drop down menu. Customers who meet the selected conditions will show up shortly
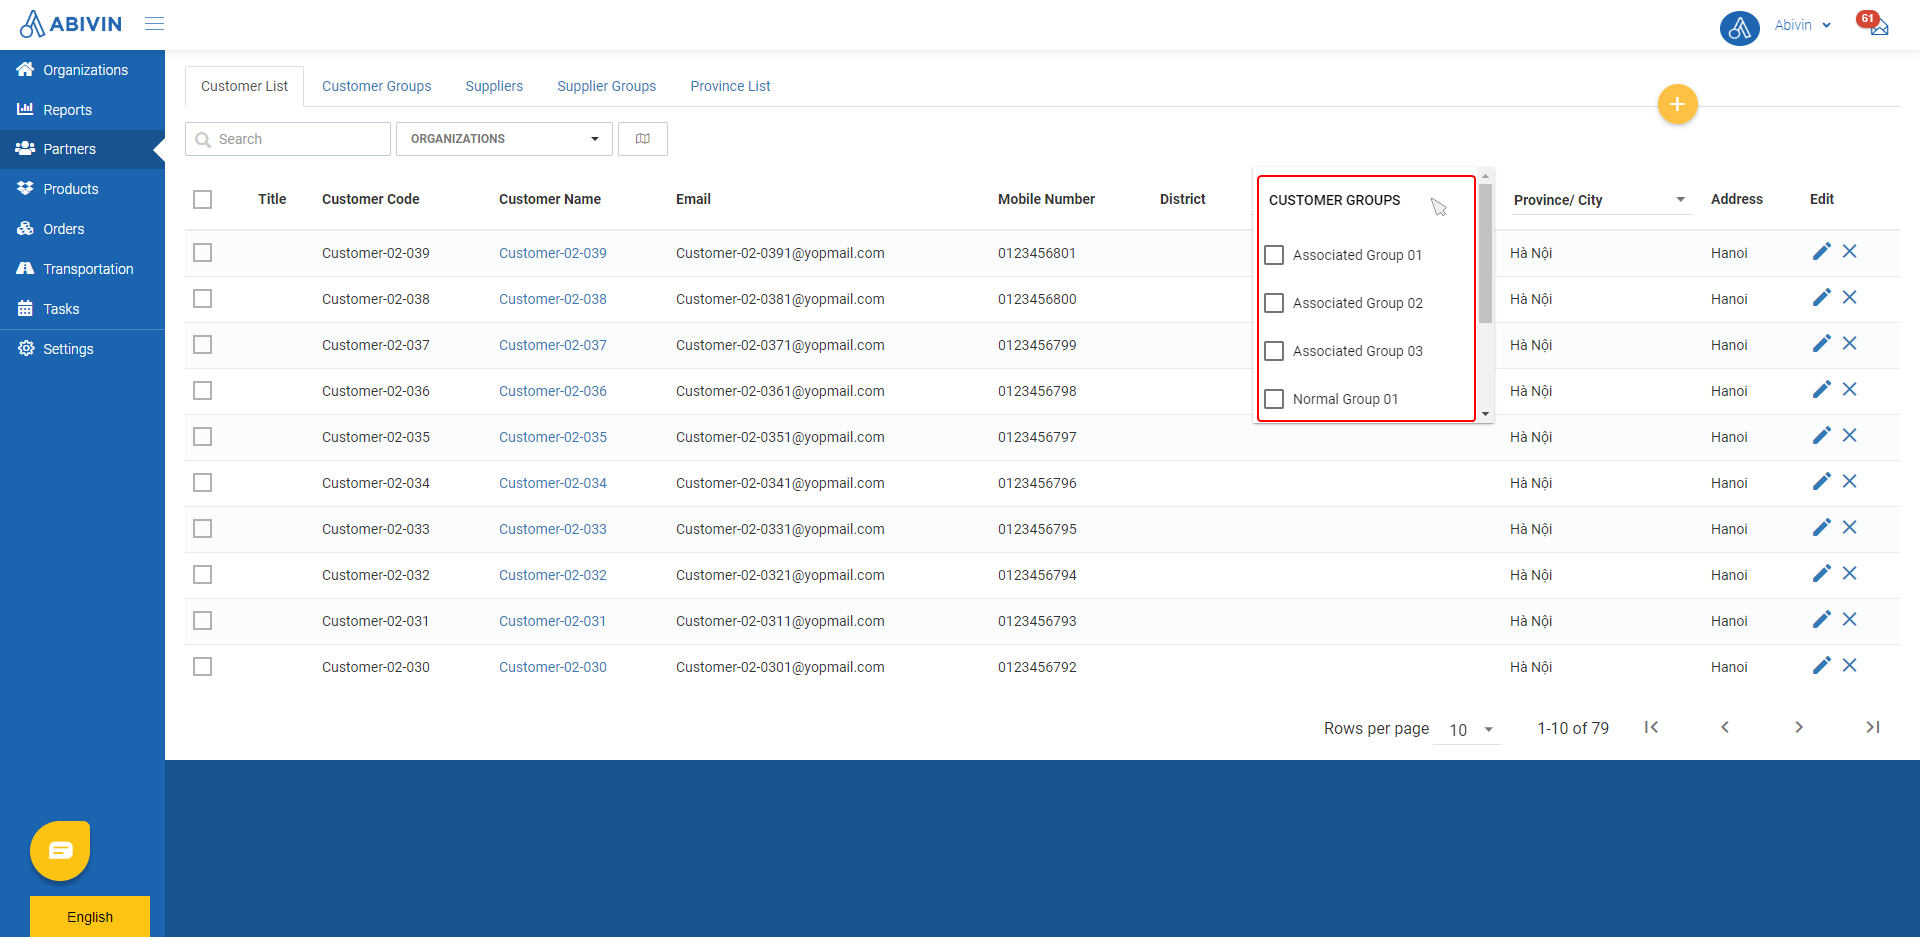
Filter customers by Customer group
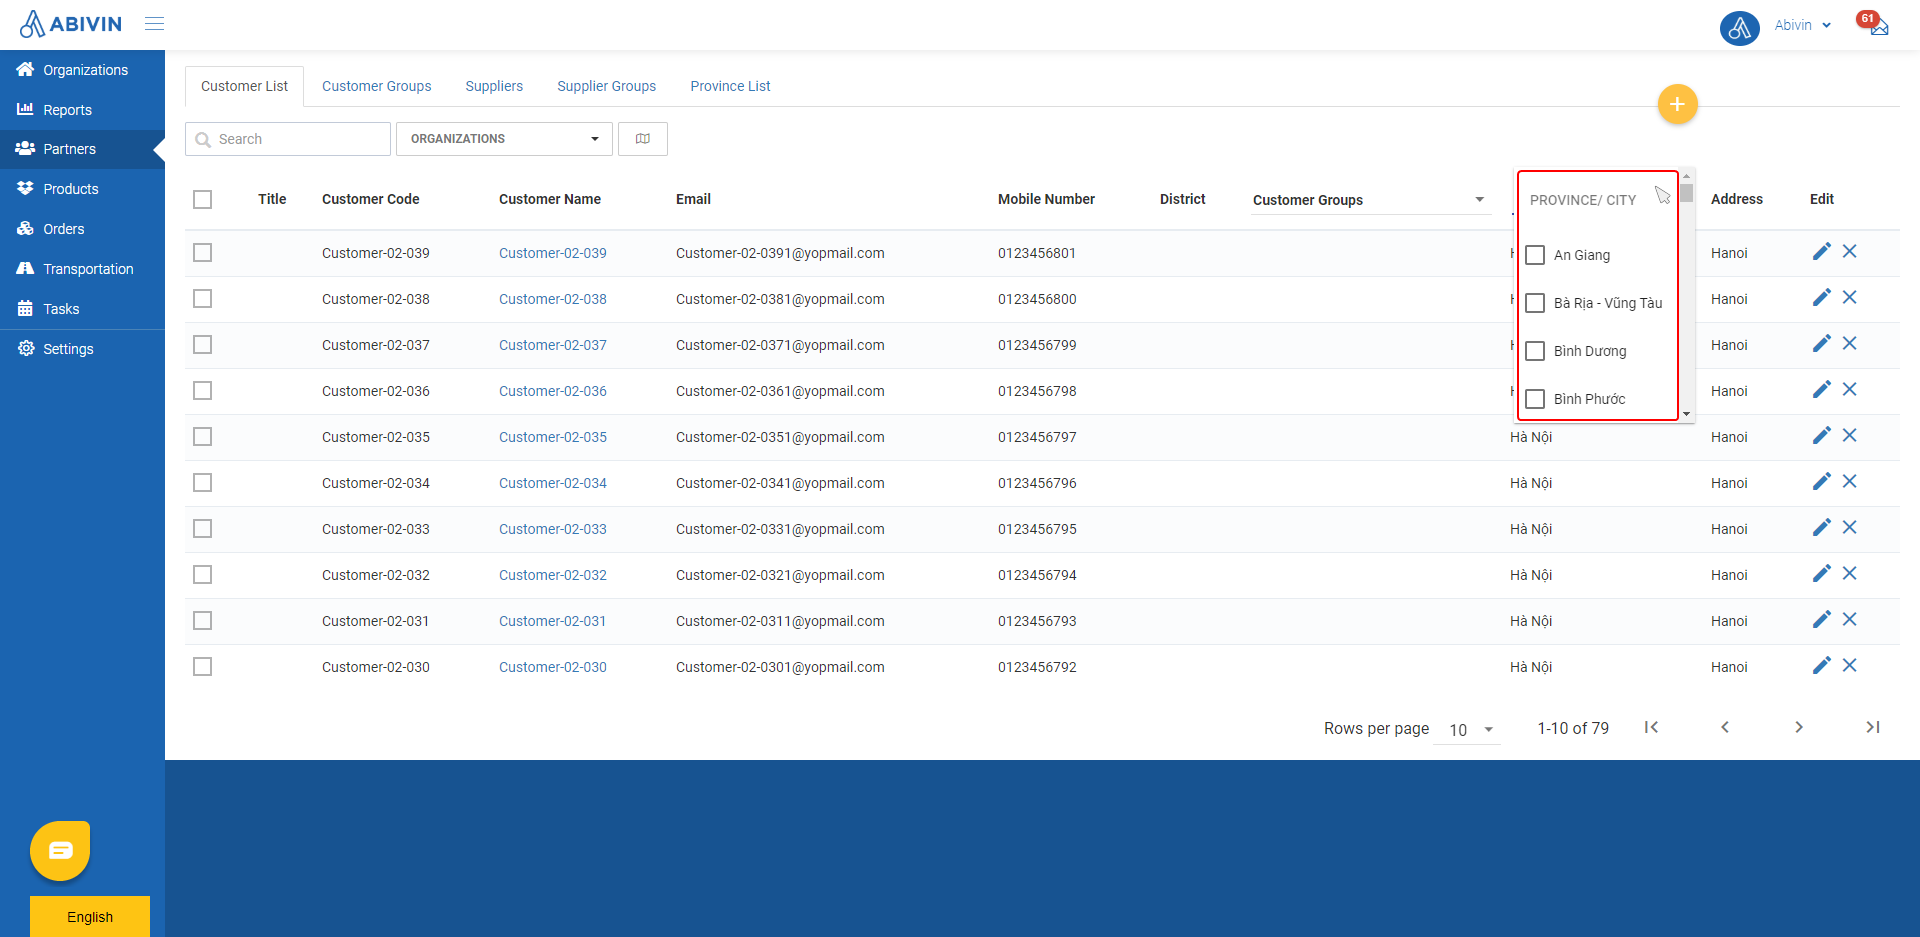
Filter customers by Province/City
You can combine several filters for more accurate search results
View Customers locations on Map
- You can view the locations of the customers on Map screen by clicking on the icon Map View
- The location of a customer will be signified by a blue location mark icon . You can click on the location mark icon to display the Customer Name
- To go back to the Customer list, click on the icon View Data Table
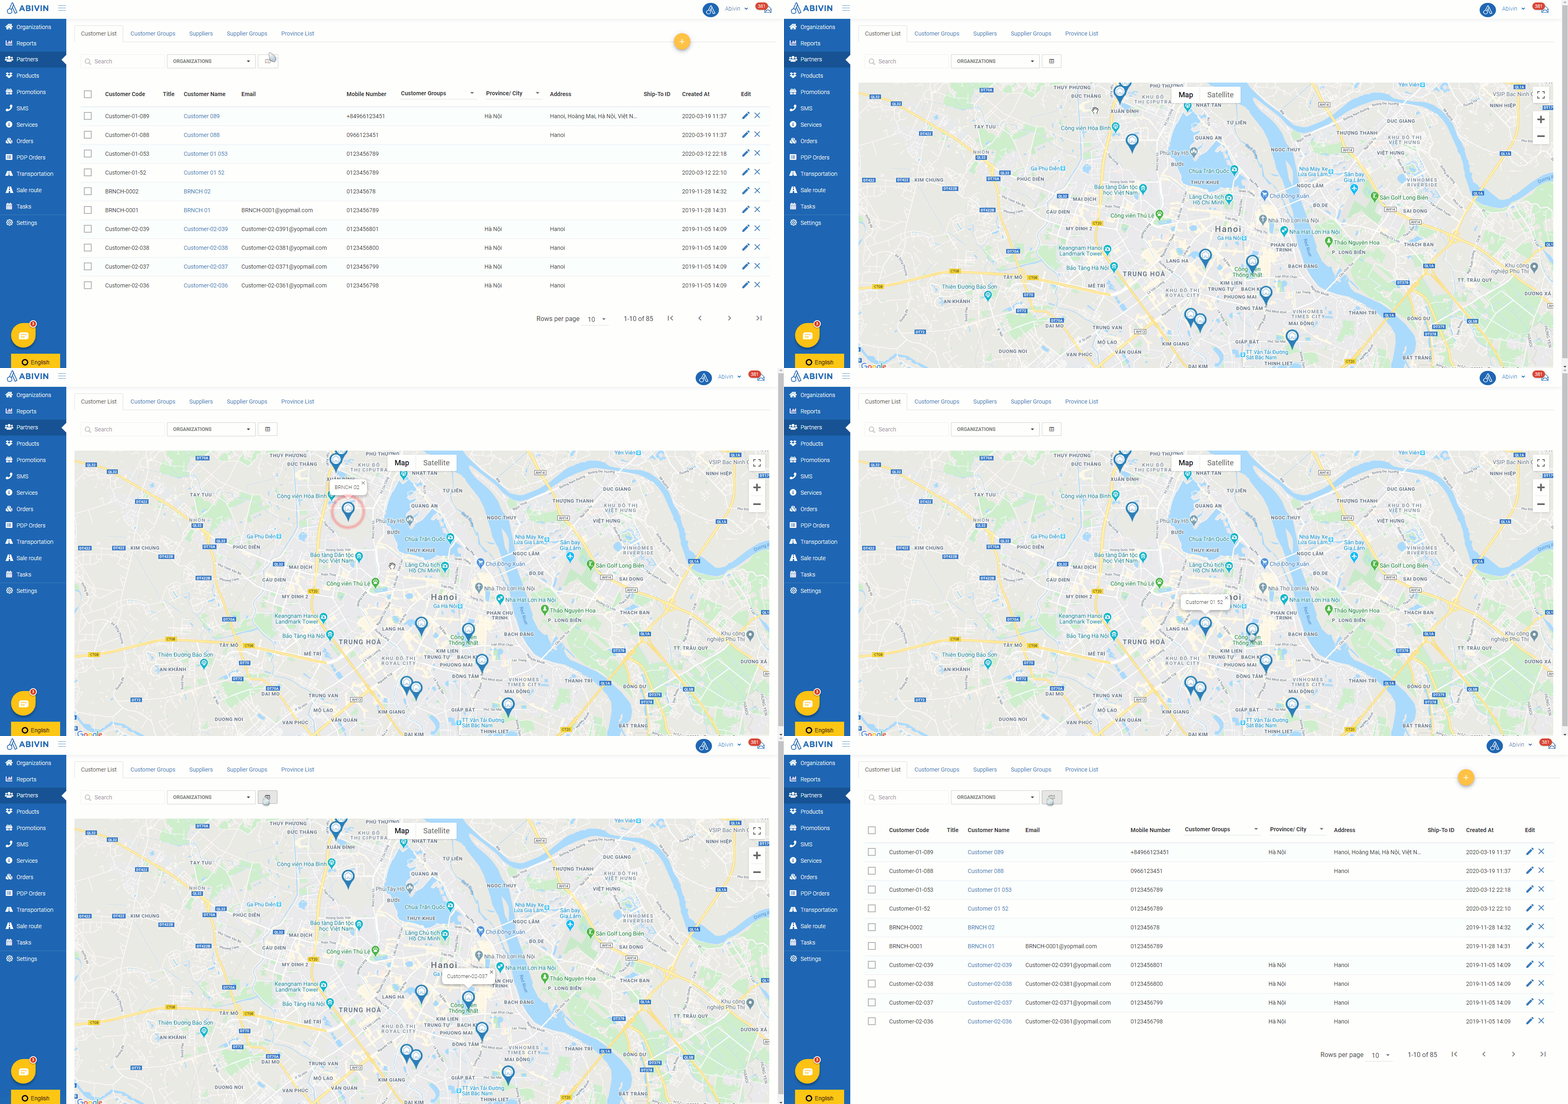
Retrieve Customer Address; Coordinates and Customer Group
- During the Customer creation/editing process, you can opt to manually input or let the system automatically retrieve the Customer address and coordinate information using Abivin built-in address engine or the Google Map engine
Automatic Customer Group allocationIn order for the system to automatically allocate Customers into appropriate Customer Groups, then prior to creating Customers you have to create and set up the Customer Groups based on Administrative Divisions. The setup guide can be found in the following article : Geographic Clustering
Manually input Customer address & coordinates
- On the Webform, you can manually input the Customer address into the Original Address field and the Customer coordinates into the Latitude; Longitude fields
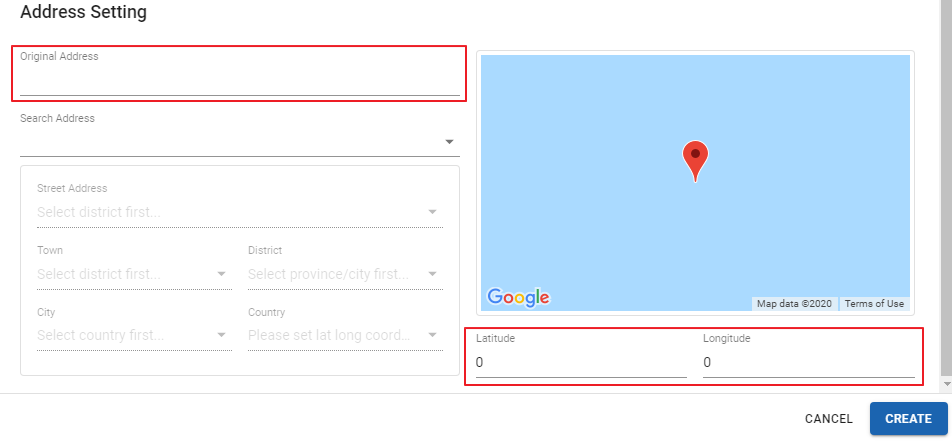
Illustration (English)
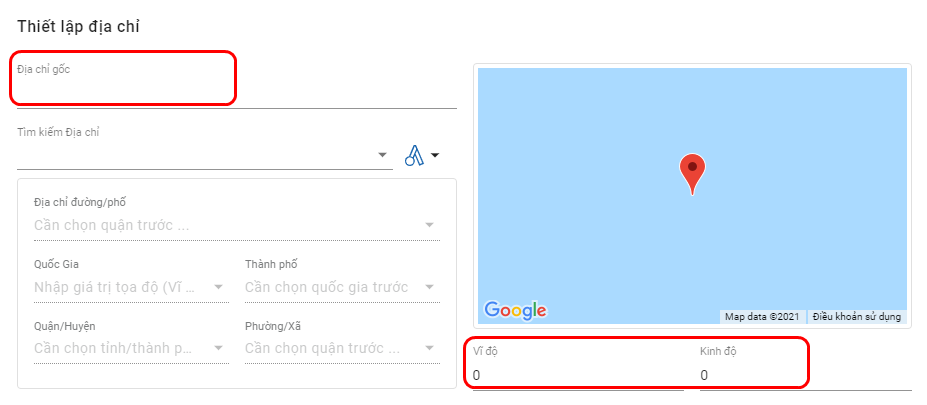
Illustration (Vietnamese)
- On the Excel import file, input the Customer address into the City/Province; Address; Street Address; Town; District; Country fields, and the Customer coordinate into the Latitude; Longitude fields
Automatically retrieve Customer address & coordinate
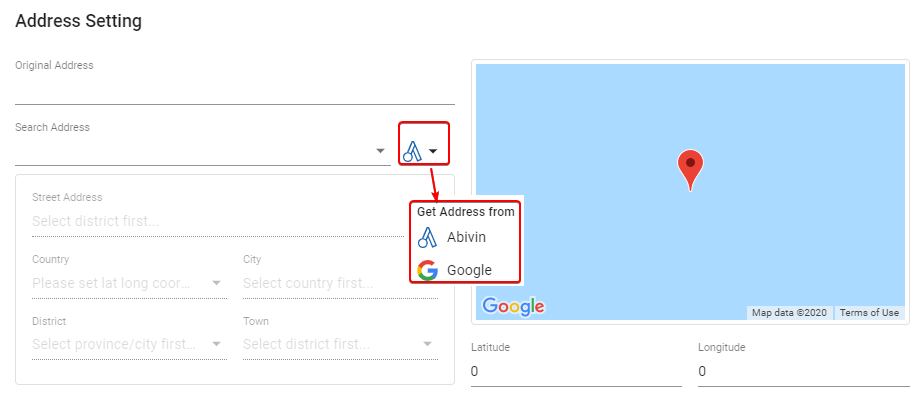
- On the Webform, first, select the address engine you want to use by clicking on the address engine selection icon (Located next to the Search Address input field). A list will pop out displaying the two aforementioned address engines. Click on the desired engine to select it
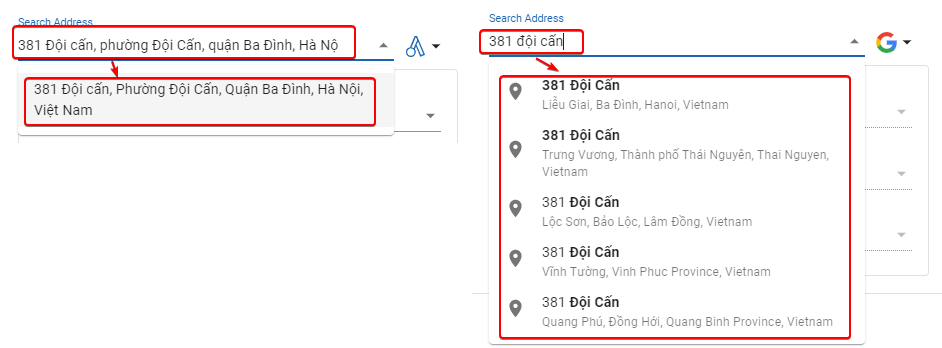
- Next, input the specific address of that customer into the Search Address field. If you use the Abivin built-in address engine, you should input the address as detailed as possible (Building number, street, town, city, country, etc.) then click on the result on the dropdown list. If you use the Google address engine, you can simply input a part of the address, not necessarily the full address. After that, the engine will show a list of suggestions for you to choose from. Click on the correct suggestion
- After you have input and selected the most appropriate address result, the system will connect to the address engine database, retrieve the address and coordinate information, then input into the corresponding fields
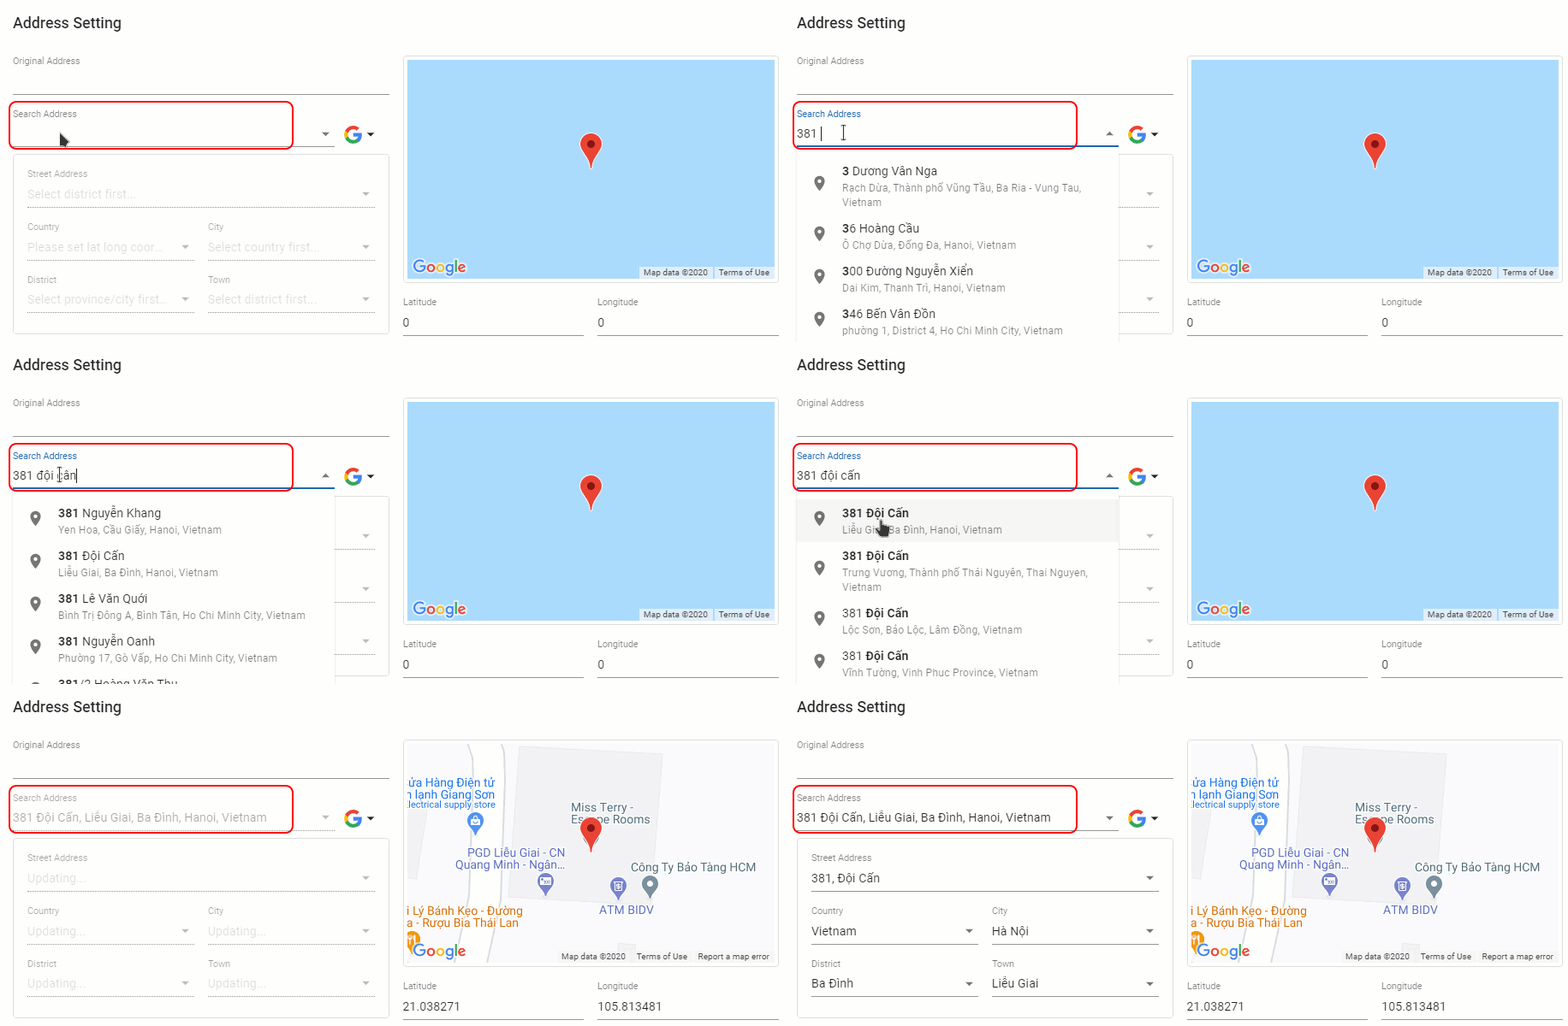
- In case you think the returned coordinate information is incorrect, you can move your mouse onto the map thumbnail, use the middle scroll button to zoom in the map, use the left mouse button to drag and drop the red location mark icon to the location you think is more correct. When you release the left mouse button, the Latitude and Longitude values will update accordingly

- In the Customer import Excel template, input the Customer address into the Address cell and leave the Latitude; Longitude; City/Province; Street Address; Town; District; Country cells blank. After uploading the Excel template, the system will connect to the address engines and automatically fills in the address and coordinate fields of the Customers on the Web form. During this process, the Abivin built-in address engine will be connected first. If the Abivin built-in engine can not return results, the system will switch to the Google Map engine
When importing Customers using Excel template. the Google Map engine is only available for certain user accounts
- If any of the above cells have value, the system will use the input value instead of retrieving from the address engines' database
Ship-to Profile
At the moment, the content in this section is exclusive for certain User accounts
- In actual operation, a Customer can receive deliveries from different Depots. Each Depot very likely manage the same Customer with different identification information. This identification information is defined as Ship-to profile
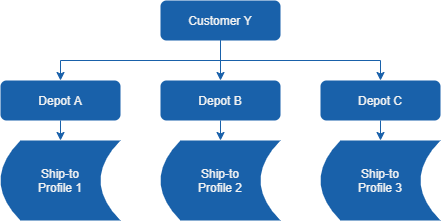
Ship-to profile information
- Below are the information fields of a Ship-to profile
Information field | Description & Input |
|---|---|
Shipper Code (Webform + Excel import file) | 1. Description: |
Ship-To Code | 1. Description: |
Ship-To Name | 1. Description: |
Ship-To Adress | 1. Description: |
Ship-To Expected Lead Time | 1. Description: |
Ship-To Time Window (HH:mm) | 1. Description: |
Ship-To Mobile Number | 1. Description: |
Ship-To Receiving Capacity | 1. Description: |
Ship-To Expected Lead Time
- Ship-To Expected Lead Time is the lead time (By day) the Customer specified for each Ship-to Depot
- This value will be used to determine the delivery date range of the Orders originating from the Ship-to Depot to the Customer. Read more in the following article: Ship-to Depot Delivery
- Below is the list of the Ship-To Expected Lead Time values:
Ship-To Expected Lead Time | Description |
|---|---|
N/A | There is no Expected Lead Time between the Customer and the Ship-to Depot |
D0 | The Expected Lead Time between the Customer and the Ship-to Depot is zero-day |
D1 | The Expected Lead Time between the Customer and the Ship-to Depot is one day |
D2 | The Expected Lead Time between the Customer and the Ship-to Depot is two days |
D3 | The Expected Lead Time between the Customer and the Ship-to Depot is three days |
D4 | The Expected Lead Time between the Customer and the Ship-to Depot is four days |
D5 | The Expected Lead Time between the Customer and the Ship-to Depot is five days |
D6 | The Expected Lead Time between the Customer and the Ship-to Depot is six days |
D7 | The Expected Lead Time between the Customer and the Ship-to Depot is seven days |
D8 | The Expected Lead Time between the Customer and the Ship-to Depot is eight days |
- Input rules: On Web form, click on this field and select the appropriate lead time value from the drop-down list. On Excel template, for each Ship-to profile, input only one of the above nine values (From D0 to D8) into the Ship-to Expected Lead Time cell
Add Ship-to profiles
- To add Ship-to profile for a customer, follow the steps below
Add Ship-to profiles on Web form
- Navigate to Ship-to Profile tab
- Input the information of each Ship-to profile into the information fields described above, then click on the button Add to List
- The recently created Ship-to profile will appear in the list below
- Repeat these steps for other Ship-to profiles of that Customer
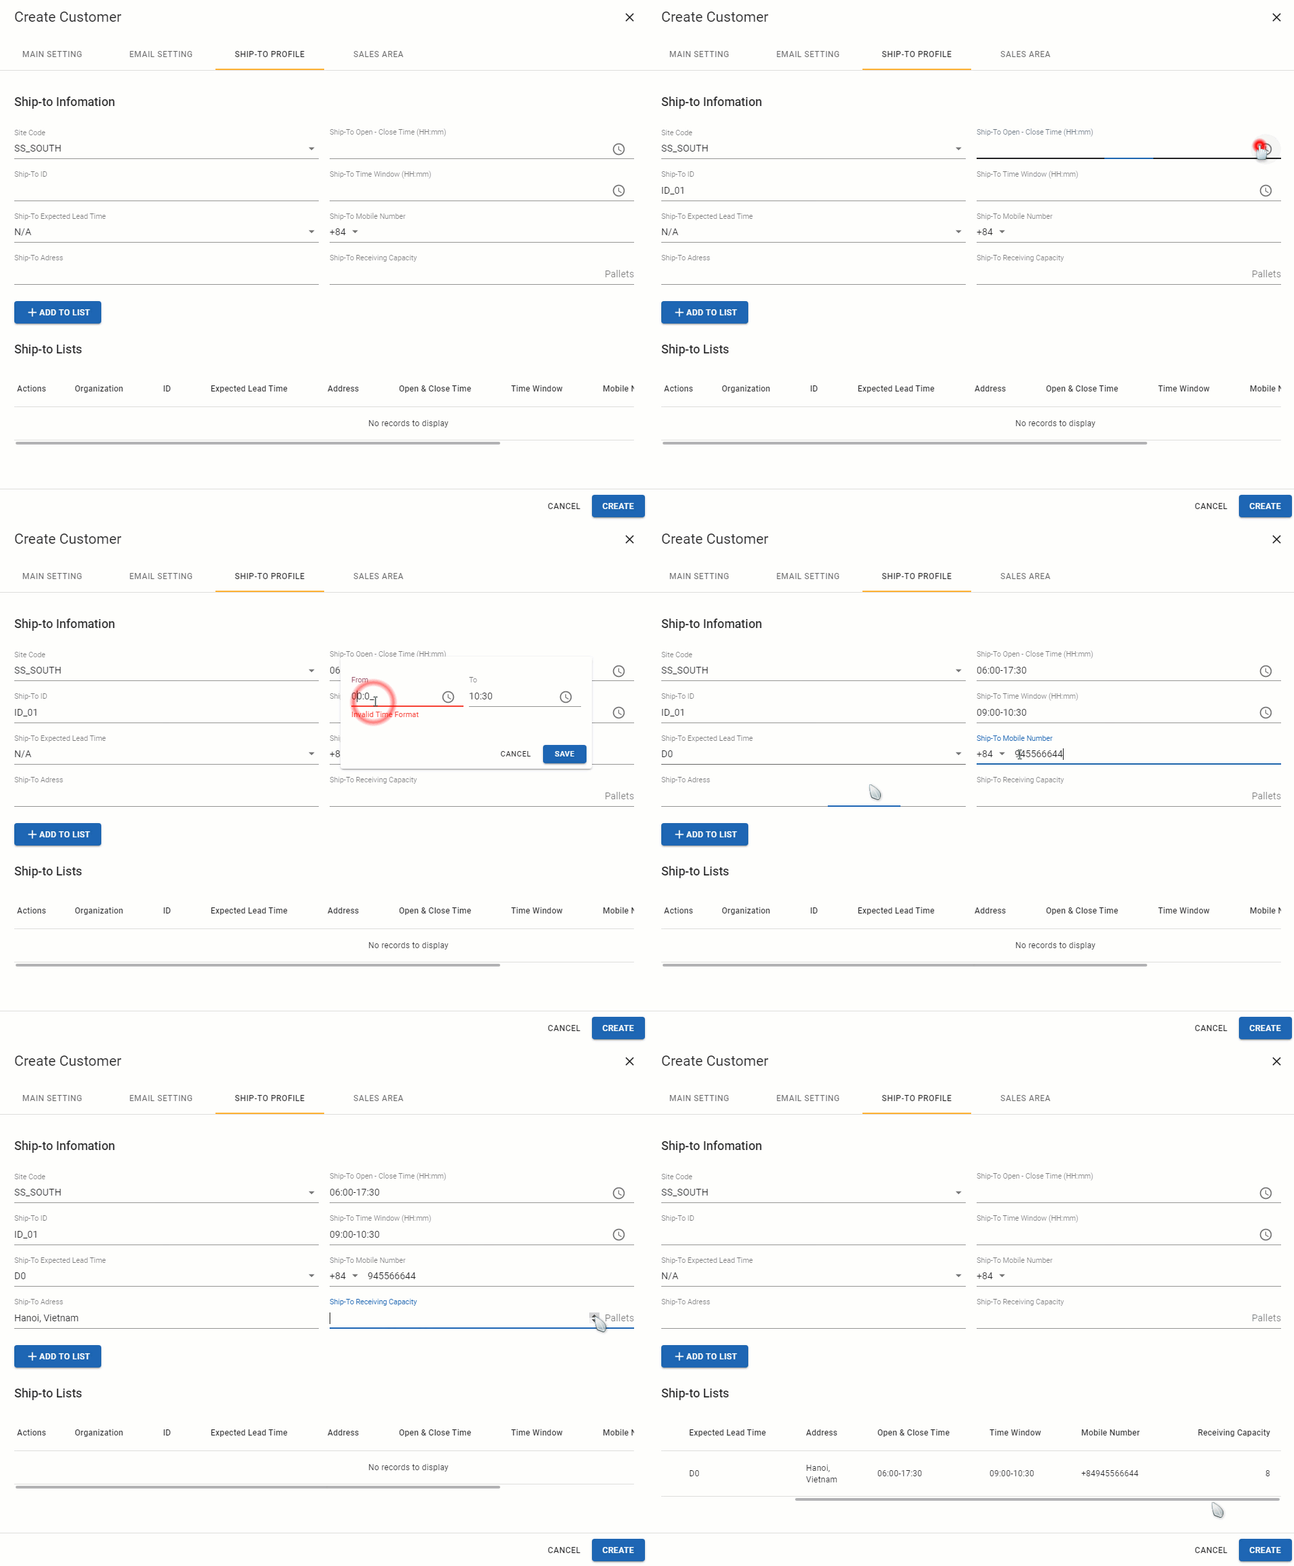
Add Ship-to profiles on Excel template
- On Excel template, if a customer has multiple Ship-to profiles, you need to put each Ship-to profile of that customer on a separate row
- Important Note: You have to duplicate every common information of the Customer between each row of its Ship-to profiles, else the Excel template can not be imported

Search & Filter Customers
Filters no-coordinates customers
- You can filter Customers who don't have coordinates information (Which means their (Latitude; Longitude) are (0;0)) by clicking on the column Validation Status and tick the checkbox No-Coordinate
Beginner's Guide
Create a Customer
- Steps to create a single customer using Web form:
- Step 1: Navigate to Partners > Customers tab.
- Step 2: Click on the symbol Create (the symbol).
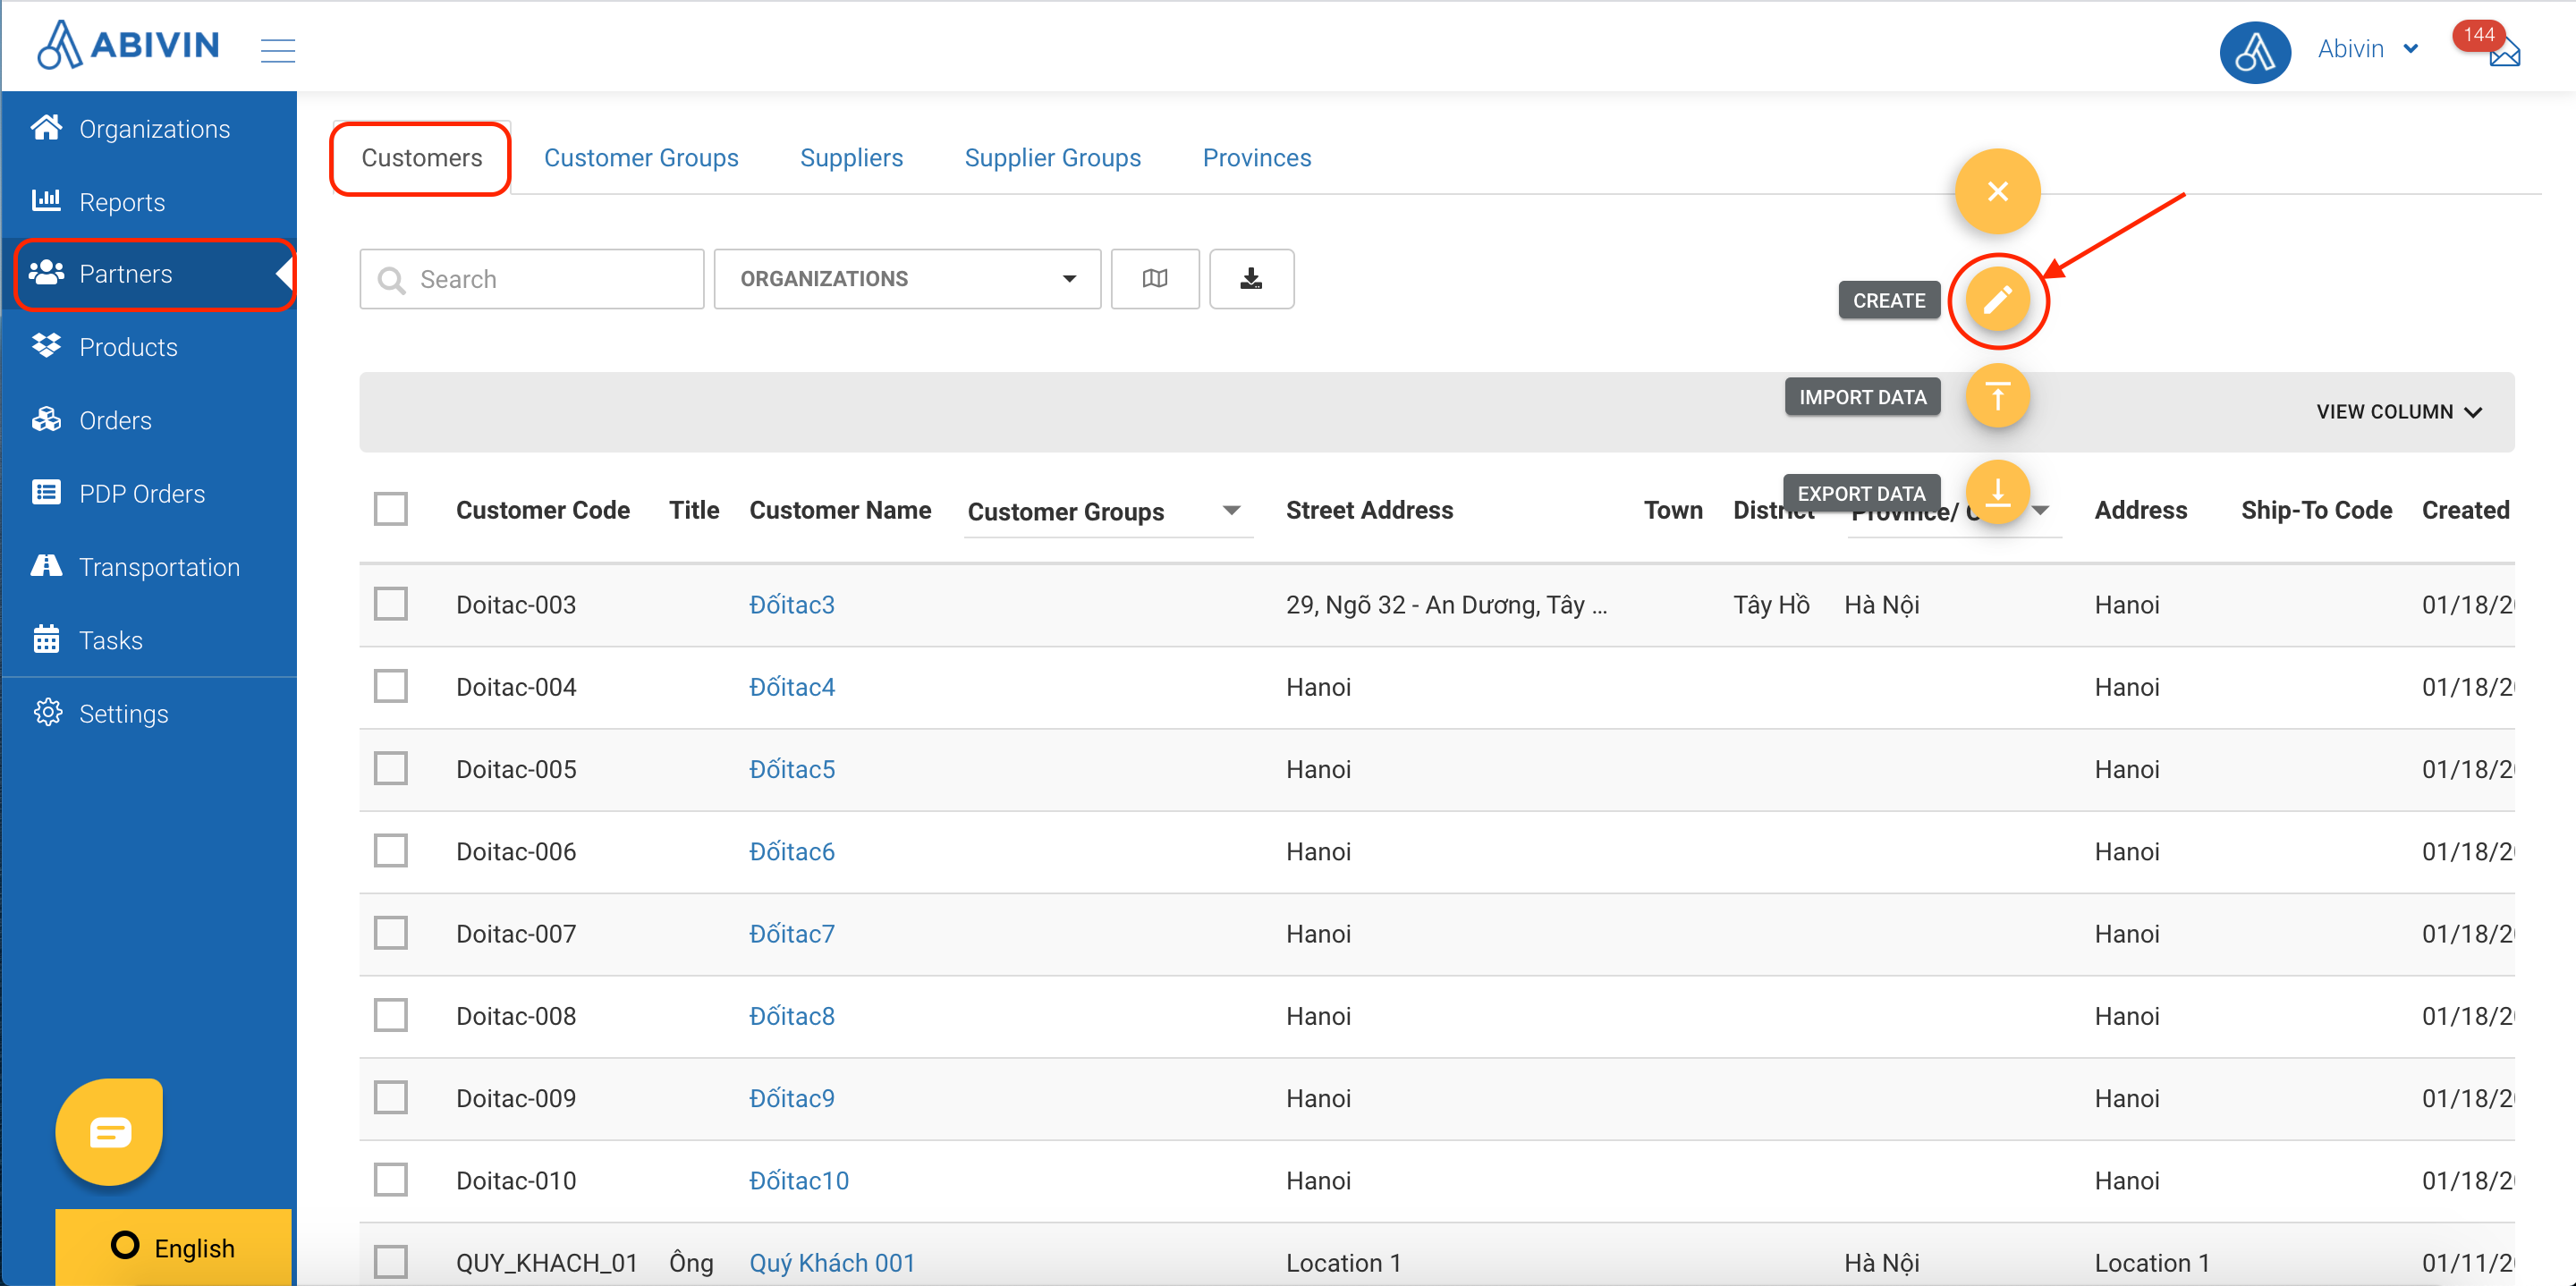
- Step 3: Navigate to the Main Setting tab and input the required information:
- Customer code: Input the management code assigned to the customer being created.
- Mobile Number: Input the mobile number of the customer being created.
- Organization: Input the Depot/Sun/Crossdock of which the customer base contains the customer being created.
- Parent Customer: Input the higher level customer group in which the customer group being created belongs.
- Full name: Input the full name of the customer being created.
- Open Time: Input the regular time of day at which the customer organization officially starts working.
- Close Time: Input the regular time of day at which the customer organization officially closes.
- Bike only; Truck only: Choose TRUE or FALSE of these fields to determine the vehicle type that can deliver to the customer being created from the default vehicle types: Motorbike; Truck and Semi-truck.
- MinTime Unloading & MaxTime Unloading: Input the minimum and maximum time period (In minutes) that the customer being created imposes on all vehicles when unloading products at their warehouse.
- Customer Group: Tick the checkbox of the Customer Group to which you want to allocate the Customer being edited. You can also input the Customer Group Code/Customer Group Name of the desired Customer Group into the search bar to filter faster.
- Important note: Even though you can select multiple Customer Groups, in this model one Customer can only belong to one Customer Group. If you select multiple Customer Groups for a Customer, the system will not be able to generate the optimized Delivery Route for that Customer during the Route Plan optimization process
- Original Address: Input the specific address of the customer being created.
- Latitude; Longitude: Input the coordinates of the customer being created.
- Example:
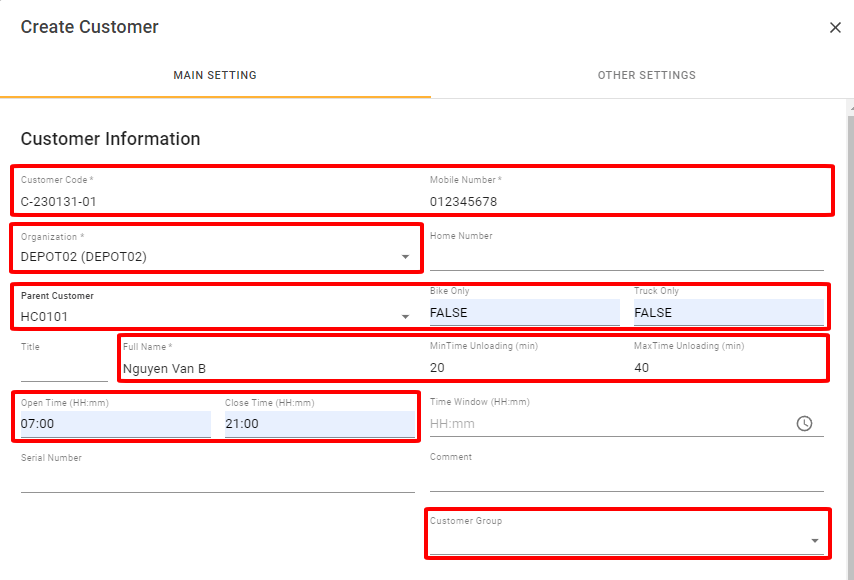
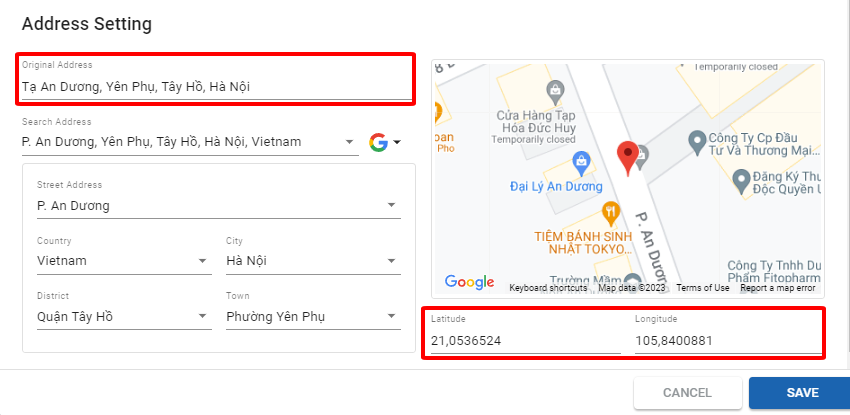
- The fields above, if properly inputted, are enough to create a single and simple customer, please click here to learn more about their notes and input rules.
- Step 4: Click SAVE.
Customer Non-working Days
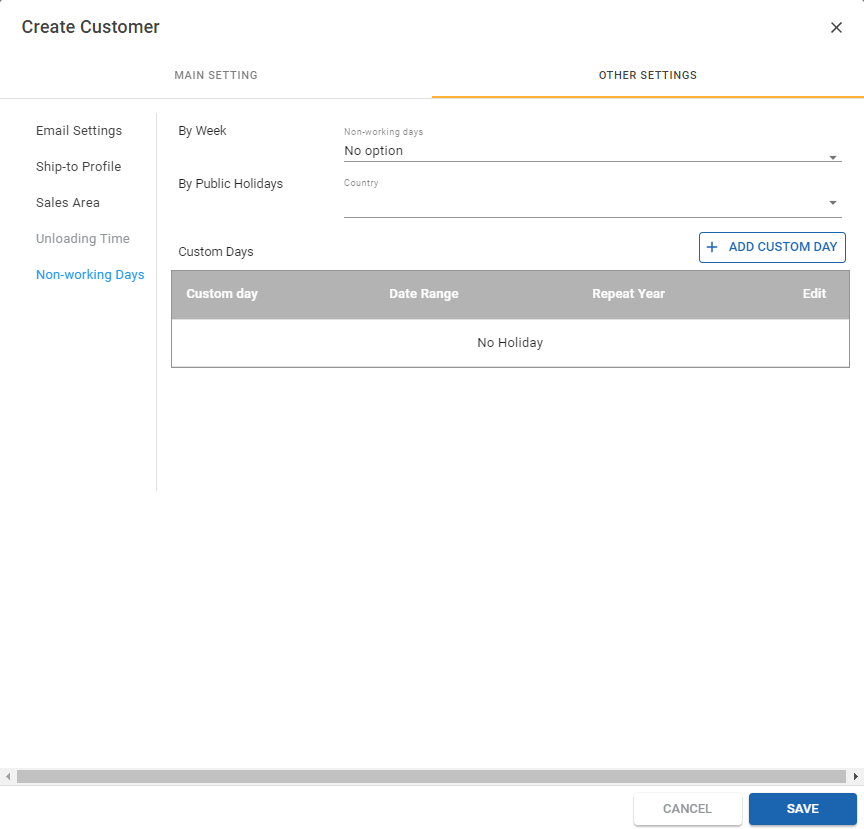
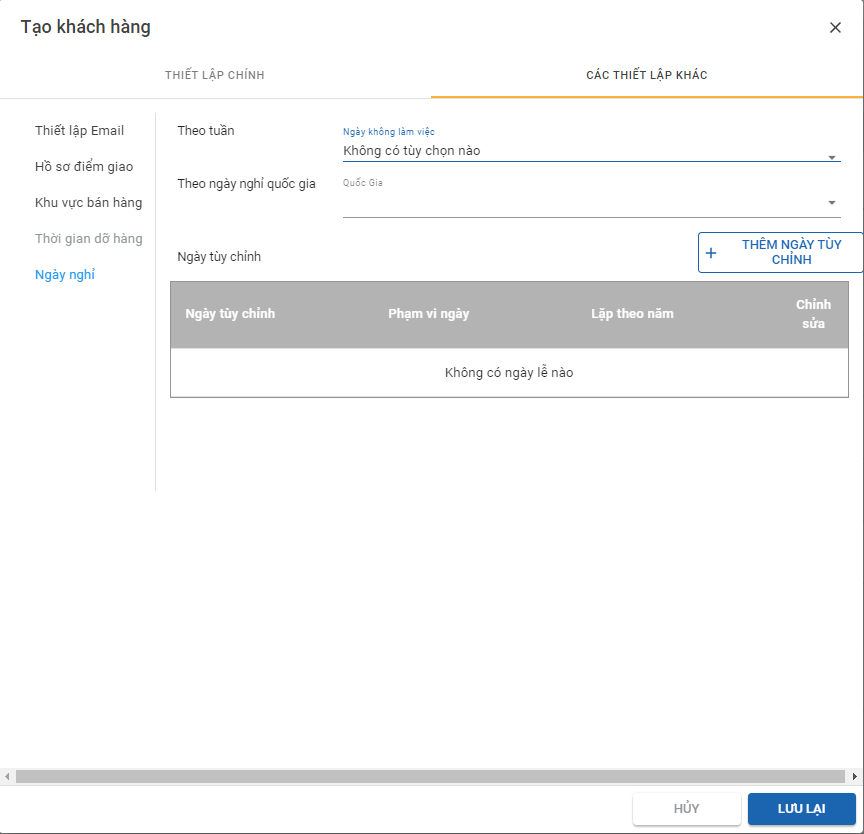
- To set up the Non-working Days of a particular Customer, navigate to the Other Settings > Non-working Days section
- By week: You can choose non-working days.
- By Public Holidays: You can choose holidays according to the country, where you work.
- Add Custom day: Add the holidays you want.
Ship-to Address
- To set up Client-specific sub-addresses, navigate to
More Settings >Ship-to Address - Stress adress: You can enter another address.
- Latitude; Longitude: Input the coordinates of the customer being created.
- Input rules:
Format: Decimal degrees, similar to Google map format
For example: 21.020123; 105.819509
Click ADD ADDRESS.
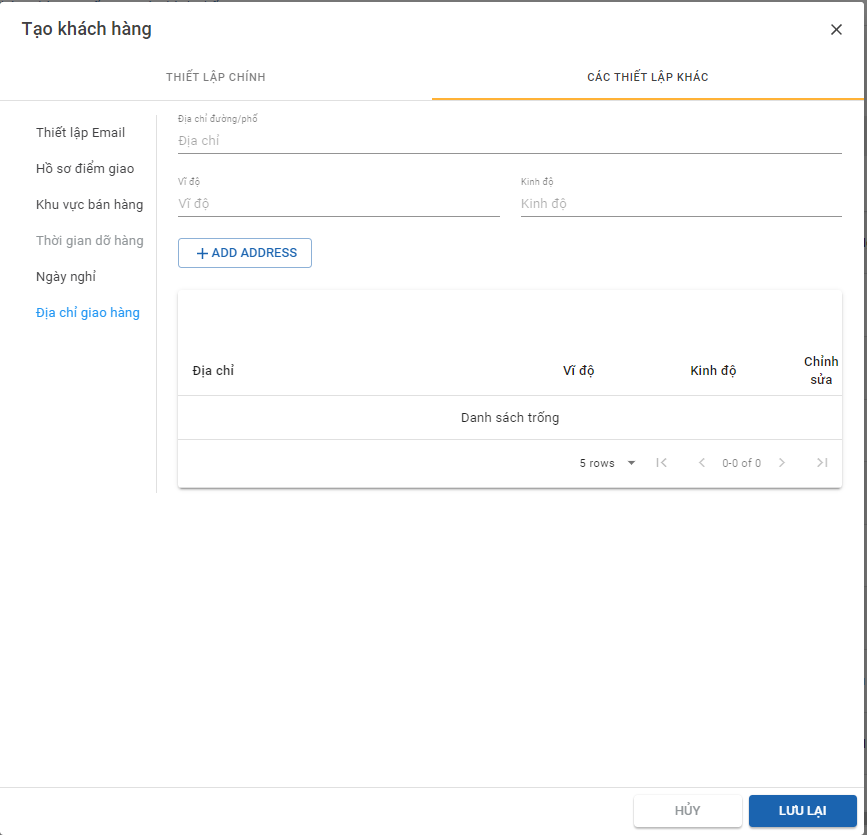
Illustration (Vietnamese)
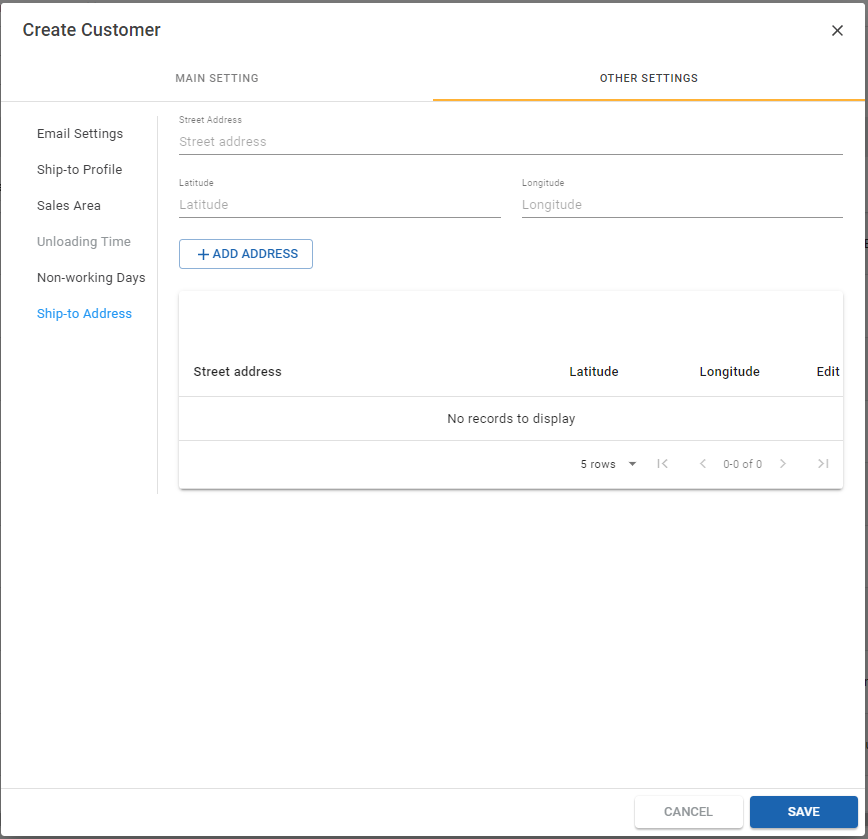
Illustration (English)
- Change the secondary address at the Order screen
At the order screen, you can choose a secondary address for same-day delivery without changing the customer's address. - Note: In a route day, each customer can create many orders but can only deliver to one address
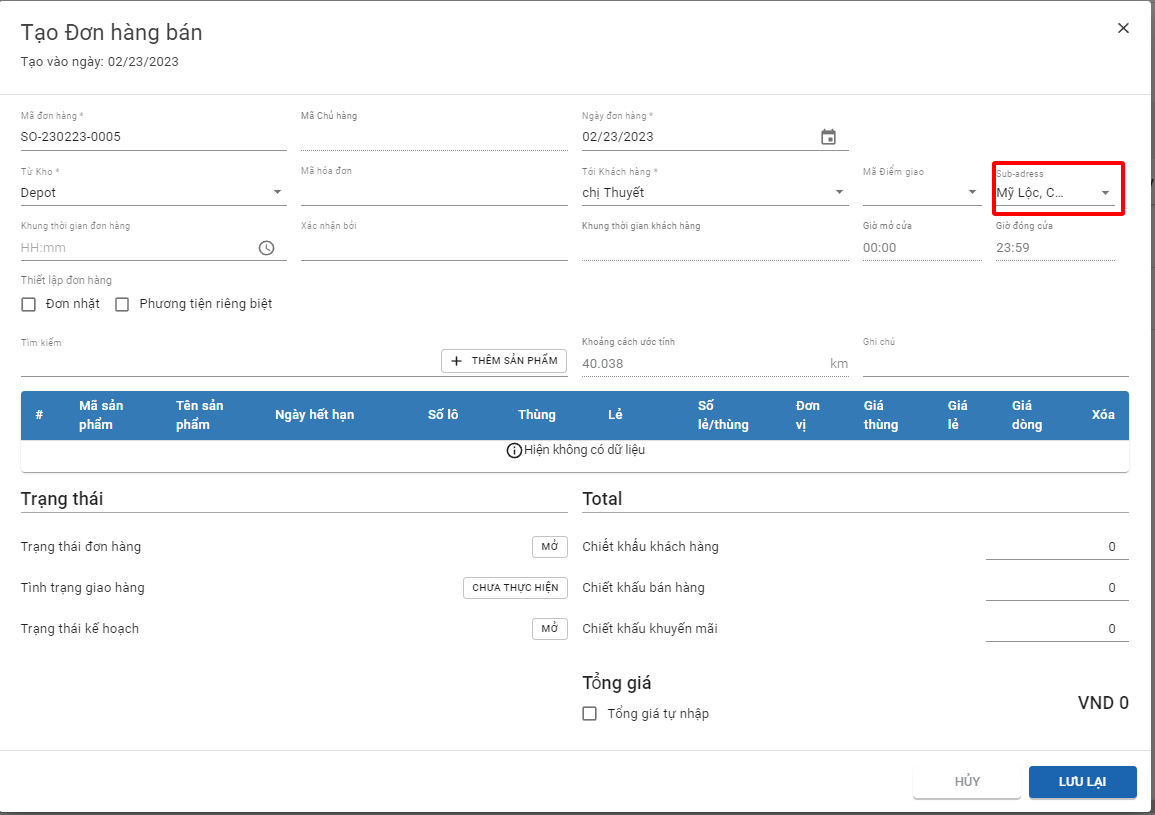
Illustration (Vietnamese)
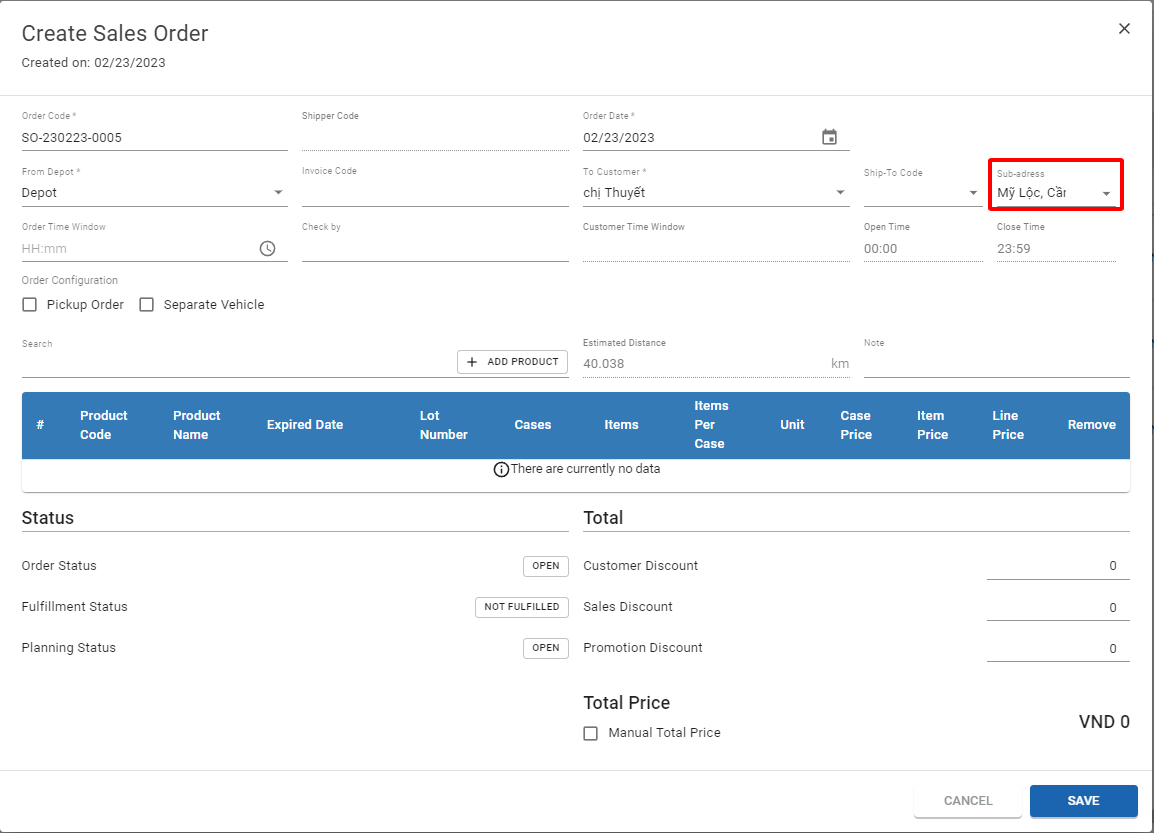
Illustration (English)
Updated about 1 month ago
