Route Plan Optimization (Map View)
Route Plan Definition
- Route Plan is the plan that consists of the optimized Delivery Routes of all Orders under a Branch on a particular day
Tasks of the Route Planner
- After you have accepted Orders forwarded from the Order Inspector, you can proceed to the Route Plan Optimization process for the accepted Orders
- The Route Plan optimization process consists of the following phases:
- Phase 1: Generate Route Plan
- Phase 2: Lock Route Plan
- Phase 3: Finalize Route Plan
Phase 1: Generate Route Plan
- Log in to your account
- Navigate to Transportation > Vehicle List tab
- Click on View Map icon on the toolbar
- You will be navigated to the screen Map view. On this screen, a form will show up. On this form, you need to select the Branch and Date to generate Route Plan
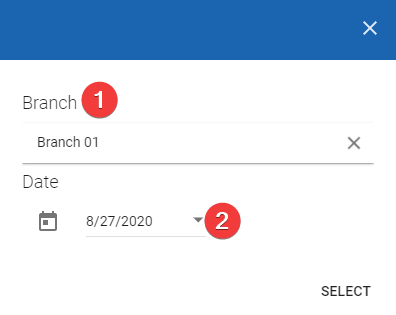
- 1 - Branch: Click on the Branch field. Input the Organization Name of the Branch into the search bar, then select from the drop-down menu
- 2 - Date: You can only select the current date or the date right after the current date as displayed on your computer. This date is defined as the Route Creation Date
- After that, click the button Select
- Note: If you select a future date that is even , the Optimize button will be greyed out, unclickable
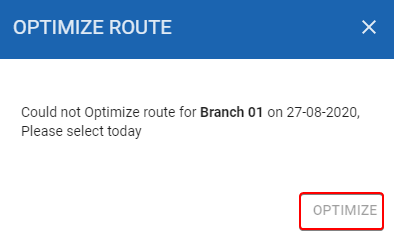
- The system will gather all accepted Orders that have the Date attribute containing the selected date above
- After a few moments, the selected vehicles, as well as their optimized Delivery Routes, will be displayed on the Timeline panel
- You can see the Route Plan description in the following section: Route Plan description
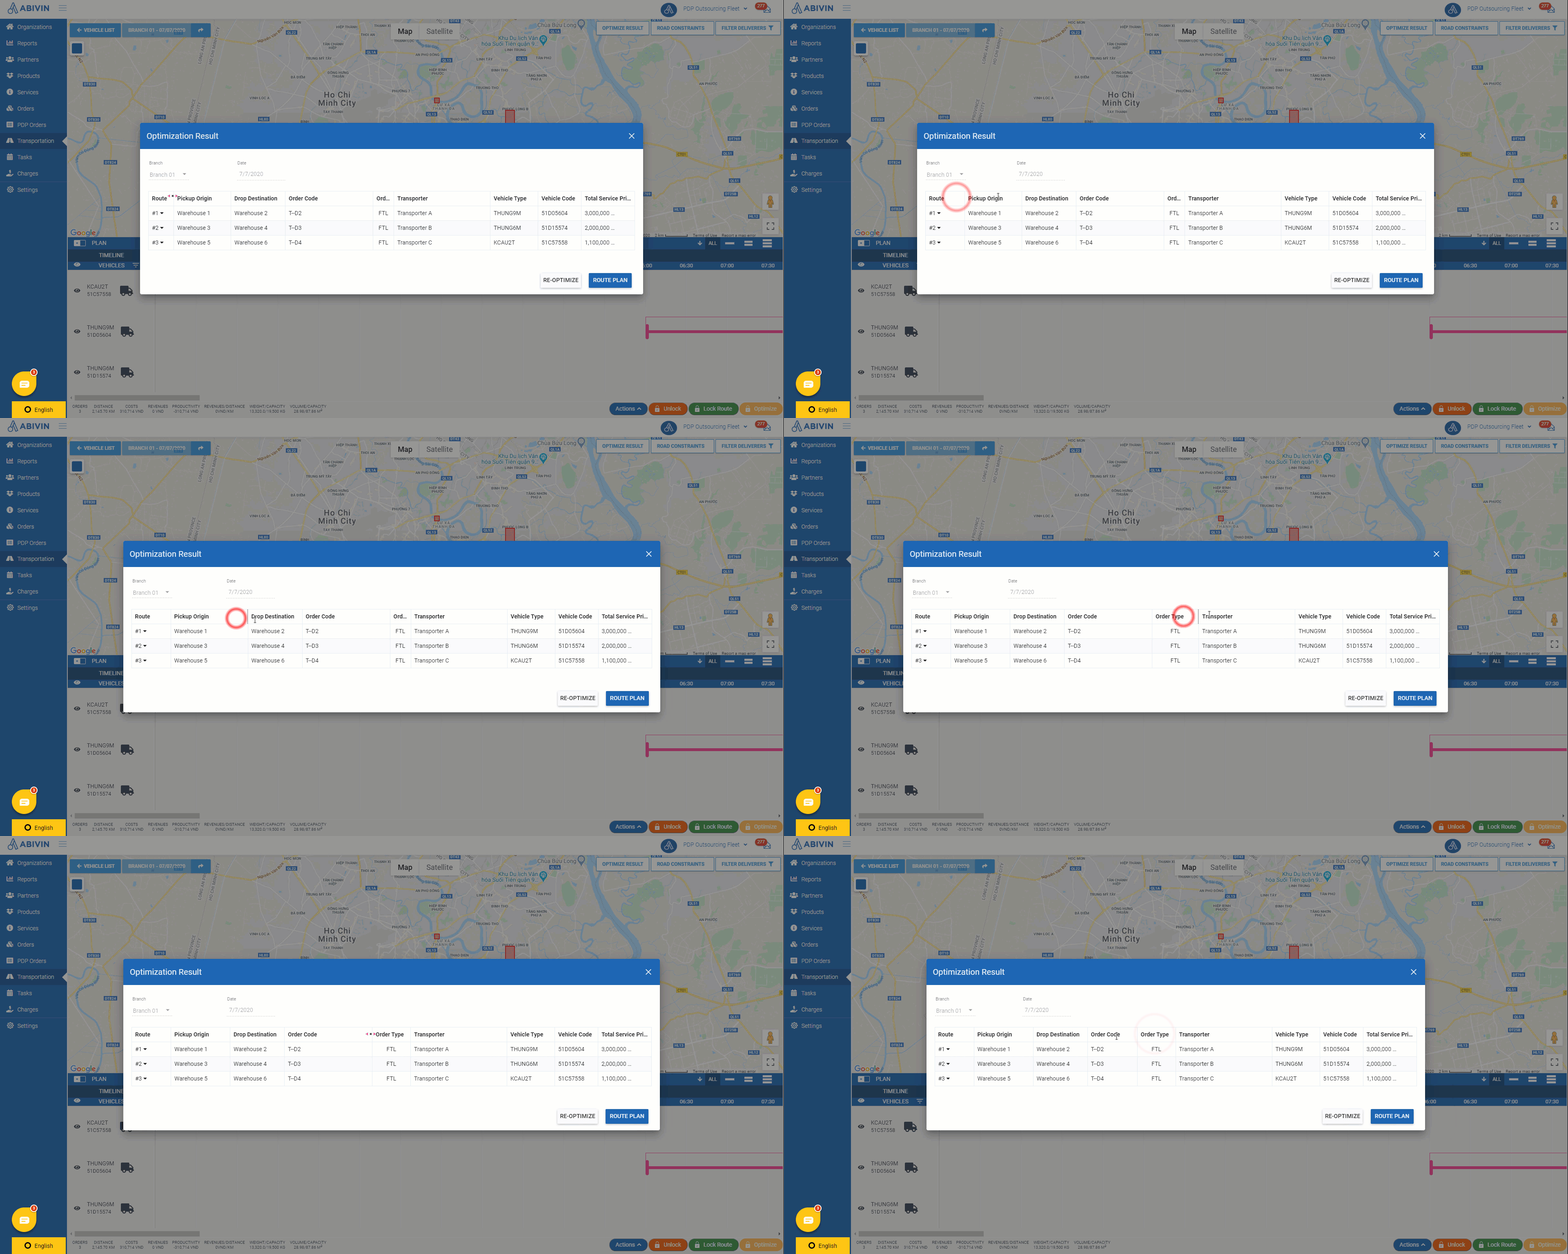
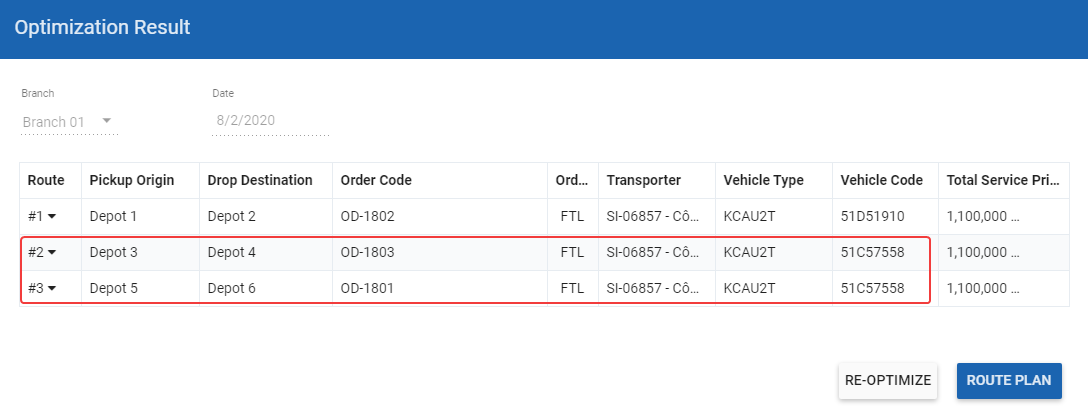
- Along with that, the form Optimization Result will show up. On this form, you will see the list of Delivery Routes with the cheapest Transport Service price automatically selected by the system
- The selected vehicles are the ones that meet the following requirements:
- 1 - Their managing Transporter provides Transport Services for the Depots mentioned in the Orders by their Vehicle Type
- 2 - Their Transport Service prices are the cheapest in comparison with other Transporters
- 3 - Their cargo areas have enough space to carry products of the Orders being optimized
- Note: The eligible vehicle list will be randomized with each optimization attempt. This will prevent the situation in which certain Transporters tend to be selected more than the others
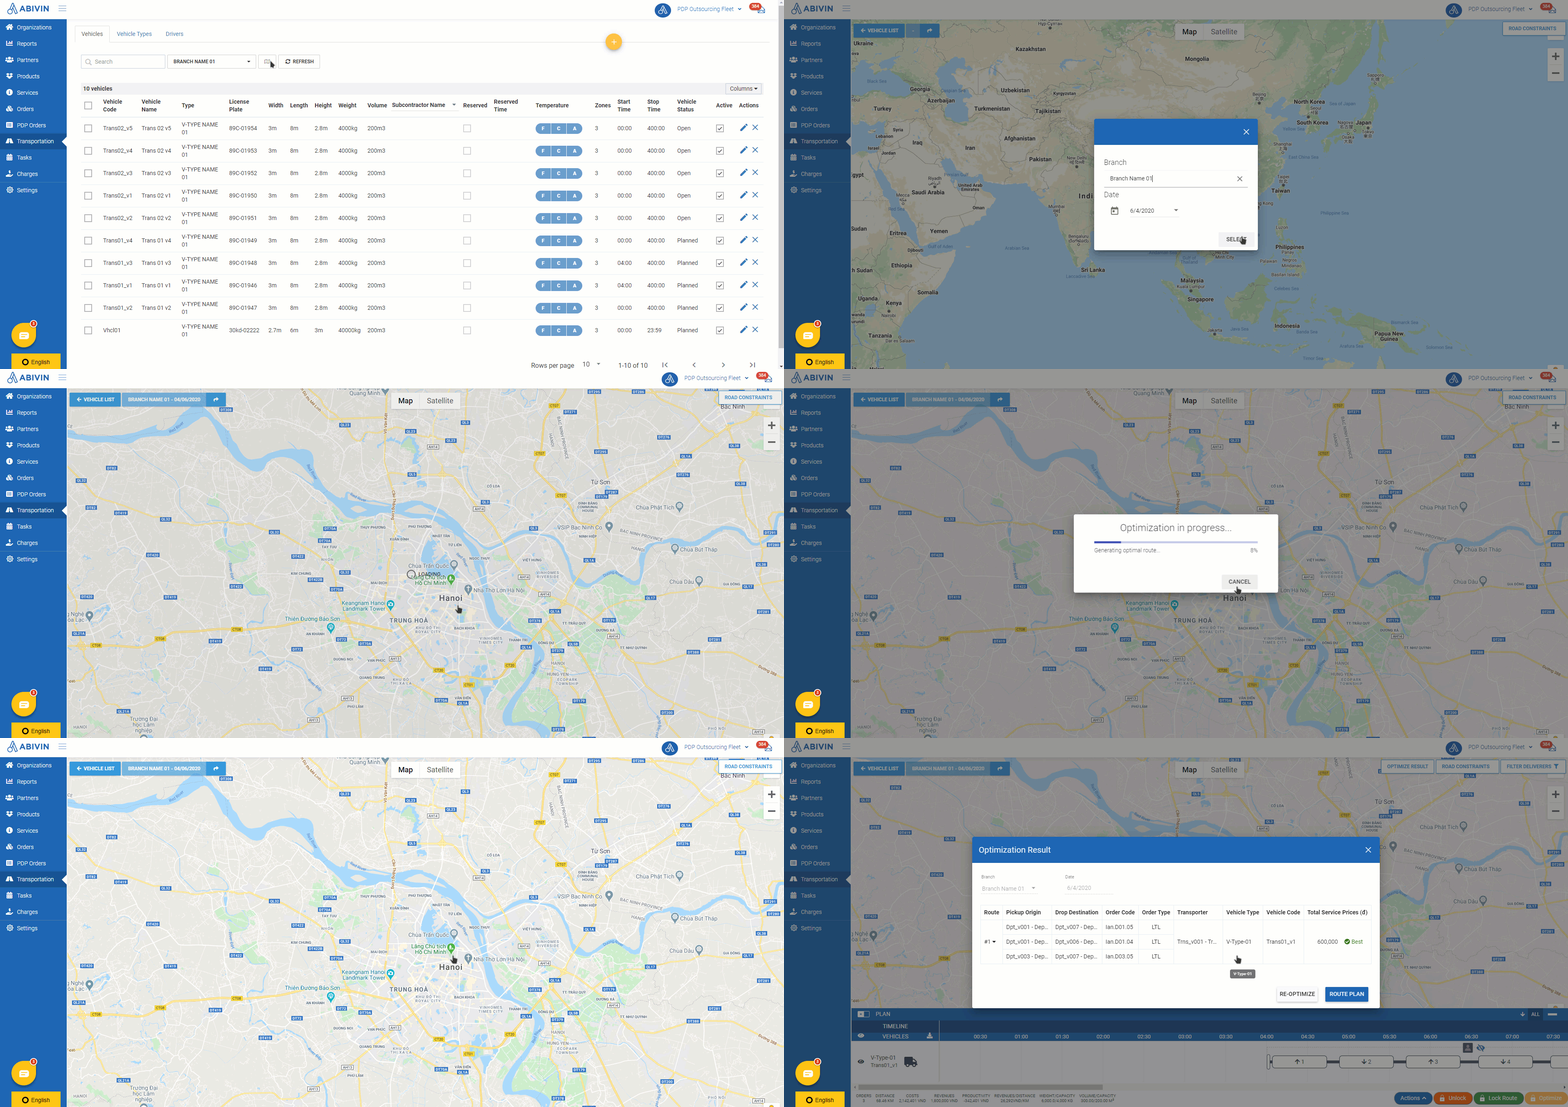
Generate Route Plan
- On the form Optimization Result, you can view the Transport Service prices applied to the Delivery Routes. To know more details for each Delivery Route, click on the down triangle icon next to the ordinal number of the Delivery Route (Under the column Route). A sub-tab titled Details will appear right below. On this sub-tab, you can view the Transport Service price and surcharge, discount (If available) applied to each Order on the Delivery Route
- The Transport Service prices calculation method is described in the following article: Transport Services
- If you click on the sub-tab More results, you can see a list of other Transporters which also provide Transport Services for the Depots in the Orders, but were not chosen due to being more expensive
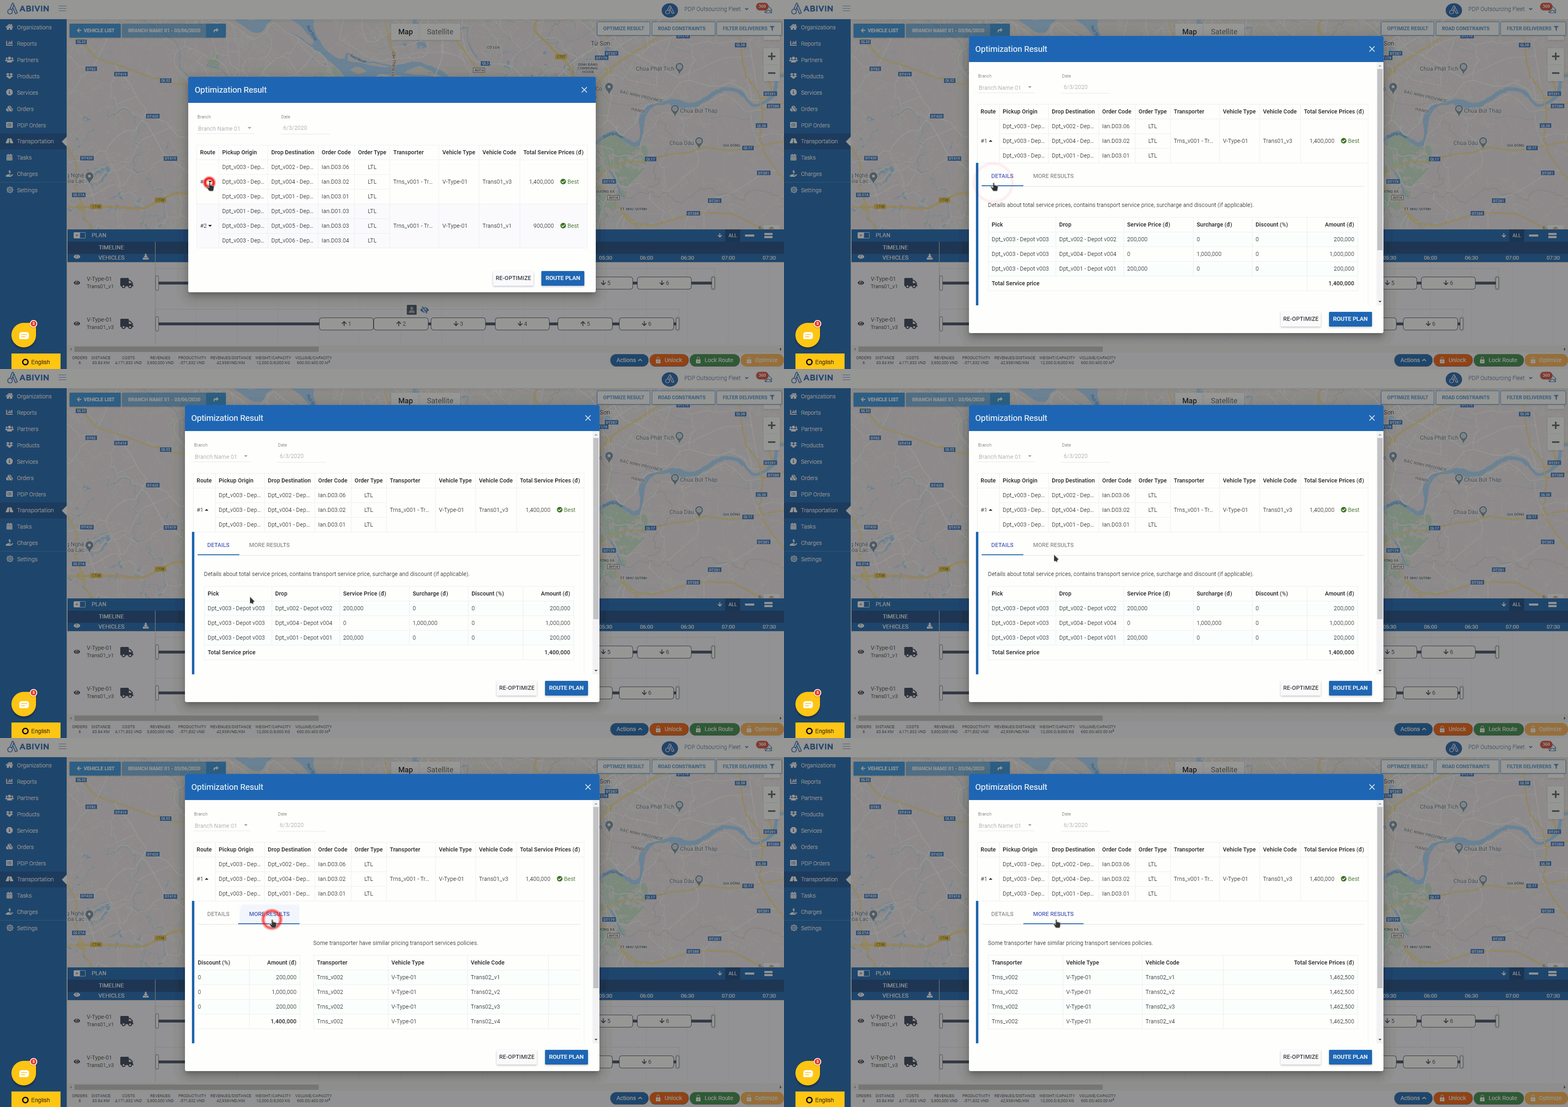
Optimization Result form
- On this form, you can change the column width by hovering your mouse on the left and right borders of the column title, then left click and drag the borders
- For the very first Delivery Shifts of the vehicles on a day, the Planned Start Time will be the Start Time values of the vehicles
- For example: In the illustration image below, two vehicles have the Start Time values to be 04:00 and 06:00 respectively, hence the first Delivery Shifts of those vehicles on a day will be planned to start exactly at those time points

- During this phase, you can perform the following adjustments:
- 1 - Extend Delivery Shifts
- 2 - Remove not yet locked Delivery Shifts
Extend Delivery Shifts
- Extending Delivery Shifts is the act of adding more Orders to a Delivery Shift if that Delivery Shift hasn't reached the maximum Order quantity yet
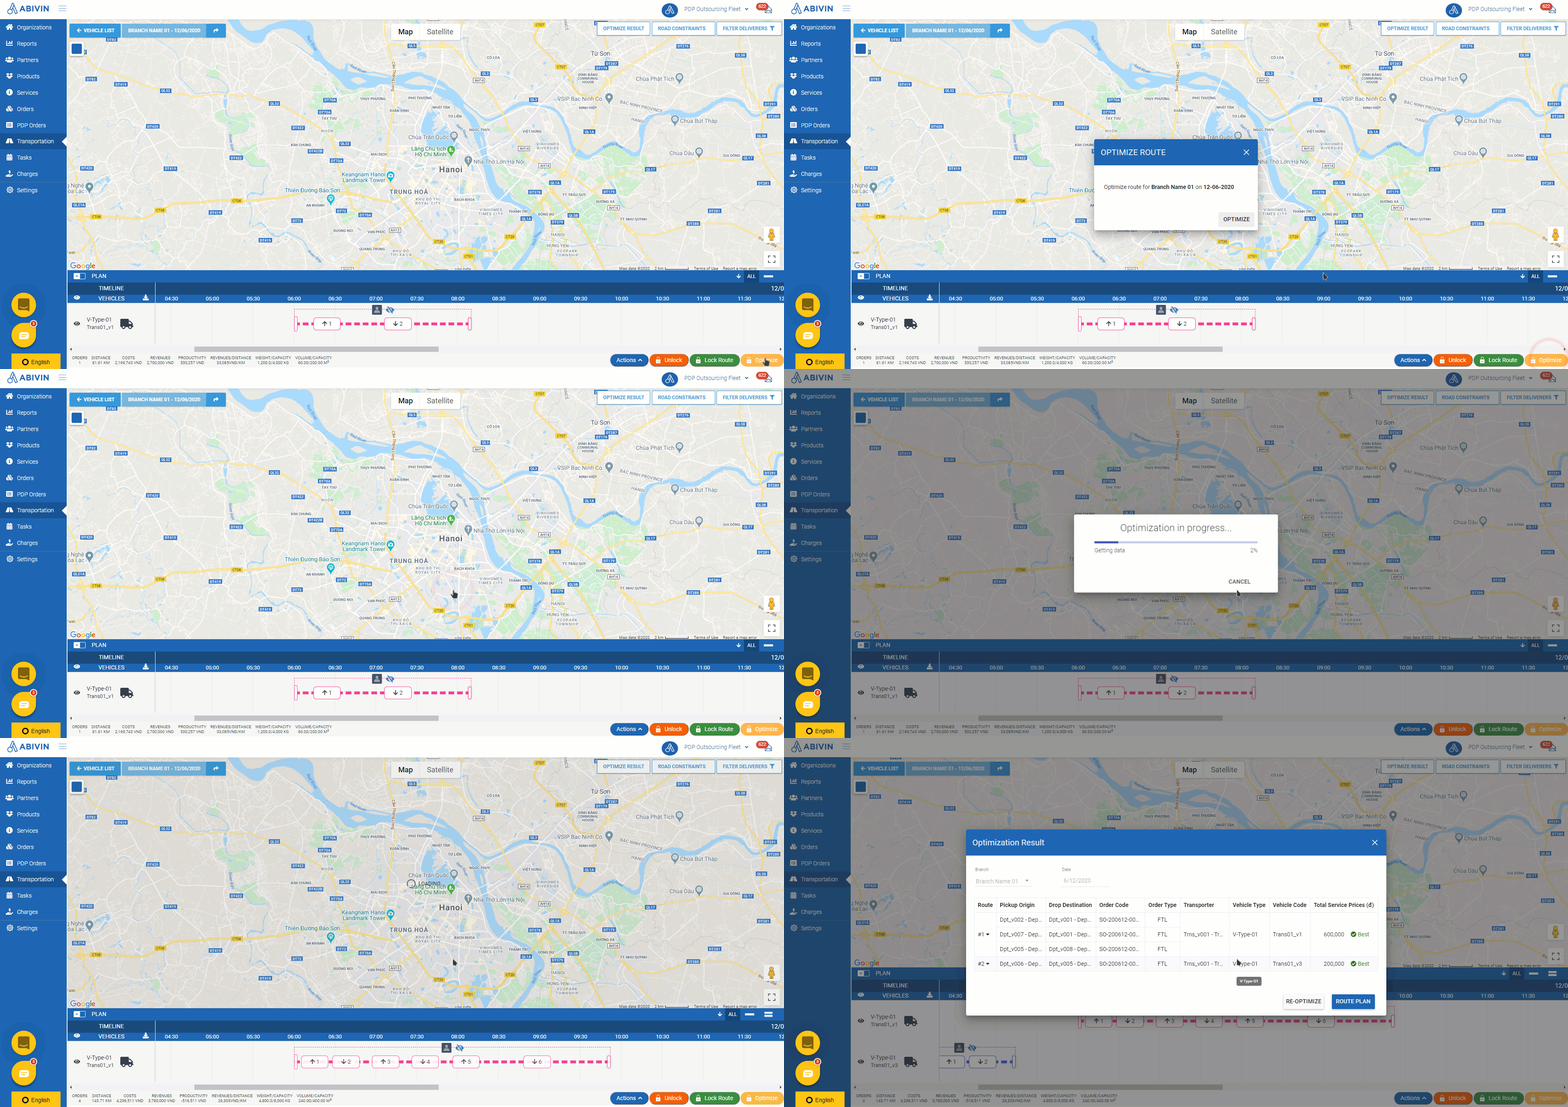
- First, navigate back to the tab PDP Orders > Current Orders to create new Orders, then navigate to the Map screen and perform the Optimization steps described above
- After a few moments, some of the newly optimized Orders will be put into the existing Delivery Shifts of the vehicles
Remove not yet locked Delivery Shifts
- You can remove not yet locked Delivery Shifts from the current Route Plan
- Click the button Actions at the bottom of the Timeline panel, then click the option Remove Shifts
- Gray rectangles will appear on the Delivery Shifts that have not been locked. In the middle of those rectangles will appear the buttons Remove
- To remove the not yet locked Delivery Shifts one by one, click on the respective Remove button of each Delivery Shift
- To remove all not yet locked Delivery Shifts at once, click the button Remove all (x) in the middle of the toolbar on top of the Timeline panel. The digit x inside the brackets indicate the number of not yet locked Delivery Shifts in the current Route Plan

- If the Delivery Shift you want to remove contains Order(s) that were automatically split from an original Over-capacity Order, and on other vehicles' Delivery Shifts there are some automatically split Orders also from that same original Over-capacity Order, then a confirmation form will appear as you click its respective Remove button

- In this form, you have to decide to either: 1 - Remove only the selected Delivery Shift, by clicking the button Remove Only. The related Delivery Shifts will not be removed; or 2 - Remove all Delivery Shifts that contain all Orders automatically split from the original Over-capacity Order, by clicking the button Remove Related
- If some of the other Delivery Shifts have already been locked, there will be an additional note on the confirmation form. The note means that the related Delivery Shifts that have been locked will still remain in the Route Plan after you click the button Remove Related, only the not yet locked/unlocked related Delivery Shifts will be removed along with the selected Delivery Shift

- If you no longer want to remove Delivery Shifts, click the button Remove at the bottom of the Timeline panel (Where the button Actions previously located)

Phase 2: Lock Route Plan
- After the Route Plan has been generated and adjusted, you can lock the Delivery Shifts/Delivery Routes inside that Route Plan
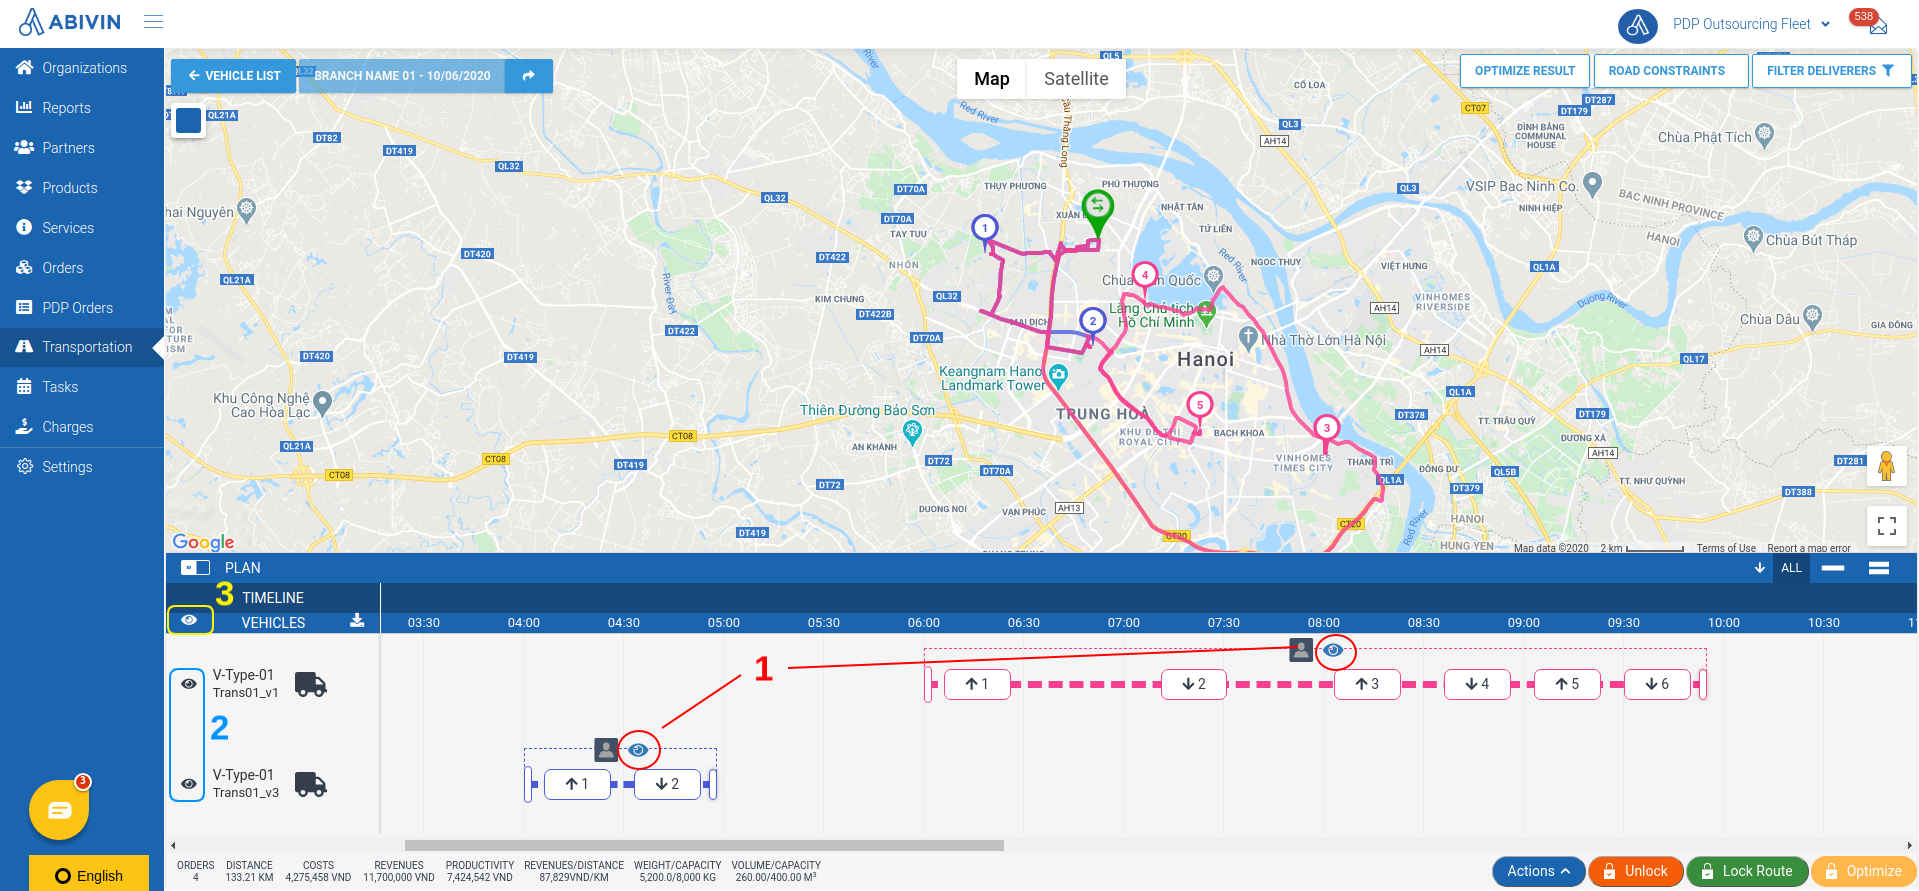
- To select the Delivery Shifts one by one, click on the slashed eye icon located in the middle of the Delivery Shifts (1). You can click on that icon next to a particular Vehicle Code to select all Delivery Shifts of that vehicle (2). You can also select all Delivery Shifts of all vehicles by clicking on that icon next to the text Vehicle on the toolbar on top of the Timeline panel (3). When the icon changes to , that means the Delivery Shifts have been selected
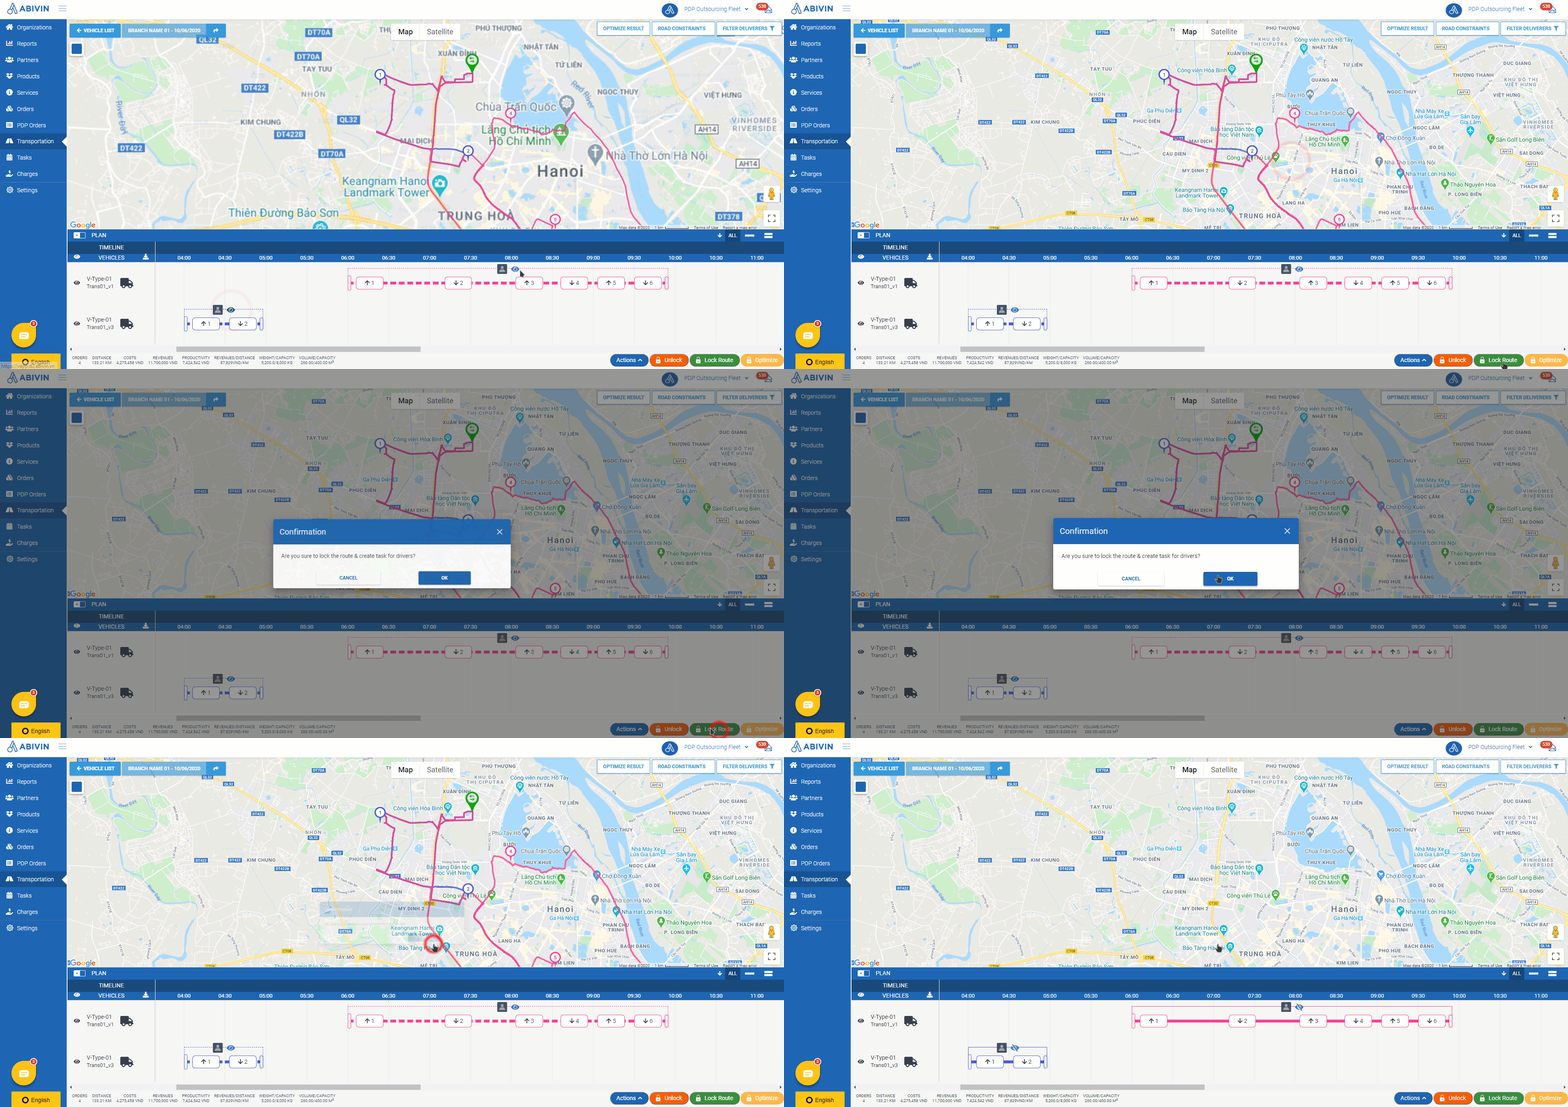
- After the wanted Delivery Shifts have been selected, click the button Lock Route at the bottom of the Timeline panel. A confirmation dialog will appear. Click OK. After that, the selected Delivery Shifts will be locked
- During this phase, you can perform the following adjustments:
- 1 - Unlock locked Delivery Shifts
- 2 - Create additional Delivery Shifts
Unlock locked Delivery Shifts
- You can unlock selected locked Delivery Shifts in the current Route Plan
- First you need to select the locked Delivery Shifts you want to unlock. Similar to Phase 1, you can select the locked Delivery Shifts one by one, select all locked Delivery Shifts of a particular vehicle, or select all locked Delivery Shifts of all vehicles in the current Route Plan
- After the wanted locked Delivery Shifts have been selected, click the button Unlock at the bottom of the Timeline panel. A confirmation message will appear, click OK. After that, the selected locked Delivery Shifts will be unlocked
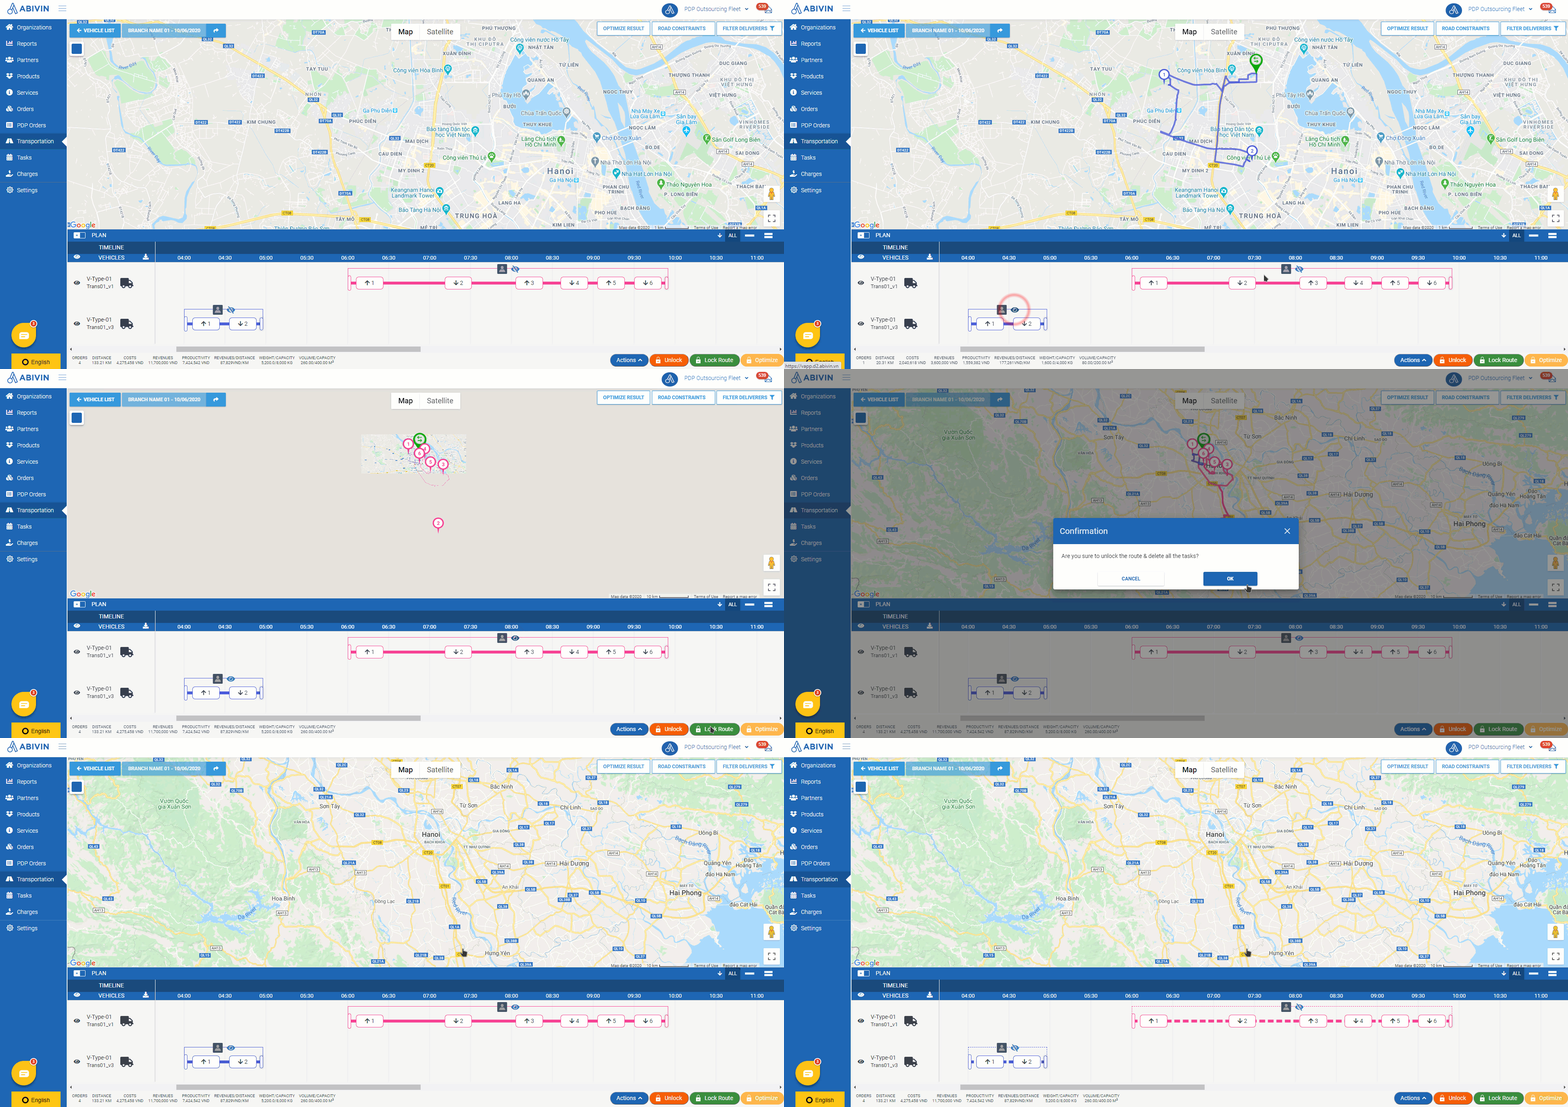
Create additional Delivery Shifts
- During this phase, after you have locked the Delivery Shifts for the vehicles, you can navigate back to the tab PDP Orders > Current Orders to create more Orders, then navigate to the Map screen again to generate Delivery Shifts for the new Orders
- As you click the button Optimize, a form will appear. On this form, you need to set the Cut-off Time, the time period that separates the Planned Finish Time of the previously locked Delivery Shift and the Planned Start Time of the new Delivery Shift on a vehicle's Delivery Route
- For example, on a vehicle's Delivery Route, the previously locked Delivery Shift is planned to finish at 13:10. The Cut-off time is 1 hour. Therefore, the Planned Start time of the next Delivery Shift of that vehicle will be 13:10 + 1:00 = 14:10
- Note: The Cut-off time value can be decimal. For example: If you input the value 0.1, that means the Cut-off time will be 0.1 hour, which equals to 6 minutes
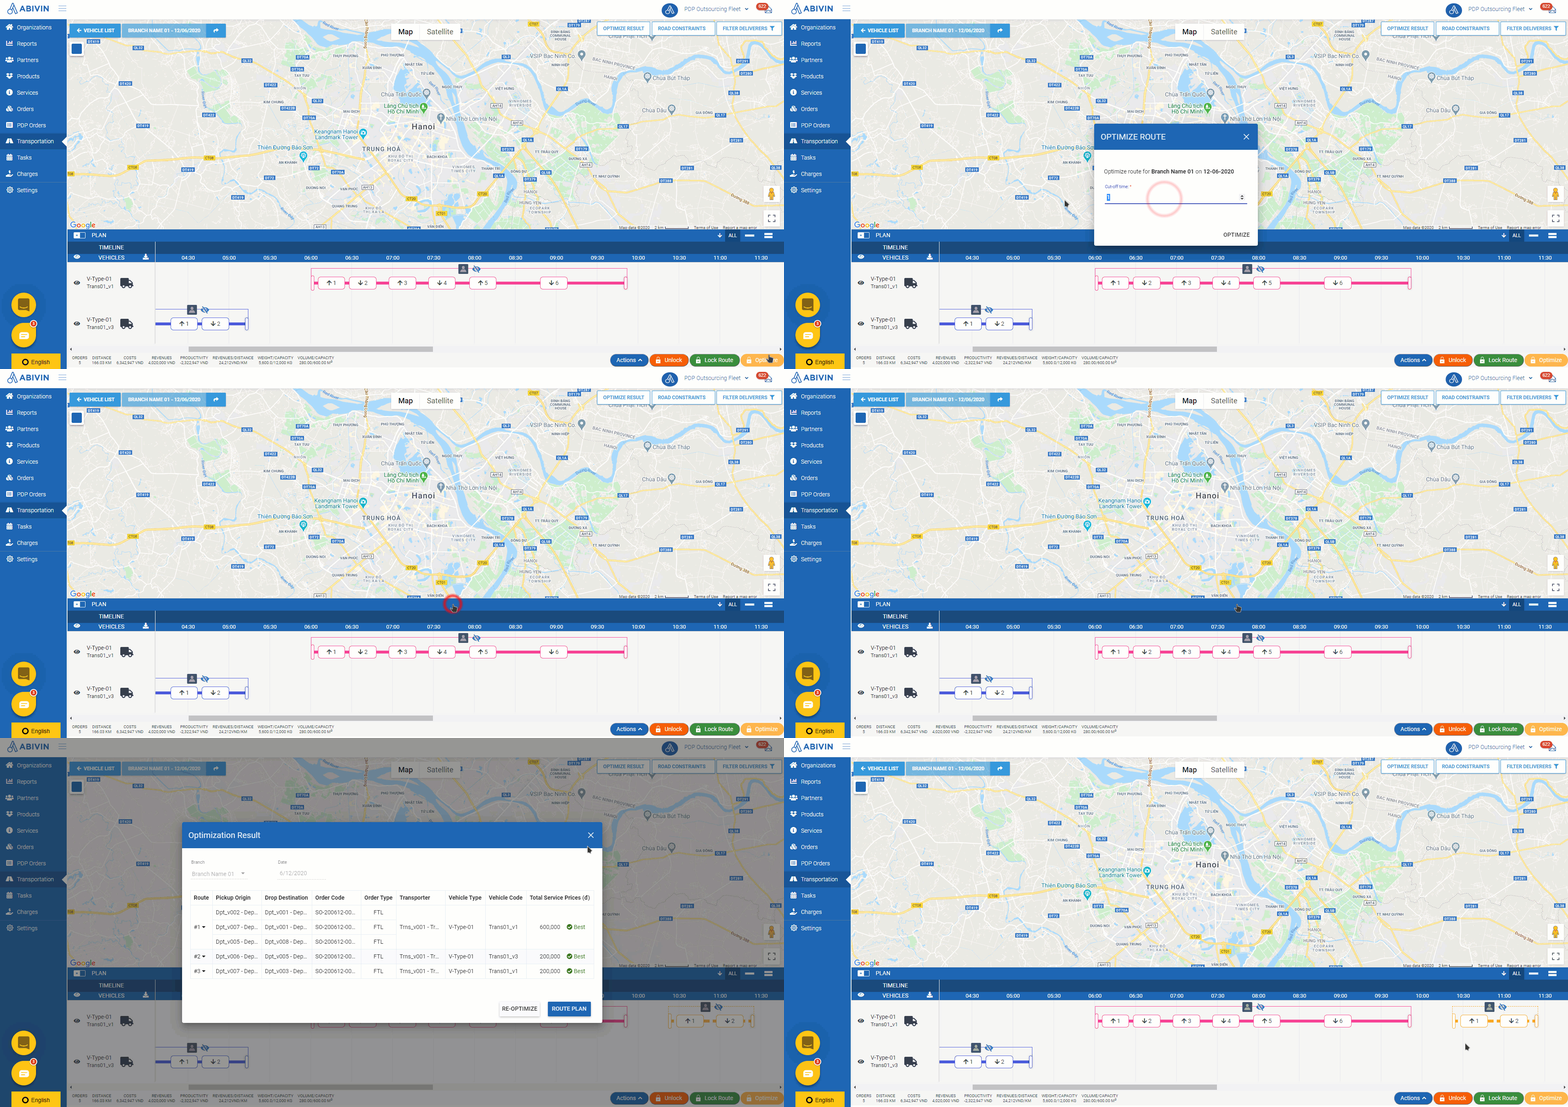
Phase 3: Finalize Route Plan
You need to enable the configuration Split Delivery at the Branch
- After the Delivery Shifts have been locked, you need to finalize them. After finalizing, the finalized Delivery Shift can not be reverted to the previous state (Locked), unless the Transporter administrator that has been chosen to perform the Delivery Shift declined it
- First you need to select the locked Delivery Shifts you want to unlock. Similar to Phase 1, you can select the locked Delivery Shifts one by one, select all locked Delivery Shifts of a particular vehicle, or select all locked Delivery Shifts of all vehicles in the current Route Plan
- After the wanted locked Delivery Shifts have been selected, click the button Actions at the bottom of the Timeline panel, then click the option Finalize Shifts on the pop-out list
- On each of the selected locked Delivery Shifts, there will appear the button Finalize. You can finalize just some selected Delivery Shifts by clicking on their respective Finalize buttons to mark them, then click the button Save Changes on top of the Timeline panel. After that, the selected locked Delivery Shifts will be finalized
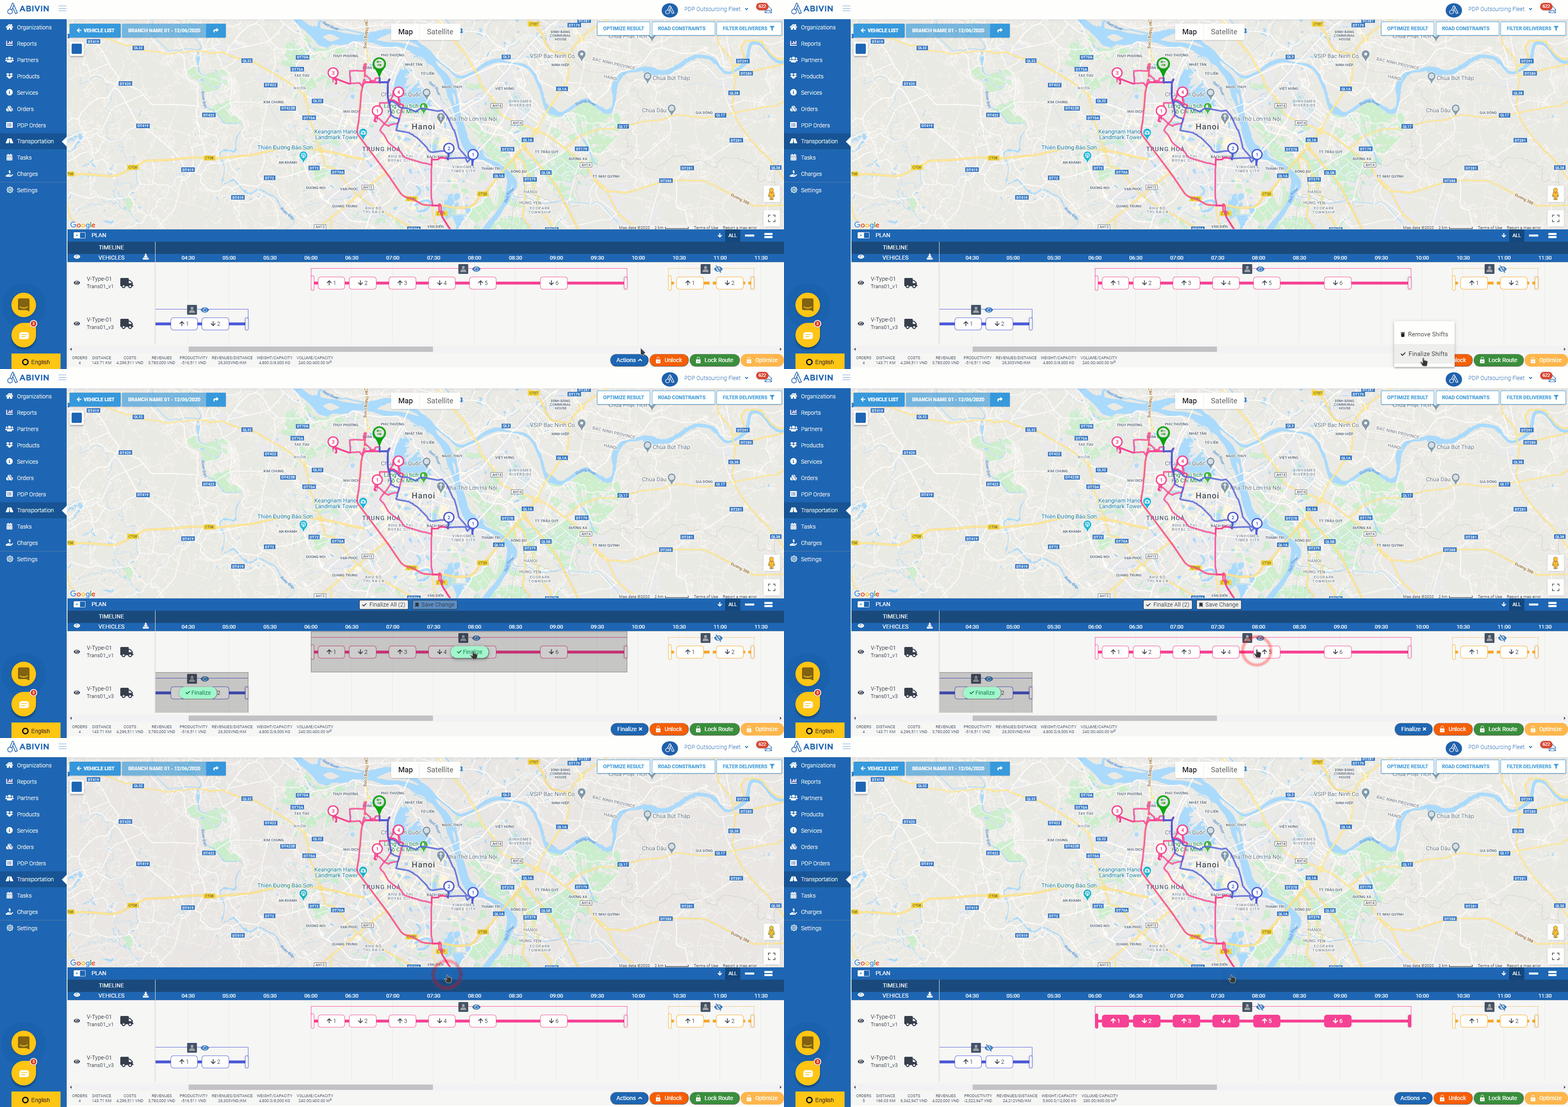
- You can also finalize all locked Delivery Shifts in the current Route Plan by clicking the button Finalize All (x) in the middle of the toolbar at the top of the Timeline panel (The digit x indicates the number of locked Delivery Shifts in the current Route Plan). After that, all locked Delivery Shifts will be finalized
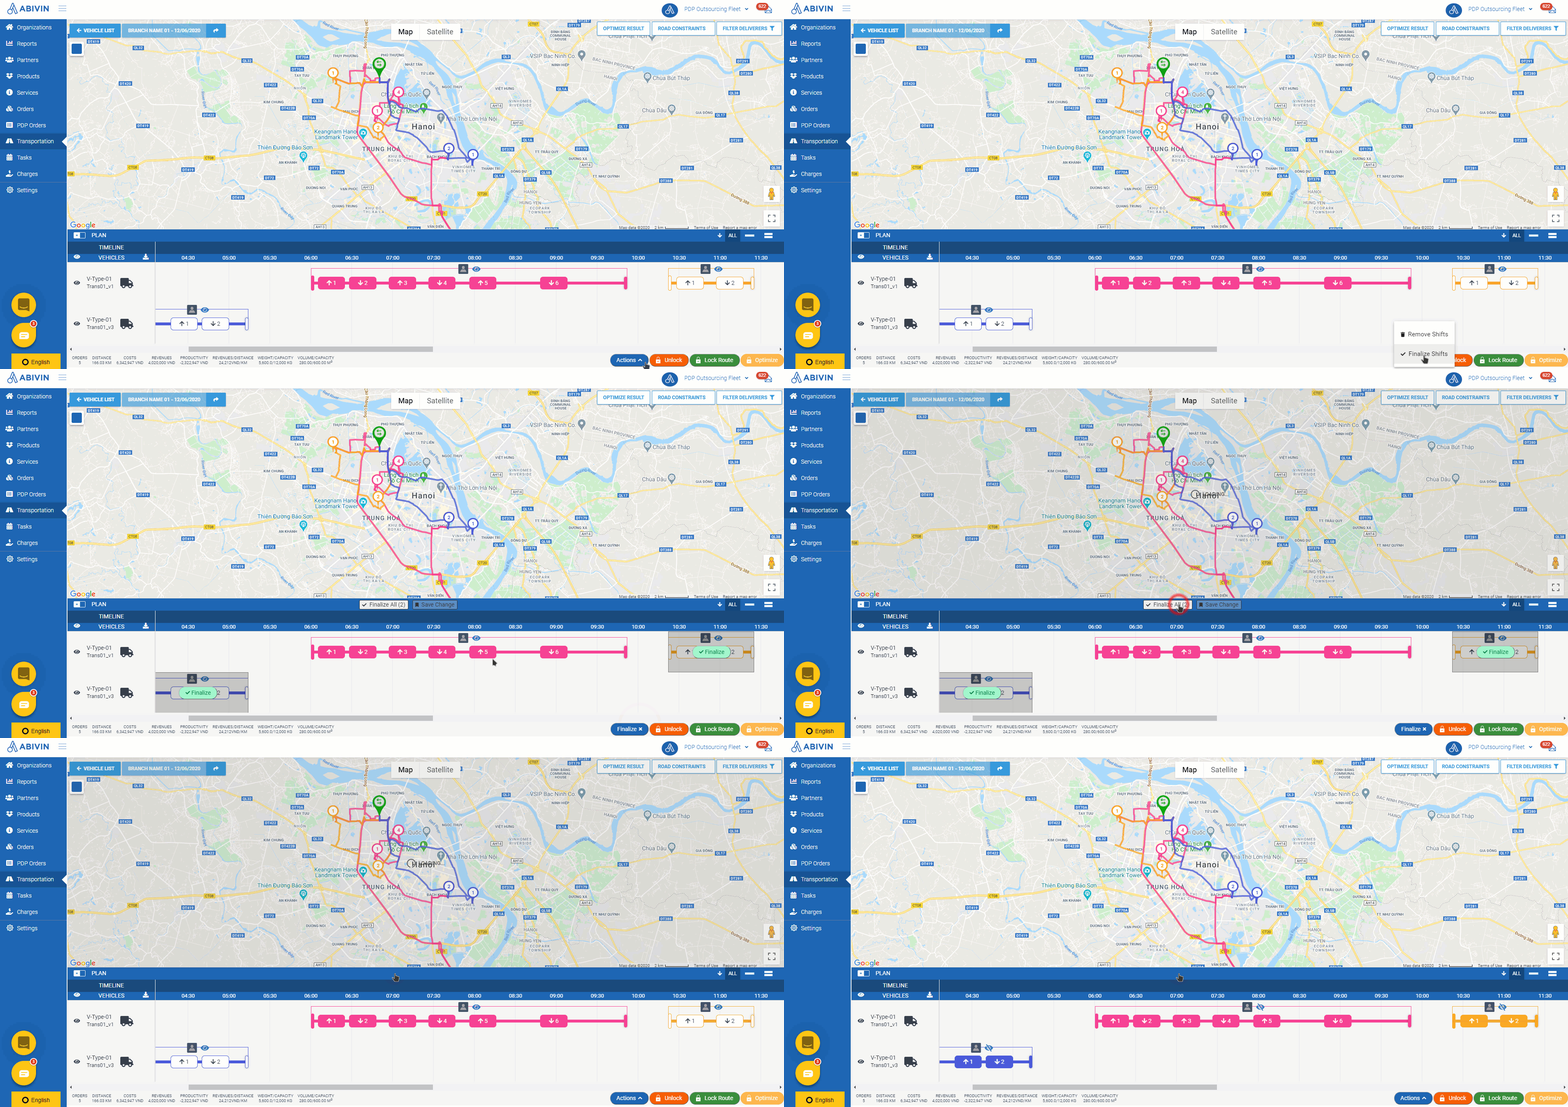
- After the Delivery Routes have been finalized, the delivery tasks will be generated. However, the delivery tasks will only be visible on the Mobile app of the Transporters' drivers once the Transporter administrators accept the forwarded Delivery Routes from the Route Planner
Tasks of the Transporter Administrator
- You are the Administrator of the Transporter. After the Route Planner of the Branch has finalized the Delivery Routes, if you are the Transporter with the most optimized (cheapest) Transport Service prices, the finalized Delivery Routes will be forwarded to your account. You will also be notified via email
Accept or Decline forwarded Delivery Routes
- To make decisions about the forwarded Delivery Routes from the Route Planner, please follow the steps below:
- Log in your account
- Navigate to Transportation > Vehicle List tab
- Click on View Map icon on the toolbar
- You will be navigated to the Map screen
- A form will appear. In this form, you will need to select the Branch for which your organization provides Transport Services. Click on the field below the text Branch, input the Organization Name of the Branch into the search bar, then select the returned value
- Next, click on the field below the text Date, select the current date on the drop-down calendar
- Then, click on Select
- The system will display the finalized Delivery Routes that have been forwarded from the Route Planner to your account
- You can select one, multiple, or all Delivery Shifts by clicking on the respective slashed eye icon located in the middle of each Delivery Shift. You can select the whole Delivery Route of a particular vehicle by clicking on the slashed eye icon to the left of the Vehicle Code on the Timeline panel. You can also select all Delivery Routes of all vehicles by clicking on the eye icon next to the text Vehicles on the Timeline panel
- After you have selected the Delivery Shifts, you can decide whether to Accept or Decline them by clicking on the corresponding button at the bottom of the Timeline panel
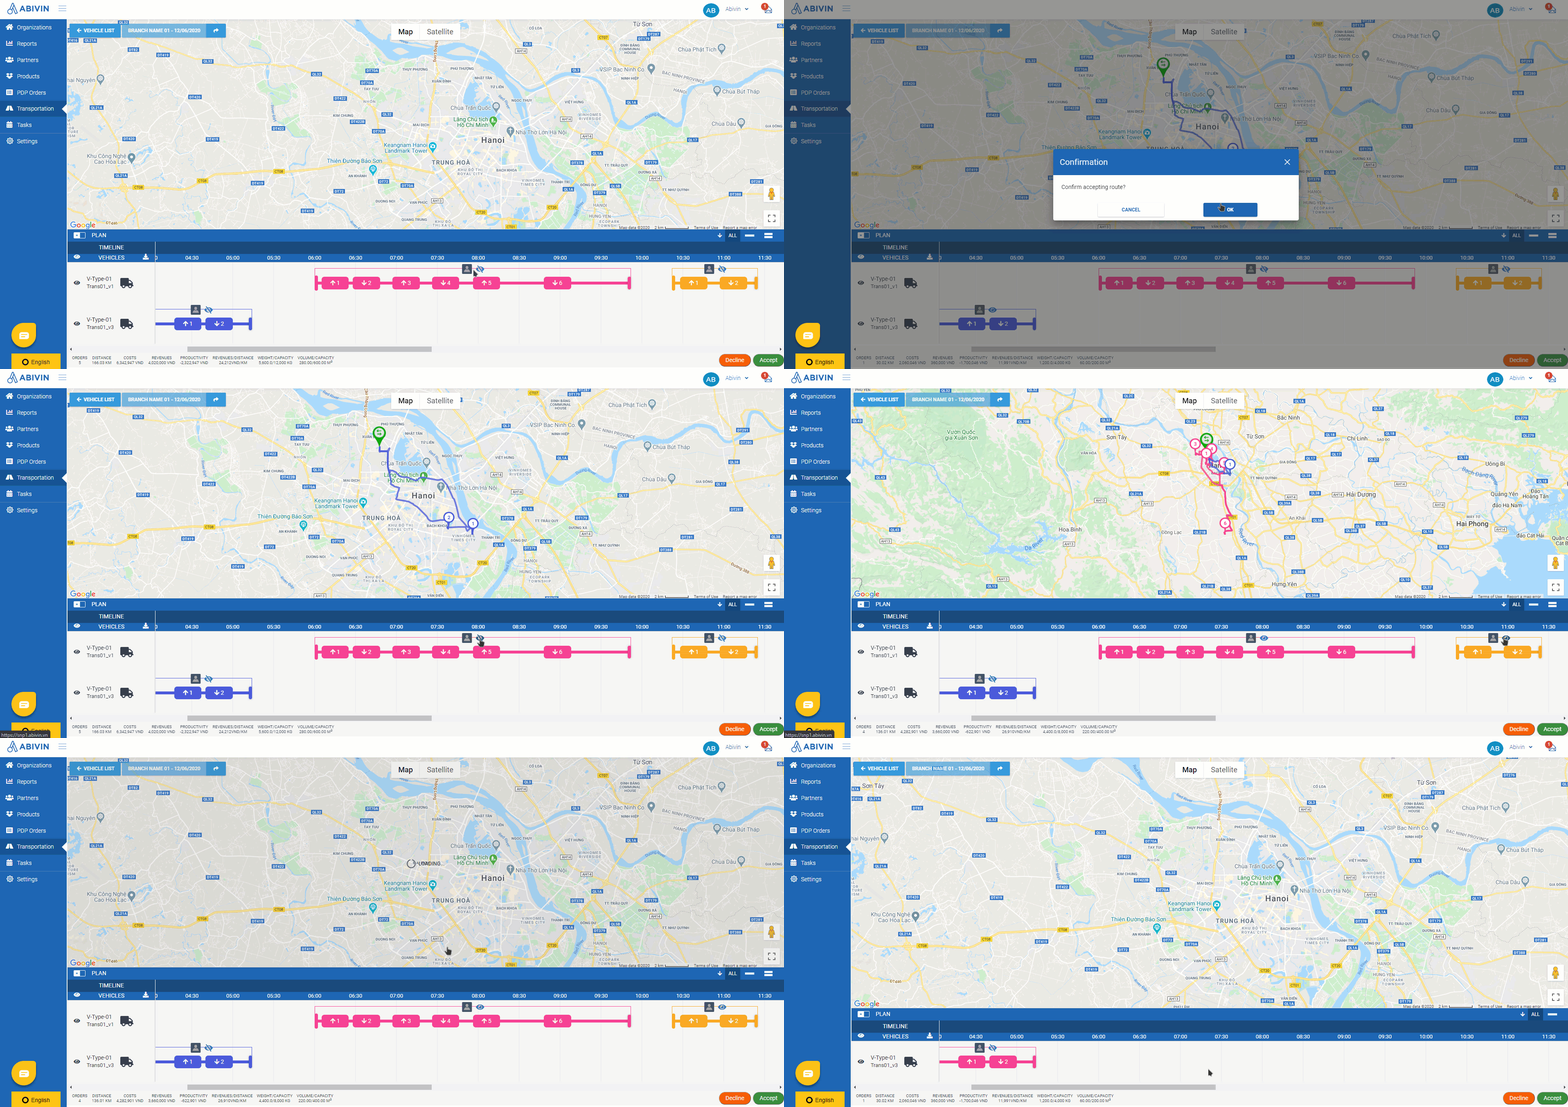
- If you accept a Delivery Shift, the Driver of the assigned Vehicle will be able to perform the delivery tasks of that Delivery Shift on the Mobile app
- Note that if you decline a Delivery Shift, then in all following Route Plan Optimization processes that include the Orders on that Delivery Shift, your organization will be moved into the blacklist of the Route Planner, i.e. you will no longer be chosen to deliver those Orders in any circumstance
Reassign vehicle, driver
- In the scenario the vehicle and/or the driver can not perform a particular Delivery Shift, you can assign that Delivery Shift to another vehicle/driver by following the steps below:
- On the Timeline panel, click on the corresponding user icon located in the middle of the Delivery Shift you want to reassign
- The form Assign to Driver will appear
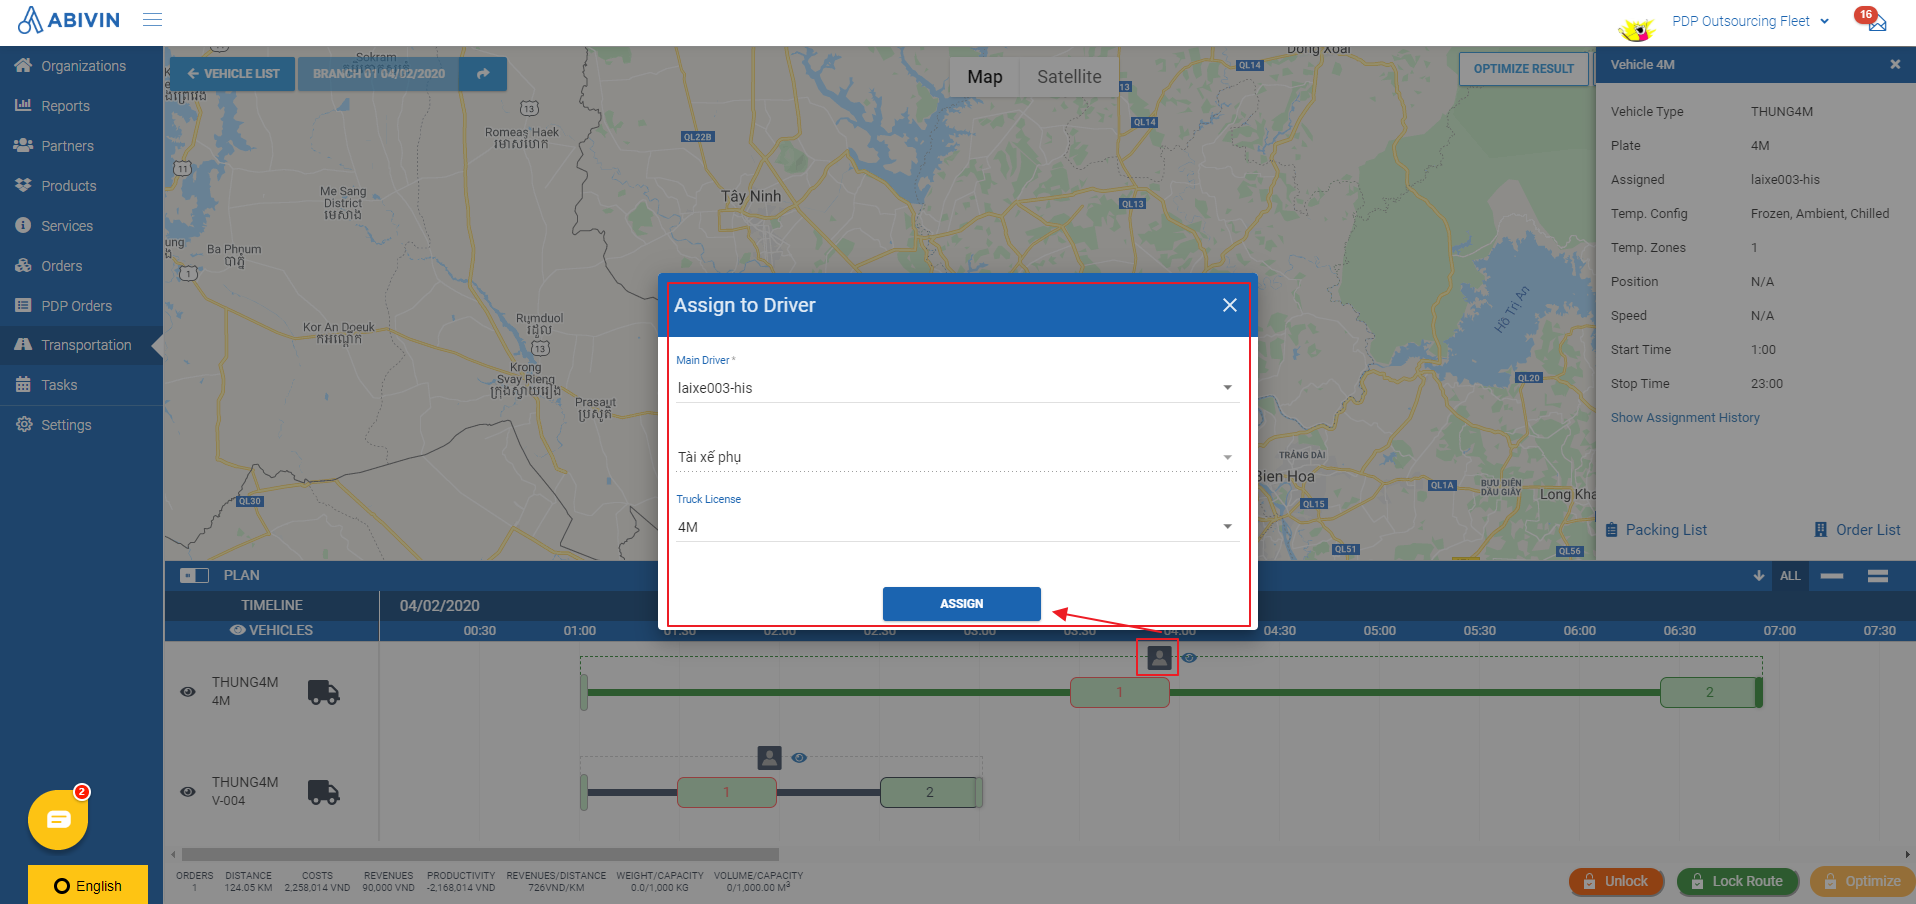
- To reassign the Delivery Shift to another driver, click on the field below the text Main Driver. The drop-down list will display the Usernames of all active drivers under your management (Only drivers who are not currently assigned other Delivery Routes will be shown). Select the appropriate driver from that list then click Assign. After reassigning, the delivery tasks will be moved from the mobile app of the former driver to the mobile app account of the new driver. The former driver will no longer see the delivery tasks on his mobile app
- Likewise, you can reassign the Delivery Shift to another vehicle by clicking on the field below the text Truck License. The drop-down list will display the License Plates of all active vehicles under your management (Only vehicles which are not currently assigned other Delivery Routes will be shown). Select the appropriate vehicle from that list
- After you have selected the appropriate driver and/or vehicle, click the button Assign. Upon doing that, all delivery tasks of that Delivery Shift will be removed from the Mobile app of the former driver and will be forwarded to the Mobile app of the recently selected driver instead
Route Plan description
Delivery Shift appearance
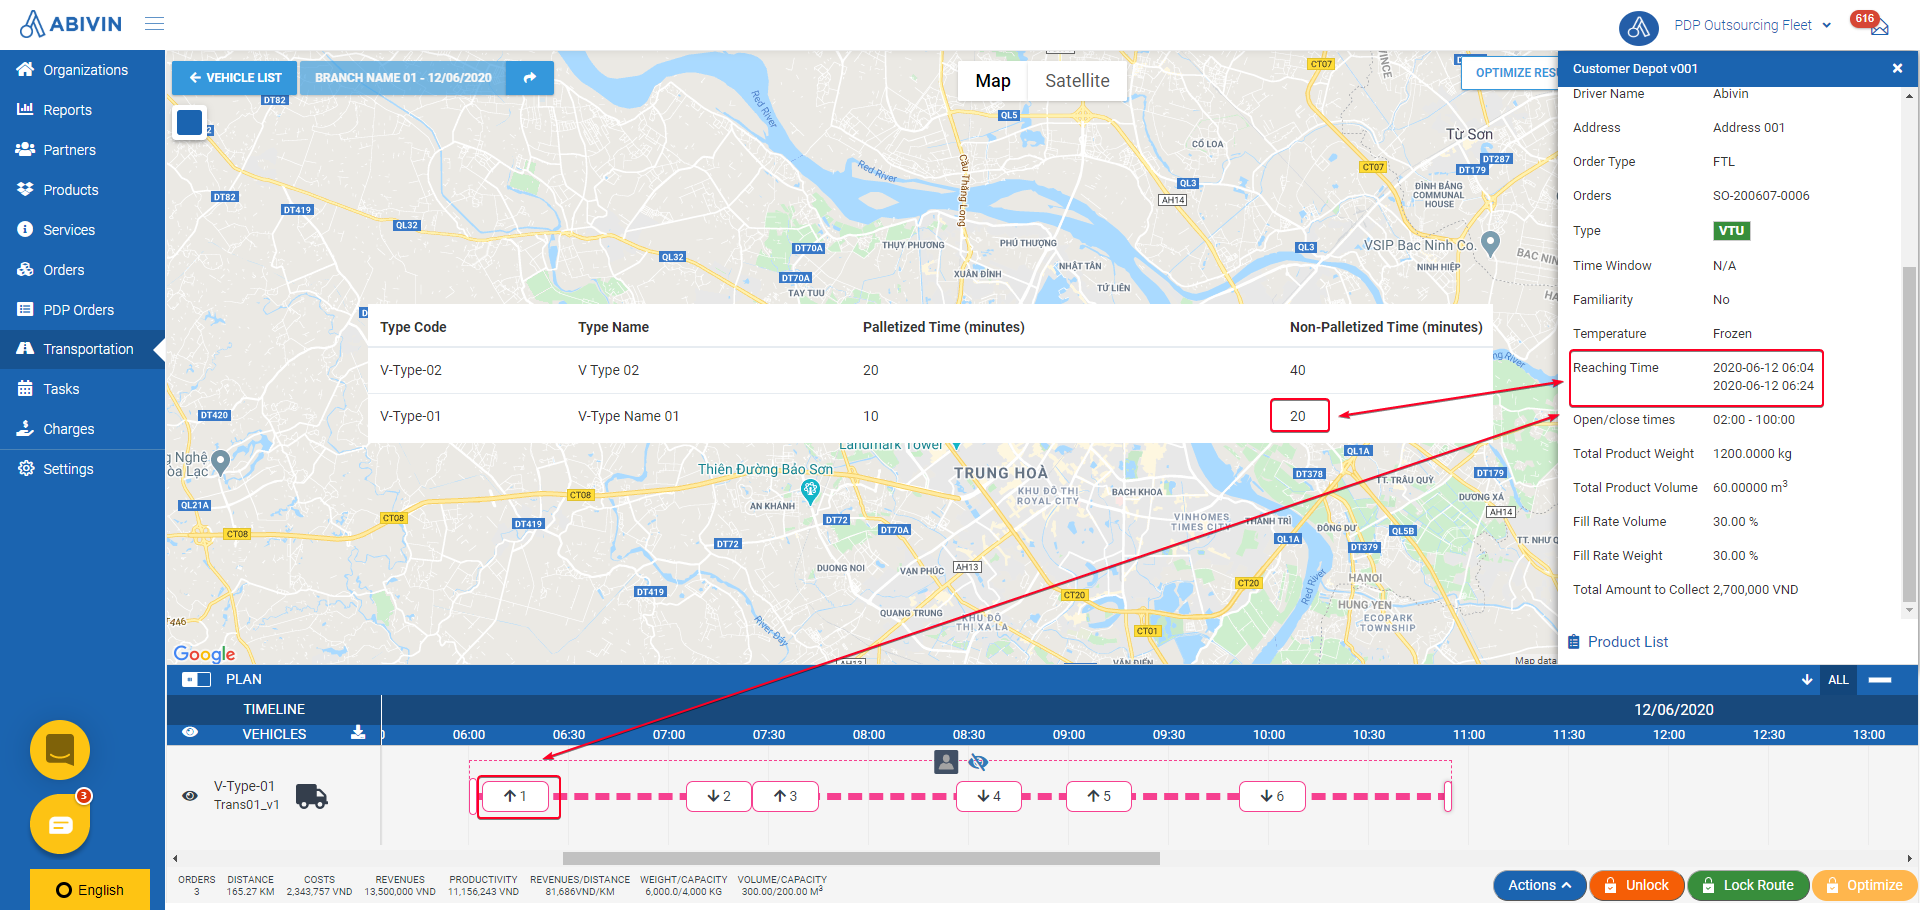
- On the Timeline panel, a Delivery Shift consists of a connecting line and multiple time blocks. The connecting line represents the travel time period, while the time blocks represent the loading/unloading time at the Depots
- The time blocks that have the up arrow icon inside represent the loading time period at the Origin Depots - The Depots where the vehicles will pick up products. The time blocks that have the down arrow icon inside represent the unloading time at the Destination Depots - The Depots where the vehicles will drop off products

- The length of a time block on a Delivery Shift of a vehicle equals to the value of the attribute Non-Palletized Time of the Vehicle Type to which that Vehicle belongs
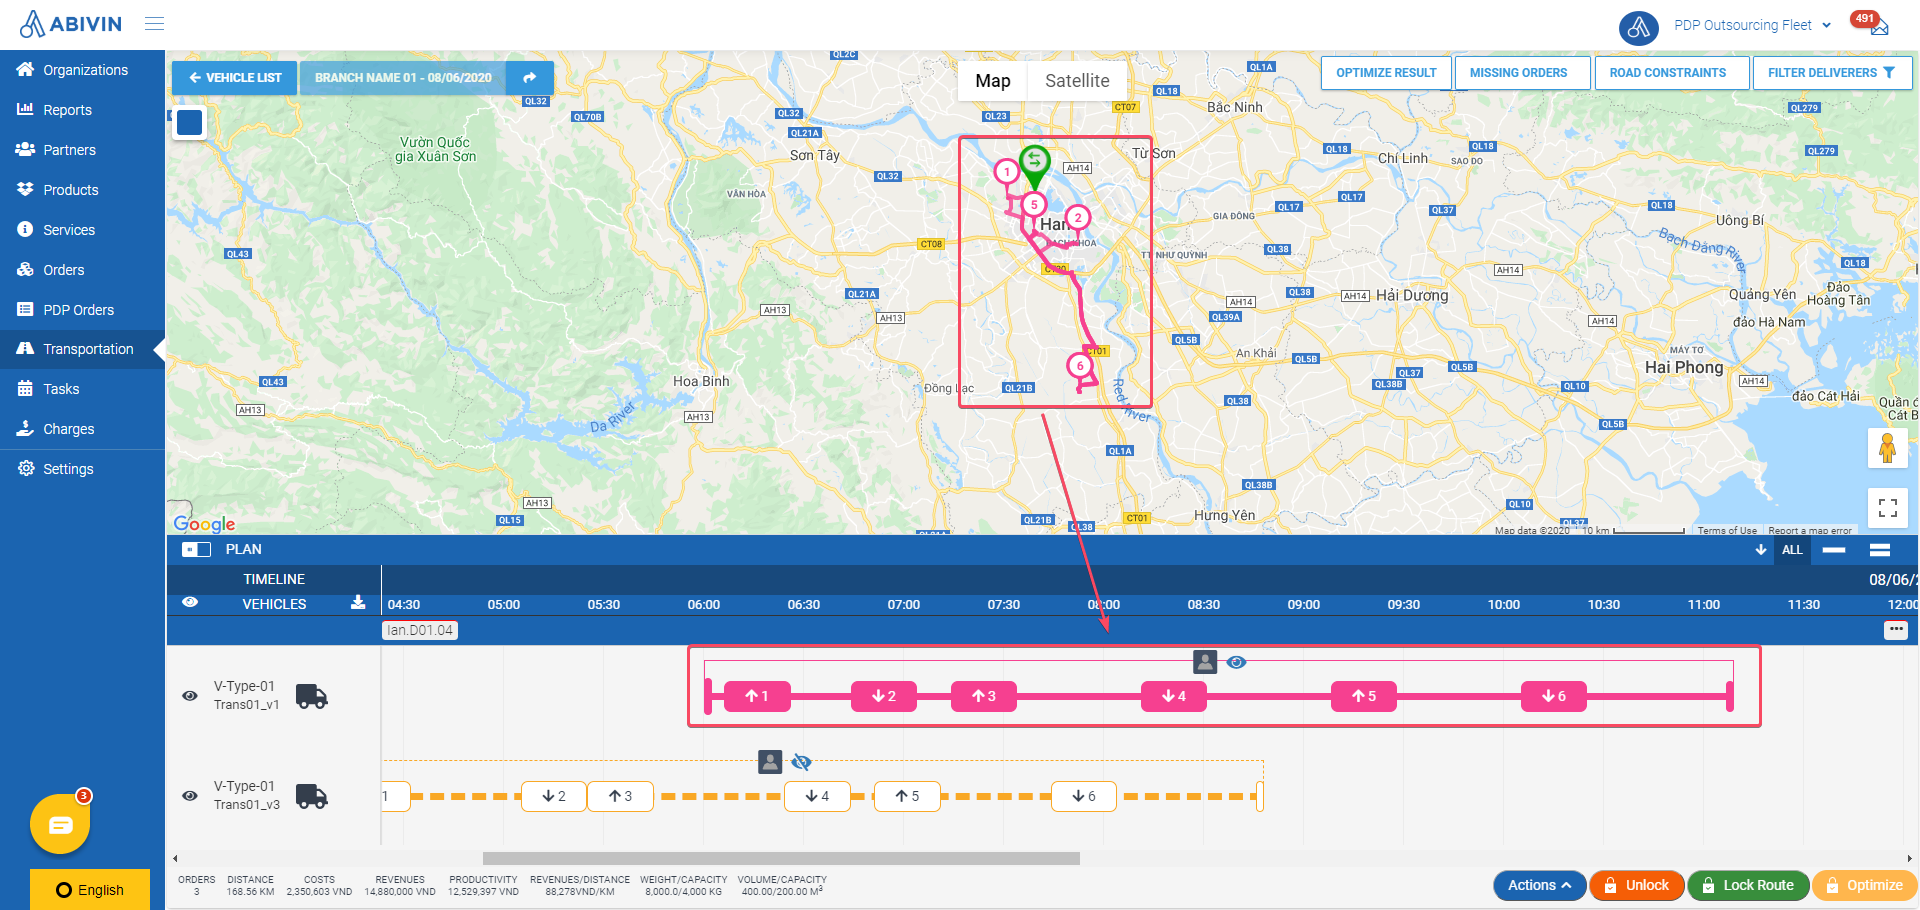
- The color of the Delivery Shifts on the Timeline panel is the same as the route line on the Map screen
- On the Timeline panel, the appearance of the Delivery Shifts changes based on their Planning Status, details below
Not yet locked/Unlocked Delivery Shift
- On a not yet locked/unlocked Delivery Shift, the connecting line is dashed. The internal color of the time blocks is white

Locked Delivery Shift
- On a locked Delivery Shift, the connecting line is solid. The internal color of the time blocks is white

Finalized Delivery Shift
- On a finalized Delivery Shift, the connecting line is solid. The internal color of the time blocks is the same as the connecting line

Maximum Order quantity per Delivery Shift
- In this model, a vehicle is set to deliver a maximum of two Orders per Delivery Shift. Pass that value, the remaining Orders would be put onto the Delivery Shift of other active vehicles if possible. In the scenario there's no other active vehicle, the remaining Orders will be regarded as Missing Orders - Orders that can not be put into any optimized Delivery Route
- For example: In the illustration image below, you are trying to optimize three Orders, but there is only one active vehicle. During the Route Plan Optimization process, there could only be two Orders that will be put onto the Delivery Shift of this vehicle, and one Order will be regarded as Missing Order

Merge Delivery Shifts of Orders that qualify to be applied Transport Service Surcharge
- If a vehicle is assigned two Orders that qualify to be applied Transport Service Surcharge or Discounted Transport Service fee, then the Delivery Shifts of those Orders will be merged into a single Delivery Shift. This will be visible on both the Timeline panel and the Optimization Result form


Separate Delivery Shift of Orders that don't qualify to be applied Transport Service Surcharge or Discounted Transport Service fee
- If a vehicle is assigned two Orders that don't qualify to be applied Transport Service Surcharge or Discounted Transport Service fee, then each Order will be put onto a separate Delivery Shift instead of merging into one single Delivery Shift. This will be visible on both the Timeline panel and the Optimization Result form

Updated about 2 months ago
