Manage Shipments
This article is being edited
Locate shipment tab
- Shipments are listed on Tasks > Shipment tab
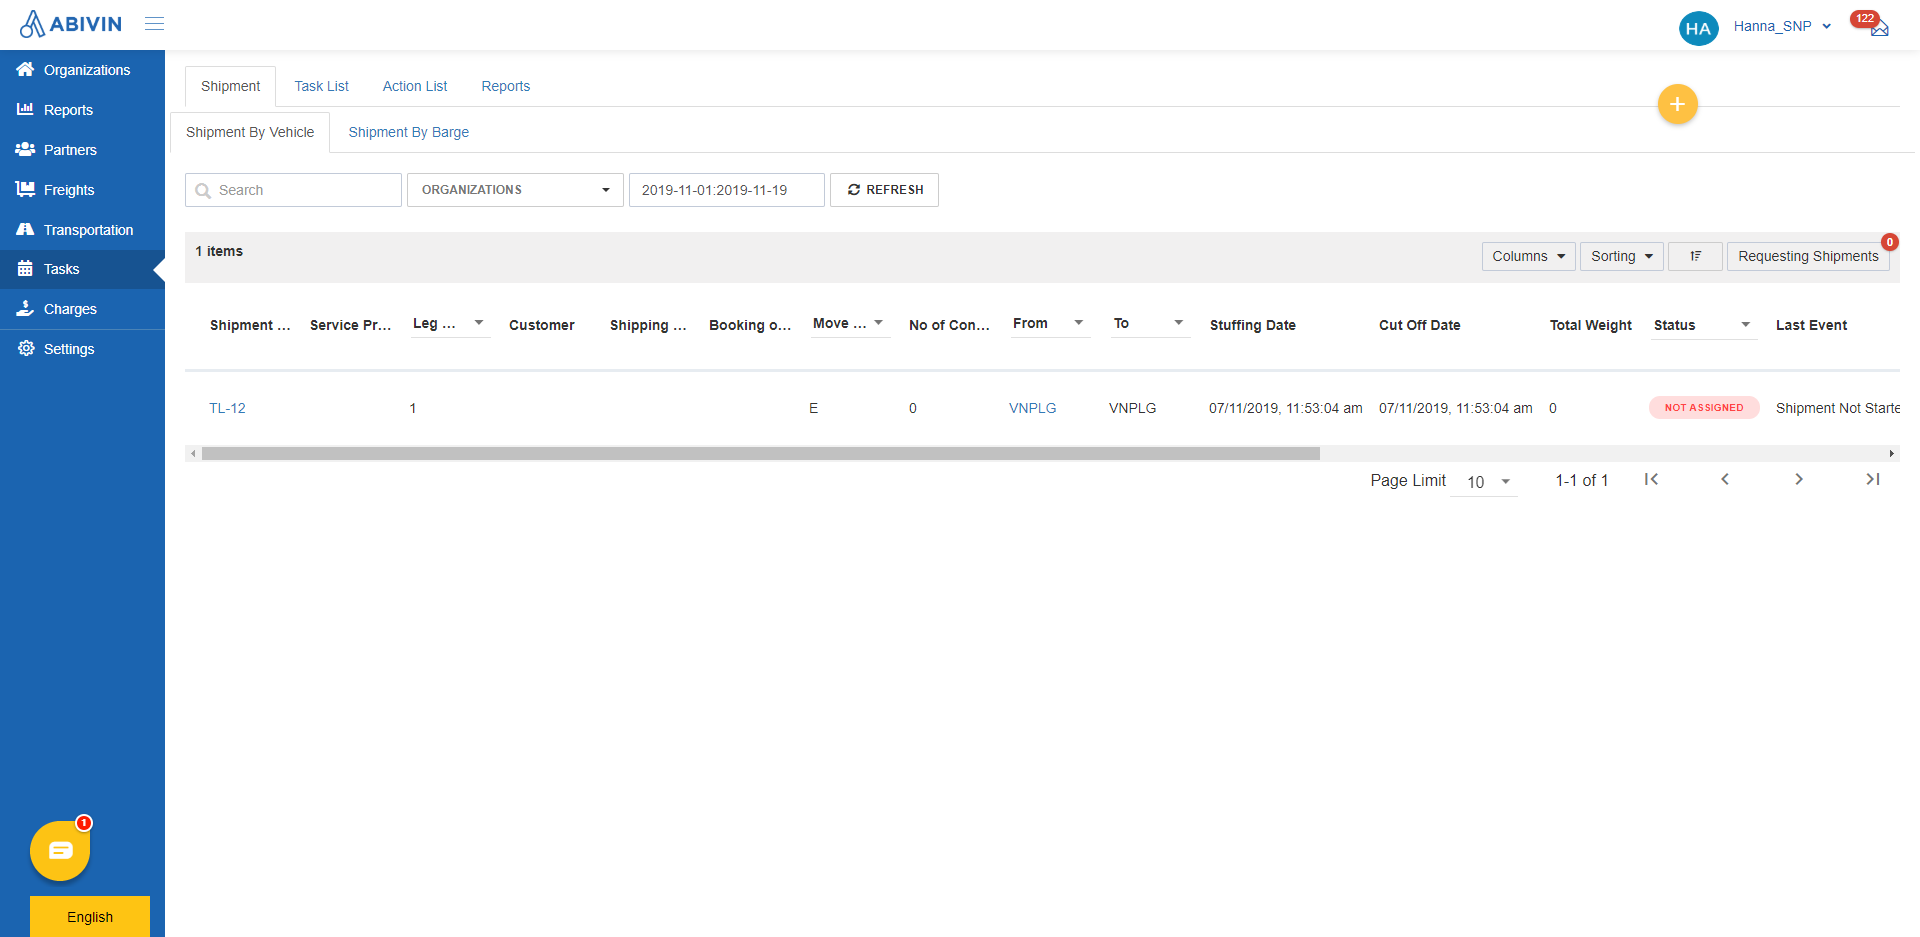
Shipment Information Fields
General Shipment information fields
Information field | Description |
|---|---|
Shipment Code (Web form + Excel template) (Required) | Management code assigned to the shipment being created |
Itinerary Code | Itinerary Code of the shipment being created |
Leg Index | The numerical order of the leg of the shipment being created Note: the numerical order must start from 0. |
Shipment Mode | Mode of transport used for the shipment being created |
Shipment Type | Type of the shipment being created |
Transaction Type | Transaction Type of the shipment being created |
Shipment Order Type | Order type of the shipment being created |
Vehicle | Vehicle Code of the terminal tractor which delivers the shipment being created |
Trailer | Code of the trailer which delivers containers of the shipment being created (If available) |
Stuffing Date | The last date to stuff goods to the containers of the shipment being created at the consolidation point |
Cut-off Date | The last date at which export containers and all related documents of the shipment being created can be received for a particular vessel |
Late Delivery Time | The last date and time at which the shipment being created will be considered late to start |
Shipment Note | A specific note about the shipment being created |
Origin Customer Code | Code of the location where the shipment being created starts |
Destination Customer Code | Code of the location where the shipment being created ends |
Shipment Stops information fields
Information field | Description |
|---|---|
Shipment Code (Excel template) (Required) | Management code assigned to the shipment being created |
Stop Index (Web form); Shipment Stop Index (Excel template) | Numerical code of the shipment stop being created |
Location (Web form); Shipment Stop Location Code (Excel template) | Location code of the shipment stop being created |
Task Group (Web form); Task Group Code (Excel template) | Code of the task group to be performed at the shipment stop being created |
Stop Type (Web form); Shipment Stop Type (Excel template) | Type of the shipment stop being created |
Estimated Time Arrival | Estimated Time of Arrival at the shipment stop being created |
Planned Time Arrival | Planned Time of Arrival at the shipment stop being created |
Estimated Time Departure | Estimated Time of Departure from the shipment stop being created |
Planned Time Departure | Planned Time of Departure from the shipment stop being created |
Shipment Containers information fields
Information field | Description |
|---|---|
Shipment Code (Excel template) (Required) | Management code assigned to the shipment being created |
Stop Index (Web form); Shipment Stop Index (Excel template) | Numerical code of the shipment stop that stores the container(s) being added |
Container Number | Numbers printed on the door of the container |
Booking Number | Booking Number of the container (If available) |
Seal Number | Number printed on the seal lock of the container |
Bill of Lading | Bill of Lading of the container (If available) |
Shipping Line | Code of the shipping line company that will transport the container |
Customer | Ultimate customer of the container |
Container Status | Most recent status of the container at the time the shipment is created |
Container Type | Type of the container |
Vessel | Code of the vessel that will transport the container |
Voyage ID | Code of the voyage that will transport the container |
Pick Location | Code of the location from where the container is picked up |
Drop Location | Code of the location to where the container will be dropped off |
IMO Class | IMO Class of the container |
Temperature | Temperature of the container |
Tare Weight | Weight of the container without loading any goods |
Gross Weight | Maximum goods weight that the container can carry |
VGM | The verified goods weight that the container can carry |
Note | A short note about the container |
Create shipments
Create shipments using Web form
- Please refer to the CRUD functions article to know the general steps about creating single object using web form
- Below is the input instruction for each information field on the Web form
Tab Shipments
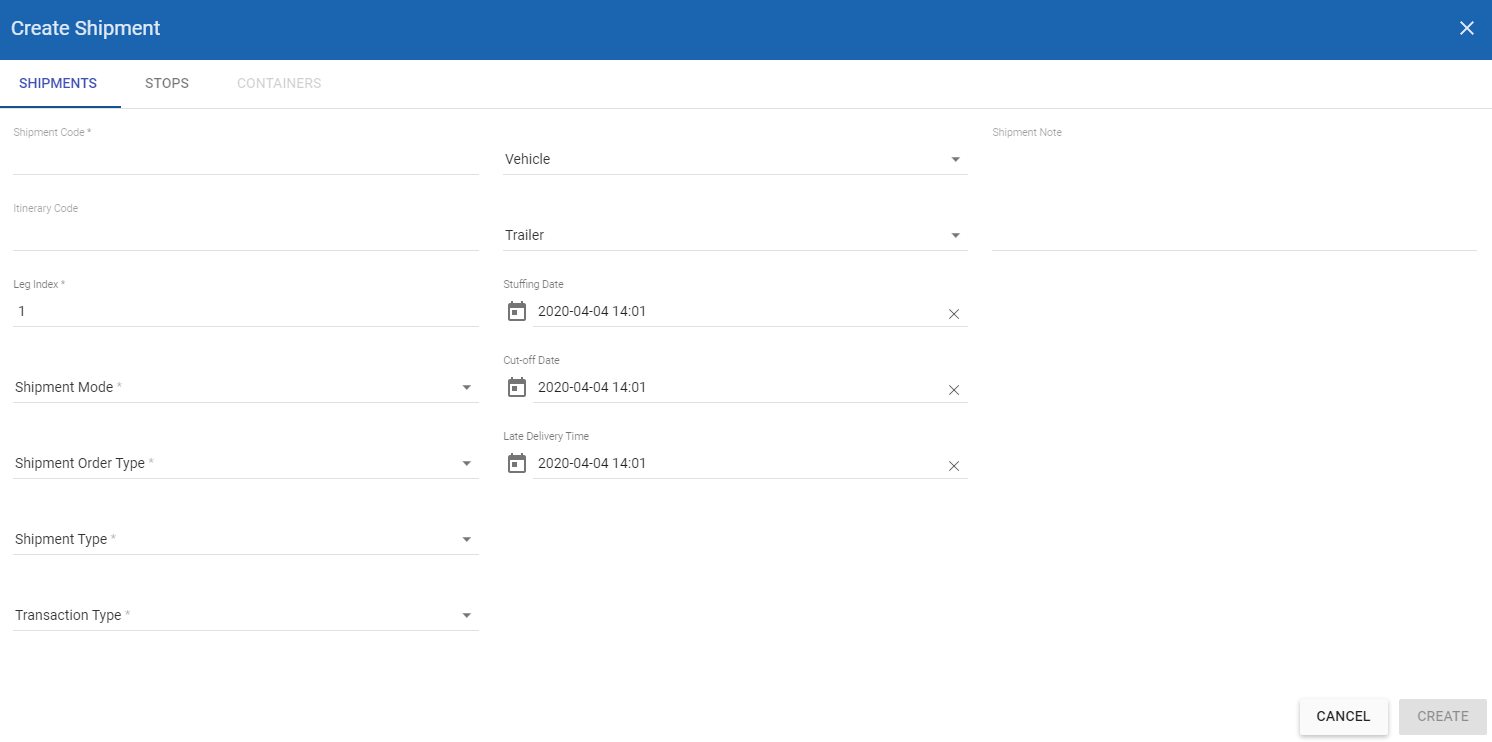
- Shipment Code:
- Format: Must not contain spaces
- Itinerary Code:
- Format: Must not contain spaces
- Leg Index:
- Format: Number (The order must start from 0)
- Shipment Mode:
- Click on this field, choose the value TL from the drop down menu
- Shipment Order Type:
- Click on this field, choose the appropriate value from the drop down menu
- Shipment Type:
- Click on this field, choose the appropriate value from the drop down menu
- Vehicle:
- Click on this field, input the appropriate vehicle code of the terminal tractor into the search bar, then select from the drop down menu
- If you don't want to assign the shipment being created to any particular terminal tractor, don't input anything into this field
- Trailer:
- Click on this field, input the trailer code of the trailer into the search bar, then select from the drop down menu
- If you don't want to assign the shipment being created to any particular trailer, don't input anything into this field
- Stuffing Date; Cut-off Date; Late Delivery Time:
- You can either click on the calendar icon and select the appropriate dates from the drop down menu, or input directly into this field in the following format: mm/dd/yyyy hh:mm
- Shipment Note:
- Format: Free-form
Tab Stops:
- In this tab, you would have to input the information for each stop of the shipment
- Location:
- Click on this field, input the appropriate location code of the stop being created into the search bar, then select from the drop-down menu
- Stop Type:
- Click on this field, select the appropriate stop type for the stop being created from the drop-down menu
- Task Group:
- Click on this field, select the appropriate code of the task group to be performed at the stop being created from the drop-down menu
- There are twelve task groups to select. The detailed tasks of each task group are listed in the below table
Task group code | List of tasks |
|---|---|
T1 (For normal shipments) | Lift On (1) |
T2 | Lift On (0) |
T3 | Gate In |
T4 | Gate In |
T5 | Gate Out |
T6 | Gate In |
T7 | Gate In |
T8 | Trailer Attach |
T9 | Gate In |
T10 | Gate In |
T11 | Trailer Attach |
T12 | Gate In |
T13 | Gate Out |
- After you have filled in the three above information fields, color the Add Stop button will turn to blue. Now you can click on that button to add the stop. The stop will appear in the Shipment Stops List. You would need to input into some more information fields of the stop
- Estimated Time Arrival; Planned Time Arrival; Estimated Time Departure; Planned Time Departure:
- Click on the icon, select the appropriate dates and time from the drop down calendar/watch
Create shipments using Excel template
- Please refer to the CRUD functions article to know the general steps about creating single object using web form
- Below is the input instruction for each information field in the Excel template
Sheet Shipment
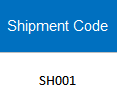
- Shipment Code:
- Format: Must not contain spaces
- Itinerary Code:
- Format: Must not contain spaces

- Leg Index:
- Input the numerical order of the leg (in number) into this cell
- For example: 1; 2; 3 etc.

- Shipment Mode:
- Always input the value TL into this cell

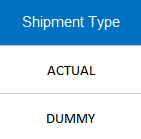
- Shipment Type:
- Always input the following value into this cell: ACTUAL
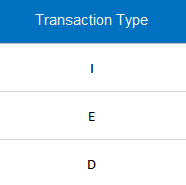
- Transaction Type:
- Input the value I (Capitalization of letter i) into this cell if the transaction type of the shipment being created is Import
- Input the value E into this cell if the transaction type of the shipment being created is Export
- Input the value D into this cell if the transaction type of the shipment being created is Domestic
- Vehicle:
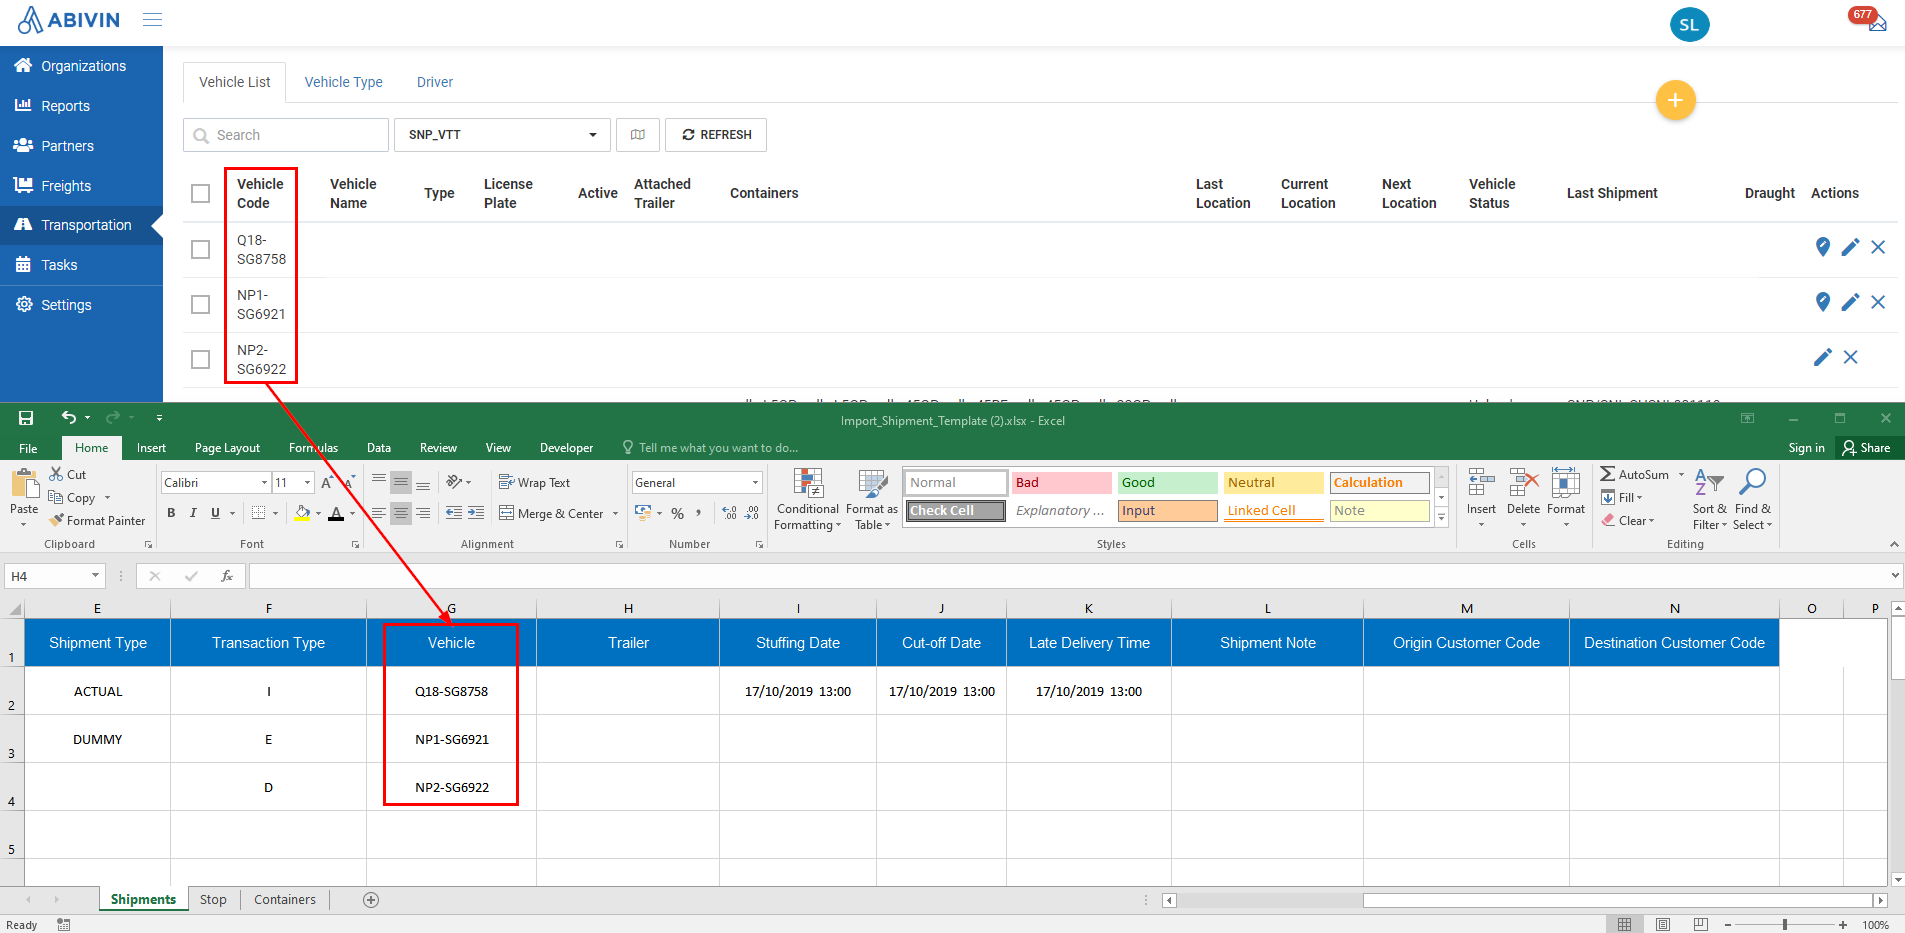
- Copy the Vehicle Code of the Truck tractor on Web app, then paste into this cell
- The Vehicle Code can be found under Vehicle Code column in Transportation > Vehicle List tab
- Trailer:
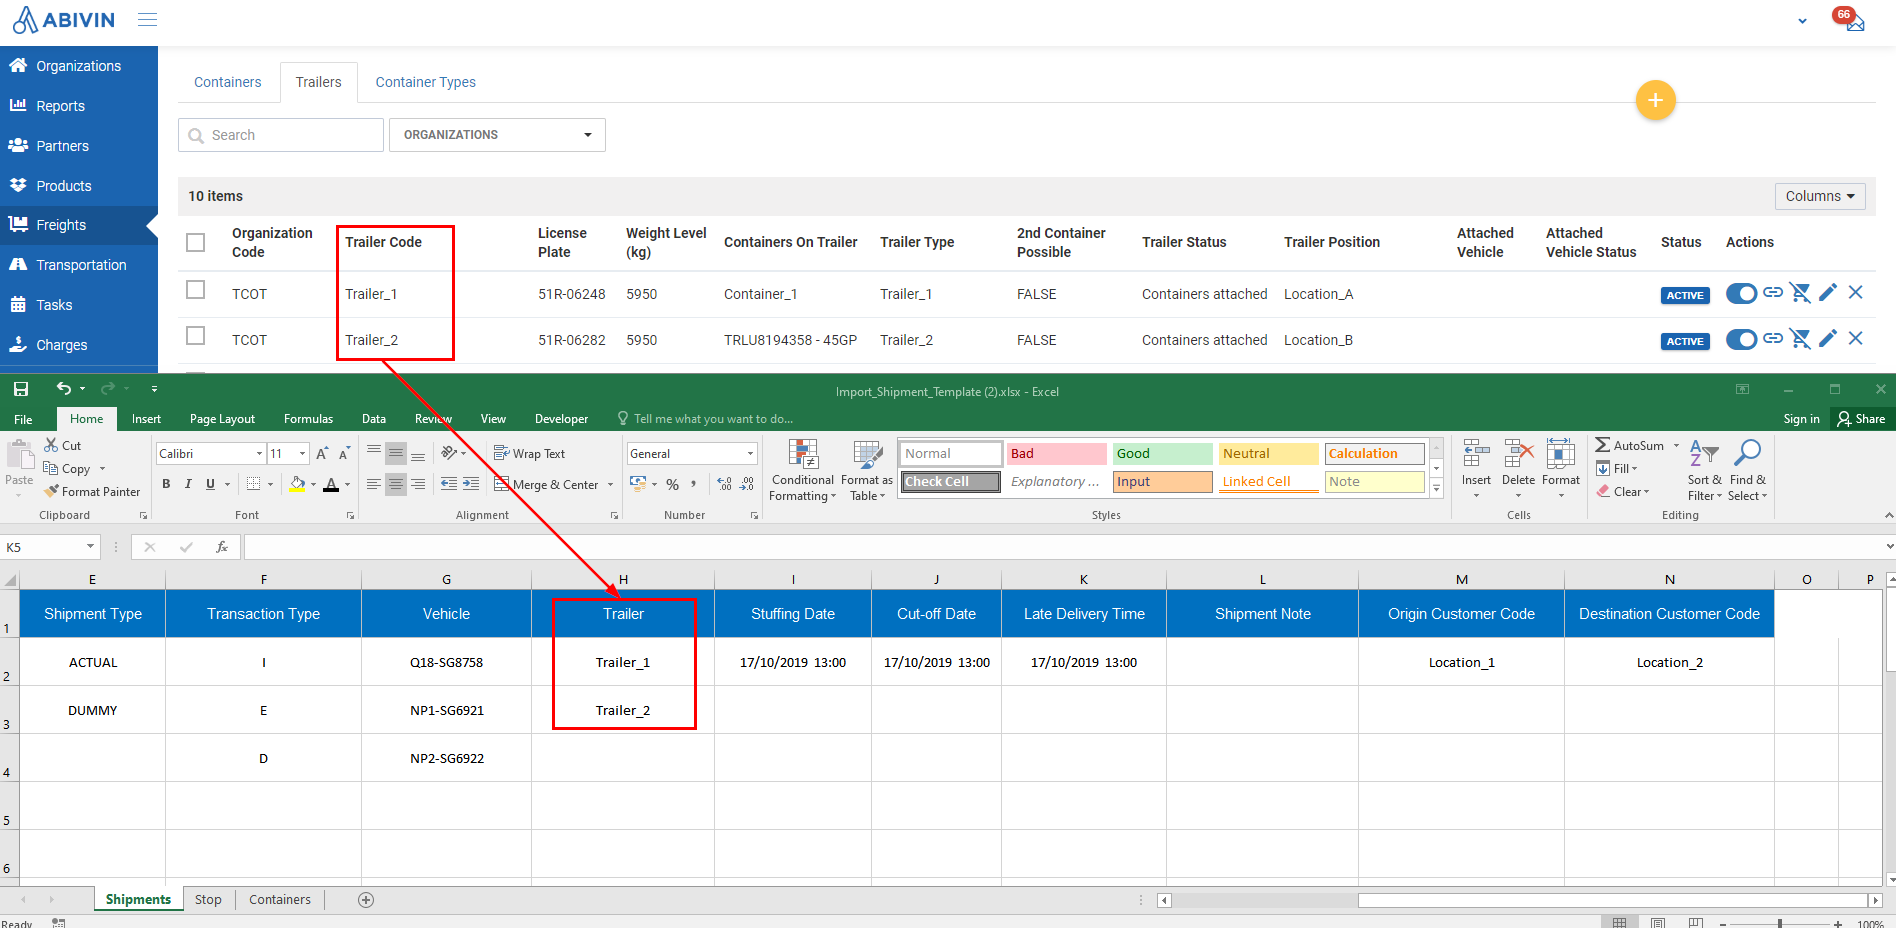
- Copy the trailer code on Web app, then paste into this cell
- The trailer code can be found under Trailer Code column in Freights > Trailers tab
- Stuffing Date; Cut-off Date; Late Delivery Time:
- These dates must be input in the following format: dd/mm/yyyy hh:mm
- For example: 20/11/2019 12:30
- Shipment Note:
- Format: Free-form
- Origin Customer Code; Destination Customer Code:
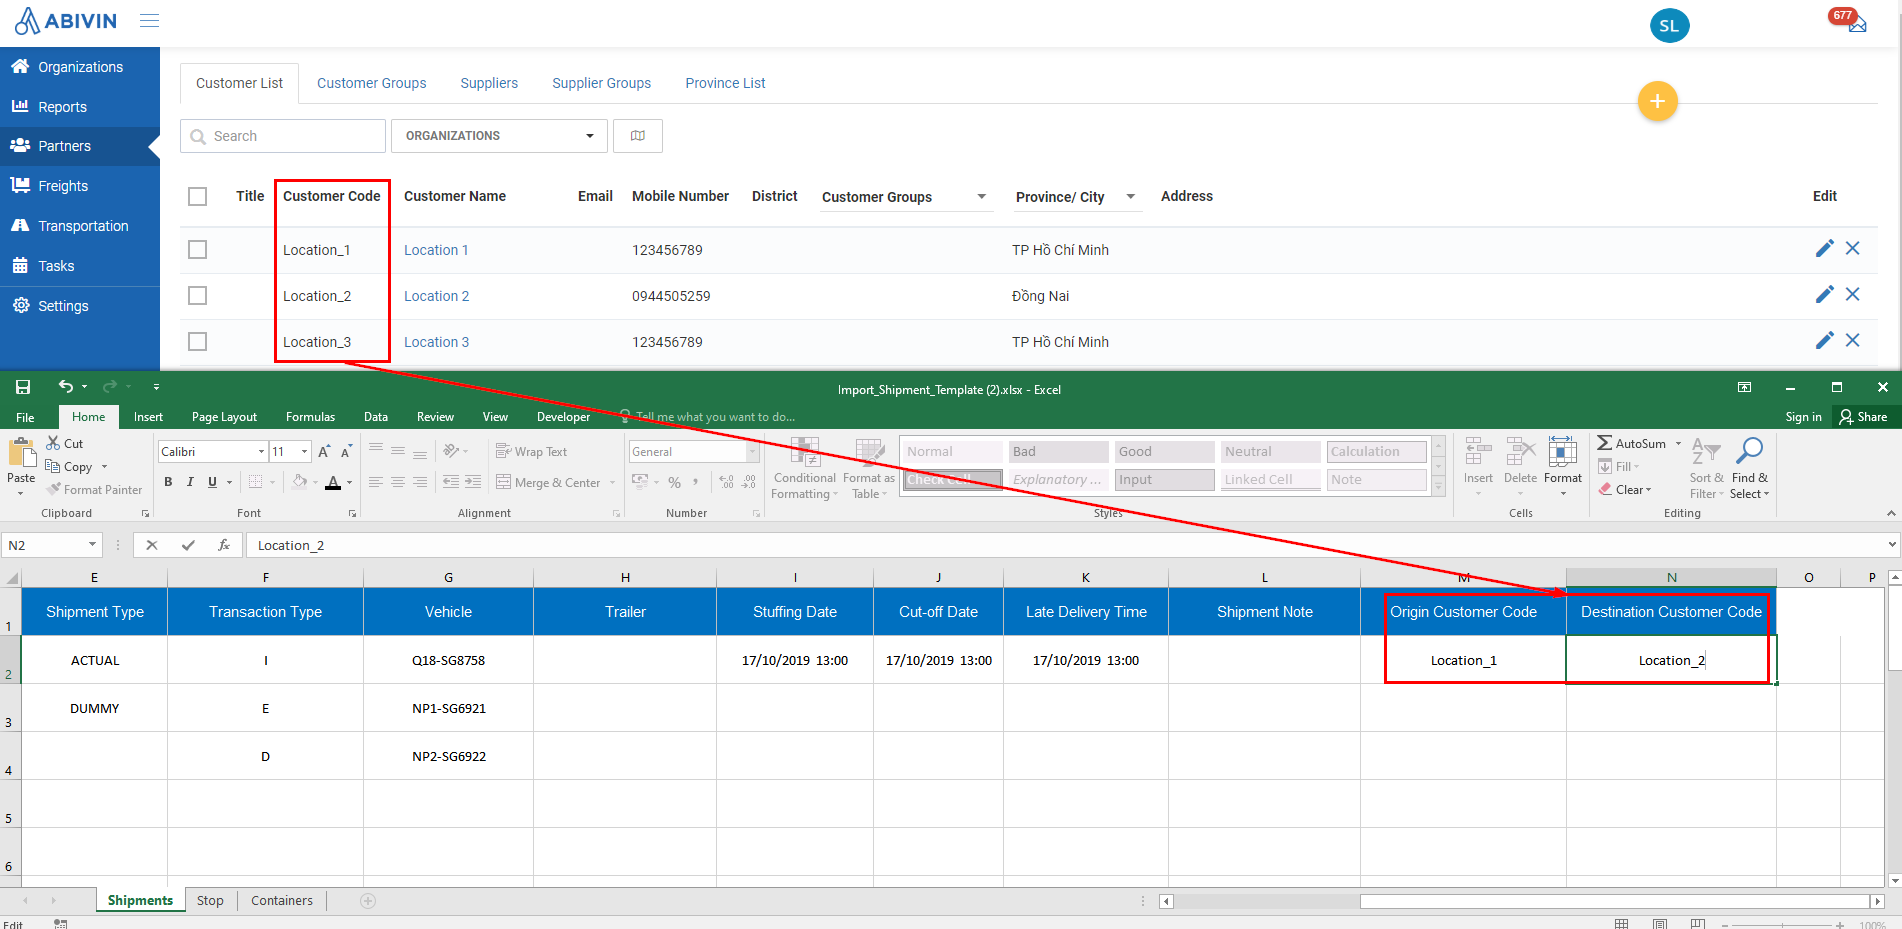
- Copy the Customer Codes of the corresponding locations on Web app, then paste into these cells
- The Customer Codes can be found under Customer Code column in Partners > Customer List tab
Sheet Stop
- Shipment Code:
- Same as instructed above
- Shipment Stop Index:
- Input the corresponding numerical order of the shipment stop into this cell
- For example: 1; 2; 3 and so on
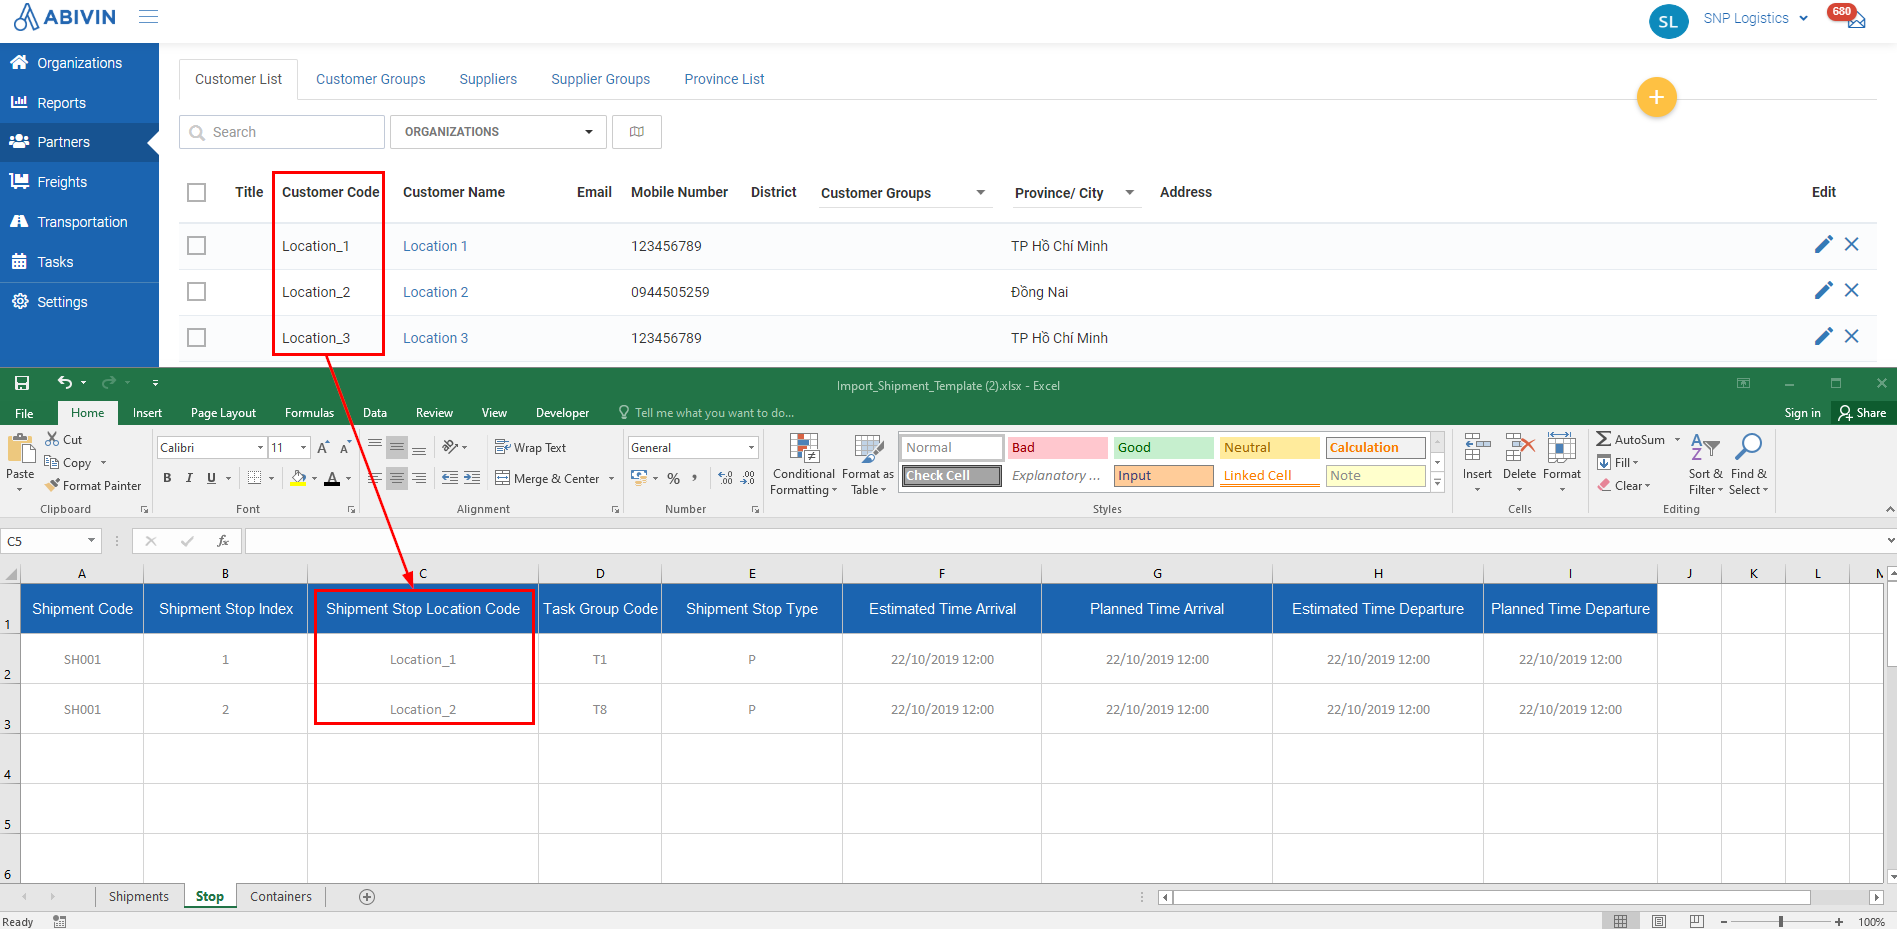
- Shipment Stop Location Code:
- Copy the Customer Codes of the corresponding locations on Web app, then paste into these cells
- The Customer Codes can be found under Customer Code column in Partners > Customer List tab
- Task Group Code:
- Input the appropriate task group code into this cell
- The list of task groups can be found above
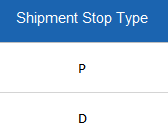
- Shipment Stop Type:
- If the stop is a Pick stop, input the following value into this cell: P
- If the stop is a Drop stop, input the following value into this cell: D
- Estimated Time Arrival; Planned Time Arrival; Estimated Time Departure; Planned Time Departure:
- These dates must be input in the following format: dd/mm/yyyy hh:mm
- For example: 18/11/2019 08:30

Sheet Container
- Shipment Code:
- Same as instructed above
- Shipment Stop Index:
- Same as instructed above
- Container Number:
- Input the numbers of the container into this cell
- For example: TKRU426221
- Booking Number:
- Input the Booking Number that comes with the container into this cell
- For example: 403772CHLTB
- Bill of Lading:
- Input the Bill of Lading numbers that comes with the container into this cell
- For example: 403772CHLTB
- Seal Number:
- Input the numbers of the seal lock of the container into this cell
- For example: ES2633201
- Shipping Line:
- Input the code of the shipping line into this cell
- For example: OCL_LN
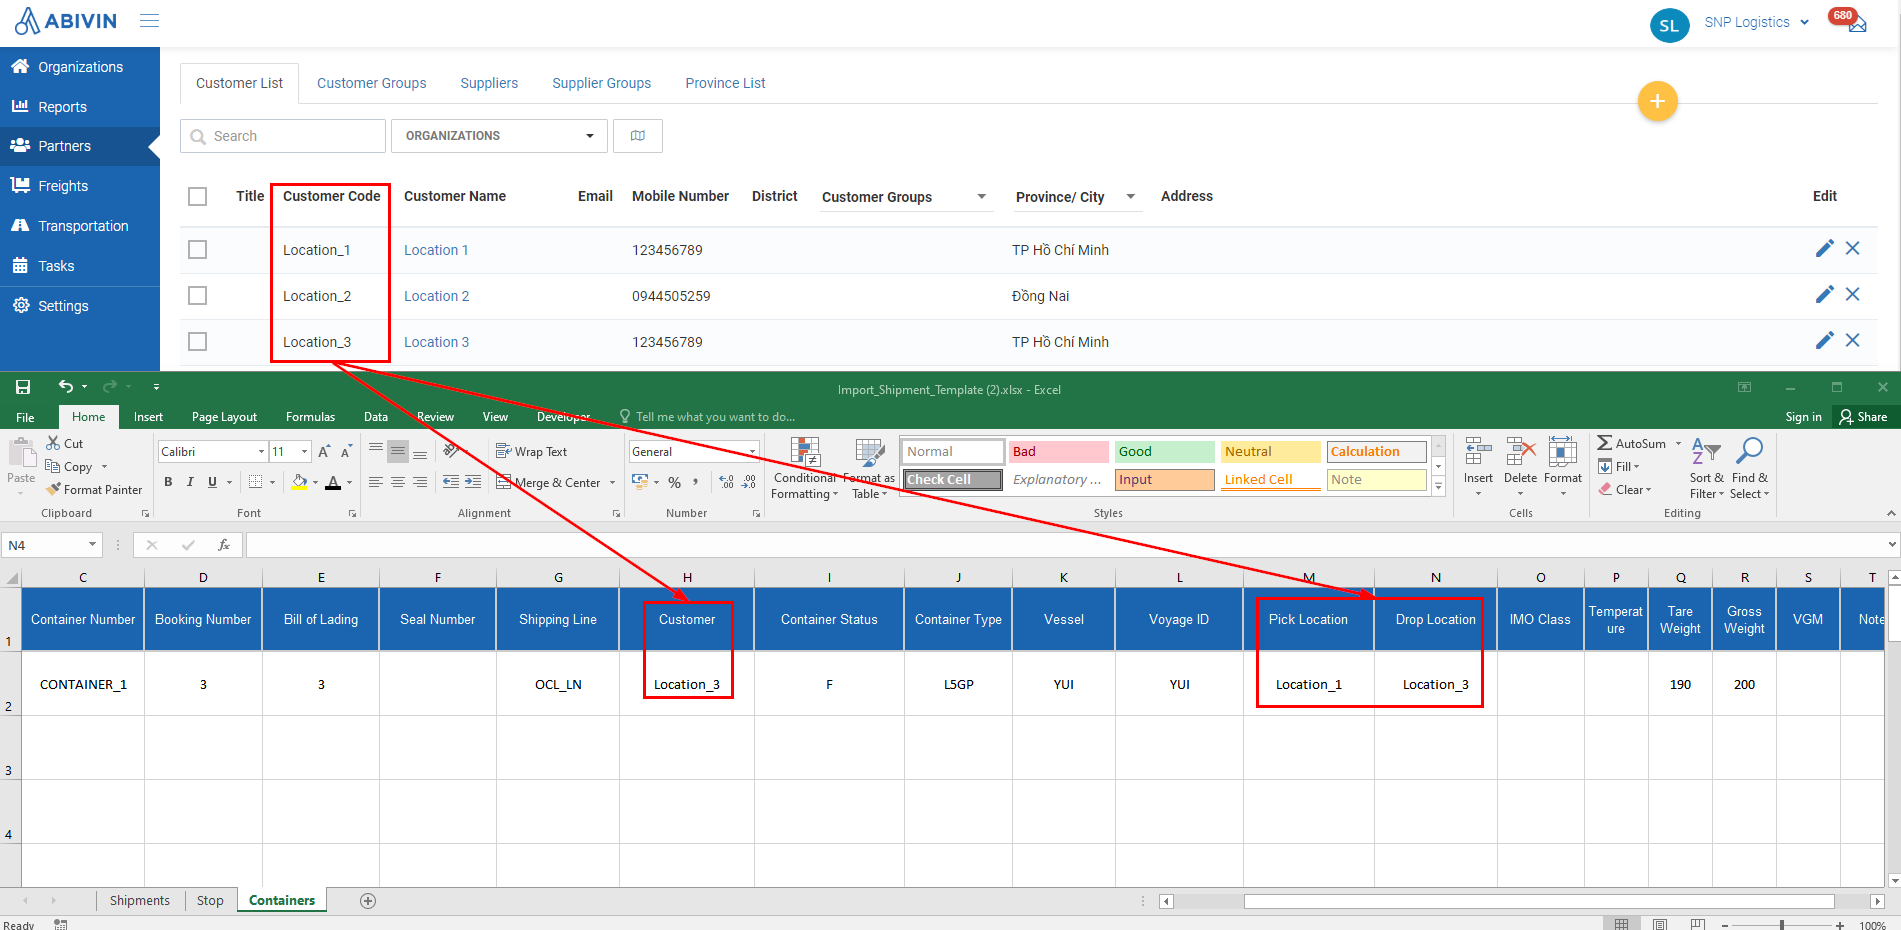
- Customer; Pick Location; Drop Location:
- Copy the Customer Codes of the corresponding locations on Web app, then paste into these cells
- The Customer Codes can be found under Customer Code column in Partners > Customer List tab
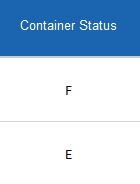
- Container Status:
- If the container has goods inside, input the following value into this cell: F
- If the container is an empty container, doesn't have goods inside, input the following value into this cell: E
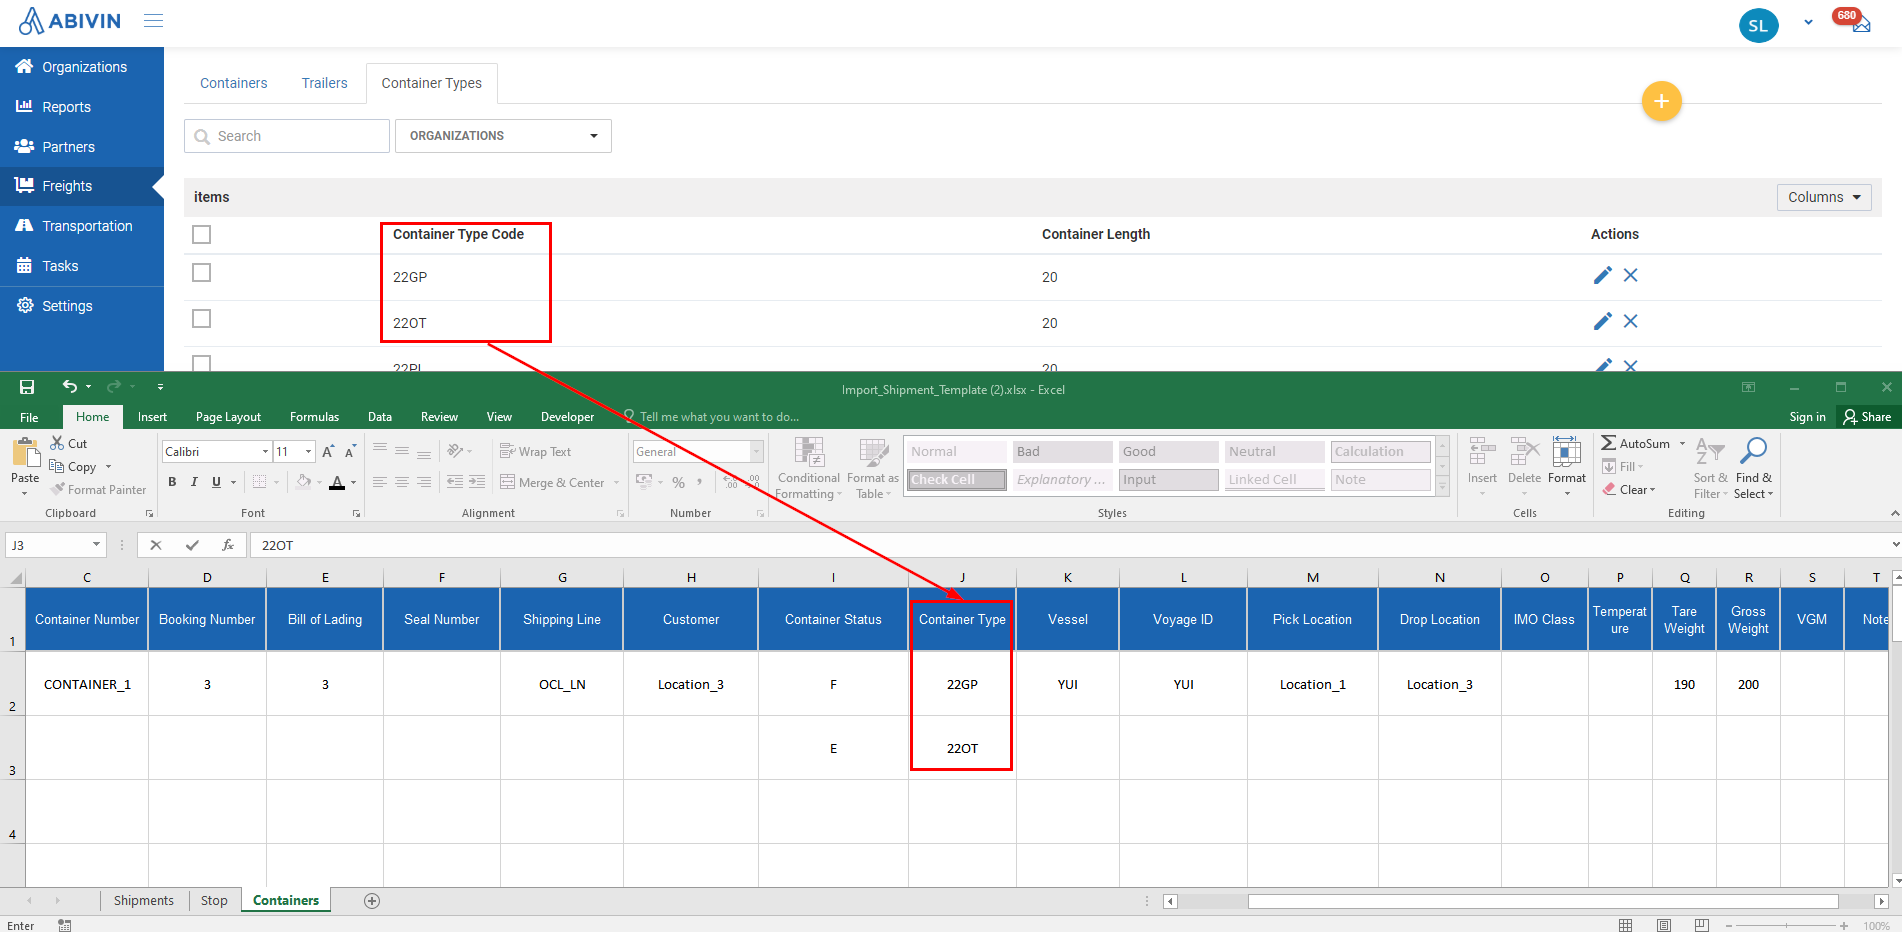
- Container Type:
- Copy the suitable container type code on Web app, then paste into this cell
- The container type code can be found under Container Type Code column in Freights > Container Types tab
- Vessel:
- Input the code of the shipping vessel into this cell
- For example: EMPT; ATE; LGB etc.
- Voyage ID:
- Input the code of the voyage into this cell
- IMO Class:
- Input the following value into this cell if the container contains dangerous goods: FXIX
- Input the following value into this cell if the container contains oversize goods: FXXO
- If the container neither contains neither dangerous nor oversize goods, leave this cell blank

- Temperature:
- Input the corresponding temperature of the container (In degree Celsius)
- For example: 2; 4; -20 etc.
- Tare Weight; Gross Weight; VGM:
- Input the corresponding weights (In kilogram) into these cells
- For example: 2500; 3000; 33000 etc.
- Note:
- Format: Free-form
Update shipment
- Click on Edit icon of the shipment which you want to edit
Delete shipment
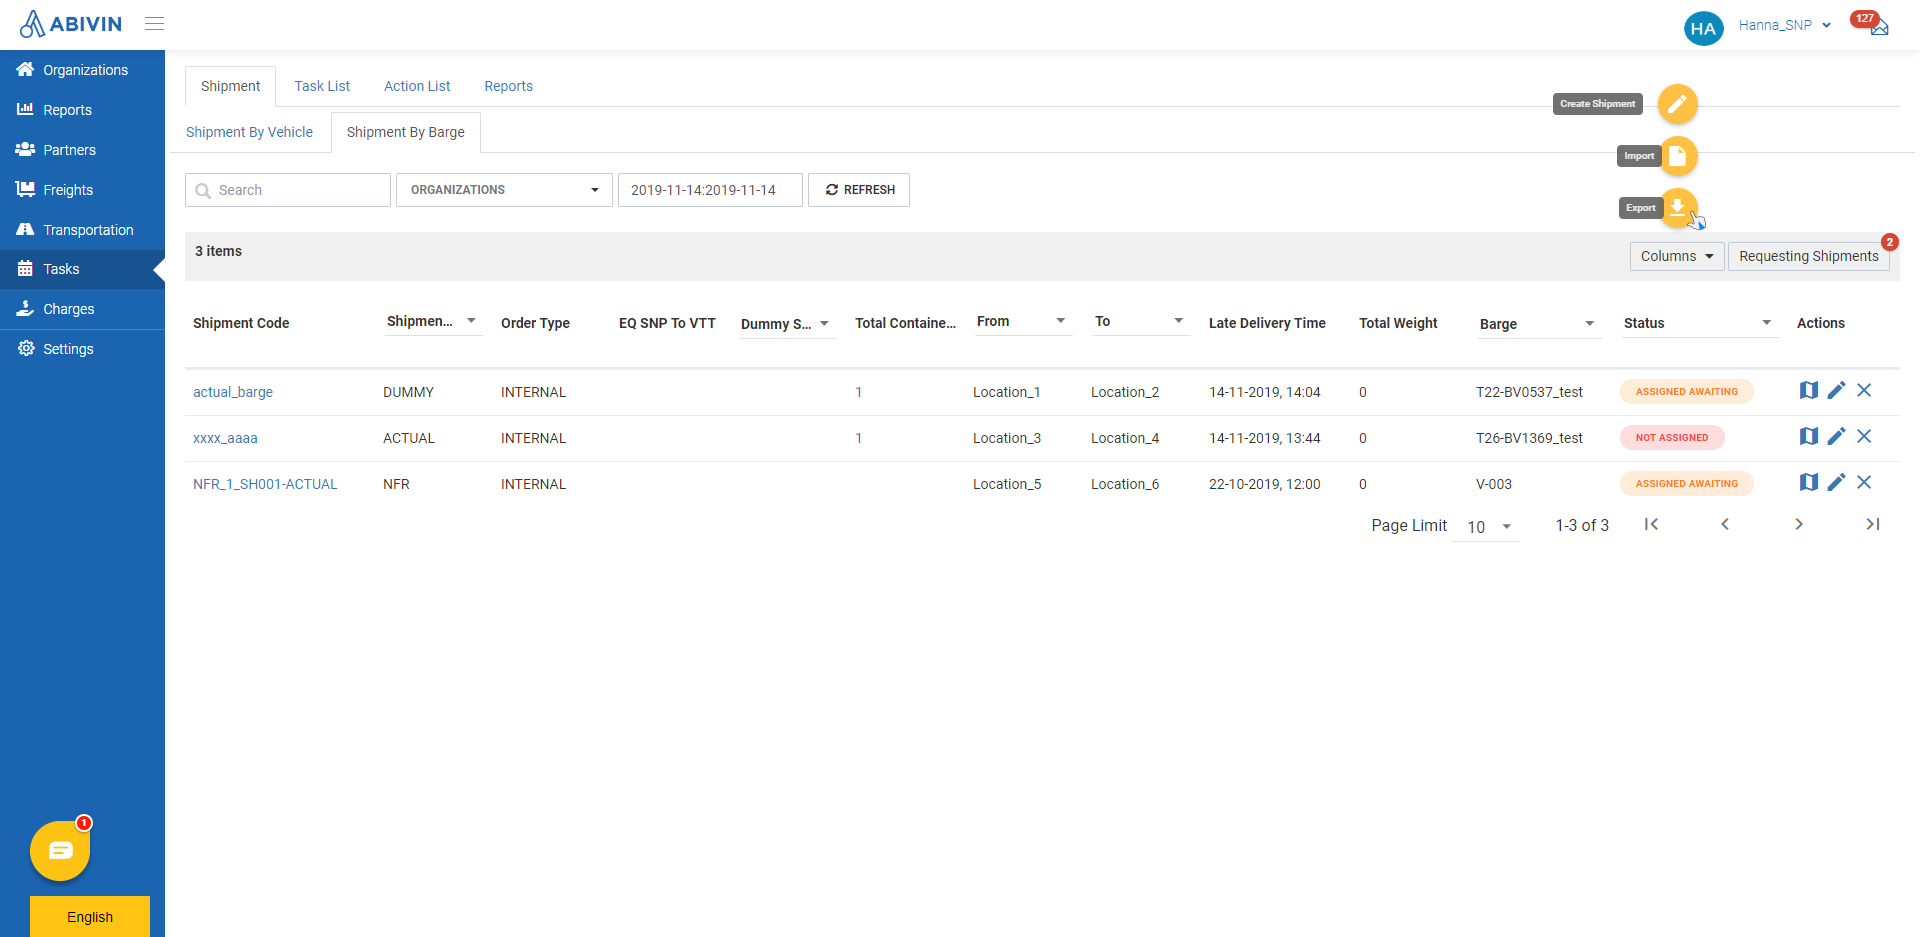
Export shipments
- Please refer to the CRUD functions article to know the general steps about exporting shipments in Abivin vRoute
Search Shipments
- You can search a Shipment by inputting one of the following attributes of that Shipment into the search bar:
- 1 - The Shipment Code
- 2 - The Container Number of a particular Container in that Shipment
Updated about 1 month ago
