Manage Products

Locate Product Tabs

  • In Abivin vRoute system, the Products will be managed in two tabs:
  • Products > Products: This tab stores the general information of the Products
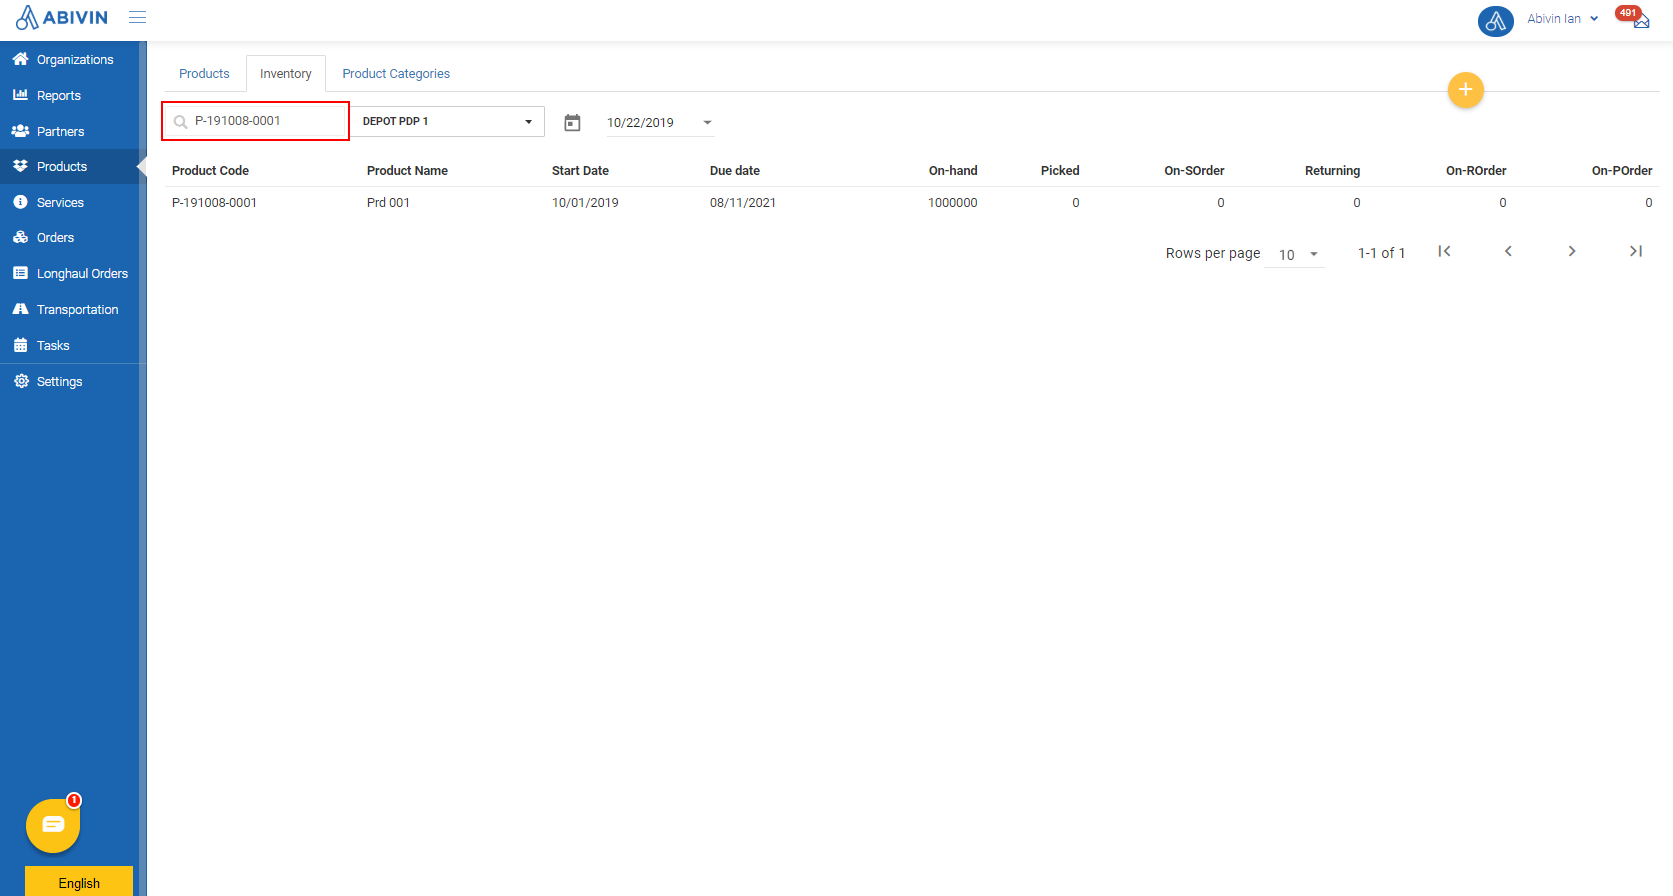
  • Products > Inventory: This tab is a ledger to track the changes of the Product inventory in the warehouse (Depot/Sun/Crossdock) shelves throughout the distribution process

Product Management Mechanisms

  • As had been mentioned in the Manage Product Categories article, in Abivin vRoute system there are two Product management mechanisms:
  • 1 - Shipper-oriented Product Management Mechanism: This mechanism is used for the user accounts of the Shippers
  • 2 - Carrier/Distributor-oriented Product Management Mechanism: This mechanism is used for the user accounts of the Carriers/Distributors
  • Depending on which Product management mechanism you use, the Product creation process will vary at certain steps, which will be described in the Create Products section

Product Unit Of Measurement

  • In the Abivin vRoute system, the default unit of measurement of all Products is the Whole Case. This unit of measurement will be used throughout all processes that involve the Products. Additionally, below the Whole Case, there will be a smaller unit of measurement called the Single Item. A whole case can contain one or multiple single items
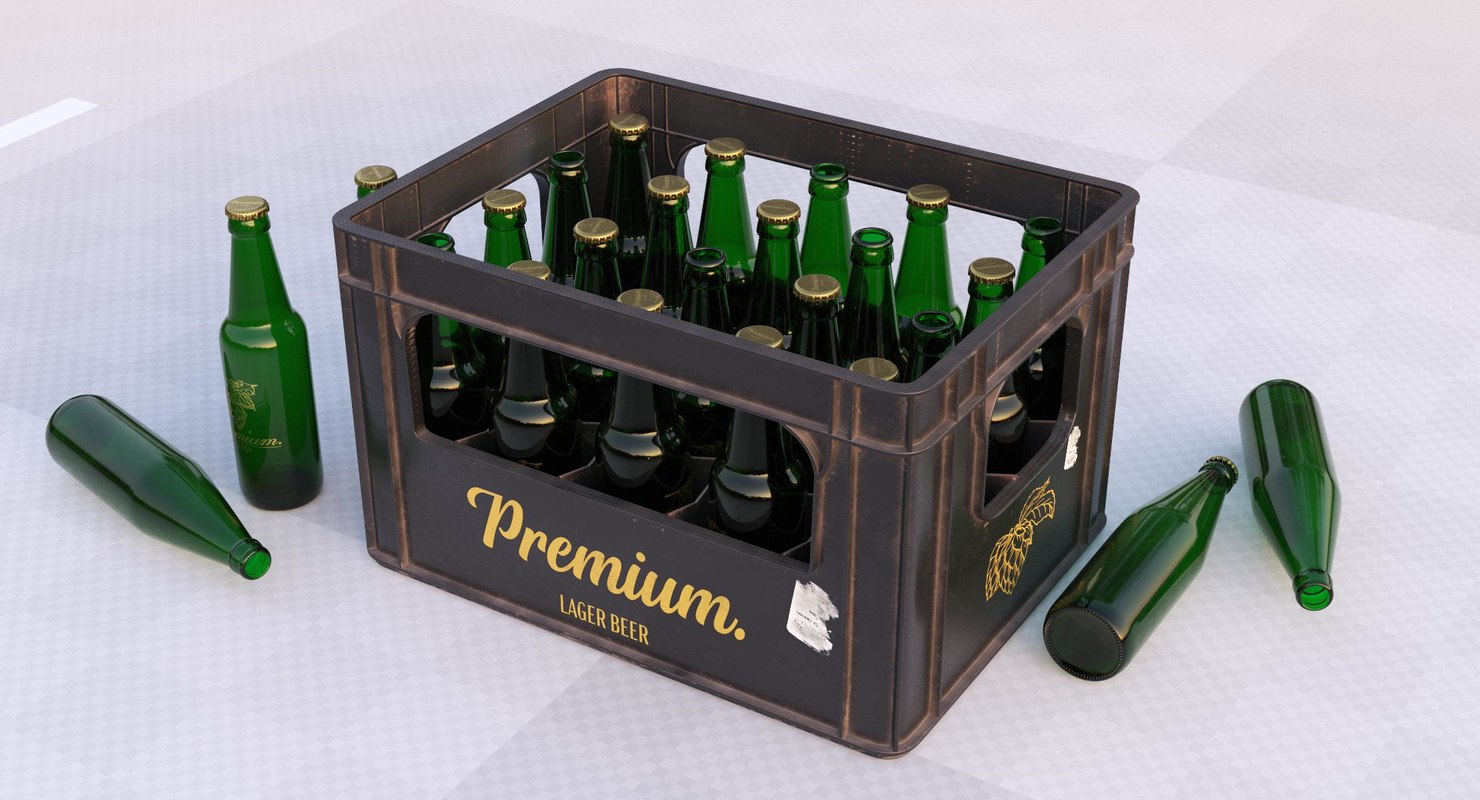
  • For example, a refrigerator is always packaged as single units, therefore a whole case of the refrigerator will only contain a single refrigerator item. On the other hand, beer bottles are often packaged in crates. A beer crate (whole case) can consist of many beer bottles (single item)
1480

Create Products

  • To create the Products, first you need to navigate to the Products > Inventory tab
  • You have two methods to create the Products: Webform and Excel import file

Product Information Fields

  • Below are all the information fields of the Products of this model

📘

Apart from the information fields described below, other information fields can be left blank during the creation/update processes

Information fieldDescription & Input Rules
Organization
(Webform)
(Required)
1. Description:
The Organization (Of Depot/Sun/Crossdock types) which directly manages the inventory of the Product being created
2. Input rules:
Click on this field. Input the Organization Name/Organization Code of the appropriate Depot/Sun/Crossdock into the search bar then select it from the drop-down menu
Note:
The Organization Name/Organization Code can be found under the columns of the same name in the "Organizations > Organizations" tab
This field is not present in the Excel import file. When you use the Excel import file to create the Products, you will have to perform additional steps which will be covered below
Product Category (Webform); Product Category Code (Excel import file)
(Required)
1. Description:
The product category in which the product being created belongs
2. Input rules:
Web form:
Click on this field and choose the suitable value from the drop down menu
Excel template:
Copy the appropriate Product Category Code on Web app, then paste into this cell
The category code can be found under "Category Code" column in "Products > Product Categories" tab
Product Code
(Webform + Excel import file)
(Required)
1. Description:
The management code assigned to the Product being created
2. Input rules:
Format: Can contain letters, numbers, special characters. Must not contain spaces
For example: "Product 01" is not acceptable; "Product_01" is acceptable
Parent Product Code
(Excel import file)
(Required)
1. Description:
The Product Code of the upper-level Product (If any) of the Product being created
One Product can have only one upper-level Product
2. Input rules:
If the Product being created has an existing upper-level Product, copy the Product Code of the upper-level Product on the Web app then paste it into this cell
If the Product being created doesn't have an upper-level Product, copy the value in that Product's Product Code then paste it into this cell, do not leave this cell blank otherwise you would not be able to import the Excel file onto the system
Product Name
(Webform + Excel import file)
(Required)
1. Description:
Product name of the product being created
2. Input rules:
Format: Free-form
Items Per Case
(Webform + Excel import file)
(Required)
1. Description:
Number of single items in a whole case, if the product being created is normally stored in a case
2. Input rules:
Format: Integer number only. The value must be larger than or at least equal to 1
Input the value in numbers. Do not input the unit
For example: A beer crate has twenty four single bottles. Input the following value into the field/cell: 24
Notes when using Web form:
If you accidentally leave this cell blank or input the value "0", the system will automatically fill the value "1"
Case Price
(Webform + Excel import file)
(Required)
1. Description:
Price of a whole case of the product being created
2. Input rules:
Input the value in numbers. Do not input the unit
For example: The product being created has the Case price to be two hundred dollars per case. Input the following value into the field/cell: 200
Item Price
(Webform + Excel import file)
(Required)
1. Description:
Price of a single item of the product being created, if the sales orders include single items of that product, not just whole cases
2. Input rules:
Input the value in numbers. Do not input the unit
For example: The product being created has the Item price to be forty dollars per item. Input the following value into the field/cell: 40
Product Discount
(Web form)
(Optional)
1. Description:
The money value to be subtracted from the total value of any Sales order that includes the product being created
This value is fixed, regardless of the quantity of whole case/single items being loaded
2. Input rules:
Input the value in numbers. Do not input the unit
For example: You want to discount two dollars from the total value of any sales order that includes the product being created. Input the following value into the field/cell: 2
If there is no discount, input the following value into the field/cell: 0
Weight (kg)
(Webform + Excel import file)
(Required)
1. Description:
Weight (In kilogram, or kg) of a Case of the product being created
2. Input rules:
Input the value in numbers. Do not input the unit
If the value is a decimal, separate the whole number part and the fractional part by a decimal point. Do not use comma
For example: The weight of a case is zero point eight kilogram. Input the following value into the field: 0.8
Volume (m3)
(Webform + Excel import file)
(Required)
1. Description:
Volume (In cubic meter, or m3) of a Case of the product being created
2. Input rules:
Input the value in numbers. Do not input the unit
If the value is a decimal, separate the whole number part and the fractional part by a decimal point or a comma, based on the setting of your computer
For example: The volume of a case is zero point eight m3. Input the following value into the field/cell: 0.8
Length (m)
(Webform + Excel import file)
(Optional)
1. Description:
Length of a whole case of the product being created
Unit: Meter (m)
2. Input rules:
Input the value in numbers. Do not input the unit
If the value is a decimal, separate the whole number part and the fractional part by a decimal point or a comma, based on the setting of your computer
For example: The length of a case is zero point eight meter. Input the following value into the field/cell: 0.8
If you do not have data of this field, just leave the field/cell blank
Note:
If the configuration "Oversized Goods Restriction" of the Manufacturer is enabled, this field/cell will become required, and the value input must be larger than 0
Width (m)
(Webform + Excel import file)
(Optional)
1. Description:
Width of a whole case of the product being created
Unit: Meter (m)
2. Input rules:
Input the value in numbers. Do not input the unit
If the value is a decimal, separate the whole number part and the fractional part by a decimal point or a comma, based on the setting of your computer
For example: The width of a case is zero point eight meter. Input the following value into the field/cell: 0.8
If you do not have data of this field, just leave the field/cell blank
Note:
If the configuration "Oversized Goods Restriction" of the Manufacturer is enabled, this field/cell will become required, and the value input must be larger than 0
Height (m)
(Webform + Excel import file)
(Optional)
1. Description:
Height of a whole case of the product being created
Unit: Meter (m)
2. Input rules:
Input the value in numbers. Do not input the unit
If the value is a decimal, separate the whole number part and the fractional part by a decimal point or a comma, based on the setting of your computer
For example: The height of a case is zero point eight meter. Input the following value into the field/cell: 0.8
If you do not have data of this field, just leave the field/cell blank
Note:
If the configuration "Oversized Goods Restriction" of the Manufacturer is enabled, this field/cell will become required, and the value input must be larger than 0
On-hand Quantity
(Webform + Excel import file)
(Required)
1. Description:
Quantity of whole cases of the product being created. Value in this field will show up under the "On-Hand" column in "Products > Inventory" tab
2. Input rules:
Input the value in numbers. Do not input the unit
For example: The product being created has two hundred cases in the warehouse. Input the following value into the field/cell: 200
Unit (Webform); Unit (Excel import file)
(Required)
1. Description:
The unit of measure for the product being created
2. Input rules:
Format: Text
For example: The product being created is beer crate. Input the following value into the field/cell: Crate
Conversion Unit
(Webform + Excel import file)
(Optional)
This information field is only used for VRP - Transporters to Create Routes Model
1. Description:
Conversion ratio from the unit of measure of the product being created to a default unit of measure specified by the management organization
This field is used to calculate the price of Transport service by product
2. Input rules:
Input the value in numbers. Do not input the unit
For example: The default unit of measure specified by your organization is Pack. If the unit of measure of the product being created is Crate, around 2.5 times larger in volume (or other attributes, depends on how the management organization specifies) than Pack, input the following value into the field/cell: 2.5
Start Date
(Webform + Excel import file)
(Required)
1. Description:
The date on which the Product being created is officially started being produced
2. Input rules:
Format: mm/dd/yyyy (Month/Date/Year)
Webform:
Input directly into this field or click on the calendar icon and select the appropriate date on the drop-down calendar
Excel template:
Input the appropriate date into this cell following the Month/Date/Year mm/dd/yyyy format, similar to the Webform
End Date
(Webform + Excel import file)
(Required)
1. Description:
The date on which the Product being created is officially stopped being produced
2. Input rules:
Same as the Start Date field
Important Note:
If the current date on your computer is a later date compared to the End Date, the Product will be hidden on the "Products > Inventory" tab. Therefore, when you create the Products, make sure to input a distant future date into this field/cell to avoid the Products become invisible undesirably
Product Temperature (Webform); Temperature (Excel import file)
(Required)
1. Description:
The temperature level of the Product being created
There are three default Product temperature levels: Ambient; Chilled; Frozen
Read more about this configuration in the following article: Cold Chain
2. Input rules:
Web form:
Tick the respective radio box of the appropriate temperature level
Excel import file:
Input only one of the following values into this cell: F, A, C
The above three letters represent the following temperature levels, respectively: Frozen, Ambient, Chilled
Properties (Webform); Variant Property (Excel import file)
(Optional)
1. Description:
Special attributes of the product being created, to better manage the product
Each property consists of three information fields:
Property Name: A name assigned to that property
Property Type: Data type of the property: A string of text, A specific date or A number
Property Value: Exact value of the property, only able to input after choosing Property Type
Note:
Each product can have multiple properties
2. Input rules:
Web form:
Click on this icon to add one property:
Input value into the fields of the property sequentially from left to right
Excel template:
Input the property into the cell in the format below:
Property Name : Property Type : Property Value
(Notice there is a space on each side of the colon)
Property Name: Input name of the property, similar to Web form
Property Type: Input either of these numbers: 1, 2, 3
These numbers represent these values in Web form respectively: Text, Date, Number
Property Value: Input the value of the property, similar to Web form
Note:
If there are multiple properties, two adjacent properties will be separated by a vertical line, with a space on each side of the vertical line
For example:
Color : 1 : Red | Expiry : 2 : 12/20/2018
Means there are two properties:
First property:
Property Name: Color
Property Type: Text
Property Value: Red
Second property:
Property Name: Expiry
Property Type: Date
Property Value: 12/20/2018
Product Serial
(Excel import file)
(Optional)
1. Description:
The serial number of the product being created
2. Input rules:
Format: Free-form
Tracking By
(Webform + Excel import file)
(Optional)
1. Description:
This information field is only used for VRP - Outsourcing fleet Model
2. Input rules:
Web form:
Always click on the following radio box: No Tracking
Excel template:
Just leave this cell blank
Number Of Layers
(Webform + Excel import file)
(Optional)
1. Description:
Specify the maximum number of product cases (layers) of the product being created that can be stacked on top of one another inside the vehicle's container
2. Input Rules:
Format: Number
For example: A maximum of one hundred cases of the product can be stacked on top of one another inside the vehicle's container. Input the following value into the field/cell: 100
Notes:
The number of layers can not exceed the following value: 1000
Facets
(Webform + Excel import file)
(Optional)
1. Description:
Specify the facets (sides) of the product case that can be arranged to face the vehicle's container floor when loaded
2. Input Rules:
Web form:
Click on the corresponding checkbox of the sides you want
You can select multiple or all checkboxes
Excel template:
Input only one of the following seven values into this cell: 1; 2; 3; 12; 13; 23; 123
In which:
The value '1' means the Front and Back sides of the product case can face the vehicle container floor
The value '2' means the Left and Right sides of the product case can face the vehicle container floor
The value '3' means the Top and Bottom sides of the product case can face the vehicle container floor

Create products

  • To create new products, you have to navigate to Products > Inventory tab
  • You can create products using two methods: Web form or Excel template

Method 1: Create single product using Web form

  • Please refer to the CRUD functions article to know the general steps about creating single object using web form
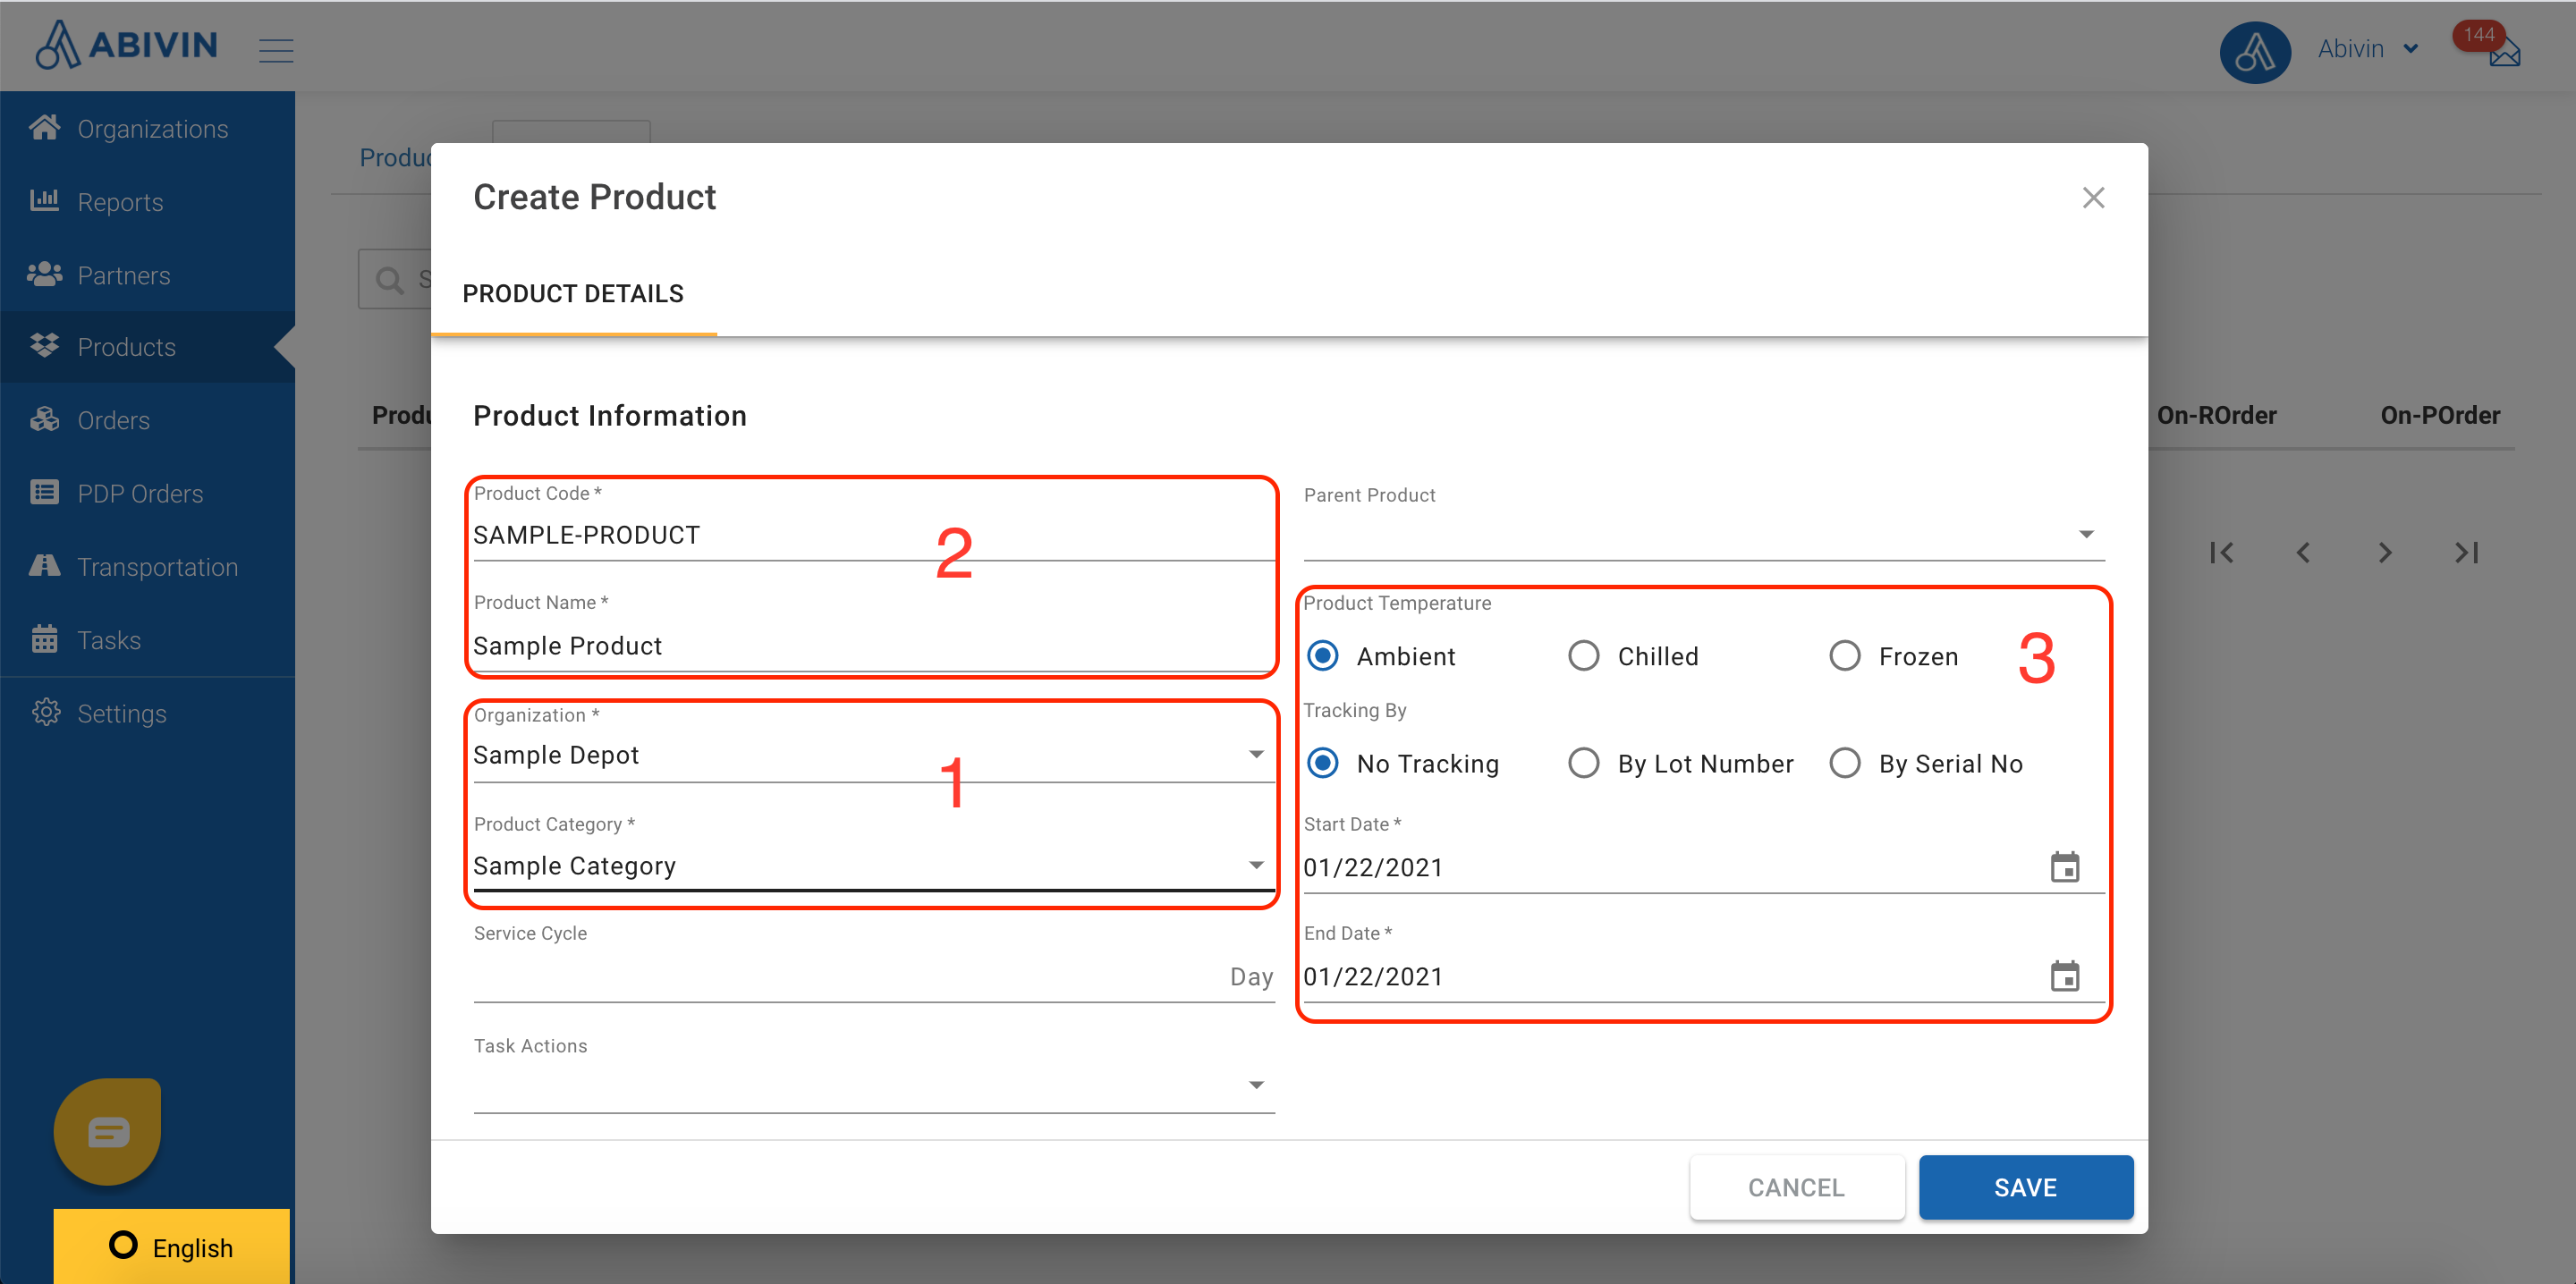
  • During the product creation process, the information fields Organization; Product Category must be input first
951

Method 2: Create multiple products using Excel template

  • This option is used when you want to create multiple products for multiple Depot/Sun/Crossdock at once. Note that the inventory quantity would be the same for every Depot/Sun/Crossdock
  • Please refer to the CRUD functions article to know the general steps about creating multiple objects using Excel template
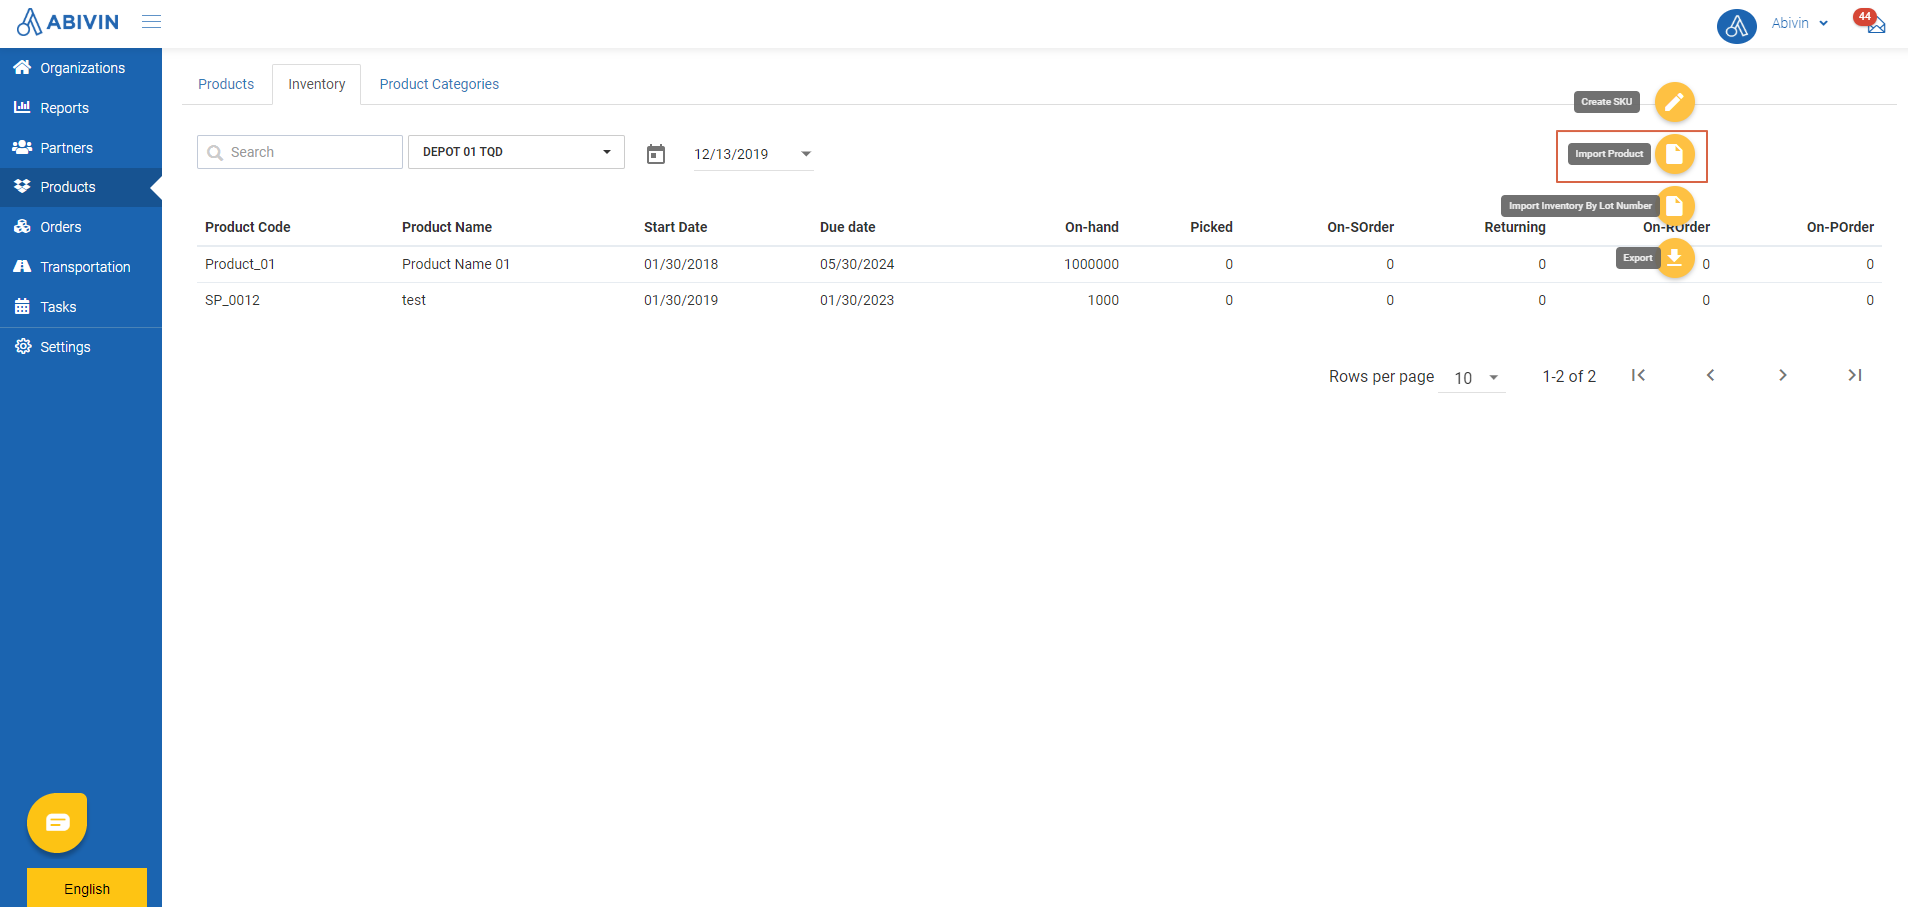
  • Note: You need to click on the icon Import Product to download the correct Excel template Import_Product_Template.xlsx
1908
  • You will notice in the Excel template, there is no Organization field. Upon uploading the Excel template, you have to choose the management Organization for the products being uploaded, as follows:

Scenario 1: Import products inventory for a specific Depot

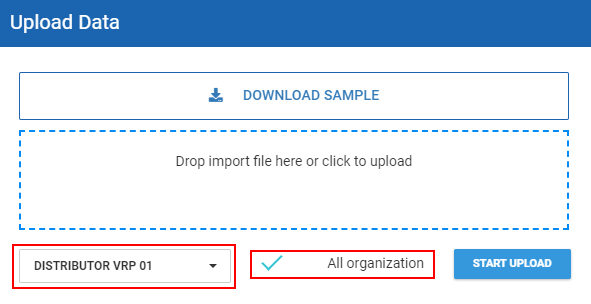
  • To import the inventory for a specific Depot, click on the Organizations field, input the Organization Name/Organization Code of that Depot into the search bar, then select it from the drop down menu. Then, click on Start Upload button. The inventory being uploaded will show up only in the inventory of the selected Depot
591

Scenario 2: Import products inventory for all Depots under the management of a particular Organization

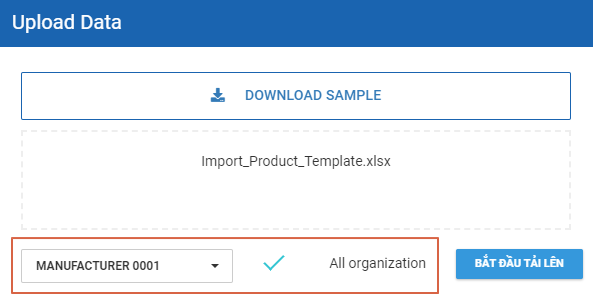
  • If you want to import products inventory for all Depots under the management of a particular Organization, you need to click on the Organizations field, input the Organization Name/Organization Code of that upper level Organization into the search bar, then select it from the drop down menu. Next, click on the All organization check box . When the check box icon turns to , that means the inventory will be updated for all Depots under that Organization. Then, click on Start Upload button. The products being uploaded will show up in the inventory of all Depots under that Organization
593
  • After being created, the products will show up on both Products and Inventory tabs

Notes when creating products using Excel template

  • If you have selected the radio box 3PL for the configuration Business of the Manufacturer, and you want to import products inventory for all Depots under the management of a particular Organization, then you need to make sure that all the Product Categories inside the Excel template have been created for that Organization as well as every Organizations under it

Update product information

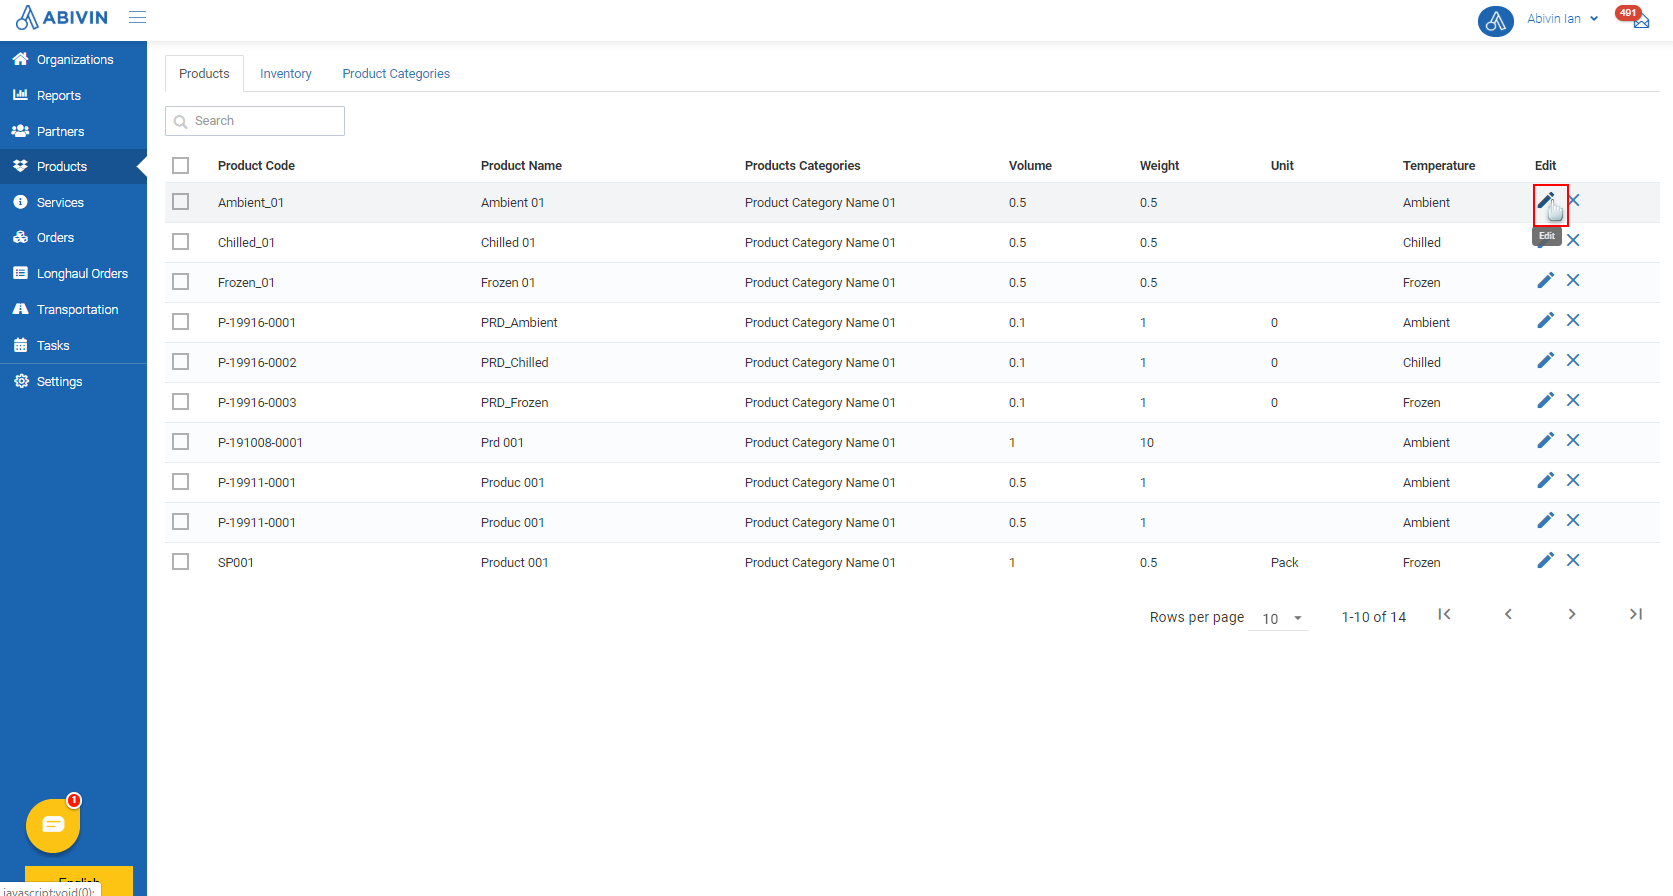
  • Navigate to Products > Products tab
  • Please refer to the CRUD functions article to know the general steps about updating objects in Abivin vRoute
  • Note that you will only be able to update product information in this tab. To update product quantity, please navigate to Products > Inventory tab and follow the instruction in this article: Manage Product Inventory
1673

Delete product

  • Navigate to Products > Products tab
  • Please refer to the CRUD functions article to know the general steps about deleting objects in Abivin vRoute
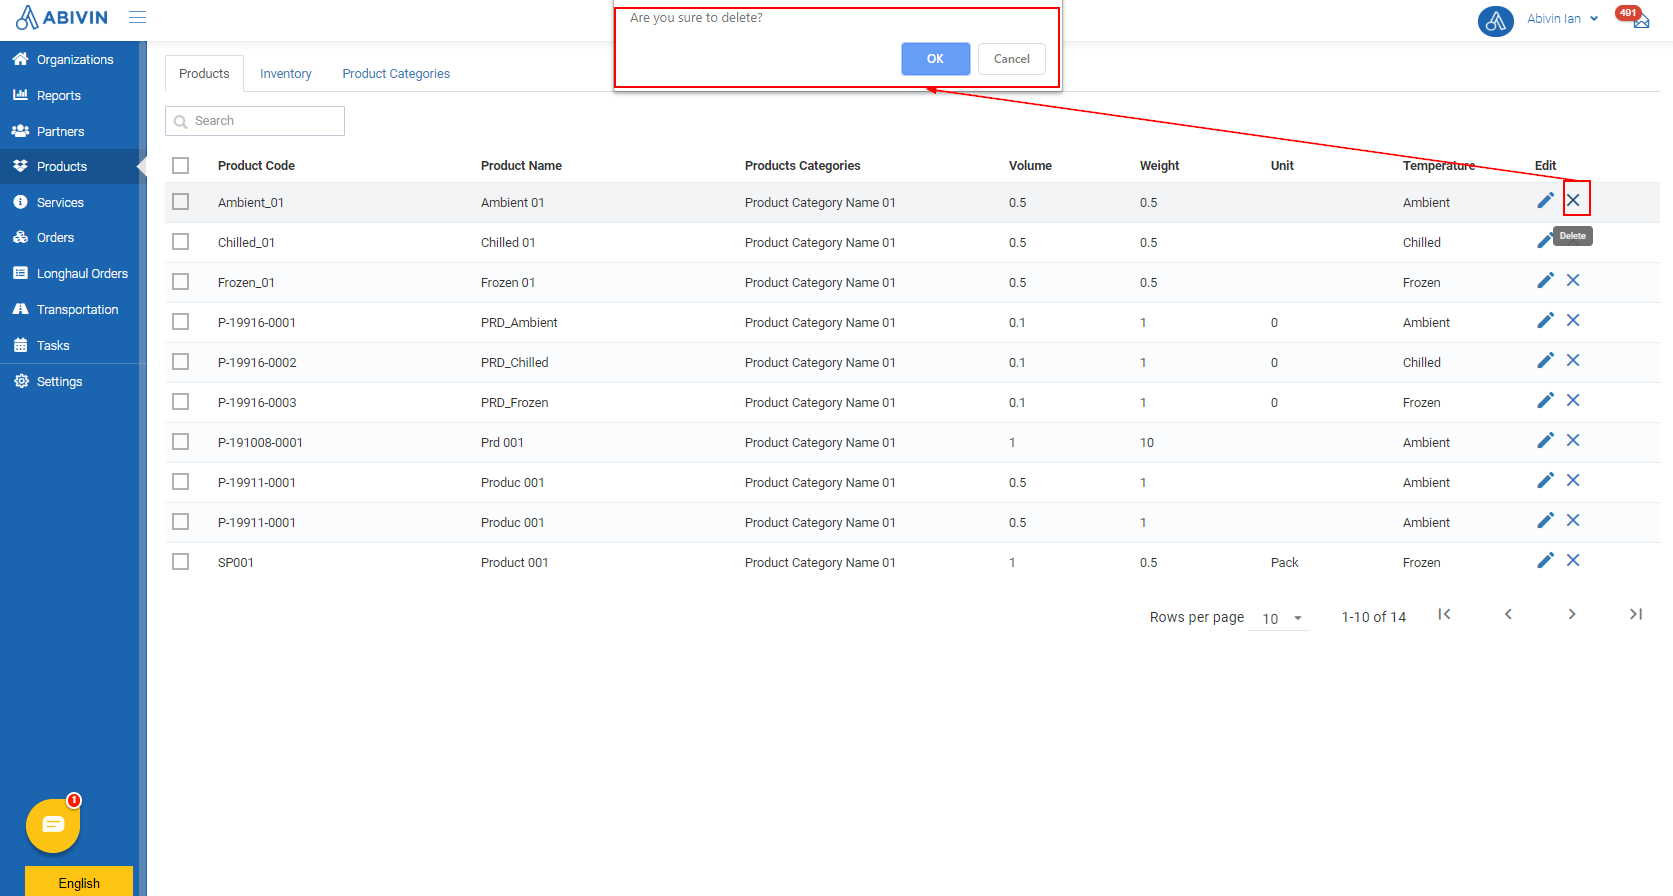
1673

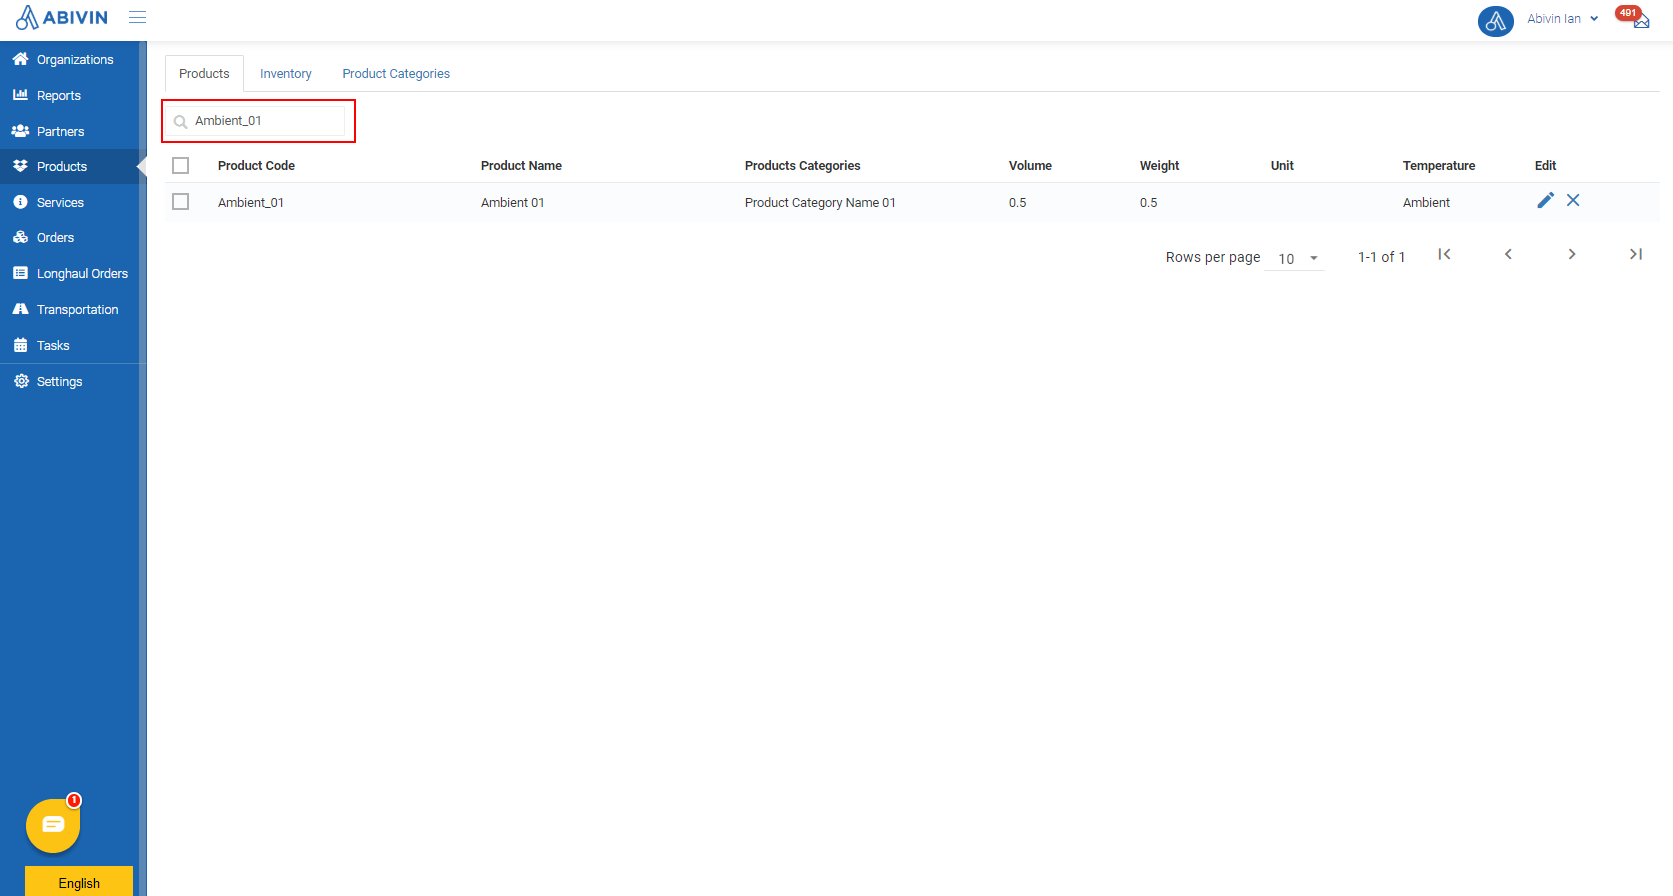
Search product

  • You can search for a specific product by inputing either the Product Code or Product Name of that product into the search field on both the Products and Inventory tabs
1673 1673

Beginner's Guide

Next up is a tutorial on how to create a product for beginners.

Create a Product

  • Below are the steps to creating a single product using Web form:
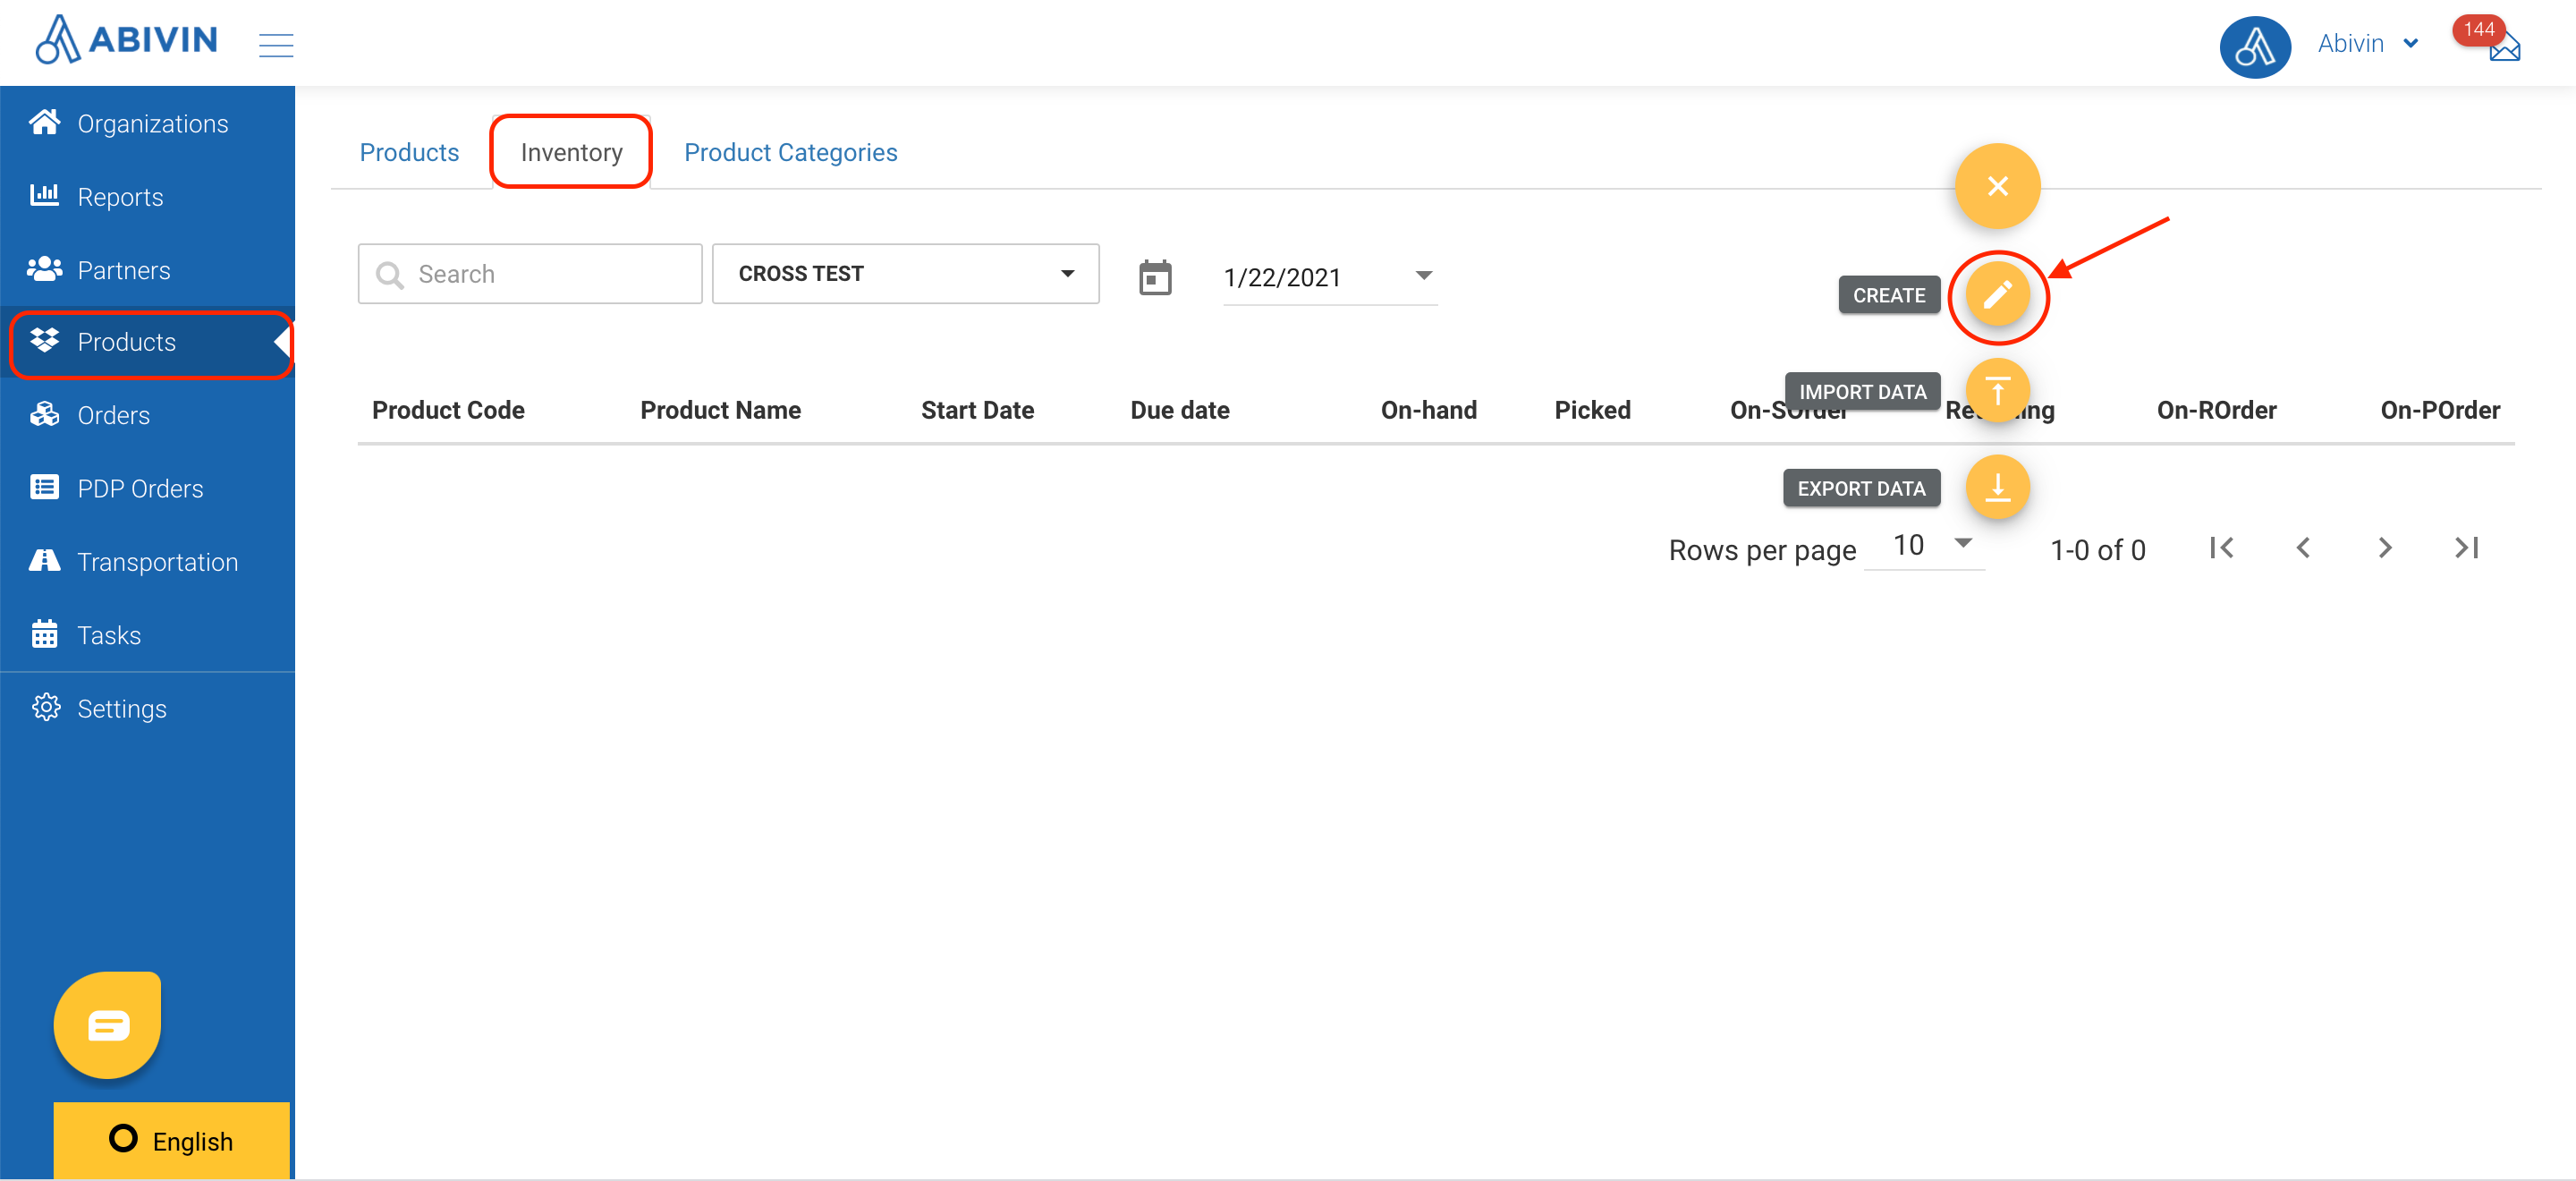
  • Step 1: Navigate to Products > Inventory tab.
  • Step 2: Click on the symbol Create (the symbol).
2880
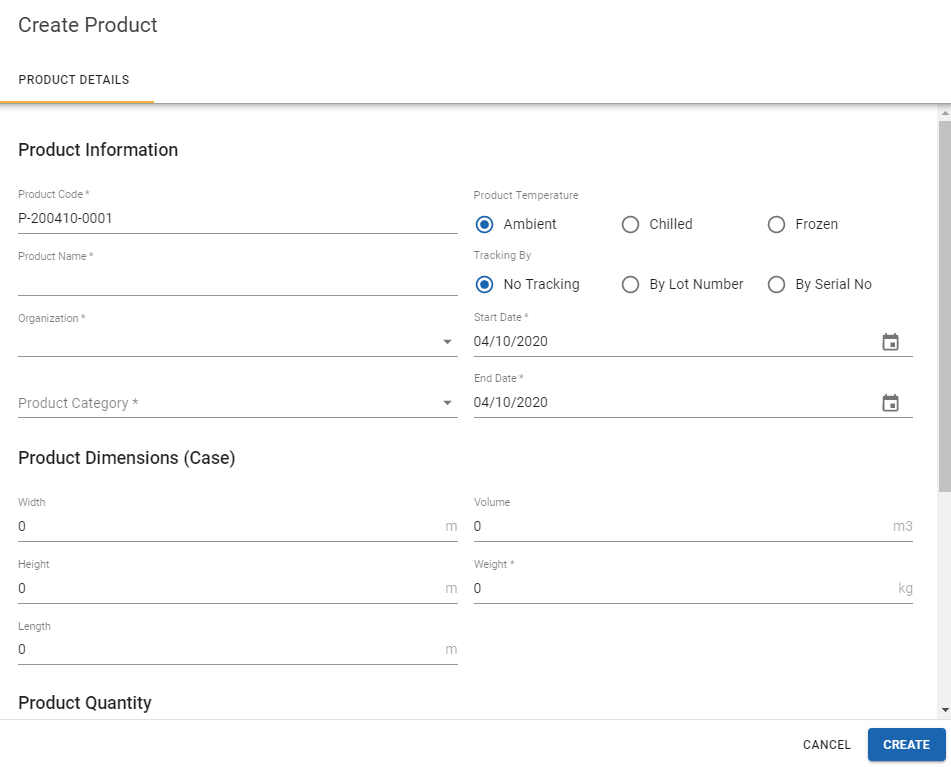
  • Step 3: In the Product Information section, fill in the required fields: (Please note that the Organization; Product Category field must be input first)
  • Product Code: Input the management code assigned to the product being created.
  • Product Name: Input product name of the product being created.
  • Organization: Input the Organization Name/Organization Code of the appropriate Depot/Sun/Crossdock into the search bar, then select from the drop down menu.
  • Product Category: Click on this field and choose the suitable value from the drop down menu.
  • Temperature: Click on the radio box corresponding to the temperature level of the product being created. There are three temperature levels: Ambient; Chilled; Frozen.
  • Tracking by: Always click on the following radio box: No Tracking
  • Start/End Date: Input the date when the product being created officially started/stopped being produced. You can type in mm/dd/yyyy format or choose the date on the drop down calendar by clicking on this icon:
  • Example:
2880
  • Step 4: Complete the Product Dimensions (Case) section:
  • Weight: Input the weight (in kilogram, or kg) of a Case of the product being created.
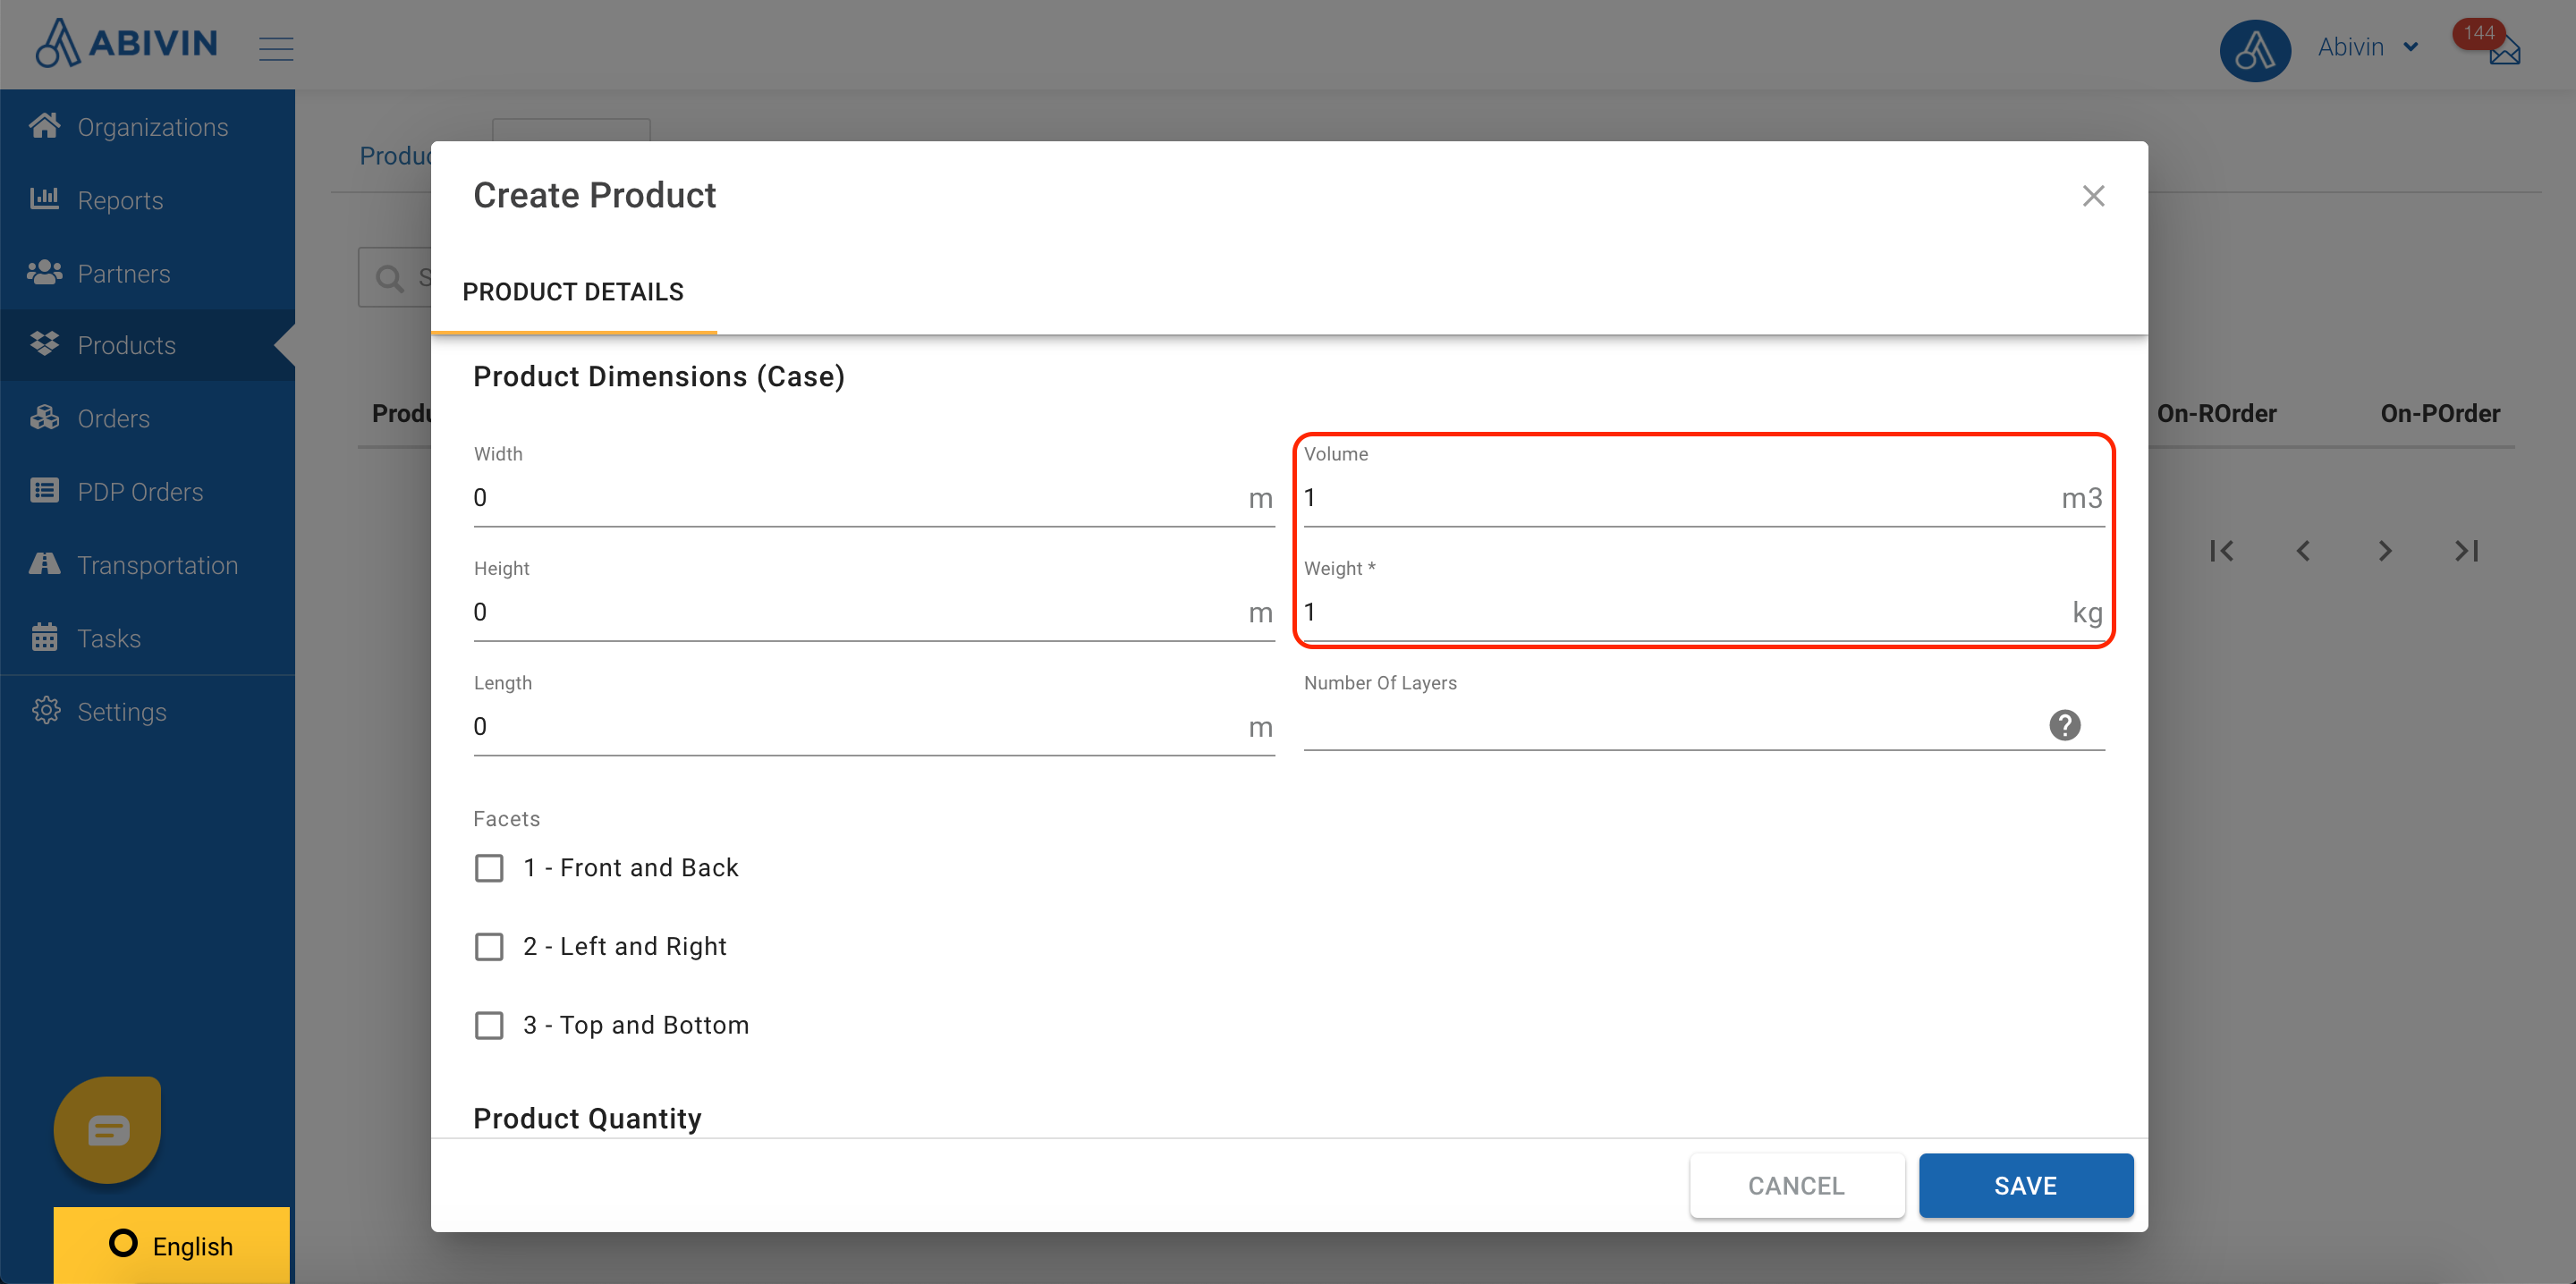
  • Volume: Input the volume (In cubic meter, or m3) of a Case of the product being created.
2880

📘

Note:

If you are using 3D Loading config, you must input below information:

  • Width: the width of the product
  • Height: the height of the product
  • Length: the length of the product
    Facets: These fields determine how the product can be loaded into the
    1 - Front and Back: the front and back sides of the product can be contacted with the ground
    2 - Left and right: the left and right sides of the product can be contacted with the ground
    3 - Top and Bottom: the top and bottom sides of the product can be contacted with the ground
    For example: TV products can only be loaded vertically, we choose 3 - Top and Bottom for TV products, while Battery products can be checked with all 3 options
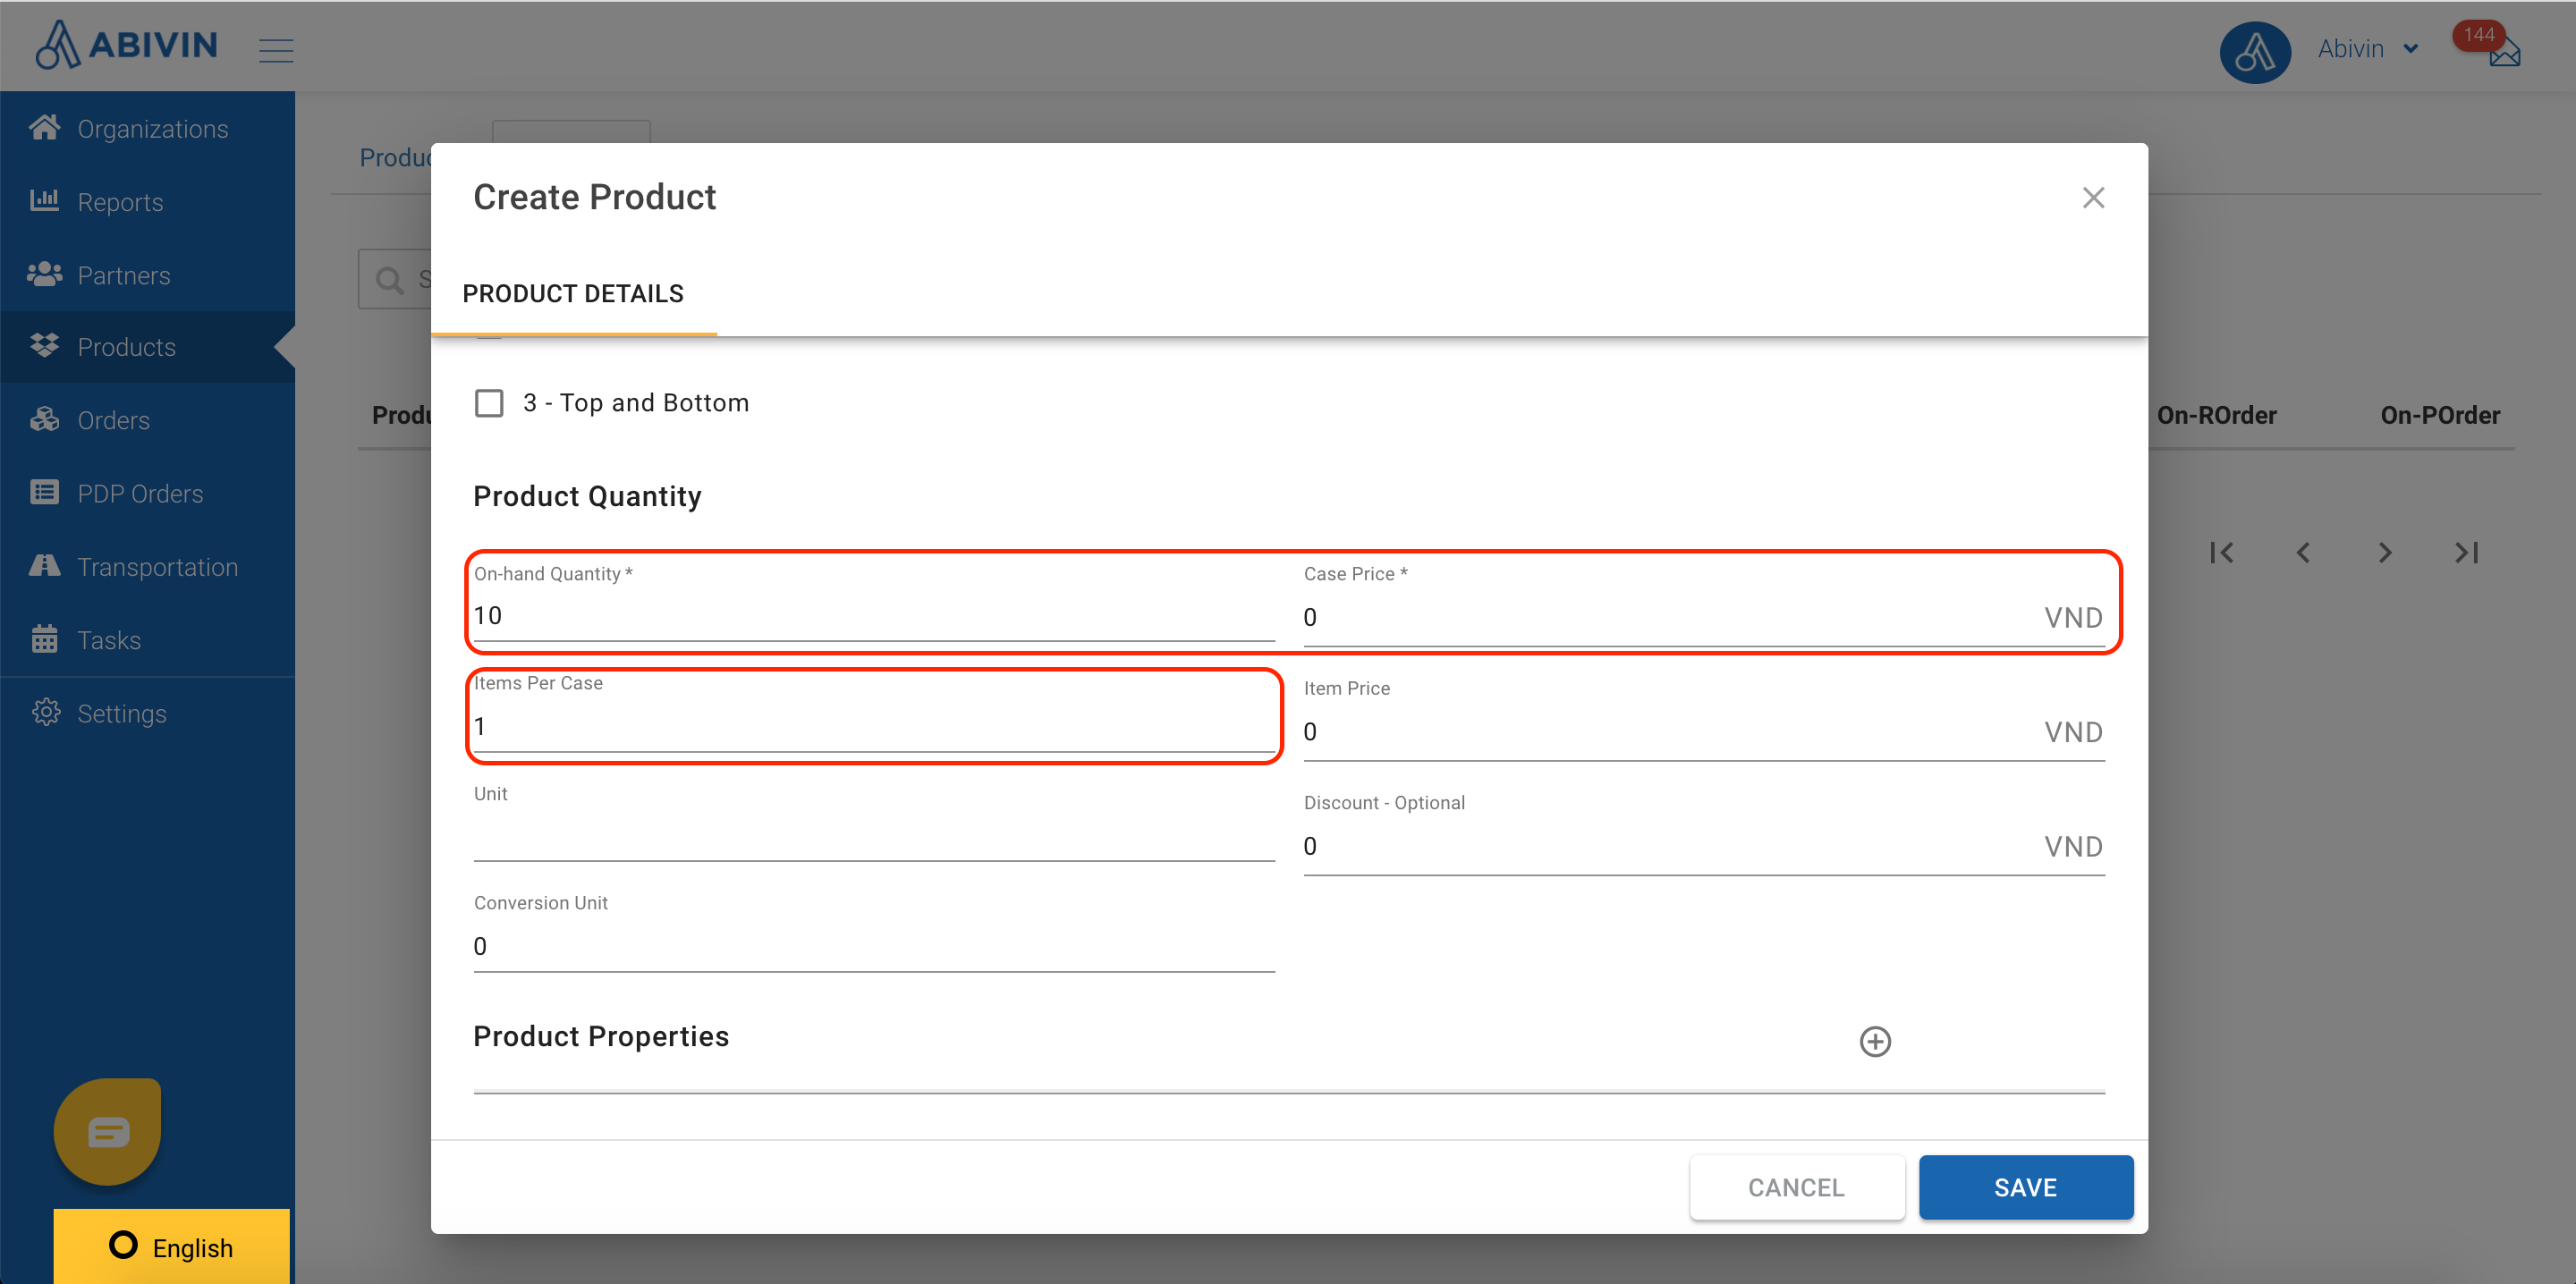
  • Step 5: Input values into the required fields of the Product Quantity section:
  • On-hand Quantity: Input the quantity of whole cases of the product being created.
  • Items Per Case: Input the number of single items in a whole case, if the product being created is normally stored in a case.
  • Case Price: Input the price of a whole case of the product being created.
2880
  • Step 6: Click SAVE.