Manage Organizations (Eng)
Organization Definition
- In Abivin vRoute system, we strive to simulate the actual Organizational chart of the business, so that the users can manage the resources more efficiently
- The Organization resource is created to achieve that. Once you have registered a master account on our system, you can start building your Organizational chart
Organization Types and Hierarchy Chart
- In Abivin vRoute system in general and in this model in particular, the Organizations can be classified into two types based on whether they are required or optional:
- Required Organization Type. The Organization Types that without which your account will not be able to function
- Optional Organization Type. The Organization Types that are not strictly required. You can create them later based on your specific needs
Required Organization Types
Below are the required Organization Types of this model:
- Manufacturer. An Organization Type that represents the Headquarter of your business. This Organization Type will manage all resources. A Manufacturer is the top-level Organization. One account can have only one Manufacturer.
- Branch. An Organization Type that represents the Planning Department. This Organization Type will be in charge of the various configurations and the Route Plan optimization process. A Branch is either the direct lower-level Organization of the Manufacturer or the Distributor (The Distributor is described below). One account can have multiple Branches.
- Depot. An Organization Type that represents the Warehouse. This Organization Type directly manages the resources that are necessary for the delivery activities, such as Products, Customers; Vehicles and Orders. A Depot is the direct lower-level Organization of the Branch. Each Branch can have multiple Depots beneath it.
Optional Organization Types
Apart from the required Organization Types above, there are several optional Organization Types:
- Distributor. This Organization Type represents the regional branch management office. It is useful if your business spans across a wide geographical area and have multiple smaller branches. The Distributor is the direct lower-level Organization of the Manufacturer and the direct upper-level Organization of the Branch. One account can have multiple Distributors. One Distributor can have multiple Branches beneath it
- Sun. Another Warehouse Organization Type, considered as the second-level warehouse below the Depot. The Sun will receive Products from the direct upper-level Depot then distributes them to its own Customer base. A Sun is the direct lower-level Organization of the Depot
Read more about this Organization Type in the following article: Sun - Crossdock. Another Warehouse Organization Type, considered as the second-level warehouse below the Depot. The Crossdock will temporarily store Products from the direct upper-level Depot before distributing them to their Customer base. A Crossdock is the direct lower-level Organization of the Depot
Read more about this Organization Type in the following article: Crossdock - Shipper. This is a special Organization Type. It is used when you set up your account as a third-party logistics service provider (Carrier or Distributor), having business relationships with various suppliers/owners of Products. This Organization Type represents the Product suppliers/owners. A Shipper is the direct lower-level Organization of either the Distributor or the Manufacturer
Read more about this Organization Type in the following article: Shipper
Account Setup Orientation
- In this model, you can set up your account in two orientations: Shipper-oriented and Carrier/Distributor-oriented
Shipper-oriented Account Setup
- You should set up your account in this orientation if you are the Shipper, the supplier/owner of the Products. You have your own vehicle fleet and you use your vehicle fleet to distribute your Products to the distribution channels or the consumers
- This account setup orientation has several characteristics:
- 1 - Organizational chart: Your organizational chart does not need to have the Organizations of Shipper type
- 2 - Product management mechanism: You need to select the Shipper-oriented Product management mechanism, which is described in the Manage Product Categories and Manage Products article
Carrier/Distributor-oriented Account Setup
- You should set up your account in this orientation if you are the Carrier and/or the Distributor, provide third-party logistics services for the Shippers such as transportation and warehousing. You have your own vehicle fleet and you use your vehicle fleet to distribute the Shippers' Products to the distribution channels or the consumers
- This account setup orientation has several characteristics:
- 1 - Organizational chart: Your organizational chart needs to have the Organizations of Shipper type. Each Shipper Organization represents one Shipper with which you has a business relationship
- 2 - Product management mechanism: You need to select the Carrier/Distributor-oriented Product management mechanism, which is described in the Manage Product Categories and Manage Products article
Locate Organization List
- The Organizations are listed on the Organizations > Organizations tab
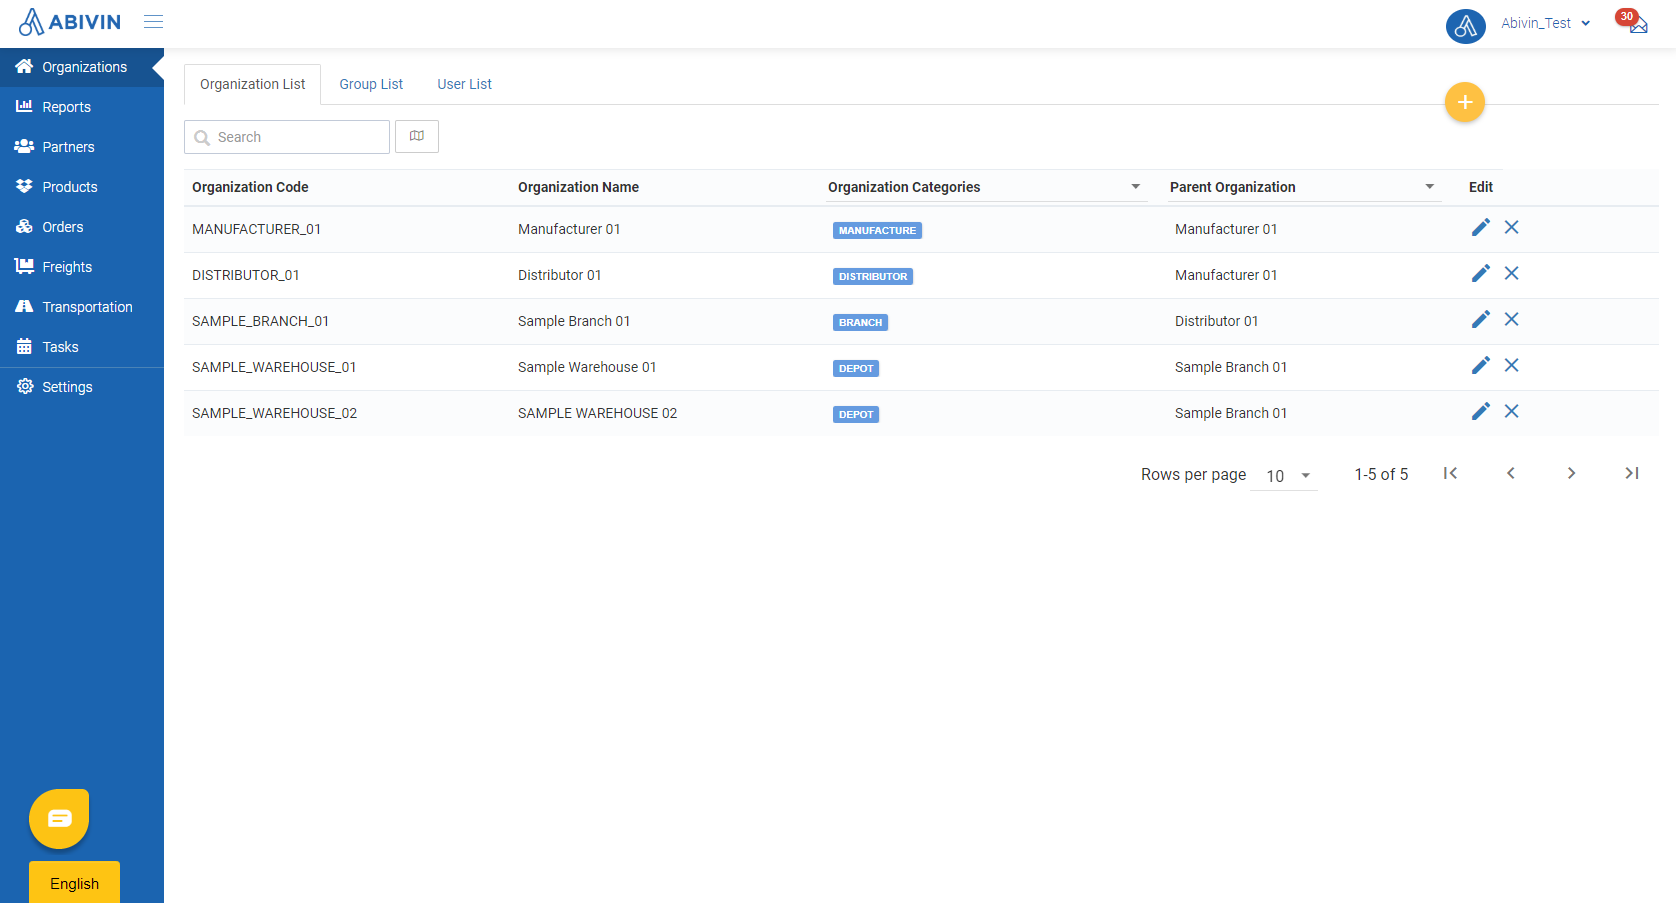
Illustration (English)
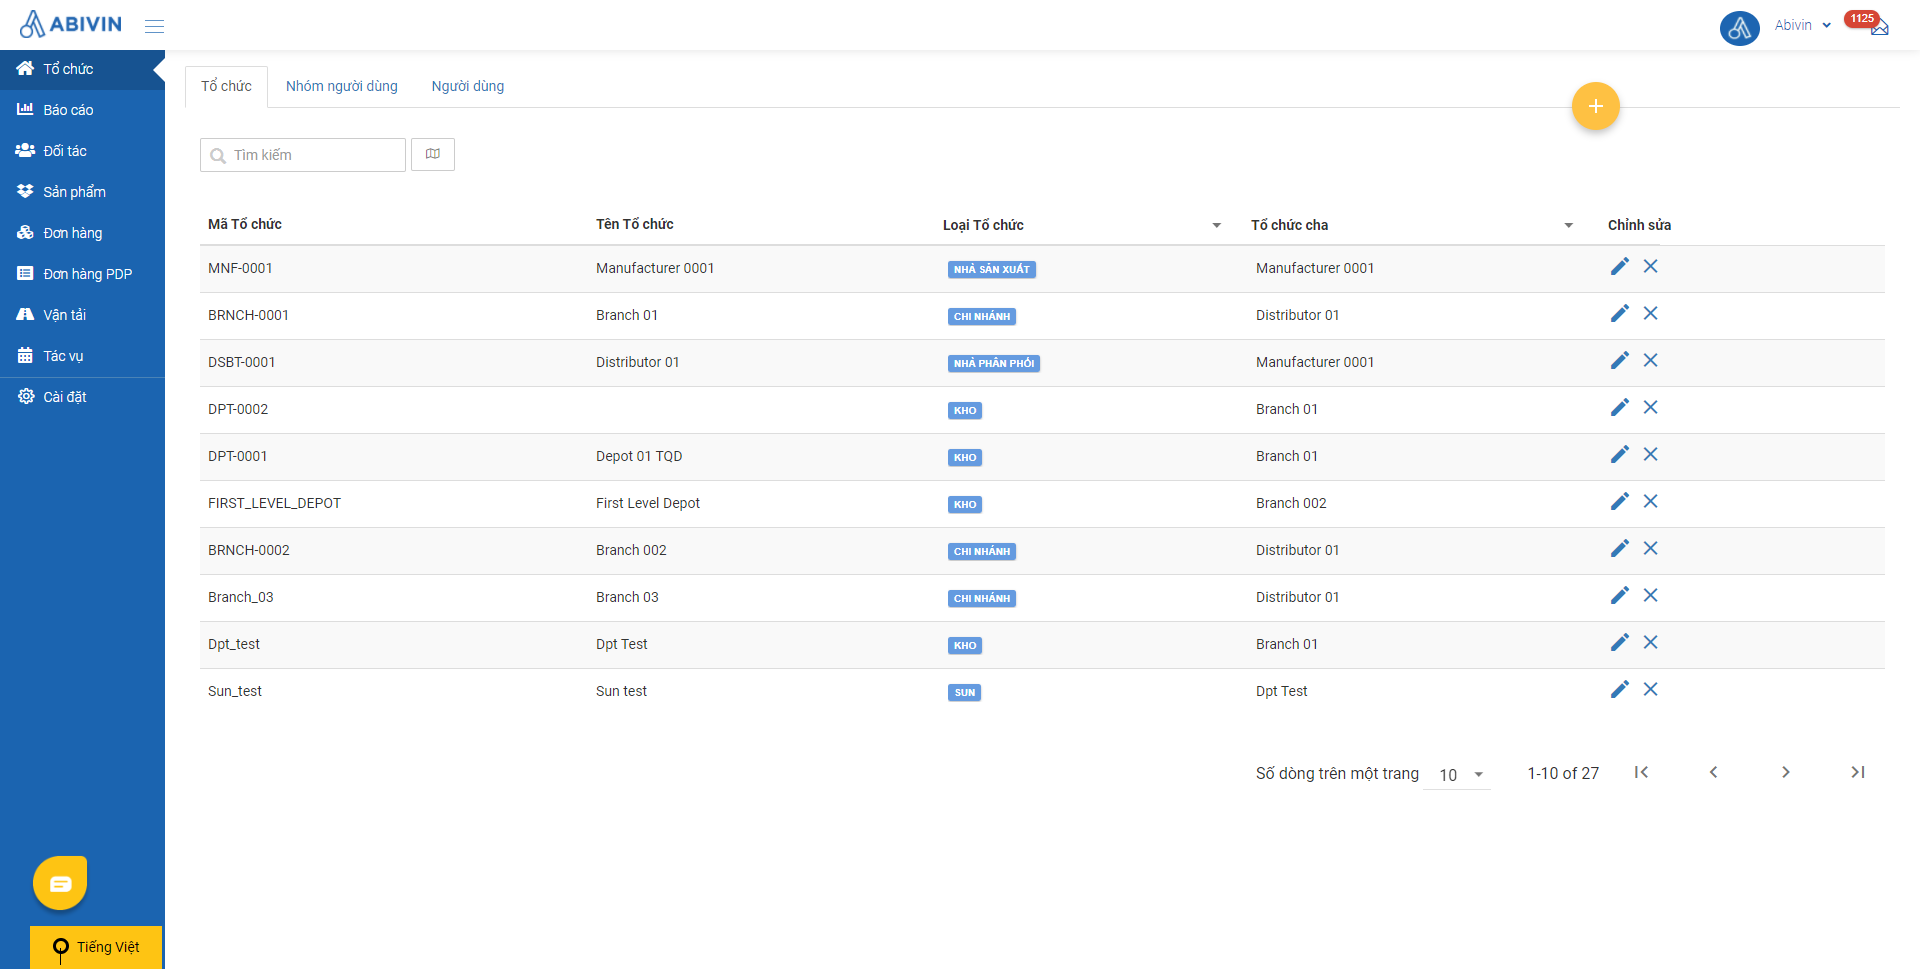
Illustration (Vietnamese)
Create Organizations
- You have two methods to create the Organizations: Webform and Excel import file
Create the Manufacturer
- The Manufacturer is the first Organization you have to create. This Organization can only be created using the Webform
- To create the Manufacturer, follow the steps below
- Step 1: On the Organizations > Organizations tab (The screen that you see right after logging in to your newly created account), hover over the circle plus icon then click the Create icon
- Step 2: On the Create Organization Webform, input the Organization Code and the Organization Name of the Manufacturer into the Organization Code and Organization Name fields then click Save
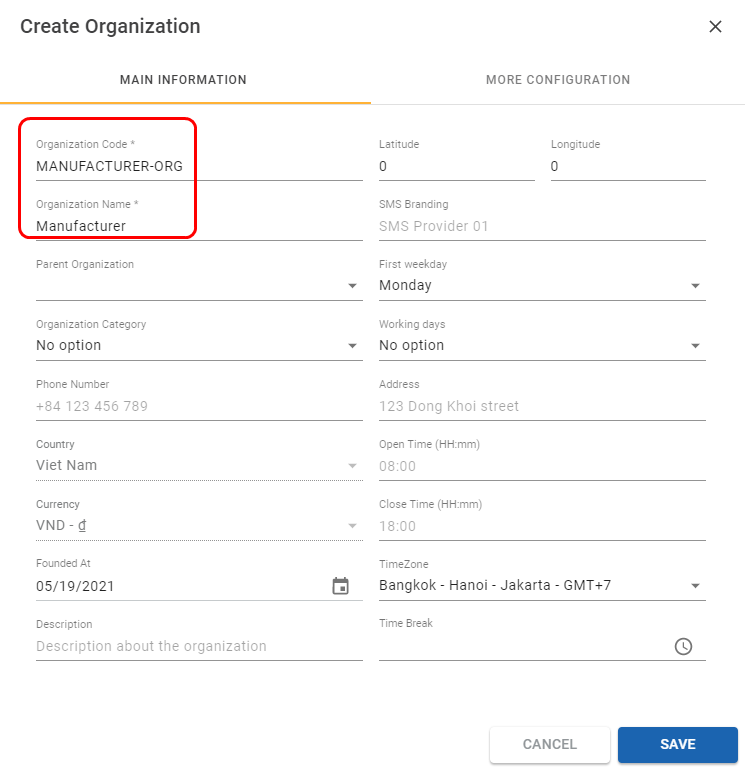
Illustration (English)
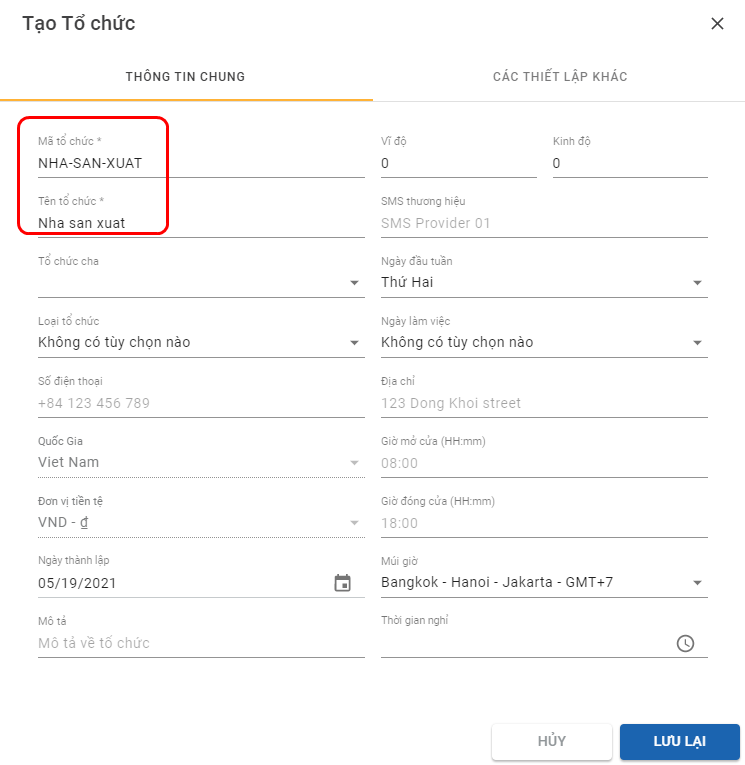
Illustration (Vietnamese)
- After the Manufacturer has been created, click its Edit icon . On the Update Organization form, click on the Parent Organization field and select itself as its own Parent Organization. Next, click on the Organization Categories field, select the Manufacturer Organization Type from the drop-down menu. Click Save to confirm the change
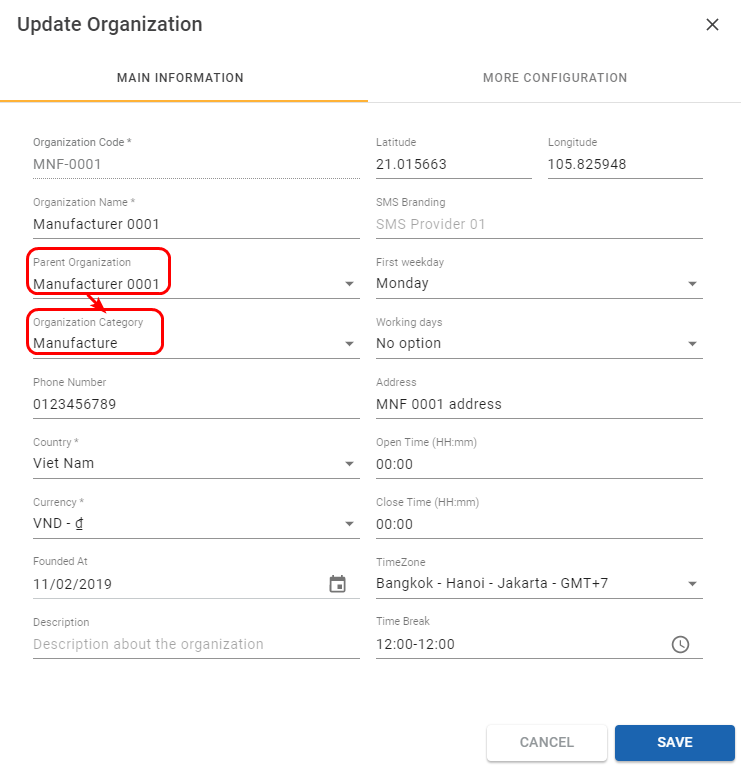
Illustration (English)
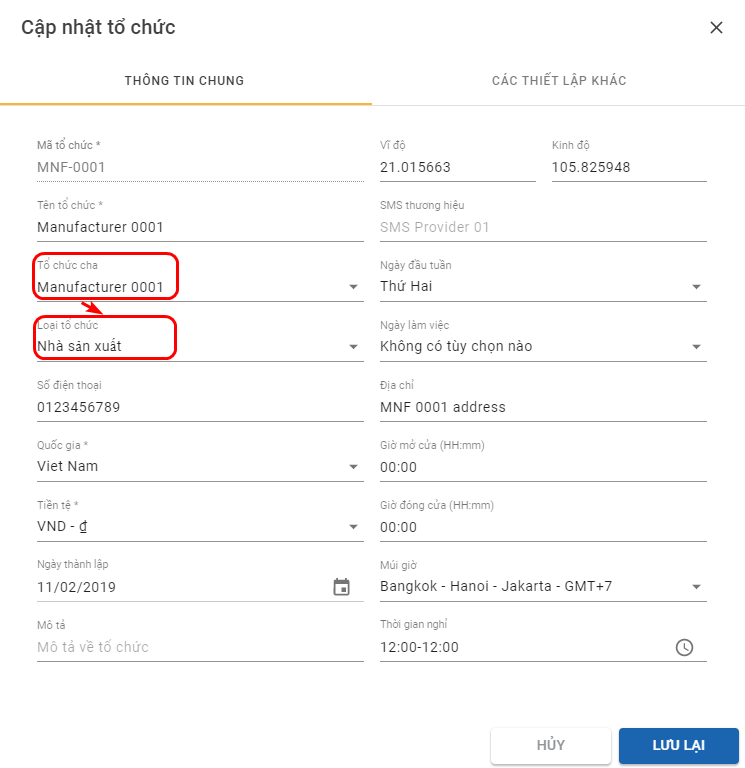
Illustration (Vietnamese)
- Now the Manufacturer has been fully set up. You can move on to create other lower-level Organizations using either the Webform or the Excel import file
Create Lower-level Organizations
- After the Manufacturer has been created, you can create other lower-level Organizations using either the Webform or the Excel import file
- If you create the Organizations using the Excel import file, there are some notes that you should be aware of:
- 1 - When you create the direct lower-level Organizations of the Manufacturer - The Distributor or the Branch, you must copy the exact Organization Code of the Manufacturer on the Web app then paste that value into the Parent Organization Code cell of the Distributor/Branch being created in the Excel import file
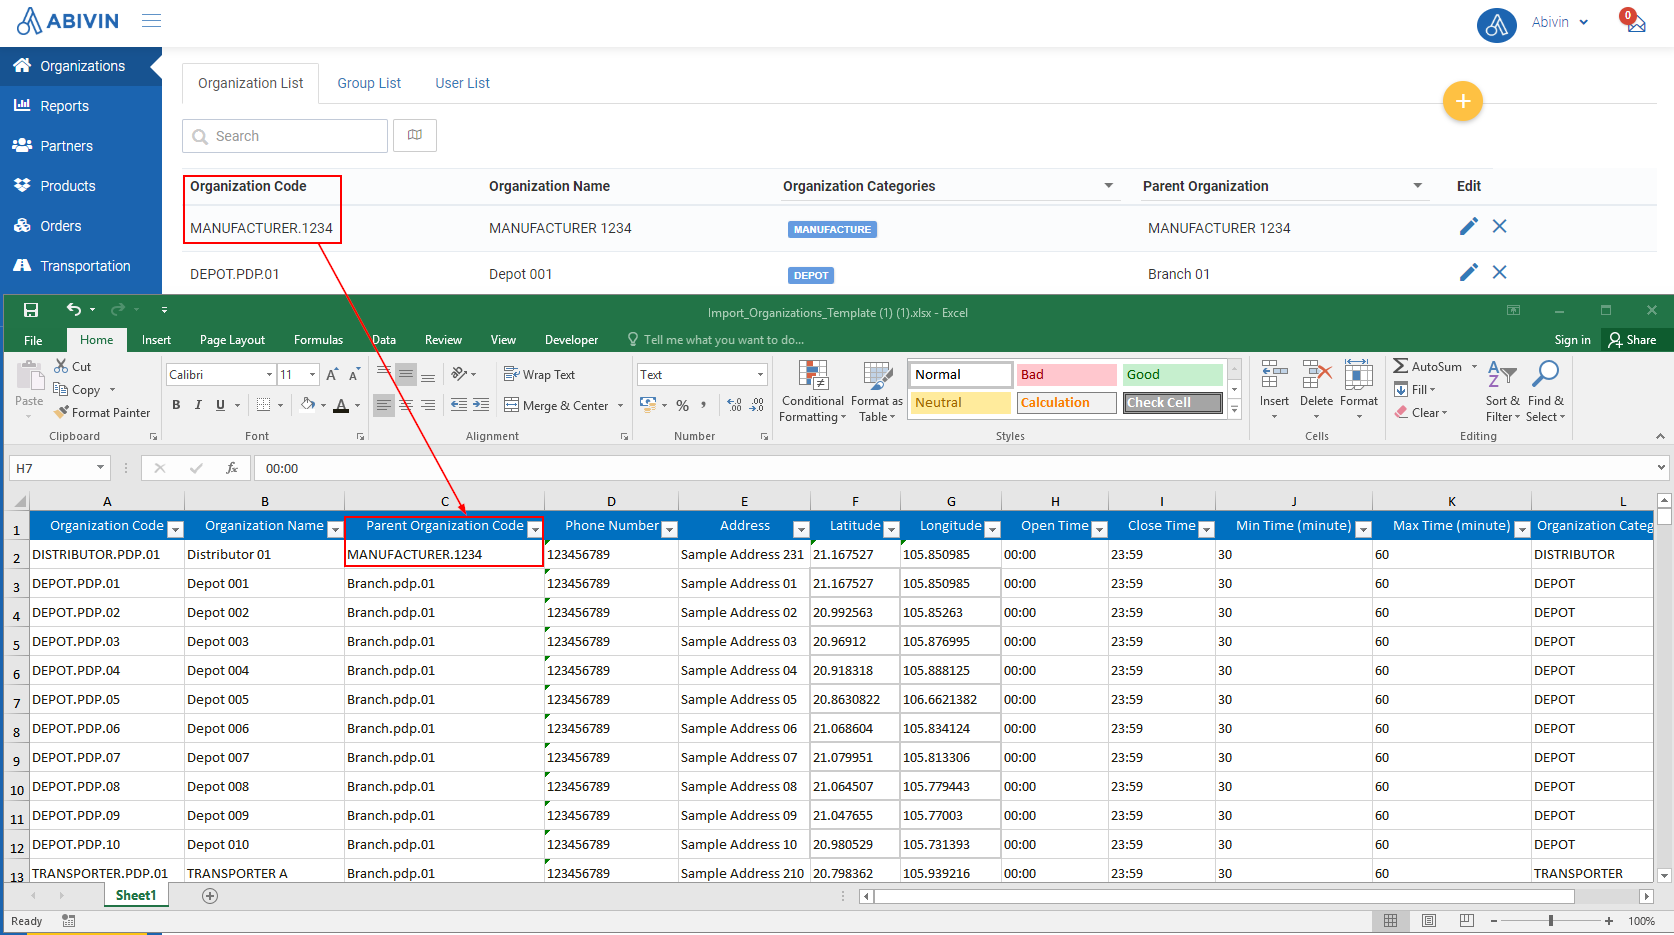
Illustration (English)
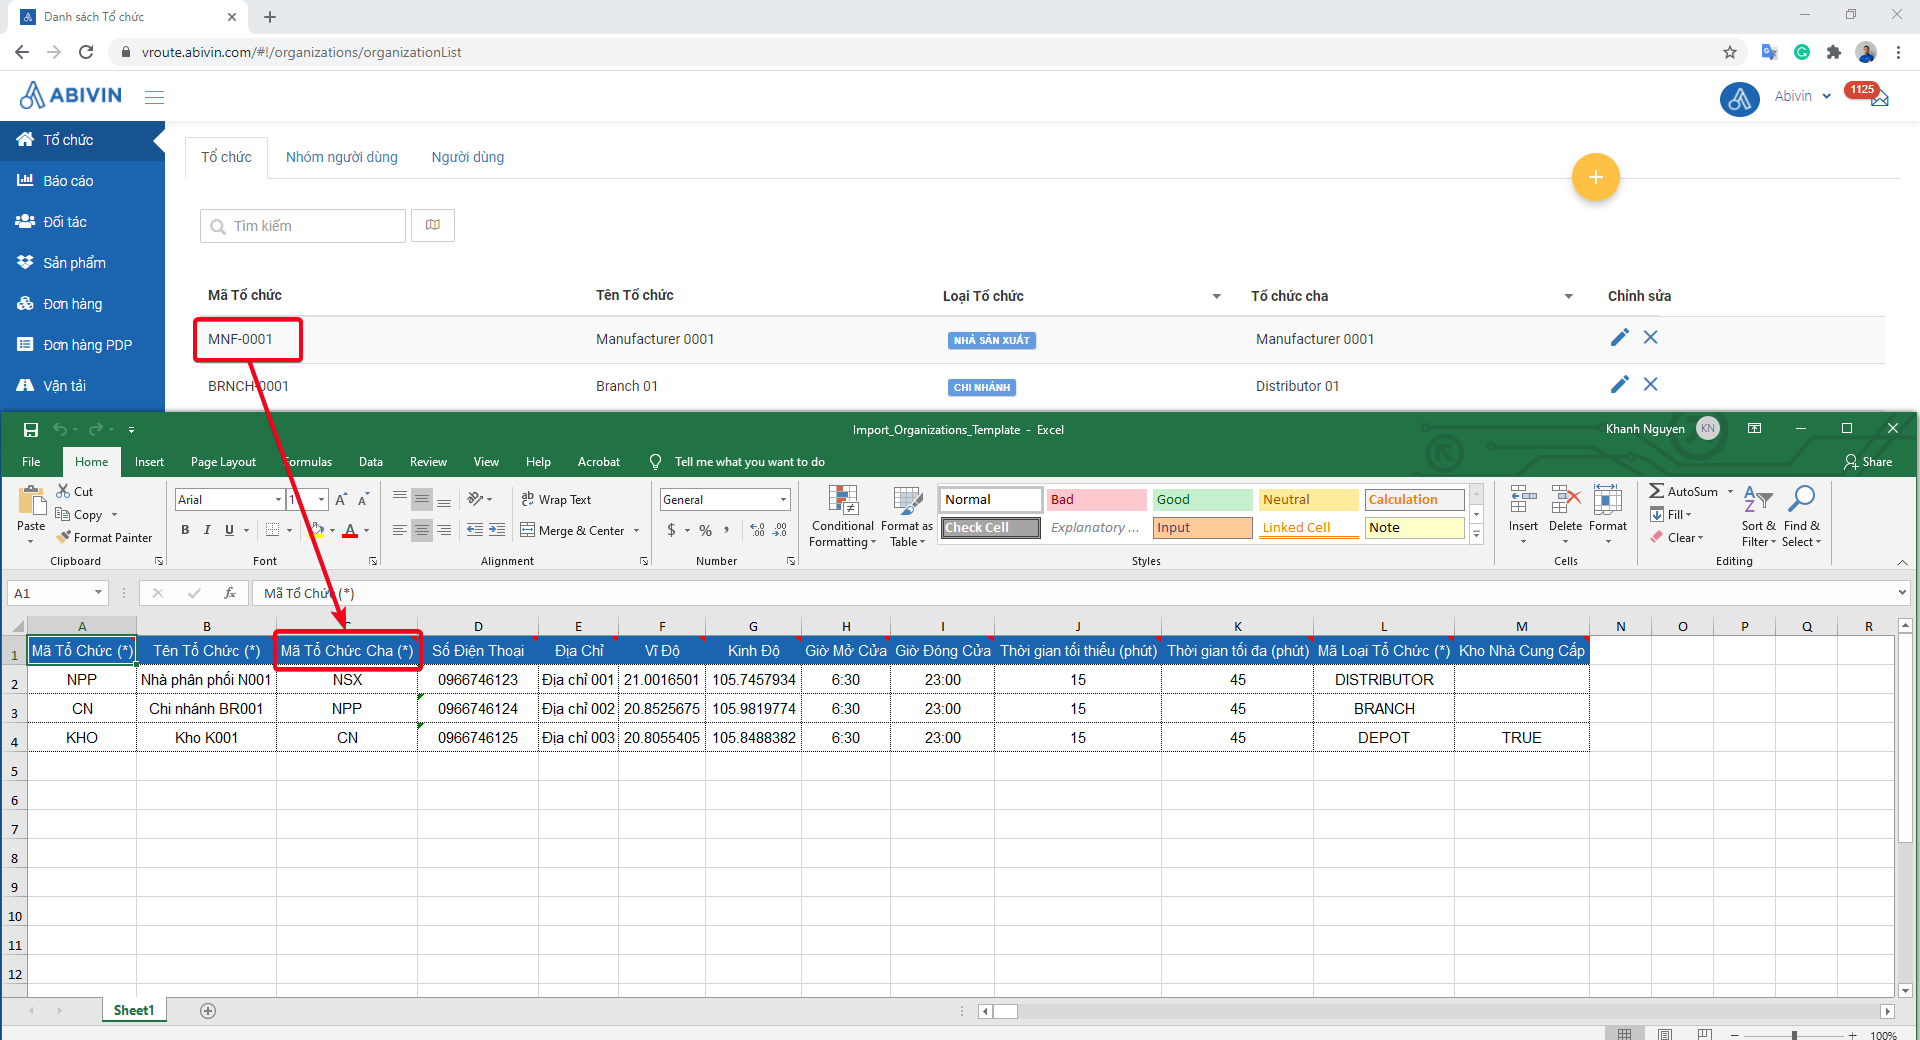
Illustration (Vietnamese)
- 2 - When you create the Organizations that have yet to exist on the Web app, follow this step to create the parent-child relationship between an upper-level Organization and its direct lower-level Organizations (For example, a Branch and its Depot) in the Excel import file: Copy the Organization Code of the upper-level Organization from its Organization Code cell then paste that value into the Parent Organization Code cells of its direct lower-level Organizations
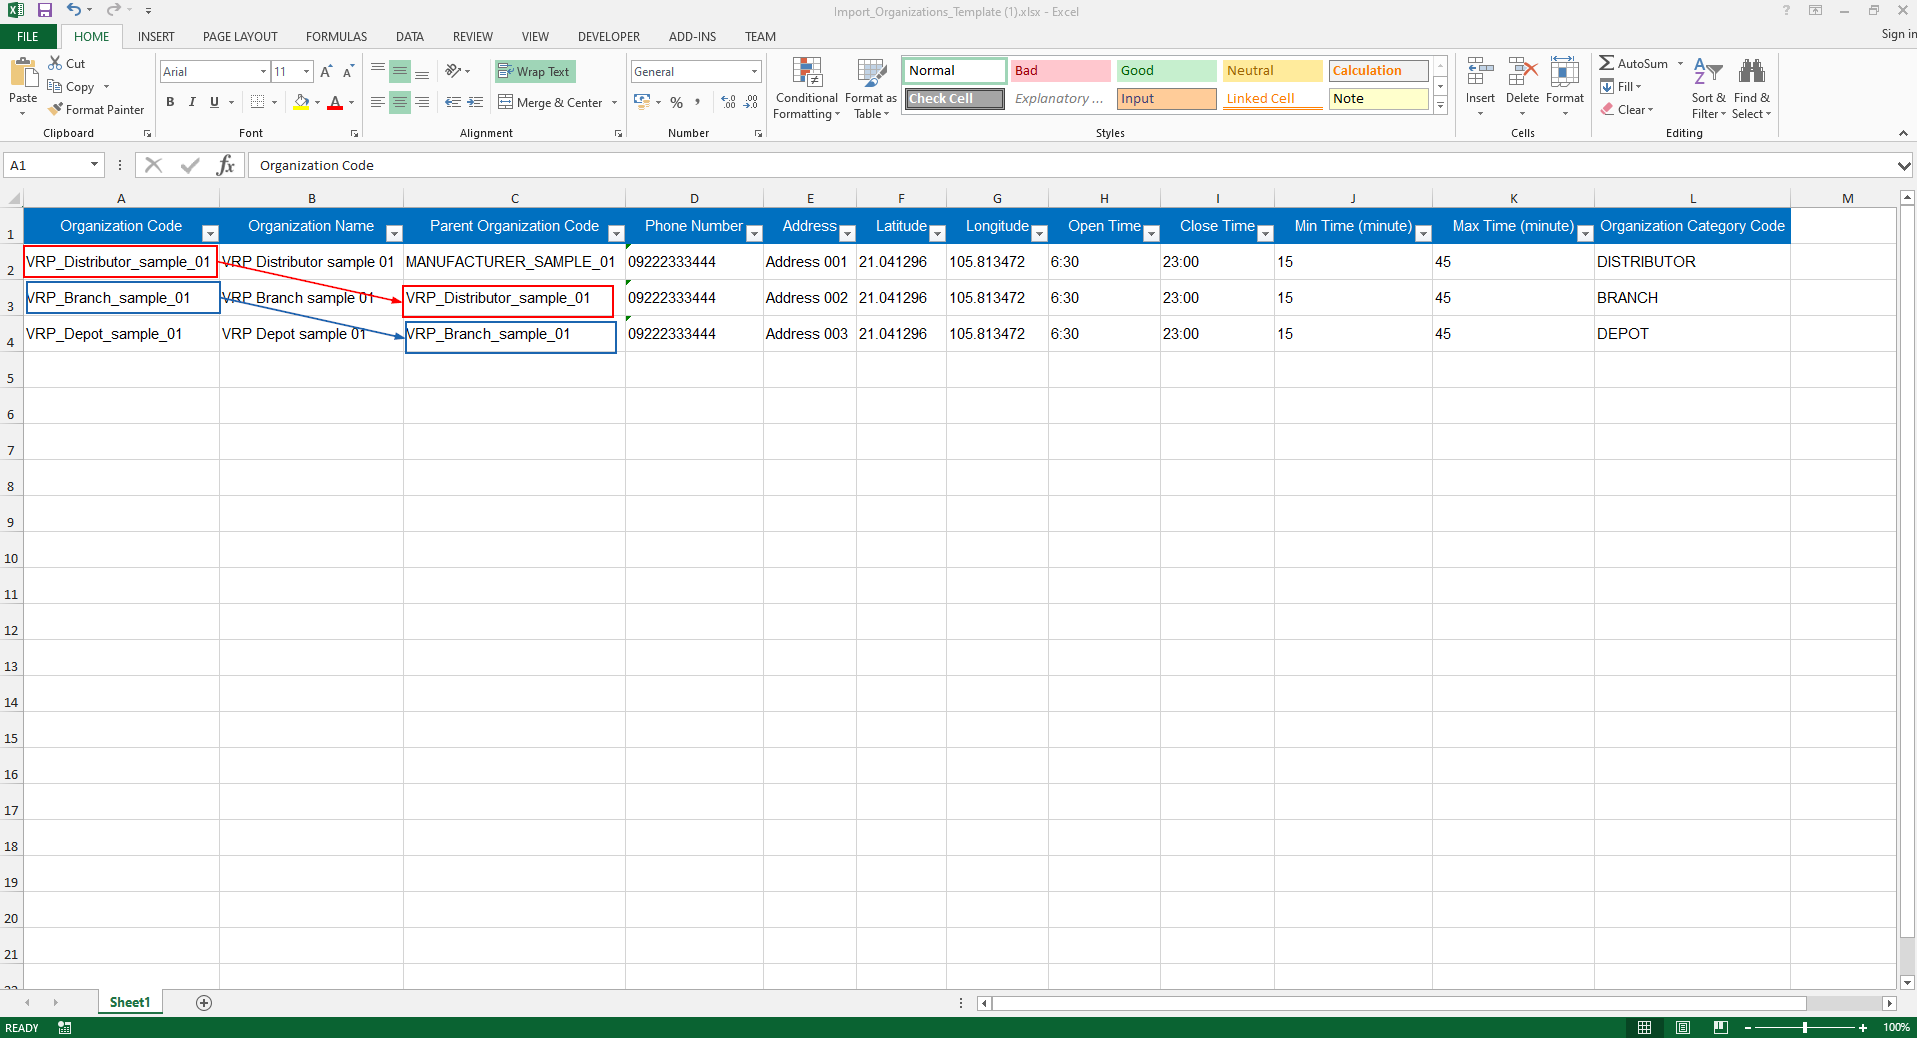
Illustration Image (English)
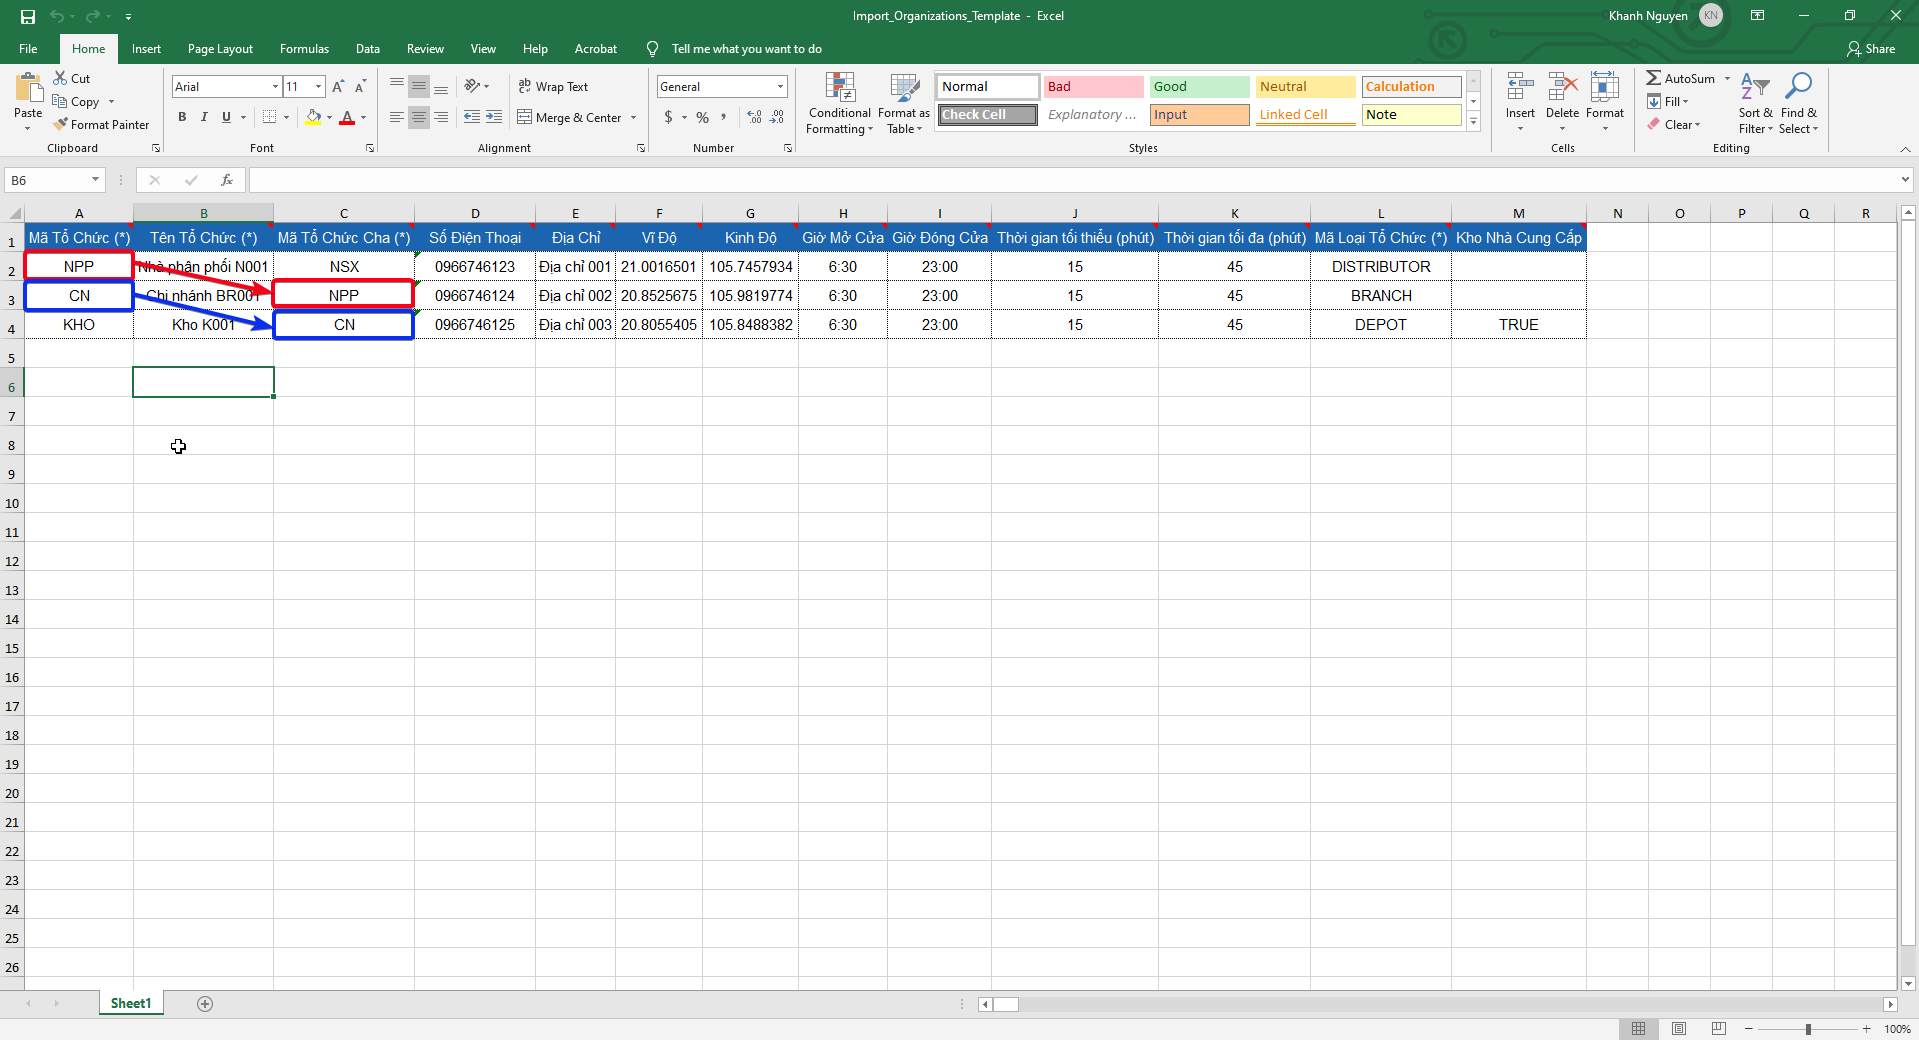
Illustration Image (Vietnamese)
Organization Information Fields
- Below are the information fields and input rules for the Organization of this model
Information Field | Description & Input Rules |
|---|---|
Organization Code (Webform + Excel import file) (Required) | 1. Description: |
Organization Name | 1. Description: |
Parent Organization (Webform); Parent Organization Code (Excel import file) | 1. Description: |
Organization Category (Webform); Organization Category Code (Excel import file) | 1. Description: |
Latitude, Longitude | 1. Description: |
Open Time; Close Time | 1. Description: |
Phone Number | 1. Description: |
Address | 1. Description: |
Country | 1. Description: |
Currency | 1. Description: |
SMS Branding | This information field is only required for some specific accounts |
First weekday | This information field is only required for some specific accounts |
Working days | This information field is only required for some specific accounts |
TimeZone | 1. Description: |
Founded At | 1. Description: |
Description | 1. Description: |
Time Break | This information field is only required for some specific accounts |
Organization Information On Webform
- On the Webform, the information of an Organization is present on two tabs: Main Information and More Configuration
- The Main Information tab holds the basic information of the Organization
- The More Configuration tab holds the specific information for each Organization Type. As you select the attribute Organization Category on the Main Information tab, this tab will update accordingly and gray out the information fields not related to the selected Organization Type
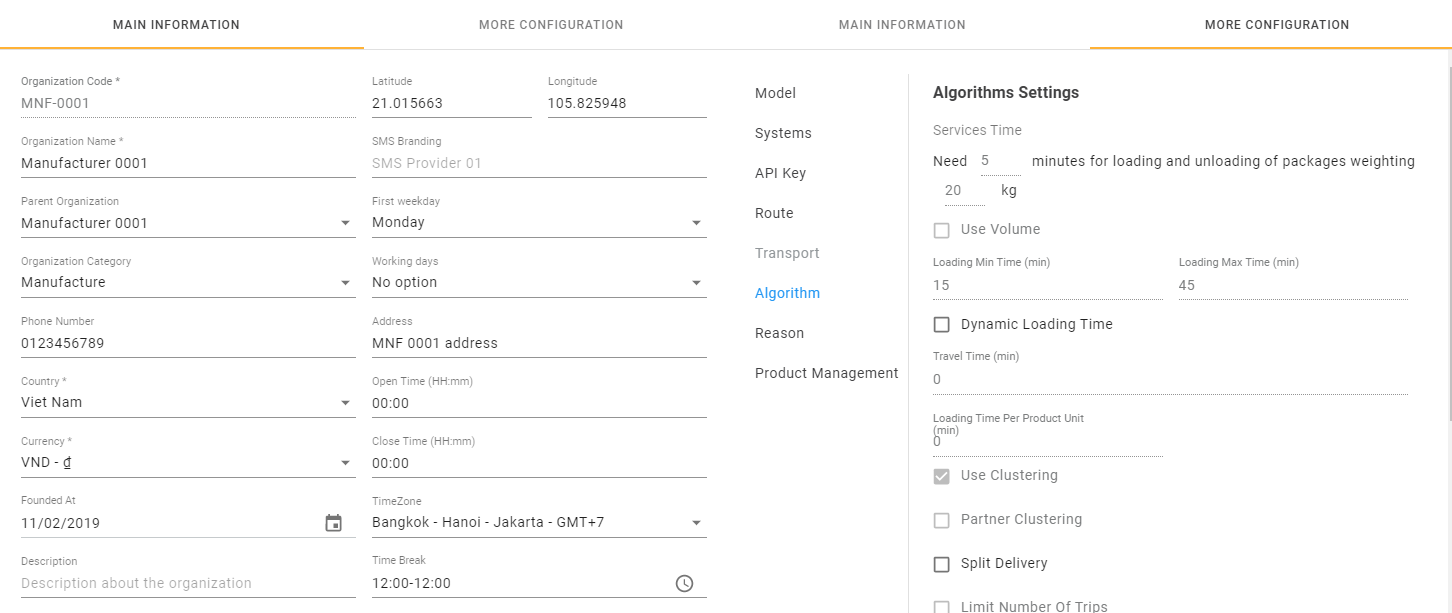
Illustration (English)
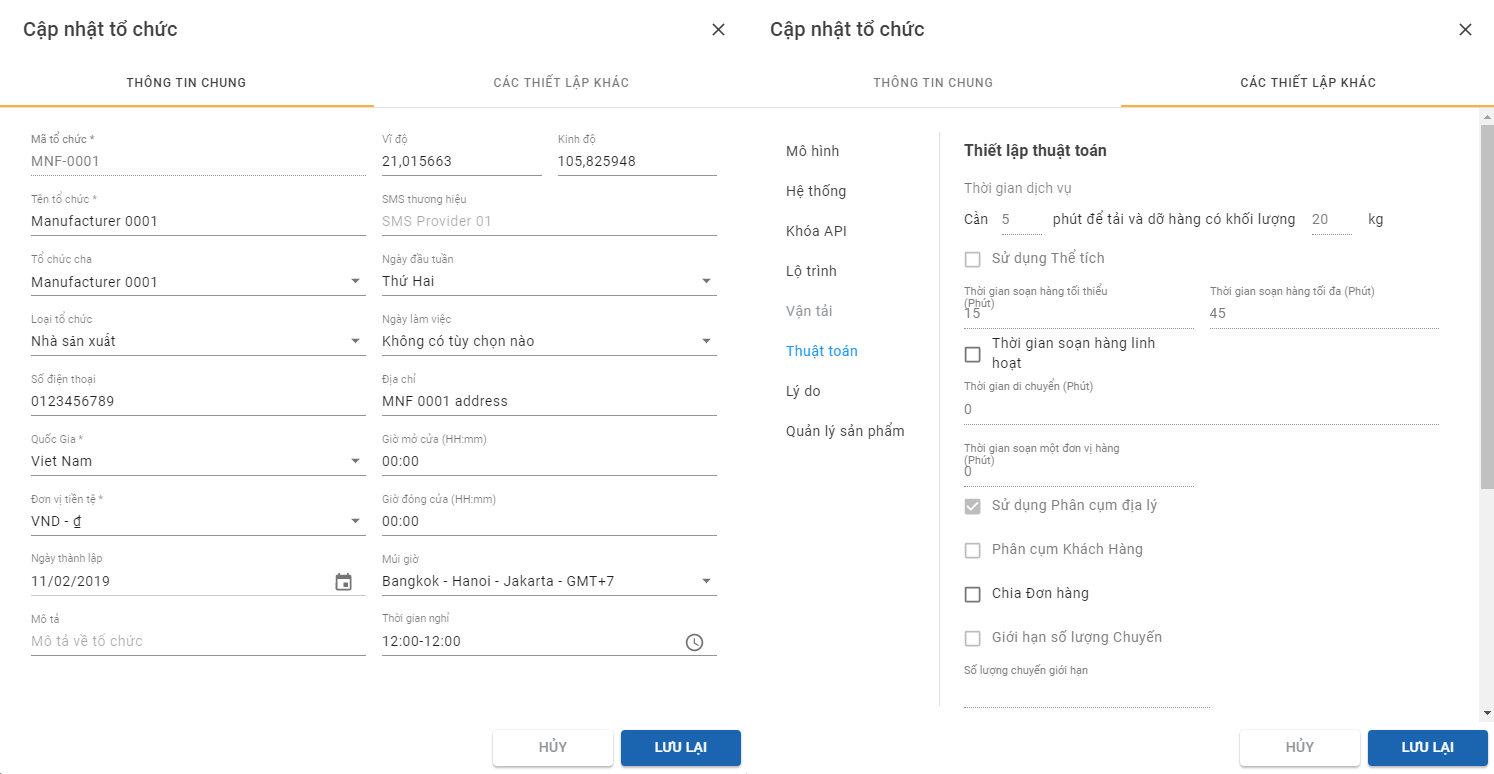
Illustration (Vietnamese)
- We have a dedicated article for the configurations on the More Configuration tab: Configurations by Organization Type
Update Organization
- Please refer to the CRUD functions article to know the general steps about updating objects in Abivin vRoute
Delete Organization
- Please refer to the CRUD functions article to know the general steps about deleting objects in Abivin vRoute
BE VERY CAREFUL WHEN DELETING ORGANIZATIONSIf you delete an organization, all resources of that organization as well as the resources of all organizations beneath it will be deleted
For example: If you delete a Branch, the resources of that Branch as well as of all Depots directly under that Branch will be deleted
Search and Filter Organization
Search Organization
- Enter either the Organization Code or the Organization Name of the organization you want to search in the search box
- The system will filter and return result shortly
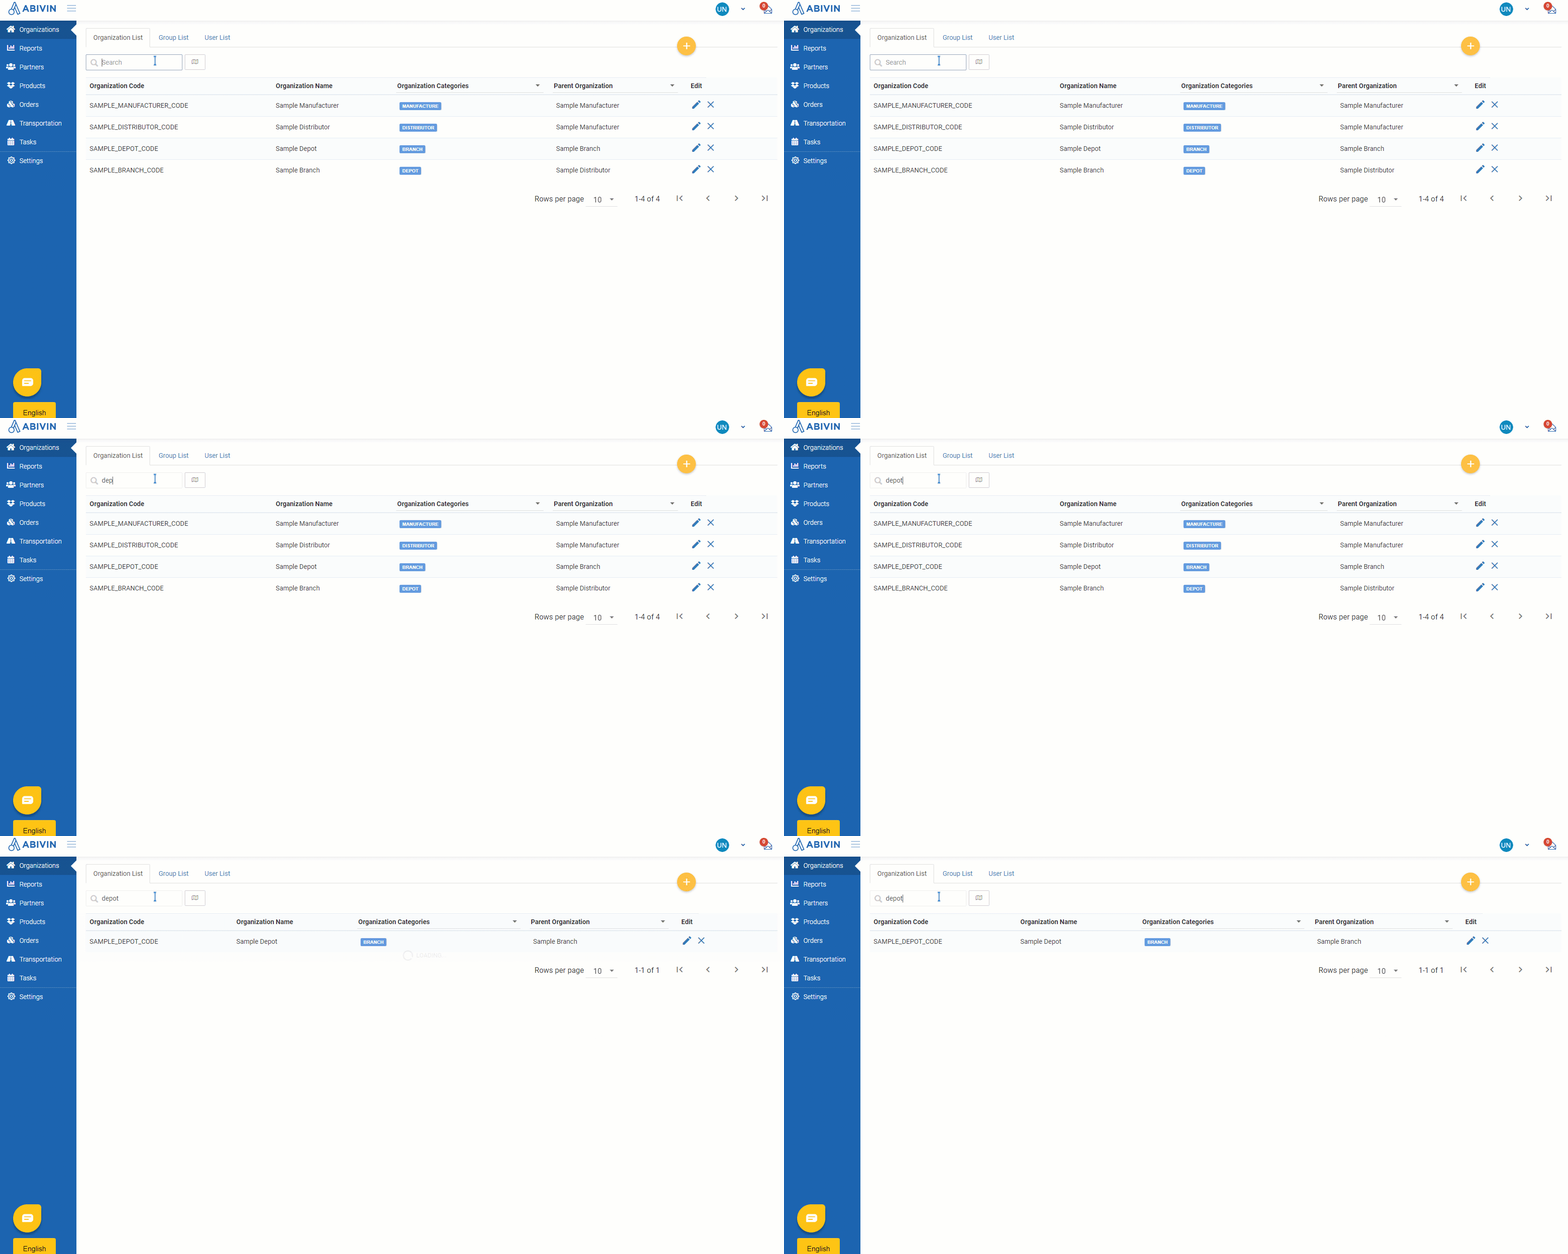
Illustration Image (English)
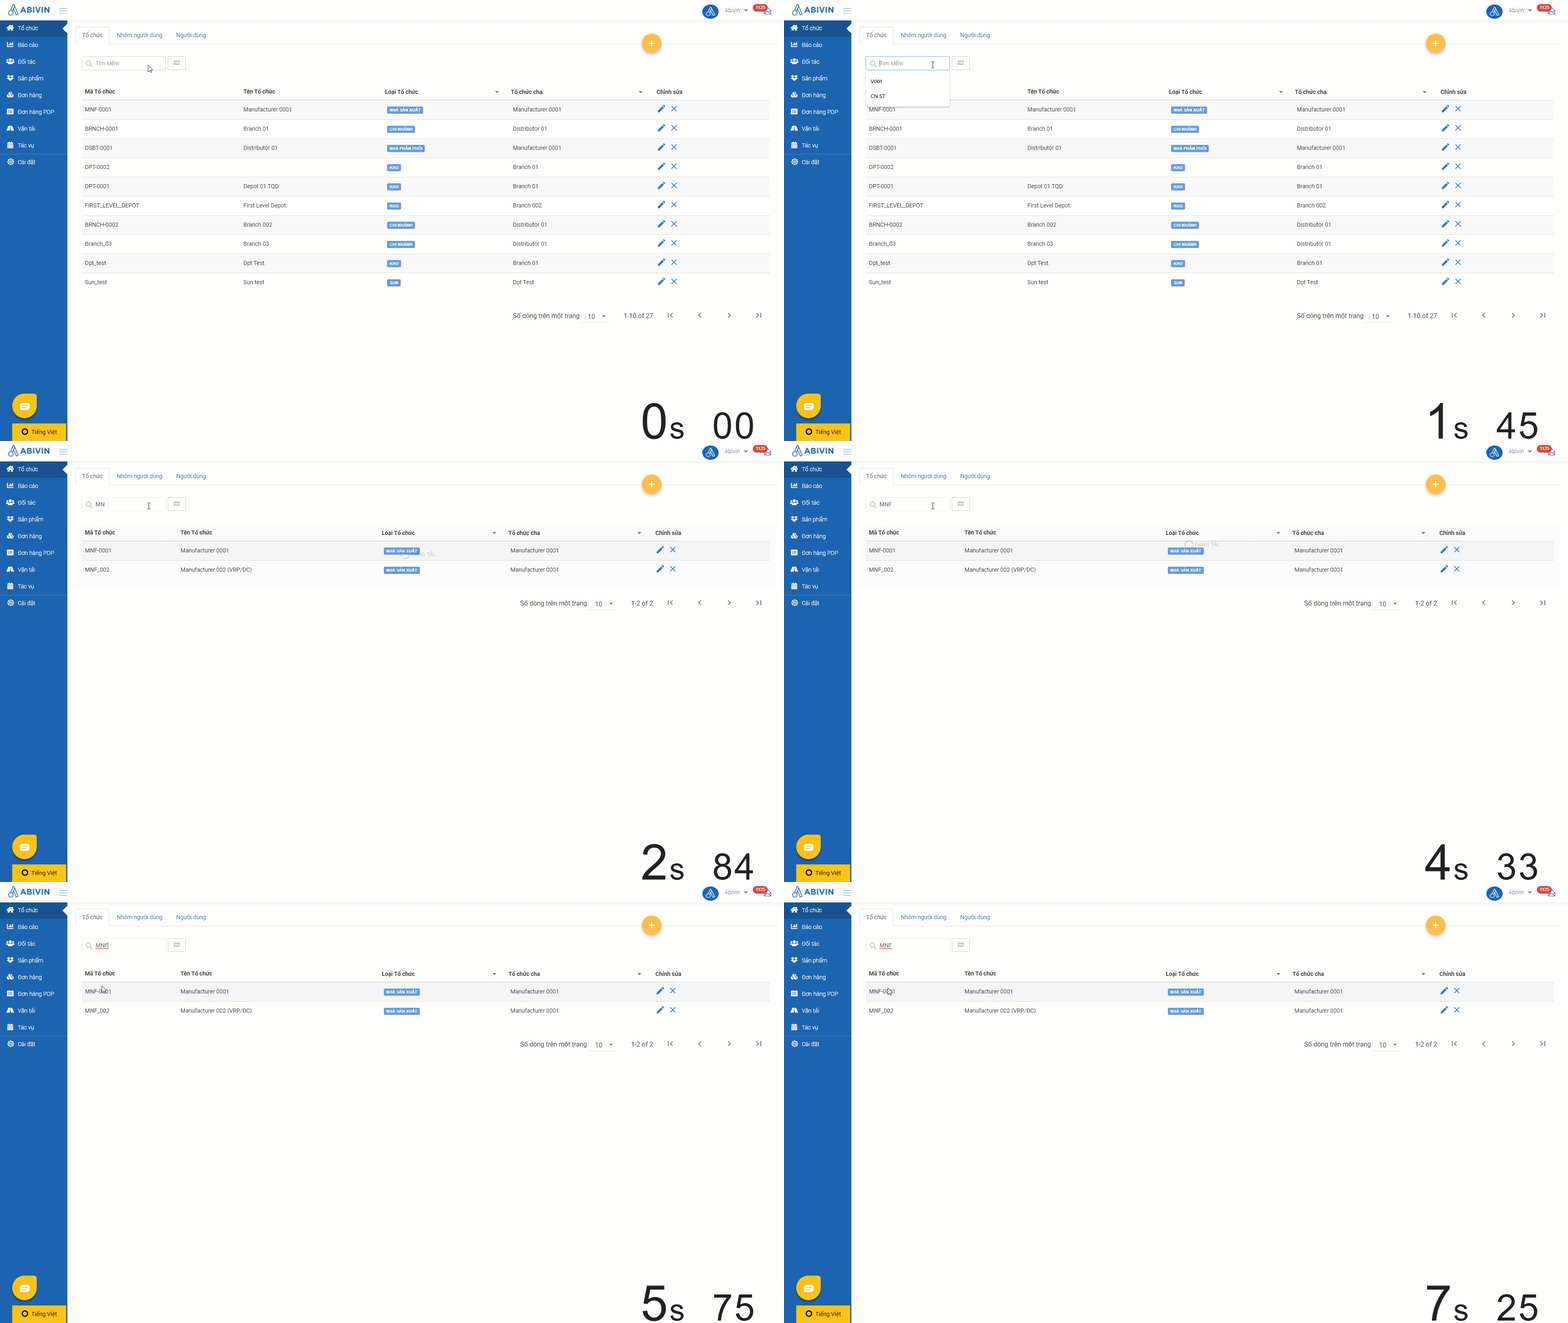
Illustration Image (Vietnamese)
Filter Organization
- You can filter Organization that are the same Organization Type or share the same Parent Organization by clicking on the Organization Categories and Parent Organization columns then ticking on boxes in the drop down menus
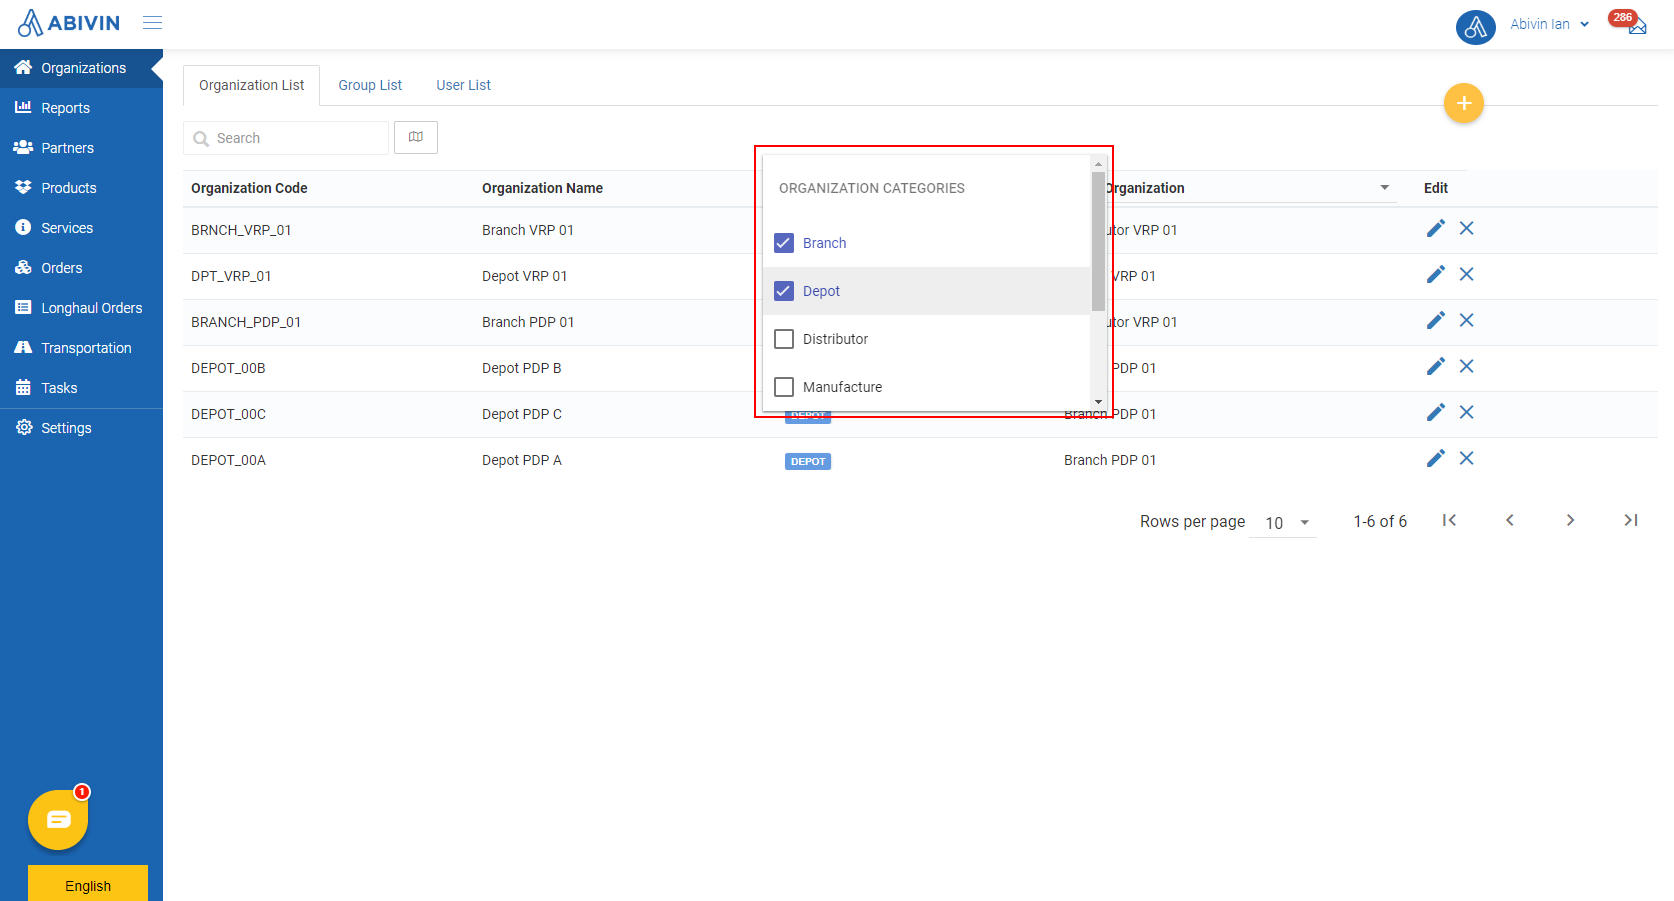
Illustration Image (English)
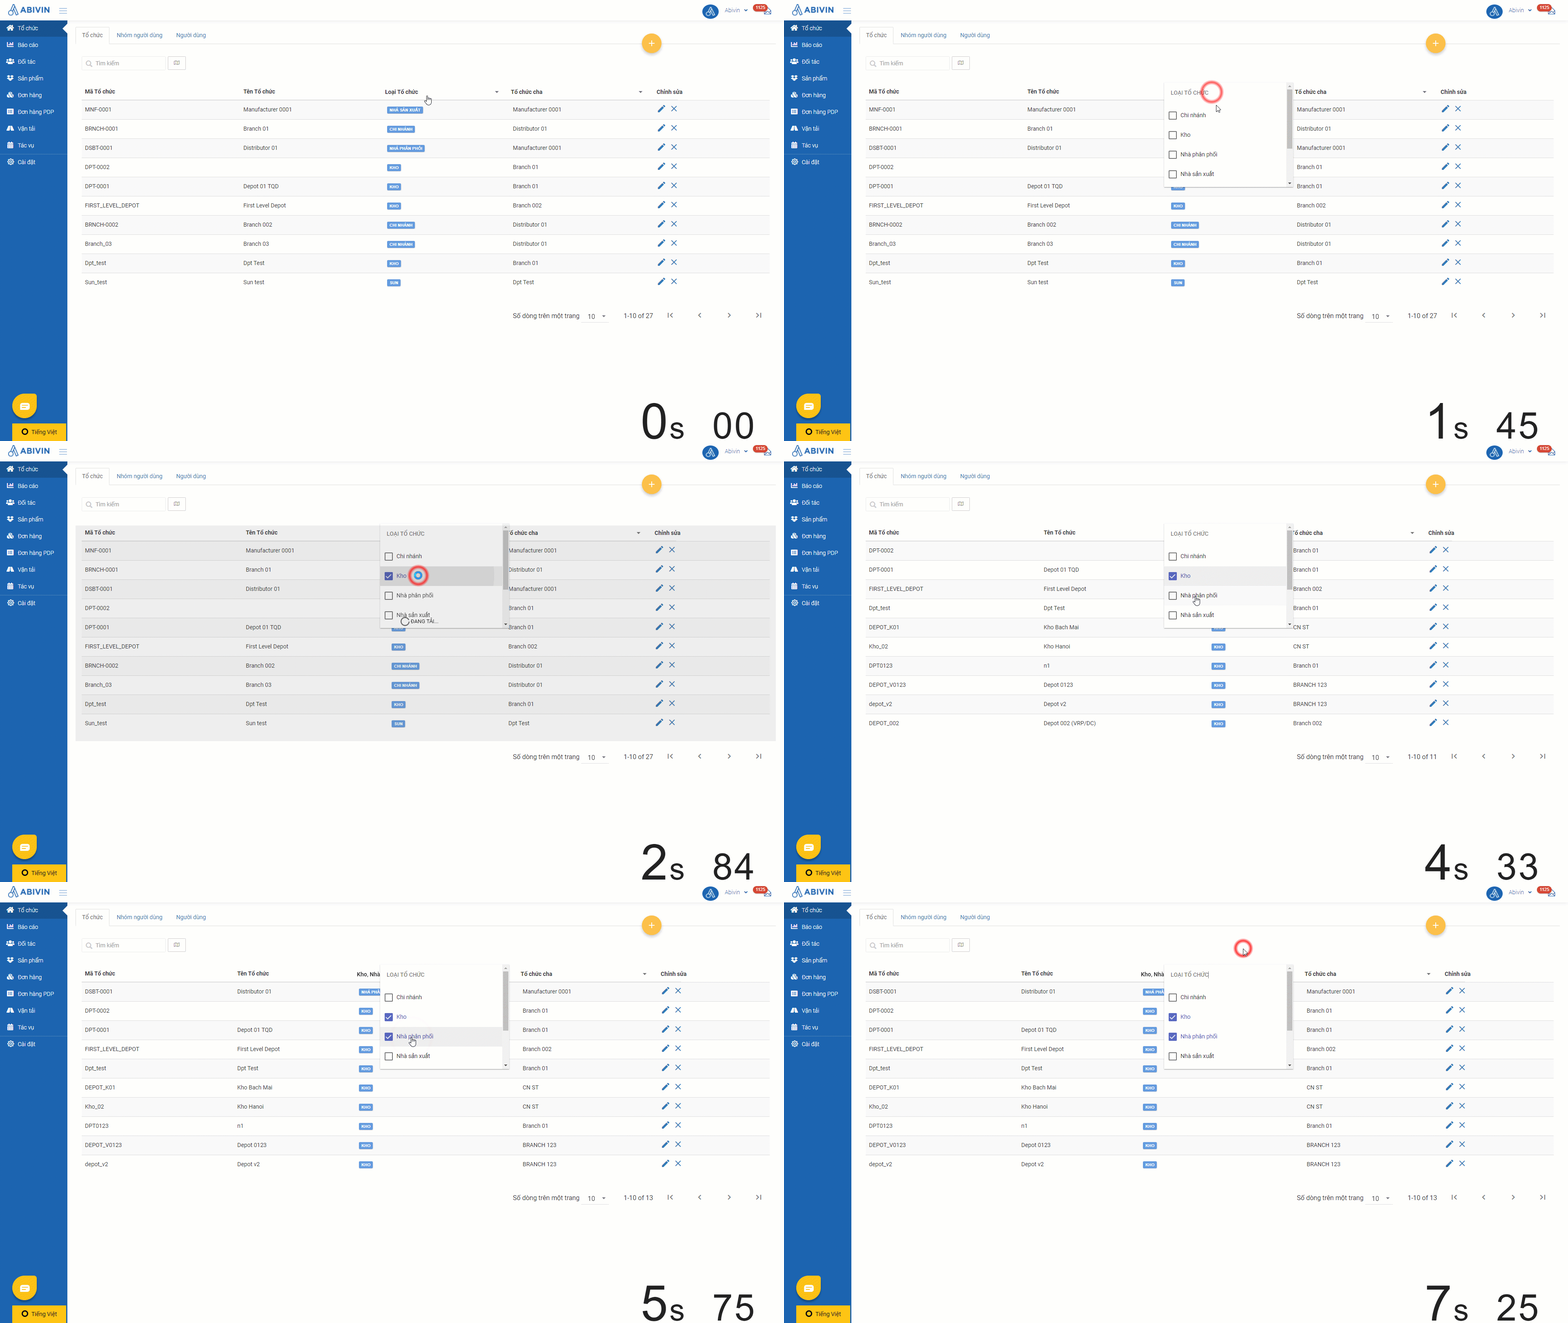
Illustration Image (Vietnamese)
- You can also search an organization quicker by typing the Organization Name or Organization Code of its upper level organization in the search bar of Parent Organization column; or the Organization Type in the search bar Organization Categories column
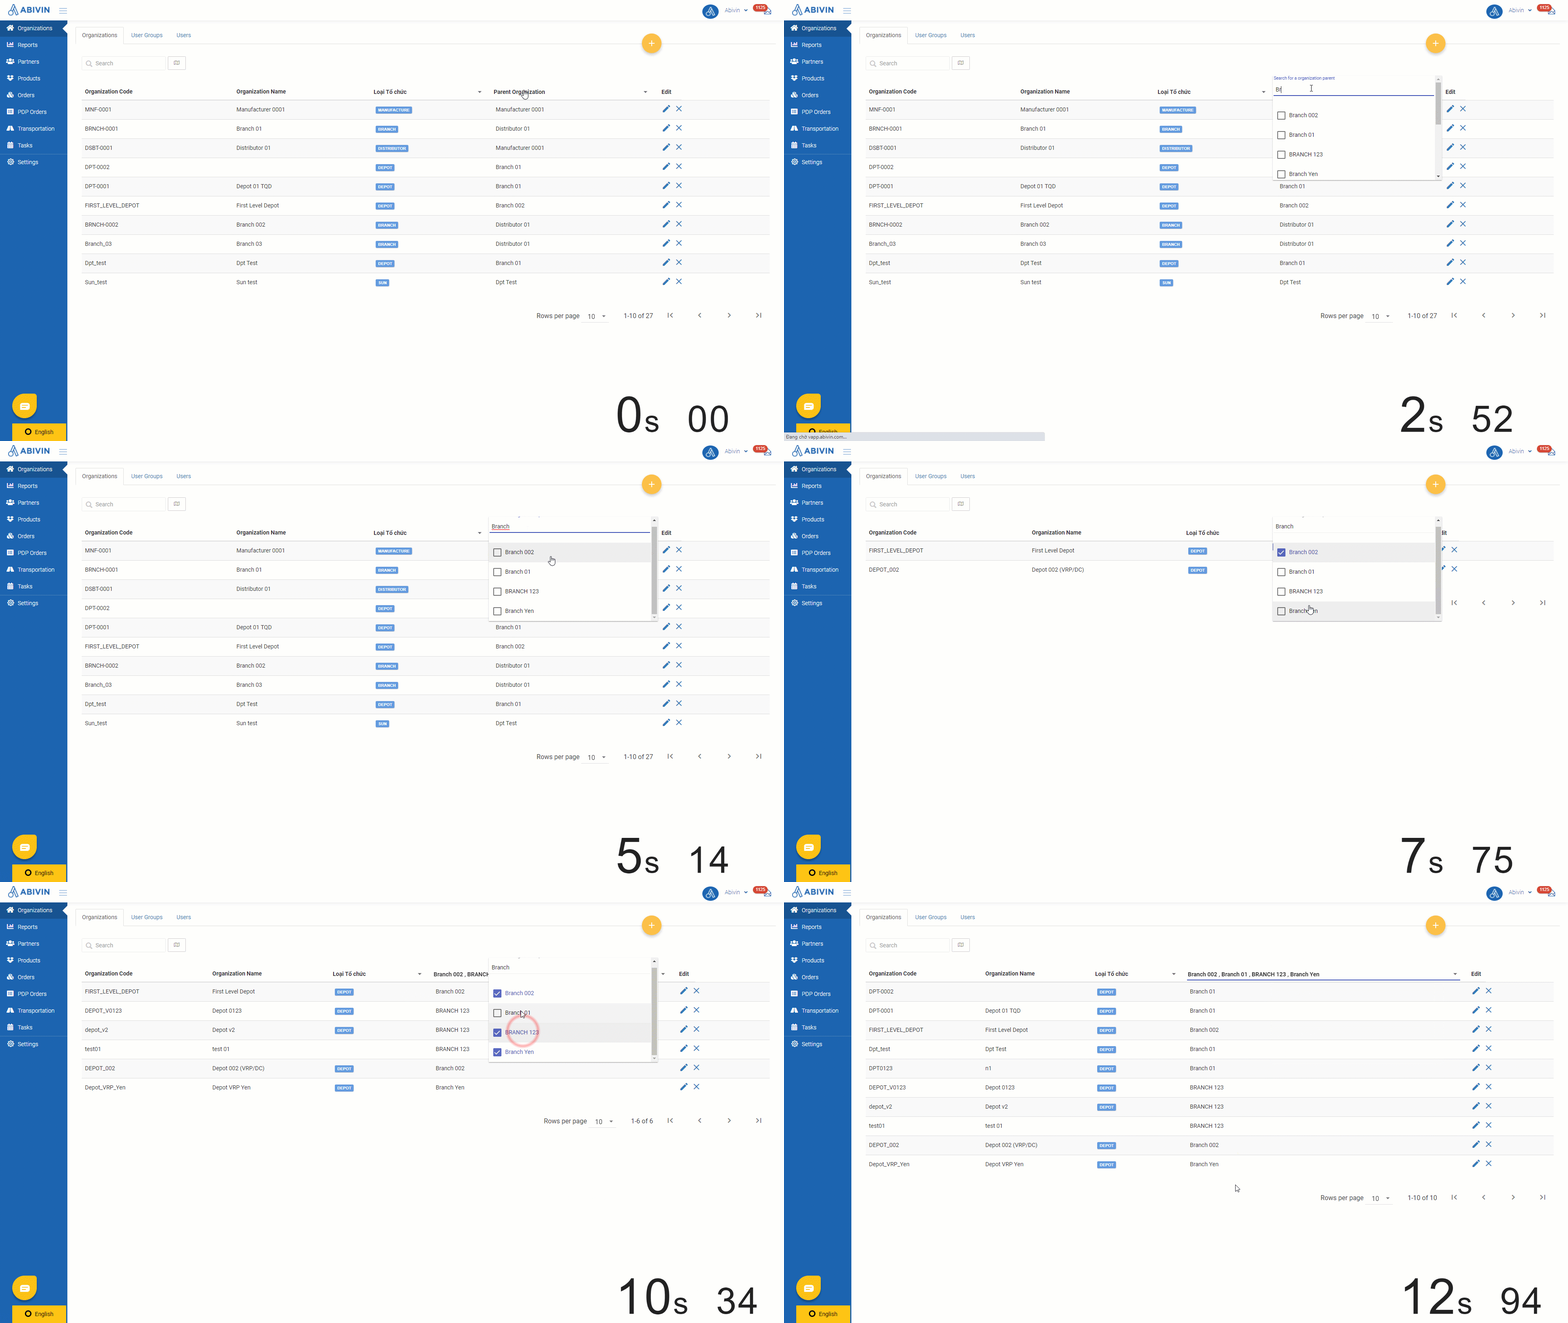
Illustration Image (English)
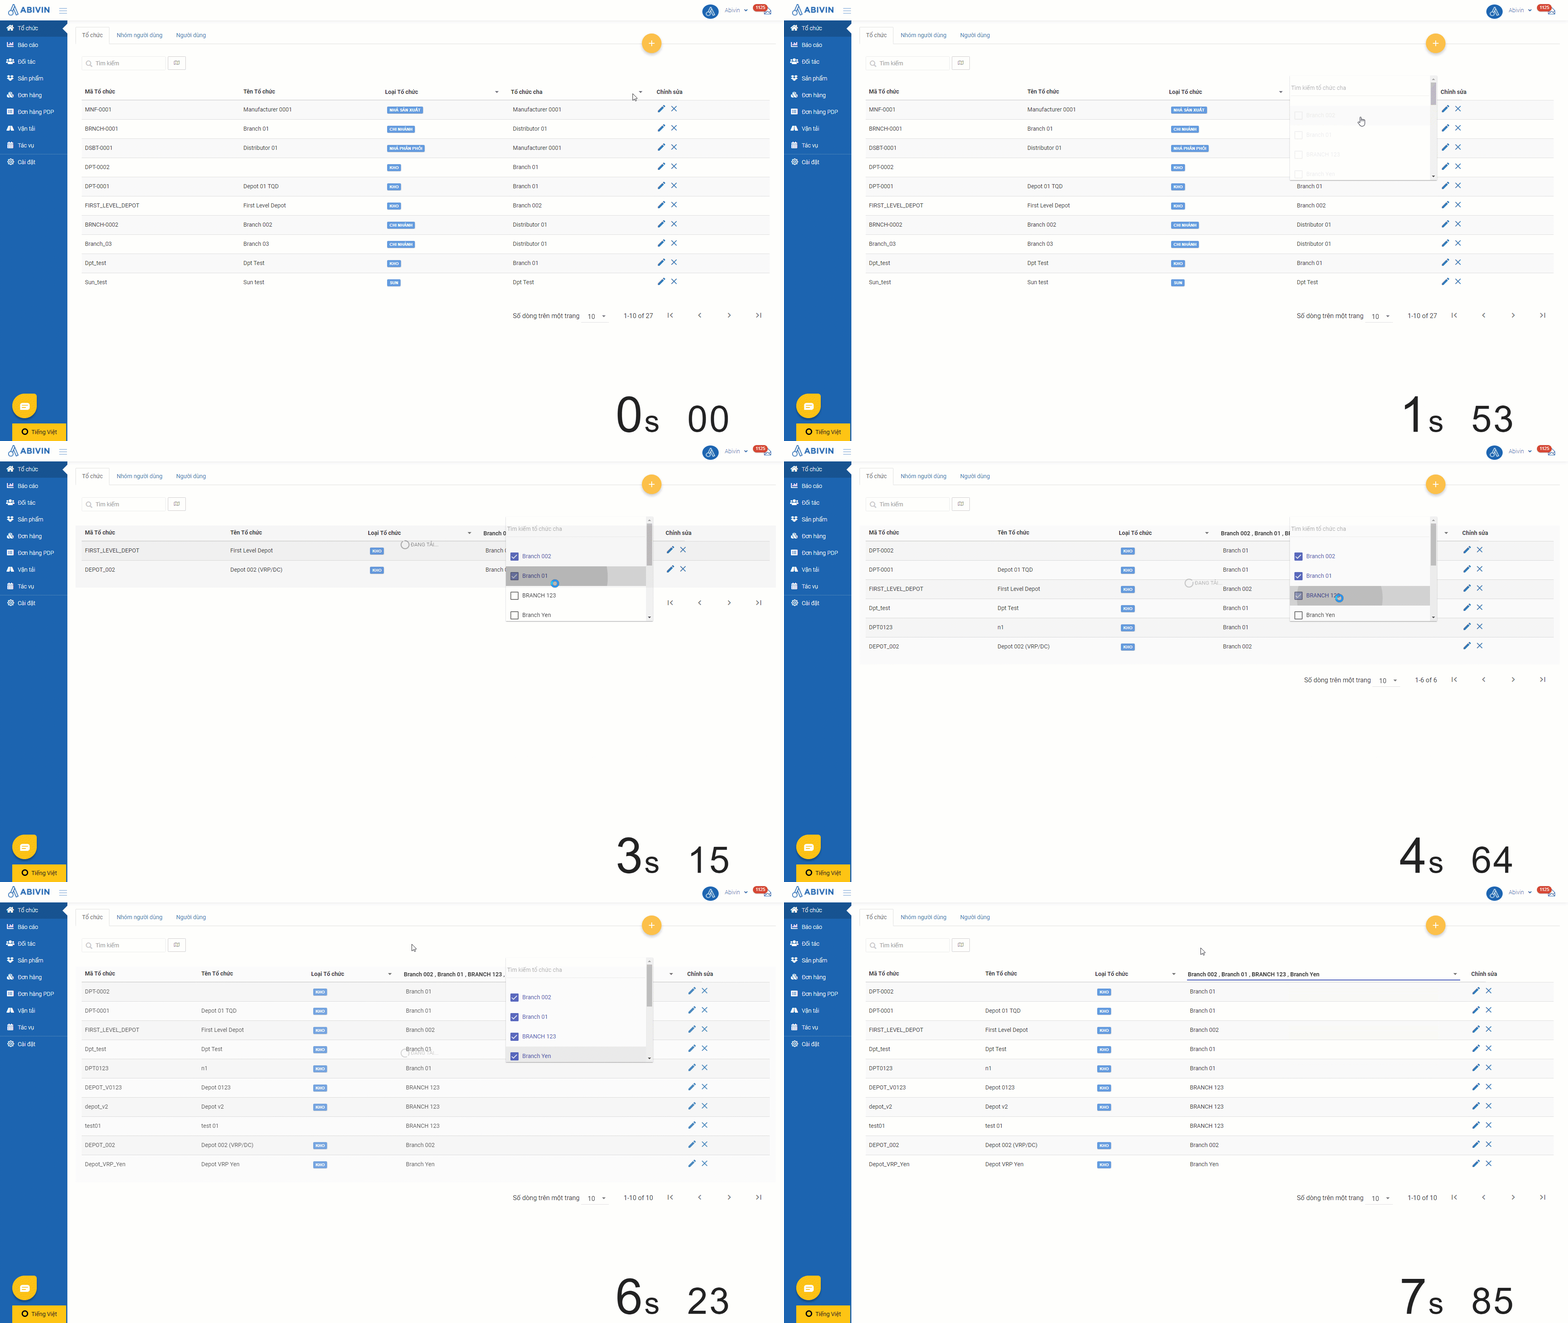
Illustration Image (Vietnamese)
- You can combine these two filters for more accurate search results
Locate Organizations on the map
- To view locations of organizations on the map, click on View Map icon (Next to the Search field)
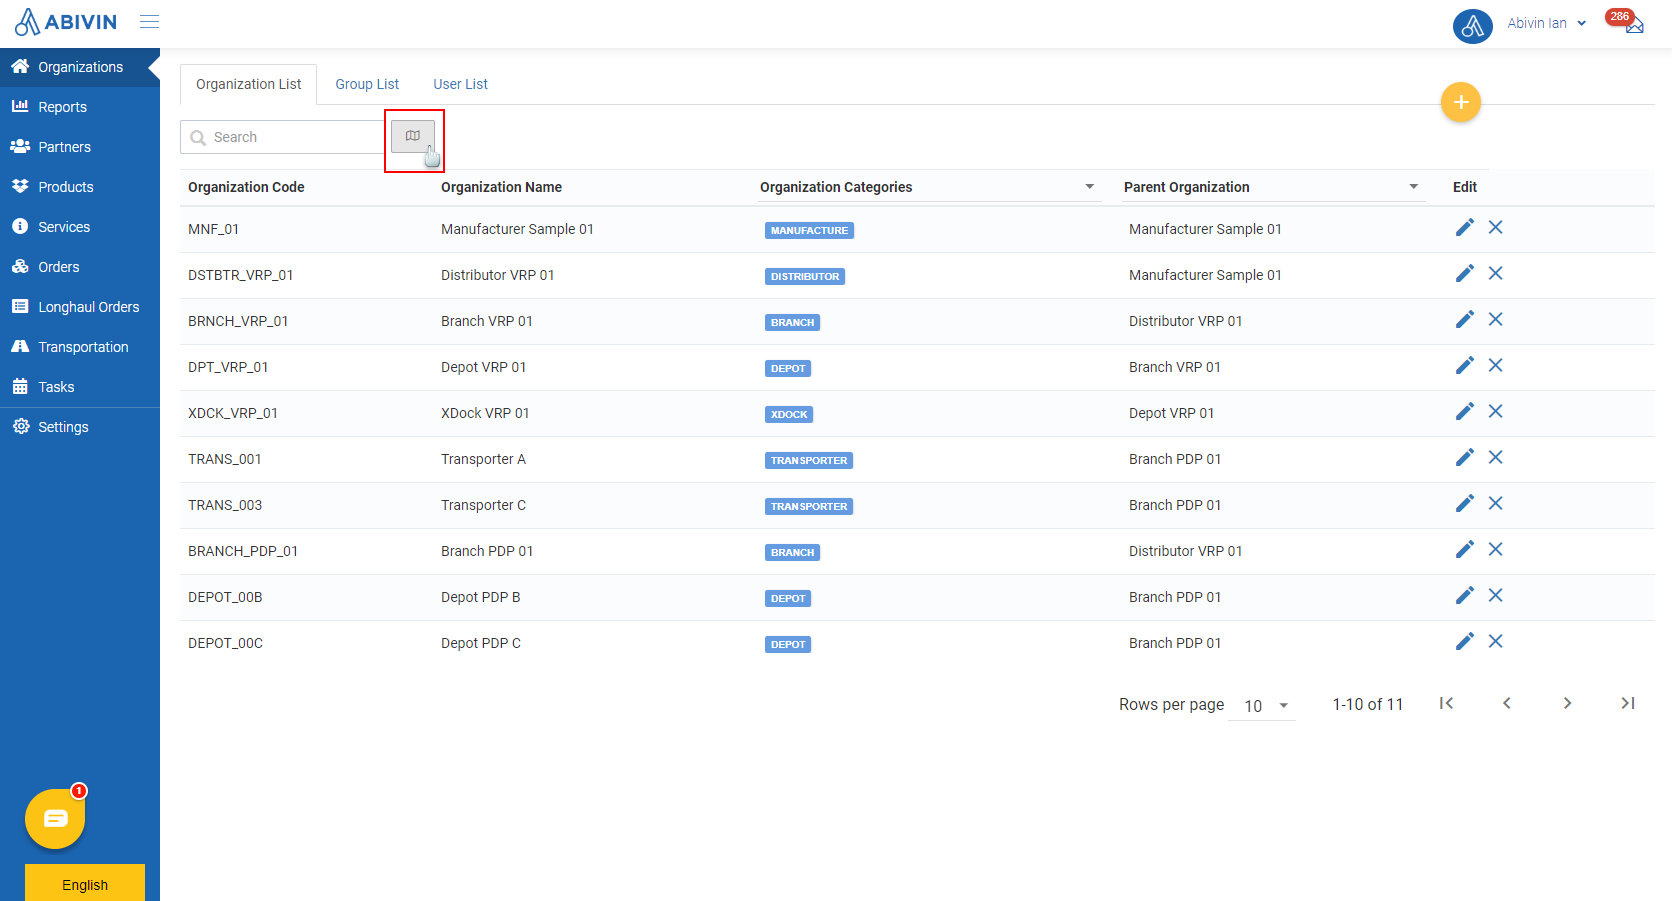
Illustration Image (English)
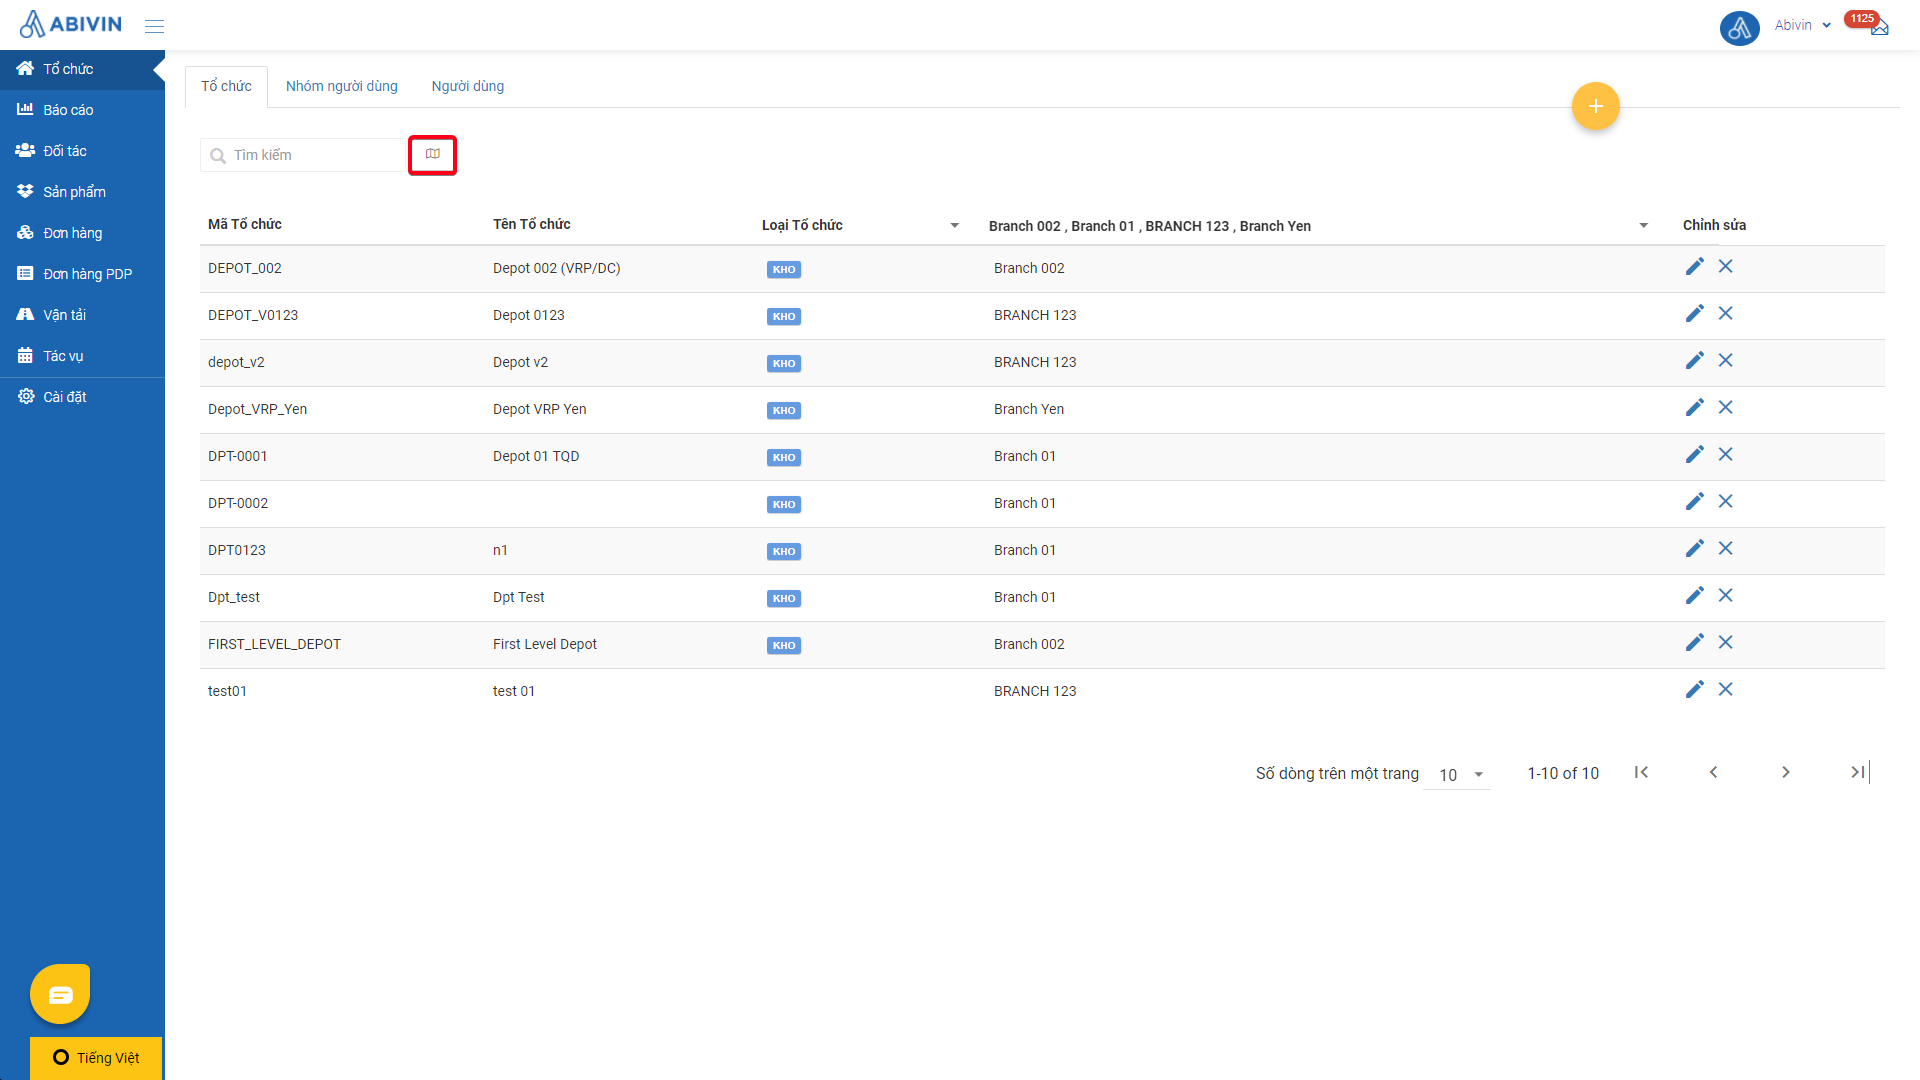
Illustration Image (Vietnamese)
- On the map, each organization is marked by a symbol
- Click on each symbol to show the label of the organization
- Click on View data table icon to get back to the organization list screen
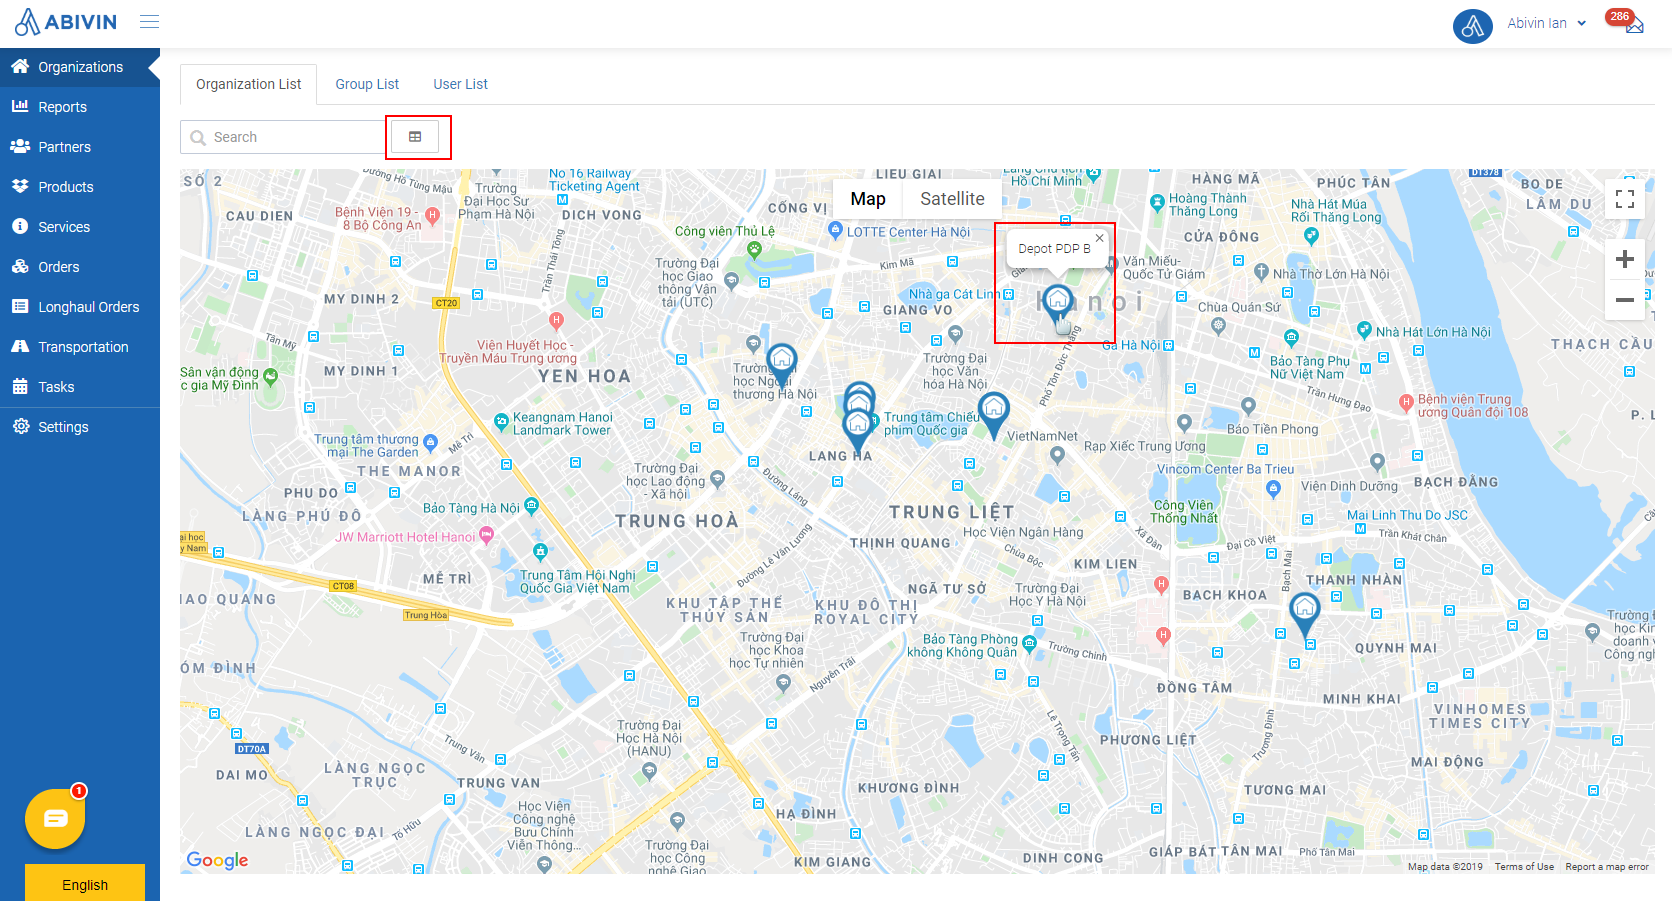
Illustration Image (English)
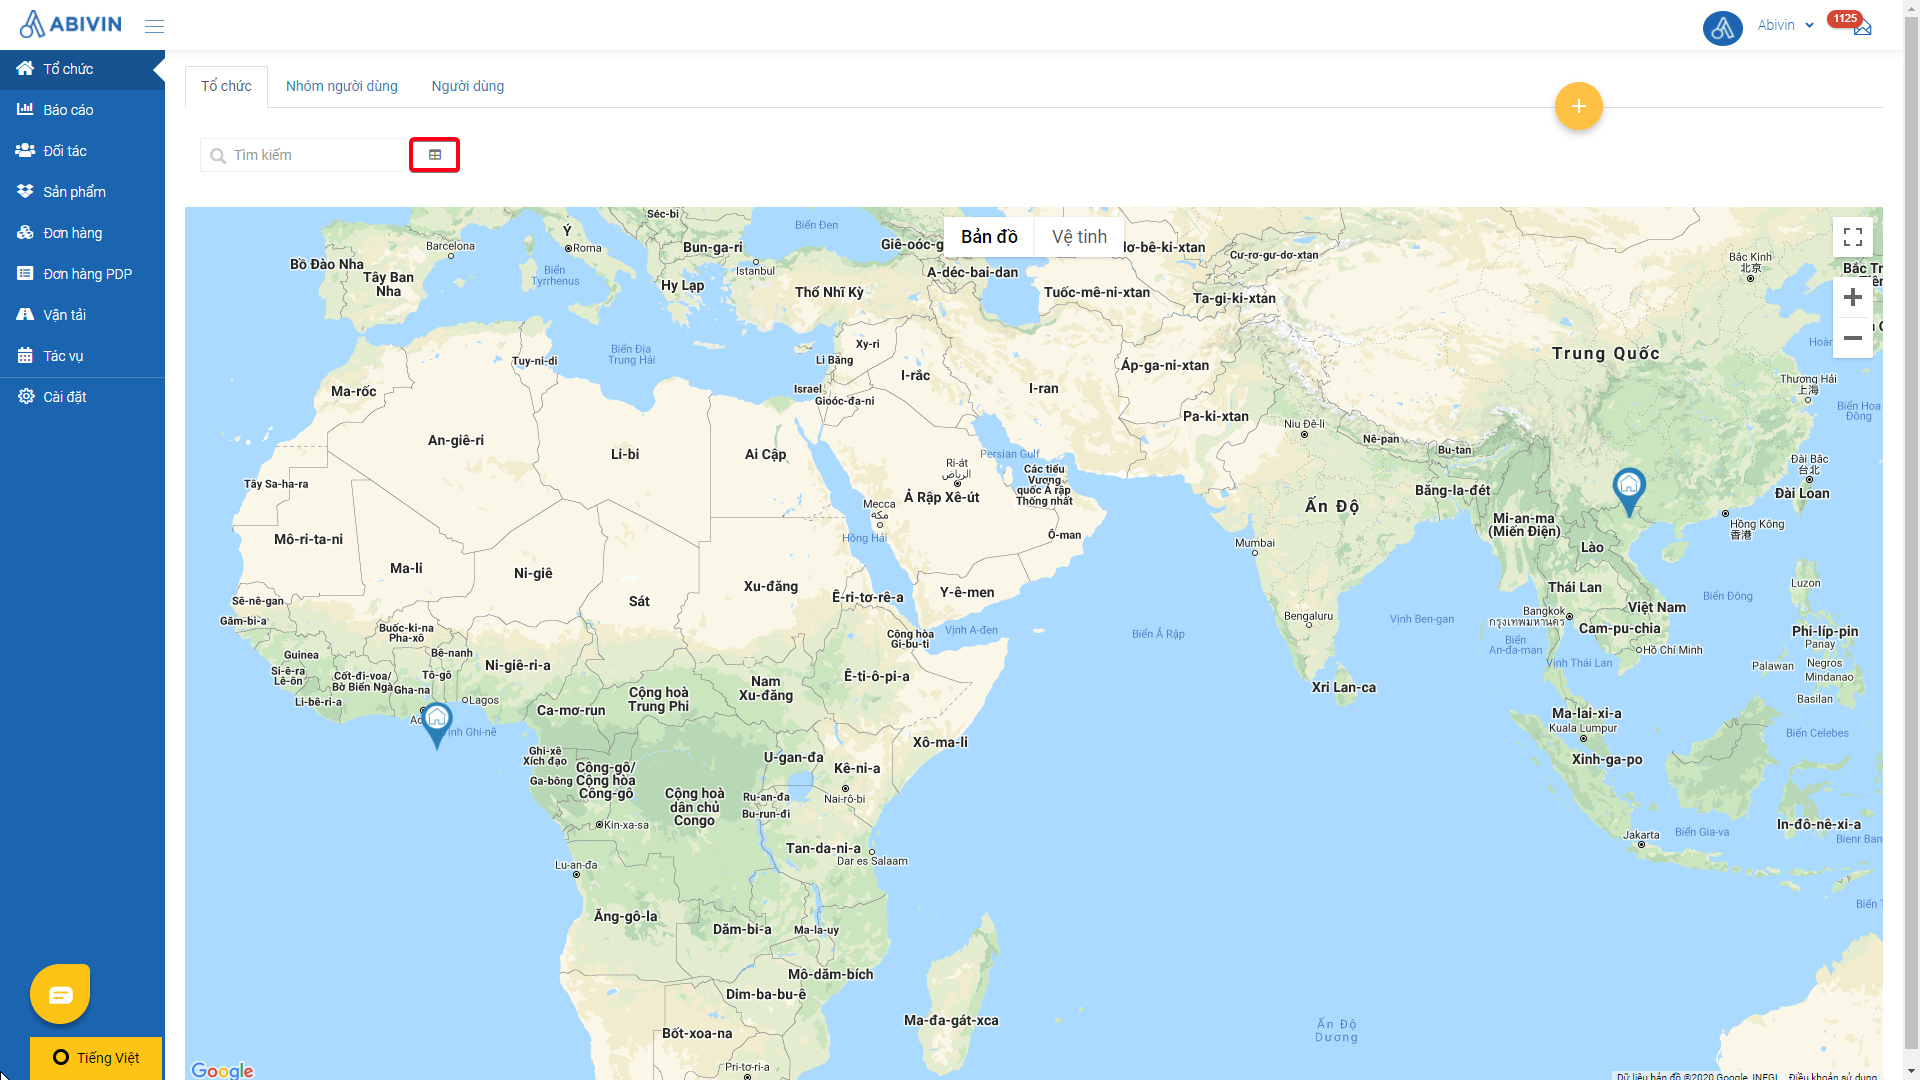
Illustration Image (Vietnamese)
Beginner's Guide
- This section is intended for new users who have just started using the system. We will provide you the most basic setup to get you up and running as quickly as possible. After you have complete the basic, feel free to tinker around on your own
- Fundamentally, in your account, you will need an Organization hierarchy that consists of one Manufacturer, one Branch, and one Depot
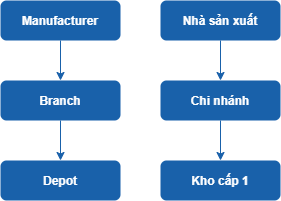
Create the Manufacturer
- To start off, let's create an Organization of Manufacturer type.
- Step 1: Navigate to the Organizations > Organizations tab.
- Step 2: Hover over the orange plus circle icon then click the Create icon
- Step 3: On the Webform, input the information of your Manufacturer as per the instruction in the Create the Manufacturer section above
Create the Branch and the Depot
- Next, let's move on to create the Branch and the Depot
- Since you are probably familiar with using the Webform by now, I suggest you switch to using the Excel import file for this task. Using the Excel import file is also much preferred when you want to create multiple Organizations (Or other resources for that matter) at once
- In the Excel import file, let's do as below:
- For the Branch, you just need to input its information into the following cells: Organization Code; Organization Name; Parent Organization Code; Organization Category Code. Do note that you need to copy the Organization Code of the Manufacturer created above from the Web app then paste that value into the Parent Organization Code cell of the Branch being created to generate the parent-child relationship between these two Organizations
- For the Depot, you just need to input its information into the following cells: Organization Code; Organization Name; Parent Organization Code; Latitude; Longitude; Open Time; Close Time; Min Time (minute); Max Time (minute); Organization Category Code. For the Parent Organization Code cell, copy and paste the value from the Organization Code of the Branch above to generate the parent-child relationship between these two Organizations
- Please refer to the following section to know the description and the input rules for the above information fields: Organization Information Fields
Updated about 1 month ago
