Manage Customer Groups
Definition of Customer Group
- In Abivin vRoute, you can allocate the customer base of a Depot into separate customer groups. There are three types of customer groups:
- Type 1: Multi-associated customer groups: Customer groups that have associations with other Customer groups

Multi-associated customer group
- Type 2: Self-associated customer groups: Customer groups that are independent. They do not have any association with other Customer groups

Self-associated customer group
- Type 3: No-associated customer groups: Customer groups that are neither Multi-associated nor Self-associated

No-associated customer group
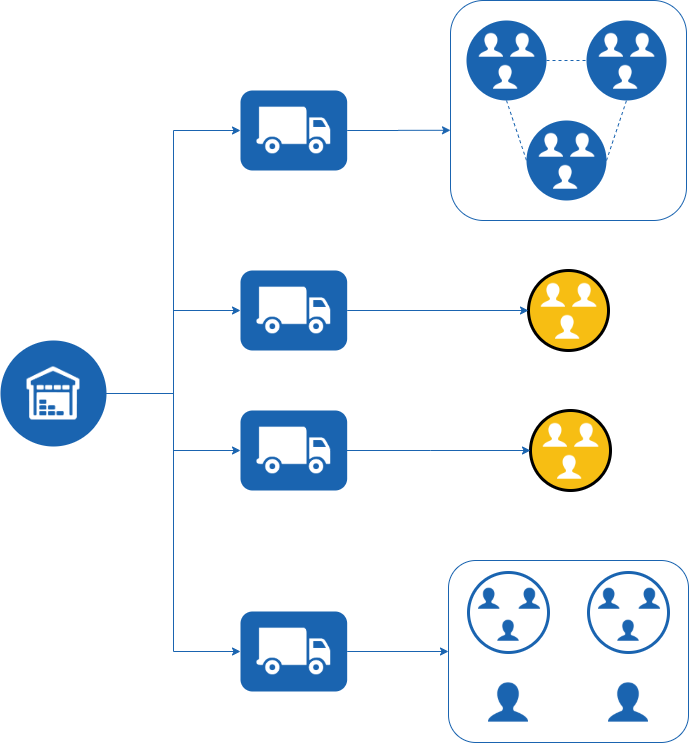
- During the route optimization process, the vehicle fleet of a Depot will be utilized according to the following rules:
- First, some vehicles will be selected to only deliver to Multi-associated customer groups which have associations between themselves
- Next, some of the remaining vehicles will be selected to only deliver to each of the Self-associated customer groups. Note that no two Self-associated customer groups share the same delivery vehicles with each other
- Finally, the remaining vehicles will be selected to deliver to No-associated customer groups, as well as customers who do not belong to any particular customer group
- Below is an illustration to help you understand easier
Access Customer Group List
- The Customer Groups are listed in the Partners > Customer Groups tab
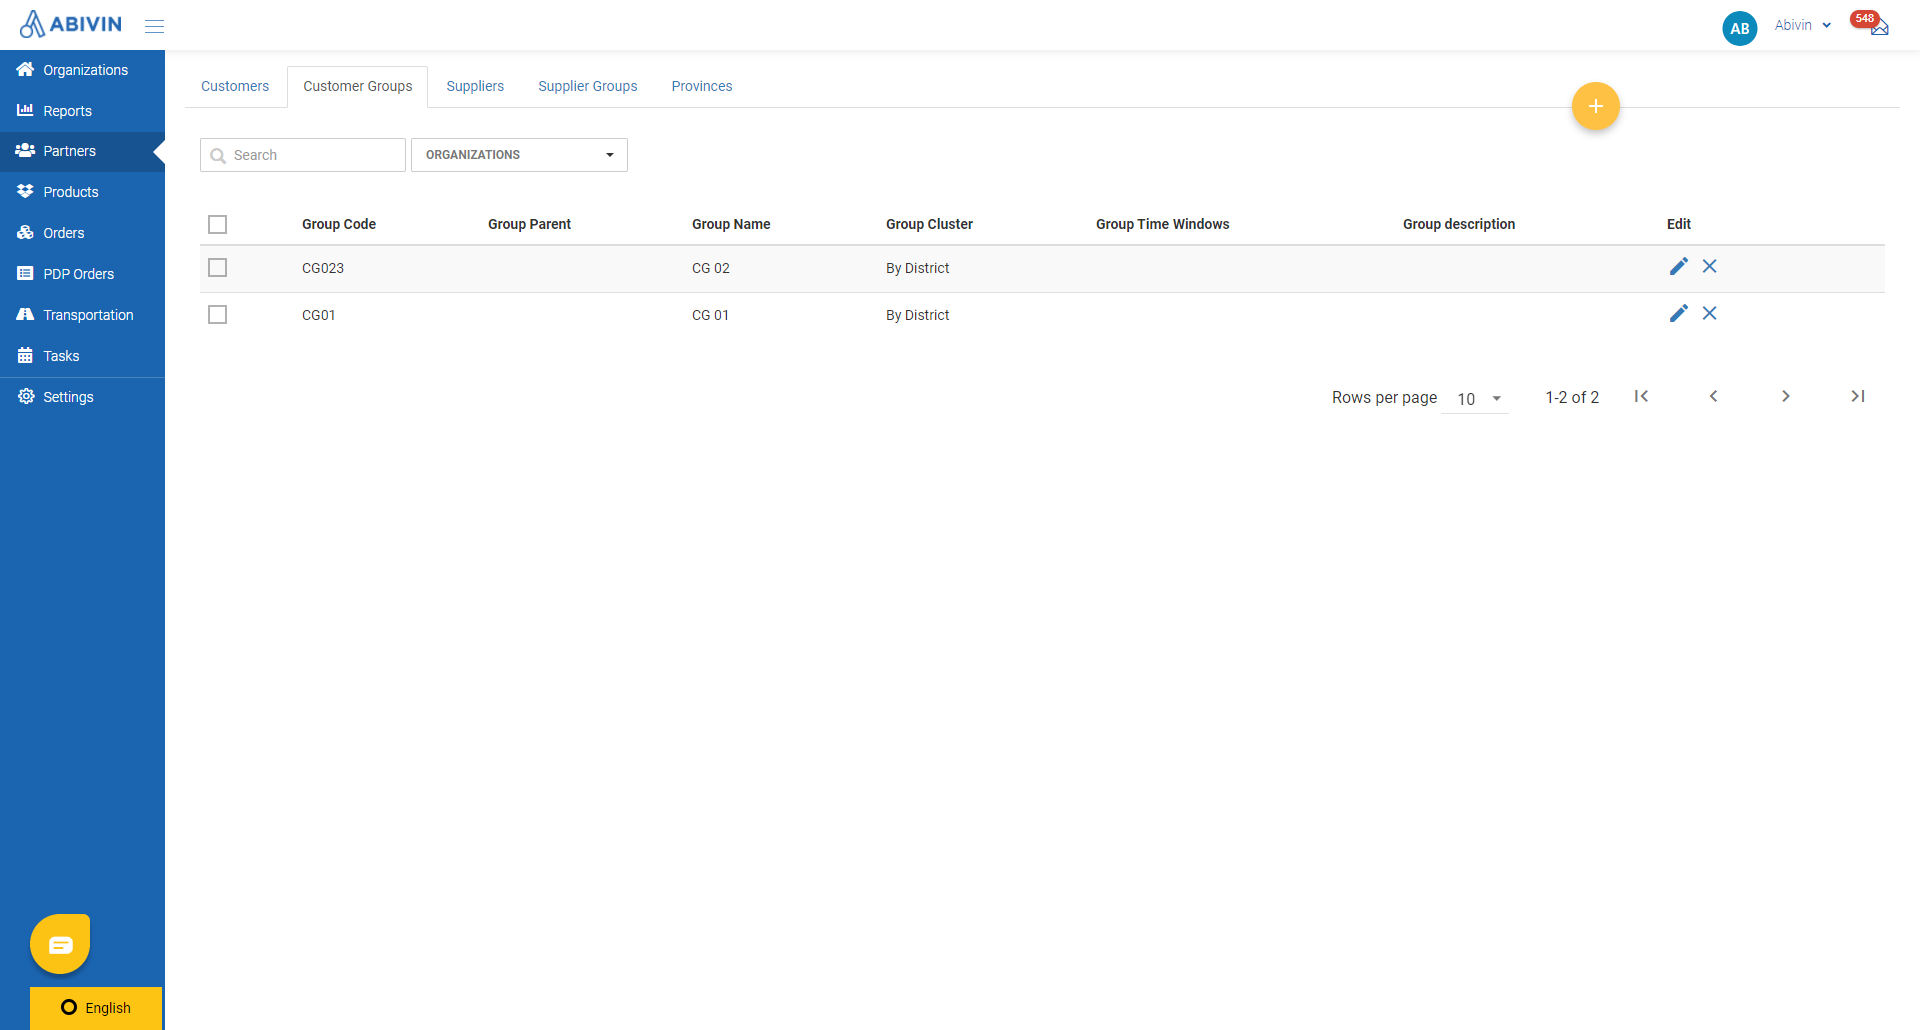
Illustration (English)
Create Customer Groups
- You have two methods to create Customer Groups: Webform or Excel template
Customer group information fields
- Below is the list of information fields of a Customer Group
Information field | Description & Input |
|---|---|
Organizations (Web form); Organization Code (Excel template) (Required) | 1. Description: |
Group Code (Web form); Partner Group Code (Excel template) | 1. Description: |
Group Name (Web form); Partner Group Name (Excel template) | 1. Description: |
Group Parent (Web form); Parent Group Code (Excel template) | 1. Description: |
Group Time Windows | 1. Description: |
Associated Group & Self-associated (Web form); Associated Group Code (Excel template) | 1. Description:
|
Group description | 1. Description: |
Partner Group Type | 1. Description: |
Group Cluster (Web form); Clustering Group Type (Excel template) | 1. Description: |
Province | 1. Description: |
District | 1. Description: |
Town | 1. Description: |
Notes when creating Multi-associated Customer Groups
- If some customer groups have associations with each other, you have to specify the associated customer groups for each one of them. See illustrations below of three Multi-associated customer groups

Specify associated customer groups on Web app

Specify associated customer groups in Excel template
Allocate Customers To Customer groups
Allocate Customers Using The Webform
- If there are just several Customers which have been created earlier than the Customer Groups, you can use the Webform to allocate them to the Customer Groups
- 1 - Navigate to Partners > Customers tab
- 2 - Click the Edit icon of the wanted Customer
- 3 - The Update Customer form will appear. In this form, click on the Customer Groups field. Tick the checkbox of the Customer Group to which you want to allocate the Customer being edited. You can also input the Customer Group Code/Customer Group Name of the desired Customer Group into the search bar to filter faster
- Important note: Even though you can select multiple Customer Groups, in this model one Customer can only belong to one Customer Group. If you select multiple Customer Groups for a Customer, the system will not be able to generate the optimized Delivery Route for that Customer during the Route Plan optimization process
- 4 - Click Save to confirm the change
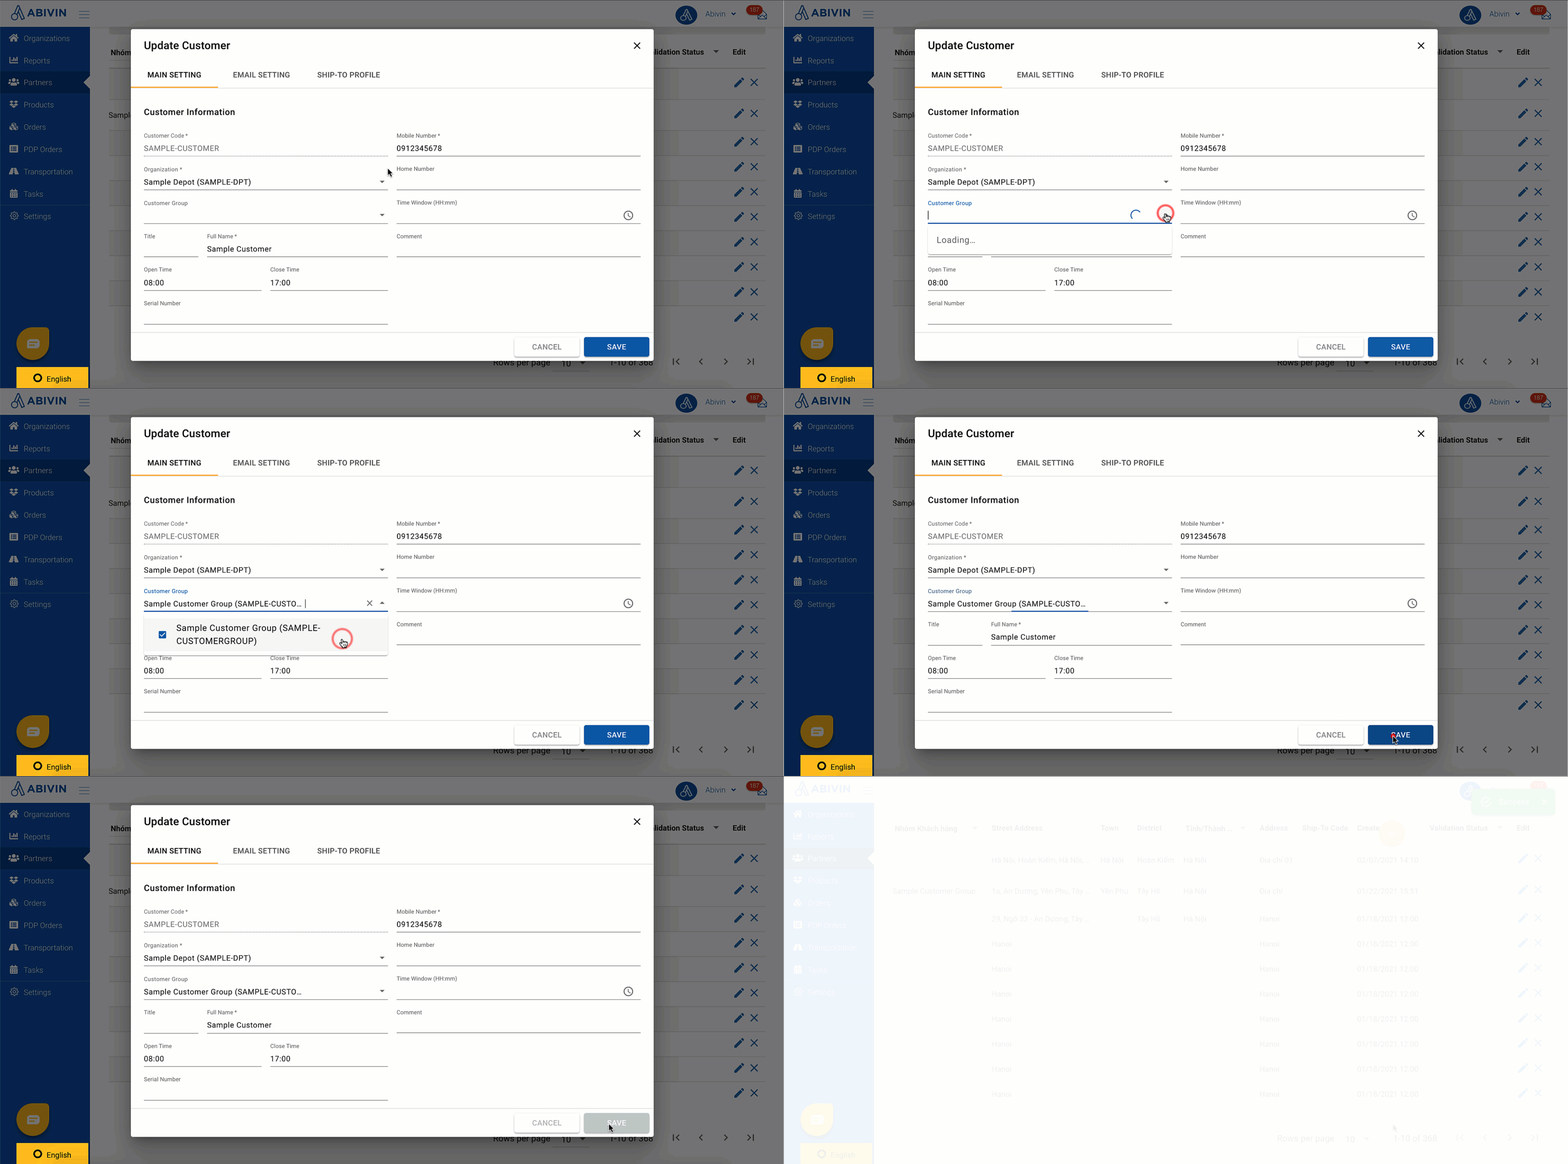
Illustration (English)
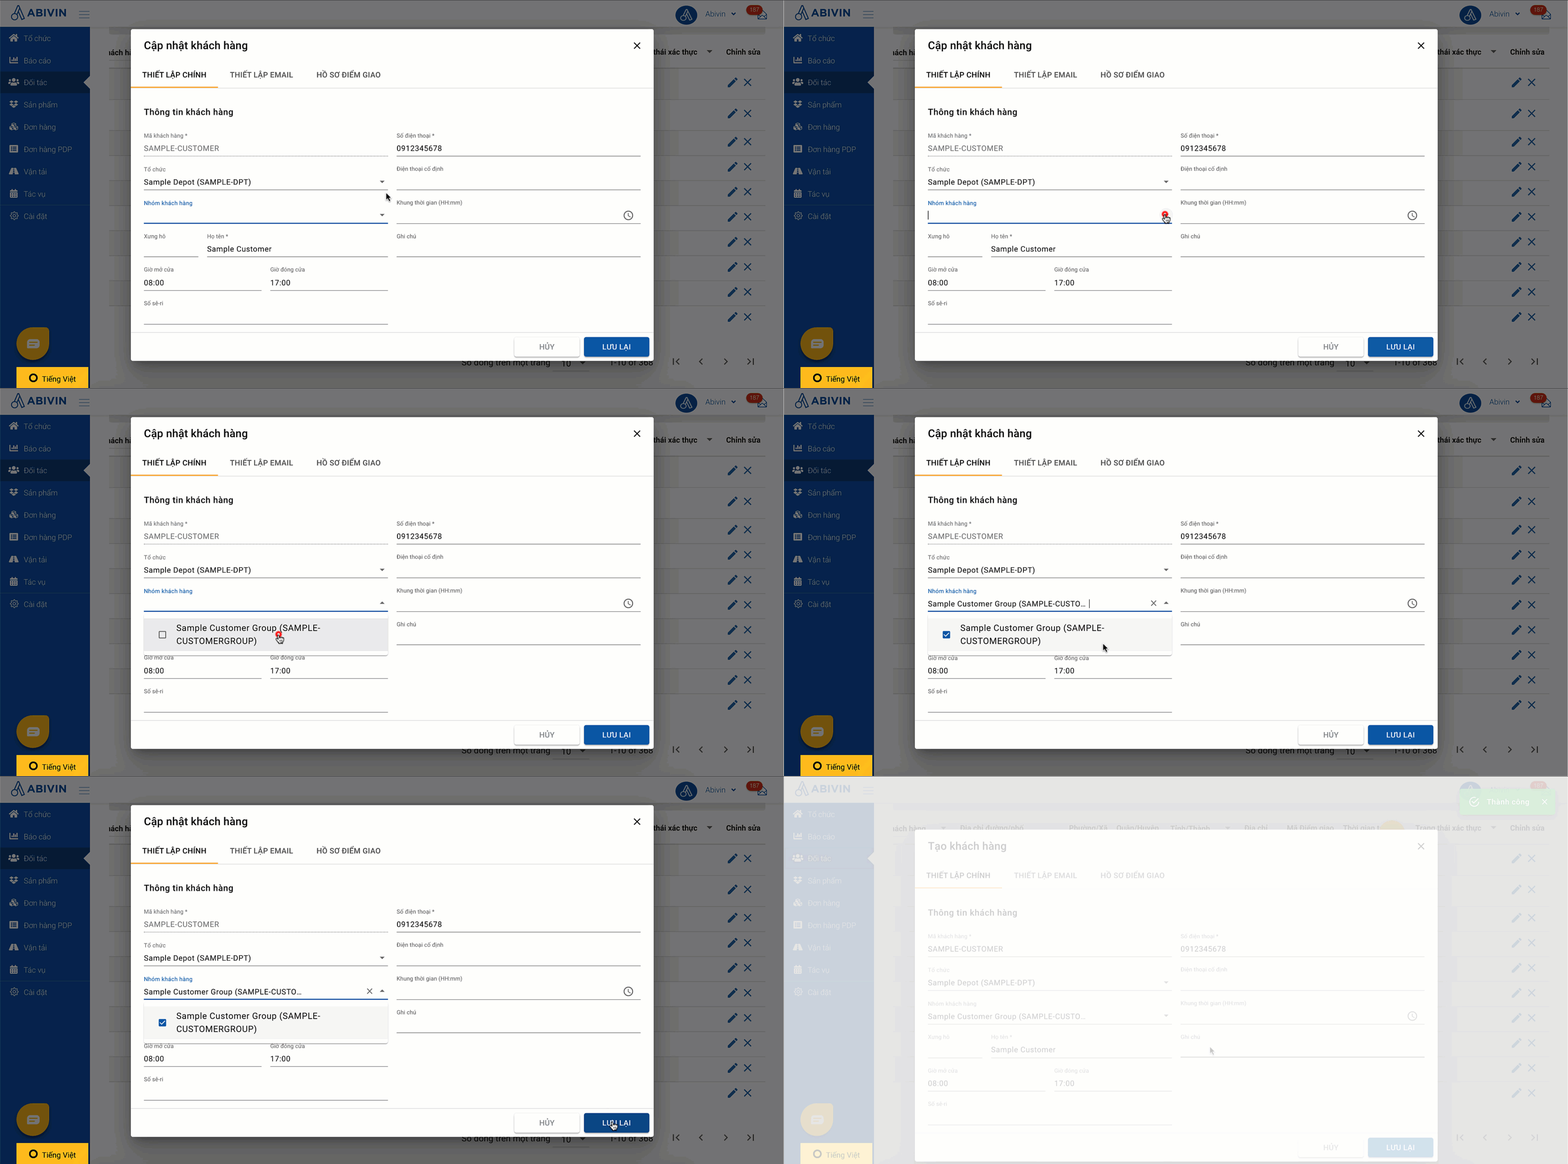
Illustration (Vietnamese)
Allocate Customers Using The Excel Import File
- If there are: 1. multiple Customers which have been created earlier than the Customer Groups, or 2. multiple new Customers, you can use the Excel import file to allocate them to the Customer Groups
- 1 - Download the Excel import file from the Web app. Input the information of the new Customers as well as the existing Customers which you want to allocate to the Customer Groups
- Note: For the existing Customers, you can export them to the Excel file, then copy the information from the export file into the import file
- 2 - Copy the Customer Group Code of the appropriate Customer Group on the Web app. The Customer Group Code can be found under the Group Code column in the Partners > Customer Groups tab
- 3 - In the Customer Excel import file, paste the Customer Group Code into the Partner Group Code cell of each Customer
- 4 - Upload the Customer Excel import file onto the Web app
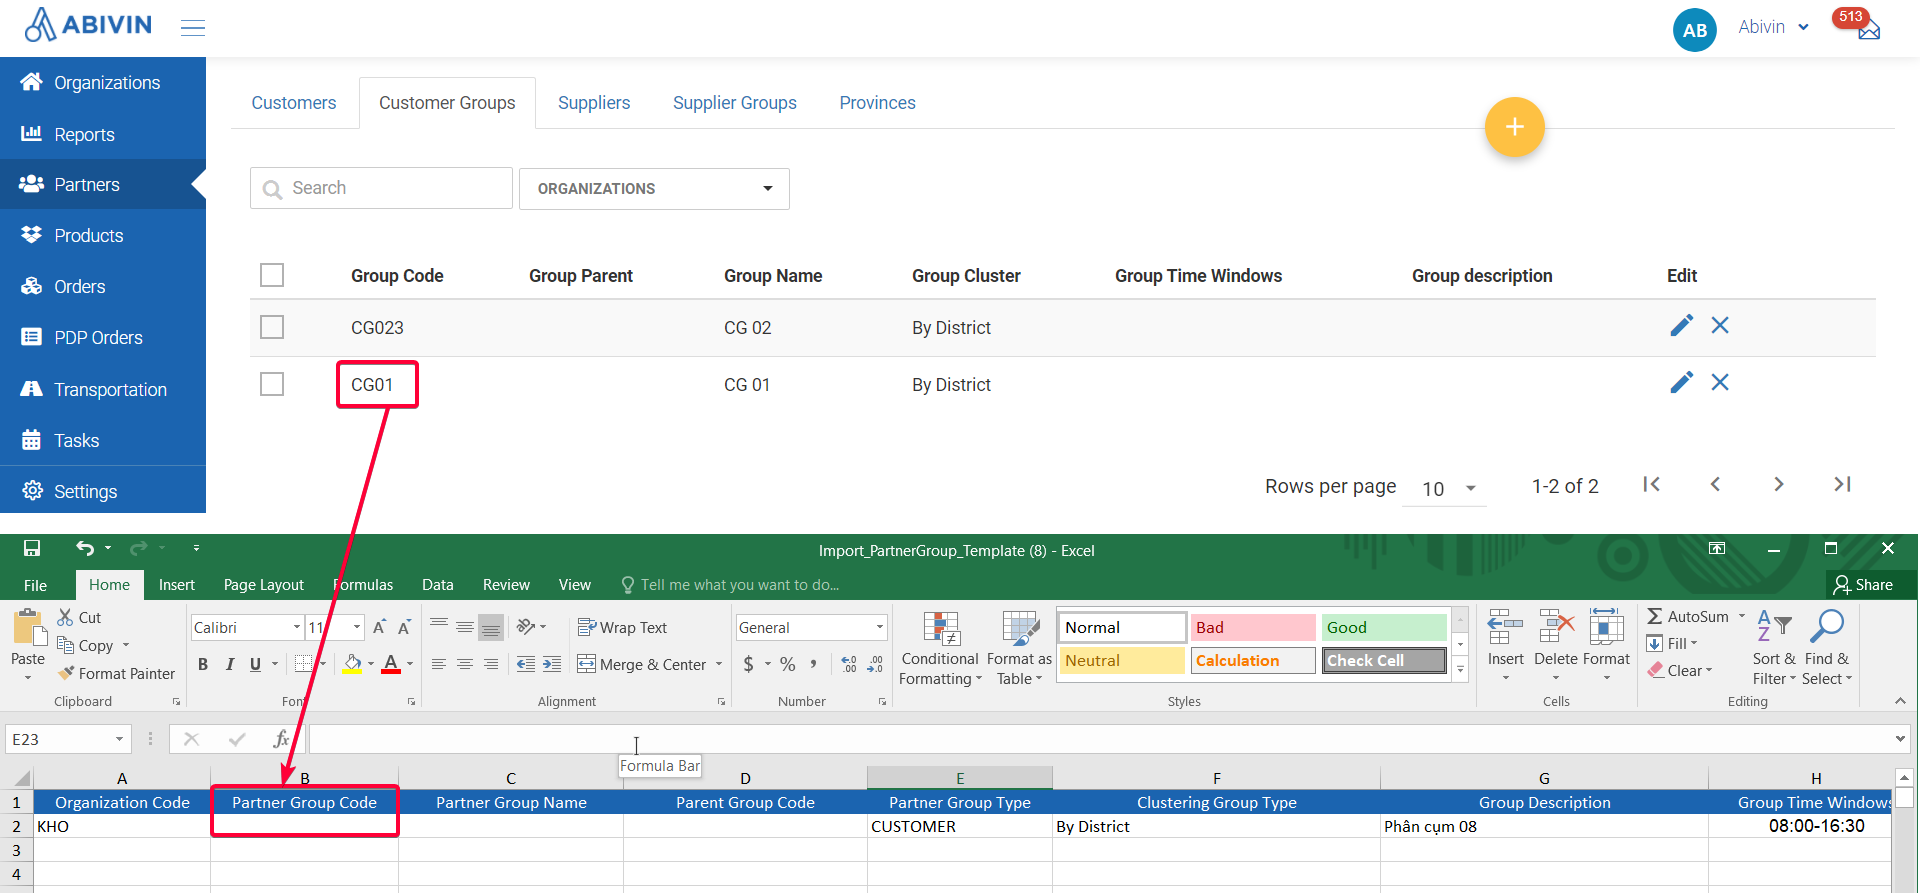
Illustration (English)
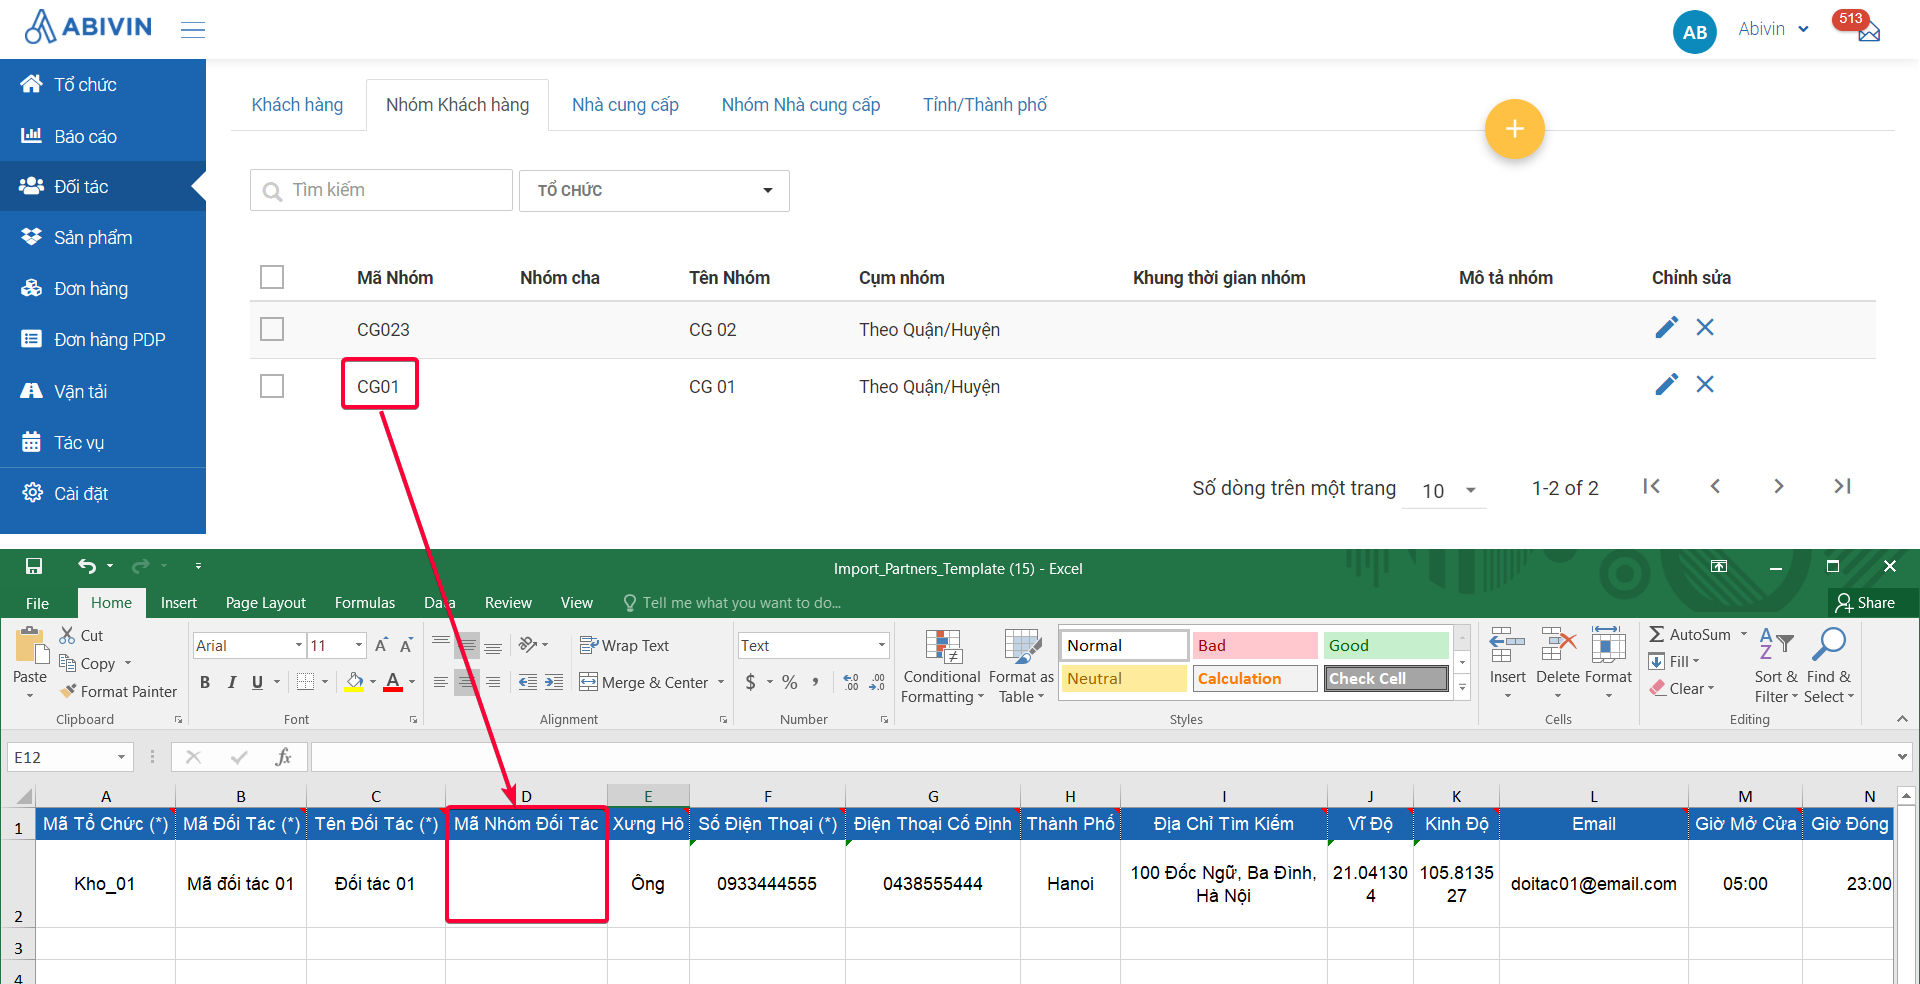
Illustration (Vietnamese)
Update Customer Groups
- You have two methods to update Customer Groups
- Method 1: Update a single Customer Group using the Webform
- Method 2: Update multiple Customer Groups using the Excel import file
Update Single Customer Group Using The Webform
Bulk Update Multiple Customer Groups Via Excel Import File
- If you wish to update multiple Customer Groups at once, you can use the Excel Customer Group import file
- To do that, perform the steps below:
- 1: Copy the management codes of the Customer Groups you wish to update from the Web App (Can be found under Group Code column in tab Partners > Customer Groups) and the Organization Codes of their managing Depots (Can be found under Organization Code column in Organizations > Organizations tab) then paste into the Partner Group Code and Organization Codecells in the Excel import file, respectively
- 2: Input the new information of the Customer Groups into other cells then save the file
- 3: Open the Upload Data form. On this form, tick the Overwriting existing data checkbox then upload the Excel import file. Upon importing, the system will replace the data of the existing Customer Groups as you intend

Upload Data Form (English & Vietnamese)
Route optimization
- After configuring the customer groups as above, you can proceed to create orders and optimize routes as usual
- The system will perform checking the data of the customers to see what customer groups they belong to, and allocate the vehicles accordingly
- Below is an example of using customer groups
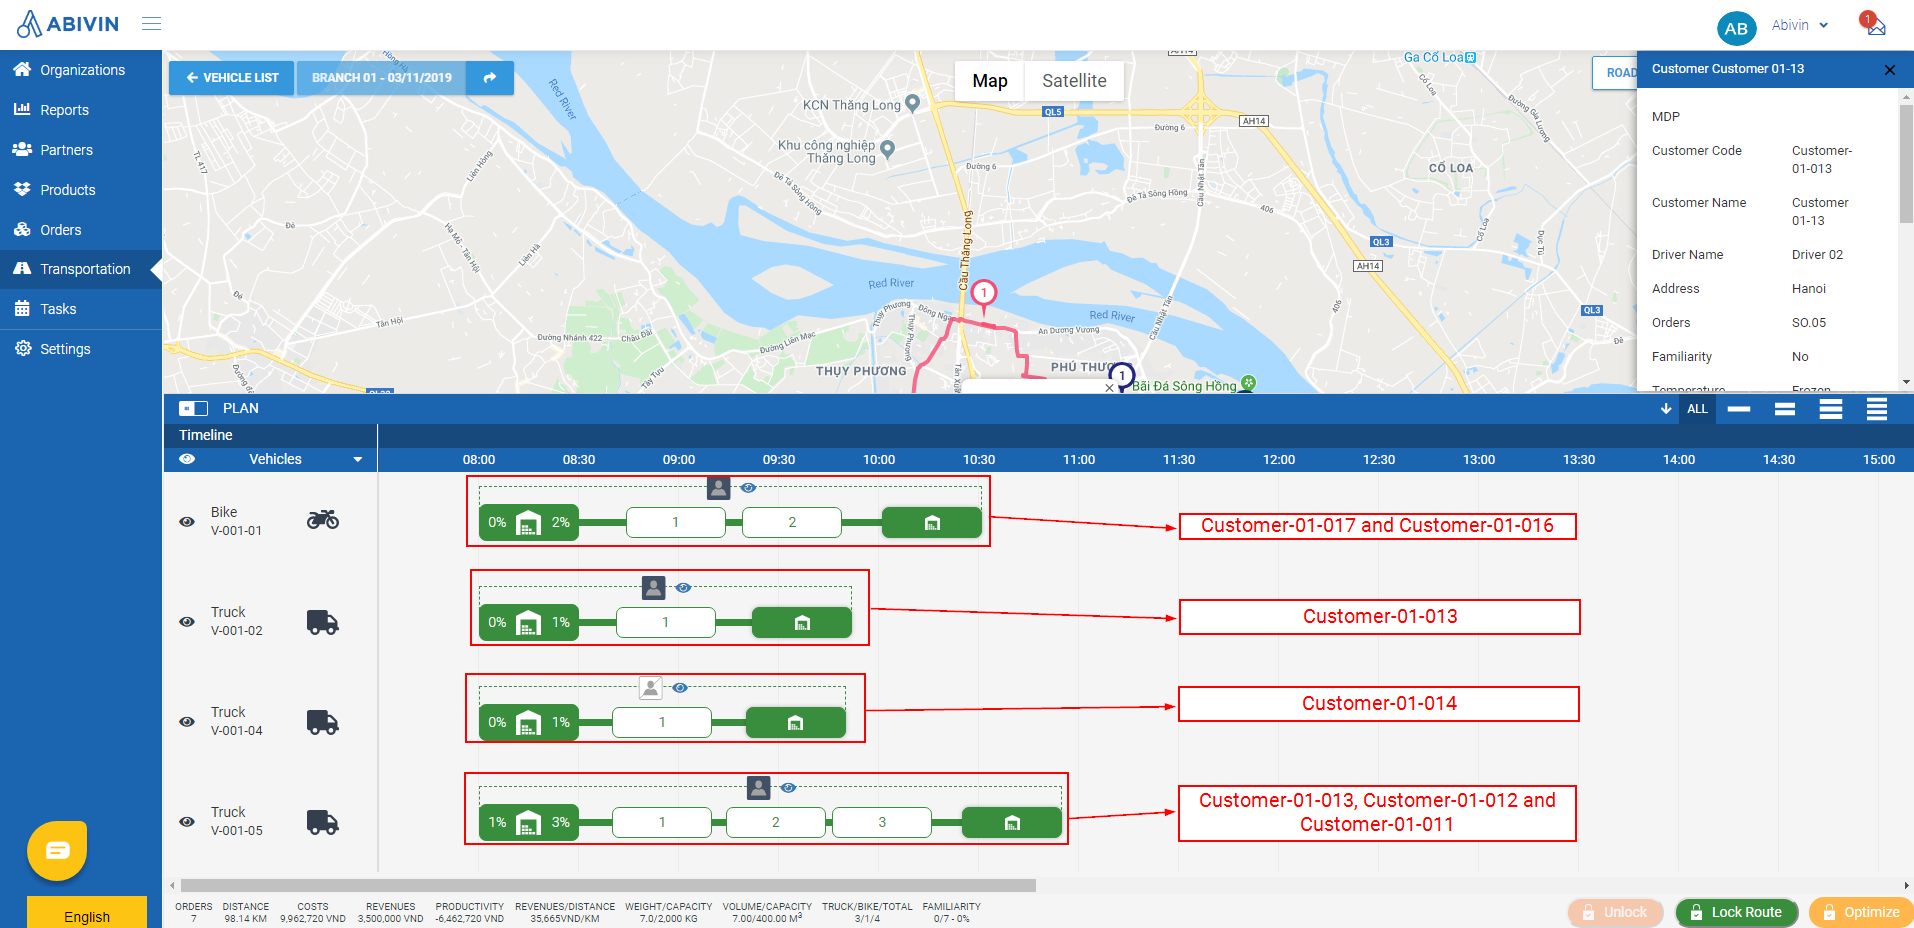
- Customer Customer-01-017 belongs to Customer group Associated Group 01; Customer Customer-01-016 belongs to Customer group Associated Group 02. These two customer groups are Inter-associated customer groups and have associations with each other
- Customer Customer-01-015 belongs to Customer group Self-associated Group 01; Customer Customer-01-014 belongs to Customer group Self-associated Group 02. These two customer groups are two Self-associated customer groups
- Customer Customer-01-013 belongs to customer group Normal Group 01; Customer Customer-01-012 belongs to customer group Normal Group 02. These two customer groups are Normal customer groups
- Customer Customer-01-011 doesn't belong to any customer group

- These seven customers place orders on the same date. During the route optimization process, the vehicles fleet have been allocated as follow:
- One vehicle will deliver to Customer-01-017 and Customer-01-016 only
- One vehicle will deliver to Customer-01-015 only
- One vehicle will deliver to Customer-01-014 only
- One vehicle will deliver to Customer-01-013, Customer-01-012 and Customer-01-011
Customer Group Geographic Clustering by Administrative Division
- Customer Group by Administrative Division is a feature to help group Customers that locate in the same administrative division (Province/District/Town). During the Route Plan Optimization process, the routing algorithm will use this information to distribute the delivery vehicles accordingly. Read more in this article: Geographic Clustering by Administrative Divisions
Customer Group Geographic Clustering by User-drawing
Beginner's Guide
Create a Customer Group
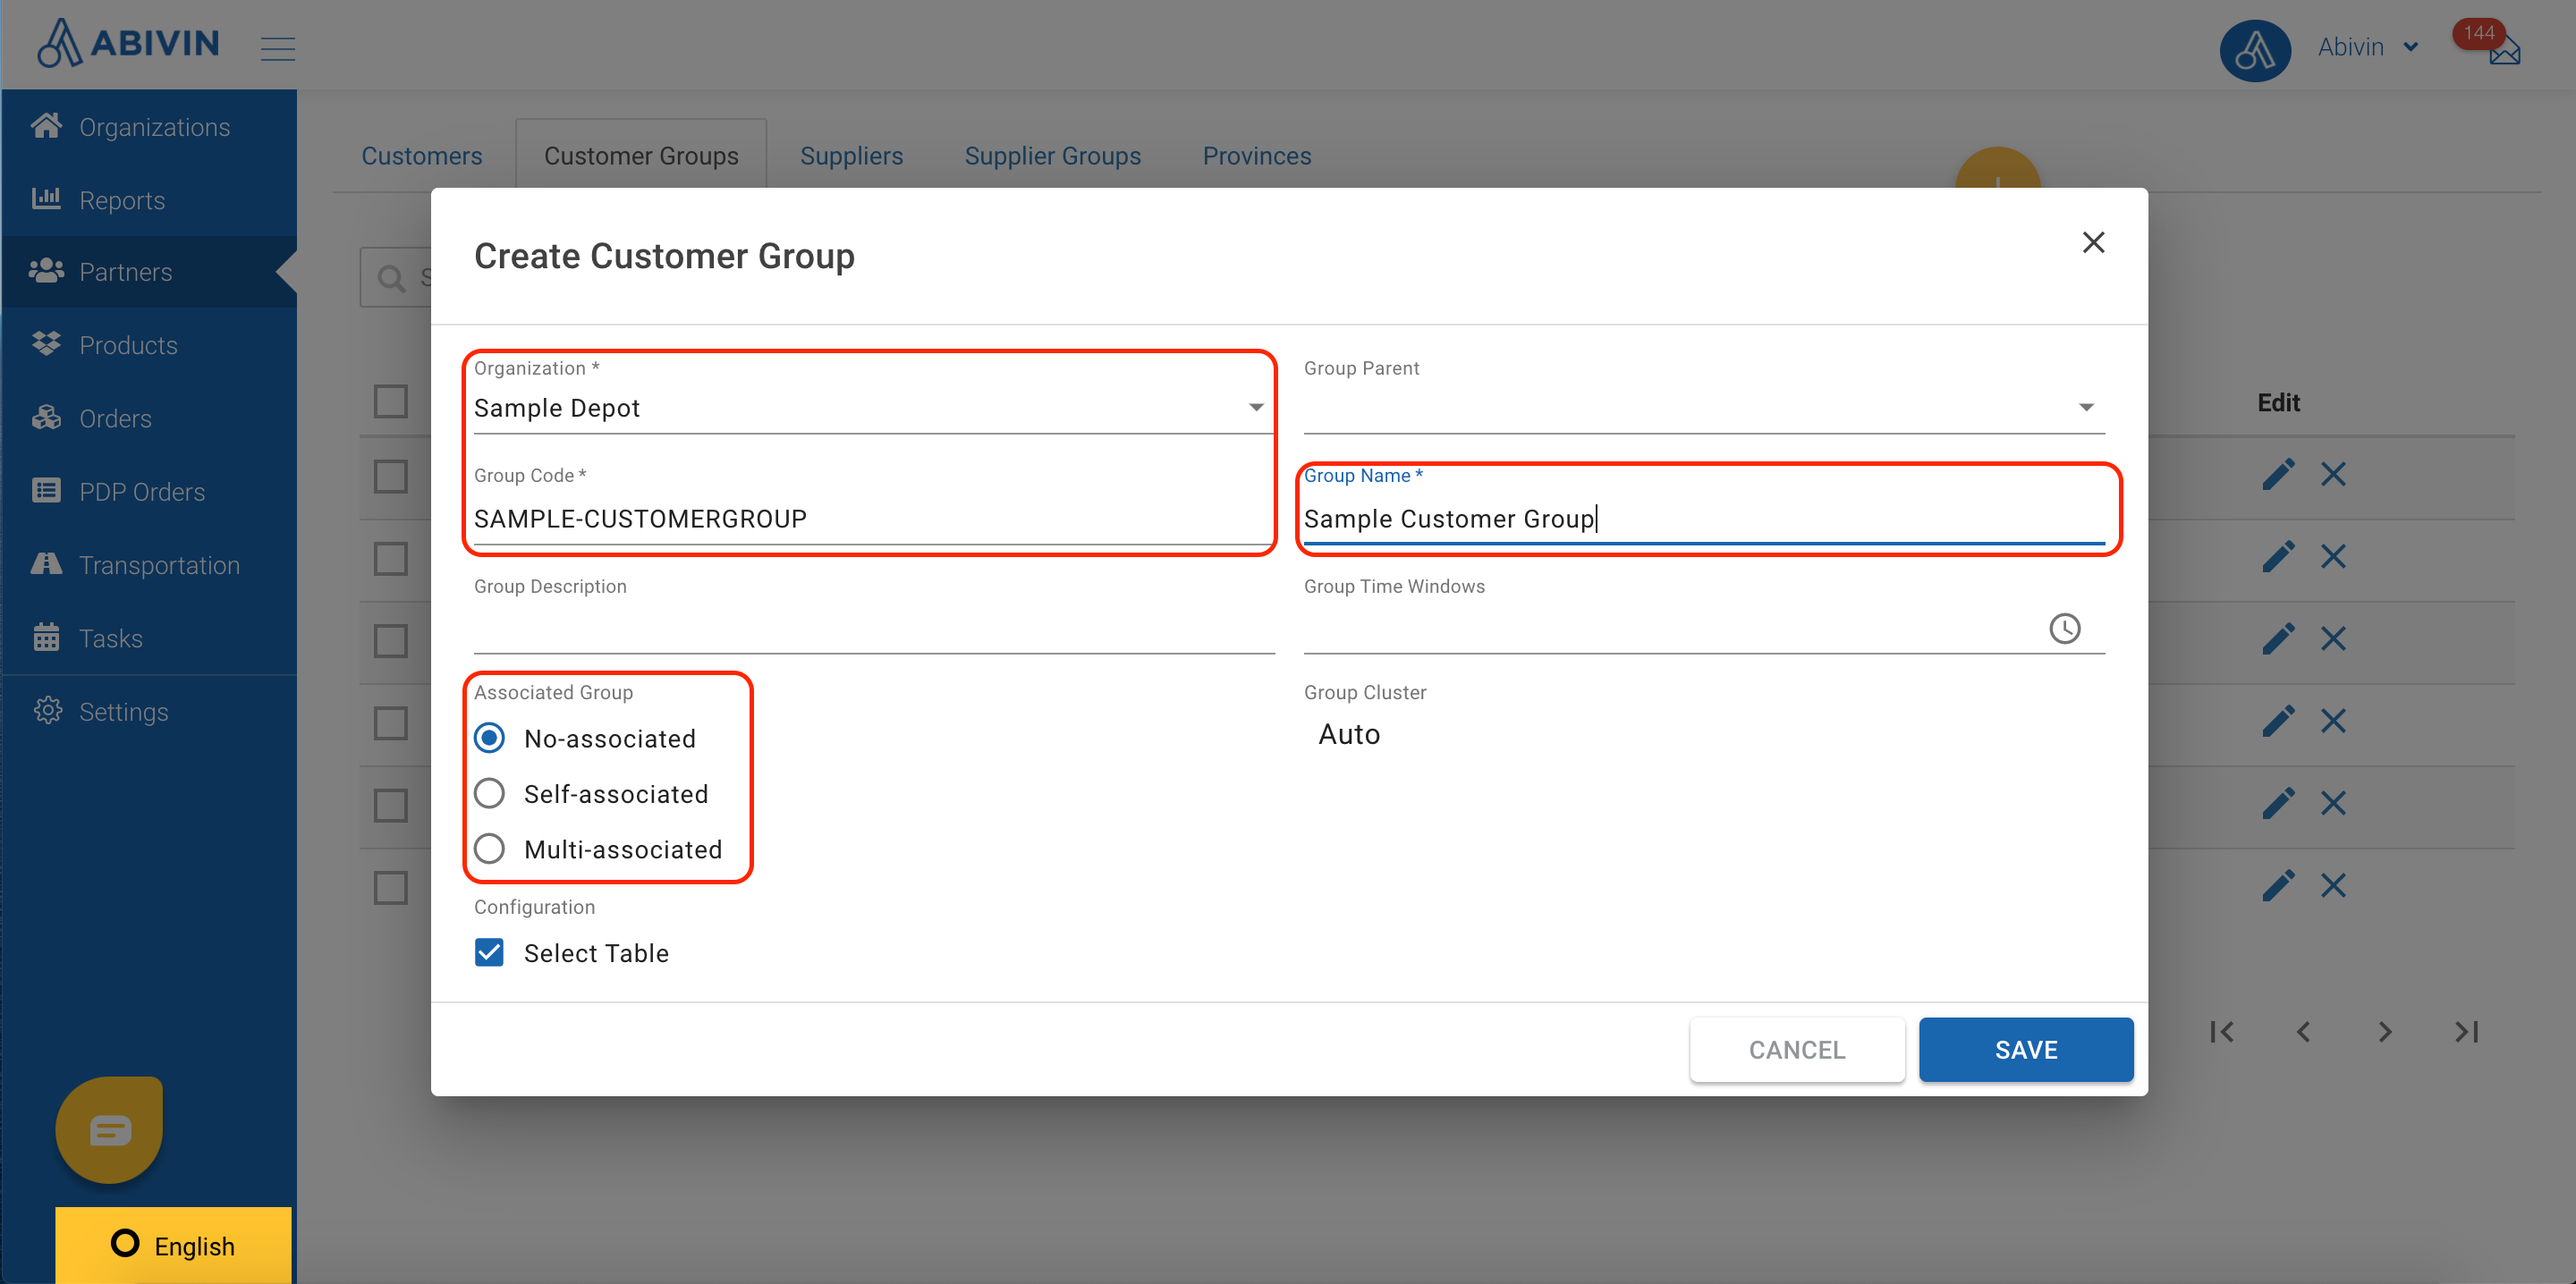
- Here is how you can create a customer group using Web form:
- Step 1: Navigate to Partners > Customer Groups tab.
- Step 2: Click on the symbol Create (the symbol).
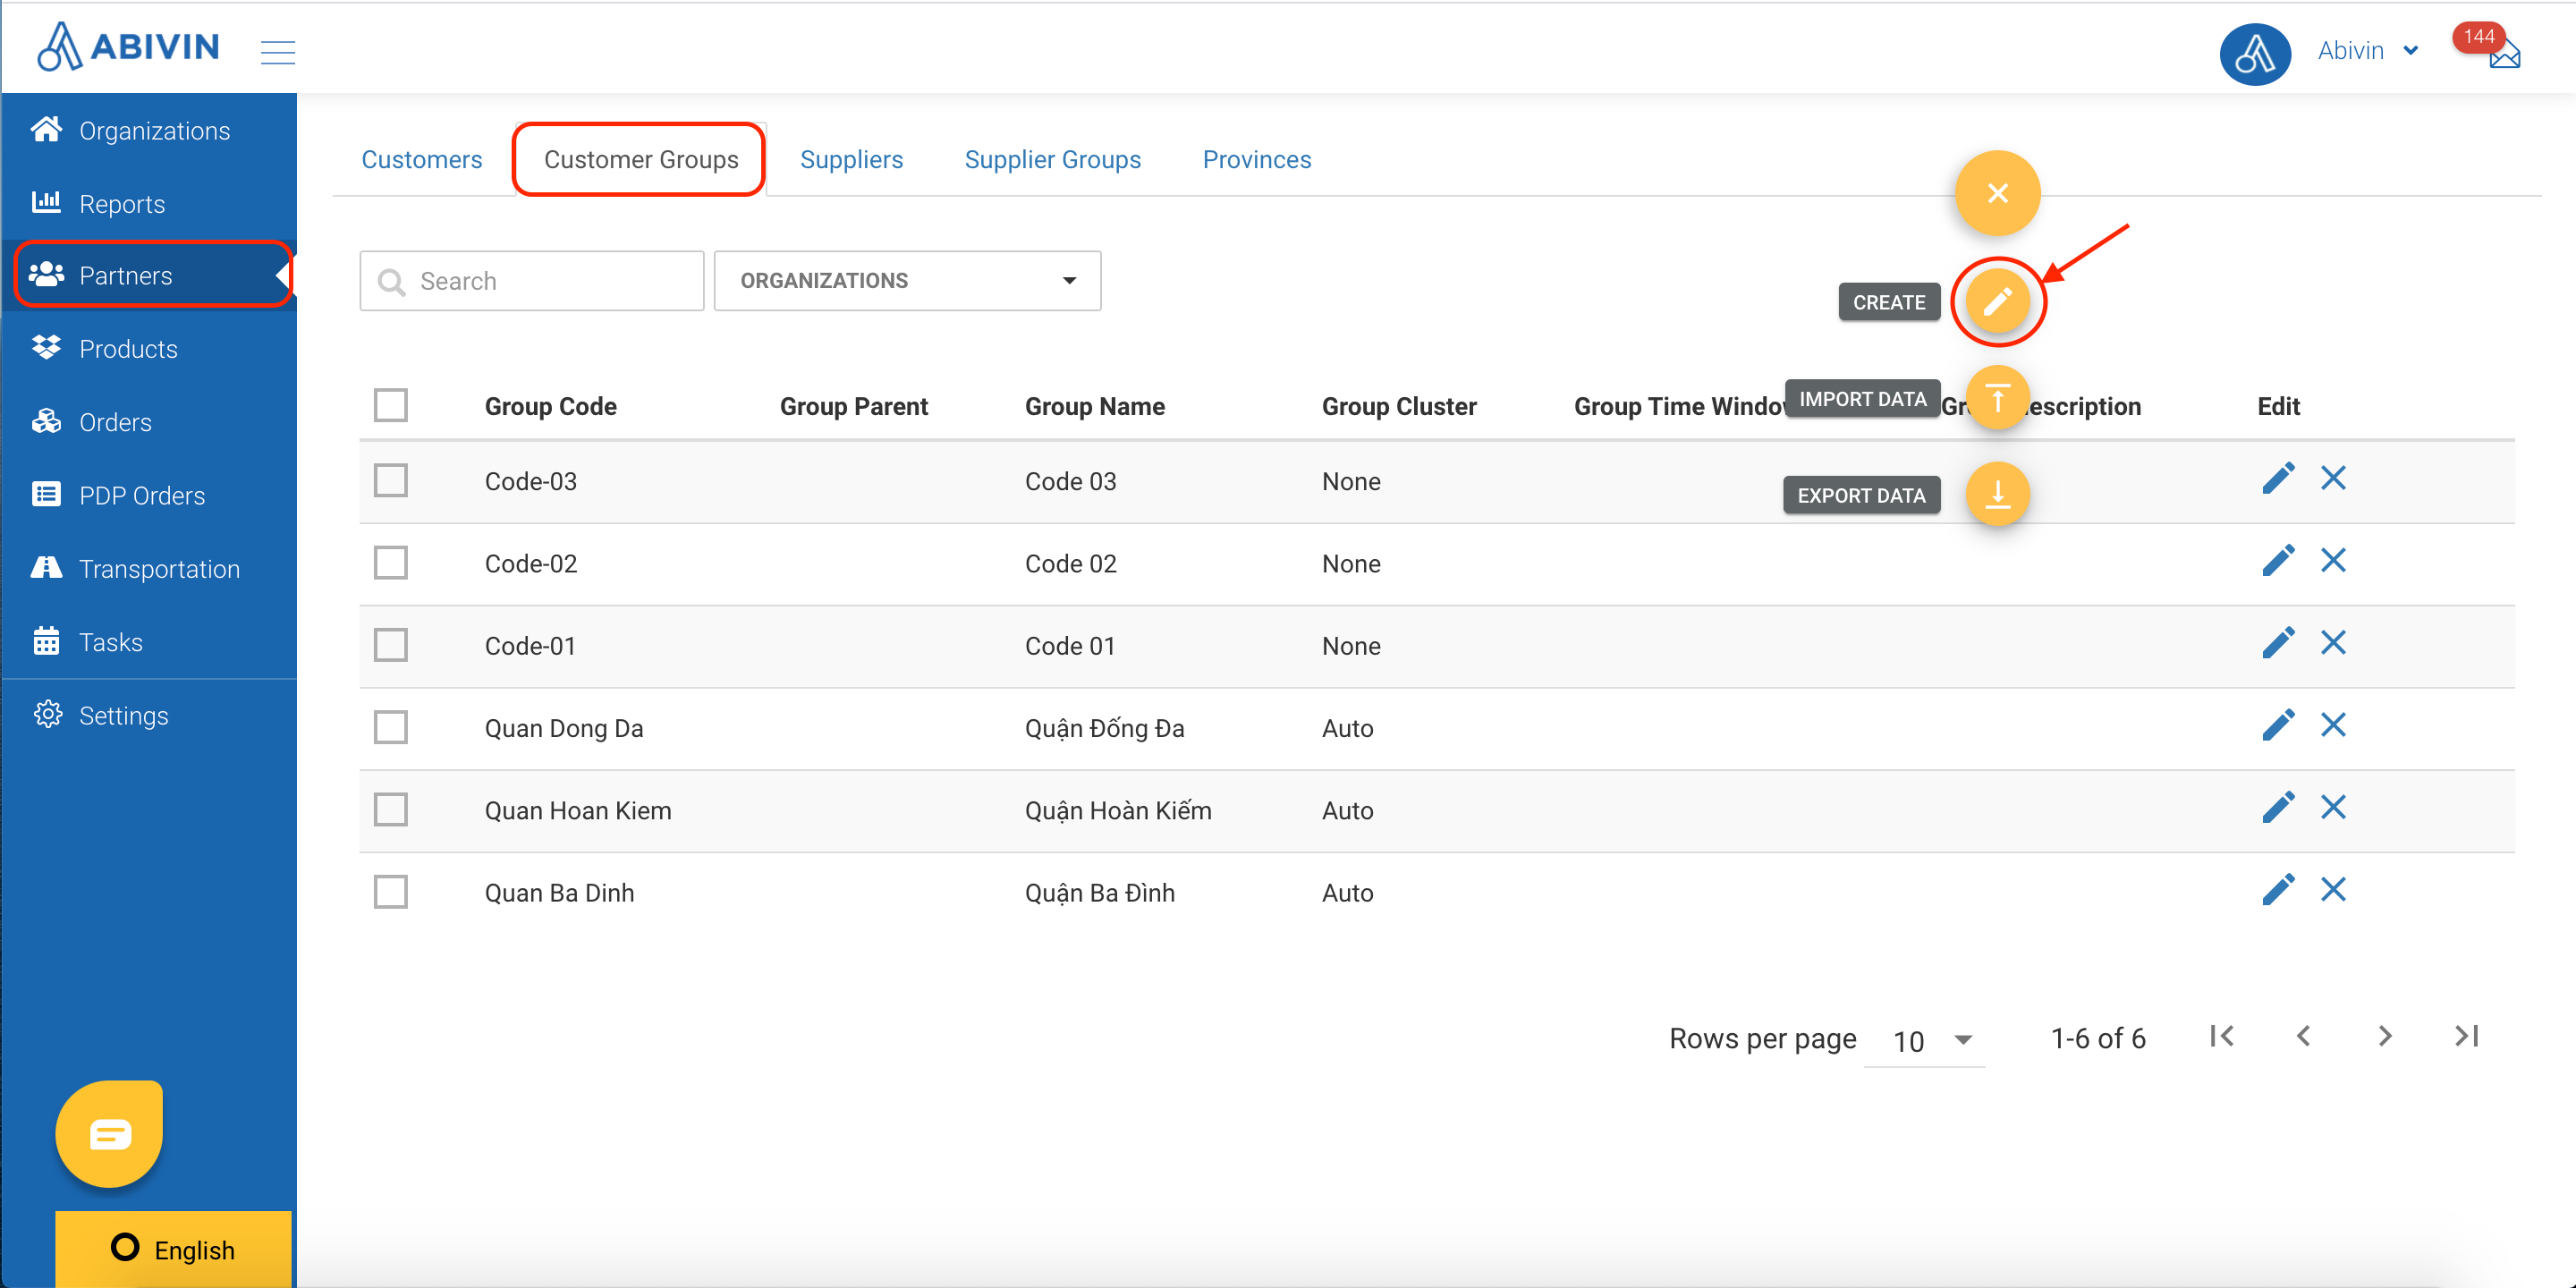
- Step 3: Input the required fields:
- Organizations: Input Branch which manages the customer group being created: Sample Branch
- Group Code: Input the management code assigned to the customer group being created: SAMPLE-CUSTOMERGROUP
- Group Name: Input the name of the customer group being created: Sample Customer Group
- Associated Group: Choose one of the three types of customer groups: No-associated; Self-associated; Multi-associated. Please click here to learn more about these types.
- Example:
- To learn more about notes and input rules of the fields above, please click here.
- Step 4: Click SAVE.
Updated about 2 months ago
