Manage Users
User Type
- In this model, essentially there seven User types:
User Type | Management Organization | Description |
|---|---|---|
Top Administrators | Manufacturer | Users who will manage all resources |
Order Creator Users | Branch | Users who will create Orders on behalf of the Depots |
Order Inspector Users | Branch | Users who will inspect and approve/decline the Orders that have been created and submitted by the Order Creators |
Route Planner Users | Branch | Users who will perform Route Plan Optimization process for the Orders that have been approved by and submitted from the Order Inspectors |
Transporter Administrators | Transporter | Users who will accept/decline the optimized Delivery Routes that have been optimized by and forwarded from the Route Planners |
Warehousemen | Depot | Users who will hand over products to the Transporter's drivers (If they belong to the Origin Depot) or receive products from the Transporter's drivers (If they belong to the Destination Depot) |
Drivers | Transporter | Users who will operate the vehicles, travel to the Origin Depot, receive products and deliver to the Destination Depot |
- These User types will be allocated into User Groups. Each User Group is assigned different permissions
Create User group
Locate User group list
- Navigate to Organizations > Group List tab
- This tab lists all the User groups in your organization
- You would notice that the Administrator User groups were automatically created for every available organization after those organizations have been created
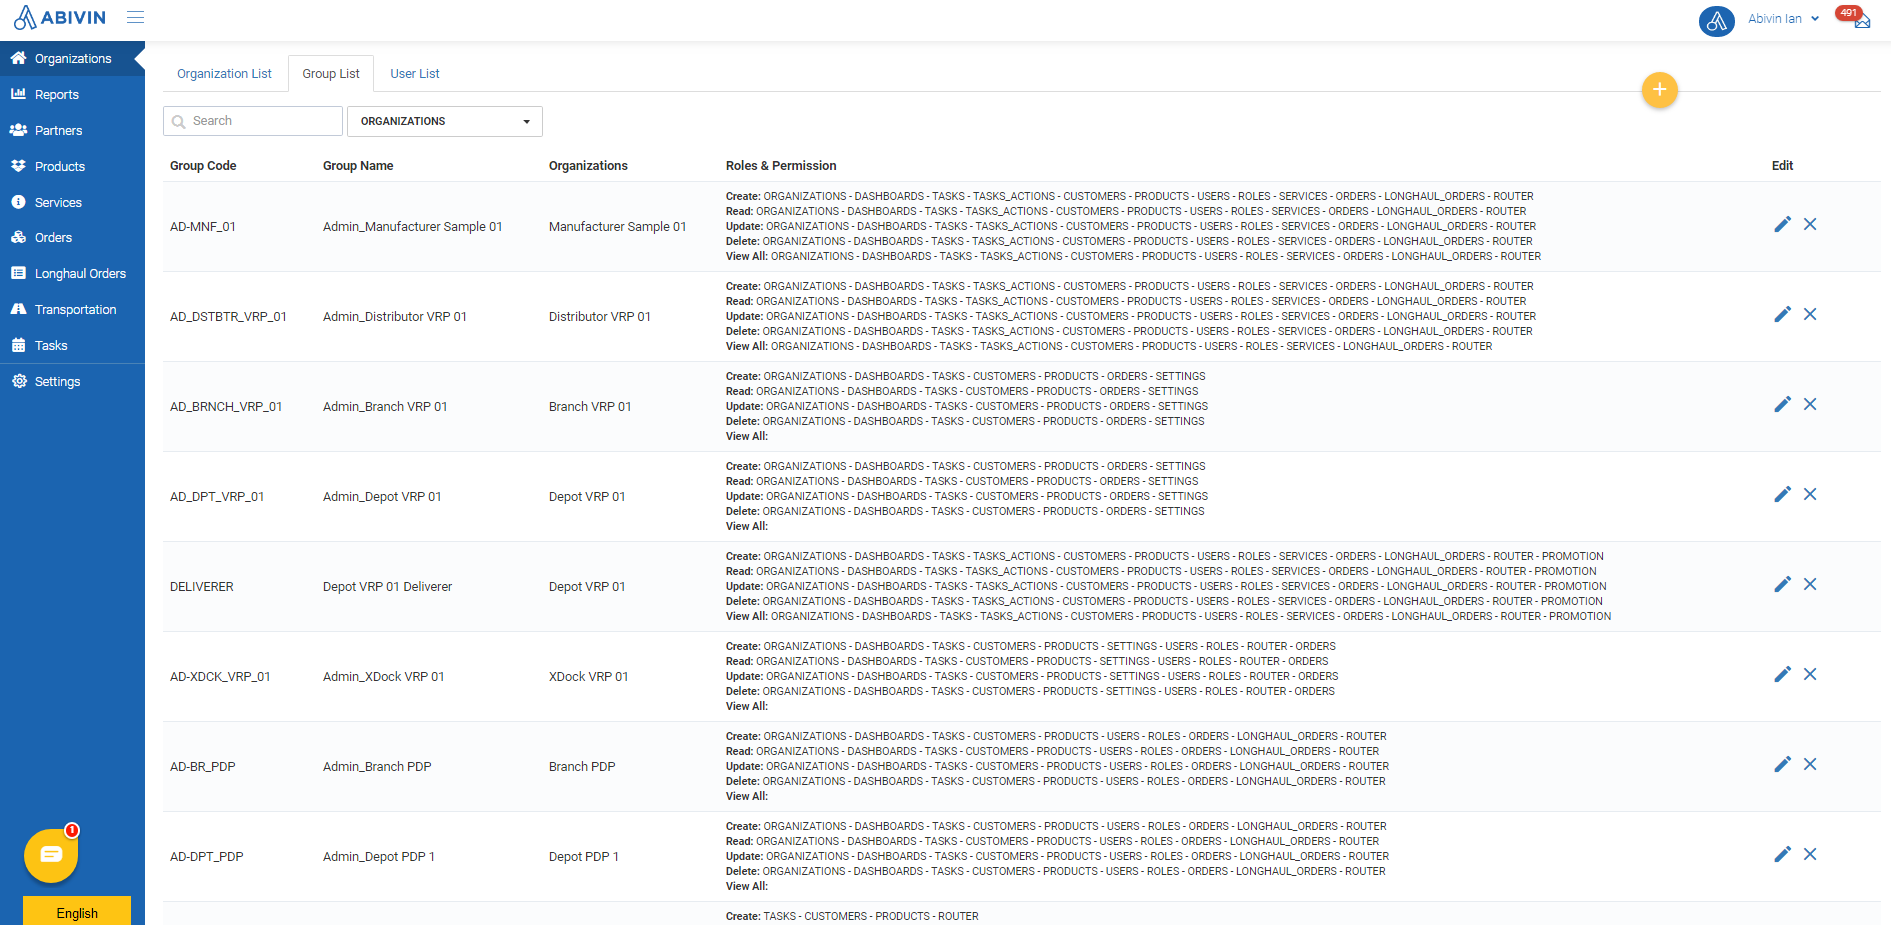
- The Warehousemen User groups will also be created automatically for every available organizations of Depot type, with the User Group Code WAREHOUSEMEN
- The Driver User groups will also be created automatically for every available organizations of Transporter type, with the User Group Code DELIVERER
Create User group
- The User group can only be created manually using Web form
- Please refer to the CRUD functions article to know the general steps about creating single objects using Web form
Basic User group information
- Below is the list of basic information fields of a User group
Information field | Description & Input |
|---|---|
Organization (Required) | 1. Description: |
Group Code | 1. Description: |
Group Name | 1. Description: |
Description | 1. Description: |
Assign CRUD rights to User group
- On the Group Information screen, apart from the basic information fields, you will also see a Module table. This table is where you could enable/disable various modules and corresponding CRUD rights for each User group
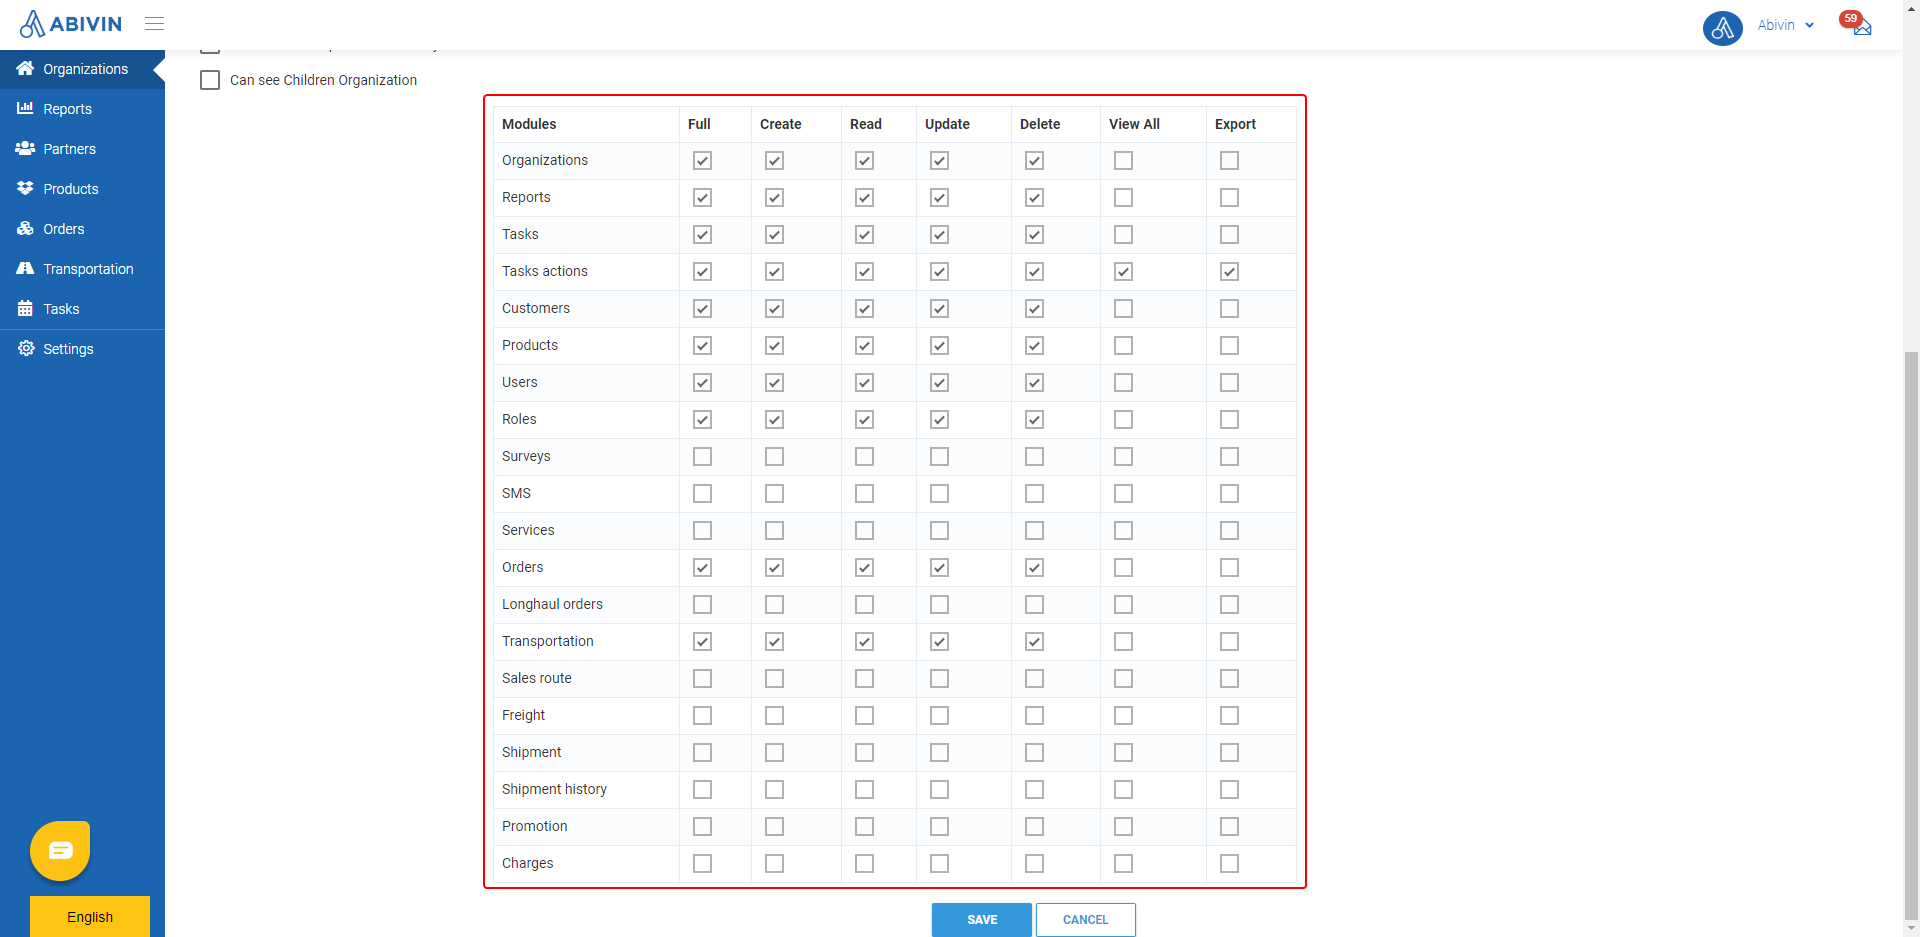
- To immediately navigate to the CRUD rights of a specific User group, click on the corresponding link in the below table:
User group | CRUD rights |
|---|---|
Top Administrators | |
Order Creators | |
Order Inspectors | |
Route Planners | |
Transporter Administrators | |
Warehousemen | |
Drivers |
Top Administrator User group
- Below are the essential CRUD rights you have to assign to this User group
Order Creator User group
- Before assigning CRUD rights to this User group, you have to make sure this User group can see all Depots under their Branch's management by clicking on Can see Children Organization check box
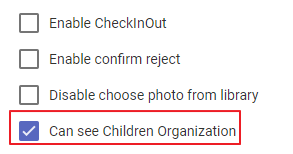
- Next, click on Order Issuer radio box under Order Approval Role field
- The field Authorized Depot will appear below. This is where you need to select the Depots which you want to grant this Order Issuer User group the authorization to create Orders on behalf of

- To select the Depots, click on the field below the Depot text. Input the Organization Code/Organization Name of the appropriate Depots into the search bar, then select from the drop down menu
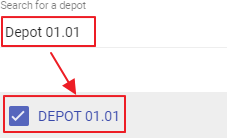
- You can also select all Depots under the Branch by clicking on Access All check box

- The selected Depots are hereby called Authorized Depots, and the remaining unselected Depots are called Not Authorized Depots
- Combining with the Depot types that have been mentioned at the article Manage Organizations, we have a total of six Depot groups based on the authorization: Authorized Internal Depot; Not Authorized Internal Depot; Authorized Customer Depot; Not Authorized Customer Depot; Authorized Supplier Depot; Not Authorized Supplier Depot
- After selecting the Depots, assign the CRUD rights to this User group as below:
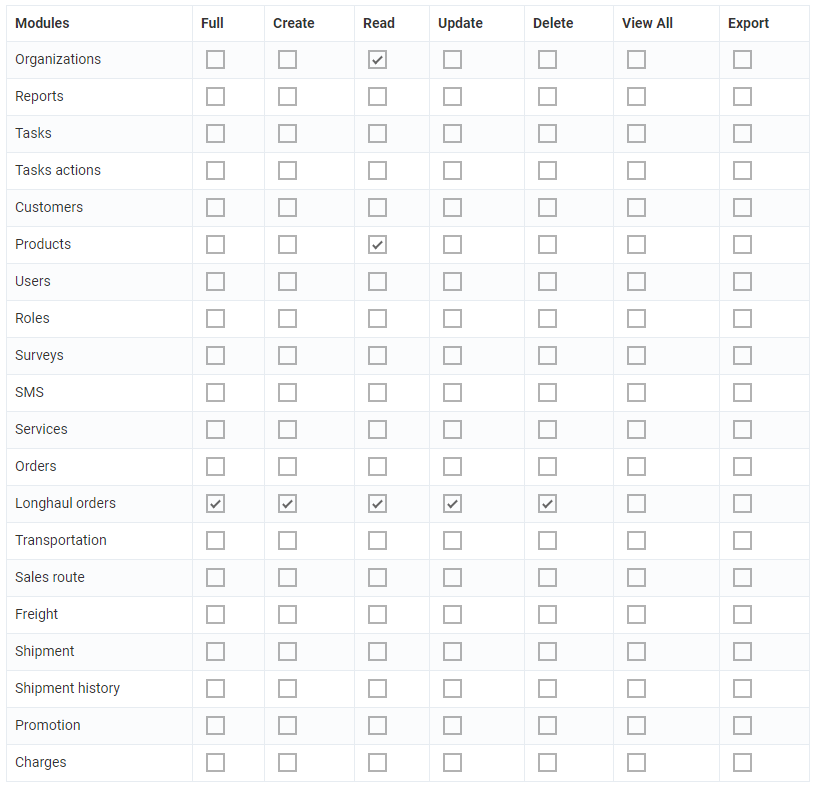
Order Creating permission
- You also need to specify the Order Creating permission for this User group. To do this, perform the following steps:
- Navigate to Organizations > Organization List tab
- Click the icon Edit of the Branch which manages this Order Creator User group
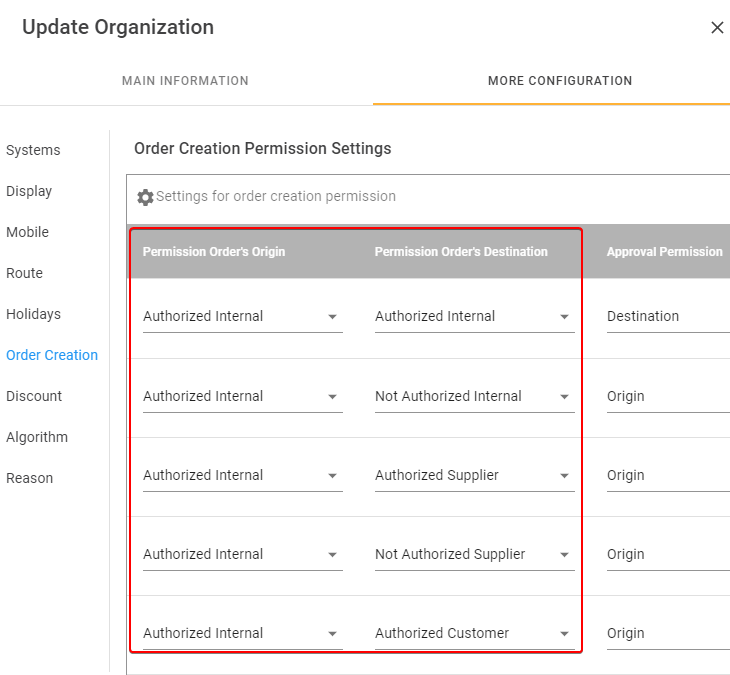
- On the form Edit Organization, navigate to the sub-tab More Configuration > Order Creation
- Here you can configure the Depot group pairs that the Order Creator User Group can create Orders on behalf of
- Sequentially click on the fields below the text Permission Order's Origin and Permission Order's Destination, select the Depot group pair which you want to grant the Order creating permission to the Order Creator User group
- For example: If the value selected from the field Permission Order's Origin is Authorized Internal and the corresponding value selected from the field Permission Order's Destination is Authorized Supplier, that means the Order Creator User group is granted the permission to create Orders from an Authorized Internal Depot to an Authorized Supplier Depot
- To add more Depot group pairs, click on the button Add Permission to add additional rows
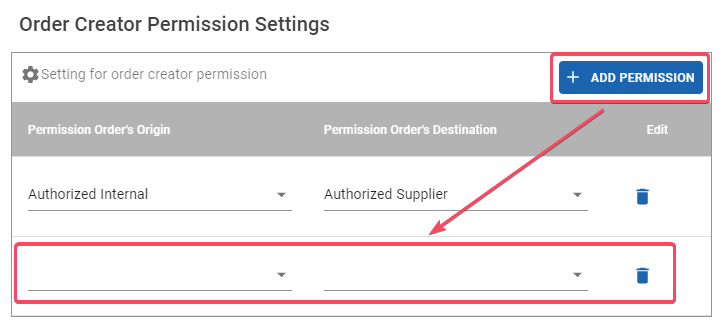
- To remove a Depot group pair, click on the corresponding recycle bin icon of that pair

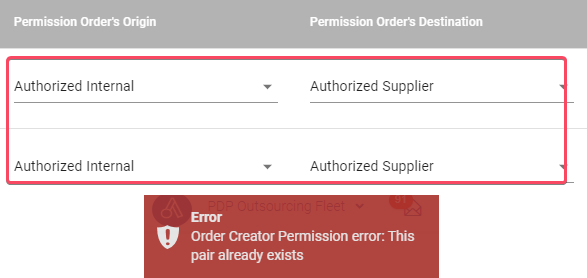
- If you accidentally add duplicate pairs, then as you click on the button Save, there will be an error message
Order Inspector User group
- Before assigning CRUD rights to this User group, you have to make sure this User group can see all Depots under their Branch's management by clicking on Can see Children Organization check box

- Next, click on Order Inspector radio box under Order Approval Role field
- The Depot field will appear below. This is where you need to select the Depots of which you want to grant this Order Inspector User group the right to inspect orders

- To select the Depots, click on the field below the Depot text. Input the Organization Code/Organization Name of the appropriate Depots into the search bar, then select from the drop down menu
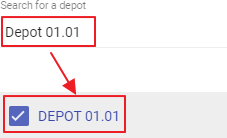
- You can also select all Depots under the Branch by clicking on Access All check box

- After selecting the Depots, assign the CRUD rights to this User group as below:
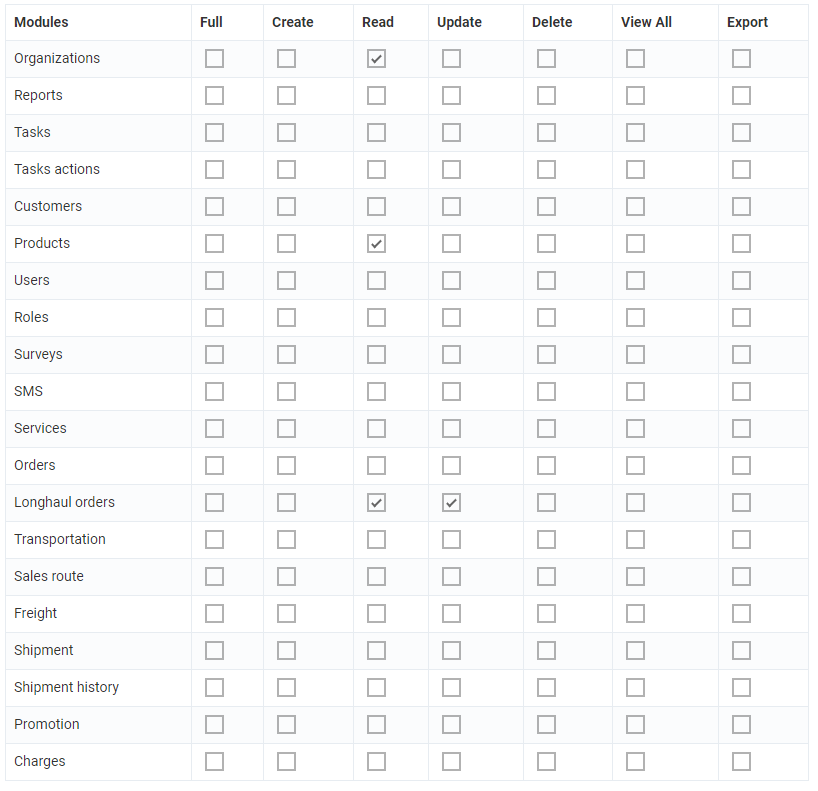
Order Approving permission
- You also need to specify the Order Approving permission for this User group. To do this, perform the following steps:
- Navigate to Organizations > Organization List tab
- Click the icon Edit of the Branch which manages this Order Inspector User group
- On the form Edit Organization, navigate to the sub-tab More Configuration > Order Creation
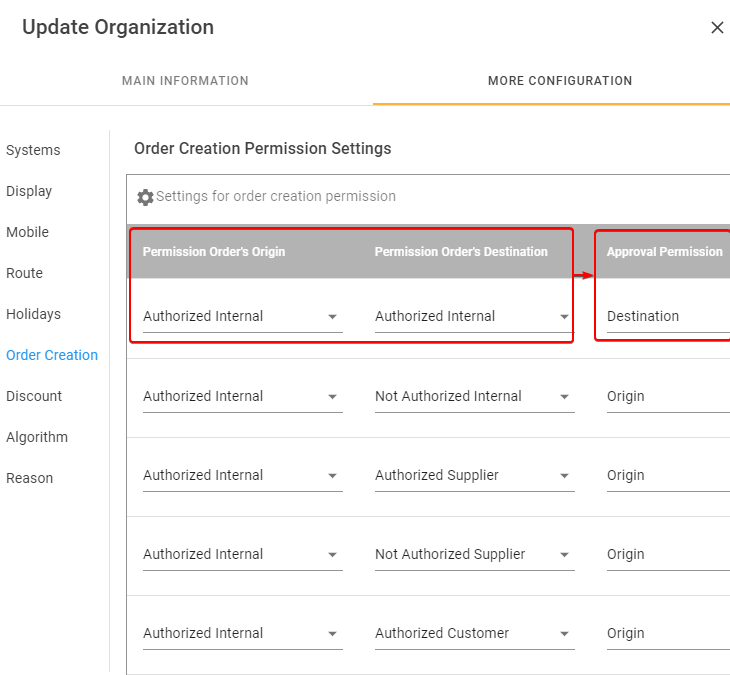
- Here, with each Depot group pair that have been created earlier for the Order Creator User Group above, you need to specify for which Depot (Between the Origin and Destination Depot) that this Order Inspector User Group can approve Orders
- For example: If the value selected from the field Permission Order's Origin is Authorized Internal, the corresponding value selected from the field Permission Order's Destination is Authorized Supplier, the value selected from the field Approval Permission is Destination, that means the Order Inspector User group can approve every Order that originates from an Authorized Internal Depot and will be delivered to an Authorized Supplier Depot as long as the Authorized Supplier Depot belongs to the list of authorized Depot configured above for this User Group
Route Planners User group
- Before assigning CRUD rights to this User group, you have to make sure this User group can see all Depots under their Branch's management by clicking on Can see Children Organization check box
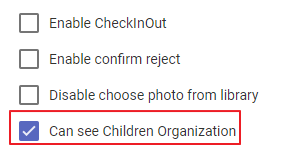
- Next, click on Route Planner radio box under Order Approval Role field

- Then, assign the CRUD rights to this User group as below:
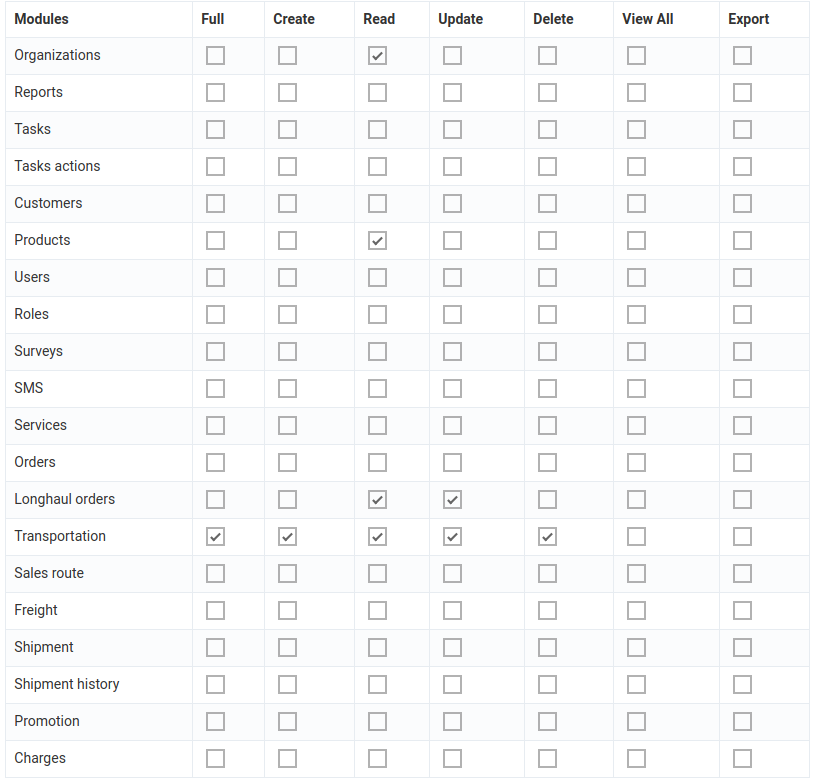
Transporter Administrator User group
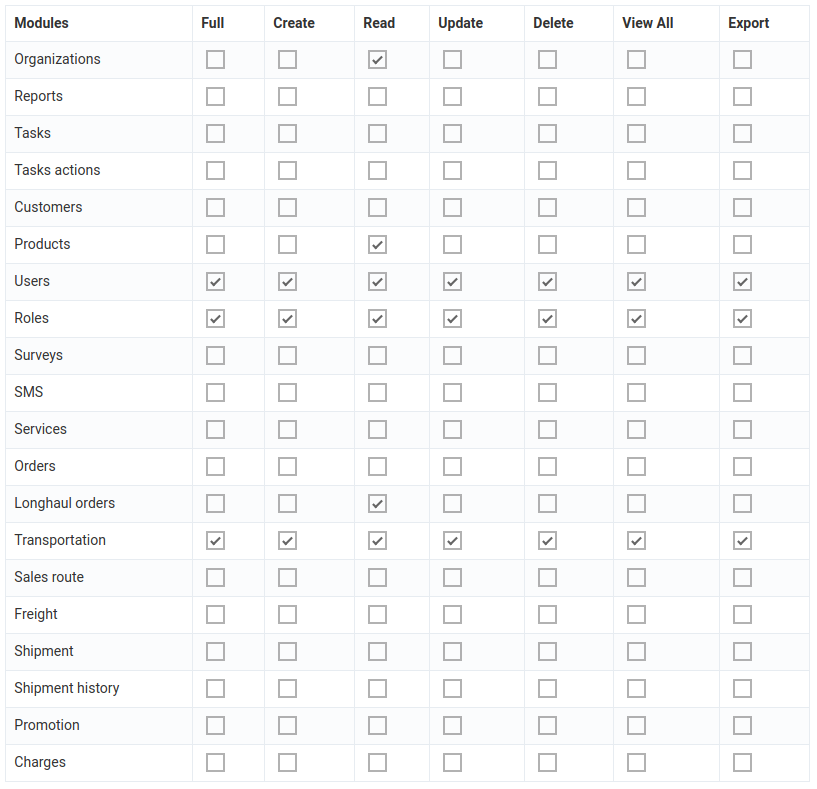
Transporter Driver User group
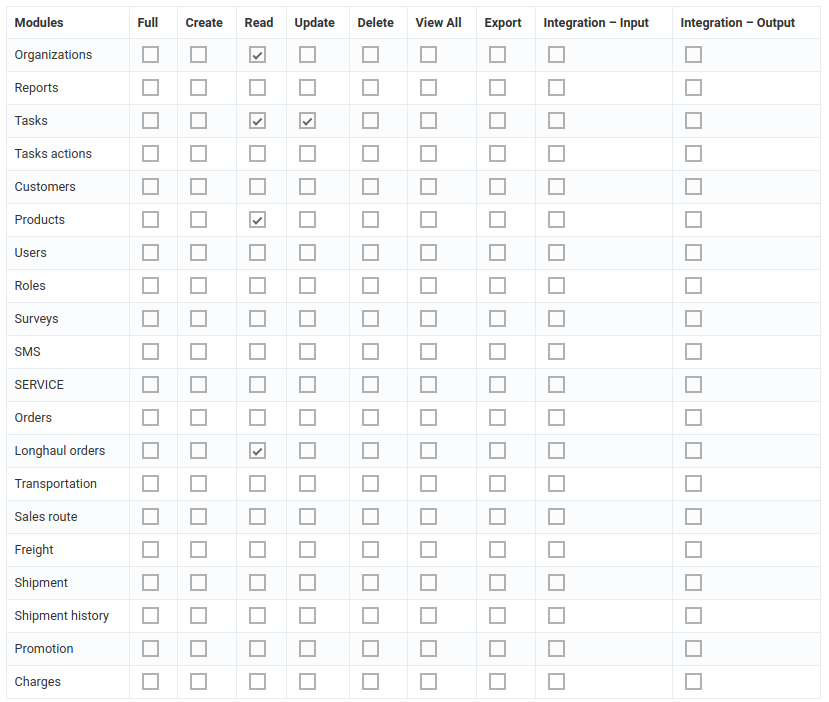
Warehousemen User group
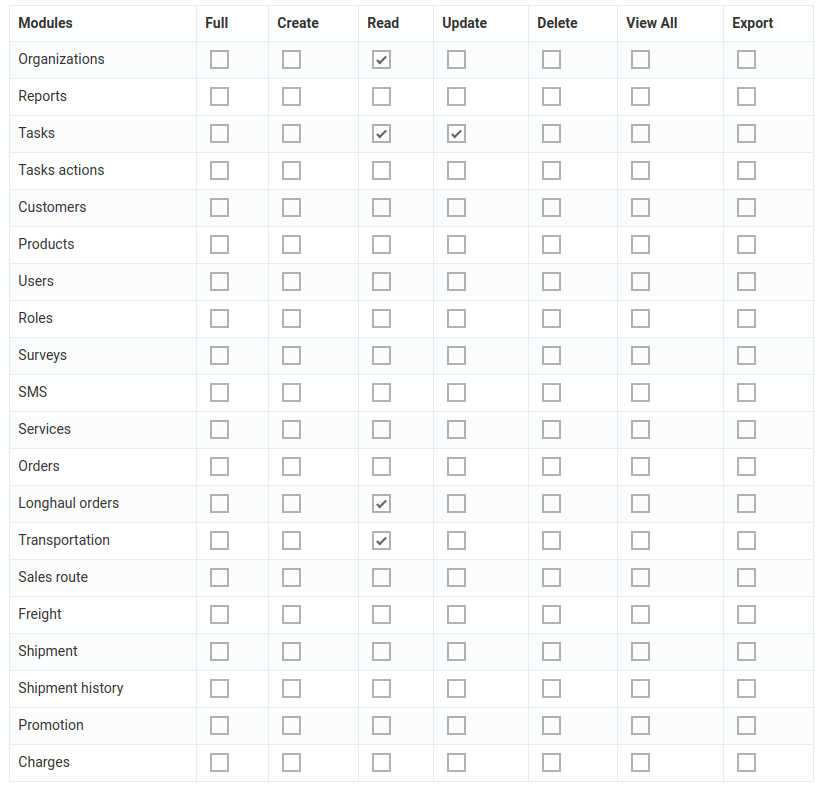
Create Users
- Navigate to Organizations > User List tab
- This tab lists the users in your organization
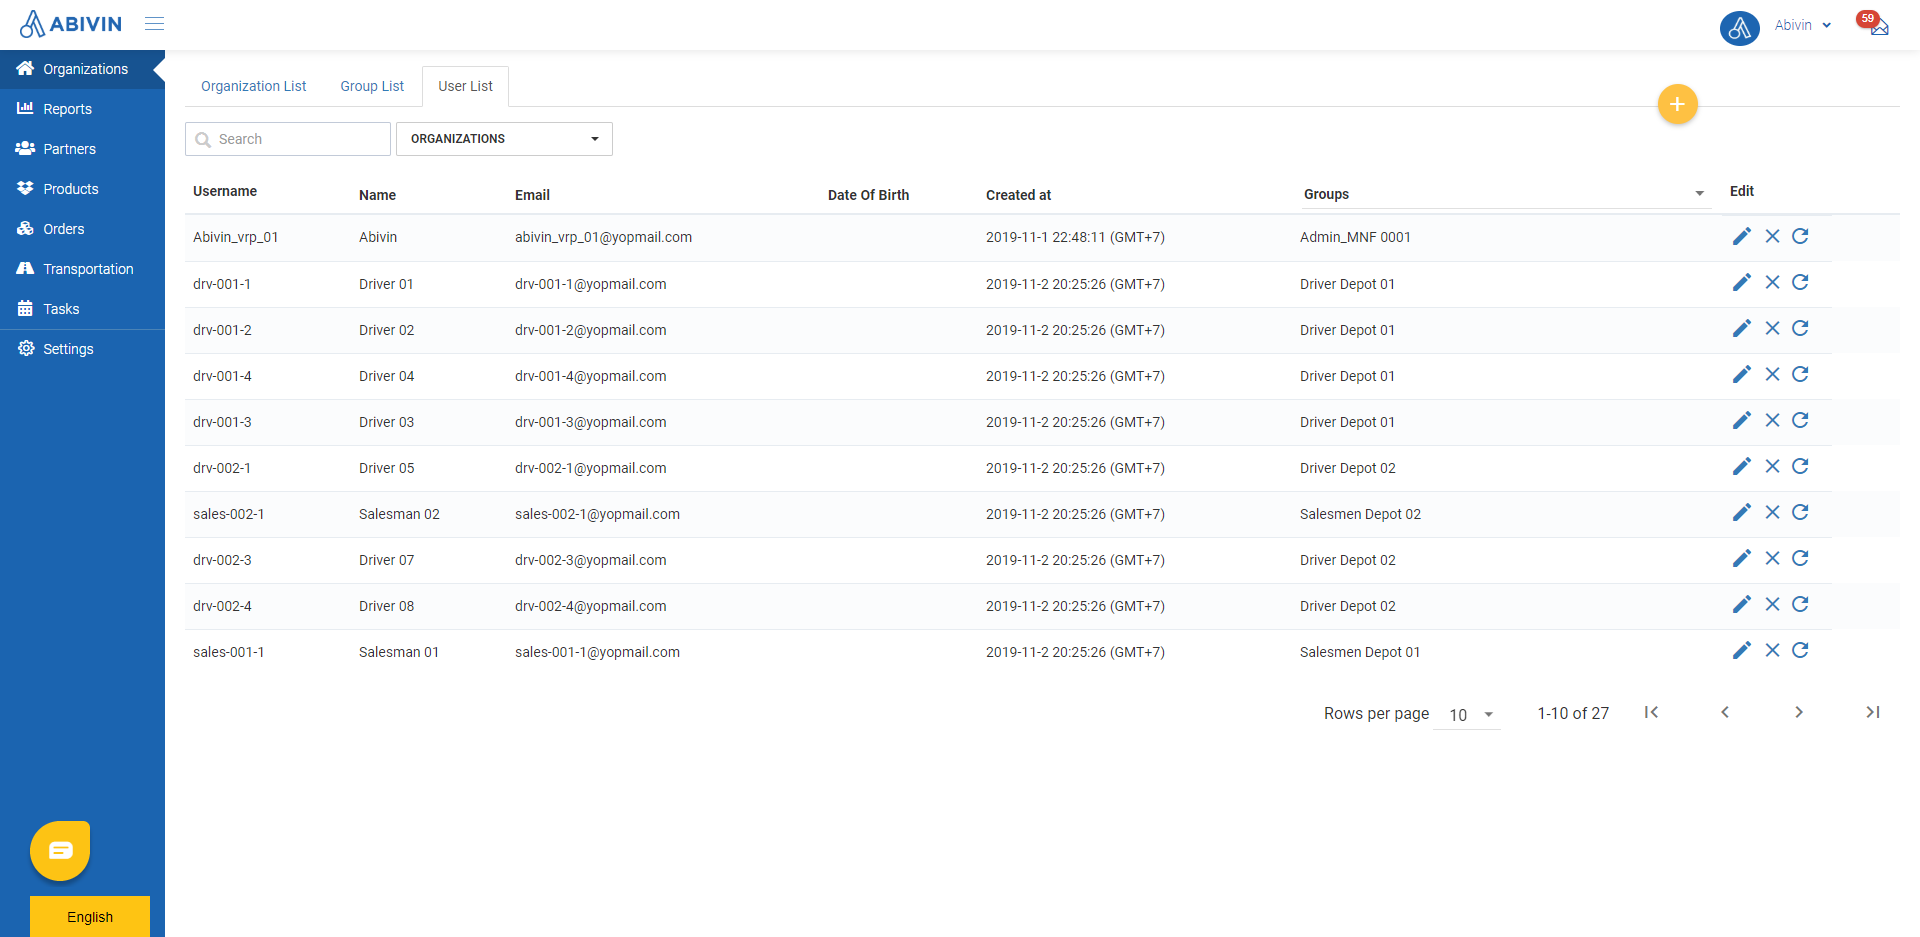
- You have two options to create Users: Using Web form or using Excel template
Option 1: Create single user using web form
- Please refer to the CRUD functions article to know the general steps about creating single objects using Web form
- When using Web form, the information fields of a new user must be input in the following sequence to ensure no mistakes:
- Organization Name
- Groups
- Username
- Password; Re-password
- Phone Number
- Full Name
Option 2: Create multiple users using Excel template
- Please refer to the CRUD functions article to know the general steps about creating multiple objects using Excel template
Basic User information
- Below are the basic information fields of a User
Information field | Description & Input |
|---|---|
Organization Name (Web form); Organization Code (Excel template) (Required) | 1. Description: |
Groups (Web form); User Group Code (Excel template) | 1. Description: |
Username | 1. Description: |
Password; Re-password | 1. Description: |
Email | 1. Description: |
Phone Number | 1. Description: |
Full Name | 1. Description: |
Extensive Driver user information
- Apart from the basic information fields above, there will be some additional information fields for users who are Delivery men (or drivers)
- On Web form, these information fields will be visible when you click on MORE CONFIGURATIONS
Information field | Description & Input |
|---|---|
Vehicle Type (Web form); Type Of Vehicle (Excel template) (Required) | 1. Description: |
Position | 1. Description: |
Driver License Number | 1. Description: |
License Class | 1. Description: |
Medically Cleared | 1. Description: |
Secret | 1. Description: |
sub scription Code | 1. Description: |
sub scription Expiry | 1. Description: |
For this model, every Depot, including Supplier's Depots, needs to have one Warehouseman user, else you will not be able to perform Route Optimization process
Similarly, every vehicles of the Transporter needs to be assigned a default driver
Change active status of Drivers
- By default, after being created, the drivers are Active - meaning that they can be assigned delivery routes
- In the scenario a driver is temporarily inable to perform delivery routes, you can change the status of that driver to Inactive by following the steps below
- Navigate to Transportation > Driver tab
- Click on the check box icon of the driver which you want to change the active status to inactive. When that icon changes to , that means the driver has been inactive
Updated about 1 month ago
