Route Plan Optimization (List View)
- Apart from the default Route Plan (Map View) screen, you can also control the Route Plan on a list-based screen called Route Plan (List View). This article will guide you through the function of this screen
Some functions on the Route Plan (List View) screen might operate differently than on the Route Plan (Map View) screen
Route Plan Definition
- Route Plan is the delivery plan generated by Abivin vRoute that consists of the Optimized Routes of all Sales Orders of a particular Branch on a specific date. A Route Plan will cover the following points:
- 1 - Which Vehicles will be utilized
- 2 - How the Orders will be allocated to the Vehicles
- 3 - The optimized Delivery Routes of the Vehicles
Enable Route Plan (List View) Screen
- In order to show the Route Plan (List View) screen on your account and uses its functions, follow the steps below:
- Step 1: Navigate to the Organizations > Organizations tab
- Step 2: Click the Edit icon of the Manufacturer
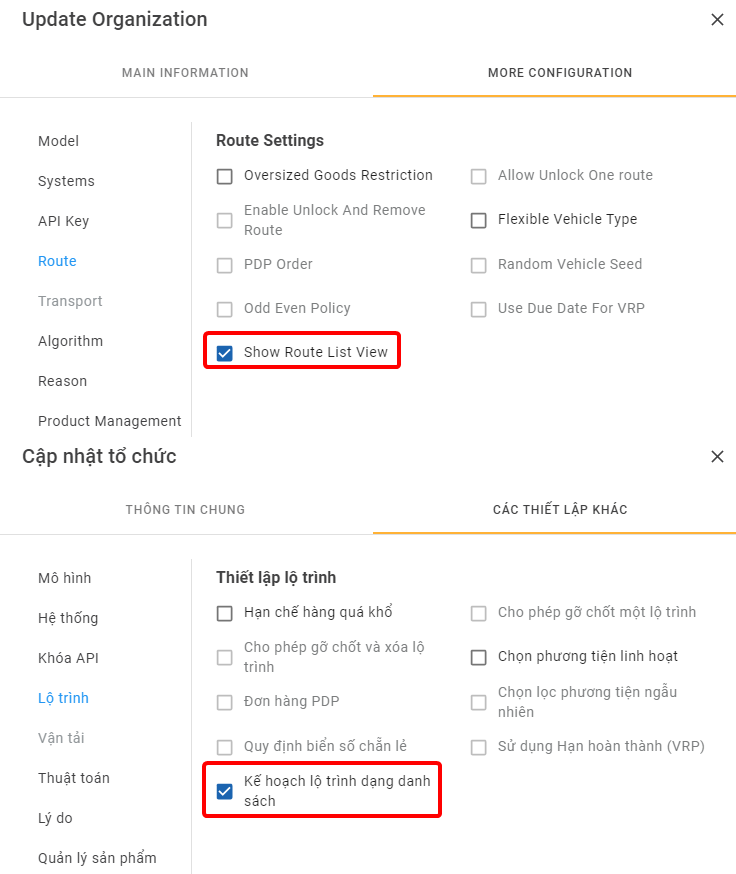
- Step 3: On the Update Organization form, navigate to the More Configuration > Route sub-tab
- Step 4: Tick the Show Route List View checkbox
- Step 5: Click Save to confirm the change
Locate Route Plan (List View) Screen
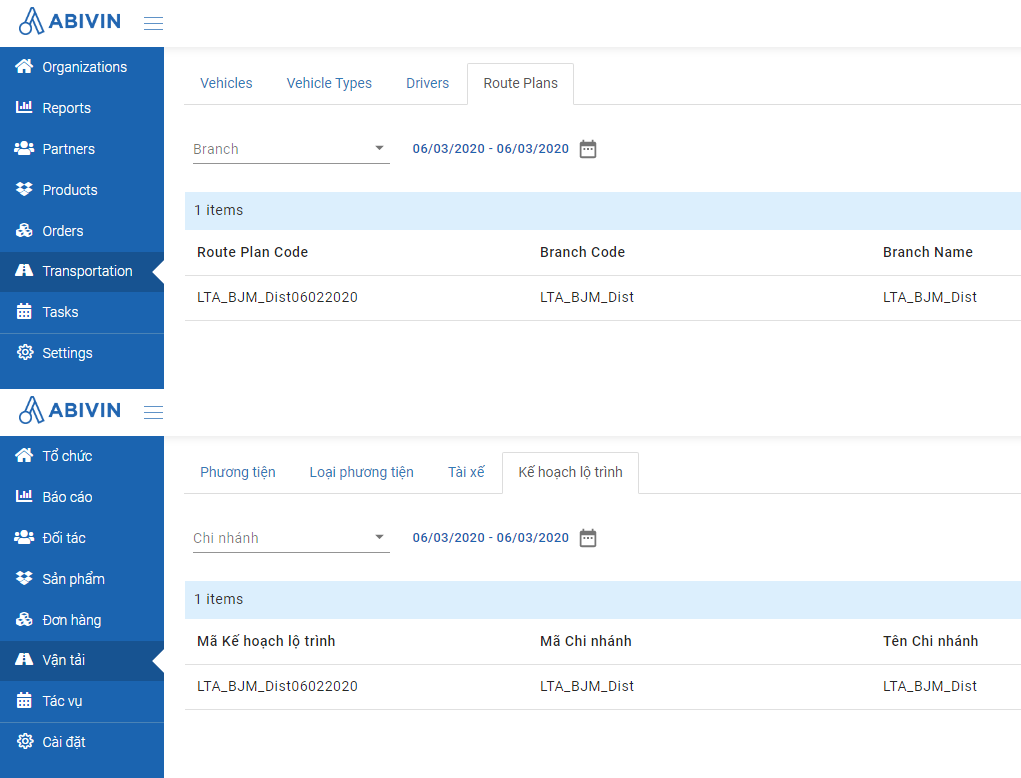
- The Route Plan (List View) is located in the Transportation > Route Plan tab
Route Plan Optimization process
- Typically, a Route Plan optimization process on the List view consists of the following phases:
- Phase 1: Generate Route Plan Record
- Phase 2: Optimize Route Plan
- Phase 3: Lock Planned Route Plan
- Phase 4: Finalize Locked Route Plan
- Phase 5: Synchronize Finalized Route Plan. This phase is only required for certain user accounts who use the external Transportation management systems (TMS)
- (Optional - Linked with Phase 5) Manually Close Finalized Route Plan
- We will go into the details of each phase below
Phase 1: Generate Route Plan Record
- To generate a Route Plan record, follow the steps below:
- Step 1: Navigate to the Transportation > Route Plans tab
- Note: The screen might occasionally appear blank. If you encounter this, refresh the webpage
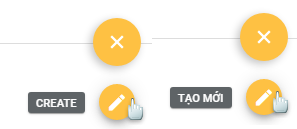
- Step 2: On this tab, hover your mouse over the yellow plus-circle icon then click the Create icon
- Step 4: The Create Route Plan form will appear. On this form, you need to select the Branch and the date to generate the Route Plan record
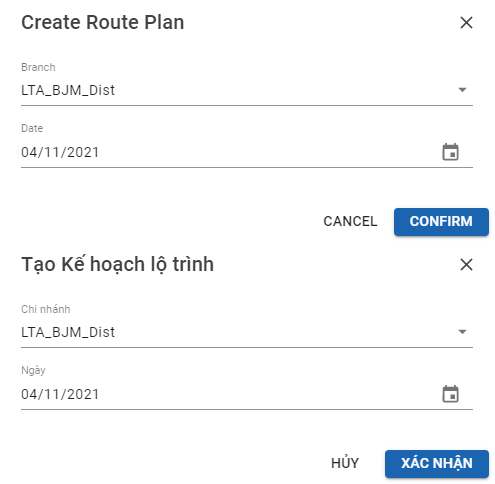
- To select the Branch, click the field Branch then select the appropriate Branch from the drop-down list
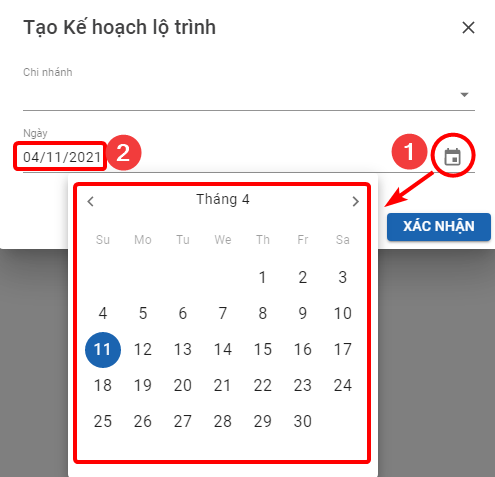
- To select the date, click the calendar icon and select the appropriate date on the drop-down calendar (1). Alternatively, you can directly input the date into the field in the mm/dd/yyyy (Month/Date/Year) format (2)
- Step 5: After you have selected the Branch and the date, click the Confirm button at the bottom right of the form
- The system will immediately generate a Route Plan record of the selected Branch on the selected date. The newly created Route Plan will appear in the Route Plan table below

Phase 2: Optimize Route Plan
- The Route Plan record that you have just generated in Phase 1 is only an empty shell. Now you will have to generate the optimized Delivery Routes inside this Route Plan
- To generate the optimized Delivery Routes, follow the steps below:
- Step 1: Click the Detail text of the recently created Route Plan (Under the Edit column)

- You will be directed to the Route Plan Details screen
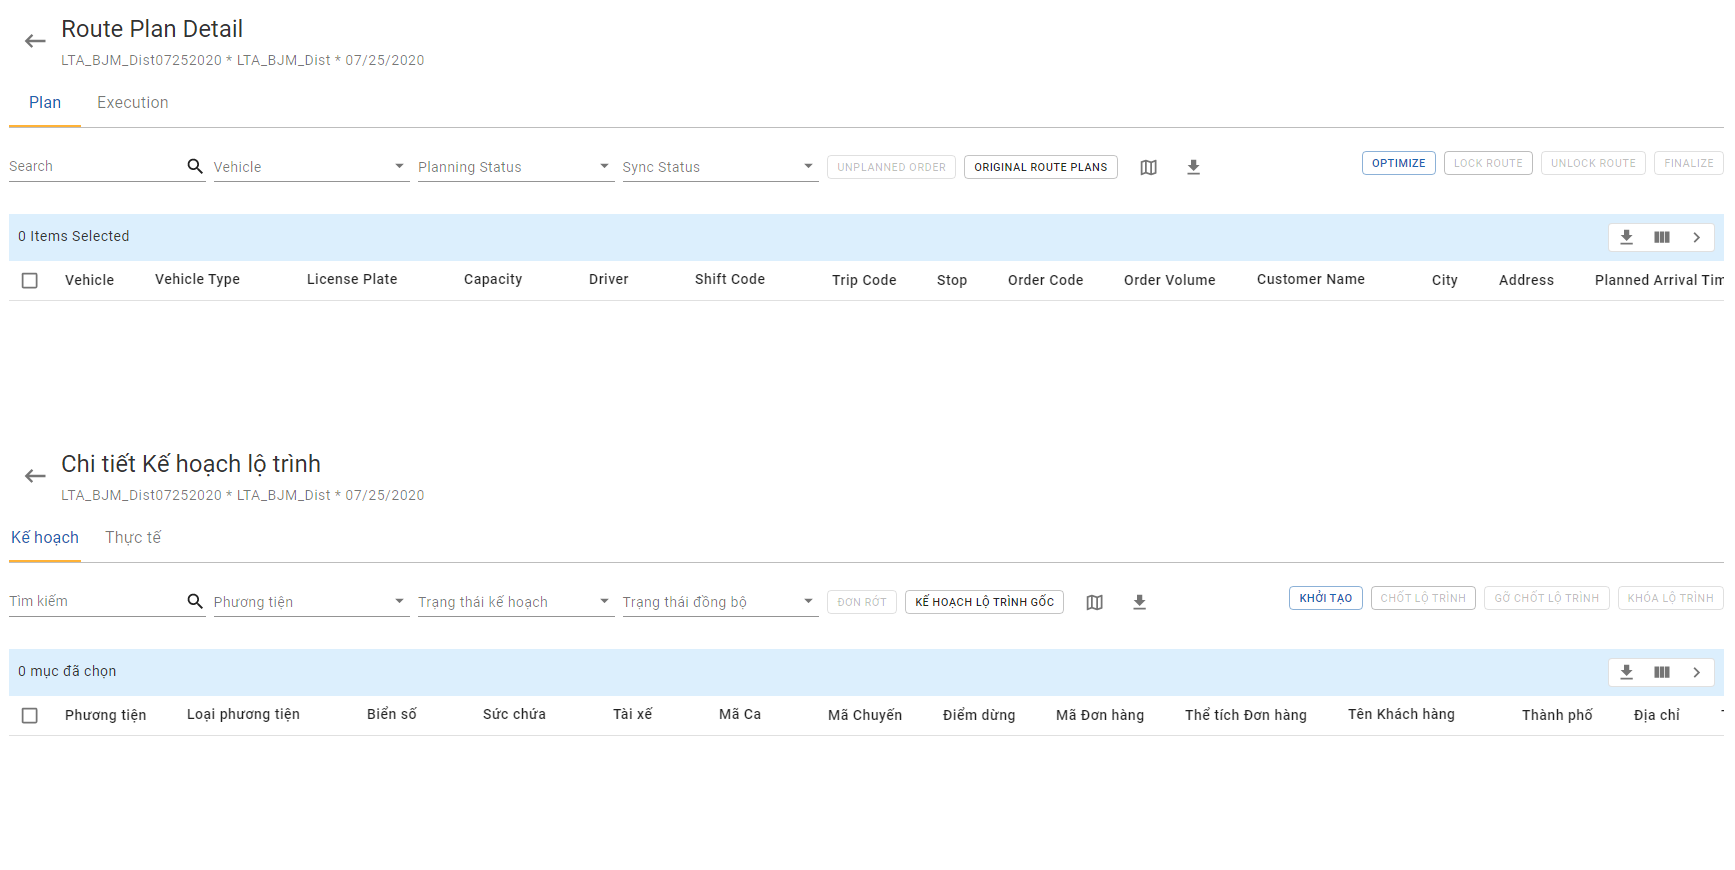
- Step 2: On this screen, click the Optimize button on the top right corner of the screen

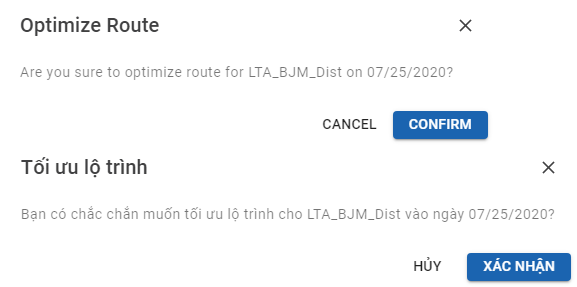
- Step 3: The Optimize Route form will appear. Click the Confirm button
- The system will start the Route Plan optimization process. The system will take into account the input information, the pre-configured constraints, select the most appropriate Vehicles, assigns the Orders to the Vehicles, then present the optimized Delivery Routes for the Vehicles in the Route Plan table below
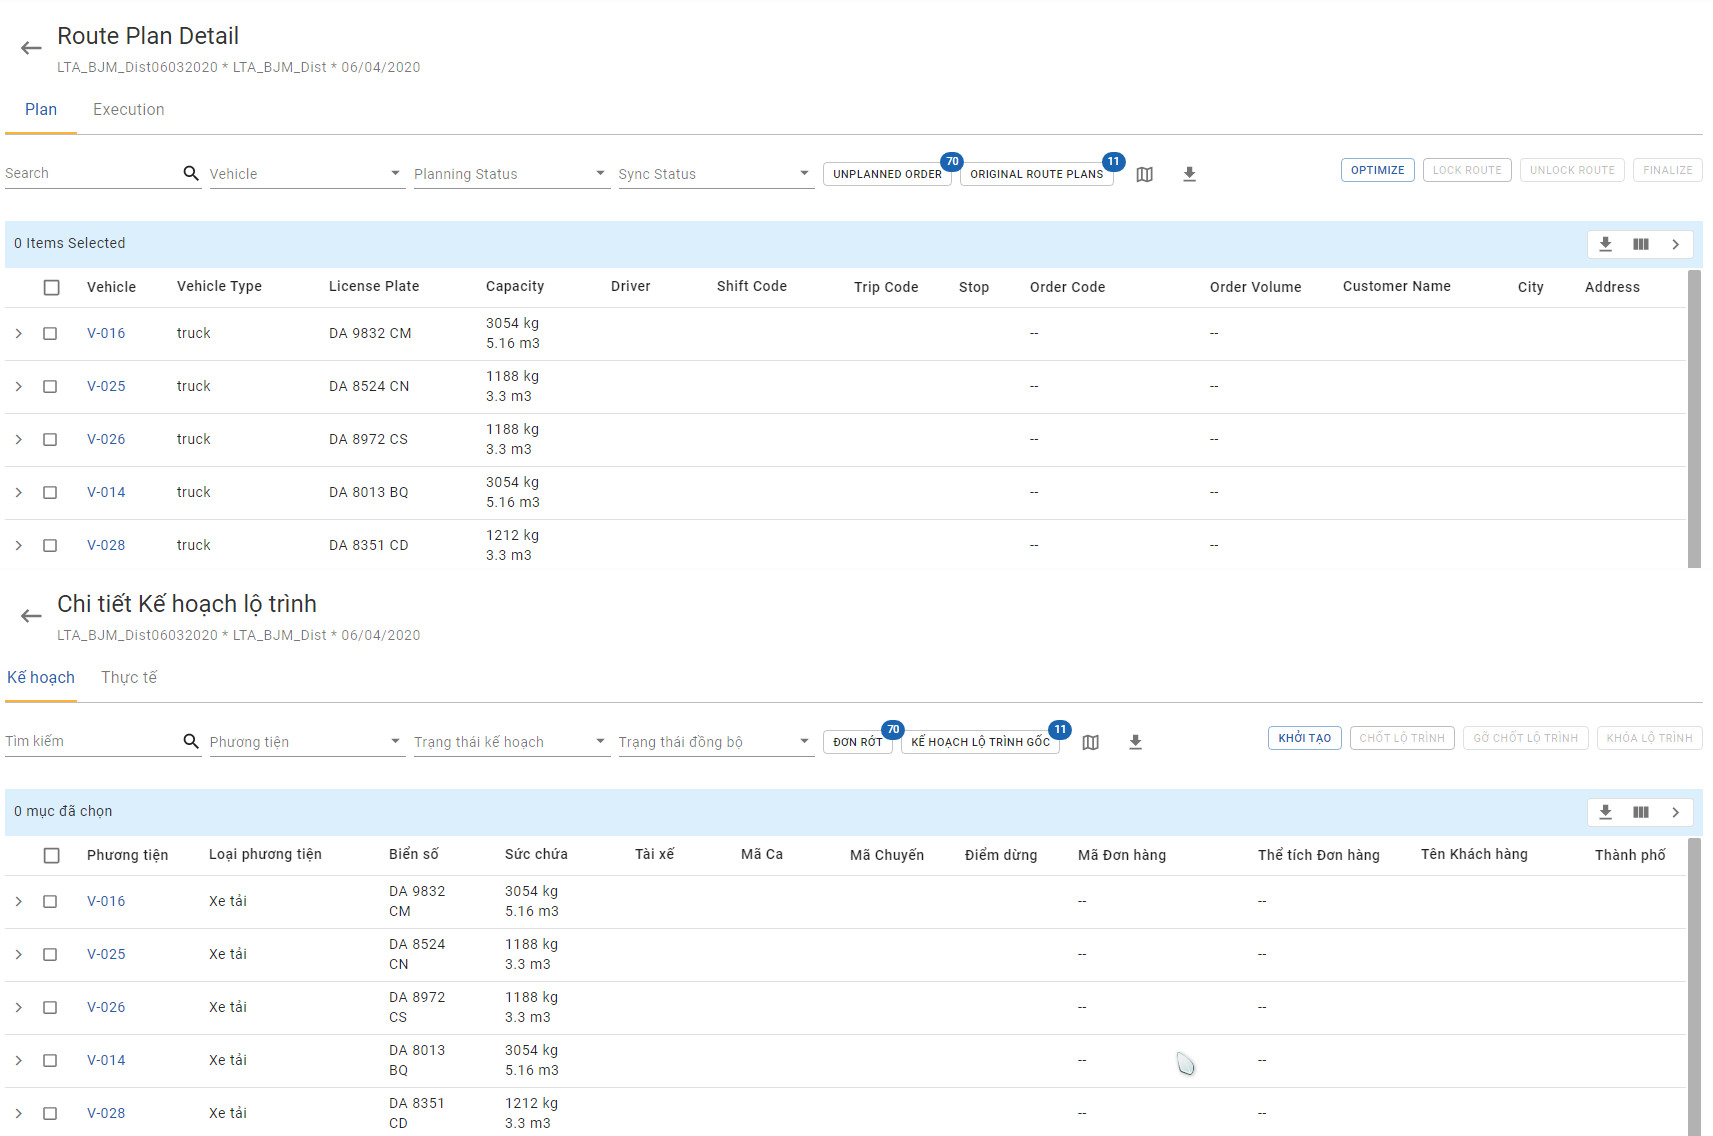
- On the Route Plan table, the Delivery Route of each Vehicle will occupy one row

- During this phase, the Planning Status of all the Vehicles' Delivery Shifts are Planned, not yet Locked, therefore you can make adjustments to those Delivery Shifts before locking them. The details will be covered in the following section: Route Plan Adjustments
- The Route Plan screen has various features, which will be described in the Route Plan Screen Features section
Phase 3: Lock Planned Route Plan
- After you have made the necessary adjustments to the Planned Delivery Shifts, you can now lock them
- Step 1: Select the Planned Delivery Shift(s) that you want to lock
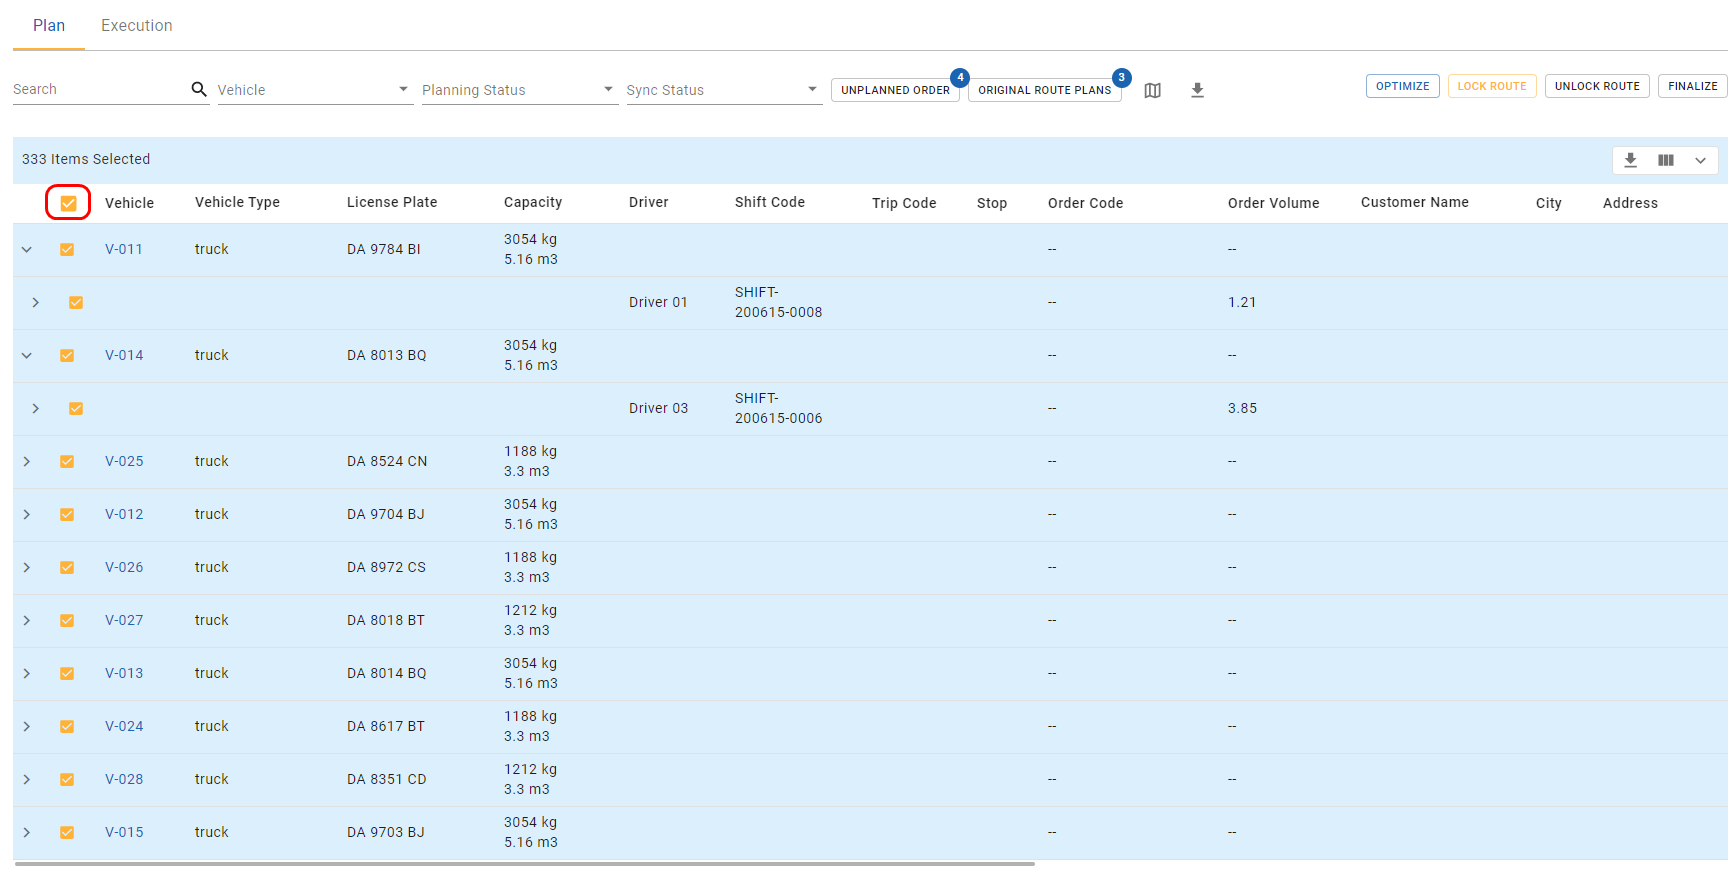
- To select a Planned Delivery Shift, tick the corresponding checkbox icon of that Delivery Shift. You can select multiple Delivery Shifts

- You can also select all the Planned Delivery Shifts of all the Vehicles in the current Route Plan by clicking on the checkbox icon on the column title bar
- Step 2: Lock The Selected Planned Delivery Shifts
- After you have selected the wanted Planned Delivery Shifts, click the Lock Route button located above the top right corner of the Route Plan table
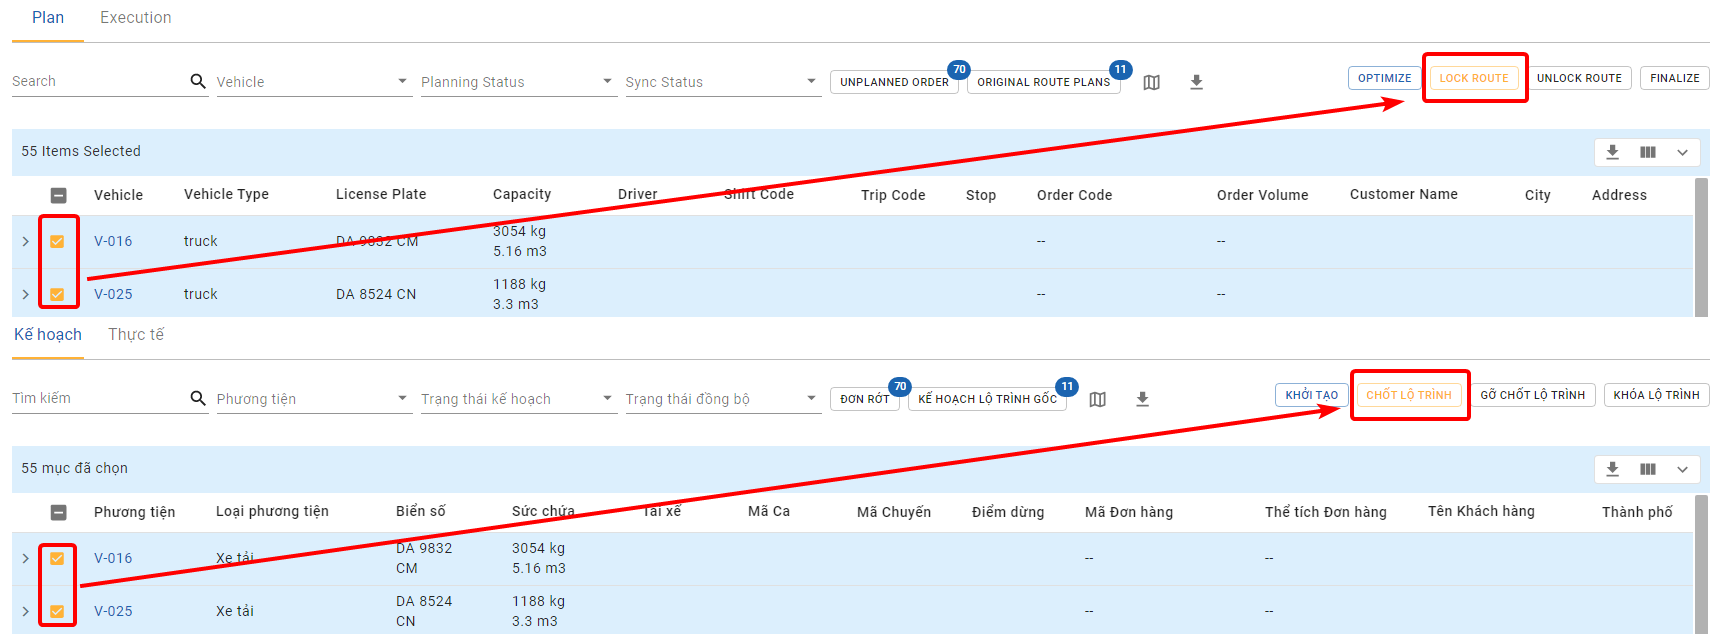
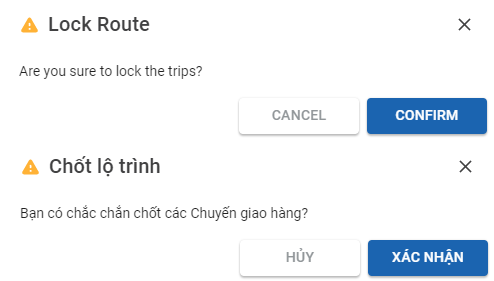
- As you click this button, a confirmation dialog box will appear. Click the Confirm button to confirm locking the selected Planned Delivery Shifts
- Note: Make sure that you have assigned the Drivers for each of the selected Planned Delivery Shifts, else the system will prevent you from locking those Delivery Shifts
- After the selected Planned Delivery Shifts have been locked, their Planning Status will update from Planned to Locked
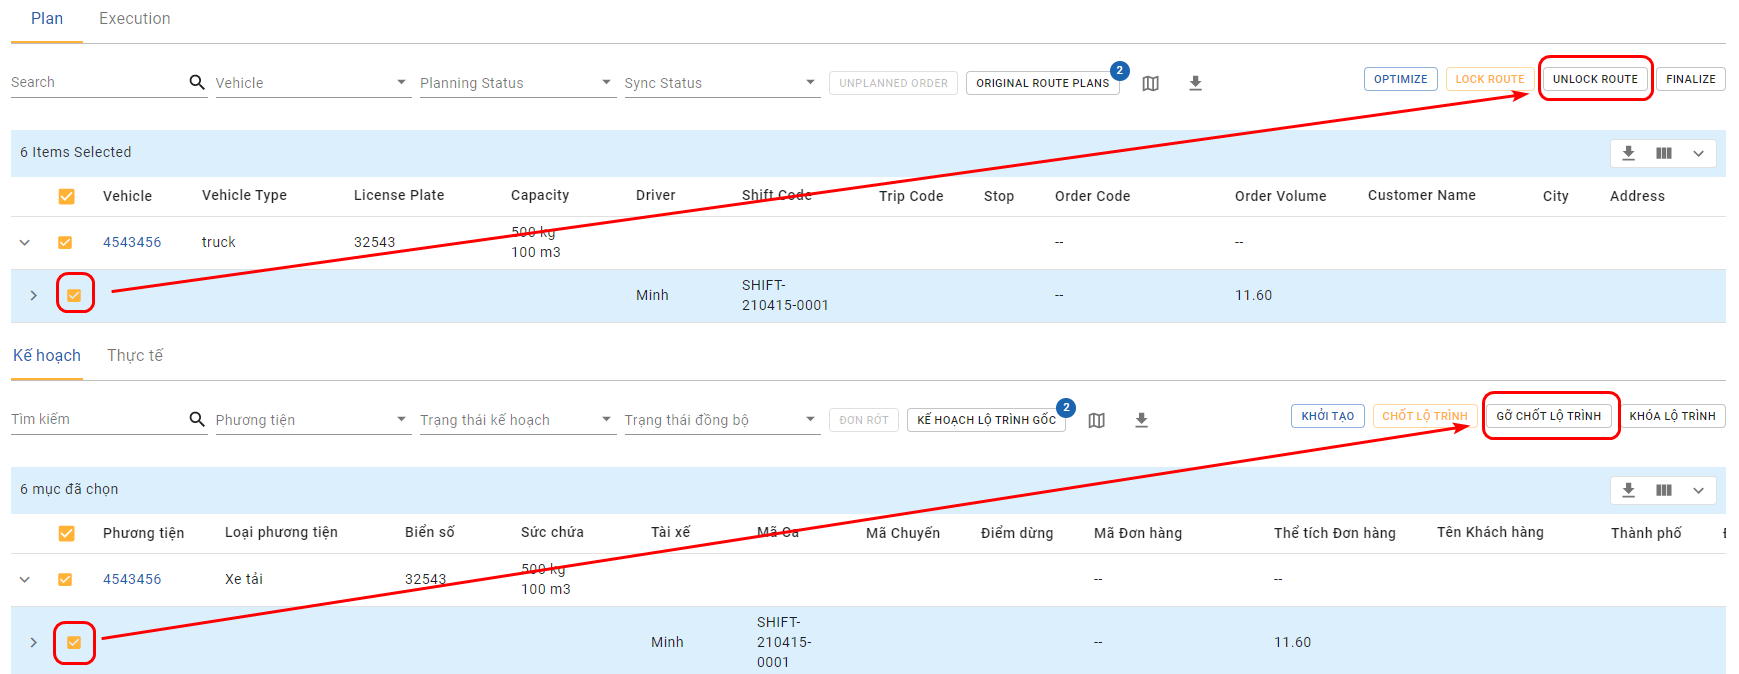
- At this phase, you can still unlock the Locked Delivery Shifts. To do that, select those Locked Delivery Shifts then click the Unlock Route button located above the top right corner of the Route Plan table
- A confirmation dialog will appear. Click Confirm. After that, the Locked Delivery Shifts will be unlocked. Their Planning Status will revert from Locked back to Planned
Phase 4: Finalize Locked Route Plan
- After the following events:
- 1 - The Planned Delivery Shifts of the Vehicles have been locked on the Abivin vRoute system, and
- 2 - The assigned Vehicles have actually finished loading Products at the manufacturing warehouses and are about to begin their assigned Delivery Shifts;
- Then you need to finalize those locked Delivery Shifts, making them no longer adjustable
- To finalize a Locked Delivery Shift, follow the steps below:
- Step 1: On the Route Plan Details screen, navigate to the Plan tab
- Step 2: On this tab, select the Locked Delivery Shifts which you want to finalize, then click the Finalize button located above the top right corner of the Route Plan table
- After a few moments, the selected Locked Delivery Shifts will be finalized. Their Planning Status will update from Locked to Finalized
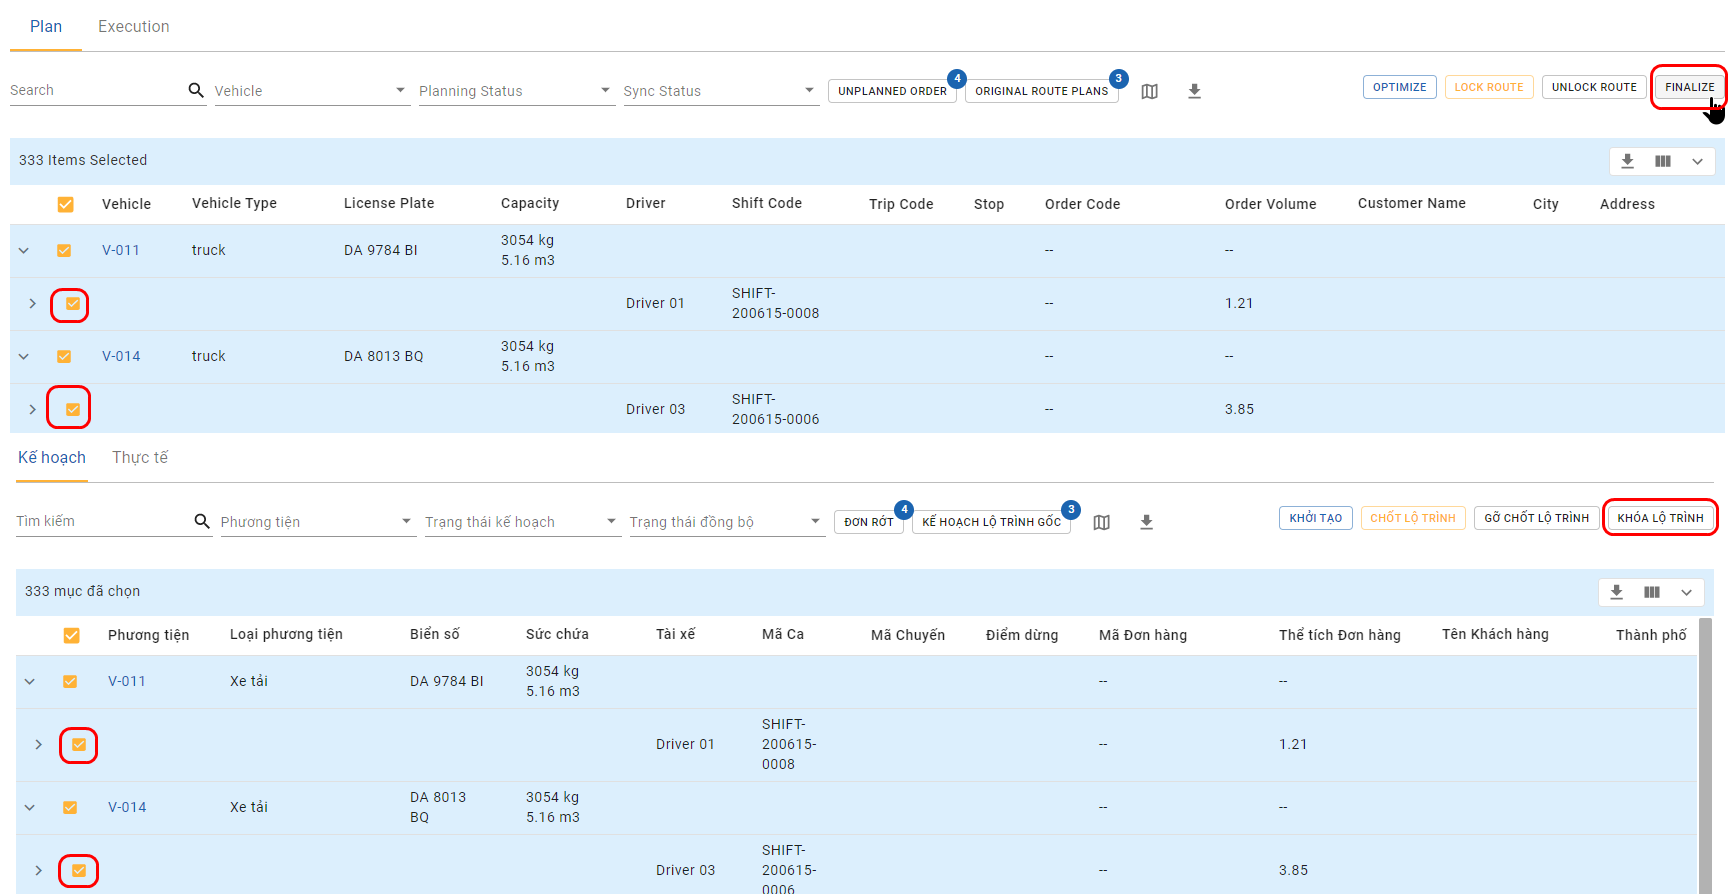
- Note: Once a Locked Delivery Shift has been finalized, you cannot revert that Delivery Shift back to the Locked status. You will no longer be able to adjust that Delivery Shift
Phase 5: Synchronize Finalized Route Plan to the external Transportation Management System (TMS)
This phase is only required for certain user accounts who use the external Transportation Management Systems (TMS)
- Right after you have finalized a Locked Delivery Shift, you need to synchronize that Finalized Delivery Shift from Abivin vRoute system to the external TMS
- To do that, follow the step below:
- Step 1: On the Route Plan Details screen, navigate to the Execution tab
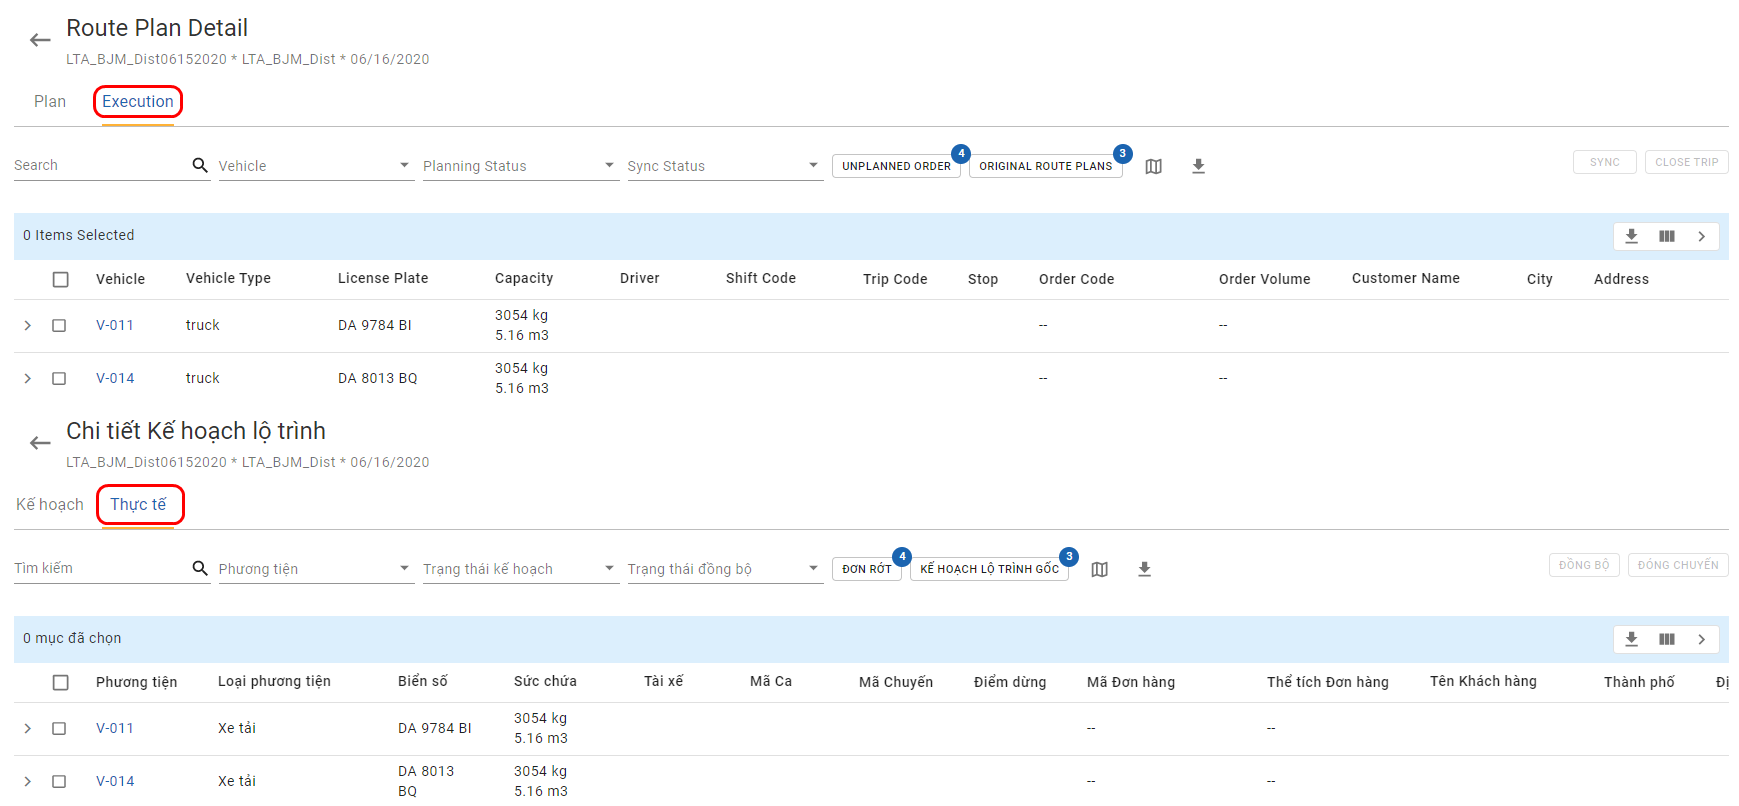
- Step 2: Click the checkbox icon of the Finalized Delivery Shifts which you want to synchronize to the external TMS
- Step 3: Click the Sync button located above the top right corner of the Route Plan table. The synchronization status of the Finalized Delivery Shift (Under the Sync Status column) will update from No to Yes once the synchronization process completes
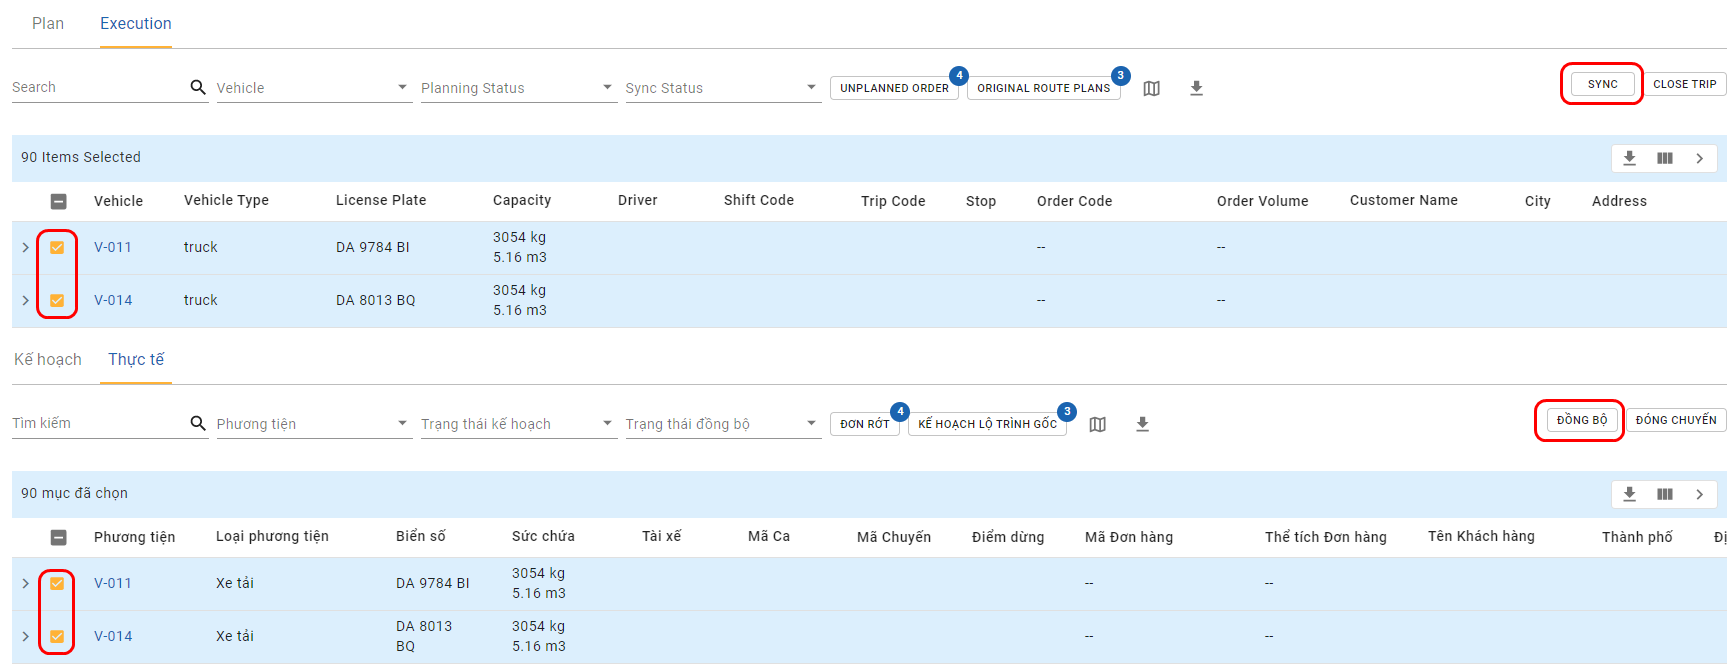
(Optional) Manually Close Finalized Route Plan
This phase is only required for certain user accounts who use external TMS, and can be performed after Phase 5
- After the following events happen:
- 1 - A Delivery Shift has been finalized and synchronized to the external TMS, and
- 2 - The Vehicles have actually performed the Delivery Shifts assigned to them, but the external TMS has yet to forward the delivery result of the Delivery Shifts back to Abivin vRoute system
- Then you can manually close that Synchronized Delivery Shift on the Abivin vRoute system. By closing a finalized Delivery Shift, the Vehicle that has been used to perform that Delivery Shift will be released and can be utilized in other Route Plan optimization processes in the future
- To manually close a Finalized Delivery Shift (Note: Synchronized Delivery Shifts can also be closed), follow the steps below:
- Step 1: On the Route Plan Details screen, navigate to the Execution tab
- Step 2: Click the checkbox icon of the Finalized Delivery Shift that you want to manually close
- Step 3: Click the Close Trip button located above the top right corner of the Route Plan table
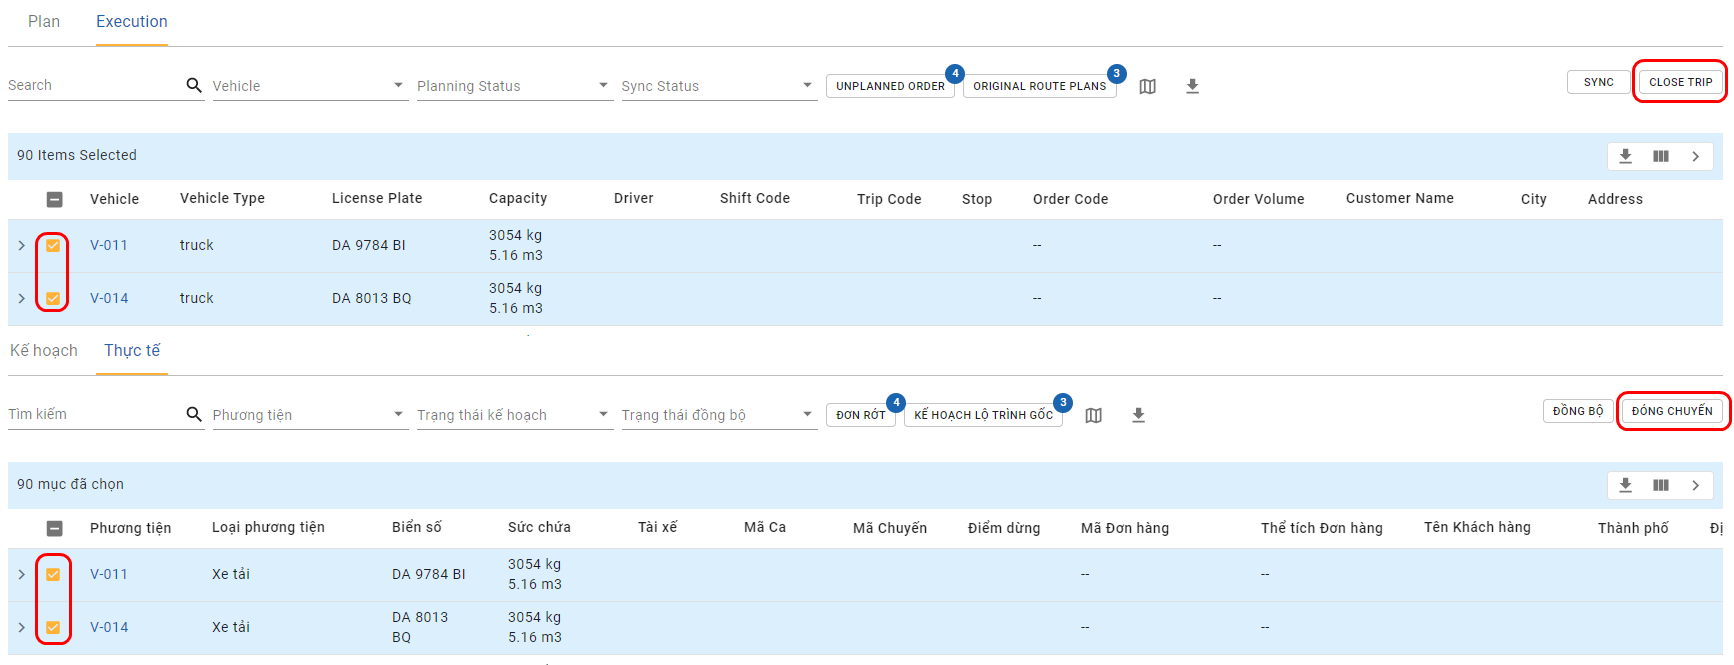
- Step 4: Upon clicking, a confirmation message will appear. Click the Confirm button on that message
- After this, over at the Transportation > Vehicles tab, the Vehicle Status of the Vehicle will update from Locked to Open
Route Plan Adjustments
Prevent concurrent actions of multiple users on the Route Plan (List View)
- As of the June 08th, 2021 release, we have implemented a mechanism to prevent multiple users from modifying a specific Route Plan at the same time
- If you try to modify a Route Plan that is being modified by another user, the system will display this warning message: Another user is taking action on this Route Plan!
- If you try to modify a Route Plan that is not yet up-to-date because it was recently modified by another user, the system will display this notification: This Route Plan has just been modified by another user. You can only take action after reloading the screen. You need to click OK to reload the screen and get the most up-to-date Route Plan
- This section presents the adjustment functions to help you manipulate the Route Plan. The adjustment functions include:
- Unlock Locked Delivery Shift
- Re-Optimize Not-Yet-Locked/Unlocked Delivery Shifts
- Change Vehicle of Planned Delivery Shift
- Change Driver of Planned Delivery Shift
Unlock Locked Delivery Shift
- After a Delivery Shift has been locked, you can still unlock it by following the steps below:
- Step 1: Click the checkbox icon of the Locked Delivery Shifts that you want to unlock
- Step 2: Click the Unlock Route button located above the top right corner of the Route Plan table
- Step 3: A confirmation message will appear. On that message, click the Confirm button
- The system will unlock the selected locked Delivery Shift. After unlocking, the Planning Status of the locked Delivery Shift will revert from Locked back to Planned
Re-Optimize Not-yet-locked/Unlocked Delivery Shifts
- If the Planning Status of a Delivery Shift is 1. still Planned, not yet Locked, or 2. is previously locked but has recently been unlocked, then you can make changes to the elements of that Delivery Shift such as Products, Vehicles, Orders, Customers, etc.. After making necessary changes to the elements of the Delivery Shift, you will need to re-run the Route Plan optimization process in order for the system to take into account the changes that you have made
- To re-optimize a Deliver Shift, follow the steps below:
- Step 1: Navigate to the Route Plan Details screen
- Step 2: Click the Optimize button again
- Upon clicking, the system will start the Route Plan optimization process again and will take into account the changes you have made
- Whilst doing this, one tip to help save you time from going back and forth between the Route Plan screen and the setup screens of the elements is to open several tabs of the Web app, with one tab being reserved for the Route Plan screen and the other tab are used for setting up the elements
Change Vehicle of Planned Delivery Shift
- When the Planning Status of a particular Delivery Shift is still Planned, not yet Locked, status, you can assign another Vehicle to perform that Delivery Shift. The detailed steps are described below
- Step 1: Drag the horizontal scrollbar to the far right of the Route Plan table until you see the Edit column. Under this column, click the Change Vehicle icon of the Delivery Shift which you want to change the Vehicle
- Step 2: The Change Vehicle form will appear. On this form, click on the To Vehicle field. The drop-down list will show the Vehicles that meet the following criteria:
- 1 - Are from the same Depot with the current Vehicle
- 2 - Have the Active Status to be Active
- 3 - Have the same Vehicle Type attribute with the current Vehicle
- 4 - Have the Weight/Volume Capacity to at least equal the Total Weight/Volume of the Orders on the Delivery Shift
- On the drop-down list, the Vehicles that appear in blue text are the ones that are not utilized in the current day Route Plan (Though they might be utilized in other days Route Plans). The Vehicles that appear in black text are the ones that are utilized in the current day Route Plan
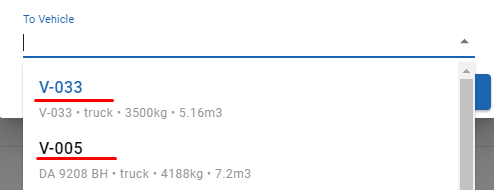
- Step 3: Select the Vehicle to which you want to reassign the Delivery Shift then click Change
- The system will start a checking process to see if the Delivery Shift can be moved to the target Vehicle or not. There are some scenarios:
- Scenario 1: The target Vehicle is not utilized in the current day Route Plan, but is utilized in other days Route Plans. In this scenario, the system will allow you to change to the target Vehicle regardless of the Planning Status of the target Vehicle's Delivery Shift in other days Route Plans. You will just need to click Confirm to confirm changing the Vehicle
- Scenario 2: The target Vehicle is utilized in the current day Route Plan. The Planning Status of the Delivery Shift assigned to the target Vehicle is Planned. In this scenario, the system will also allow you to change to the target Vehicle. Click Confirm to confirm changing the Vehicle
- Scenario 3: The target Vehicle is utilized in the current day Route Plan. The Planning Status of the Delivery Shift assigned to the target Vehicle is Locked/Finalized. In this scenario, the system will not allow you to change to the target Vehicle
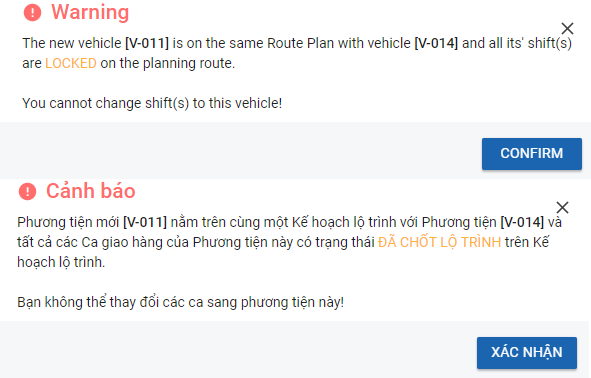
Change Driver of Planned Delivery Shift
- When the Planning Status of a particular Delivery Shift is still Planned, not yet Locked, you can change the Driver to operate the Vehicle that is currently assigned that Delivery Shift. The detailed steps are described below:
- Step 1: Drag the horizontal scrollbar to the far right of the Route Plan table, until you see the Edit column. Under this column, click on the Change Driver icon of the Delivery Shift that you want to change the Driver
- Step 2: The Change Driver form will appear. On this form, click on the New Driver field. The drop-down list will show the Drivers that meet the following criteria:
- 1 - Are from the same Depot with the current Vehicle
- 2 - Have the Active Status to be Active (If the desired Driver is currently inactive, you can change his Active Status over at the Transportation > Drivers tab)
- 3 - Is not currently assigned to any other Vehicle on that Route Plan
- Step 4: Select the Driver to which you want to reassign the Delivery Shift then click Change
Move Order/Stop
- You can move the Orders/Stops of a particular Delivery Shift if the Planning Status of that Delivery Shift is Planned/Locked, not yet Finalized
- If the Planning Status of that Delivery Shift is Planned, you can move the Orders within a Stop, a whole Stop, or multiple Stops within the Delivery Trips of that Planned Delivery Shift to another Delivery Trip of the current Vehicle or the Planned Delivery Shift of other Vehicles within that same Route Plan
- If the Planning Status of that Delivery Shift is Locked, you can move the Orders within a Stop, a whole Stop, or multiple Stops of that Delivery Shift only within that same Delivery Shift. You cannot move the Orders/Stops of that Delivery Shift to other Delivery Shifts of other Vehicles
- There are two Order/Stop moving mechanism:
- Mechanism 1: Move Single Stop
- This mechanism is currently available for Delivery Shifts in Planned Planning Status
- Mechanism 2: Move Multiple Stops
- This mechanism is available for Delivery Shifts in both Planned and Locked Planning Status
Move Single Stop
- To move a single Stop, perform the steps below:
- Step 1: Click on the right angle icon on the row containing the Vehicle Code to display the Delivery Shift assigned to that vehicle. Continue to click on the right angle icon on the row of the Delivery Shift to display all Delivery Trips within that Delivery Shift
- Step 2: Scroll the horizontal scrollbar of the Route Plan table to the far-right until you see the column Edit. Under this column, click the Move Order icon of the Stop containing the Orders that you want to move
- A confirmation dialog will appear. Click OK to confirm
- Step 3: The Move Stop/Order form will appear. On this form, first, you need to click on the Orders field. Upon clicking, a list will appear showing the Orders in that Stop. To select the Orders, tick their corresponding checkbox icons
- Note: By default, when opening this form, you can see that the Orders field shows the value No option. That value actually means that the whole Stop, equals all the Orders within that Stop, are selected, so if you initially intend to move that whole Stop, you don't need to manually click on this field and select each Order of that Stop
- Step 4: After the Orders have been selected, click on the to Vehicle field. Upon clicking, a drop-down list will appear showing the Vehicles which 1. are utilized in the current day Route Plan. These Vehicles will appear in black text, and 2. are not utilized in the current day Route Plan. These Vehicles will appear in blue text
- Step 5.1: If you select a Vehicle that is not utilized in the current day Route Plan, there will not appear any other additional information field. You can click Confirm to confirm moving the selected Orders/Stop to the target Vehicle
- Step 5.2: If you select a Vehicle that is utilized in the current day Route Plan, two additional information fields, to Trip and to Before Position will appear
- First, let's click on the to Trip field. The drop-down list will show the available Delivery Trips on the Delivery Shift of the selected Vehicle. Select the appropriate Delivery Trip from that list
- Next, click on the to Before Position field. The drop-down list will show the Stops on the selected Delivery Trip. Select the appropriate Stop before which you want to move the selected Orders/Stop
- Now, click Confirm to confirm moving the selected Orders/Stop to the intended position
Move Multiple Stops
- To move multiple Stops at once, follow the steps below:
- Step 1: Click the respective checkbox icons of the Stops you want to move to select them
- As you tick the checkbox icon of a Stop, the system will display a message above the Route Plan table to indicate whether the selected Stop belongs to a Planned or a Locked Delivery Shift
- Make sure to follow the message instruction, that is:
- 1 - If the selected Stop belongs to a Planned Delivery Shift, continue to select other Stops that also belong to that Planned Delivery Shift or the Planned Delivery Shift of other Vehicles, and
- 2 - If the selected Stop belongs to a Locked Delivery Shift, continue to select the other Stops only within that Locked Delivery Shift
- Do not select the Stops that belong in both Planned and Locked Delivery Shift

Message when the selected Stops are in a Planned Delivery Trip
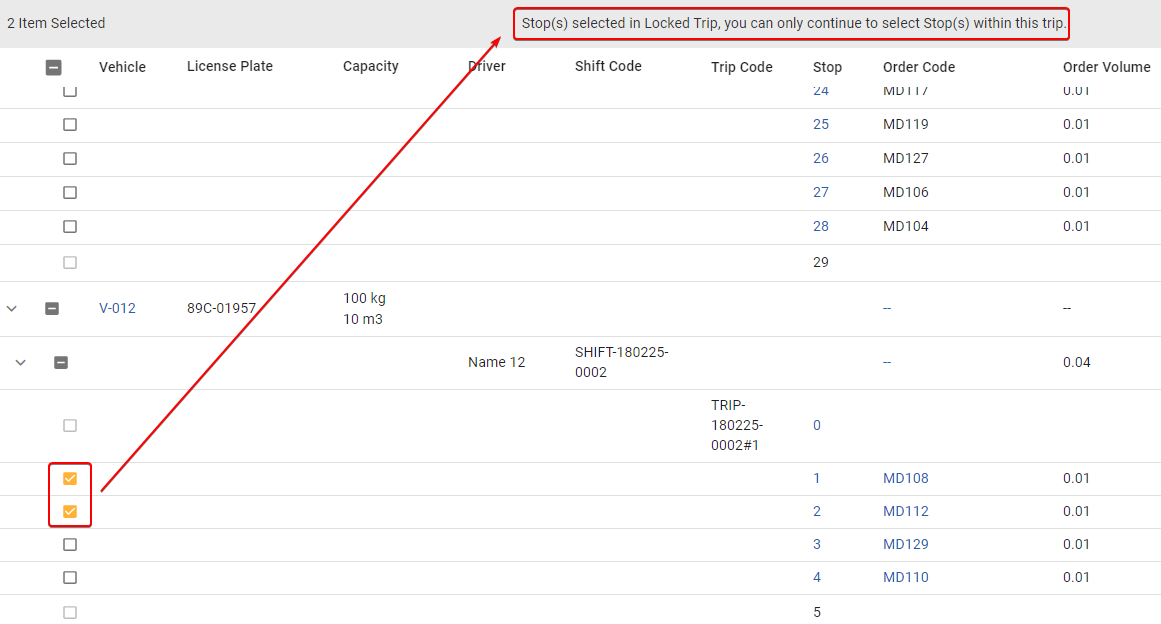
Message when the selected Stops are in a Locked Delivery Trip
- Step 2: After you have selected the wanted Stops, click the Move button located above the top right corner of the Route Plan table
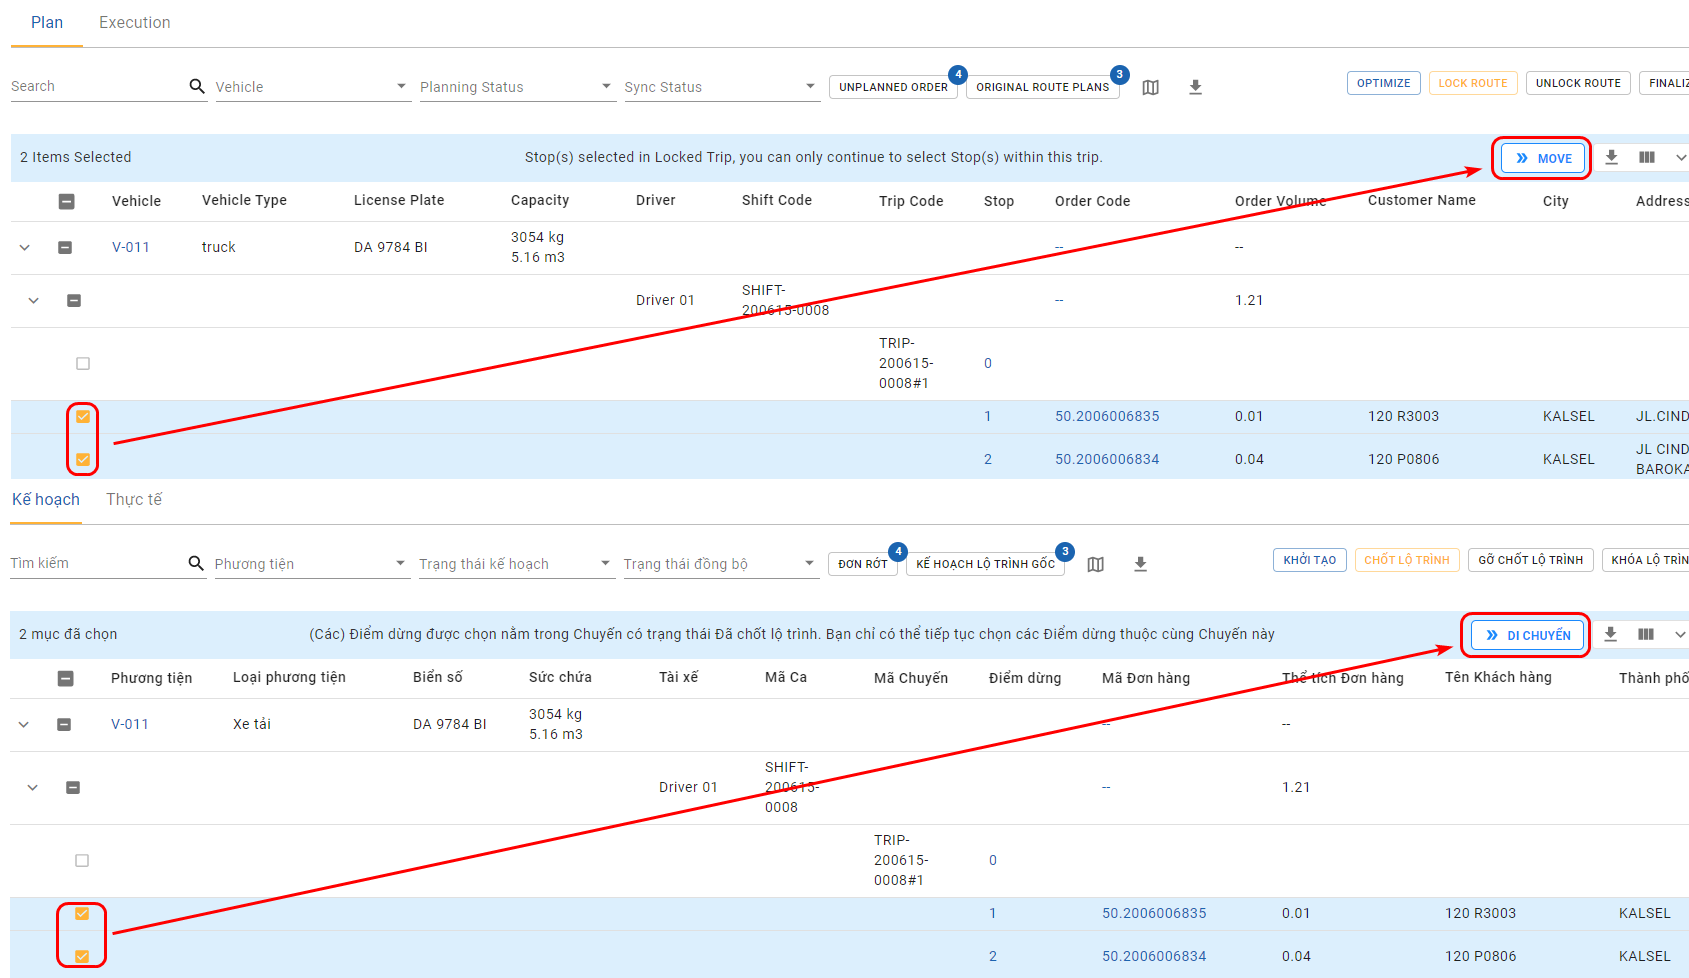
- The Move Stop panel will appear on the right side of the screen
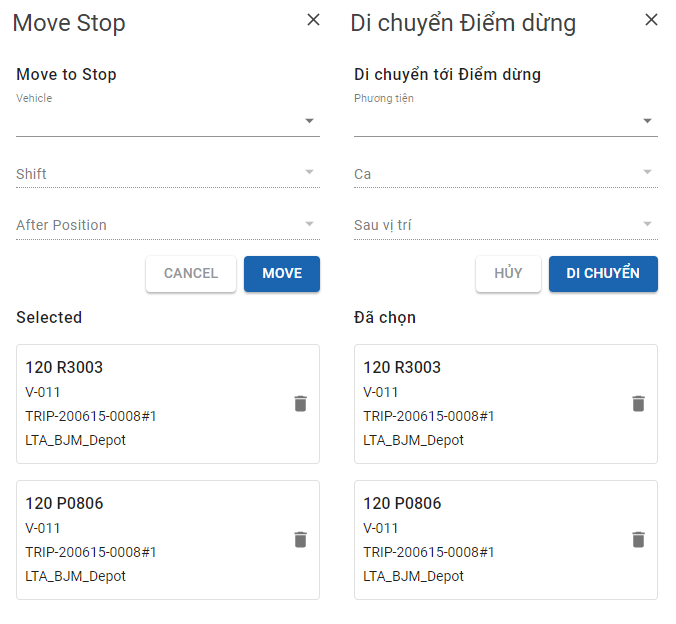
- Step 3: On the Move Stop panel, the selected Stops will appear below the Selected text
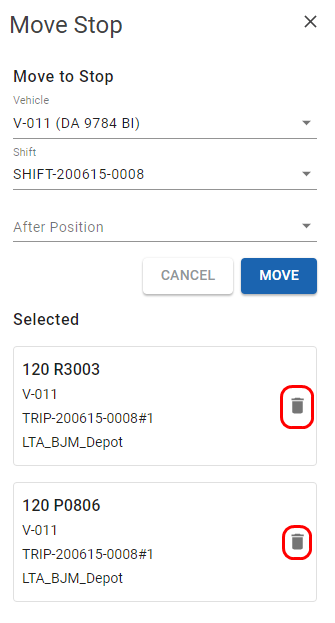
- If you accidentally selected some unwanted Stops, click the respective remove icons of the unwanted Stops to remove them
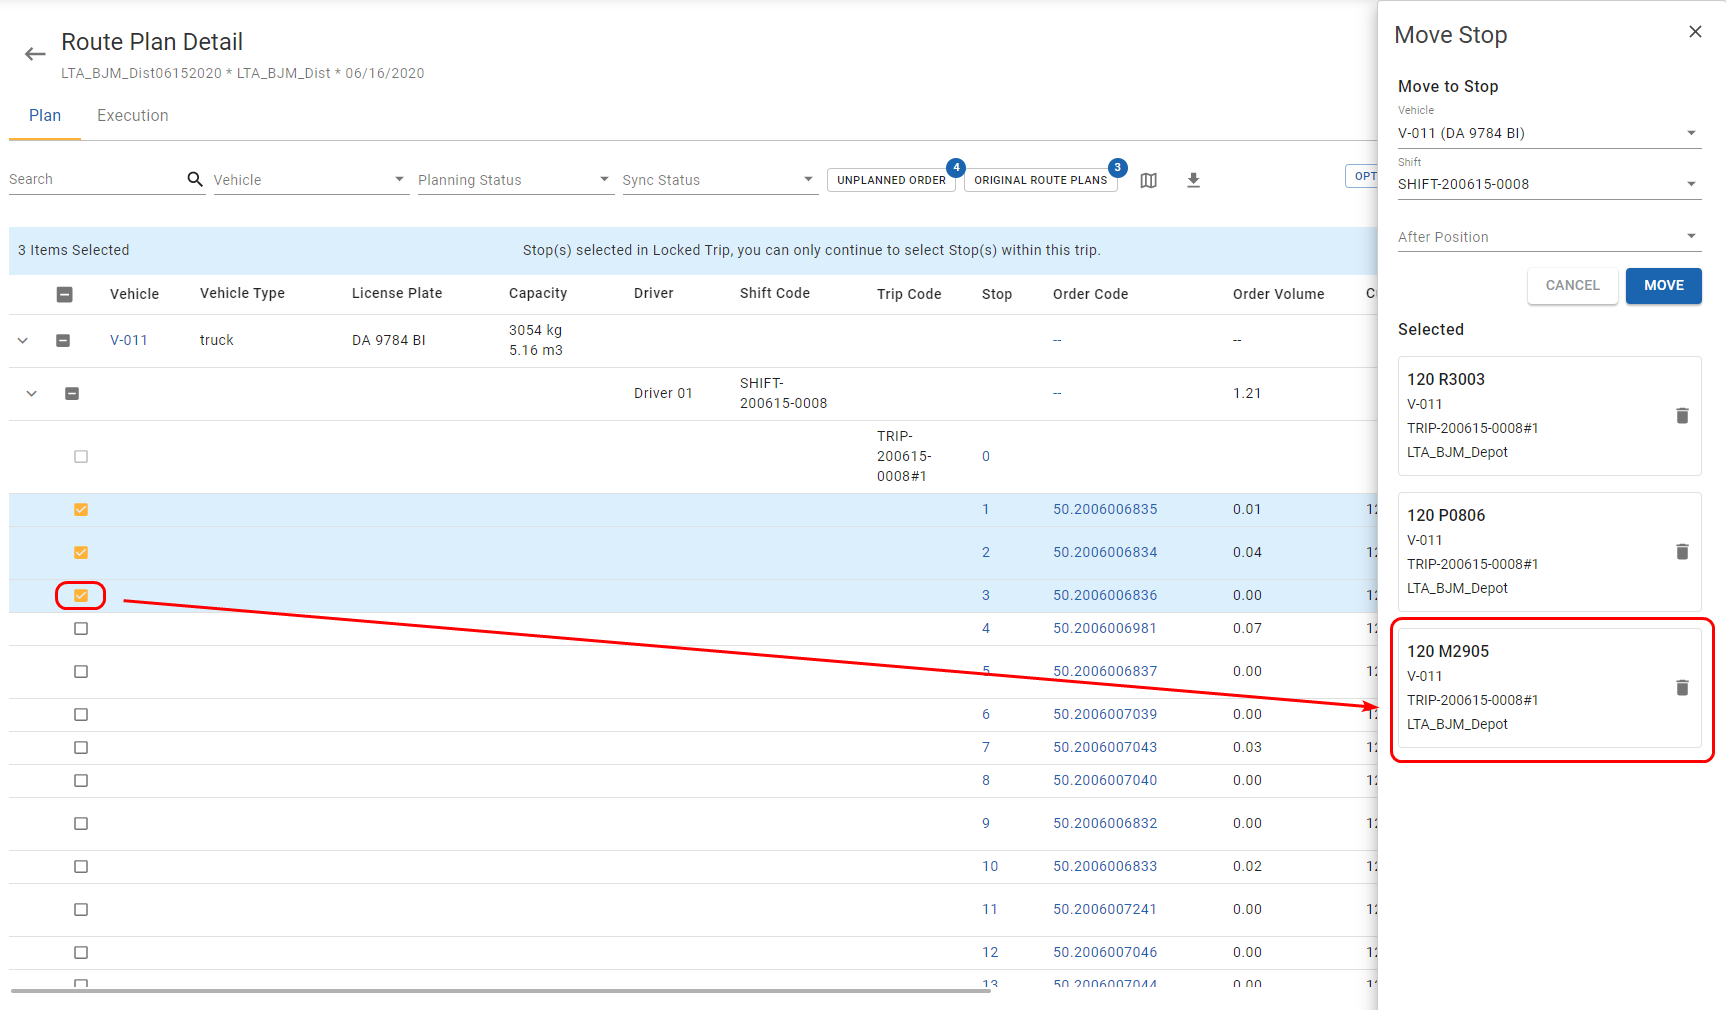
- On the other hand, if you want to add more Stops, you can continue to click the checkbox icons of the wanted Stops on the Route Plan table. The new Stops will appear on the Move Stop panel once their checkbox icons are ticked
- Step 4: After you have selected the Stops, click on the Vehicle field to select the Vehicle to which you want to move the selected Stops
- If the selected Stops belong to a Locked Delivery Shift, the drop-down list will only show the Vehicle that is currently assigned that Locked Delivery Shift
- If the selected Stops belong to Planned Delivery Shifts, the drop-down list will show 1. The Vehicles which are utilized in the current day Route Plan. These Vehicles will appear in black text, and 2. The Vehicles which are not utilized in the current day Route Plan. These Vehicles will appear in blue text
- Select the target Vehicle from the drop-down list
- Step 5.1: If the selected Vehicle is not utilized in the current day Route Plan, there will not appear any other information field
- Step 5.2: If the selected Vehicle is utilized in the current day Route Plan, two more information fields, Shift, and After Position will appear right below the Vehicle field
- First, let's click on the Shift field. The drop-down list will show the available Planned Delivery Shift of the selected Vehicle to which you want to move the selected Orders/Stops
- Next, click on the After Position field to select the position on the selected Planned Delivery Shift after which you want to move the selected Orders/Stops
- Step 6: Finally, click Move. After a short while, the system will move the selected Orders/Stops to your intended position
Remove Order/Stop from Planned Delivery Trip
- If the Planning Status of a Delivery Shift of a Vehicle is still Planned, not yet Locked, then you can remove the Orders within a Stop, a whole Stop, or multiple Stops of that Delivery Shift from the current day Route Plan
Remove Orders Within A Single Stop
- To remove a particular Order or a whole Stop from the Delivery Route of a vehicle, follow the steps below:
- Step 1: Scroll to the far right of the Route Plan table
- Step 2: Click the Remove Order icon (Under the Edit column) of the Stop that you want to remove
- Step 3: A confirmation dialog will appear. Click OK
- Step 4: The Remove Stop/Order form will appear
- On this form, you need to click on the Orders field to select the Orders to remove. If a Stop has multiple Orders, you can select just one Order, select several Orders or select all Orders (Which equals to selecting the whole Stop)
- Note: By default, when opening this form, you can see that the Orders field shows the value No option. That value actually means that the whole Stop, equals all the Orders within that Stop, are selected, so if you initially intend to move that whole Stop, you don't need to manually click on this field and select each Order of that Stop
- Step 5: After the Orders have been selected, click the Confirm button
- The system will remove the selected Orders from the current day Route Plan and treat them as Unplanned (Missing) Orders
Remove Multiple Stops
- To remove multiple Stops from a Planned Delivery Shift, follow the steps below:
- Step 1: Click the respective checkbox icons at the beginning of the wanted Stops
- Step 2: Click the Remove button above the top right corner of the Route Plan table
- The system will remove all the Orders belonging to the selected Stops from the current day Route Plan and treat them as Unplanned (Missing) Orders
Move Unplanned (Missing) Orders back to Delivery Route
Unplanned Order = Missing OrderThe Unplanned Orders on the Route Plan (List View) screen are the same as the Missing Orders on the Route Plan (Map View) screen. From now on, we will refer to them as Unplanned (Missing) Orders to minimize confusion
- Unplanned (Missing) Orders are:
- 1 - Orders that the system could not successfully put into the optimized Delivery Routes during the Route Plan optimization process due to various reasons, or
- 2 - Orders that the system successfully puts into the optimized Delivery Routes during the Route Plan optimization process, but have then been manually removed out of the optimized Delivery Routes by the users
- To access the Unplanned (Missing) Orders of the current day Route Plan, click the button titled Unplanned Orders on the toolbar above the Route Plan table
- The Unplanned Orders panel will appear on the right side of the screen
- On this panel, the Unplanned (Missing) Orders are grouped by Stops. Click on a Stop will show the Unplanned (Missing) Orders of that Stop
- To know the reason why the system treats a particular Order as an Unplanned (Missing) Order, click on its Order Code. The Unplanned Order Detail panel will appear to the right of the Unplanned Orders panel
- Here, you can perform the following actions to the Unplanned (Missing) Orders:
- 1 - Move a single Unplanned (Missing) Order back to the current day Route Plan
- 2 - Move a whole Stop or multiple Stops back to the current day Route Plan
Move a single Unplanned (Missing) Order back to the Route Plan
- Follow the steps below to move a single Unplanned (Missing) Order back to the Route Plan:
- Step 1: Click on the four arrows icon of the Unplanned (Missing) Order you want to move
- Step 2: The system will display a confirmation dialog. Click OK on to proceed
- Step 3: The Move Order into Trip form will appear
- On this form, first you need to click on the to Vehicle field. Upon clicking, the drop-down list will show the Vehicles which are 1. utilized in the current day Route Plan. These Vehicles will appear in black text, and 2. not utilized in the current day Route Plan. These Vehicles will appear in blue text. Select the Vehicle to which you want to move the Unplanned (Missing) Order
- Step 4.1: If the selected Vehicle is utilized in the current day Route Plan, two more information fields , to Trip and to Before Position will appear
- Click on the to Trip field and select the Delivery Trip of the selected Vehicle to where you want to move the Unplanned (Missing) Order
- Next, click on the to Before Position field and select the position on the selected Delivery Trip before which you want to move the Unplanned (Missing) Order
- Step 4.2: If the selected Vehicle is not utilized in the current day Route Plan, there will not appear any other additional information fields
- Step 5: Finally, click on Move. After a few moments, the system will move the Unplanned (Missing) Order to the intended position
- Note: If on the selected vehicle's Delivery Route there already exists a Stop of the same customer as that of the Unplanned (Missing) Order, then the system will move the Unplanned (Missing) Order right into the Stop of that customer
Move a whole Stop or multiple Stops back to the Route Plan
- To move a whole Stop or multiple Stops back to the Route Plan, follow the steps below:
- Step 1: On the Unplanned Orders panel, click the respective checkbox icons of the Stops you want to move
- Step 2: After you have selected the Stops, click the Move button at the bottom of the panel
- Step 3: The Move Stop panel will appear to the right side of the Unplanned Orders panel
- Step 4: On this panel, the selected Stops will appear below the Selected text. If you want to remove some Stops, click their corresponding remove icons
- Step 5: Click on the Vehicle field. Upon clicking, the drop-down list will show the Vehicles which are 1. utilized in the current day Route Plan. These Vehicles will appear in black text, and 2. not utilized in the current day Route Plan. These Vehicles will appear in blue text. Select the Vehicle to which you want to move the selected Stops
- Step 5.1: If the selected Vehicle is utilized in the current day Route Plan, two more information fields, Shift, and After Position will appear
- Click on the Shift field and select the Delivery Shift of the selected Vehicle to where you want to move the selected Stops
- Next, click on the After Position field and select the position on the selected Delivery Shift before which you want to move the selected Stops
- Step 5.2: If the selected Vehicle is not utilized in the current day Route Plan, there will not appear any other additional information fields
- Step 6: Finally, click the Move button. After a few moments, the system will move the selected Stops to the intended position
Manually Split Orders On Locked Delivery Routes
- If the current Planning Status of a particular Delivery Shift is Locked then you can manually split the Orders on that Delivery Trip into smaller Orders
- To manually split an Order, follow the steps below:
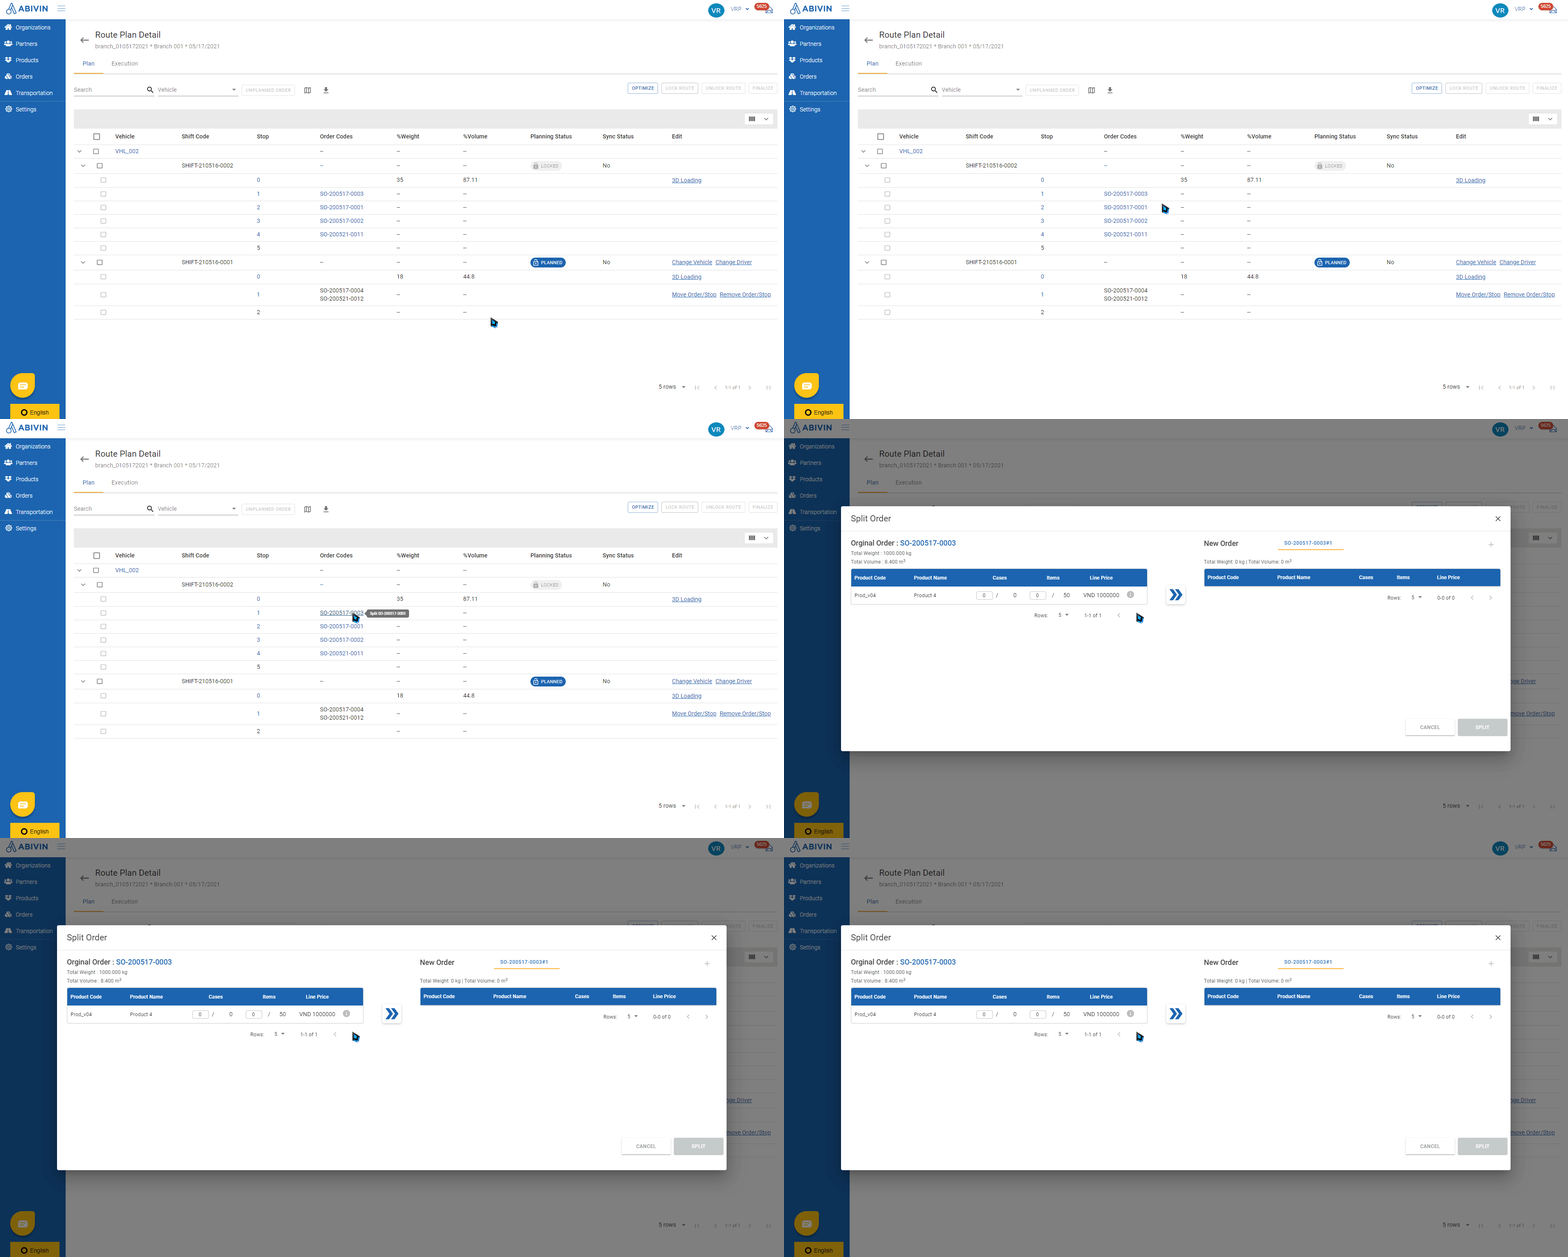
- Step 1: Click on the Order Code of the Order that you want to split. (Under the Order Codes column)
- The Split Order form will appear
- Now, follow the steps that have been described in the article Manage Sales Orders
Route Plan Screen Features
View Route Plan Of Each Vehicle
- To view the details of a certain Vehicle's Delivery Route, click the right angle icon at the beginning of that Vehicle's row
- Upon clicking, the Delivery Shift(s) of that Vehicle will reveal below. Continue to click the right angle icon at the beginning of each Delivery Shift to reveal the list of Delivery Stops within that Delivery Shift
View Route Plans Of All Vehicles At Once
- You can quickly show the details of all the Vehicles' Route Plans at once by clicking the right angle icon above the top right corner of the Route Plan table
Show/Hide Information Columns
- To show or hide certain information columns on the table, click the View columns icon (Located above the top right corner of the Route Plan table) then tick/untick the column titles on the drop-down list to show/hide them on the Route Plan table
Access Route Plan (Map View) Screen
- You can navigate to the Route Plan (Map View) screen to visually view the Delivery Routes by clicking the View Map icon on the toolbar above the Route Plan table
Sort Delivery Trips
- On the Route Plan table, you can sort the Delivery Trips by the following parameters:
- Vehicle Type
- License Plate
- Capacity
- Driver
- Shift Code
- Customer Name
- To sort the Delivery Trips by a particular parameter, hover over the column title of that parameter. You will see the up arrow icon . Click on that icon will sort the Delivery Trips in ascending order. Click on that icon one more time will make it change to down arrow icon , which will sort the Delivery Trips in descending order
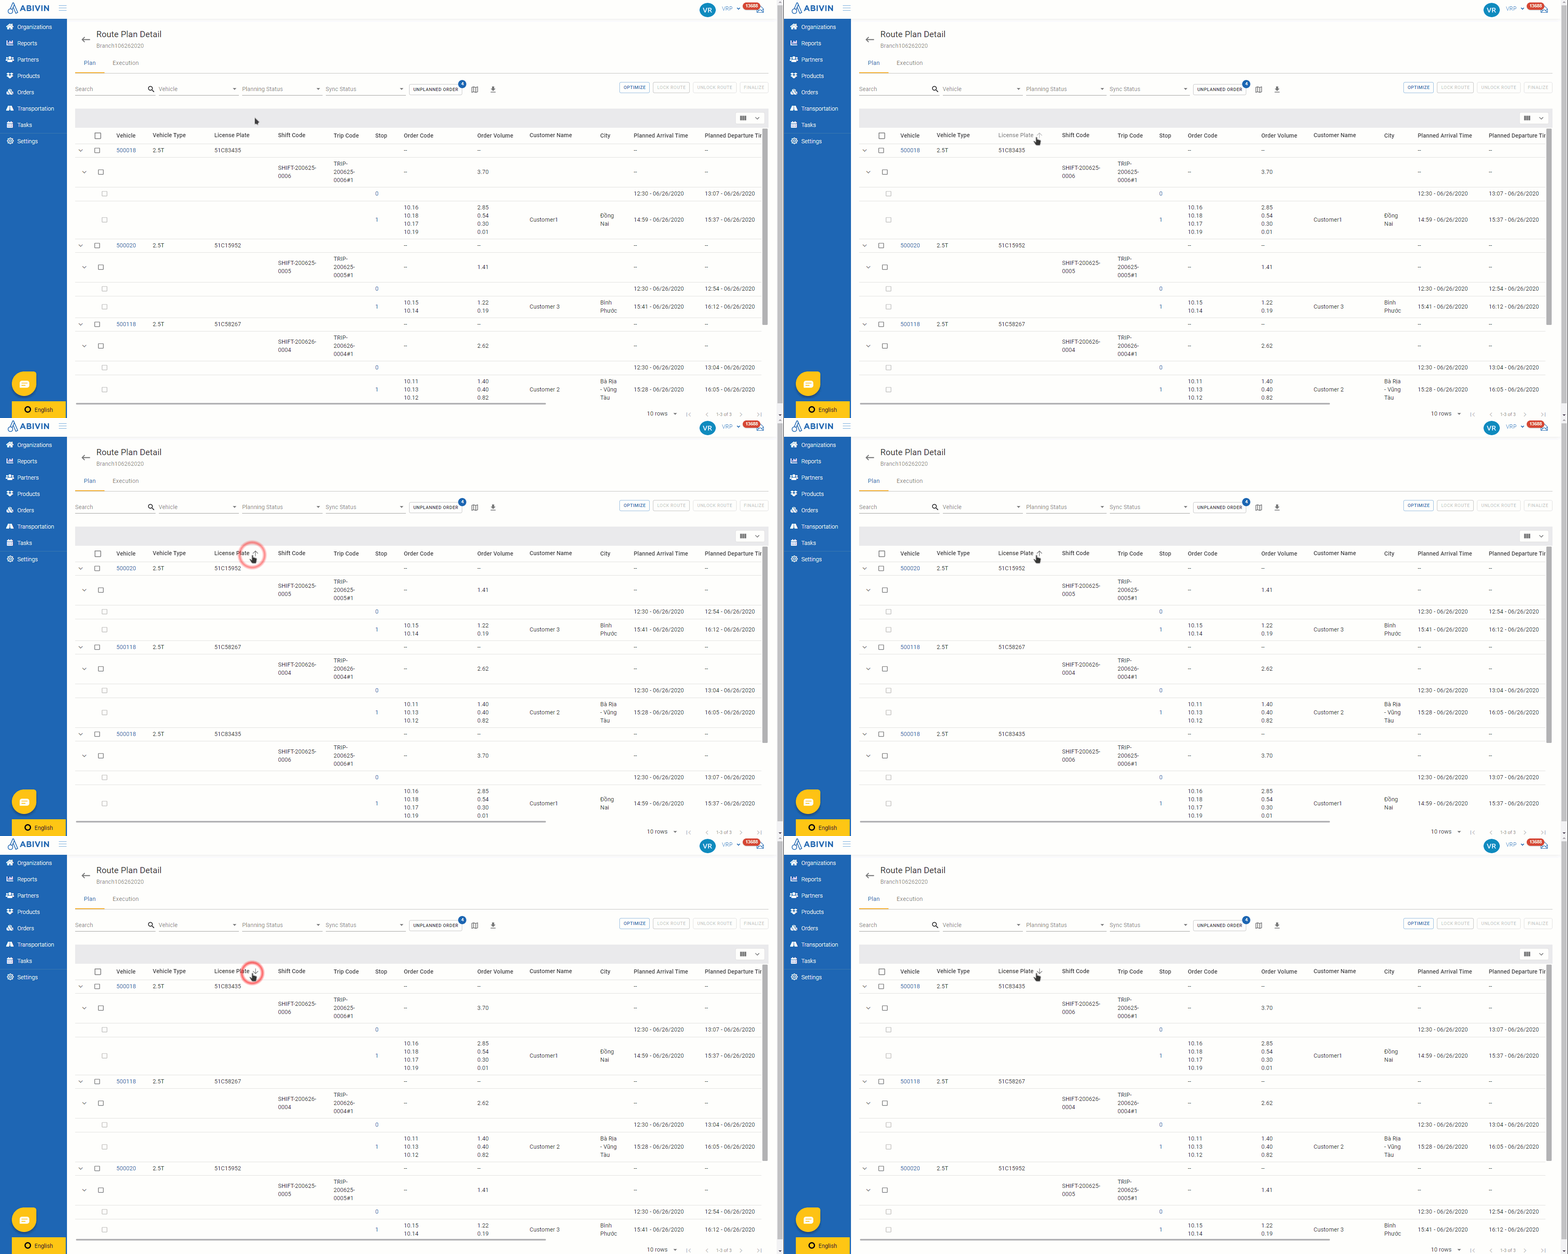
View Delivery Stop Information
- When you reveal the whole details of a Delivery Shift on the Route Plan table, the Delivery Stops within that Delivery Shift will appear under the Stop column
- Note: The 0 numerical order always refers to the manufacturing Depot, the very first Stop on every Delivery Shift
- To view the detailed information of a particular Delivery Stop, click on the corresponding numerical order of that Stop
View Depot Stop Information
- If you click on the numerical order of the manufacturing Depot, the Depot Detail panel will appear on the right side of the screen
View Customer Stop Information
- If you click on the numerical order of the Customers' receiving locations, the Stop Detail panel will appear on the right side of the screen
Export Route Plan
Export Route Plan Of All Vehicles
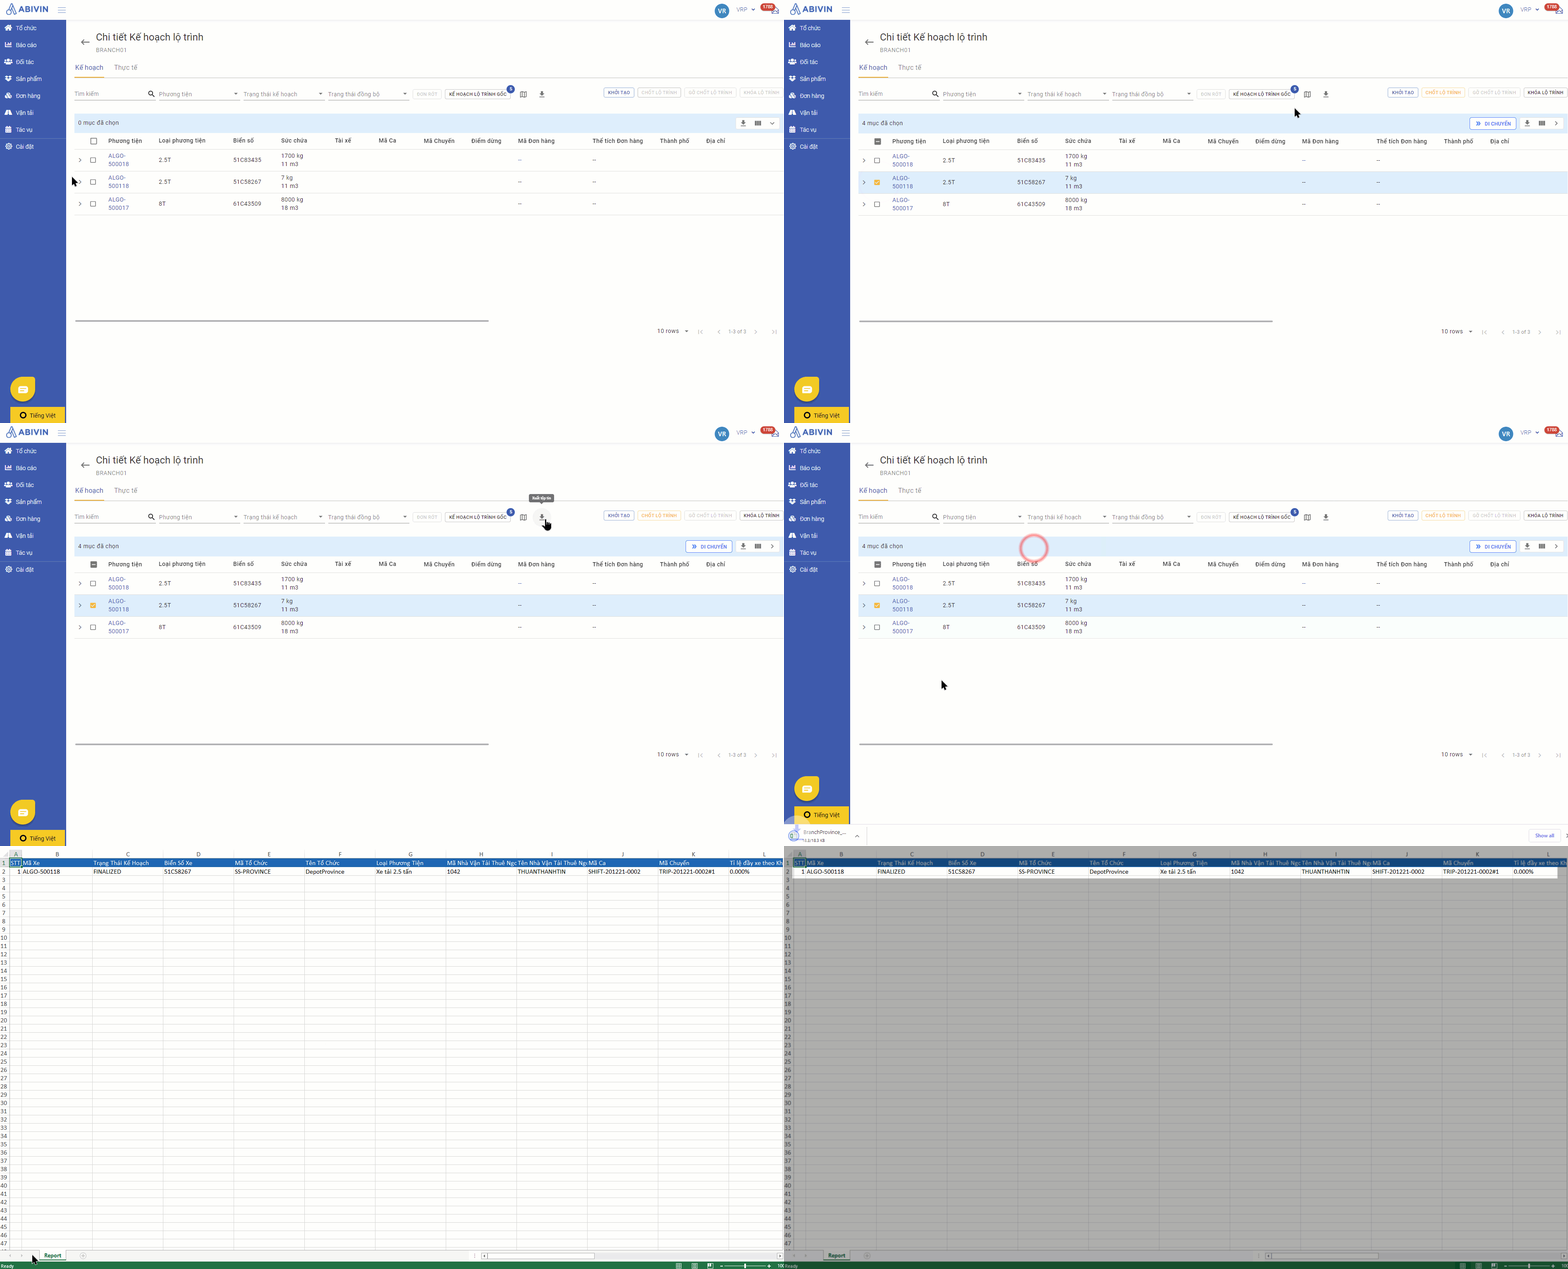
- To export the Route Plans of all Vehicles on the current date, click the Export button . The system will export the Route Plans of all Vehicles to an Excel file
Export Route Plan Of Only Selected Vehicles
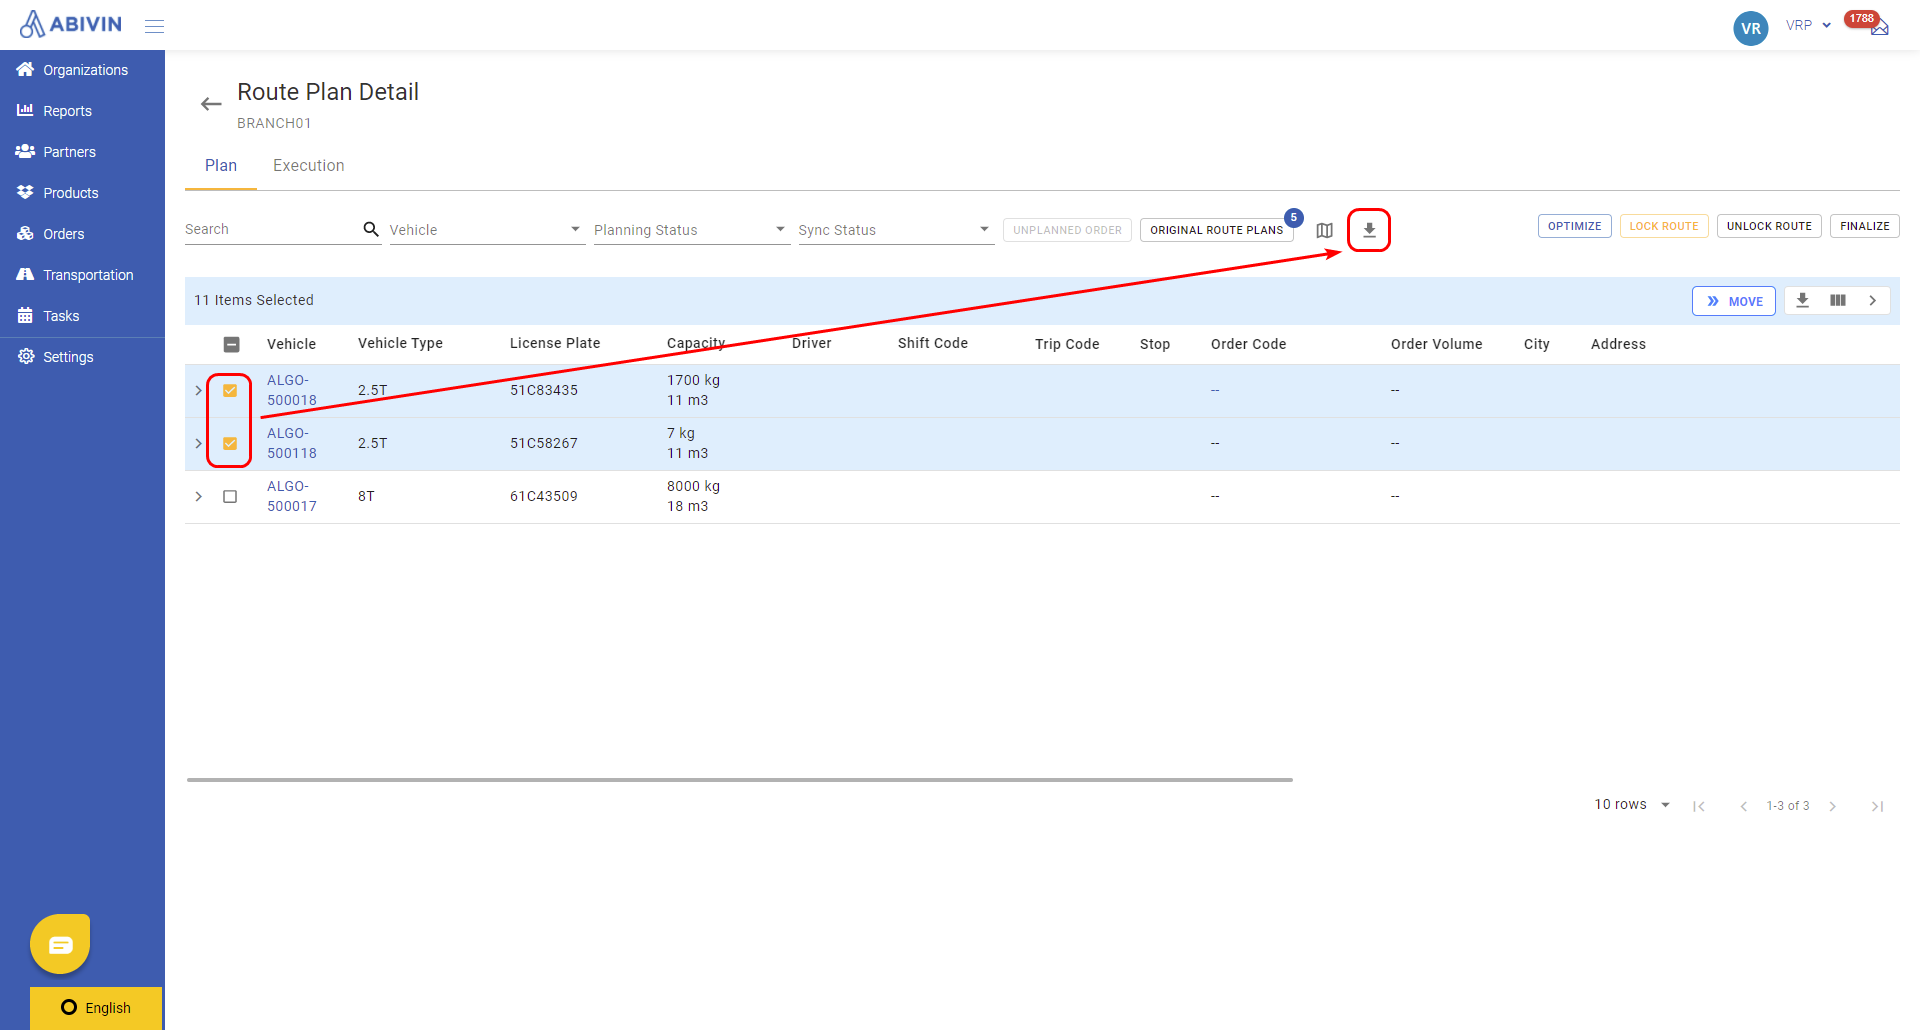
- You can also export the Route Plans of only some selected Vehicles. To do that, follow the steps below:
- Step 1: Tick the checkbox icons of the wanted Vehicles
- Step 2: Click the Export button
Store And Export Route Plan Versions
- Each time the route dispatcher performs an adjustment to the Route Plan, whether right in the Route Plan (Such as changing Driver, changing Vehicle) or to the elements of the Route Plan (Products, Customer etc.) and re-run the Route Plan optimization process, the system will store a record of the Route Plan version right before the Route Plan optimization process is re-run
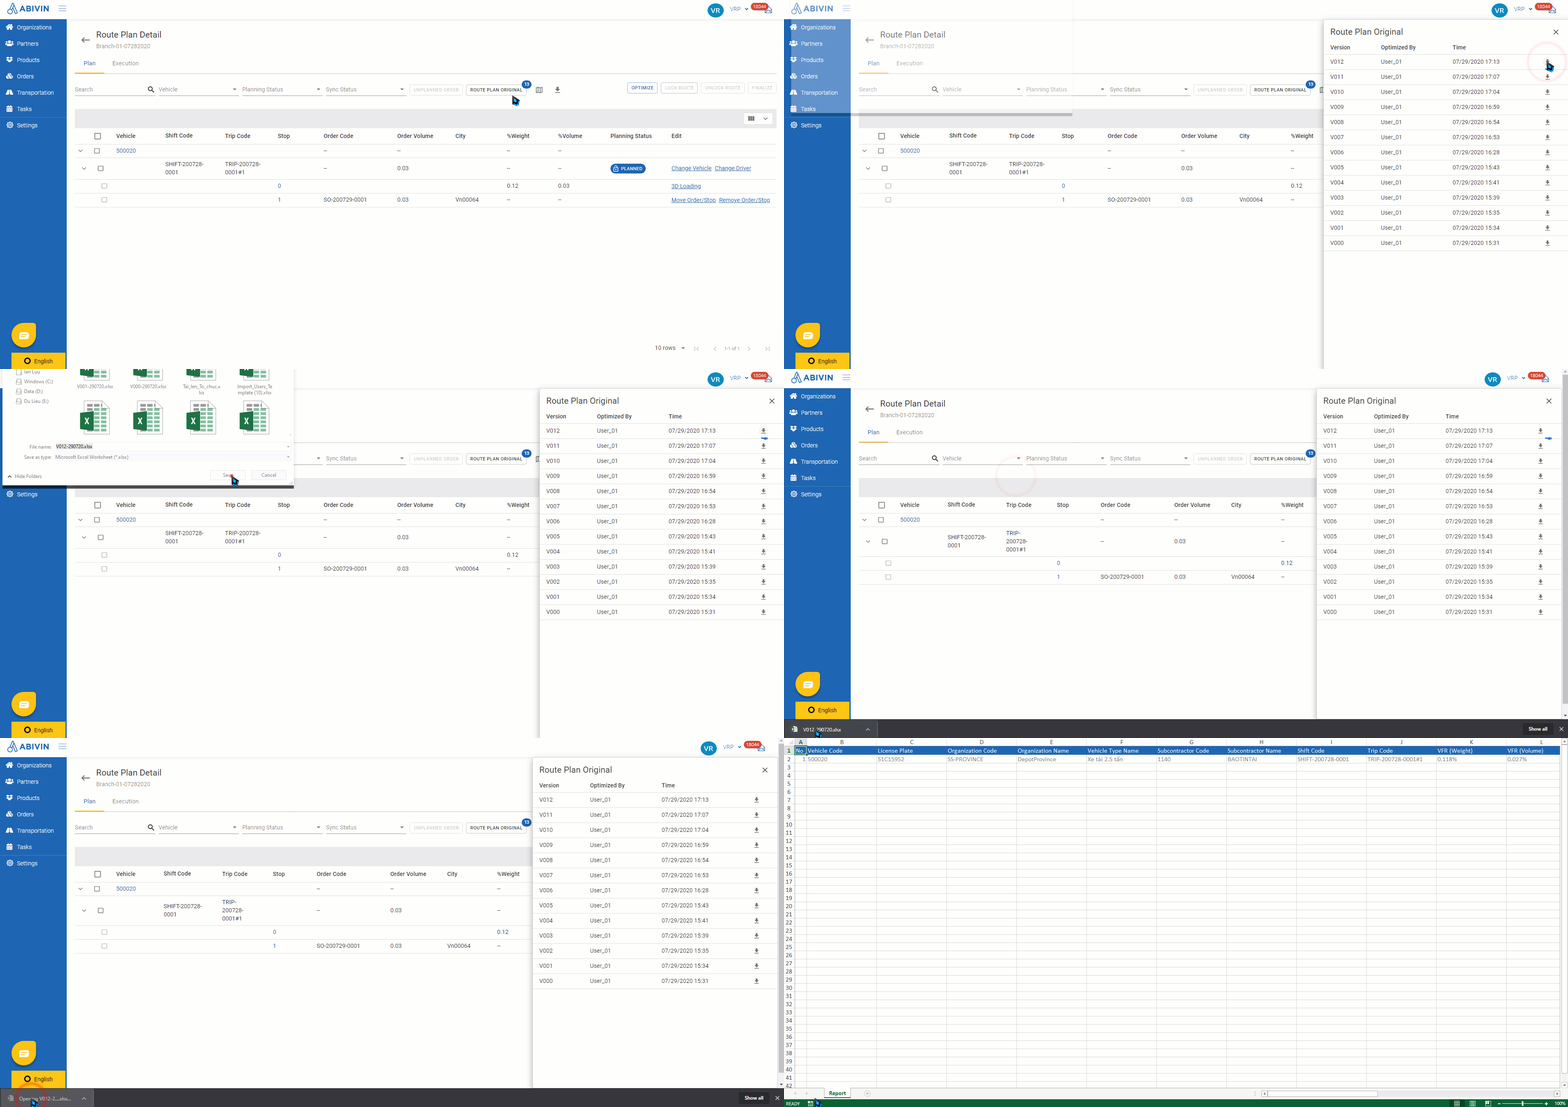
- On the Route Plan screen, the Route Plan versions can be accessed via the button Original Route Plans, located on the toolbar above the Route Plan table
- The number on the top right of the button indicates the number of Route Plan versions that have been created to date
- Upon clicking the button, the Original Route Plans form will appear on the right side of the screen. Here you will be able to view all versions of the Route Plan to date. The versions are sorted in chronological order, with the latest version on the top of the list, and the oldest version at the bottom. The Planning Version column shows the names of the versions; the Planned by column shows the Username of the User who generated that Route Plan version; the Planning Time column shows the time stamp a Route Plan version was created
- To export a specific Route Plan version, click the corresponding download icon of that version. That version will be immediately exported as an Excel spreadsheet to view offline
Search Route Plans
Search Route Plans By Creation Dates
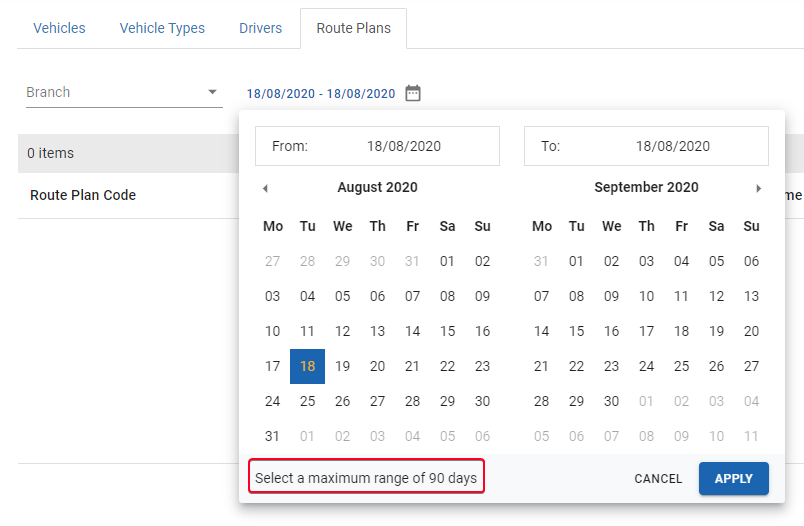
- On the Transportation > Route Plans tab, you can search Route Plans that are created within a specific date range (Note: The maximum date range is ninety days). To do that, click the calendar icon then select the appropriate date range from the calendar
Search Within Route Plans
- Within a Route Plan, you can use the search bar located above the top left corner of the Delivery Shift table to search for specific Delivery Shifts/Delivery Trips within that Route Plan. You can search by the following attributes:
- Customer Name
- Customer Address
- Order Code
- Planning Status
- Sync Status
- Vehicle Name
- License Plate
- Shift Code
- Trip Code
Filter Within Route Plans
Filter by Vehicles
- You can filter the Delivery Shifts assigned to a specific Vehicle by clicking on the Vehicle box (Located to the right of the search bar) then select the desired Vehicle from the drop-down list. You can also input the Vehicle Name/License Plate of the Vehicle into the search bar of that box to filter out faster
Filter Route Plan By Planning Status
Filter Route Plan By Synchronization Status
Updated about 1 month ago
