Manage Sales Orders
Types of Sales Orders
- In this model, there are two types of Orders: Full Truckload (FTL) and Less than Truckload (LTL)
- Less than Truckload (LTL): This type of Order is used in the scenario you want to create multiple Orders that have the same Origin Depot, but different Destination Depots
- Full Truckload (FTL): This type of Order is used in the scenario you want to create multiple Orders that have different Origin Depots
In this model, one Order (Even of LTL type) can only consist of one Origin Depot and one Destination Depot. DO NOT create LTL Orders that have multiple Origin Depots
Locate PDP Order list
- Current PDP Orders (Orders that have the attribute Date containing the current date) are listed on the tab PDP Orders > Current Order
- This is where you can create new Orders
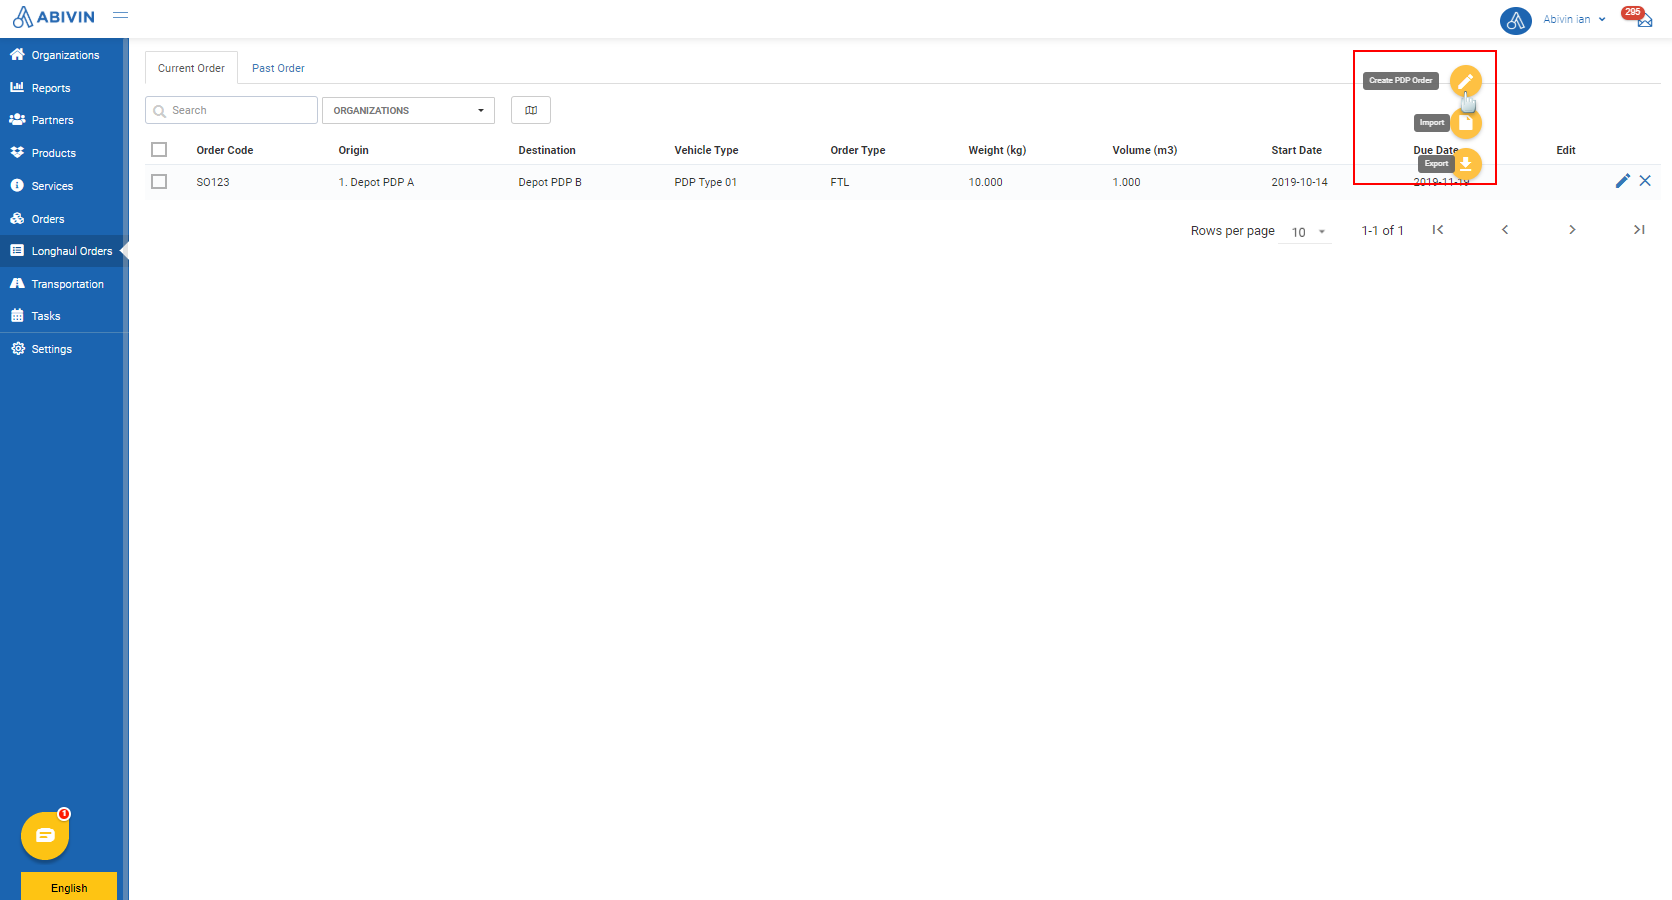
- Past PDP Orders (Orders that are considered to have expired, which have the attribute Date to be earlier than the current date) are listed on the tab PDP Orders > Past Order
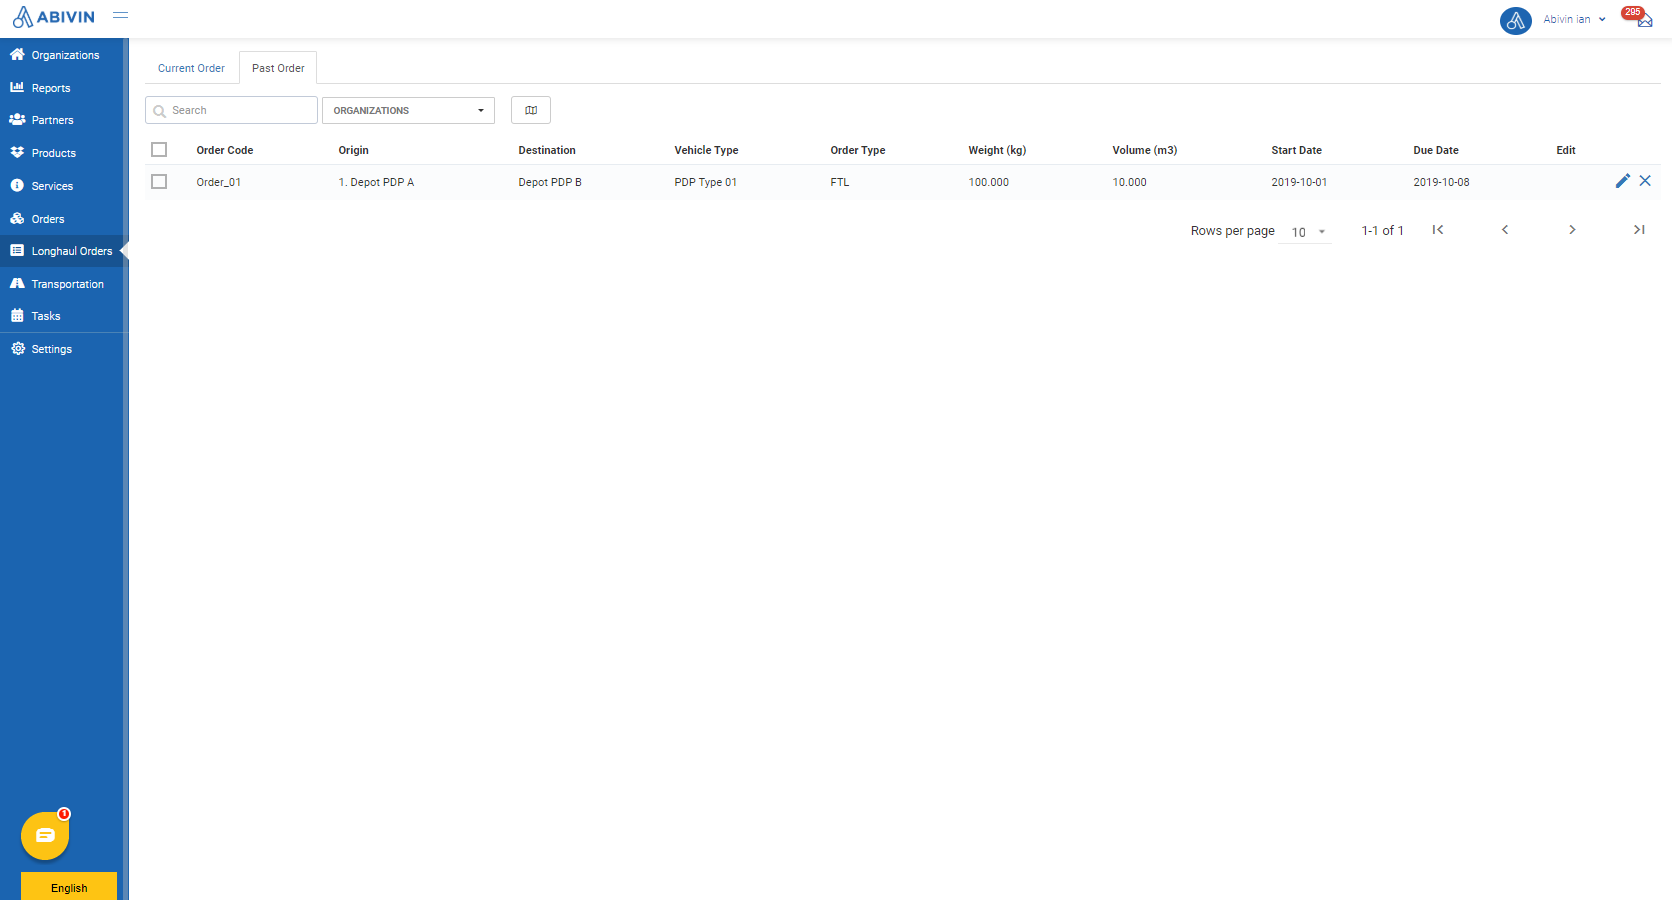
Future PDP Orders will not be visibleOrders that have the attribute Date to be at later dates than the current date will not be visible. They will only become visible on the tab PDP Orders > Current Order once the current date reaches the Start Date of the attribute Date
Tasks of the Order Issuer
- You are the Order Issuer of the Branch. You can create Orders for the Depots that you have been assigned the management right over
- Below we will guide you through the steps of creating and submitting Orders
Order information fields
- Below is the list of all information fields of an Order
You don't necessarily need to input into all information fieldsApart from the information fields listed below, other information fields can be left blank during the creation process
Information field | Description |
|---|---|
Order Code (Web form + Excel template) (Required) | The management code assigned to the order being created |
Organization | The Branch which directly manages the order being created |
Date | The date range during which the order being created will be performed |
Start Date; End Date | Start Date: The first date of the date range during which the order being created will be performed |
Origin Pickup (Web form); Origin Pickup Code (Excel template) | The Depot from where products will be picked up |
Destination Delivery (Web form); Destination Delivery Code (Excel template) | The Depot to where products will be delivered |
Origin Time Window | The time range of day during which the Origin Depot allows the vehicles to come and pick up products |
Destination Time Window | The time range of day during which the Destination Depot allows the vehicles to come and deliver products |
Order Type | Type of the order being created |
Type of Vehicle (Web form); Vehicle Type (Excel template) | The vehicle type which will perform the order being created |
Sub-contractor | Specify whether the order being created might/will be performed by vehicles of sub contractor or not |
Sub-contractor Name | Name of the sub-contractor whose vehicles might/will perform the order being created |
Palletized | Specify whether the products loaded in the order being created will be placed onto pallet or not |
Product (Web form); Product Code (Excel template) | The product loaded in the order being created |
Expired Date | The date on which the product in the order being created is regarded as expired, no longer usable |
Lot Number | The number of the product lot, in which the product loaded in the order being created belongs |
Total Weight | The total weight value of the order being created, in kilogram (kg) |
Total Volume | The total volume value of the order being created, in cubic metre (m3) |
Pallet (Web form); Number Of Pallets (Excel template) | The quantity of pallets of a specific product loaded in the order being created |
Number Of Cases | The quantity of cases of a specific product loaded in the order being created |
Number Of Items | The quantity of single items of a specific product loaded in the order being created |
Total Price | The total price of the order being created |
Customer Reference Number | The reference phone number of the Destination Depot |
Check by | Name of the personnel who checks the accuracy of the order being created |
Note | A short note about the order being created |
Service Payer | The Depot which will have to pay the Transport Service price of the Order |
Create Orders using Web form
- Please refer to the CRUD functions article to know the general steps about creating single object using web form
- When using Web form, the information must be input exactly in the following sequence:
1.1. Order Code
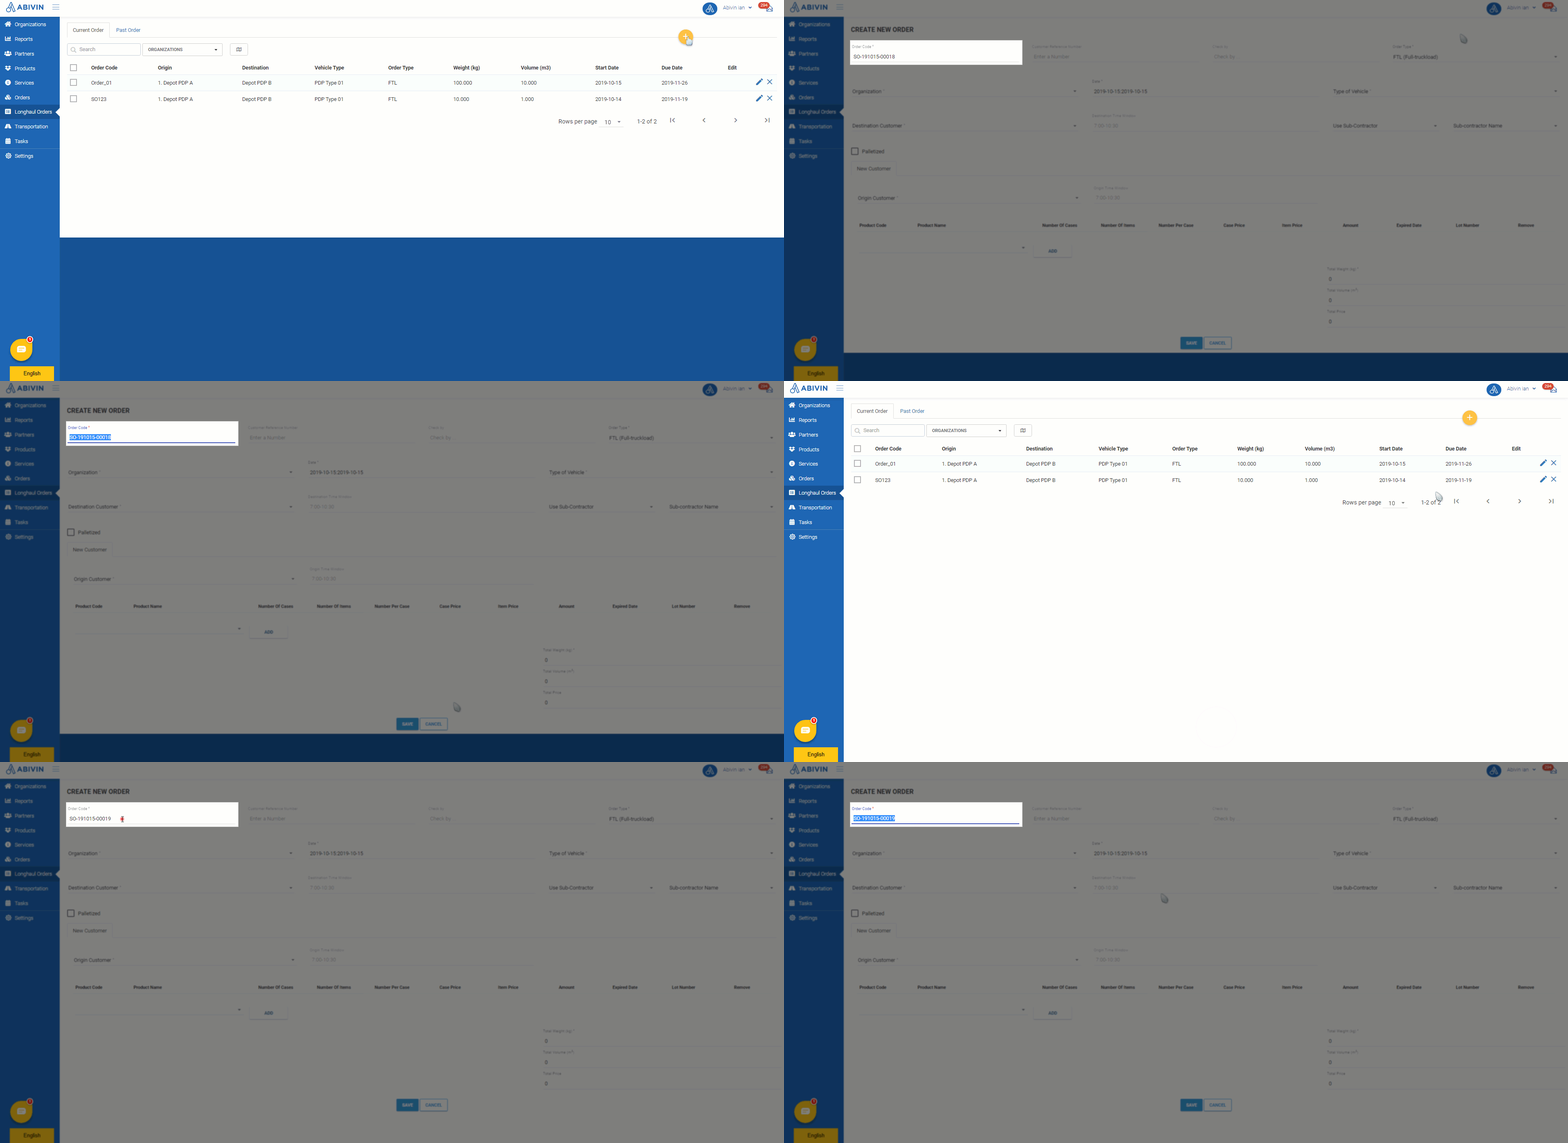
- The Order code is automatically generated in the following format:
SO-yymmdd-xxxxx - In which:
- SO stands for Sales Order
- yy is the last two digits of the current year. For example: The current year is 2019, then the yy value would be 19
- mm is the current month. For example: The current month is October, then the mm value would be 10
- dd is the current date. For example: The current date is Sixteenth, then the dd value would be 16
- xxxxx is the numerical order of the order. This numerical order will automatically increase each time you open the Create New Order screen. For example: 00001; 00023; 11111 and so on
- You can also change the order code to your own format. The order code must not contain spaces
This field will not be visible for certain user accounts
1.2. Organization
- Click on this field. Input the Organization Code/Organization Name of the appropriate Depot into the search bar, then select from the drop down menu

1.3. Order Type
- Click on this field. Select the appropriate order type from the drop down menu
- As have been mentioned at the beginning of this article, if you want to create multiple orders that have the same Origin location, select the order type LTL for each of those orders. If the orders don't have the same Origin location, select the order type FTL instead
1.4. Origin Pickup & Destination Delivery
- Click on this field. Input the Organization Name/Organization Code of the appropriate Depot into the search bar, then select from the drop down menu
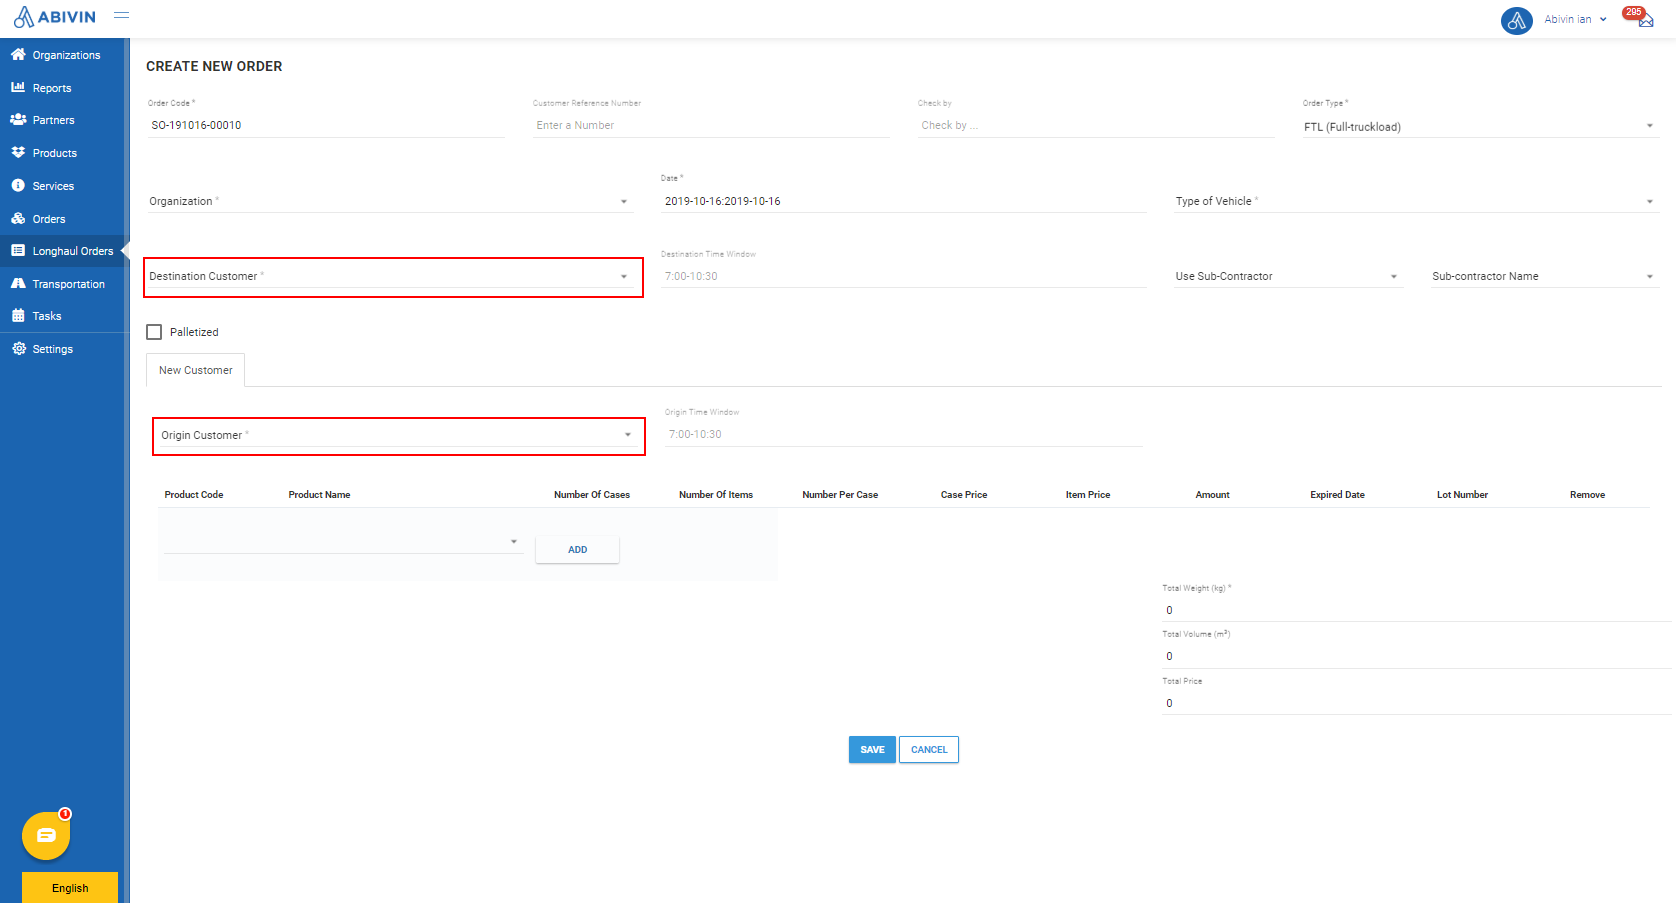
- Important Note: You can only create Orders if the following two conditions are met:
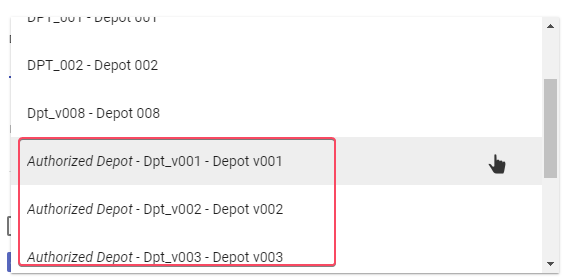
- 1 - The Depots mentioned in the Orders are Authorized Depots (The Depots that you have been granted the permission to create Orders on behalf of the Depots. Read more in the following article: Manage Users). On the drop-down list, these Depots will have the prefix Authorized Depot to distinguish them from the Not Authorized Depots
- 2 - The Order Creator User group in which your account belongs have been granted the Order creating permission for the Depot type pairs that are the same as the Depots mentioned in the Orders. Read more in the following article: Manage Organizations
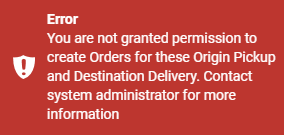
- If one of those two conditions is not met, there will be a warning message
1.5. Origin Time Window & Destination Time Window
- Input the time window exactly in this format: hh:mm-hh:mm. For example: 08:00-12:30
- If the order being created doesn't require any time window, leave these fields blank
1.6. Date
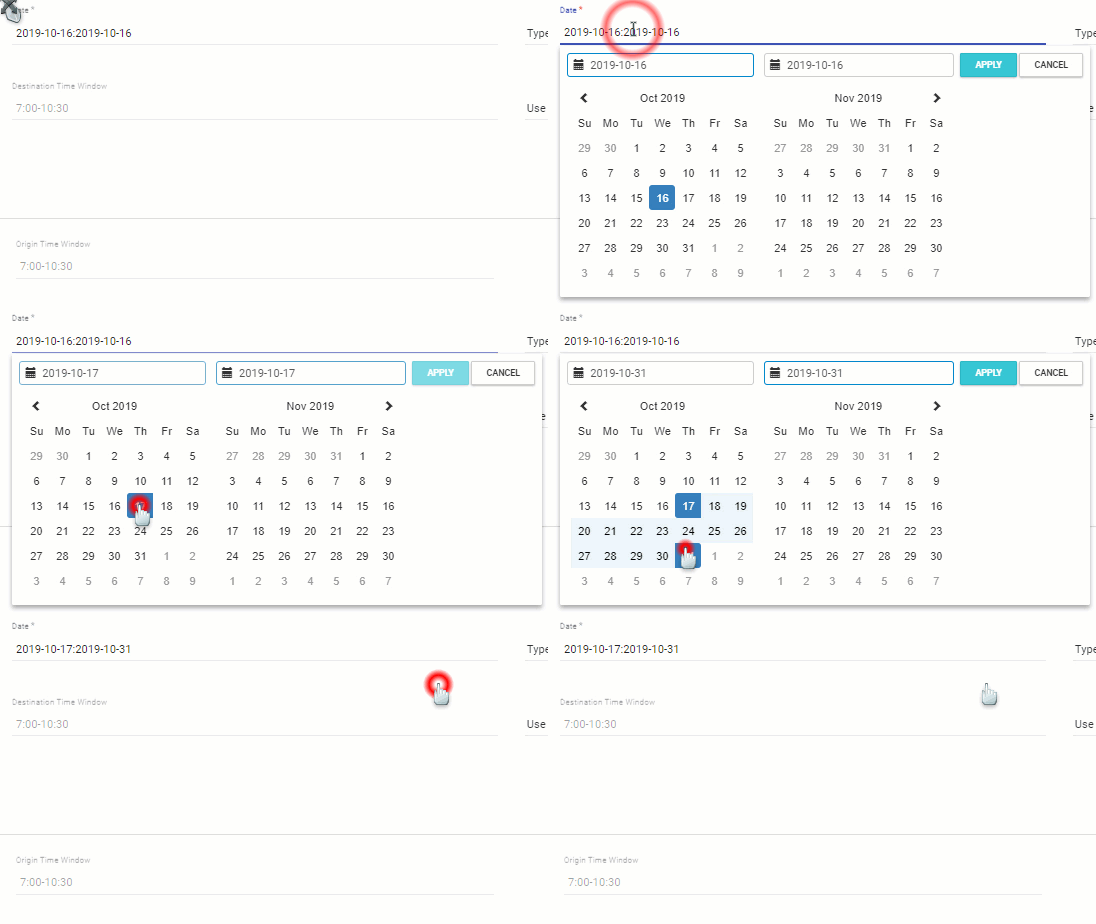
- Click on the field. Choose the Start date and End date from the drop down calendar. Then click on Apply button to finish creating the date range
1.7. Type of Vehicle
- Click on this field. Select the appropriate vehicle type from the drop down menu
1.8. Sub-contractor; Sub-contractor Name
- Click on this field. On the drop down menu, select the appropriate option from these three options : Always; Use if Needed; No
- If you select Use if Needed or Always option, you have to specify the sub-contractor by clicking on Sub-contractor Name field, then choose the appropriate sub-contractor from the drop down menu

1.9. Product
- Click on this field. Input the Product Name/Product Code of the appropriate product into the search bar, then select from the drop down menu. Next, click on the Add button to add that product into the order
- You can select multiple products by repeating these steps
- If you accidentally added the wrong product, click on the Remove icon of that product to remove it from the order

1.9.1. Product not placed onto pallet
- Input the quantity of whole cases/items of a product into the corresponding Number Of Cases/Number Of Items fields
- gle item of a s If there is zero single item of a specific product in the order being created, you must input 0 into the Number Of Items field of that product

- Similarly, If there is zero case of a specific product in the order being created, you must input 0 into the Number Of Cases field

1.9.2. Product placed onto pallet
- If the product is placed onto pallet, click on Palletized check box, then input the quantity of pallets of that product into the Pallet field

1.9.3. Product Lot Number; Product Expired Date
- The Expired date and Lot Number fields are optional. If you don't have information of these fields, just leave them blank

1.10. Total Weight; Total Volume and Total Price
1.10.1. Manually input Total Weight; Total Volume and Total Price
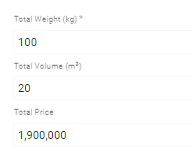
- By default, these information fields must be input manually
- Only input the value (in number), do not input the unit
1.10.2. Automatically calculate Total Weight; Total Volume and Total Price
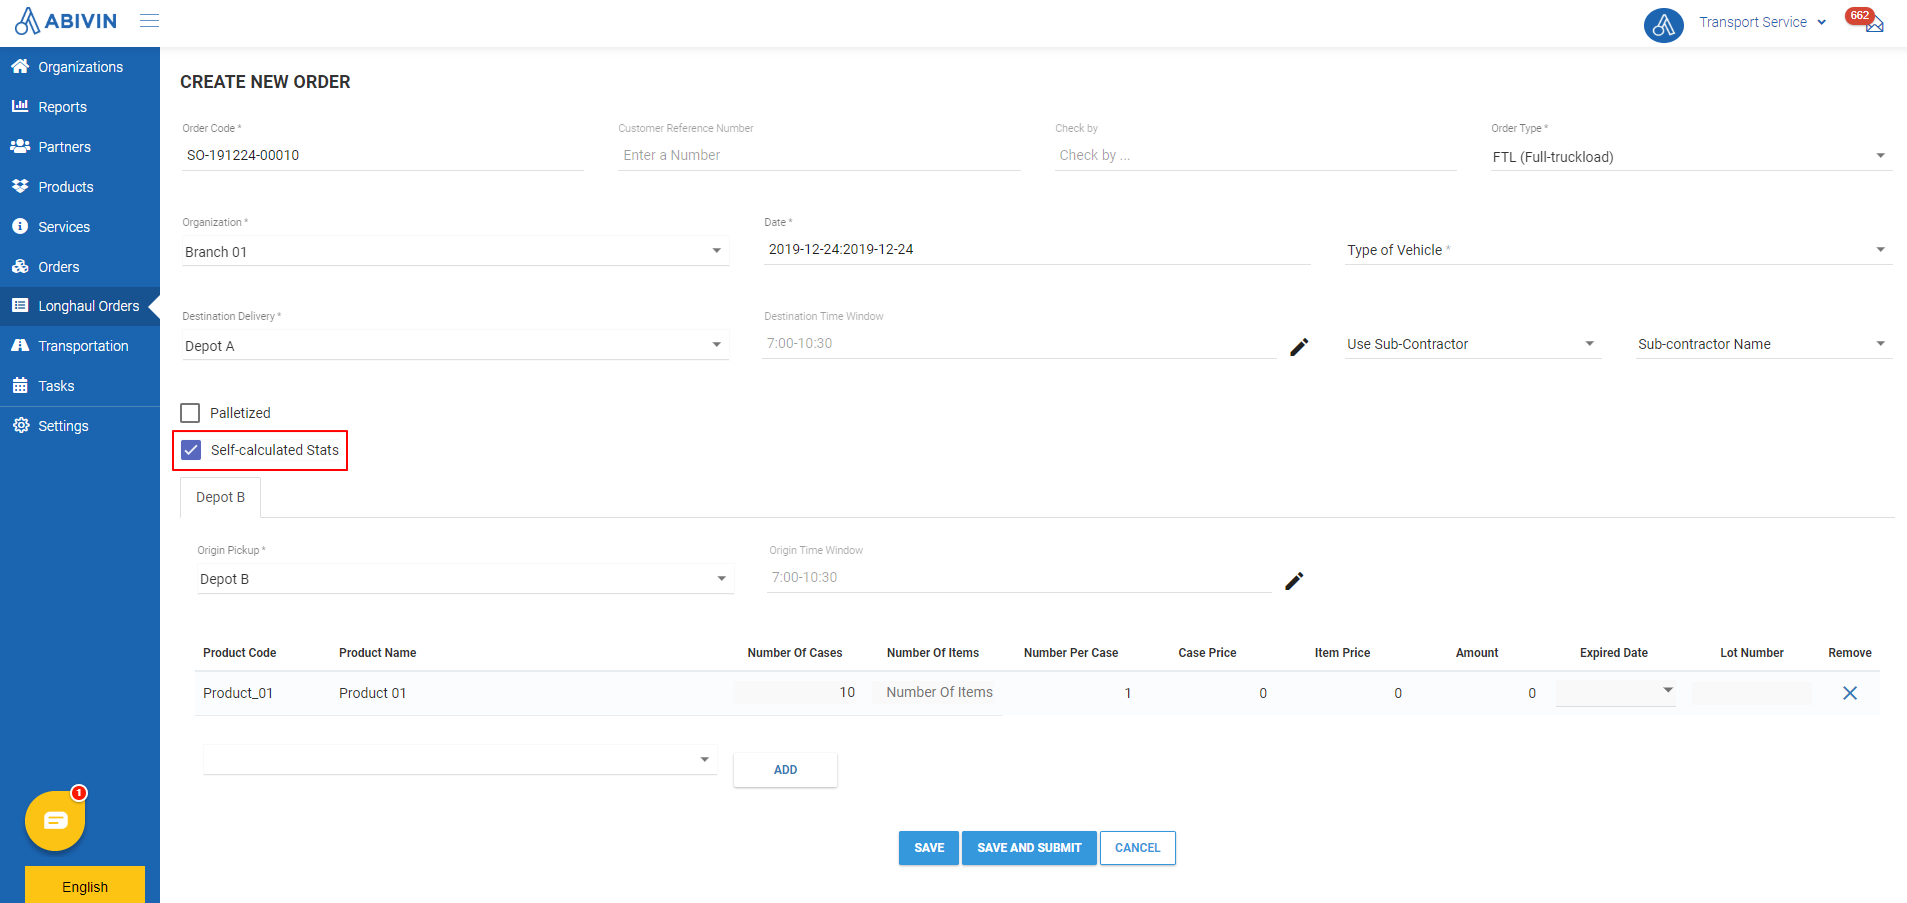
- If you wish to let the system automatically calculate these information based on the product and quantity information, click on the check box Self-calculated Stats. These fields will be greyed out
1.11. Customer Reference Number; Check By
- These information fields are optional. If you don't have information, just leave these fields blank
1.12. Note
- Input the note of the order being created into the field that has the text Add A Text
- Format: Free-form
- This field is optional. If the order being created has no note, leave this field blank
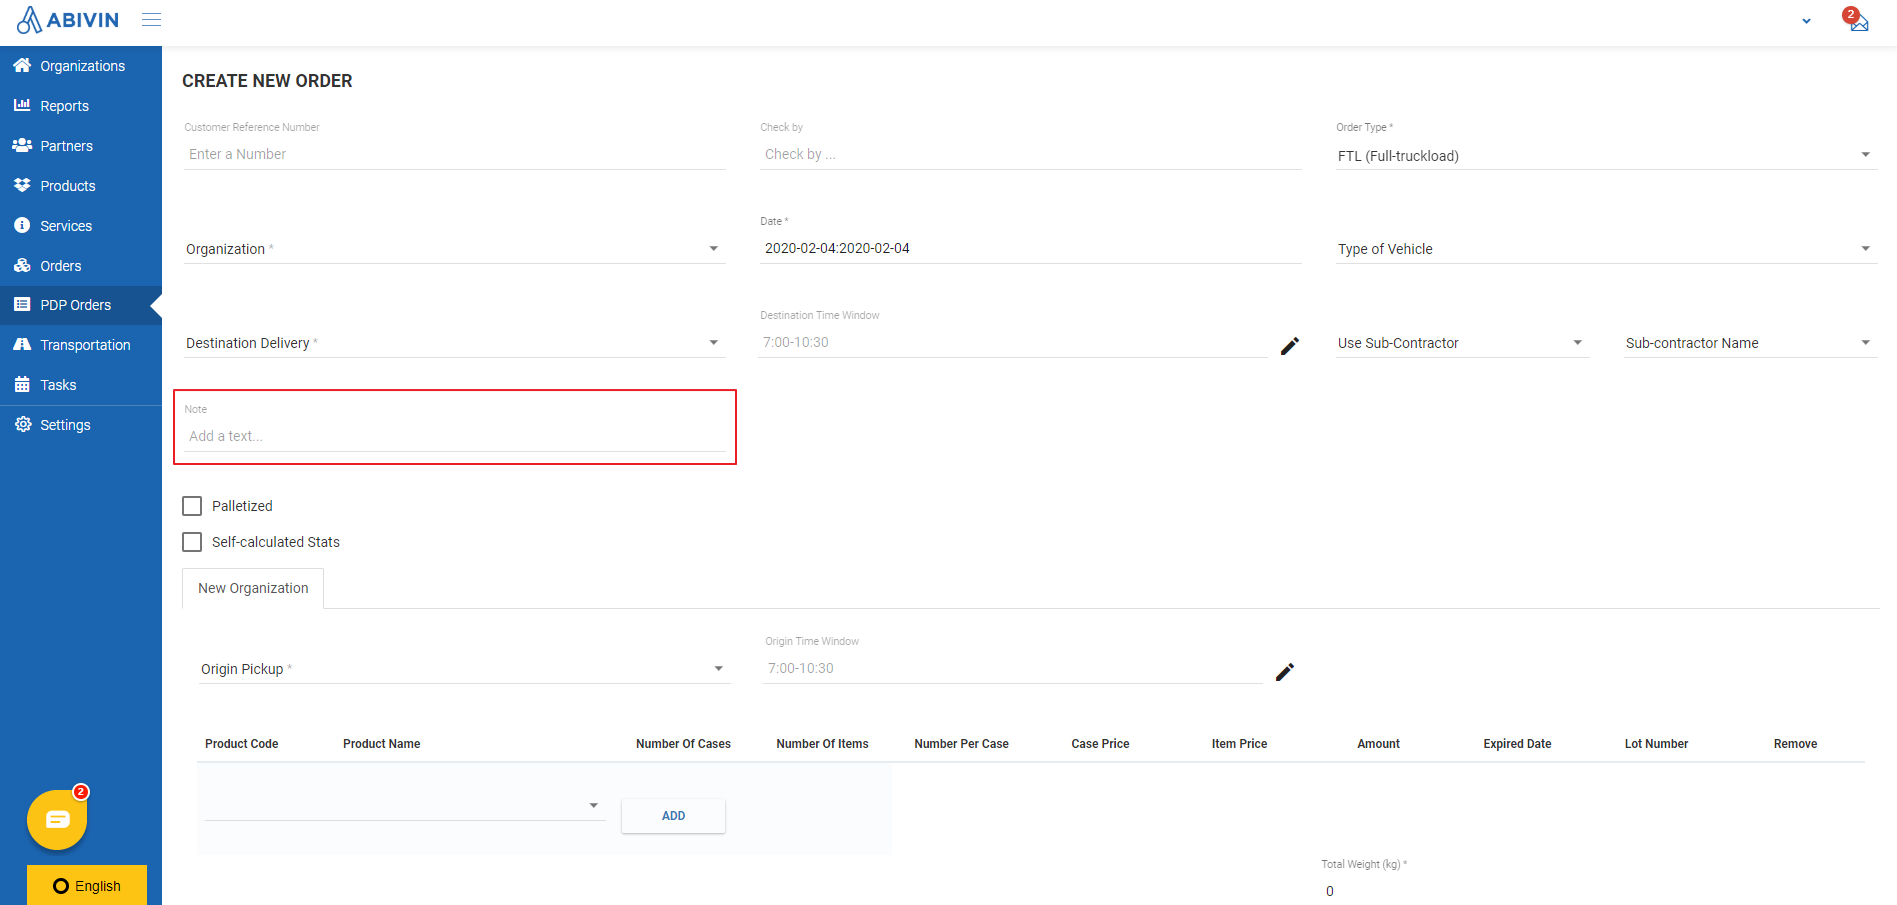
Không thấy ô Self-calculated Stats ở hình này, cần có để tạo sự đồng nhất về giao diện sử dụng.
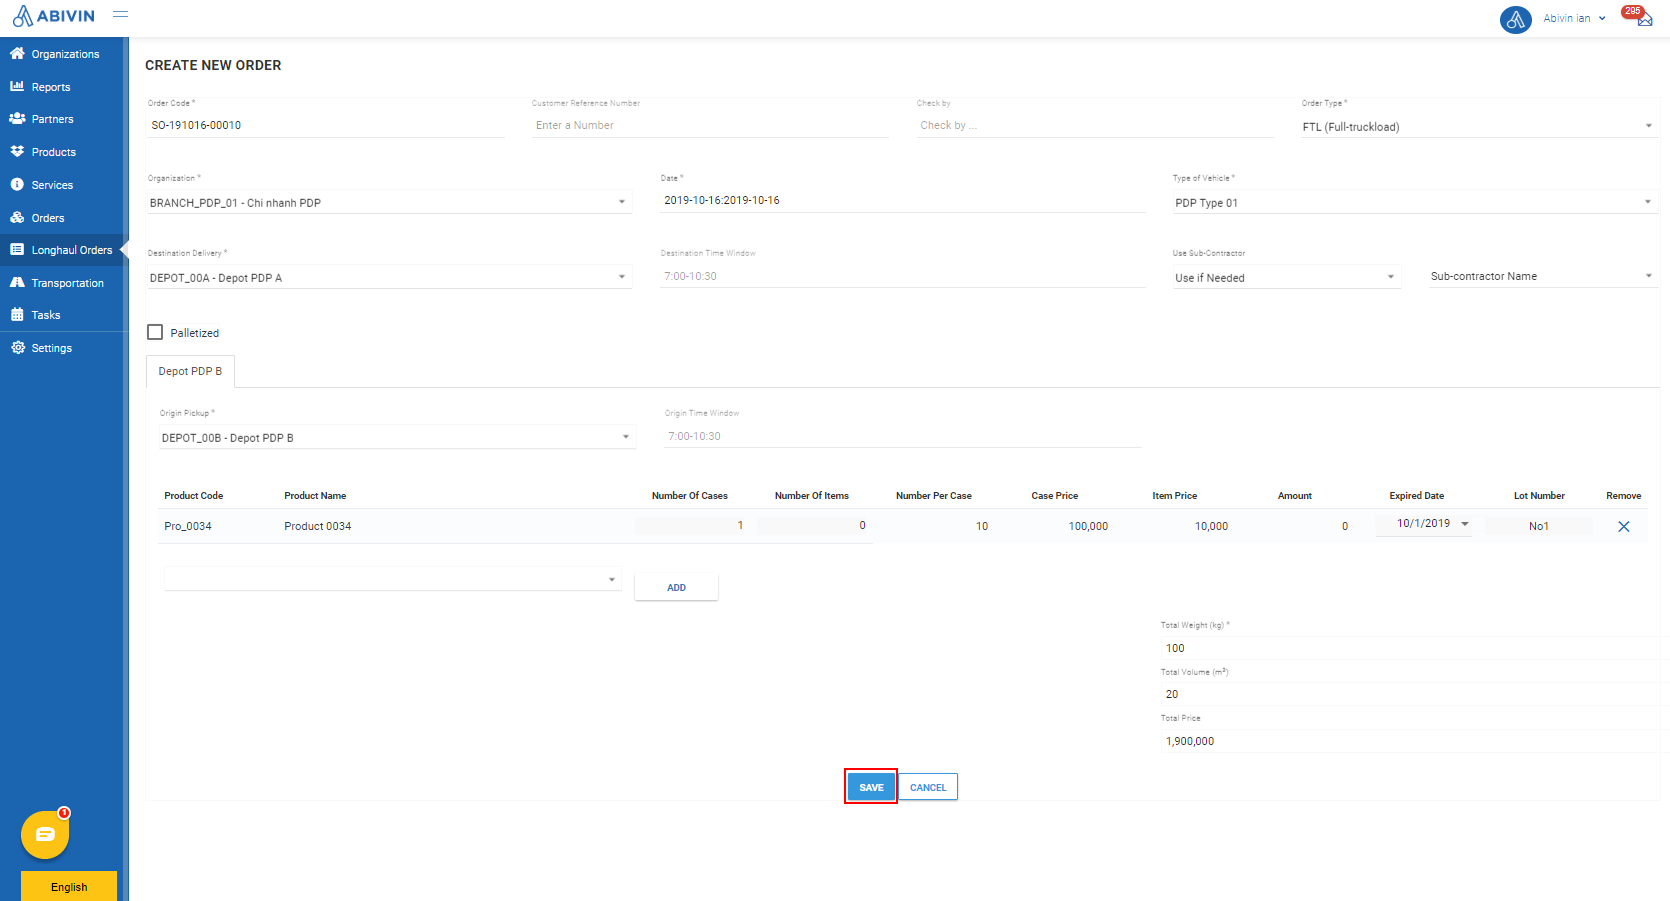
- After you have input all information, click on the blue Save button to finish creating the order
Create Orders using Excel template
- Please refer to the CRUD functions article to know the general steps about creating multiple objects using Excel template
- Below is the instruction to input in the information fields
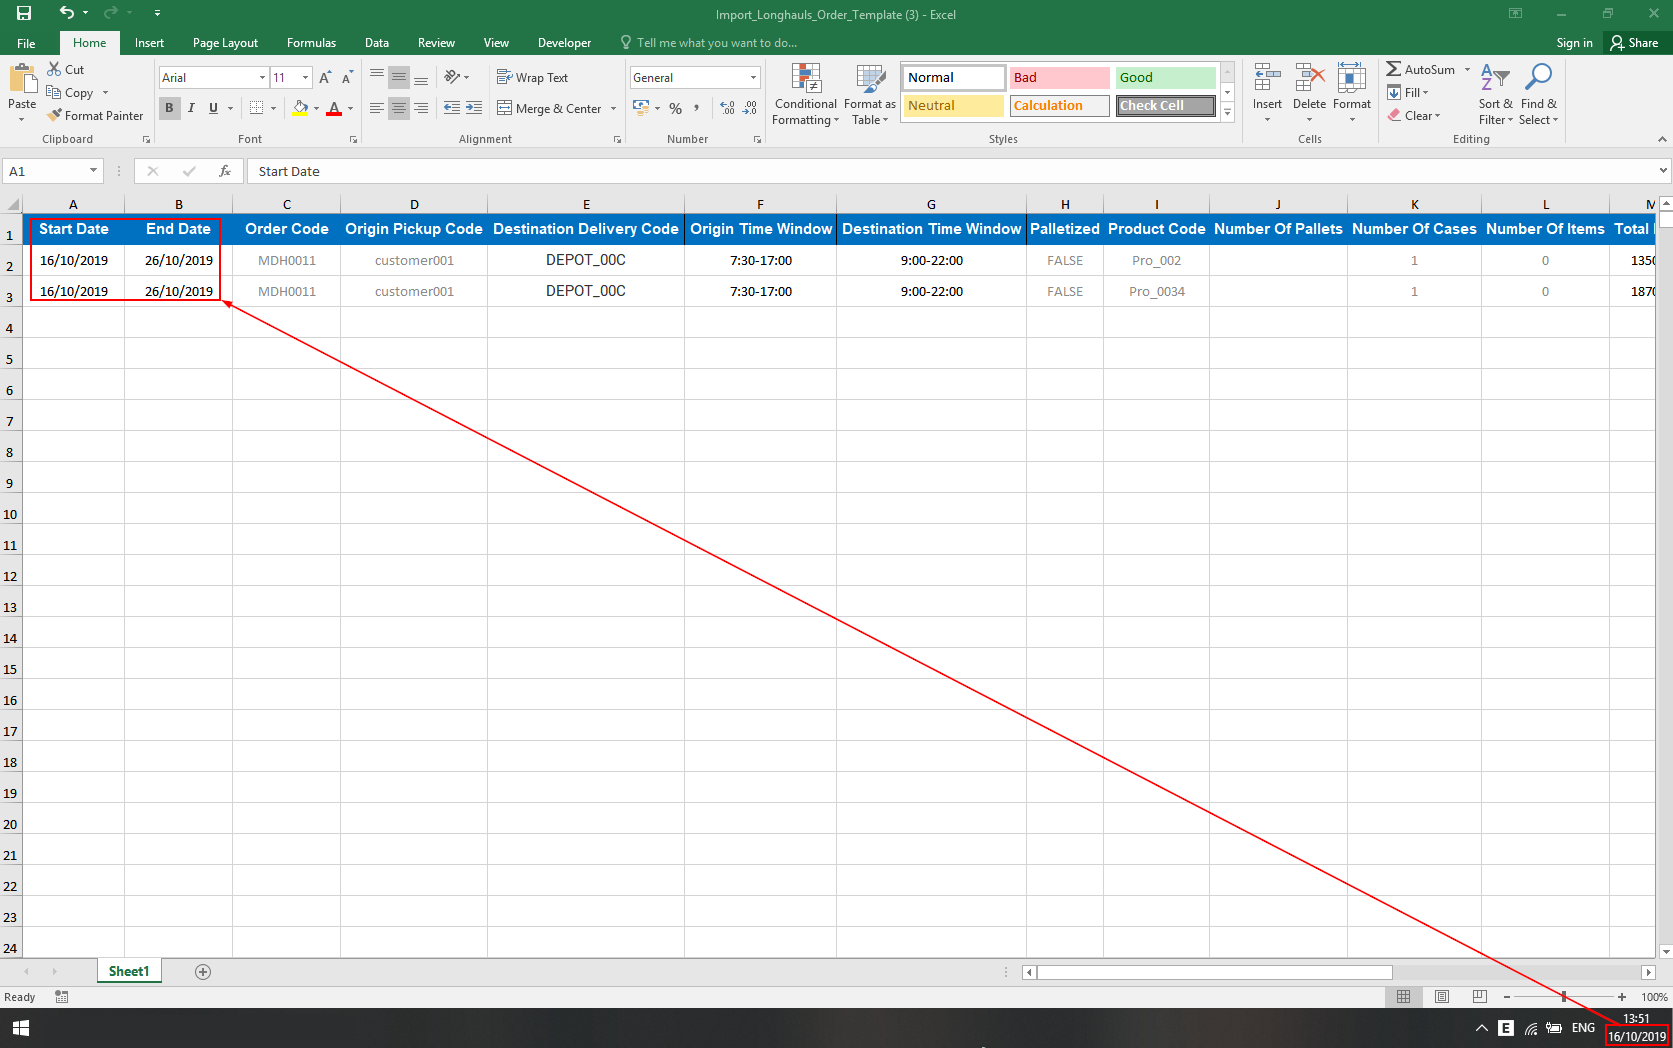
2.1. Start Date; End Date
- Input in either dd/mm/yyyy or mm/dd/yyyy format, based on the current Date format of your computer
2.2. Order Code
- The Order code must not contain spaces
2.3. Order Type
- As have been mentioned at the beginning of this article, if you want to create multiple orders that have the same Origin location, input the value LTL into this cell for each of those orders. If the orders don't have the same Origin location, input the value FTL instead

2.4. Origin Pickup Code & Destination Delivery Code
- Copy the Organization Code of the appropriate Depots on Web app, then paste into these cells
- The Organization Codes can be found under Organization Code column in Organizations > Organization List tab
2.5. Origin Time Window & Destination Time Window
- The format must be hh:mm-hh:mm

- If the Order doesn't have any time window, just leave these cells blank
2.6. Product
2.6.1. Product Code
- Copy the product code of the appropriate product on Web app, then paste into this cell
- The product code can be found under the Product Code column in Products > Products tab
- If there are multiple products loaded into the order being created, separate each product on a dedicated row
2.6.2. Product is not placed onto pallet
- If the product is not placed onto pallet, input the following value into Palletized cell: FALSE
- Next, input the quantity of cases and/or single items of that product into the Number of Cases and Number of Items cells, leave the Number of Pallets cell blank
- put 0 int If a product has zero case loaded in the order, input 0 into the Number of Cases cell. Similarly, if a product has zero single item loaded in the order, input 0 into the Number of Items cell. Do not leave these cells blank


2.6.3. Product is placed on to pallet
- If the product is placed onto pallet, input the following value into Palletized cell: TRUE
- Next, input the quantity of pallets into Number Of Pallets cell; leave the Number of Cases and Number of Items cells blank

DO NOT MIX PALLETIZED AND NON-PALLETIZED PRODUCTS IN AN ORDERIn an order, all products can only be placed either onto pallet or without pallet. DO NOT mix the two types
2.6.4. Lot Number; Expired Date
- Input the lot number and expiry date of the product into these cells
- These information are optional. You can leave them blank
2.7. Total Price; Total Weight; Total Volume
2.7.1. Manually input Total Weight; Total Volume and Total Price
- If an order consists of multiple products, input the Total Weight; Total Volume and Total Price values of the order into the corresponding cells of each product
- If a value is decimal number, the separator between the whole part and the decimal part can either be dot (.) or comma (,) based on the setting of your computer and Excel software
2.7.2. Automatically calculate Total Weight; Total Volume and Total Price
- If you want to let the system automatically calculate Total Weight; Total Volume and Total Price of an order based on the attributes of the products, then after uploading that order onto the system, you have to click on Edit icon of that order, then click on Self-calculated Stats check box, then click Save

2.8. Use Subcontractor; Subcontractor Name
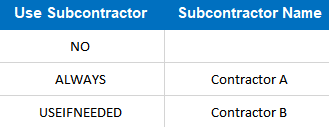
- If the order being created will not be performed by Sub-contractor vehicle, input the following value into the Use Subcontractor cell: NO
- If the order being created might be performed by Sub-contractor vehicle (In case your organization doesn't have any vehicle left that can perform this order), input the following value into the Use Subcontractor cell: USEIFNEEDED
- If the order being created will be performed by Sub-contractor vehicle, input the following value into the Use Subcontractor cell: ALWAYS
- If the Use Subcontractor cell value is either USEIFNEEDED or ALWAYS, input the Sub-contractor name in the Subcontractor Name cell
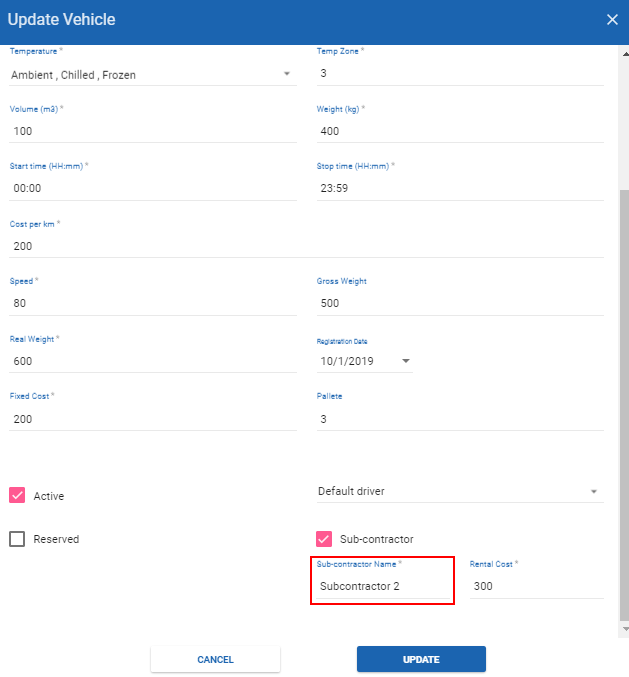
- You can copy the name of the Sub-contractor in the vehicle information on Web app, if that vehicle is set as a vehicle of the Sub-contractor
2.9. Vehicle Type
- Copy the the code of the vehicle type which will perform the order being created on Web app, then paste into this cell
- The vehicle type code can be found under Type Code column in Transportation > Vehicle Type tab
2.10. Customer Reference Number
- This information is optional. If you don't have information, just leave the cell blank
Submit Orders to the Order Inspector
- After you have created an Order, the Approval Status of that Order is Not Submitted

- If you are sure that the order is correct, you can submit it to the Order Inspector, following the steps below:
- Click on the icon Edit of that Order
- On the screen Update Order, click the button Save and Submit
- Note: You can also submit the Order right during the Order creation process
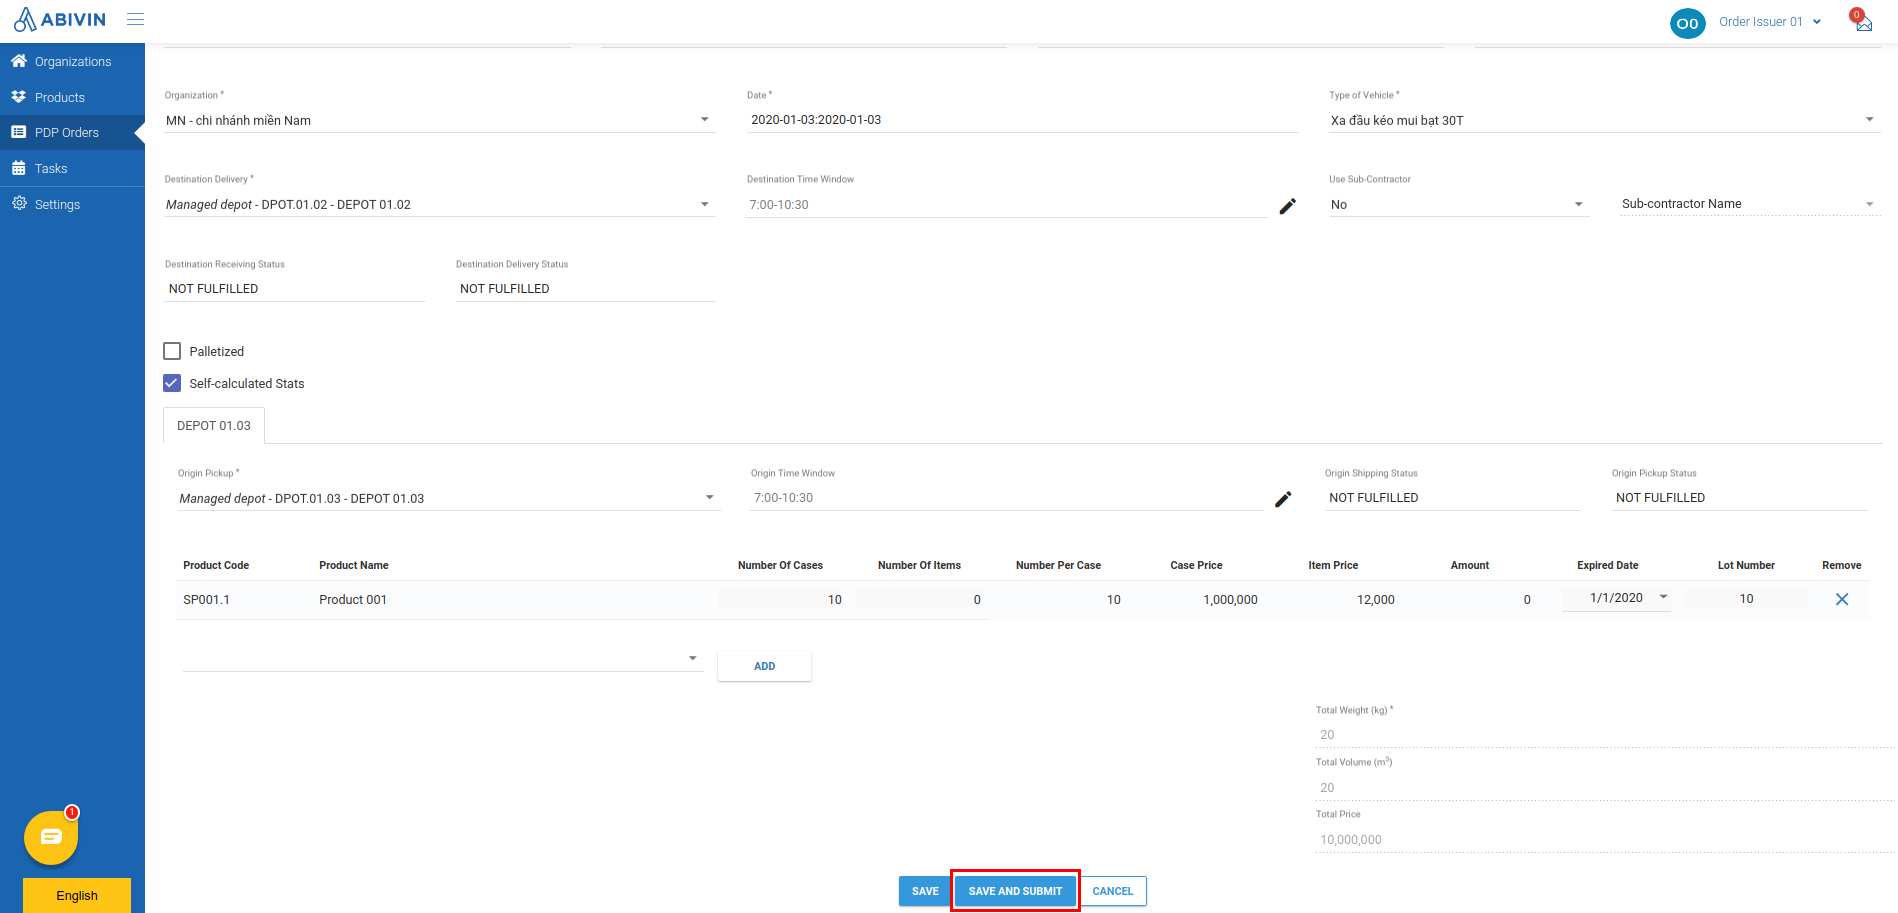
- The order will be forwarded to the Order Inspector. The order's planning status will change to Submitted

- If the Order is not accepted by the Order Inspector, you would be notified via email. The Order's Approval Status will also revert back to Not Submitted
Tasks of the Order Inspector
- After the Order Issuer has submitted orders, you would be notified via email
- You can click directly on the link attached in the email to navigate to the Order information screen on Web app
- You can also navigate to PDP Orders > Current Order tab to view the list of all submitted orders
- To make the decision on a particular Order, click the icon Edit of that Order
- On the Order information screen, you can either Accept the order - Allow the order to be forwarded to the Route Dispatcher; or Decline the order - Don't allow the order to be forwarded to the Route Dispatcher; by clicking on the respective button

- If you accept, the order will be forwarded to the Route Dispatcher. The order's planning status will change to Approved

- If the order is not accepted by the Route Dispatcher, you will be notified via email. The order's planning status will also revert back to Submitted
Order color highlights
- On Orders > Sales Orders tab, the order will be highlighted with some background colors to indicate its status
- No highlight: Unrouted order

- Gray color highlighted: Routed order

- Yellow color highlighted: There are two cases
- Case 1. The order weight and volume is zero, meaning there is zero product case and product item in this order
- Case 2. The weight and/or volume of the order exceeds the weight and/or volume capacity of every available vehicles

Tasks of the Route Planner
- You are the Route Planner. After the Order Inspector has approved the Orders, the Orders will be forwarded to your account. You will be notified via email
- To view the list of all Orders forwarded to your account, navigate to PDP Orders > Current Order tab
- By default, all Orders forwarded to your account are supposedly already accepted. If you want to decline an Order, click on the icon Edit of that Order. On the screen Update Order, click the button Decline
Automatically Split Over-capacity Orders
In order for this function to work, you have to enable the configuration Split Delivery at the Branch prior to performing Route Plan Optimization
- Over-capacity Orders are Orders which have the attribute Weight and/or Volume to exceed the carrying capacity of all active vehicles from the Transporters who provide Transport Services for the Depots mentioned in those Orders
- During the Route Plan Optimization process, the system can automatically split those over-capacity Orders into smaller Orders to fit the capacity of the available active vehicles. If there are multiple over-capacity Orders, the system will start splitting from the largest over-capacity Orders to the highest capacity vehicle and will continue to split lesser over-capacity Orders to lesser capacity vehicles
- Note: The system will calculate to minimize the number of Transporters and vehicles utilized
- The Orders automatically split from the original over-capacity Orders will be assigned Order Codes that equals to the Order Code of the original over-capacity Orders plus the suffix sharp symbol (#) and ordinal number
- For example: The original over-capacity Order has the Order Code Order_01. The first Order split from the original over-capacity Order will have the Order Code Order_01#1, the second Order split from the original over-capacity Order will have the Order Code Order_01#2 and so on
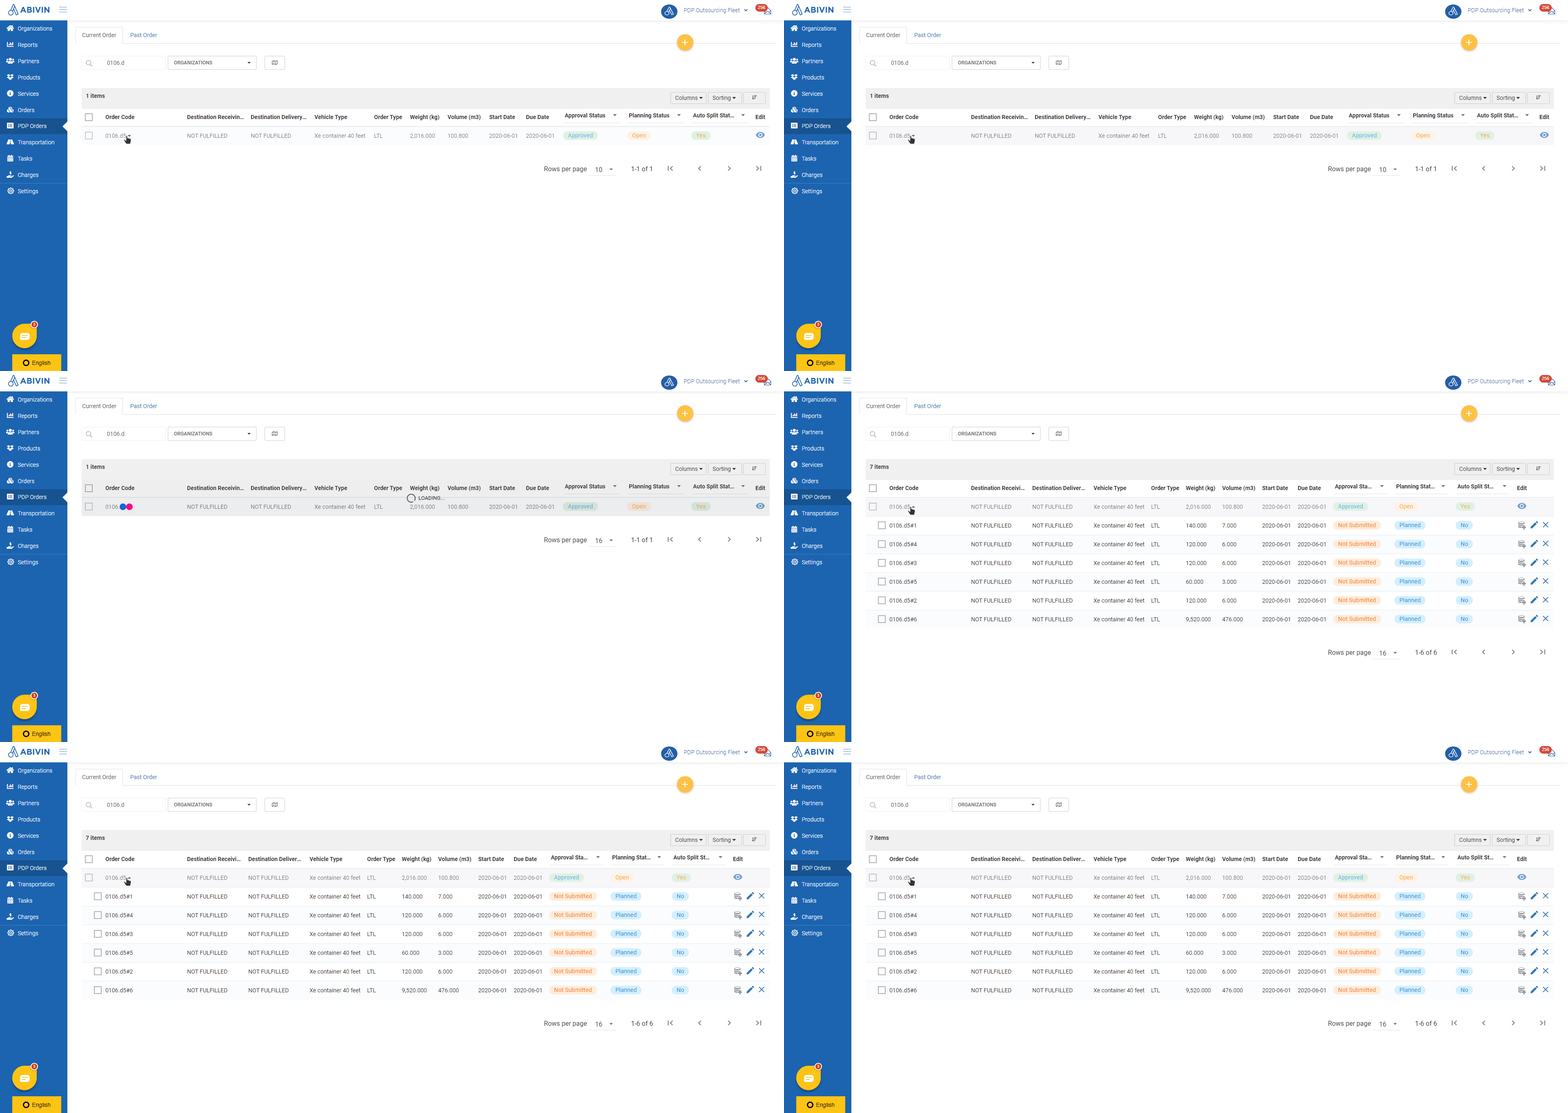
- The over-capacity Orders that have been automatically split during the Route Plan Optimization process will have the value Yes under the column Auto Split Status. Their details will also appear dimmer compare to other Orders. As you click on the Order Code of an automatically split over-capacity Order, the Order list will expand and display the Orders that have been automatically split off that over-capacity Order during the Route Plan Optimization process
- Below is an illustration of an original over-capacity Order 0106.d5 and six Orders that have been automatically split off that original over-capacity Order
Filter Orders
Filter Orders by Start Date
- You can filter both current and past Orders by the attribute Start Date. To do that, click on the field Filter by Start Date. On the drop down calendars, select a date range then click Apply. The Order list will refresh and show Orders which have the Start Dates to lie within the selected date range
Order Statuses
Origin Shipping Status
- This status indicates the result of product handing over from the warehousemen of the Origin Depot to the Transporter driver
- Below are the possible values
Origin Pickup Status
- This status indicates the result of product handing over from the warehousemen of the Origin Depot to the Transporter driver
- Below are possible values
Destination Receiving Status
Destination Delivery Status
Approval Status
Status Value | Description |
|---|---|
Not Submitted | The Order has not been submitted by the Order Creator to the Order Inspector |
Approved | The Order has been approved by the Order Inspector and has been forwarded to the Route Planner, pending to be optimized |
Submitted | The Delivery Route that includes the Order has been submitted by the Order Creator, pending to be approved/declined by the Order Inspector |
Approved by Carrier | The Delivery Route that includes the Order has been approved by the Carrier (Transporter) Administrator |
Declined by Carrier | The Delivery Route that includes the Order has been declined by the Transporter Administrator |
Planning Status
Auto-Split Status
- This status indicates whether the Order has been auto split into smaller Oders during the Route Plan Optimization process or not
Updated about 1 month ago
