Manage Actions
Definition of Actions
- Actions in PDP Model are defined and served exactly the same way as in VRP/DC Model. For more information on Actions, please refer to this article: Definition of Actions
All data must be input exactly as shown on images, both lowercase and uppercase letters, unless specified otherwise
Locate Action Code List
- Action Codes are listed in the Tasks > Actions
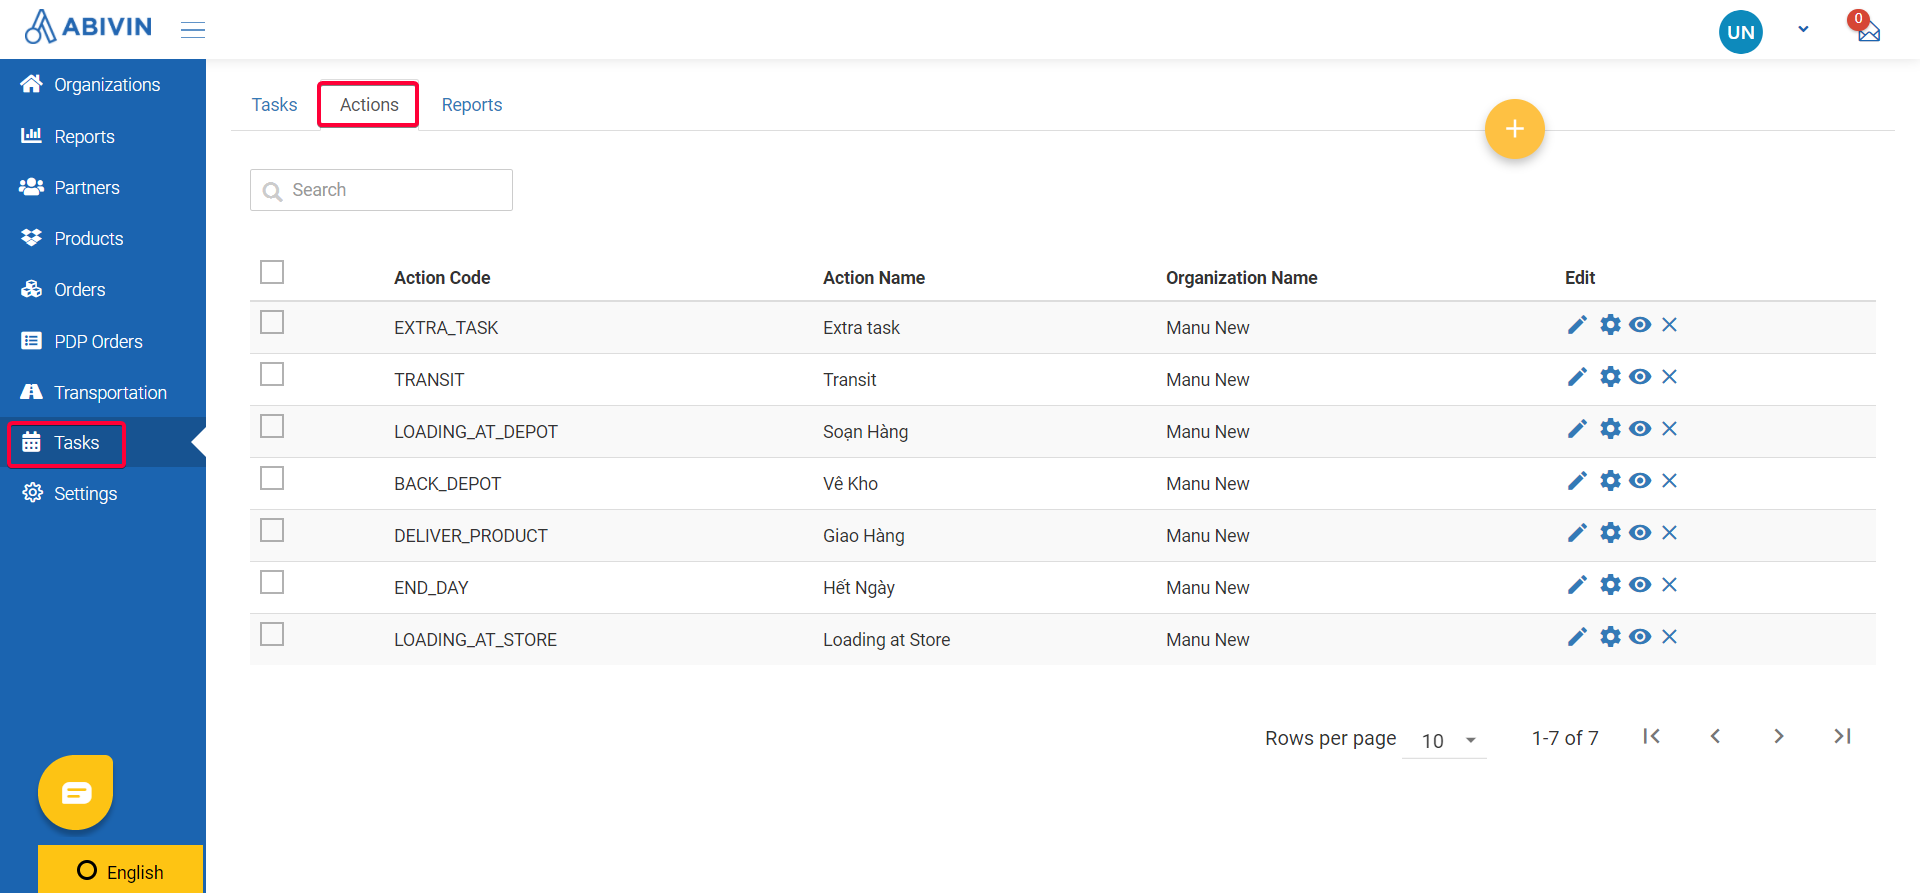
Illustration (English)
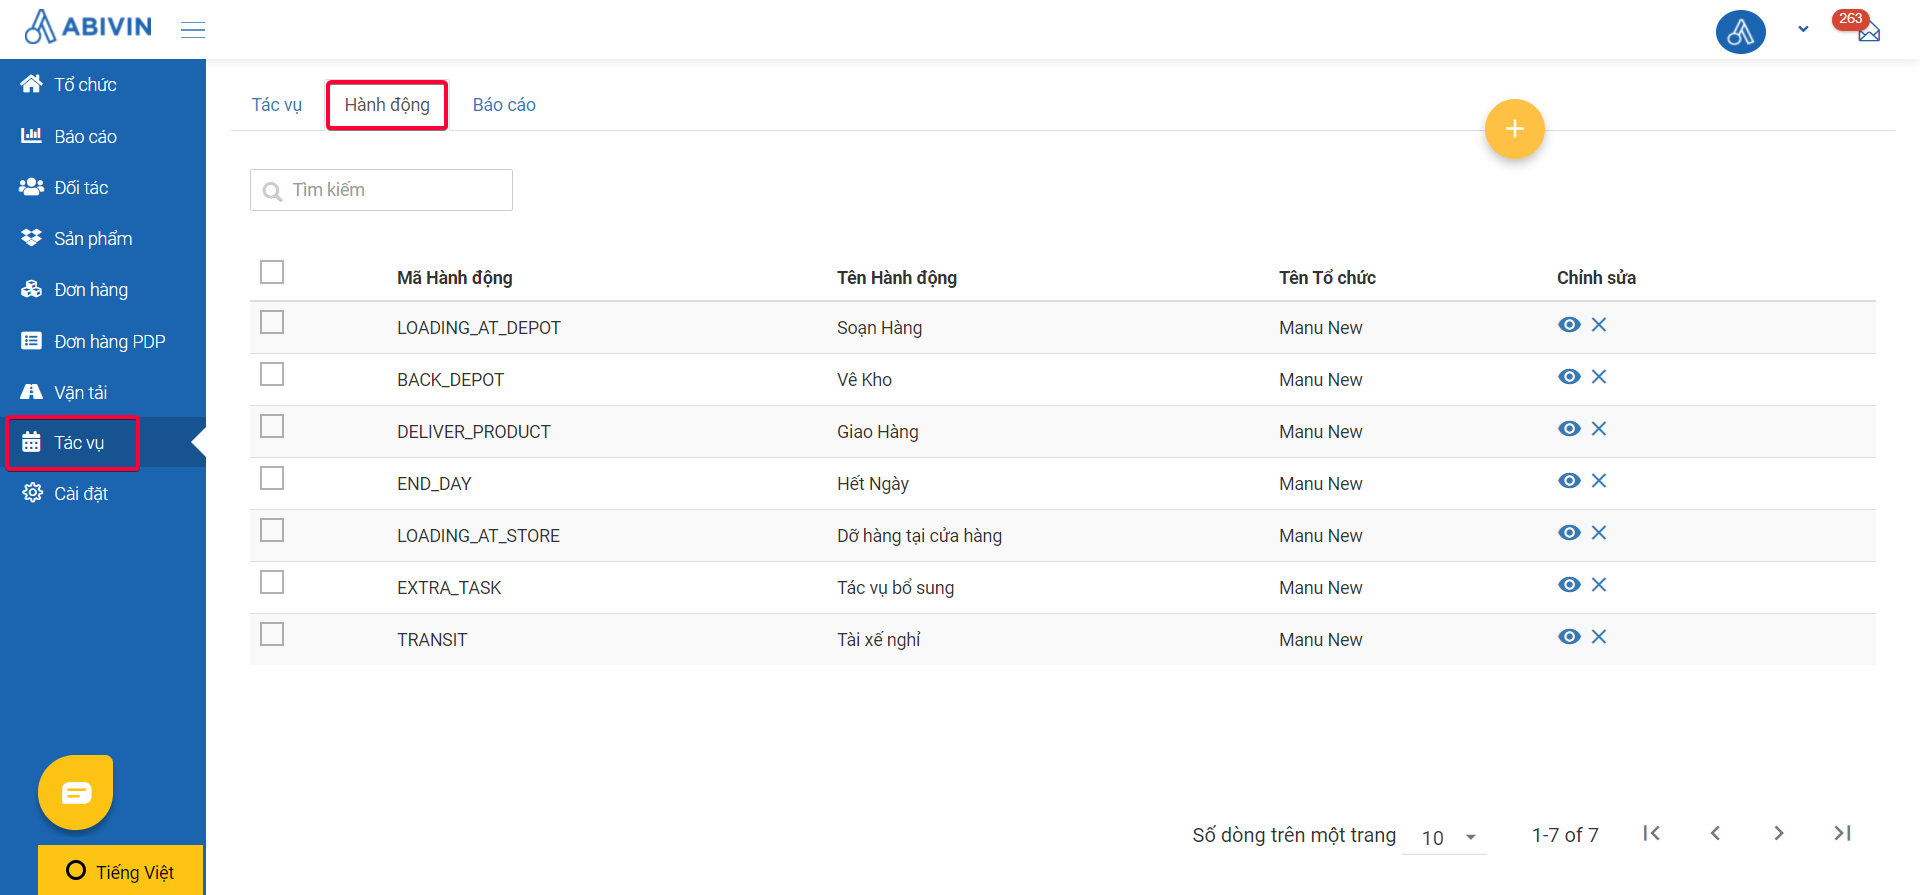
Illustration (Vietnamese)
Create Action Codes
- Navigate to tab Tasks > Actions
- You will notice that a set of actions has been automatically created. These are the default action codes for VRP model
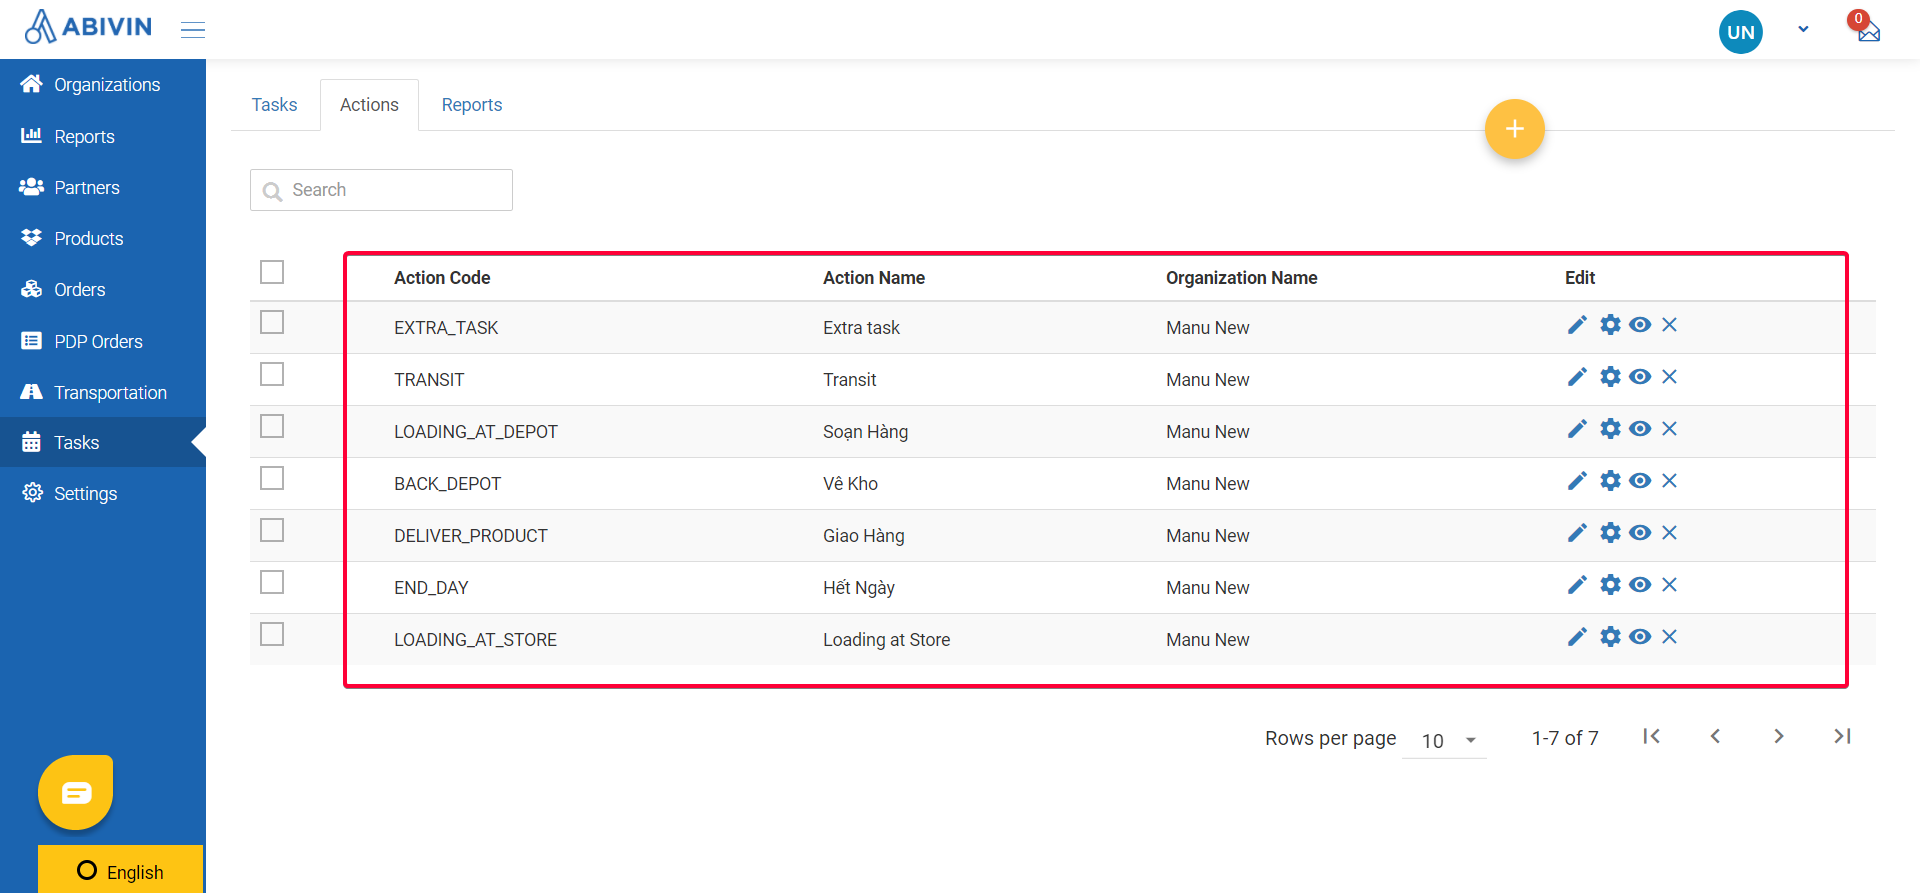
Illustration (English)
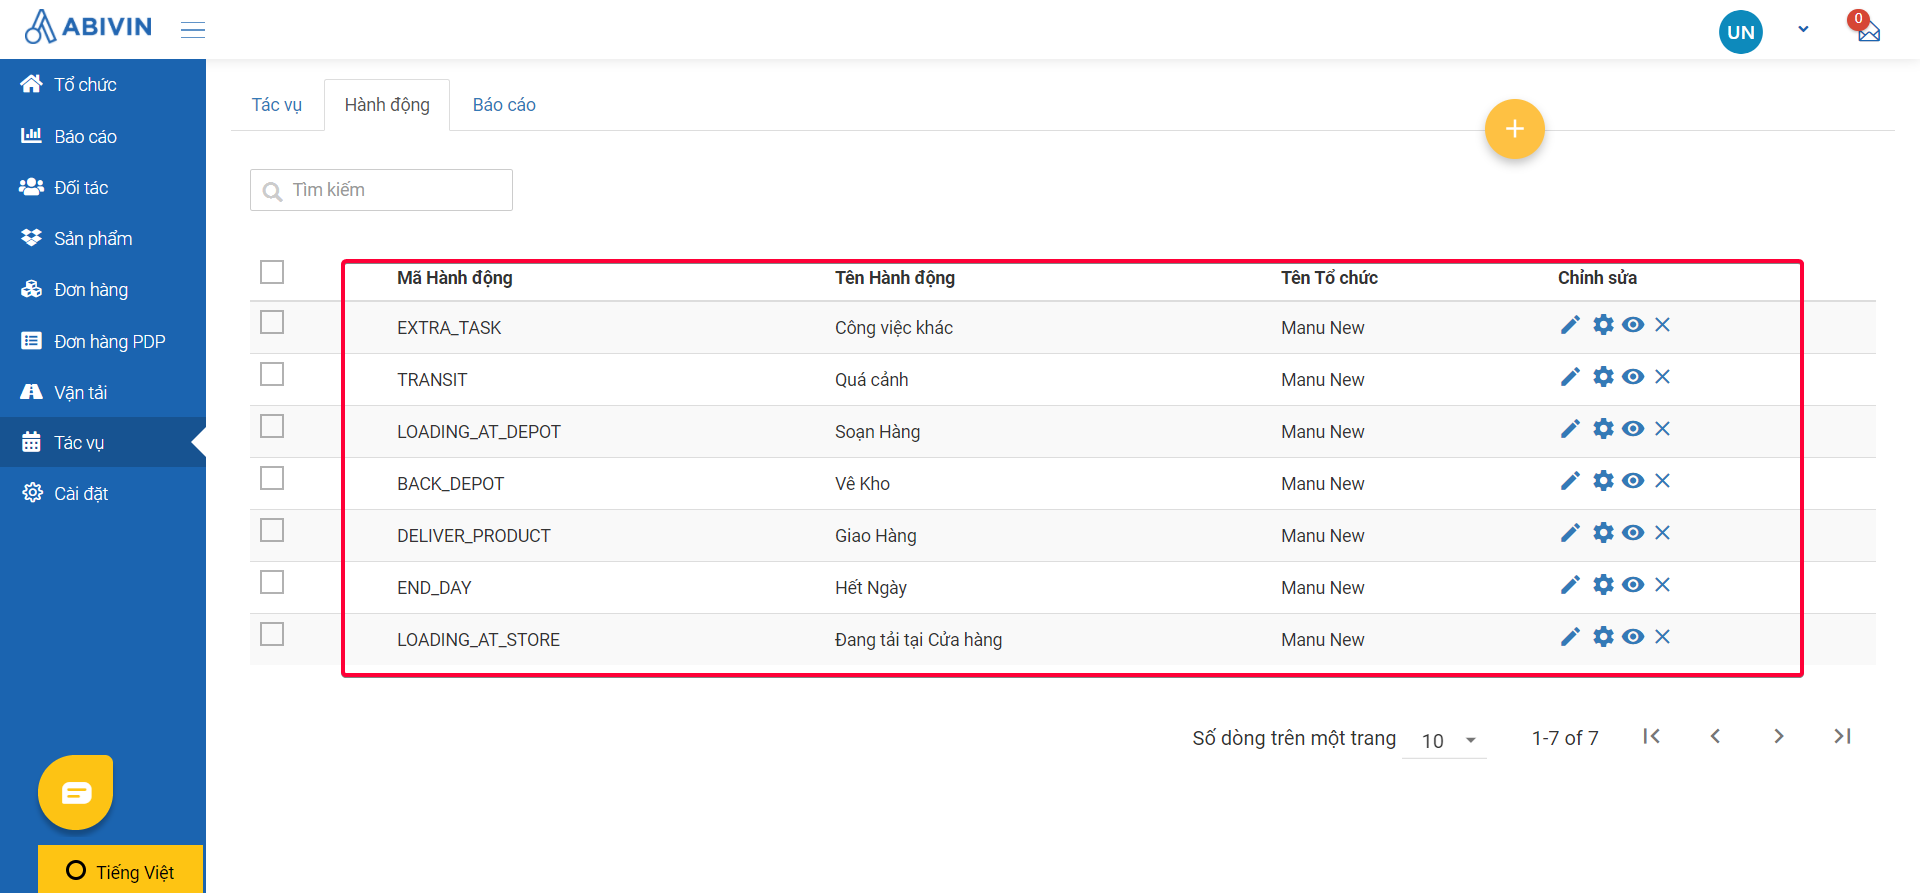
Illustration (Vietnamese)
- You would need to delete all those actions by clicking on the icon on the left of column Action Code, then click on the button Delete All
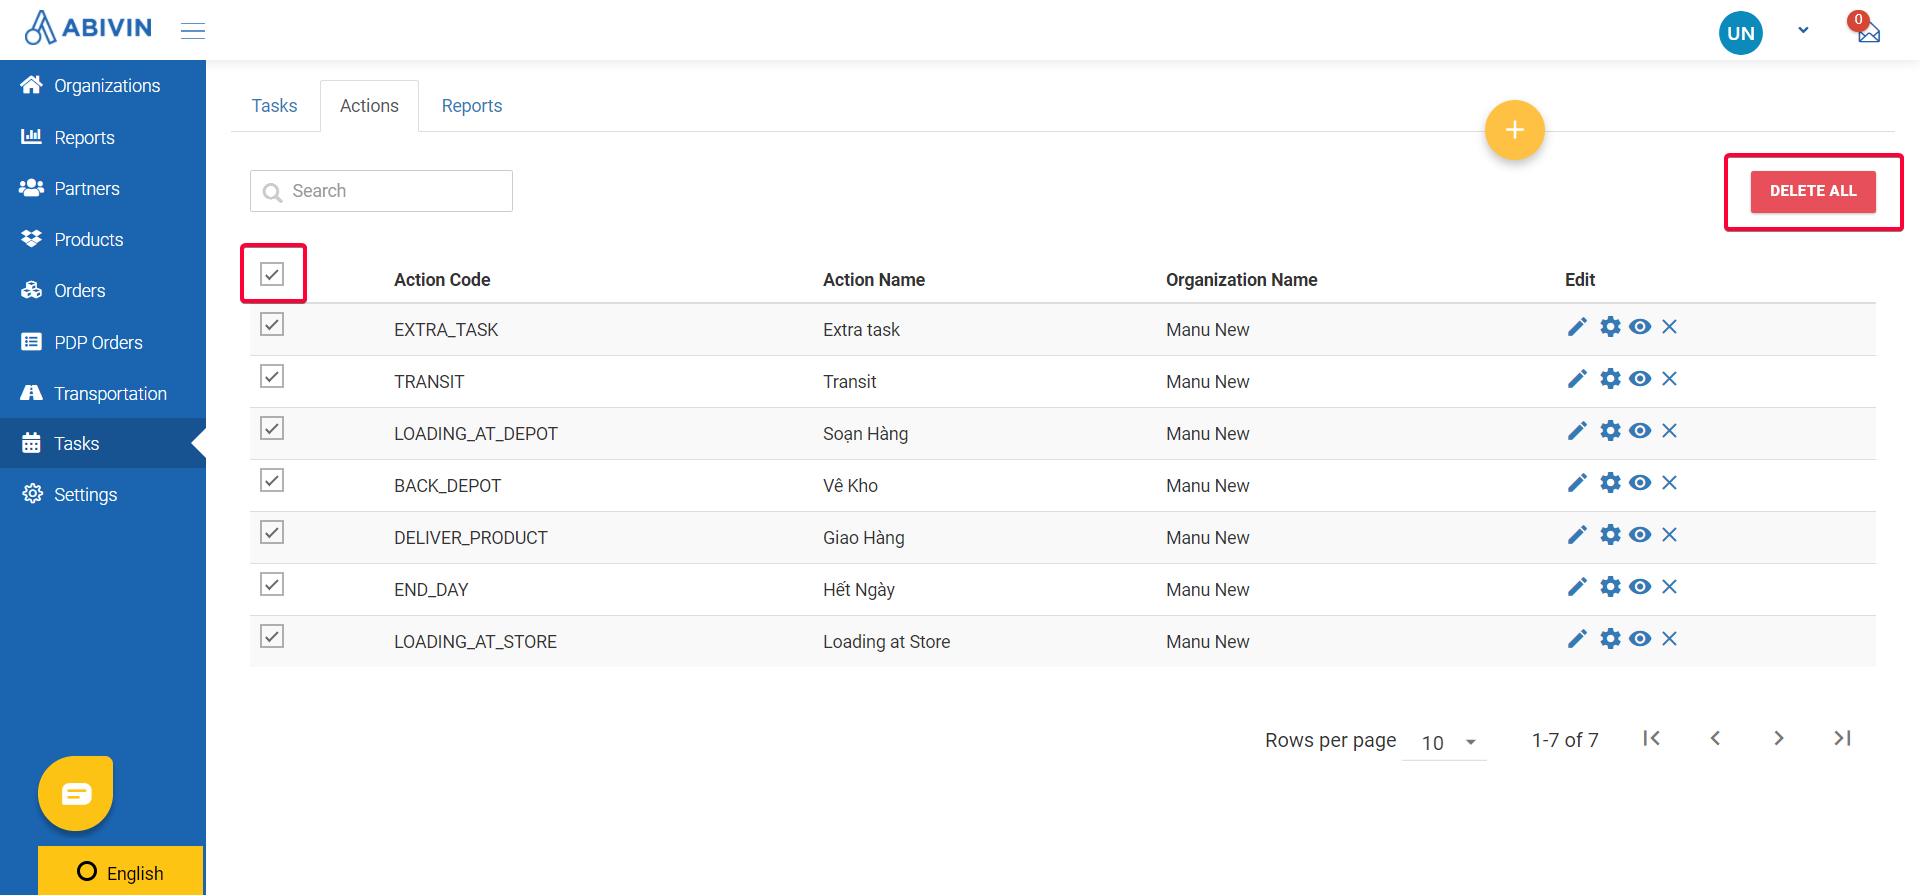
Illustration (English)
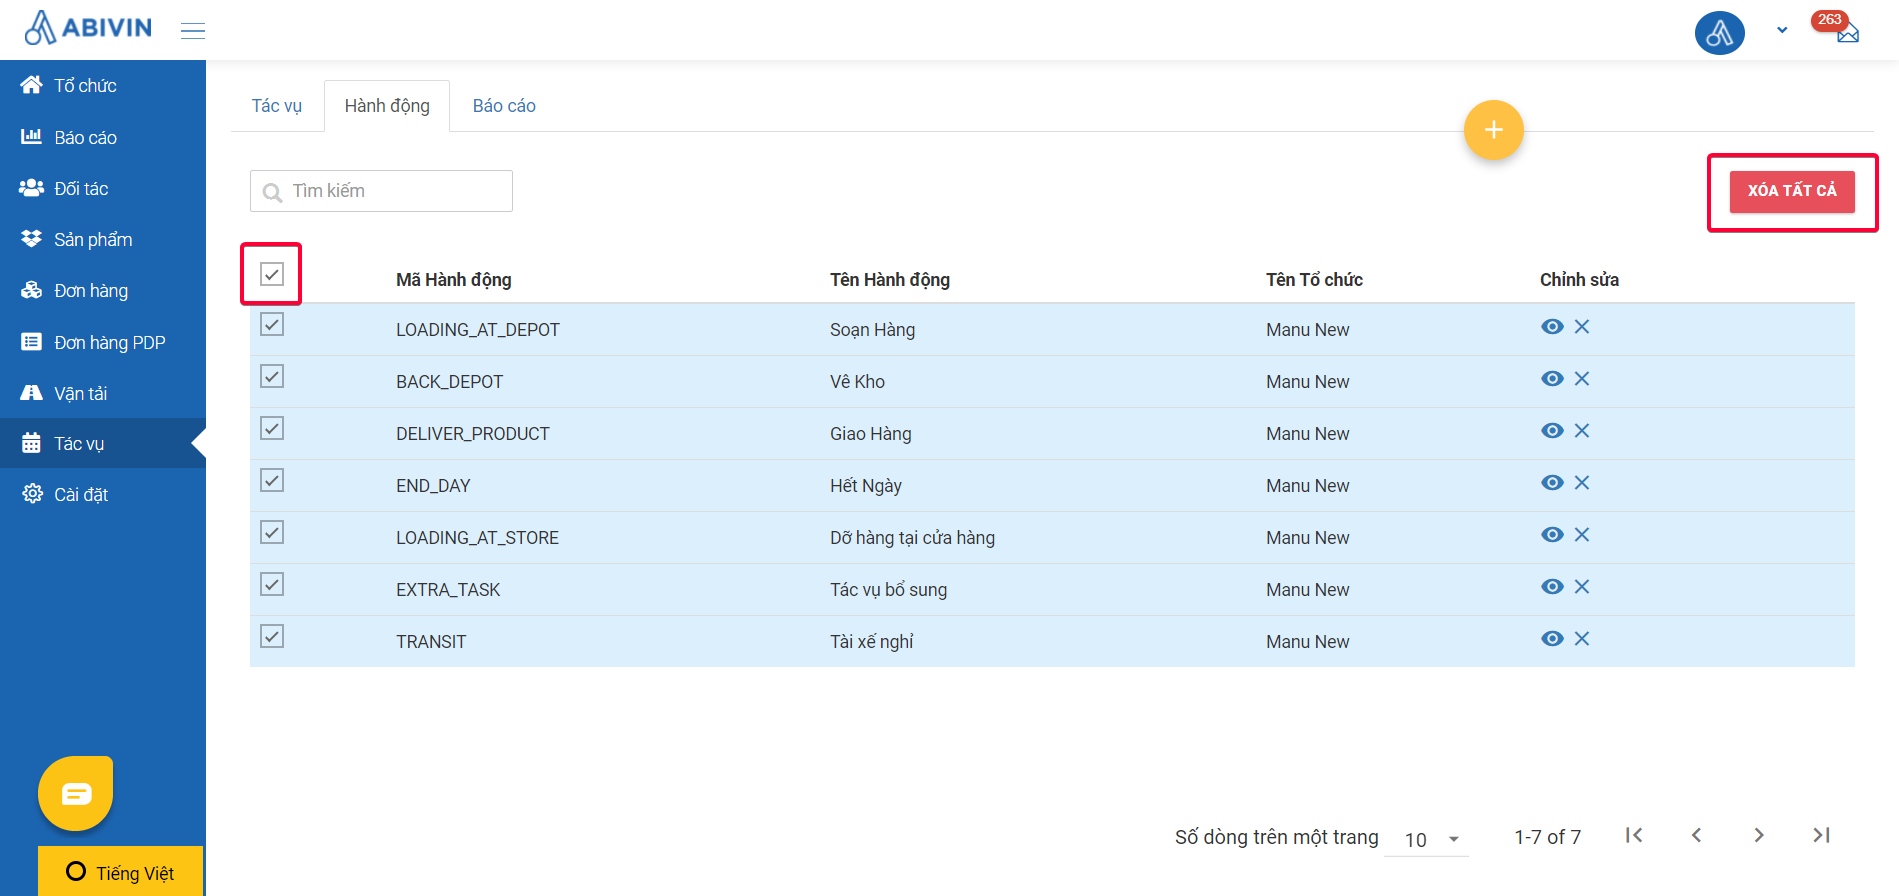
Illustration (Vietnamese)
Action Code information fields
- In case the Action Code list is empty or the Action Codes appear differently than the ones shown in the above image, you need to create the correct Action Codes using the Excel import file. DO NOT use the Webform to create Action Codes
- Below are the information fields of the actions of this model:
Action Code (Compulsory) | Action Name (Can be changed) | Action Description | Organization Code |
|---|---|---|---|
LOADING_AT_DEPOT | Driver Starts | Driver starts at the garage | Always input the Organization Code of the Manufacturer |
LOADING_AT_STORE | Load Products at Origin customer | Driver loading products at the Origin customer | Always input the Organization Code of the Manufacturer |
TRANSIT | Driver Resting | Driver rests after each eight hours of working (Including driving and loading/unloading products at the customer locations) | Always input the Organization Code of the Manufacturer |
DELIVER_PRODUCT | Deliver products at Destination customer | Driver delivers products at the Destination customer | Always input the Organization Code of the Manufacturer |
BACK_DEPOT | Back to Depot | Driver travels back to garage | Always input the Organization Code of the Manufacturer |
END_DAY | End Delivery shift | Driver ends the delivery shift | Always input the Organization Code of the Manufacturer |
Create Forms for Action Codes
Enable Form Building Function
- The Action Codes recently created have not yet had any information inside. Imagine them as blank Excel spreadsheets. In order for the Mobile app users to see and perform their tasks on the Mobile app, you have to build the display/input fields for each Action Code using the Form Building function
- The steps to enable the form building function in PDP model are the same as those in the VRP/DC Model. Please refer to this article for more information: Enable Form Building Function
General Steps to Build Forms for Action Codes
-
The steps to build form for Action Codes in PDP model are the same as those in the VRP/DC Model. Please refer to this article for more information: General Steps to Build Forms for Action Codes
-
We will now move on to create forms for each action code
1. LOADING_AT_DEPOT action codes
- For this Action Code, you will need to build the Arrival Check In Panel, which allows the Drivers to check-in at the parking garage.
- Here is how the final Action Code will look like after you have completed building its forms:

Illustration (English)

Illustration (Vietnamese)
1.1 Arrival Check In Panel
- Component used: Special Components > File
- Position: On top
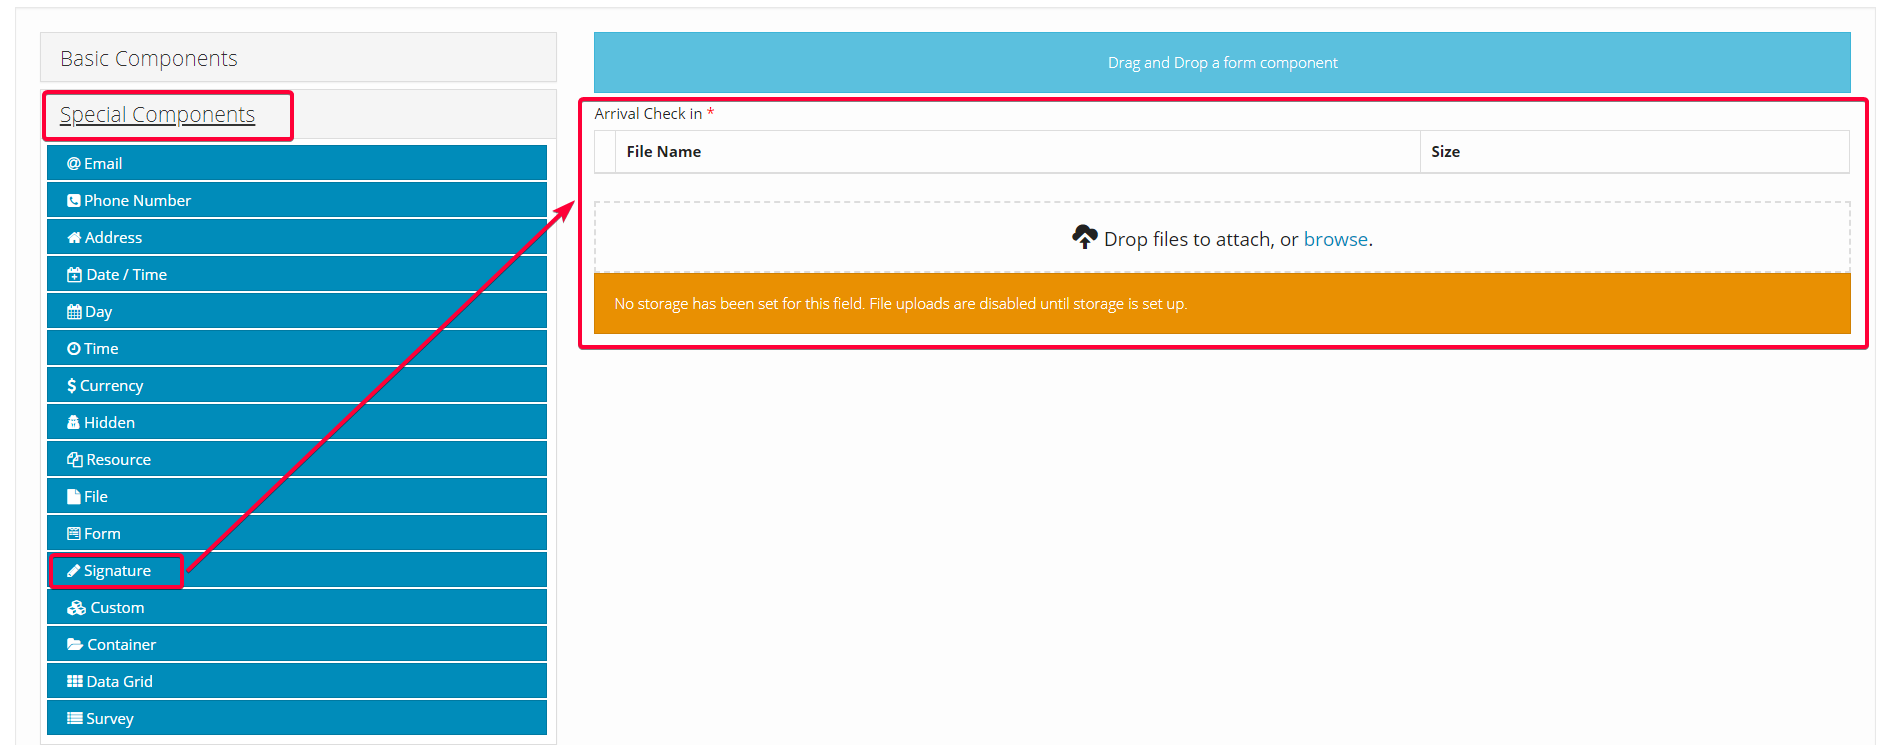
Illustration (English)
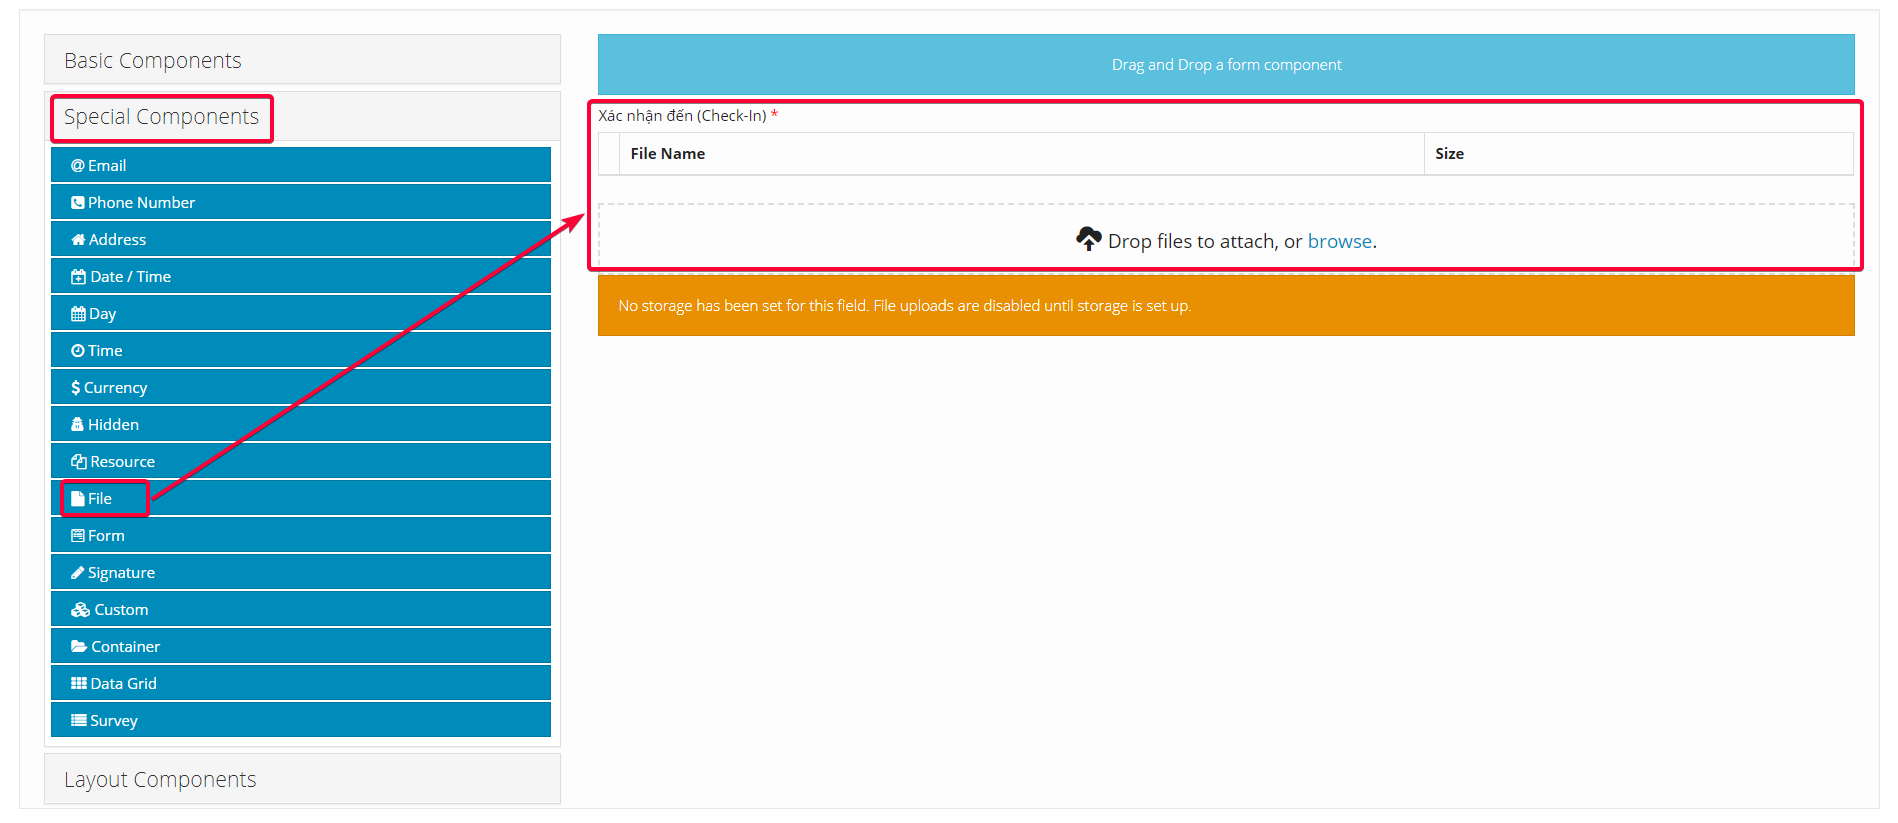
Illustration (Vietnamese)
- Component content:
- Note: The value input into Label field can be changed freely


- In the Validation tab, if you tick the Required checkbox, the Drivers will not be able to submit the Loading at Depot task without performing the Check-in action. If you leave this checkbox unticked, the Drivers will be able to submit this task without having to perform the Check-in action
- We strongly recommend you tick this checkbox because the moment that the Drivers perform this Check-in action will be recorded as the beginning timestamp of the Loading at Depot task and will reflect it on the Execution timeline of Route Plan (Map View) screen. If you don't tick this checkbox, the Drivers might bypass this action, thus the system will have no record of this task's beginning timestamp

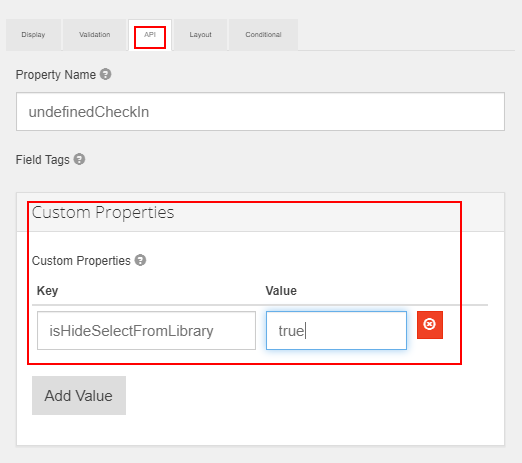
- For the API tab, you need to input the exact value as shown in the table below
Information Field | Value To Input |
|---|---|
Custom Properties | Key-Value 1: Specify if the Drivers can select a pre taken picture or will need to take a new picture |
2. LOADING_AT_STORE action code
- For this Action Code, you will need to build the following forms:
- 1 - A Check-in Panel, which allows drivers to check in when they load goods at the customer's location
- 2 - Confirm Loading Status Panel, which allows drivers to confirm that products are taken out from the customer's store
- 3 - Signature Panel, which allows the Customers to sign directly on the mobile device of the Drivers
- Here is how the final Action Code will look like after you have completed building its forms:
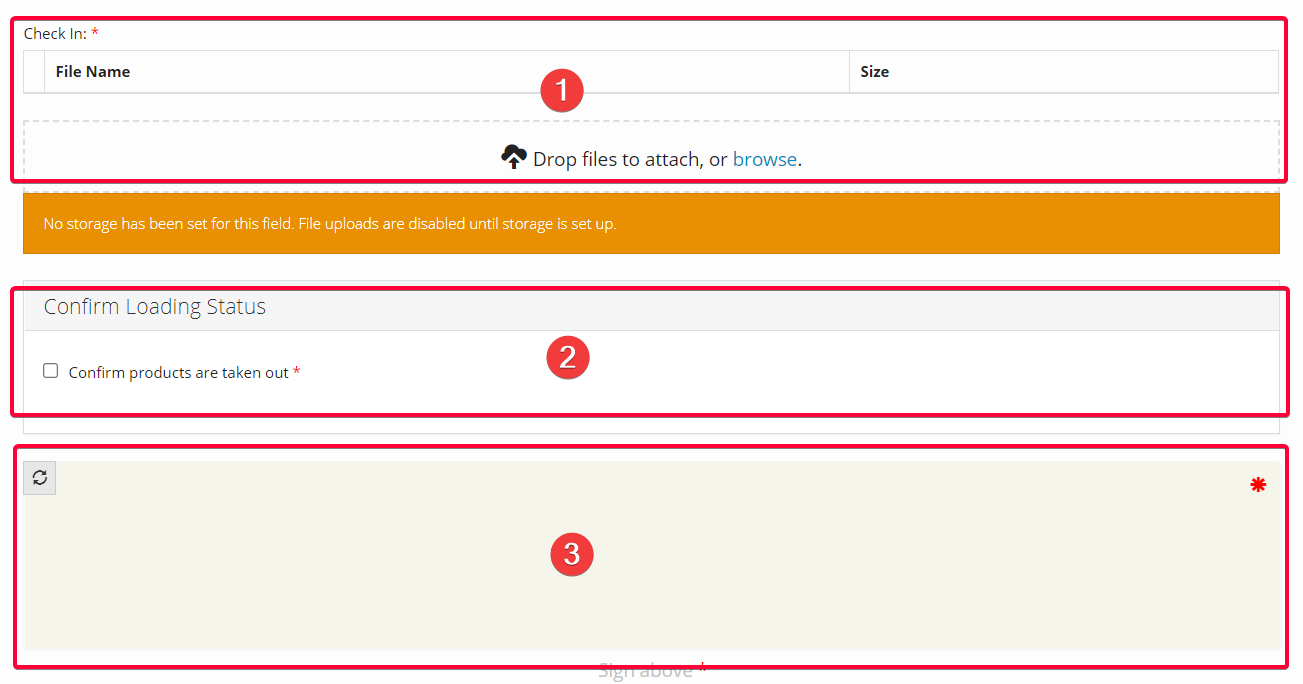
Illustration (English)
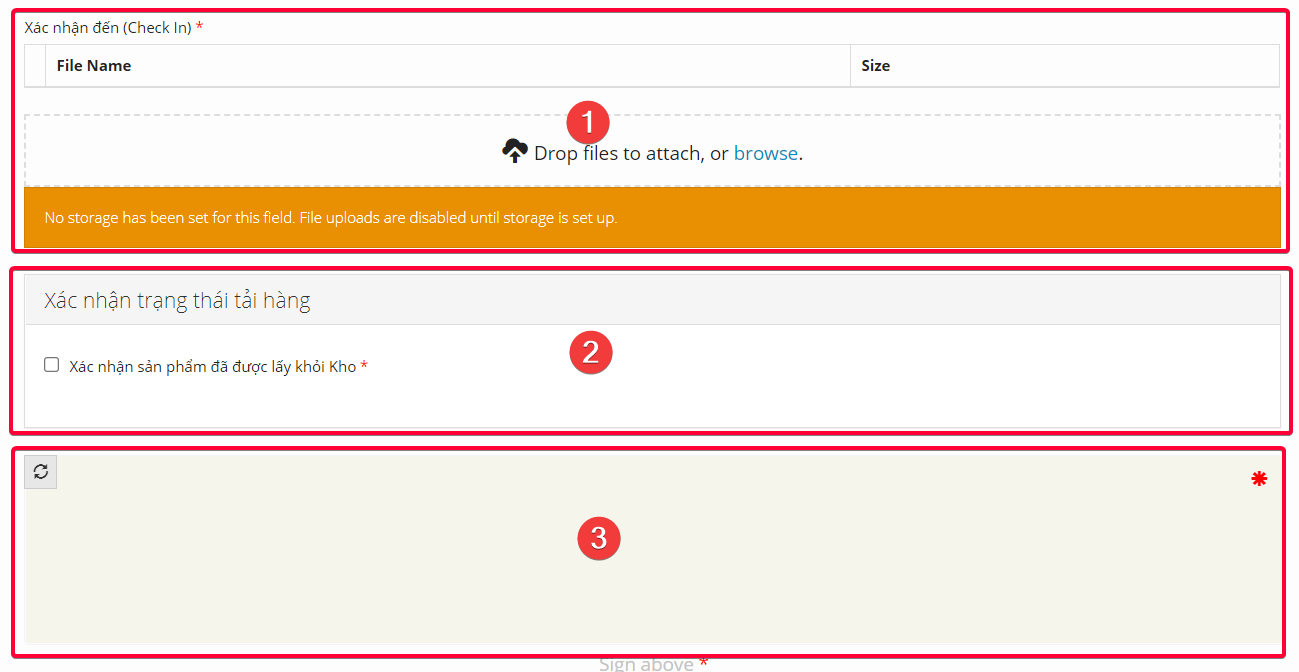
Illustration (Vietnamese)
2.1 Check In Panel
- Component used: Special Components > File
- Position: On top
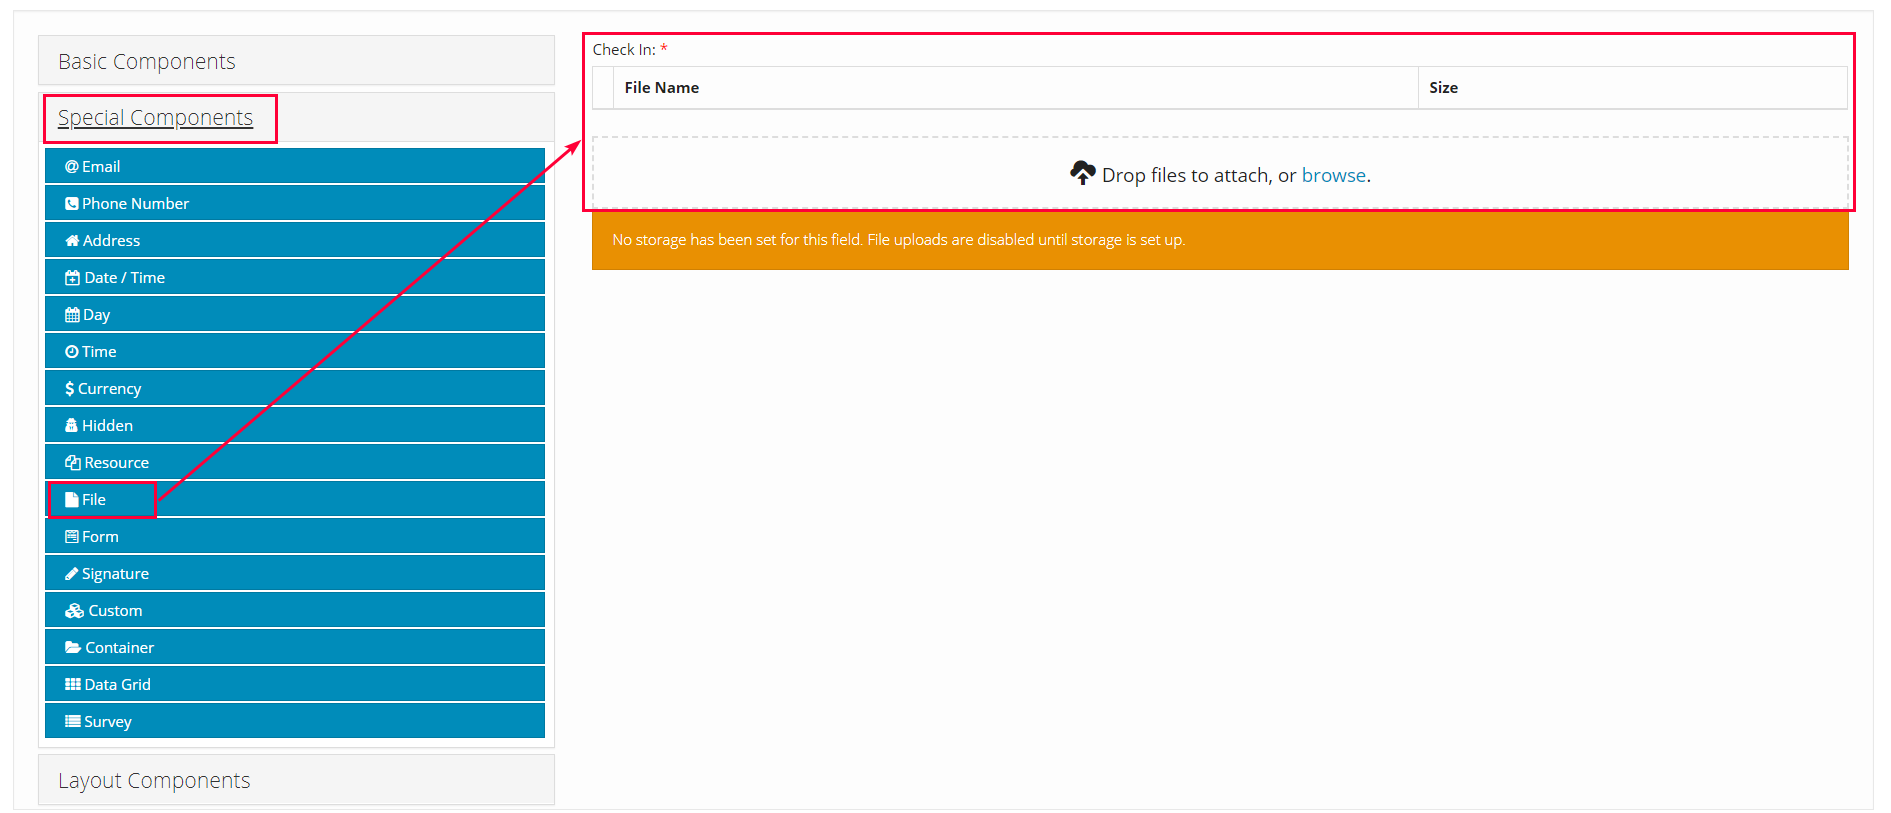
Illustration (English)
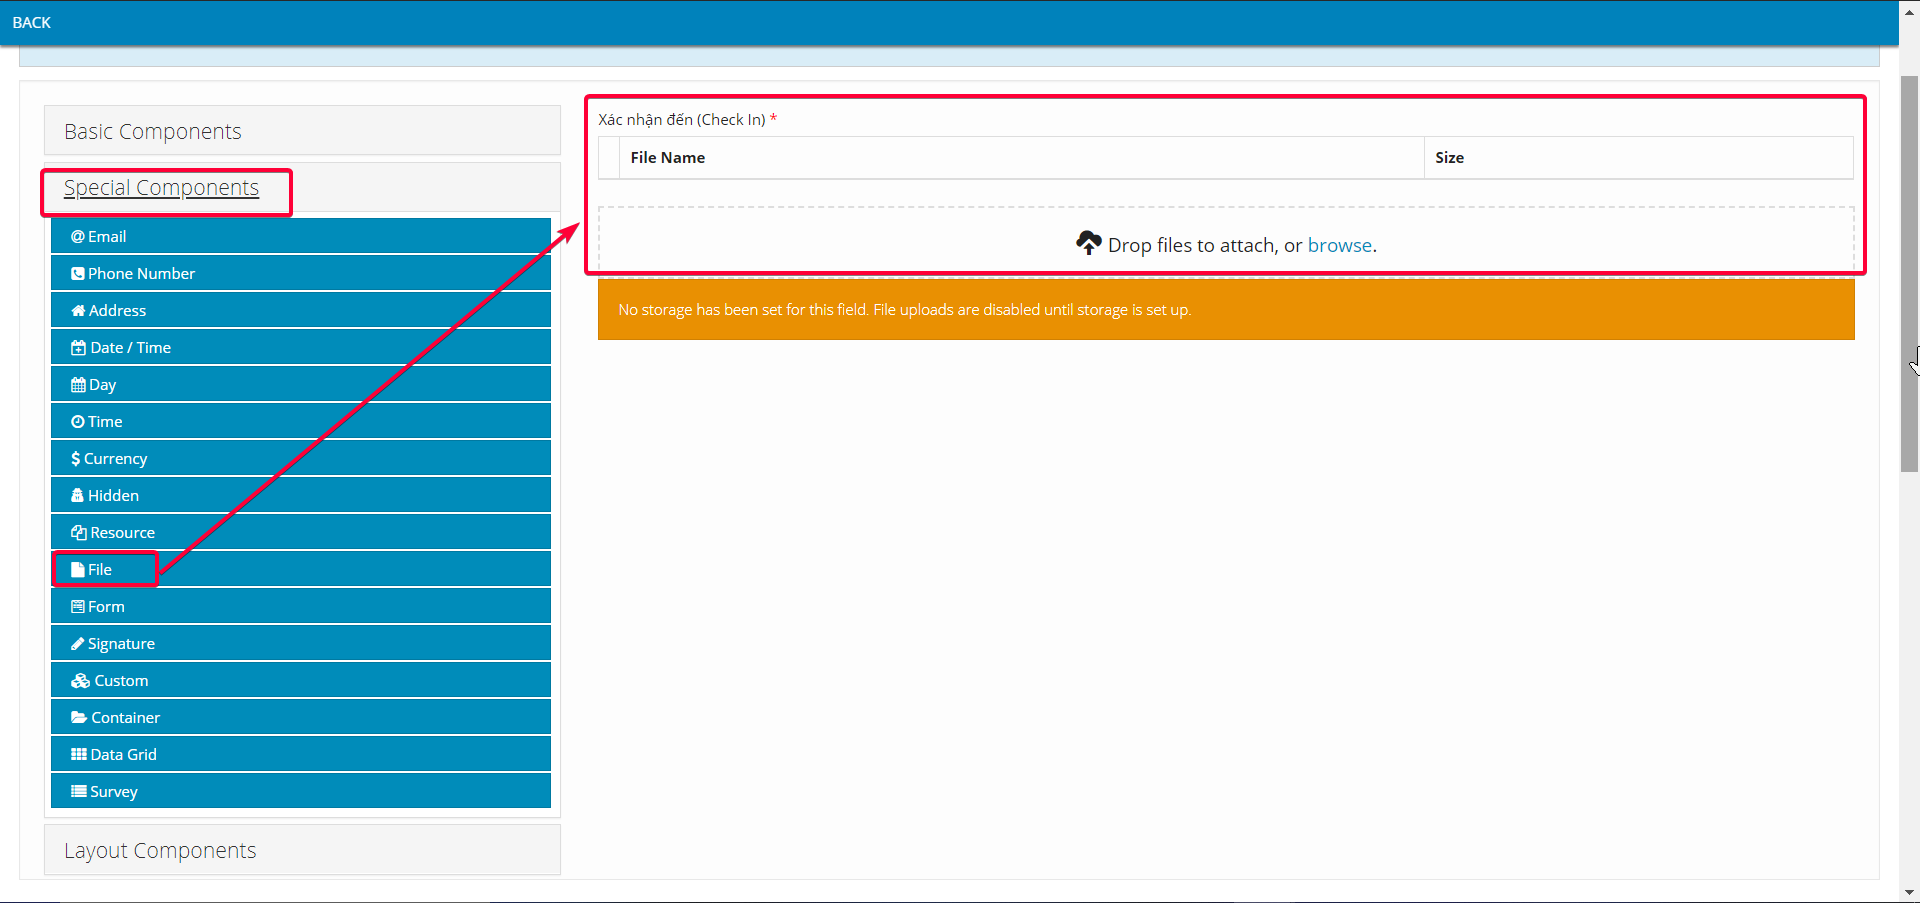
Illustration (Vietnamese)
- Component content:
- Similar as Check In Panel described above
2.2 Confirm Loading Status Panel
- Component used: Layout Components > Panel
- Position: Below Check In Panel
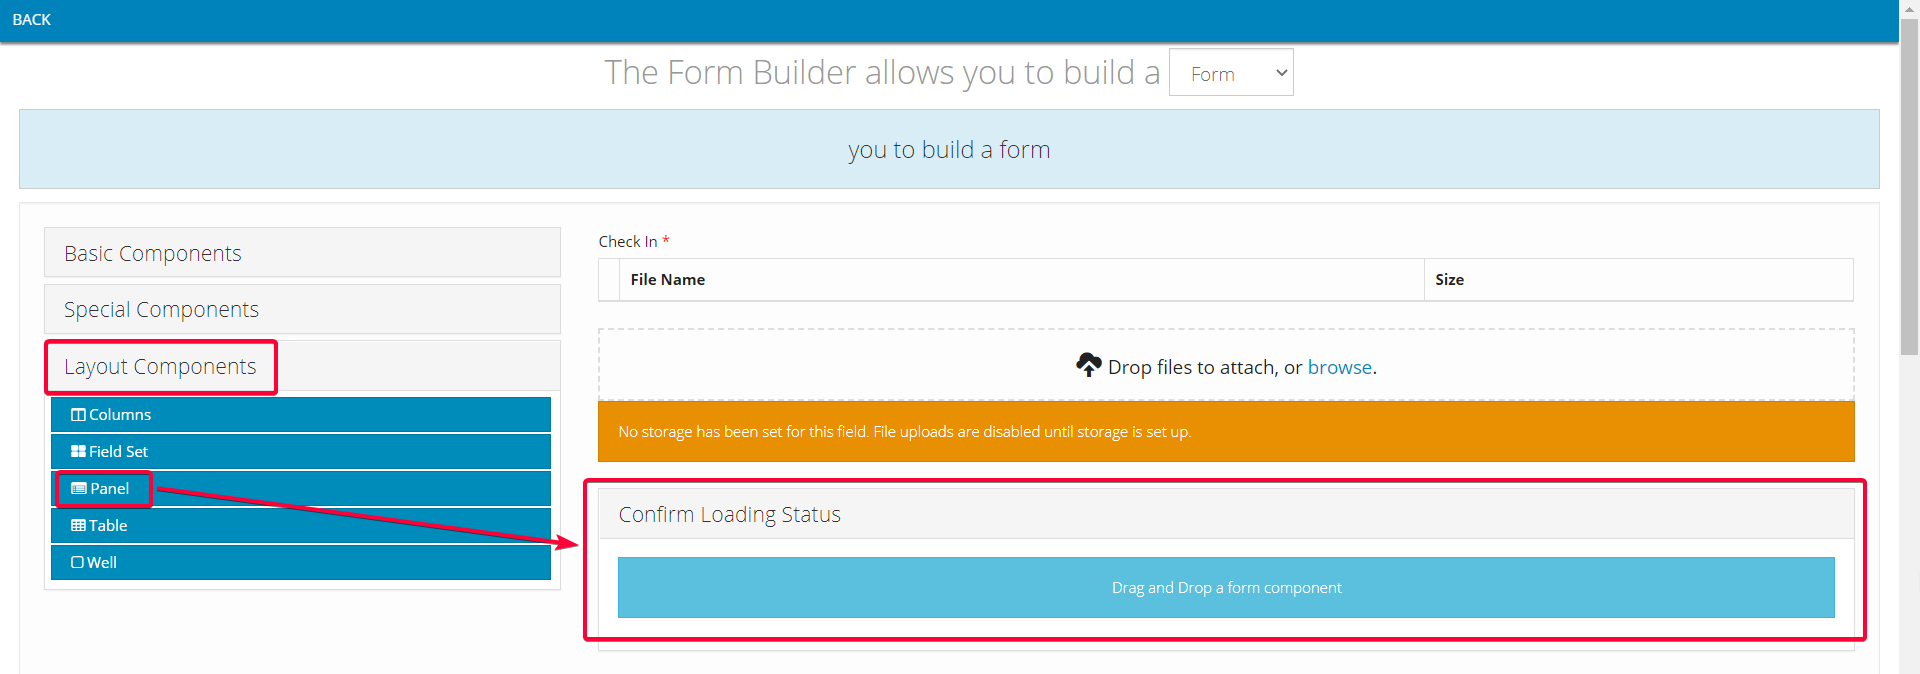
Illustration (English)
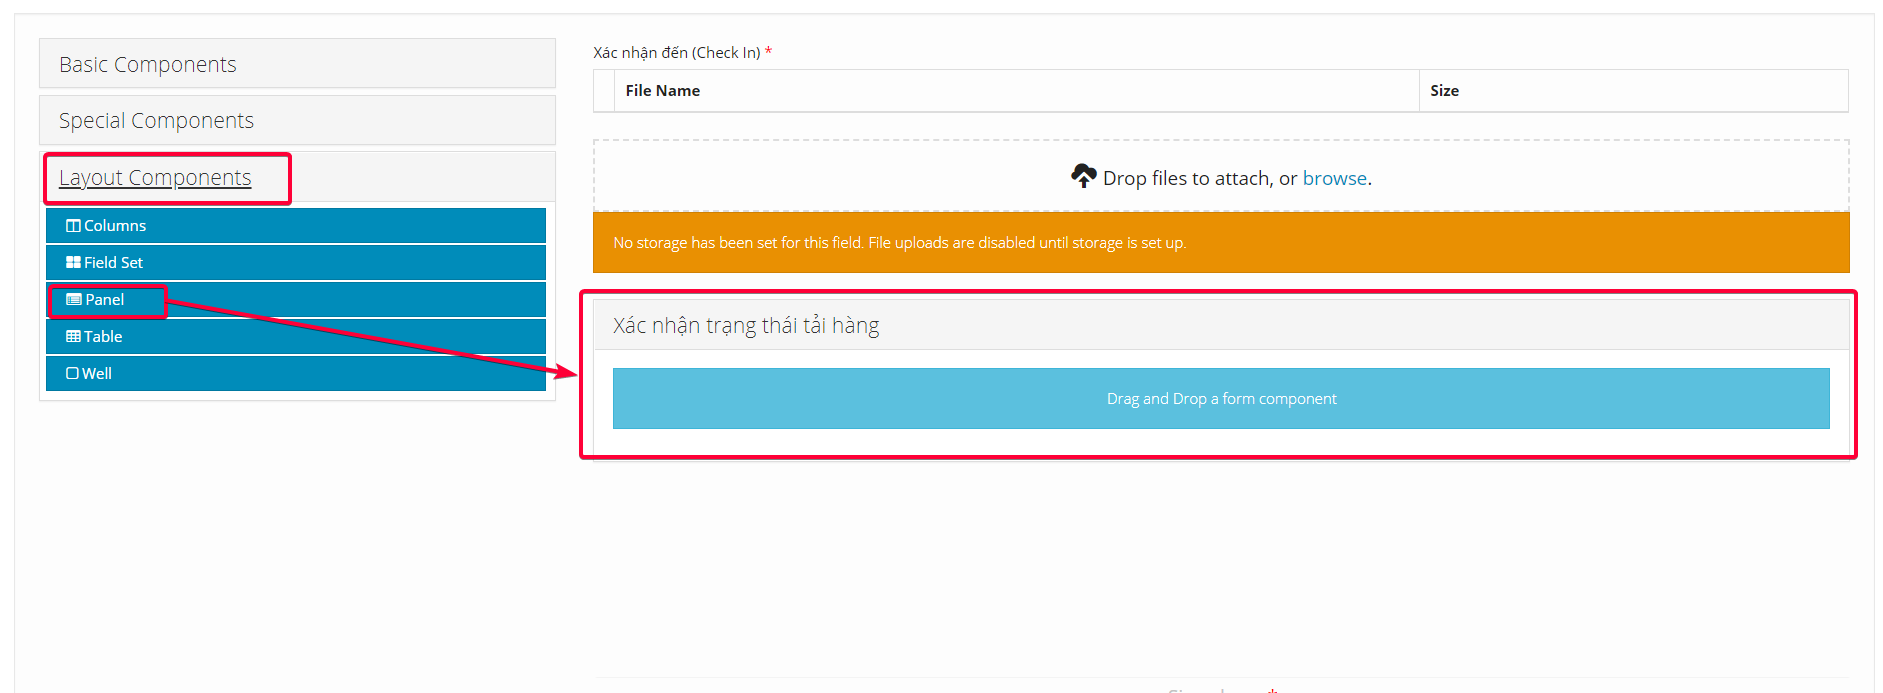
Illustration (Vietnamese)
- Component content:
- Note: The value input into Title field can be changed freely

Illustration (English)

Illustration (Vietnamese)
- Next is the confirmation statuses. You can add as many confirmation statuses as you want. Below we will present a sample confirmation status
2.3 Confirm products are taken out Checkbox
- Component used: Basic Components > Check Box
- Position: Inside Confirm Loading Status panel component
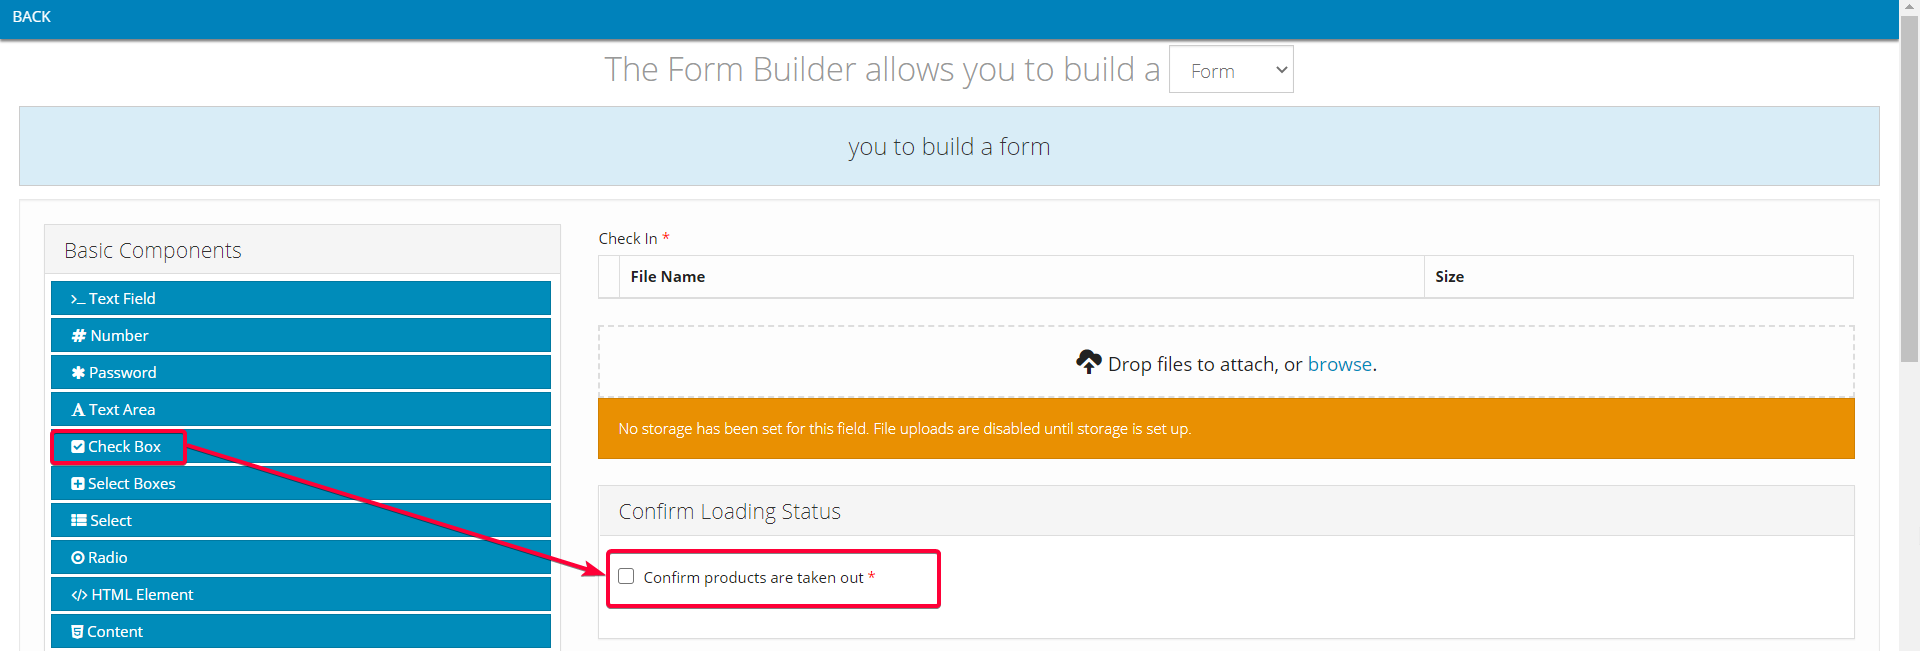
Illustration (English)
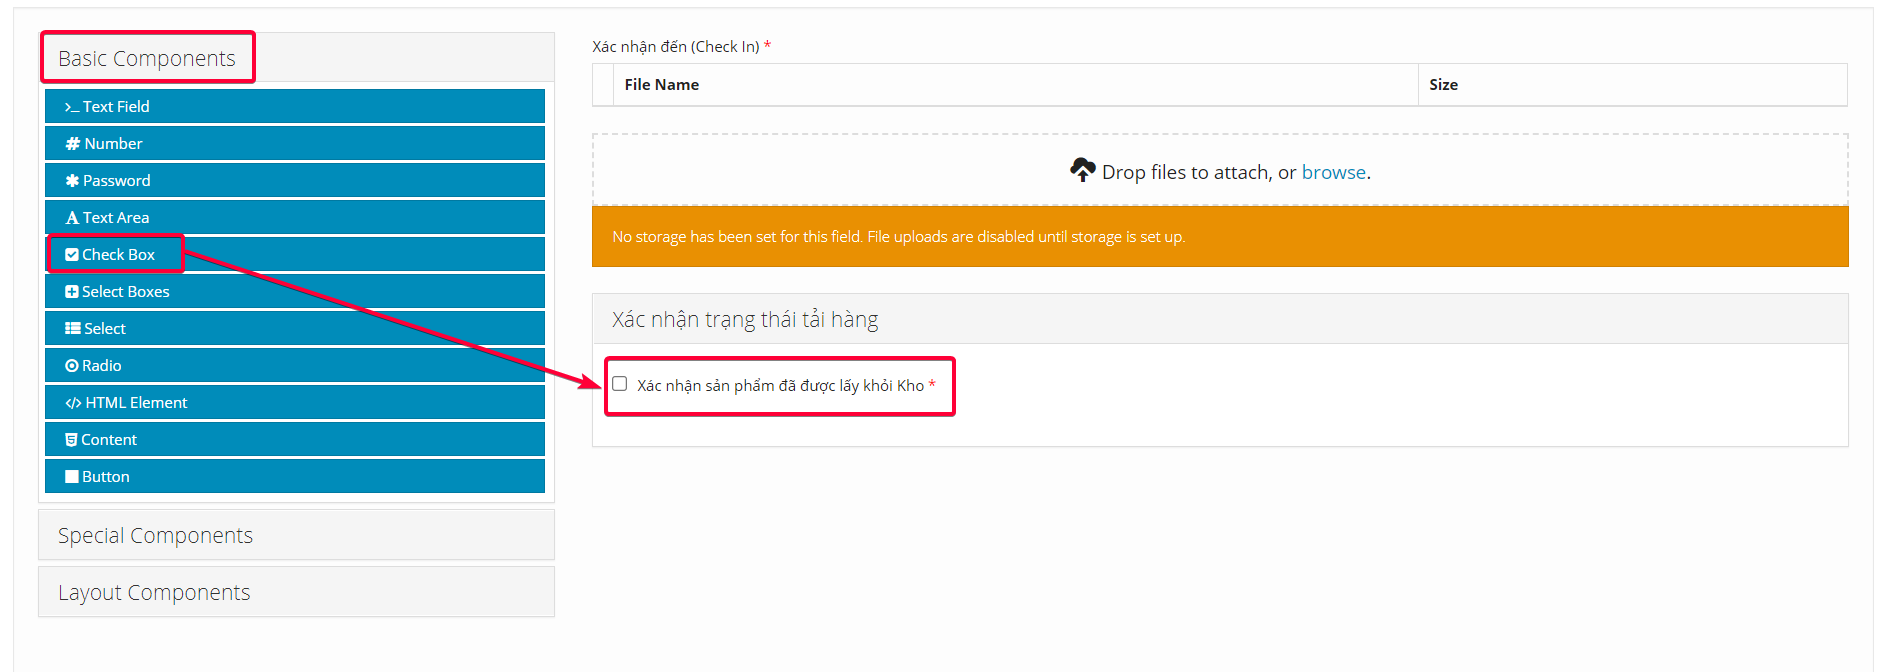
Illustration (Vietnamese)
- Component content:
- Note: The value input into Label field can be changed freely

Illustration (English)

Illustration (Vietnamese)
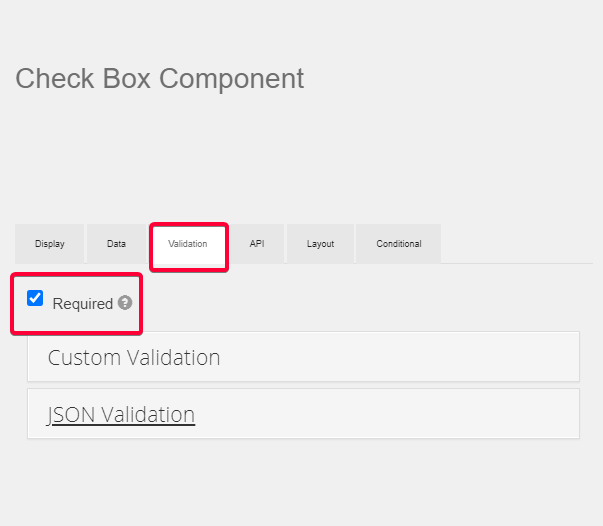
- In the Validation tab, if you tick the Required checkbox, the Drivers will not be able to submit the Loading at Store task without confirming this status. If you leave this checkbox unticked, the Drivers will be able to submit this task without having to confirm this status
2.4 Signature
- Component used: Special Components > Signature
- Position: Below the panel Confirm Loading Status
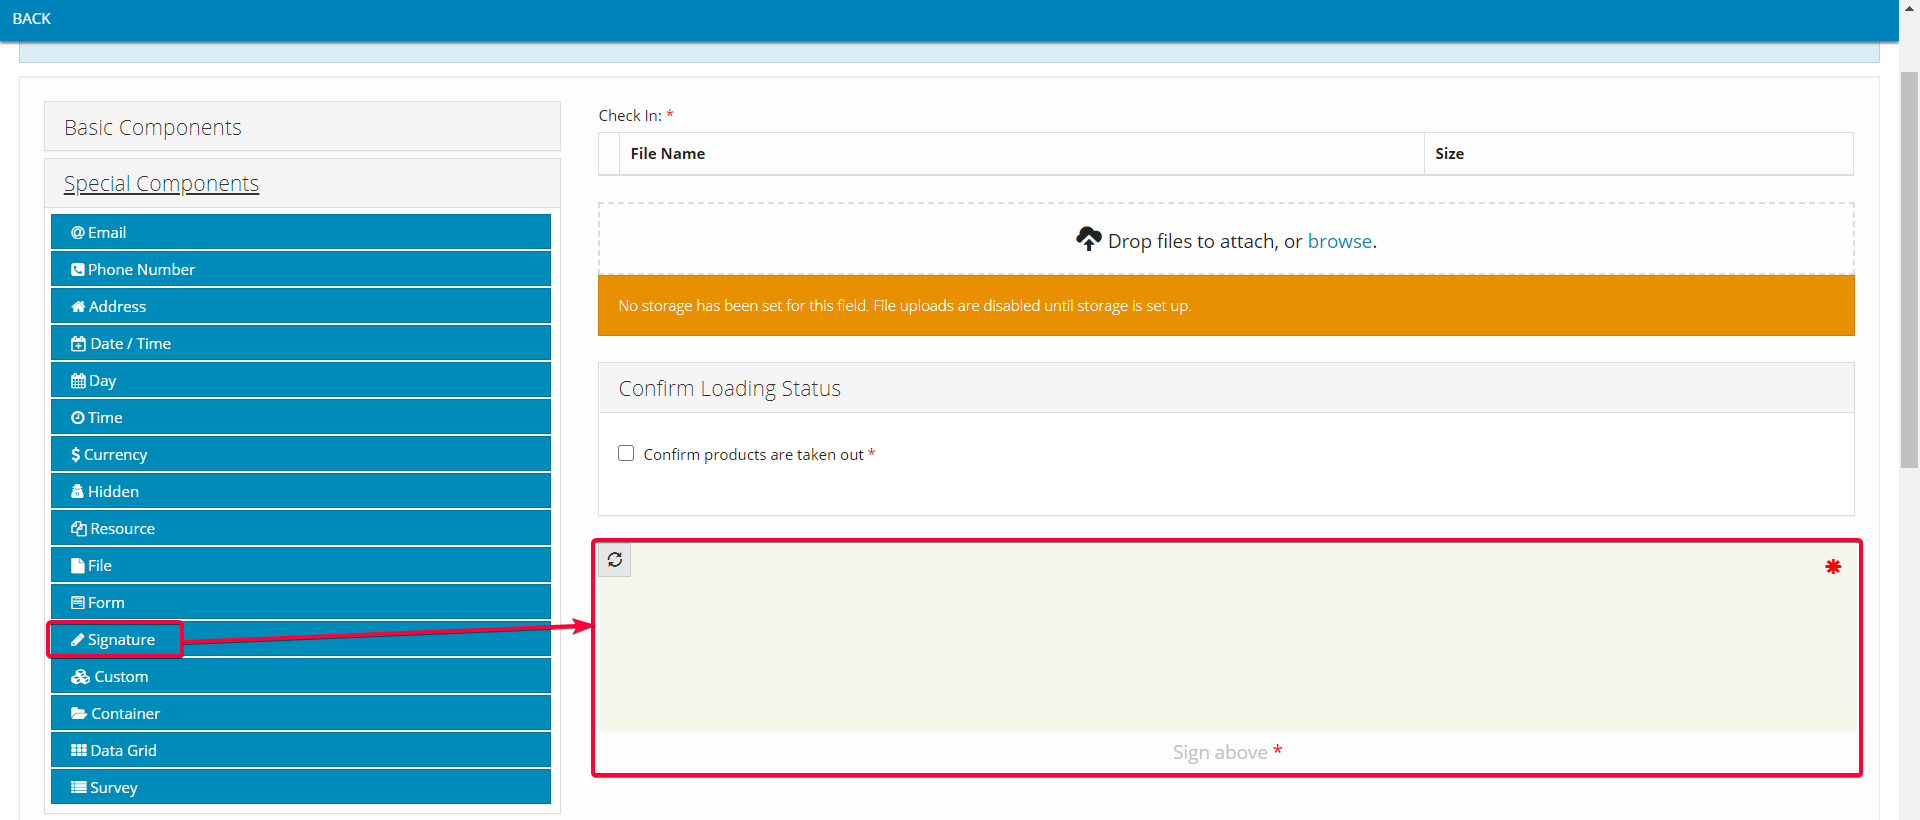
Illustration (English)
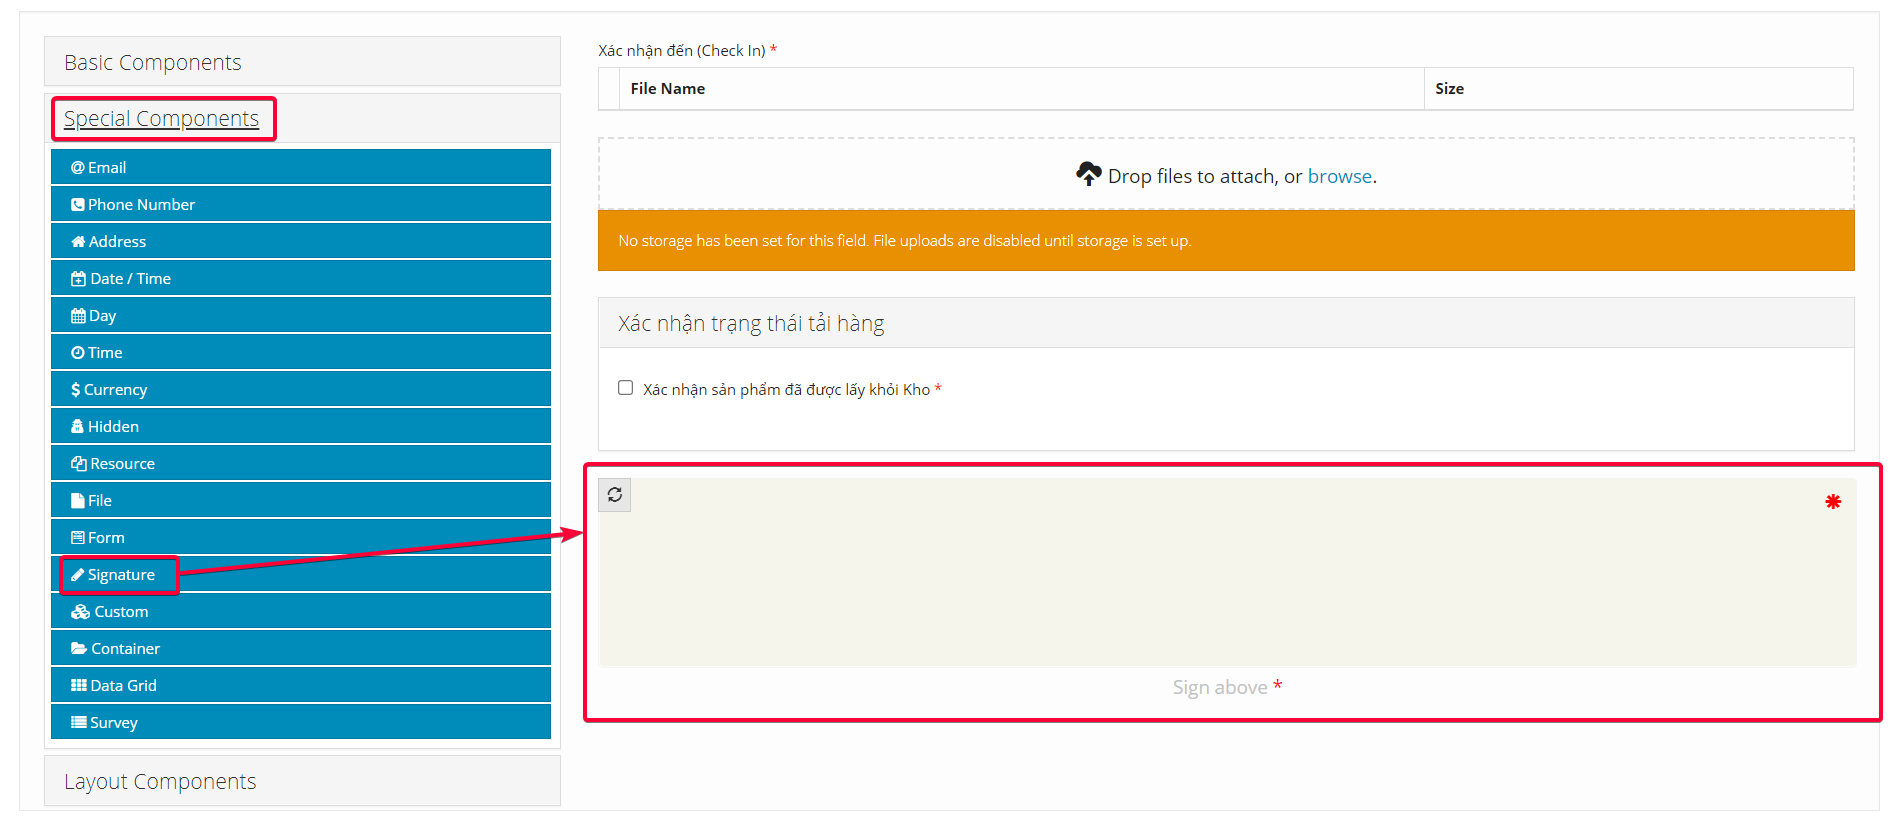
Illustration (Vietnamese)
- Component content: You do not need to input anything
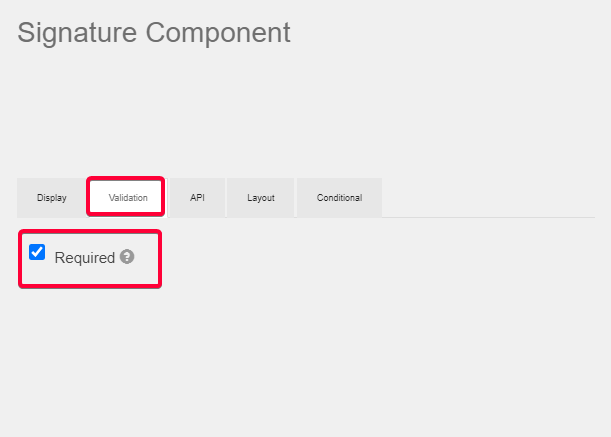
- In the Validation tab, if you tick the Required checkbox, the Drivers will not be able to submit the Loading at Store task without submitting the Signature. If you leave this checkbox unticked, the Drivers will be able to submit this task without having to perform the Signature action
3. TRANSIT action code
3.1 Check In Panel
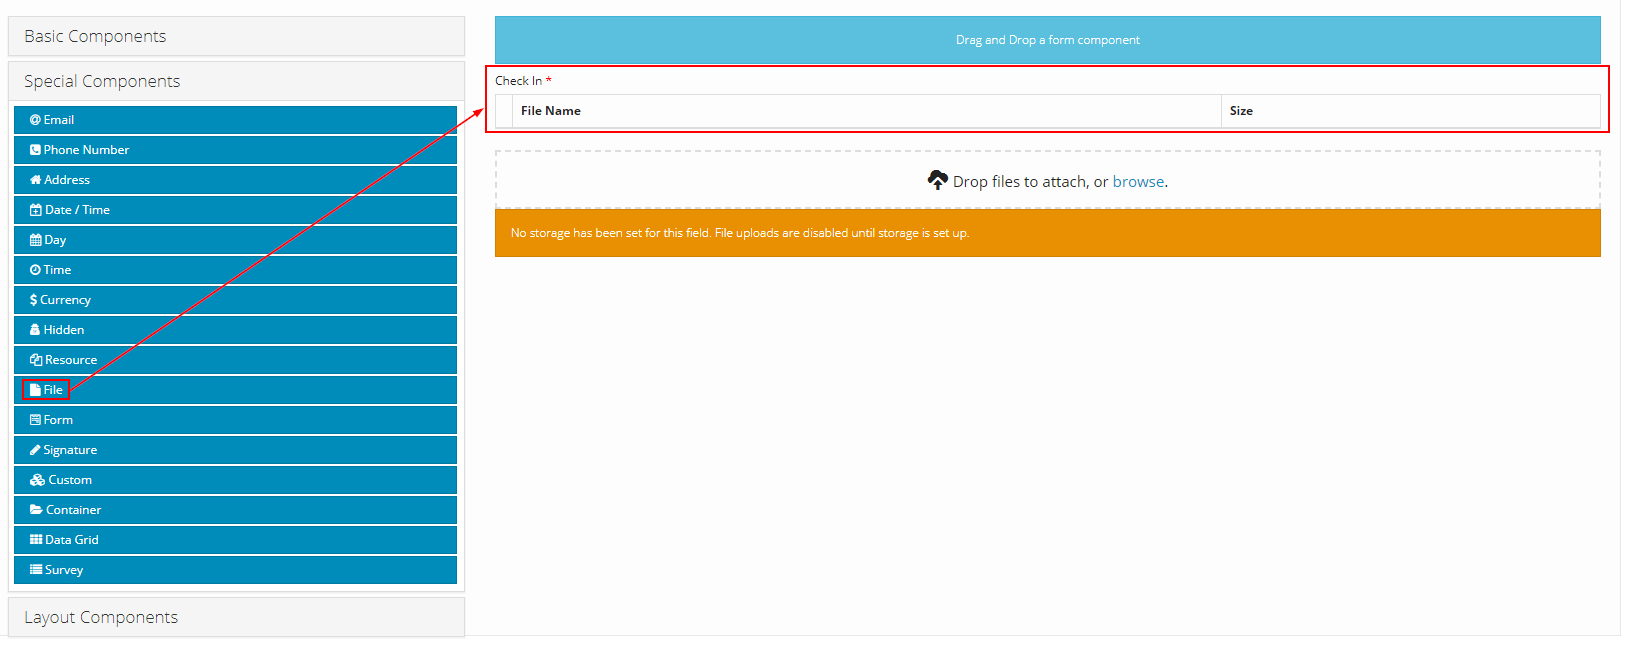
- Component used: Special Components > File
- Component content:
- Similar as Check In Panel described above
4. DELIVER_PRODUCT action codes
- For this Action Code, you will need to build the following forms:
- 1 - The Arrival Check-in panel, which allows the Drivers to check-in when they arrive at the Customers' receiving locations
- 2 - The Unloading Check-in section, which allows the Drivers to specify the delivery result
- 3 - The Customer signature section, which allows the Customers to sign directly on the mobile device of the Drivers
- Here is how the final Action Code will look like after you have completed building its forms:
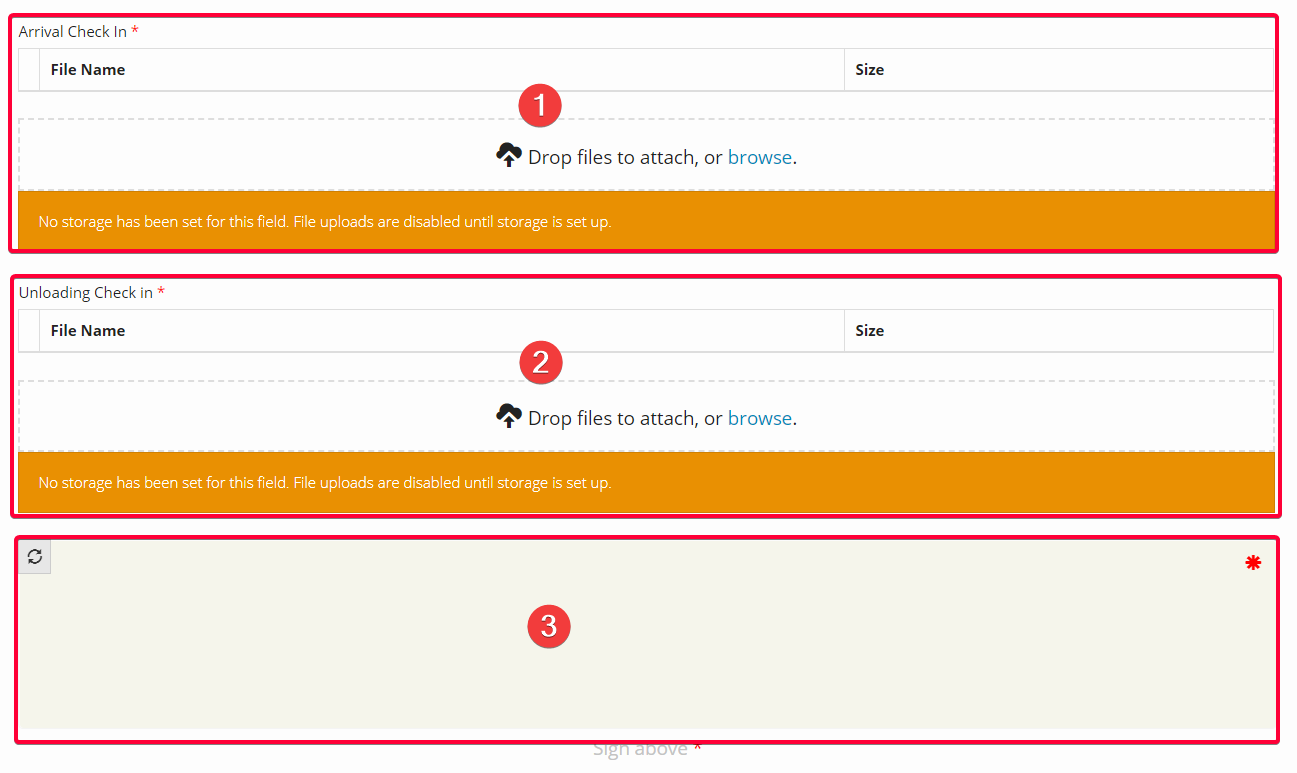
Illustration (English)
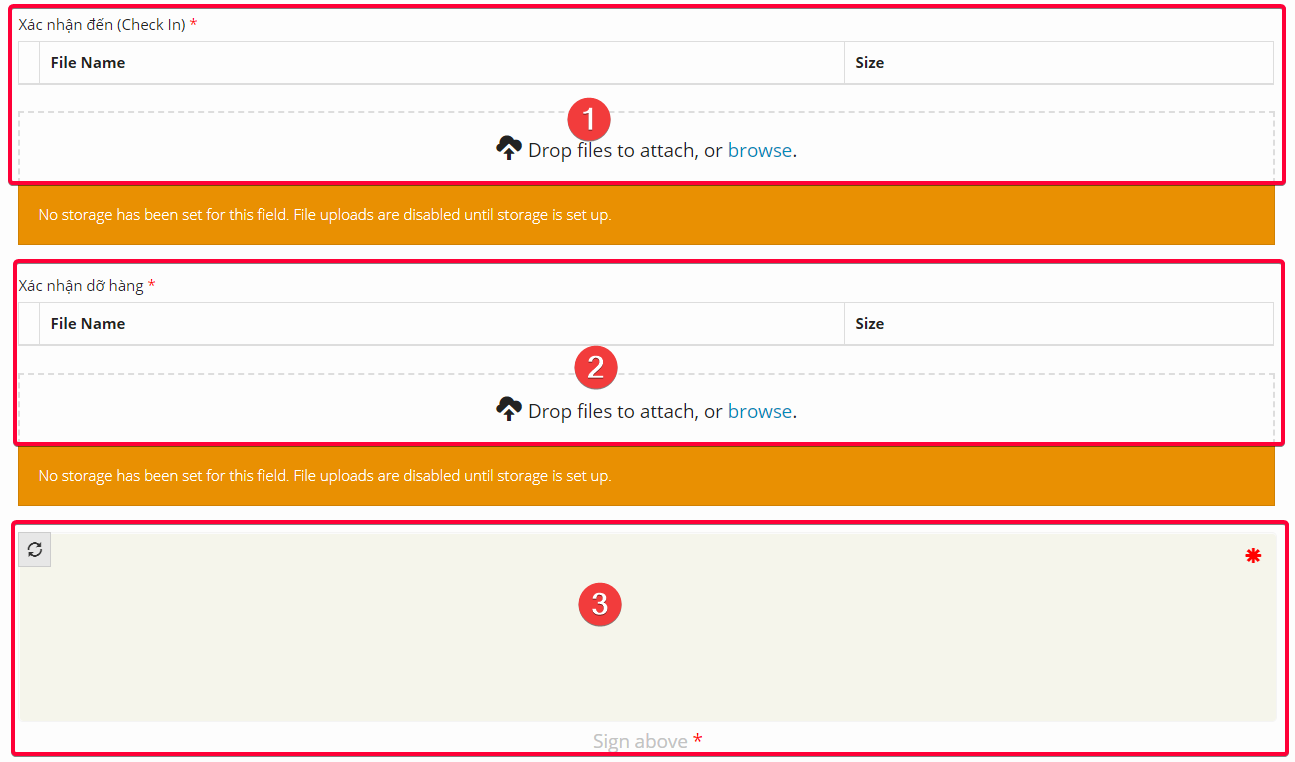
Illustration (Vietnamese)
4.1 Arrival Check In Panel
- Component used: Special Components > File
- Position: On top
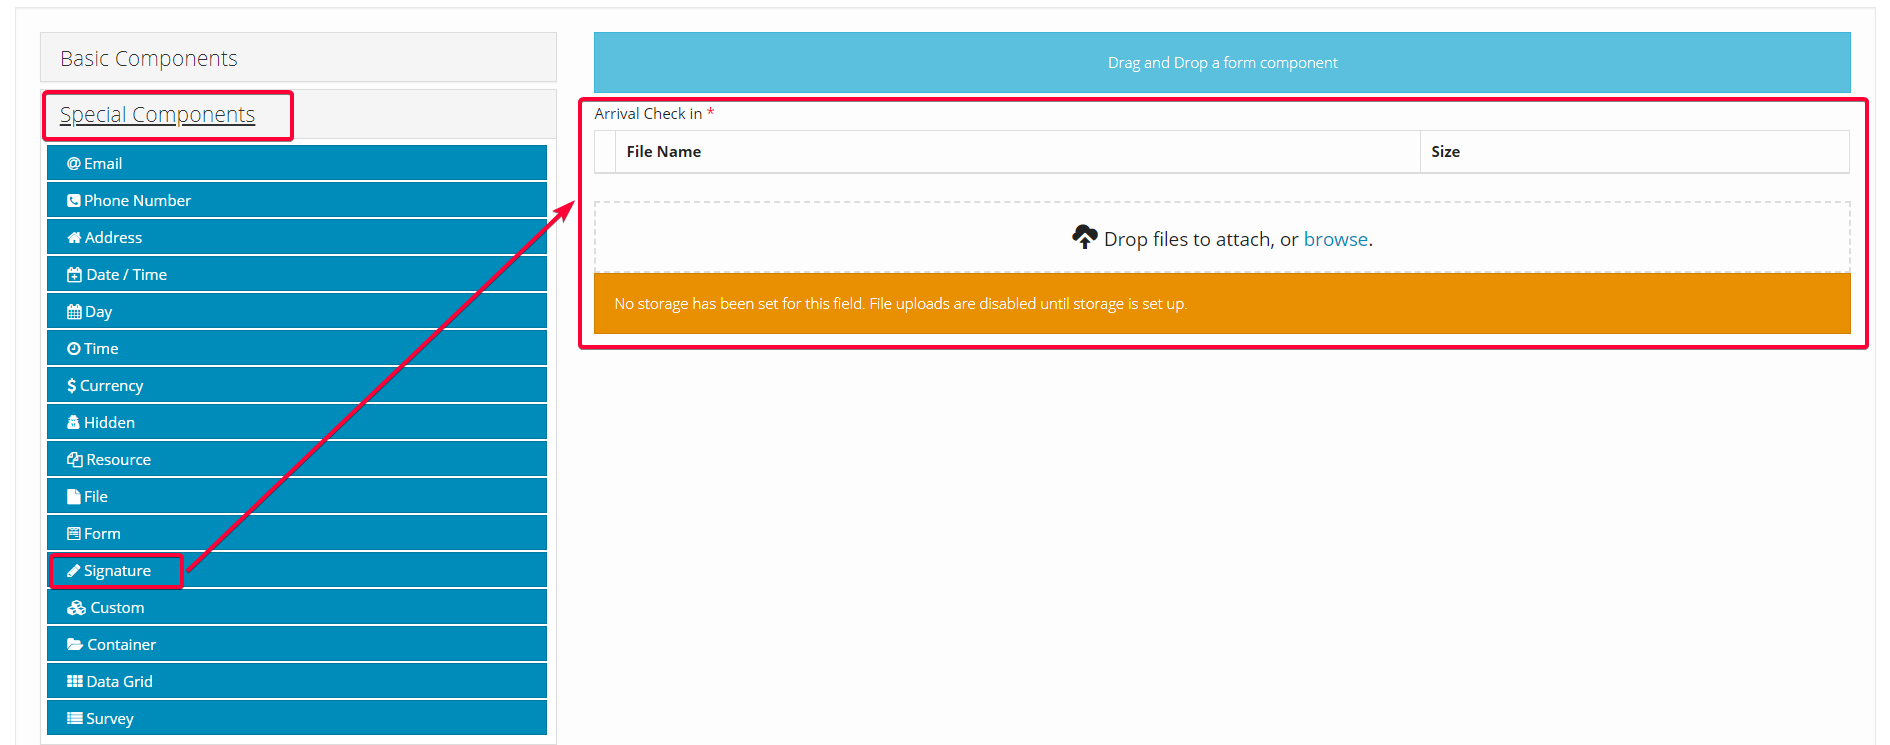
Illustration (English)
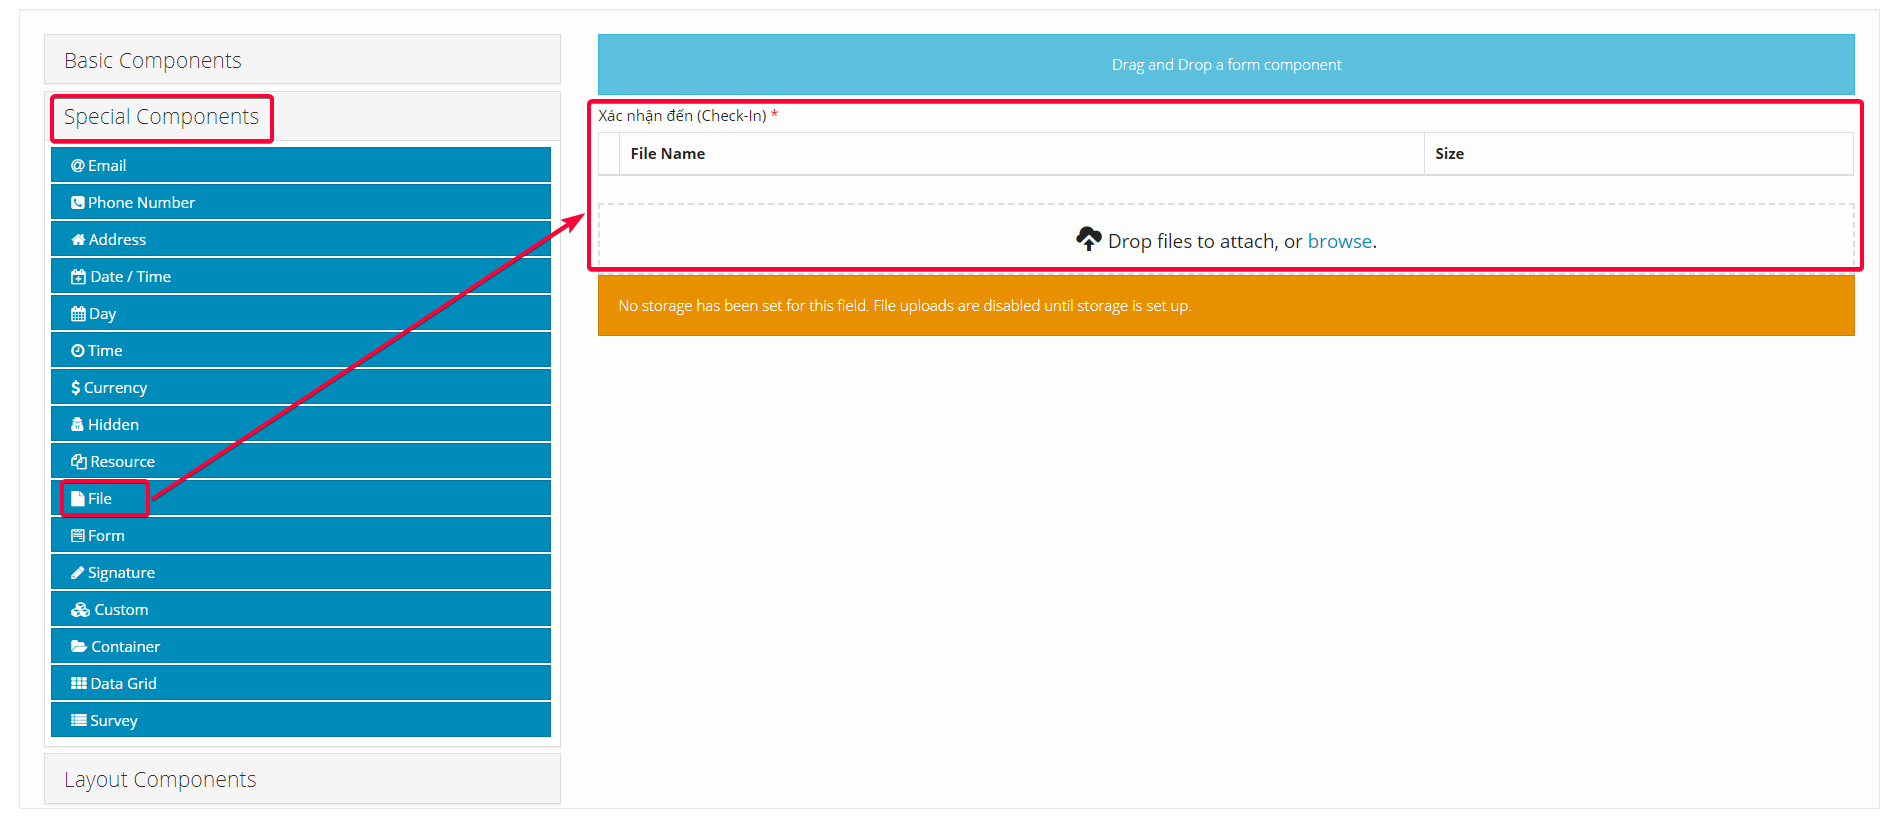
Illustration (Vietnamese)
- Component content:
- Similar as Check In Panel described above
4.2 Unloading Check In Panel
- Component used: Special Components > File
- Position: Below Loading Check In panel
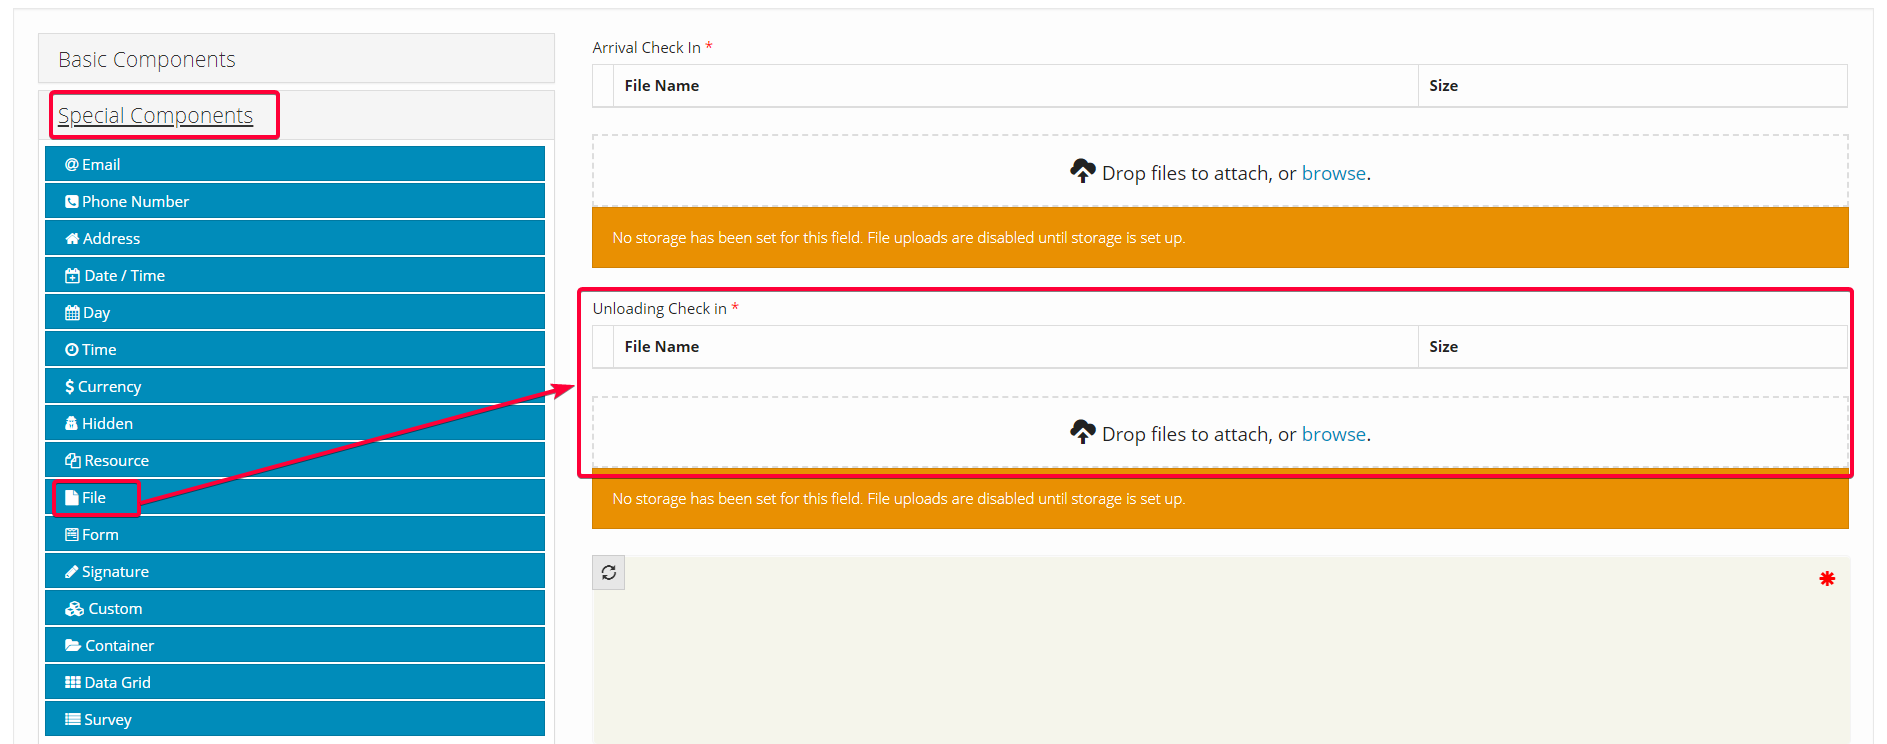
Illustration (English)
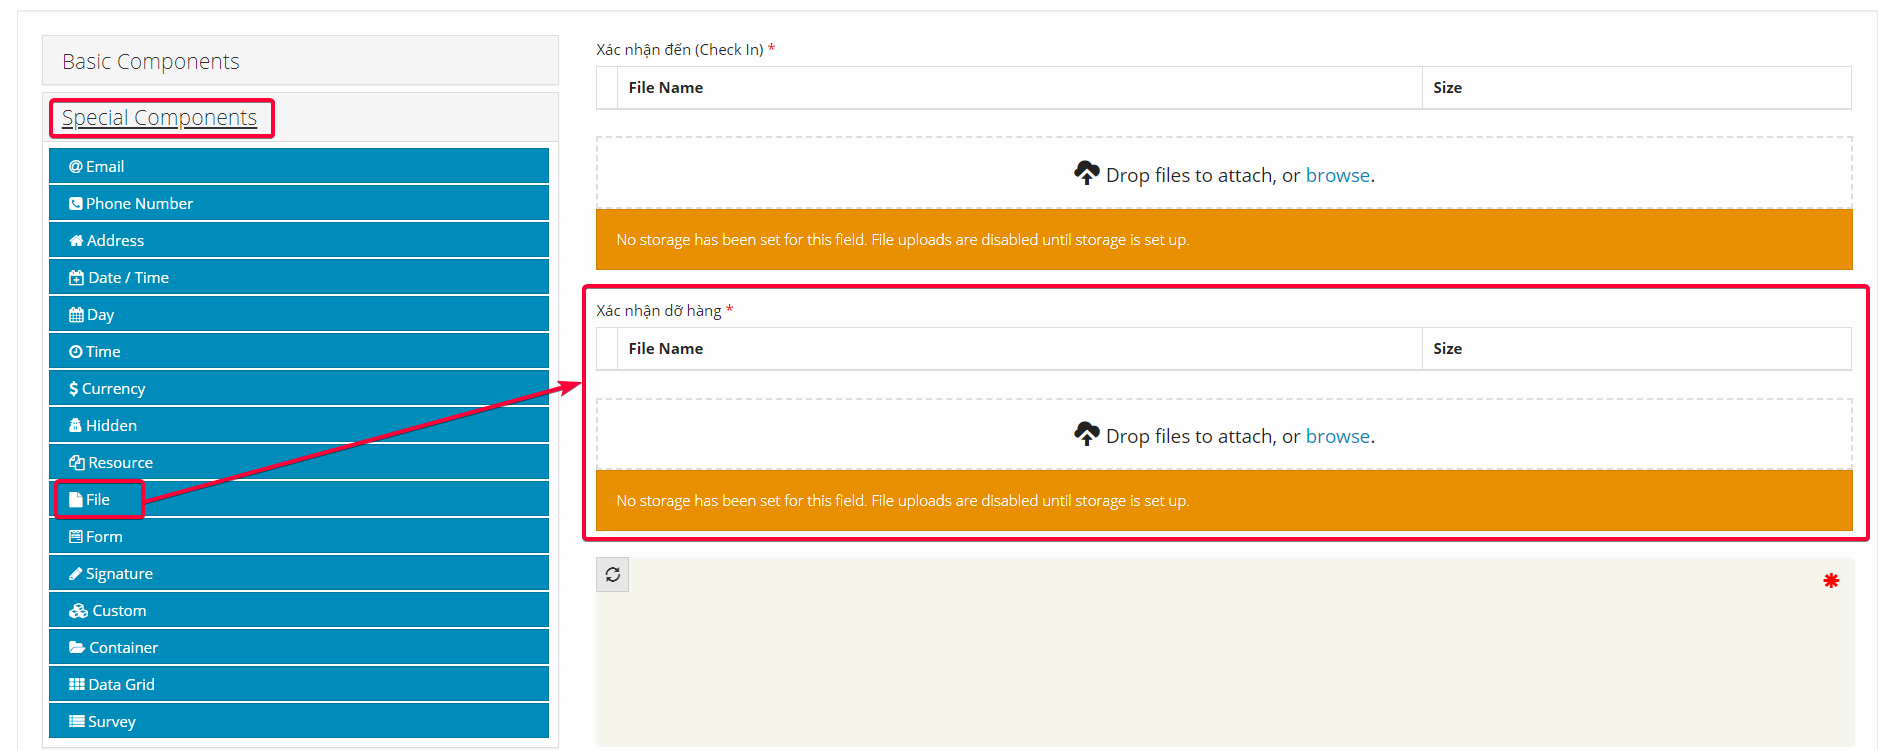
Illustration (Vietnamese)
- Component content:
- Similar as Check In Panel described above
4.3 Signature
- Component used: Special Components > Signature
- Position: Below Unloading Check In panel
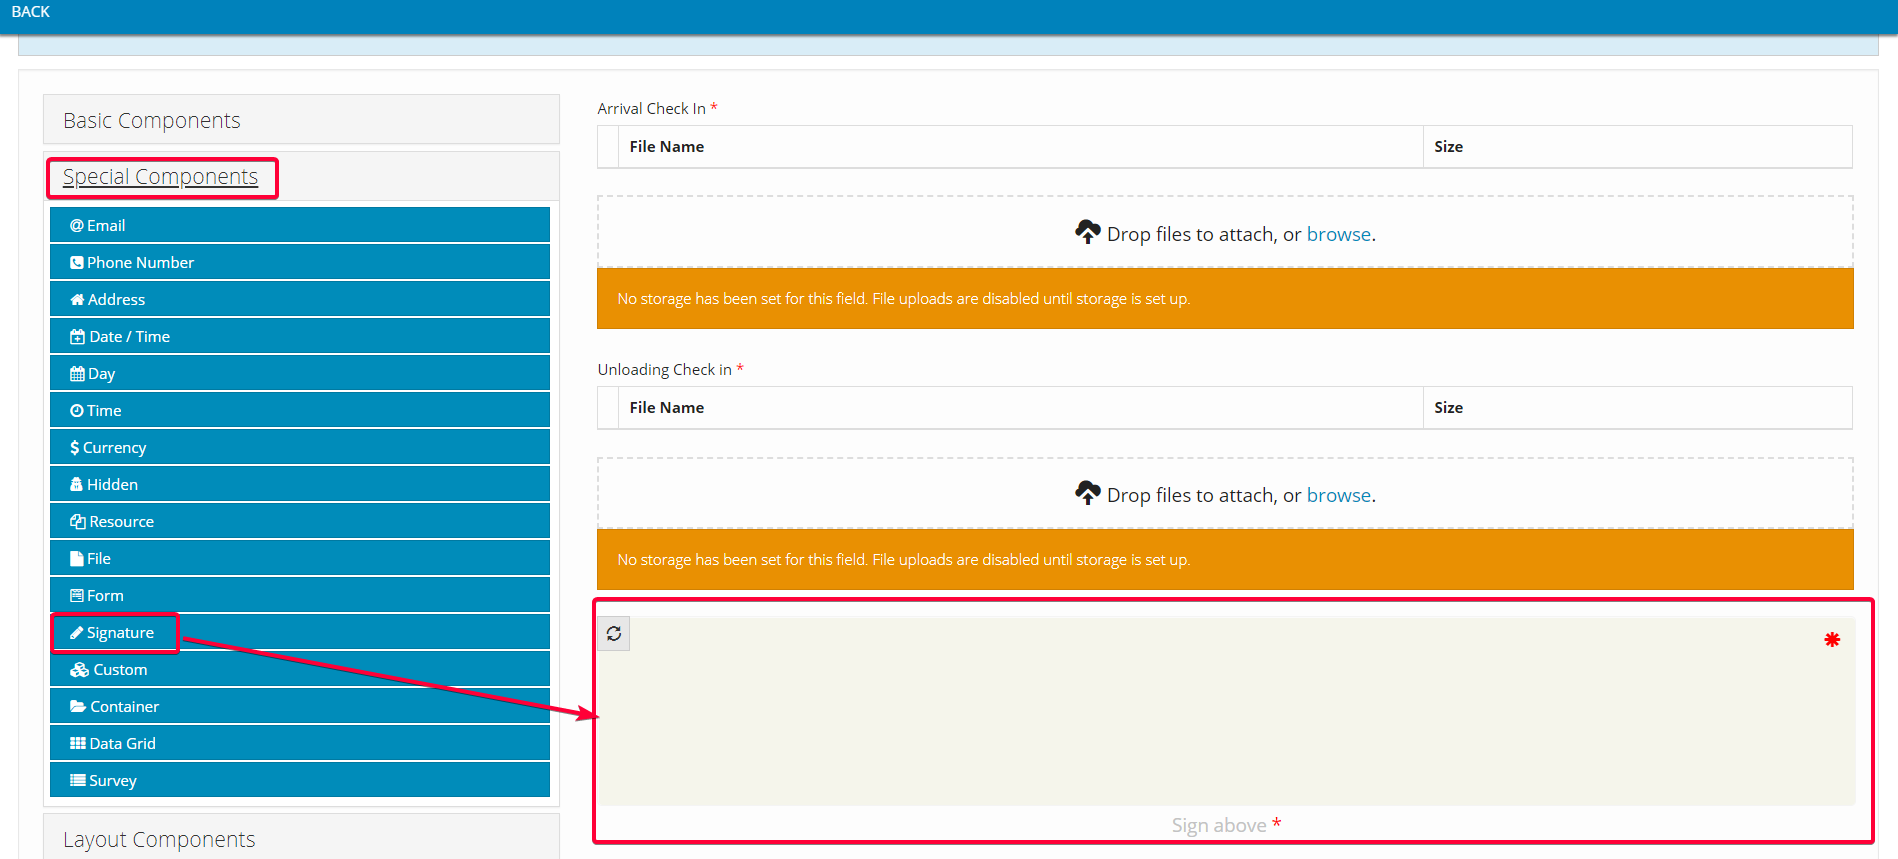
Illustration (English)
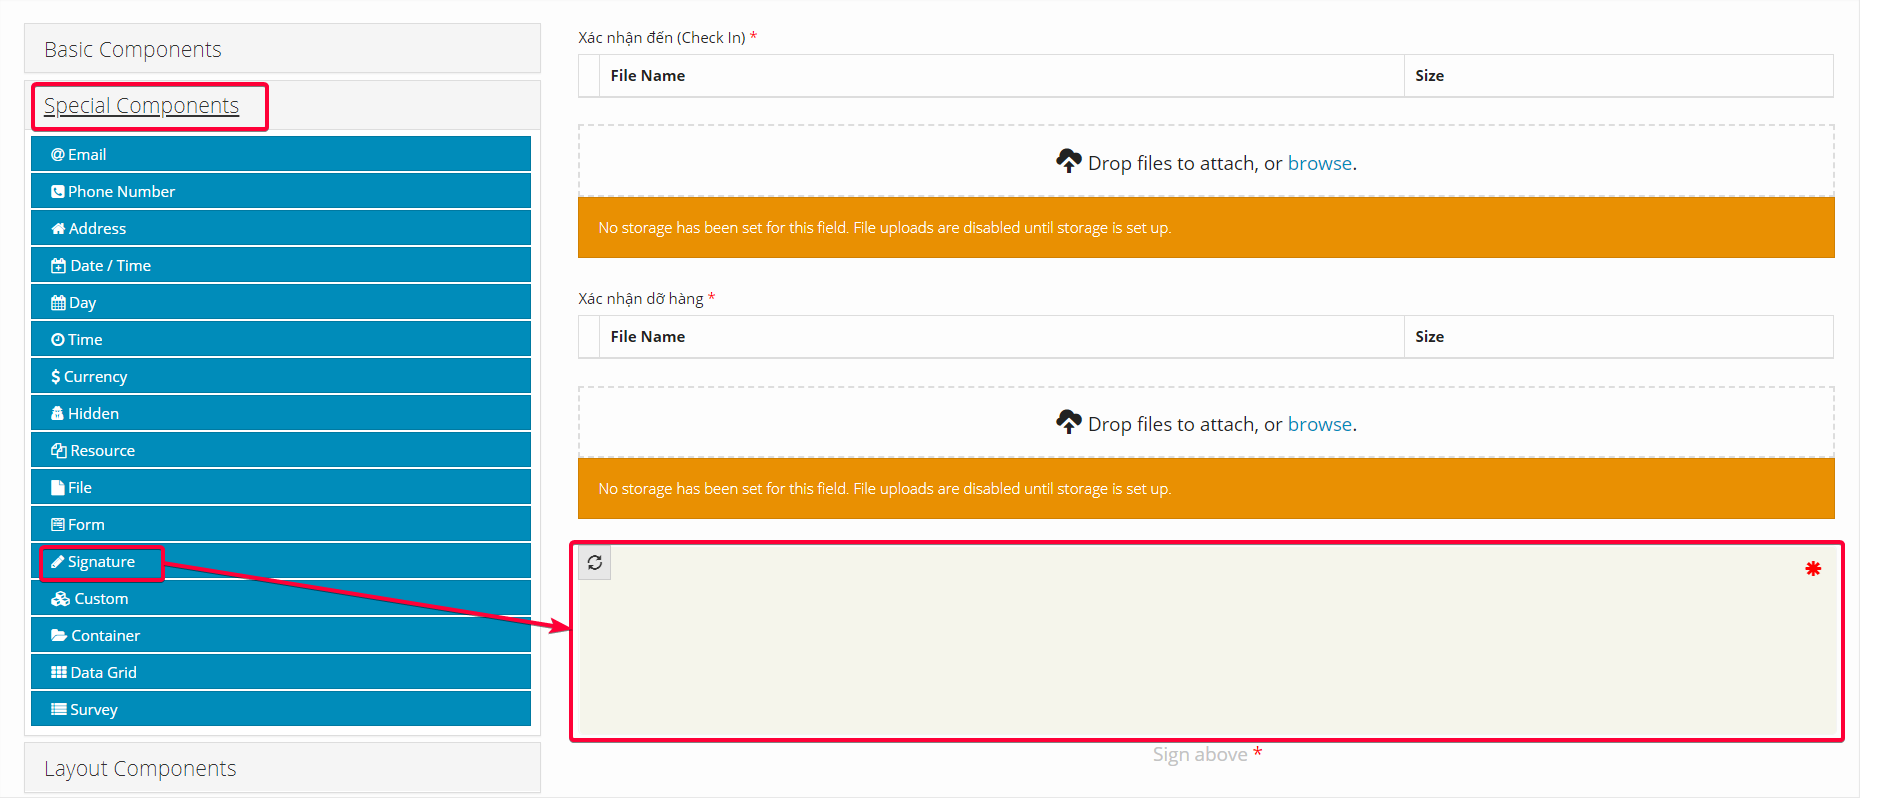
Illustration (Vietnamese)
- Component content:
- Similar as Signature described above.
5. BACK_DEPOT action codes
- For this Action Code, you will need to build the Check In Panel, which allows the Drivers to check-in as they return to the Depot.
- Here is how the final Action Code will look like after you have completed building its forms:

Illustration (English)

Illustration (Vietnamese)
- Component used: Special Components > File
- Position: On top
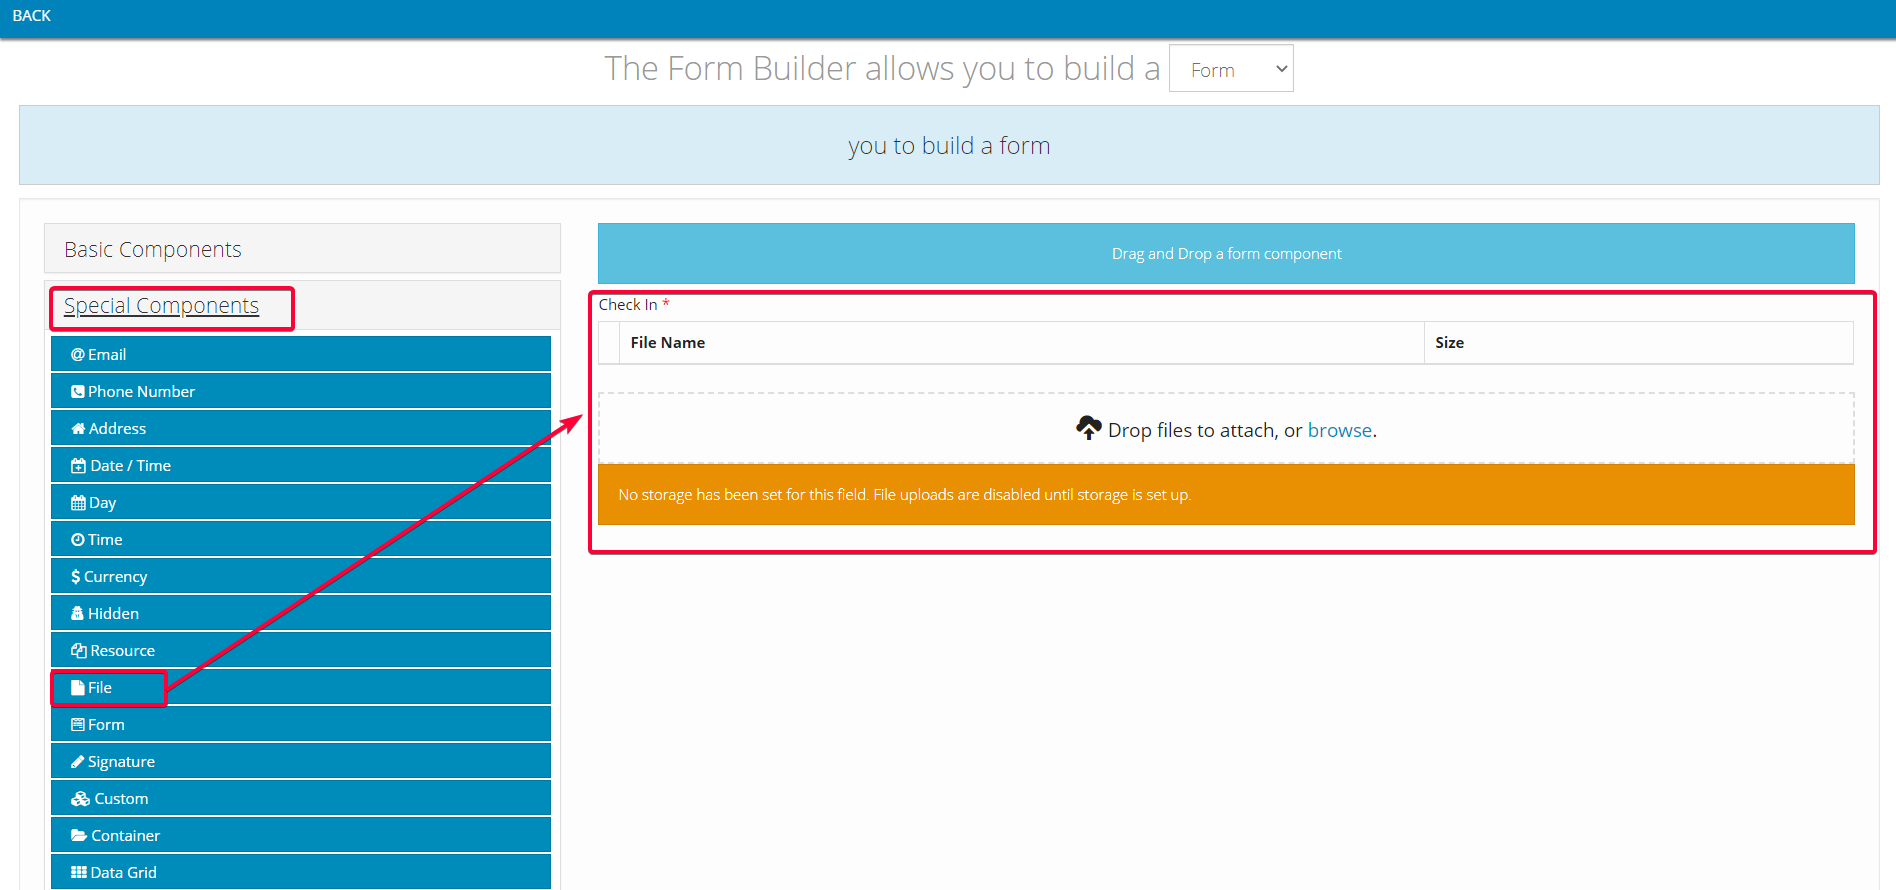
Illustration (English)
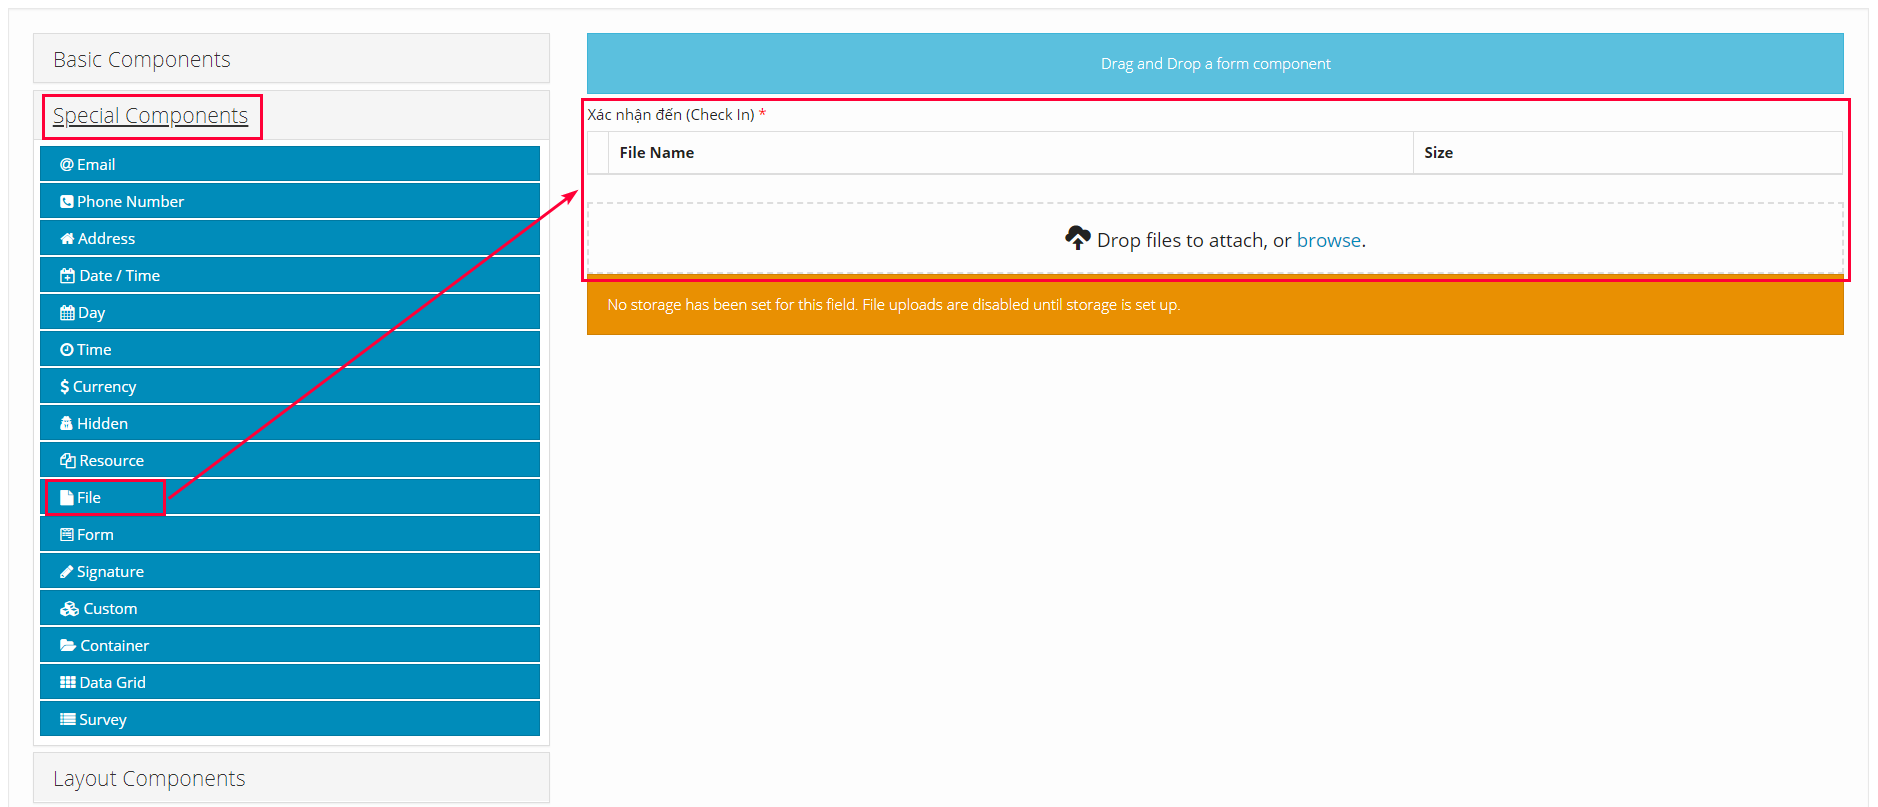
Illustration (Vietnamese)
- Component content:
- Similar as Check In Panel described above
6. END_DAY action codes
- For this Action Code, you will need to build the following forms:
1 - The Delivery Performance Table, which shows the information of the Orders that the Drivers have delivered
2 - The Check-in panel, which allows the Drivers to check-in at the end of their Delivery Shifts - Here is how the final Action Code will look like after you have completed building its forms:
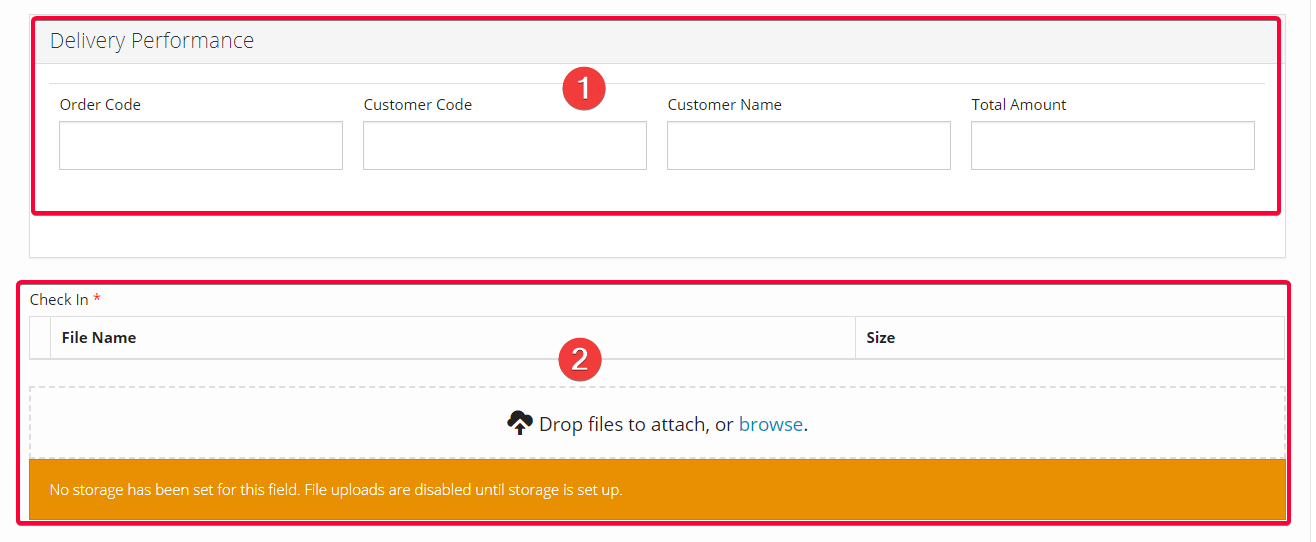
Illustration (English)
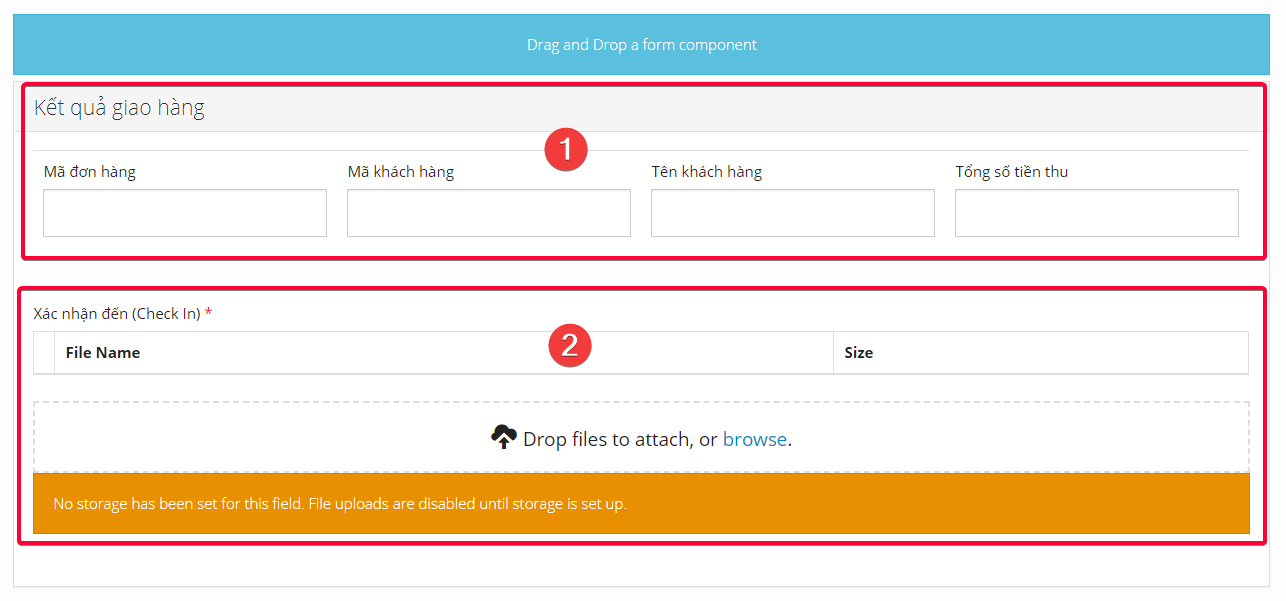
Illustration (Vietnamese)
6.1 Delivery Performance Panel
- Component used: Layout Components > Panel
- Position: On top

- Component content:
- On the component setup form of this component, you need to input information into two tabs, Display and API
- Note: The value input into the Title field in the Display tab can be changed freely. It doesn't necessarily need to be Delivery Performance

Illustration (English)

Illustration (Vietnamese)
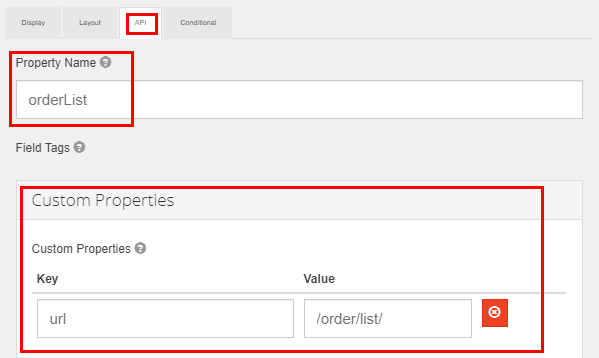
- In the API tab, you will need to input exactly as shown in the table below (Notice the lowercase and uppercase letters)
- Note: For the Custom Properties field, you will first need to click on its text to expand it. Next, you need to click the Add Value button to add a Key-Value row
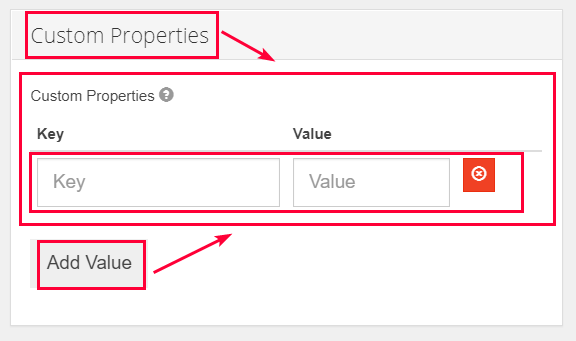
- To ensure there is no mistake, you can simply copy the values in the table below and paste into the component setup form of yours
Information Field | Value To Input |
|---|---|
Property Name | orderList |
Custom Properties | For the "Key" field, input the following value: url |
- Here is how this tab looks after you have input the needed information
6.2 Delivery Performance Table
- Component used: Layout Components > Table
- Position: Inside Delivery Performance panel

- Component content:
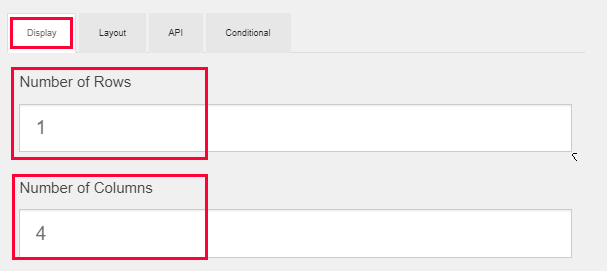
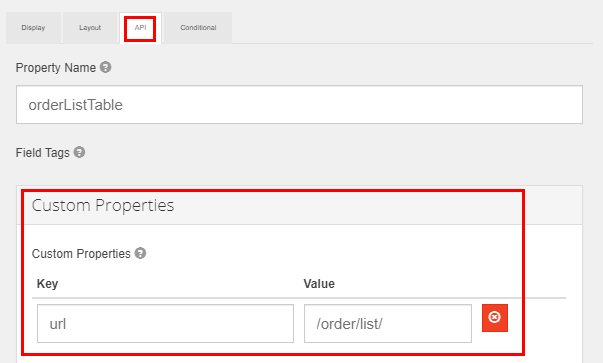
- On the component setup form of this component, you need to input information into two tabs, Display and API
Information Field | Value To Input |
|---|---|
"Display" tab "Number of Rows" | 1 |
"Display" tab | 4 |
"API" tab | For the "Key" field, input the following value: url |
6.3 Order Code Field
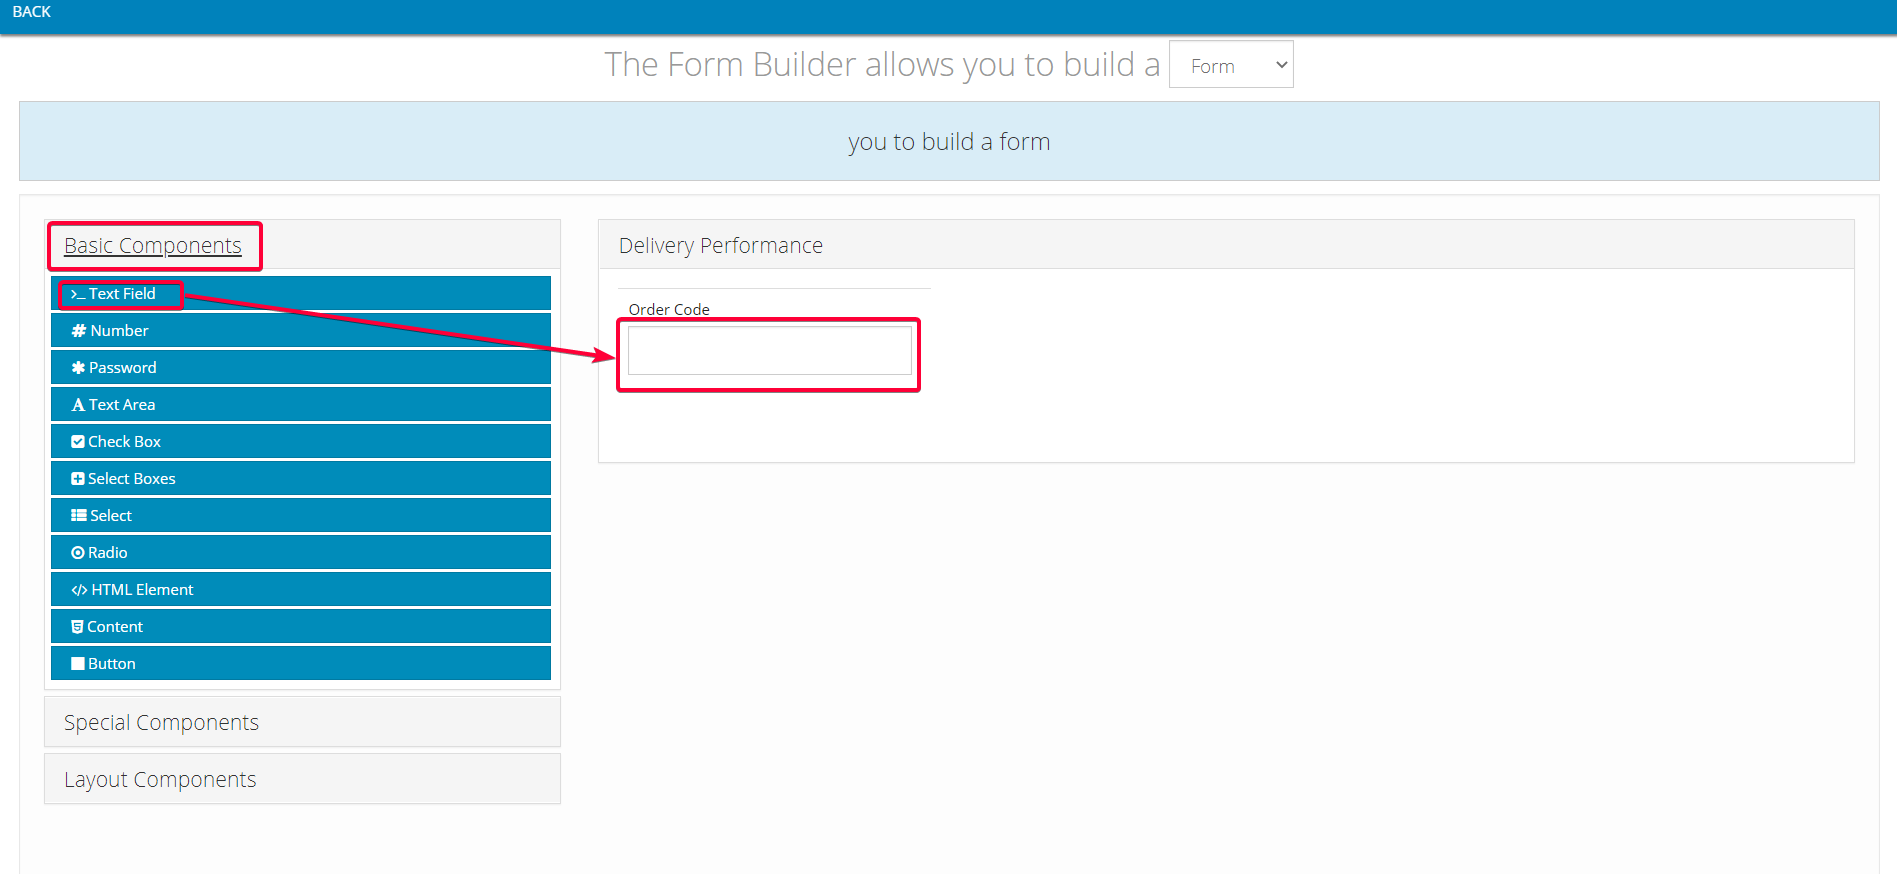
- Component used: Basic Components > Text Field
- Position: Inside the Delivery Performance panel
- Component content
- On the component setup form of this component, you need to input information into two tabs, Display and API
- Note: The value input into the Label field in the Display tab can be changed freely. It doesn't necessarily need to be Order Code

Illustration (English)

Illustration (Vietnamese)
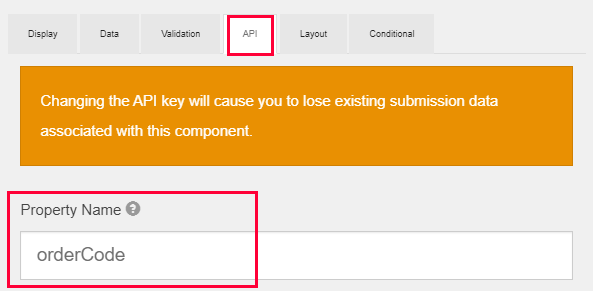
- For the API tab, you need to input the exact value as shown in the table below
Information Field | Value To Input |
|---|---|
Property Name | orderCode |
6.4 Customer Code Field
- Component used: Basic Components > Text Field
- Position: Inside the Delivery Performance panel, to the right of the Order Code Field
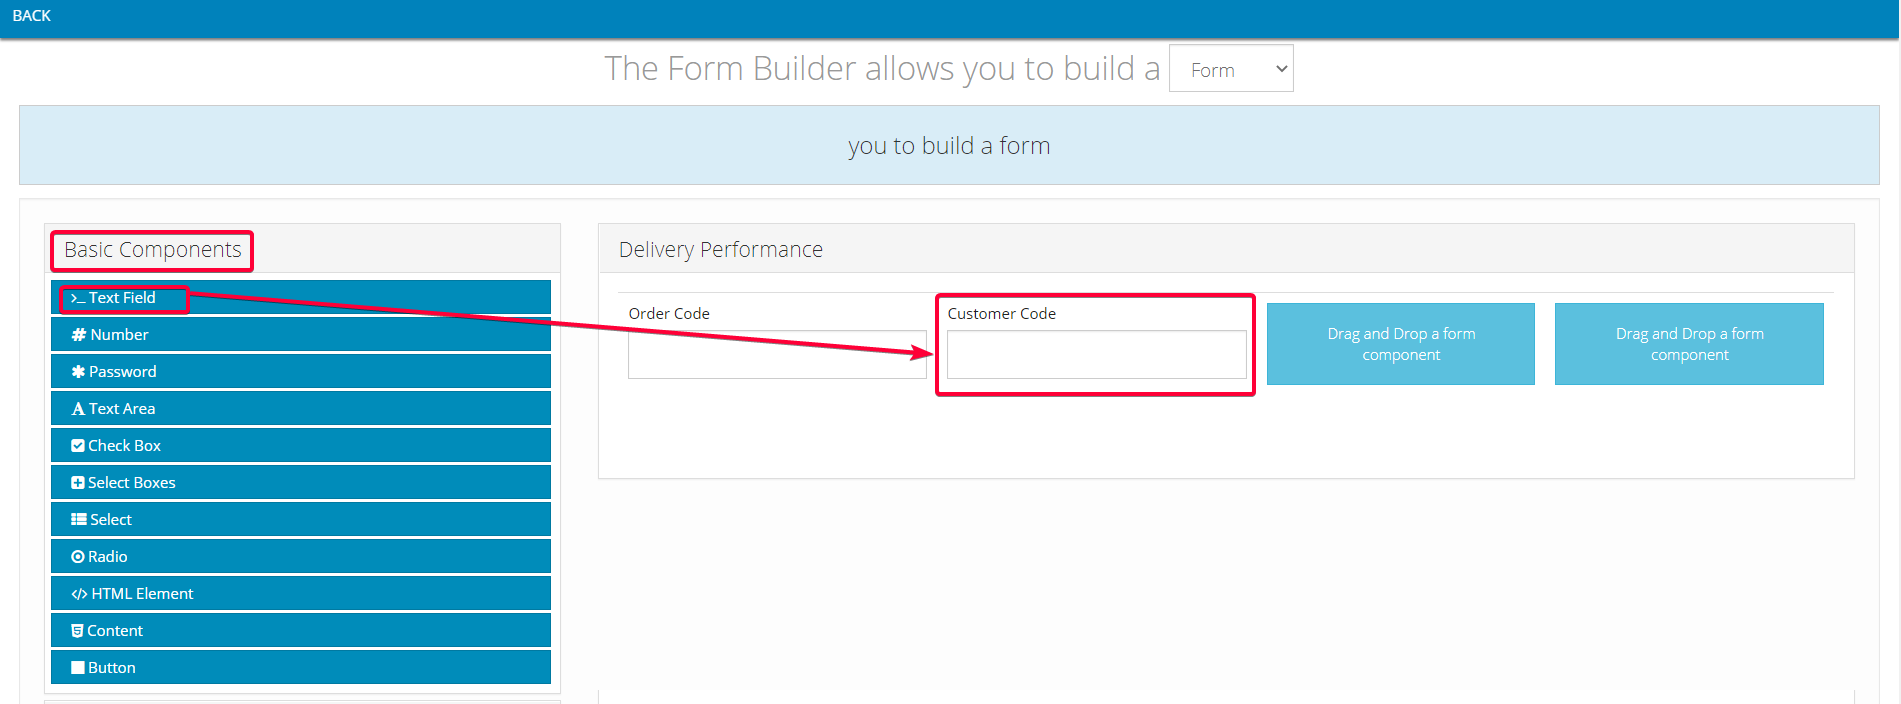
- Component content:
- On the component setup form of this component, you need to input information into two tabs, Display and API
- Note: The value input into the Label field in the Display tab can be changed freely

Illustration (English)

Illustration (Vietnamese)
- For the API tab, you need to input the exact value as shown in the table below
Information Field | Value To Input |
|---|---|
Property Name | customerInfo.customerCode |

6.5 Customer Name Field
- Component used: Basic Components > Text Field
- Position: Inside the Delivery Performance Table, to the right of the Customer Code Field
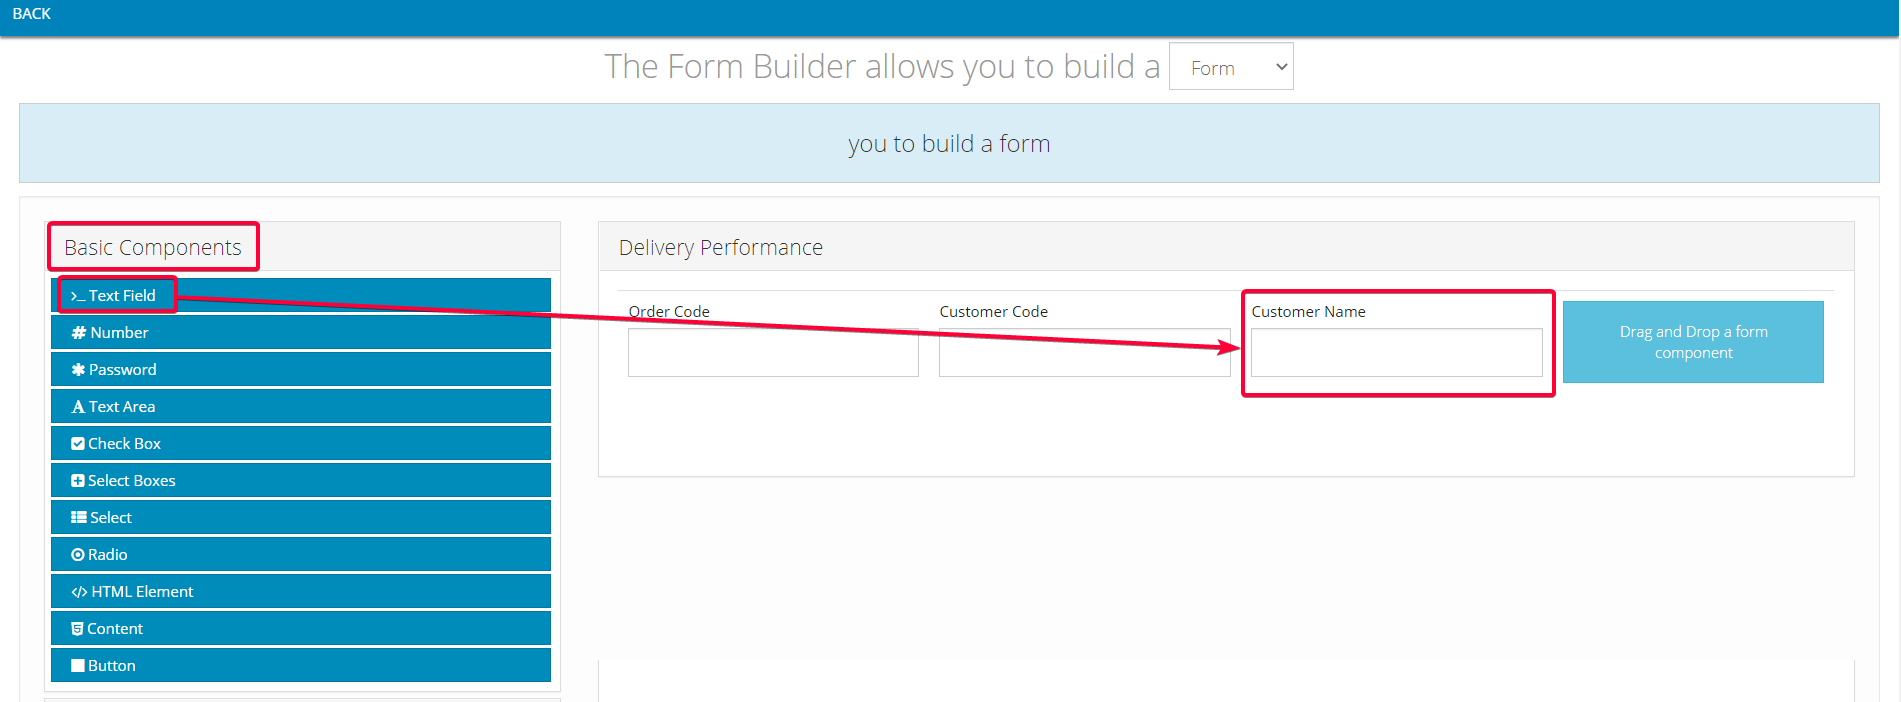
- Component content:
- On the component setup form of this component, you need to input information into two tabs, Display and API
- Note: The value input into the Label field in the Display tab can be changed freely

Illustration (English)

Illustration (Vietnamese)
- For the API tab, you need to input the exact value as shown in the table below
Information Field | Value To Input |
|---|---|
Property Name | customerInfo.fullName |

6.6 Total Amount Field
- Component used: Basic Components > Text Field
- Position: Inside the Delivery Performance Table, to the right of the Customer Name Field
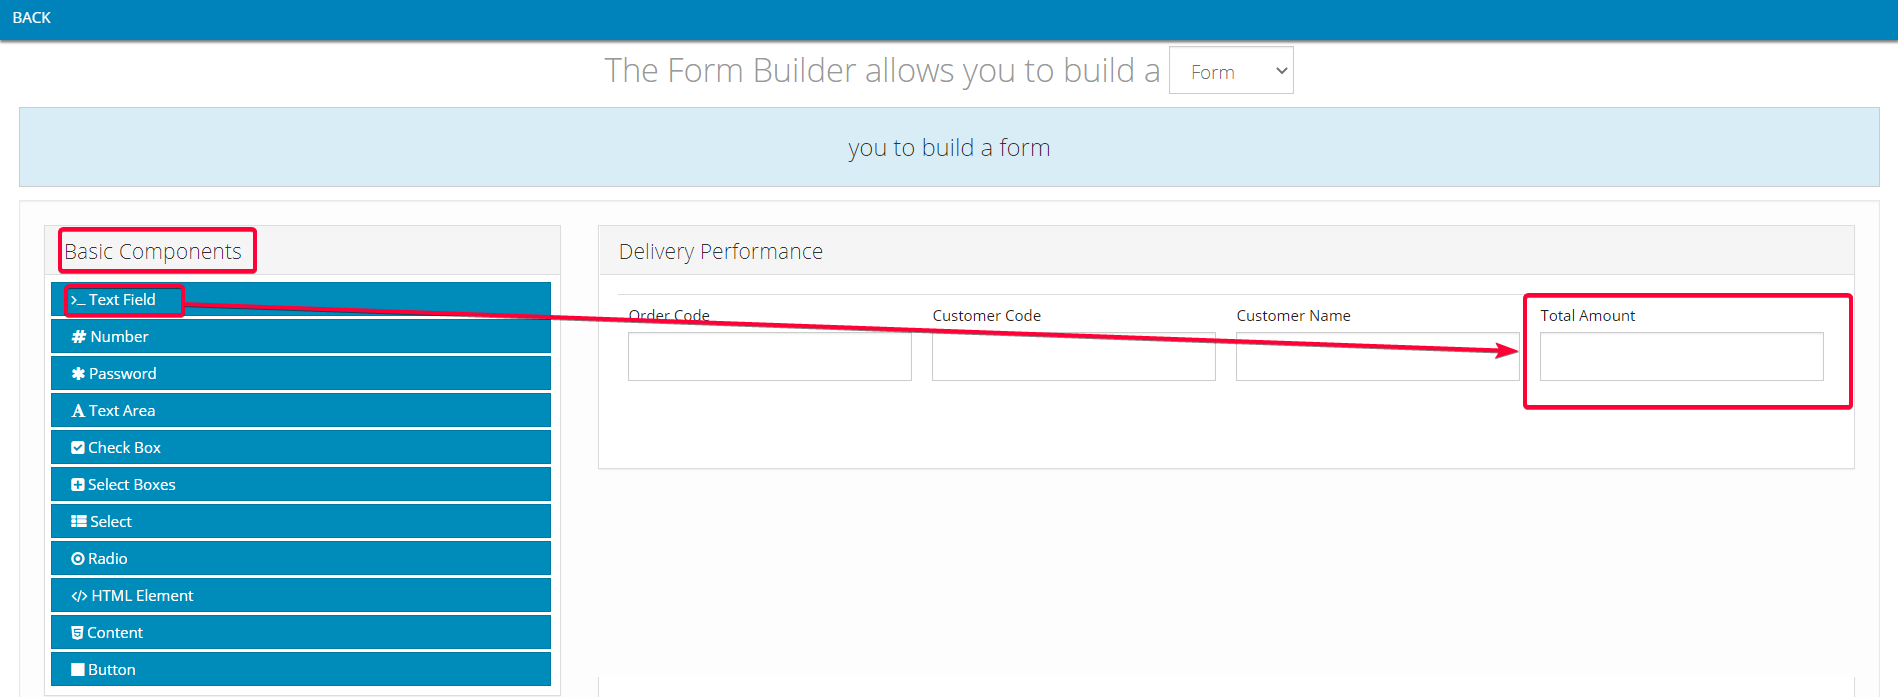
Illustration (English)

Illustration (Vietnamese)
- Component content:
- On the component setup form of this component, you need to input information into two tabs, Display and API
- Note: The value input into the Label field in the Display tab can be changed freely

Illustration (English)

Illustration (Vietnamese)
- For the API tab, you need to input the exact value as shown in the table below
Information Field | Value To Input |
|---|---|
Property Name | totalPrice |

6.7 Check In Panel
- Component used: Special Components > File
- Position: Below Delivery Performance Panel
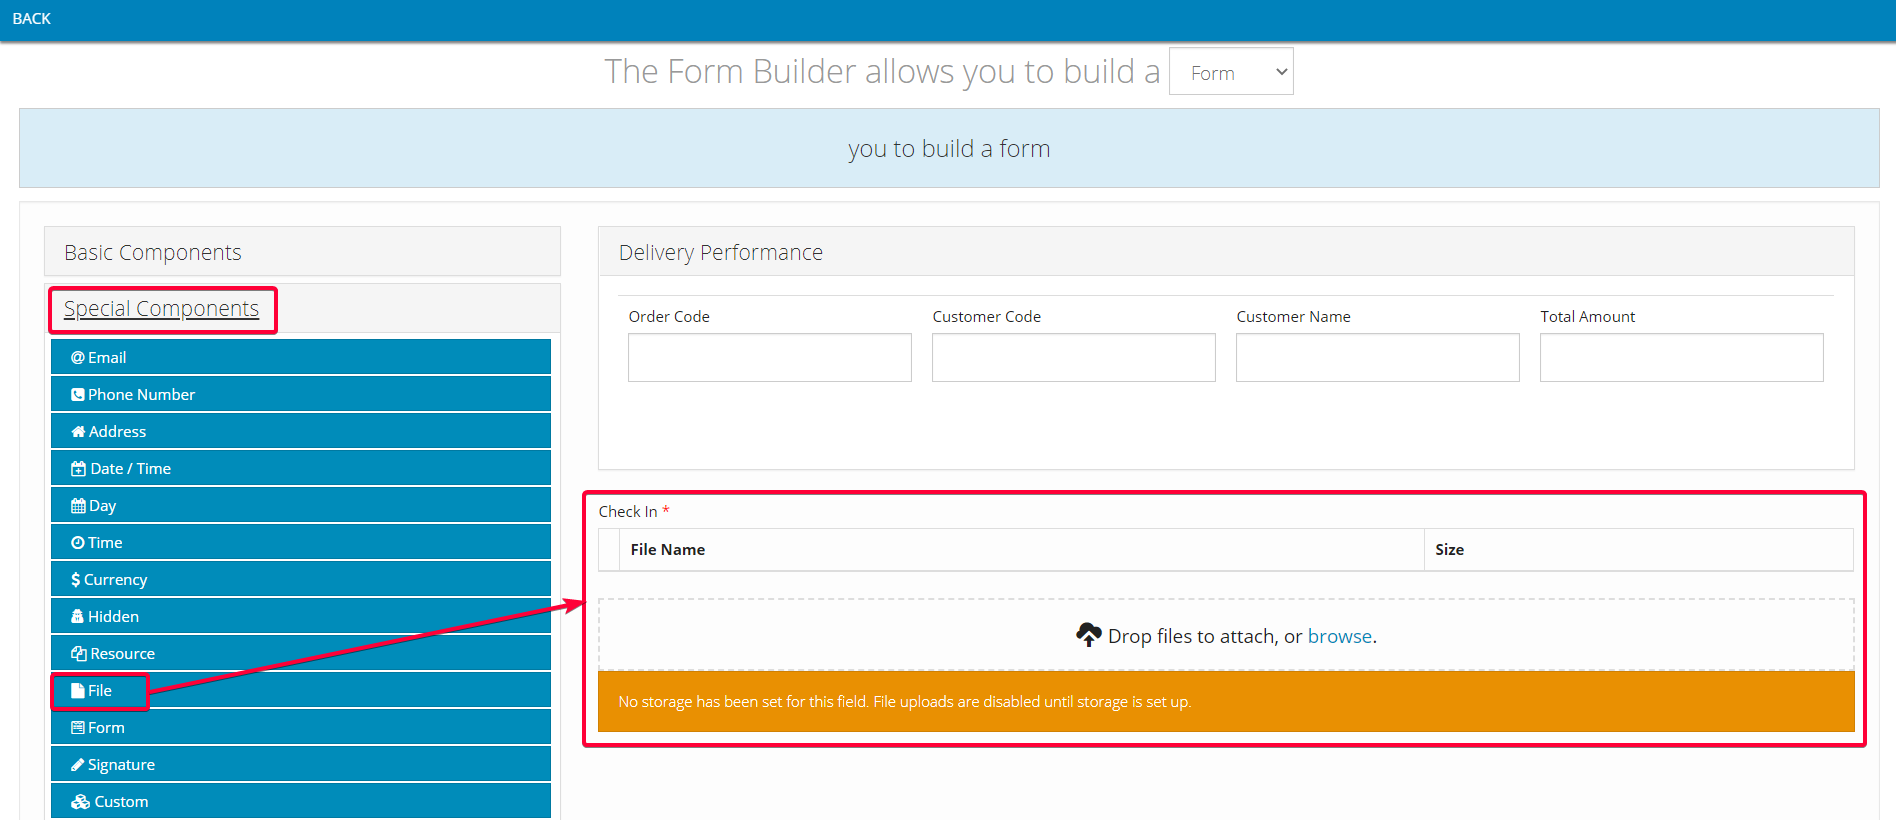
Illustration (English)
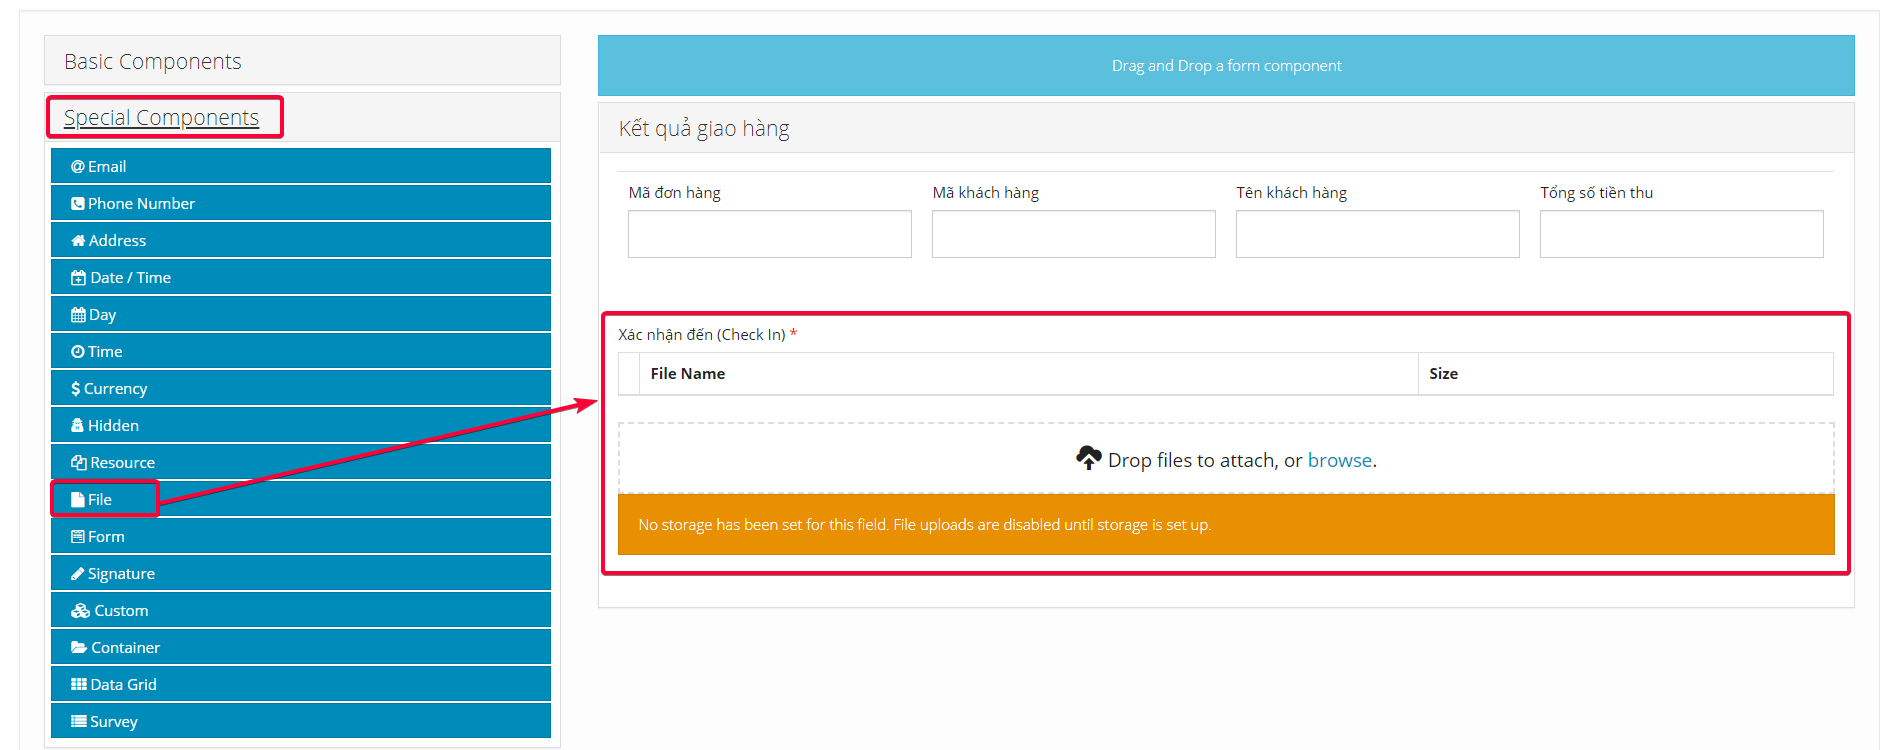
Illustration (Vietnamese)
- Component content:
- Similar as Check In Panel described above
7. EXTRA_TASK action codes
- For this Action Code, you will need to build the following forms:
- 1 - Check In Panel, which allows drivers to take photos at the place where drivers take on extra tasks
- 2 - Extra Task Type Panel, which allows drivers to specify the type of extra task
- 3 - Description Panel, which allows drivers to enter a detailed description of the extra task
- 4 - Cost Panel, which allows drivers to enter the amount of fee or cost incurred in the extra task.
- Here is how the final Action Code will look like after you have completed building its forms:
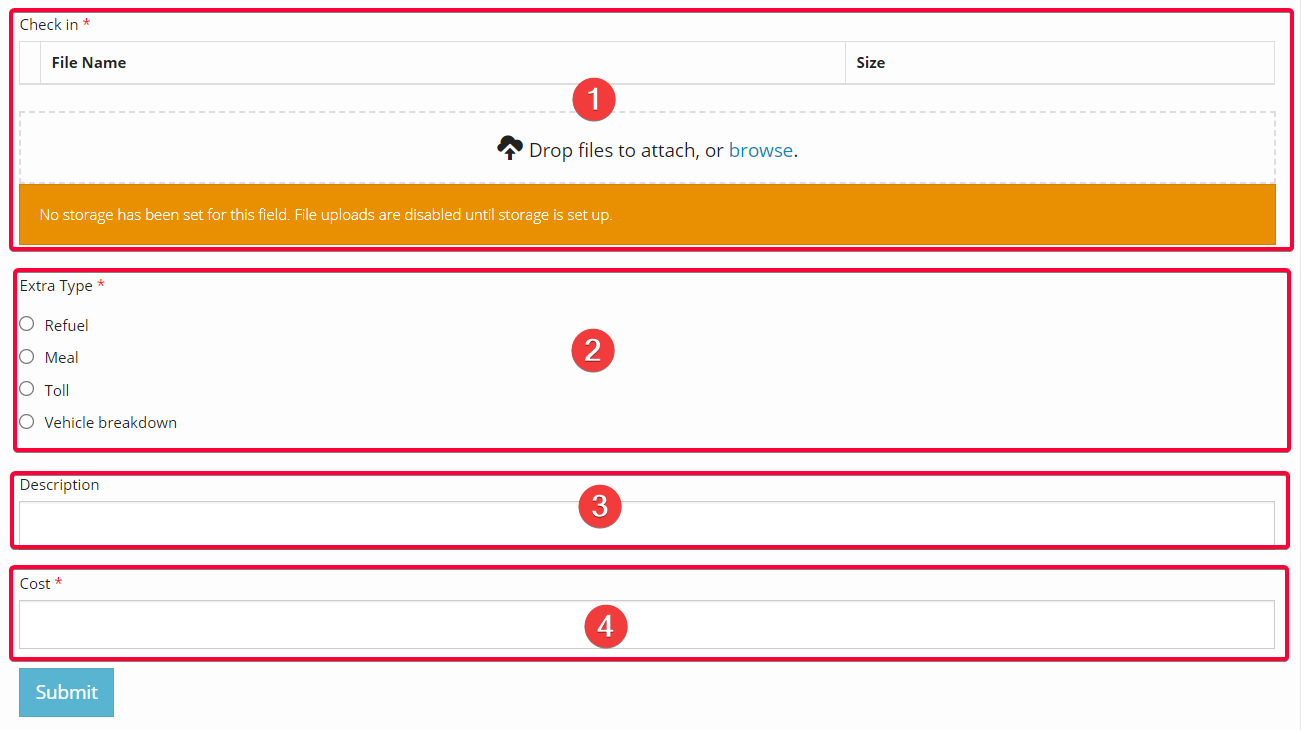
Illustration (English)
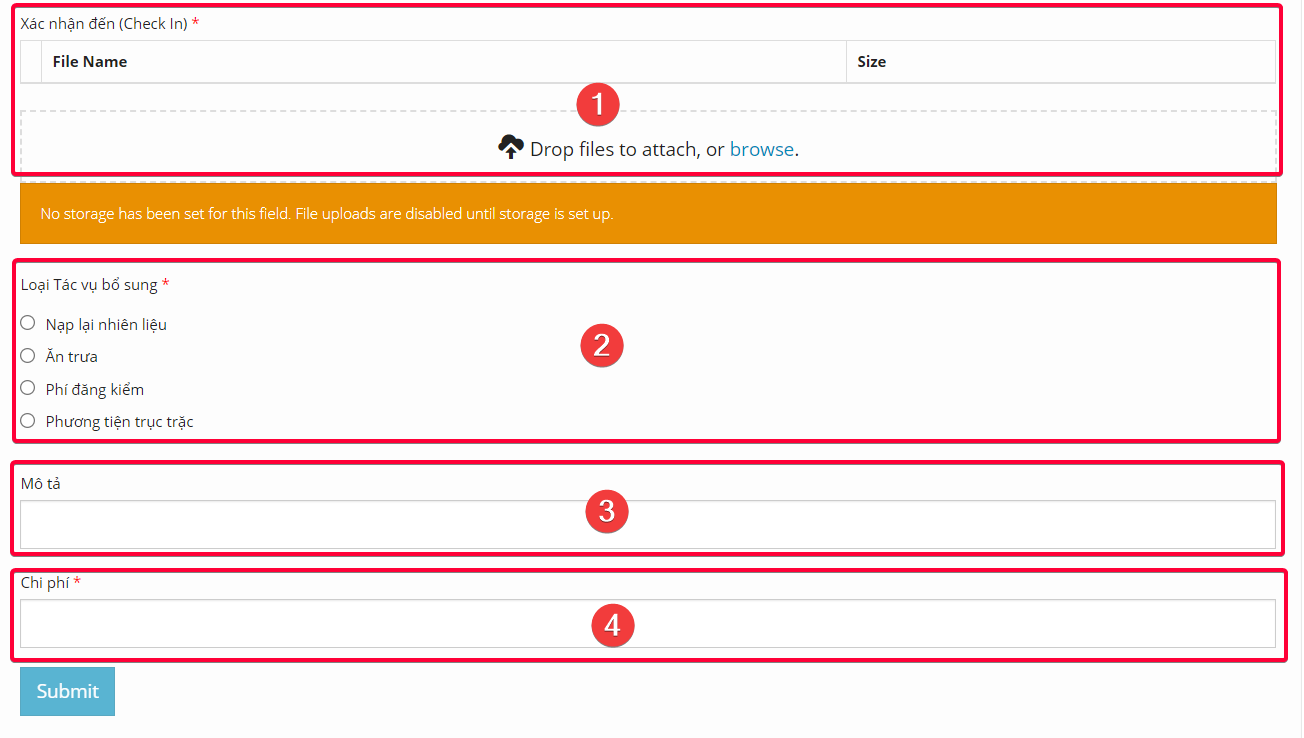
Illustration (Vietnamese)
7.1 Check In Panel
- Component used: Special Components > File
- Position: On top
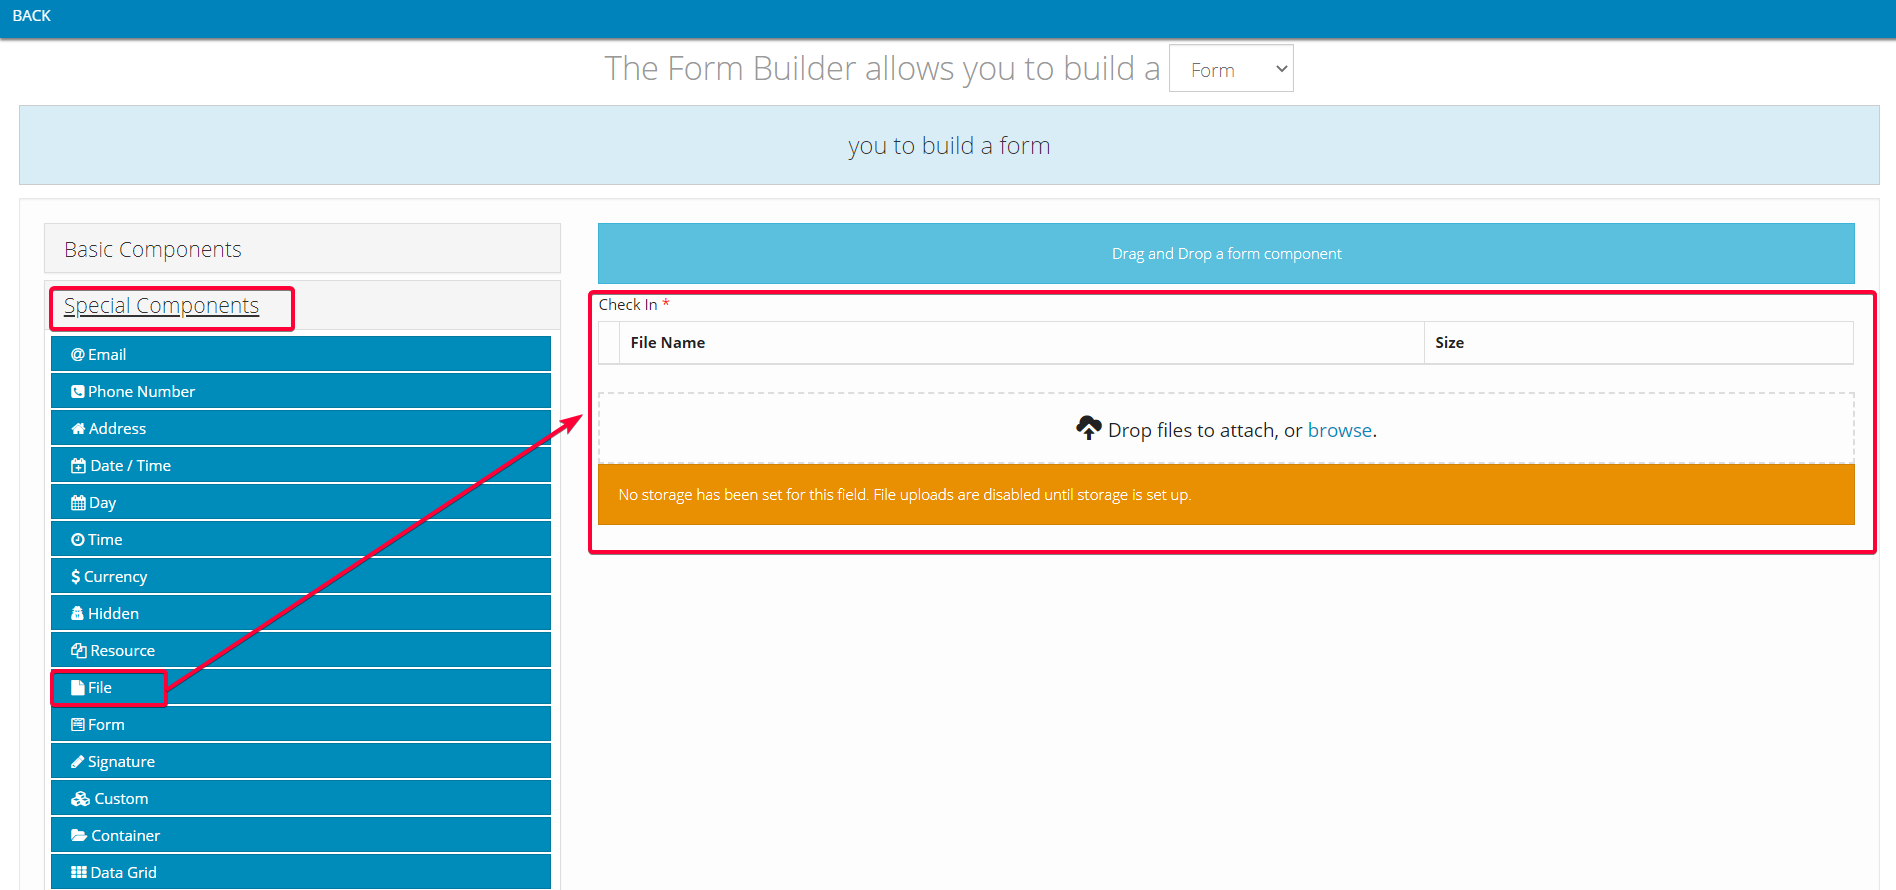
Illustration (English)
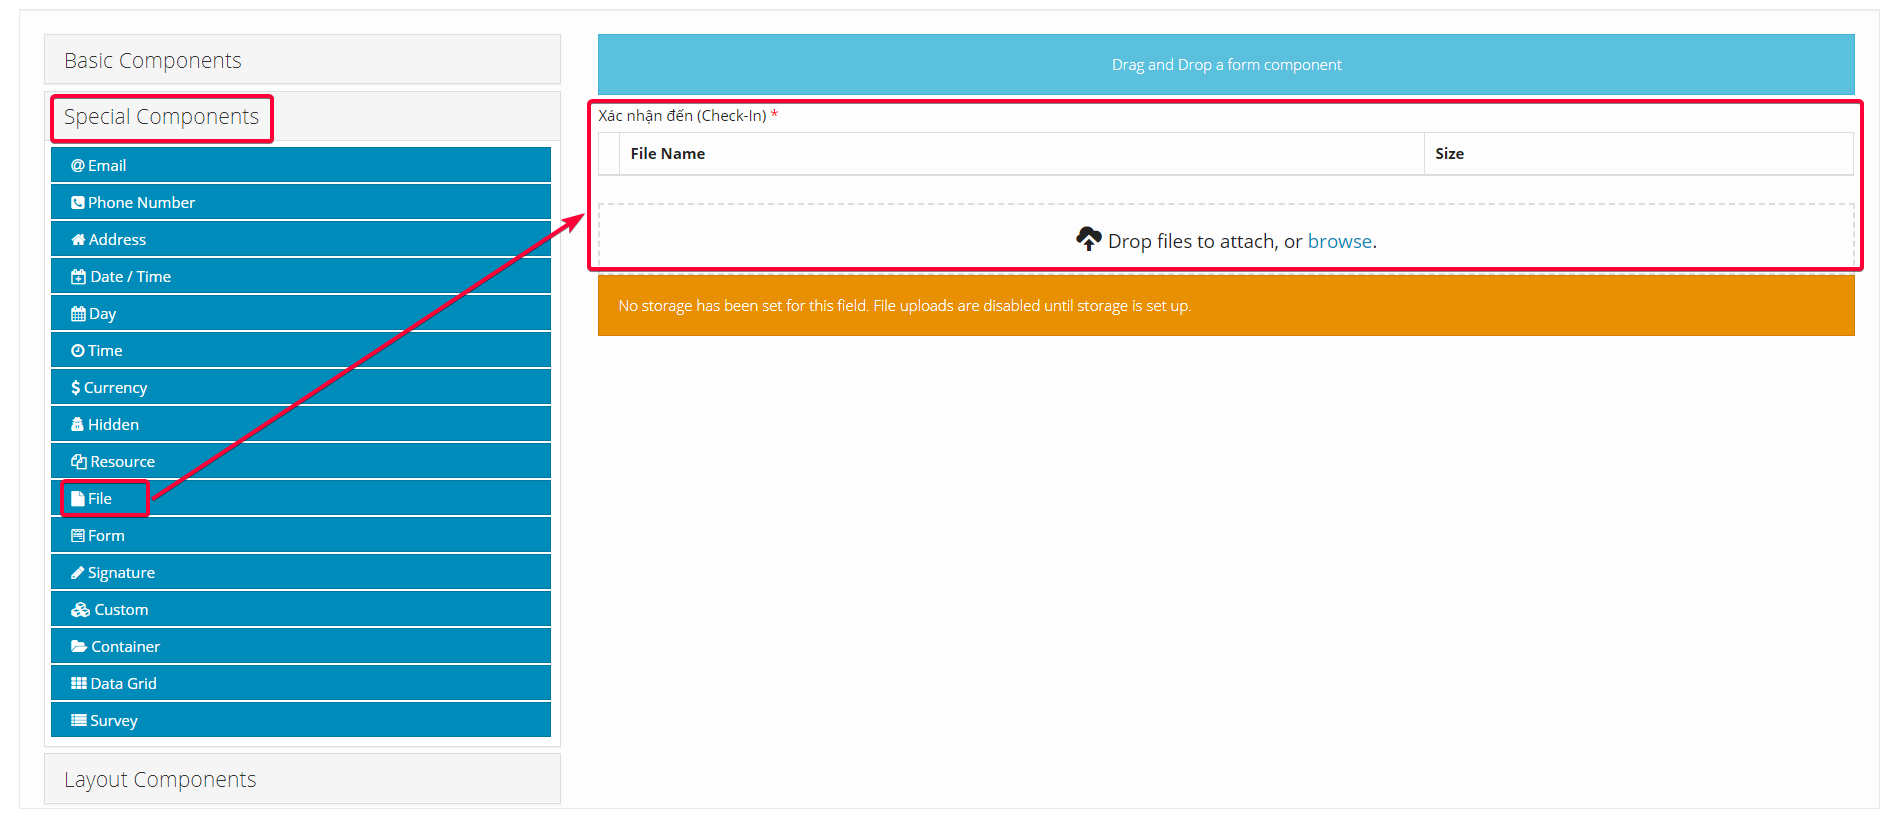
Illustration (Vietnamese)
- Component content:
- Similar as Check In Panel described above
7.2 Input Extra Task Type
- Component used: Basic Components > Radio
- Position: Below Check In panel component
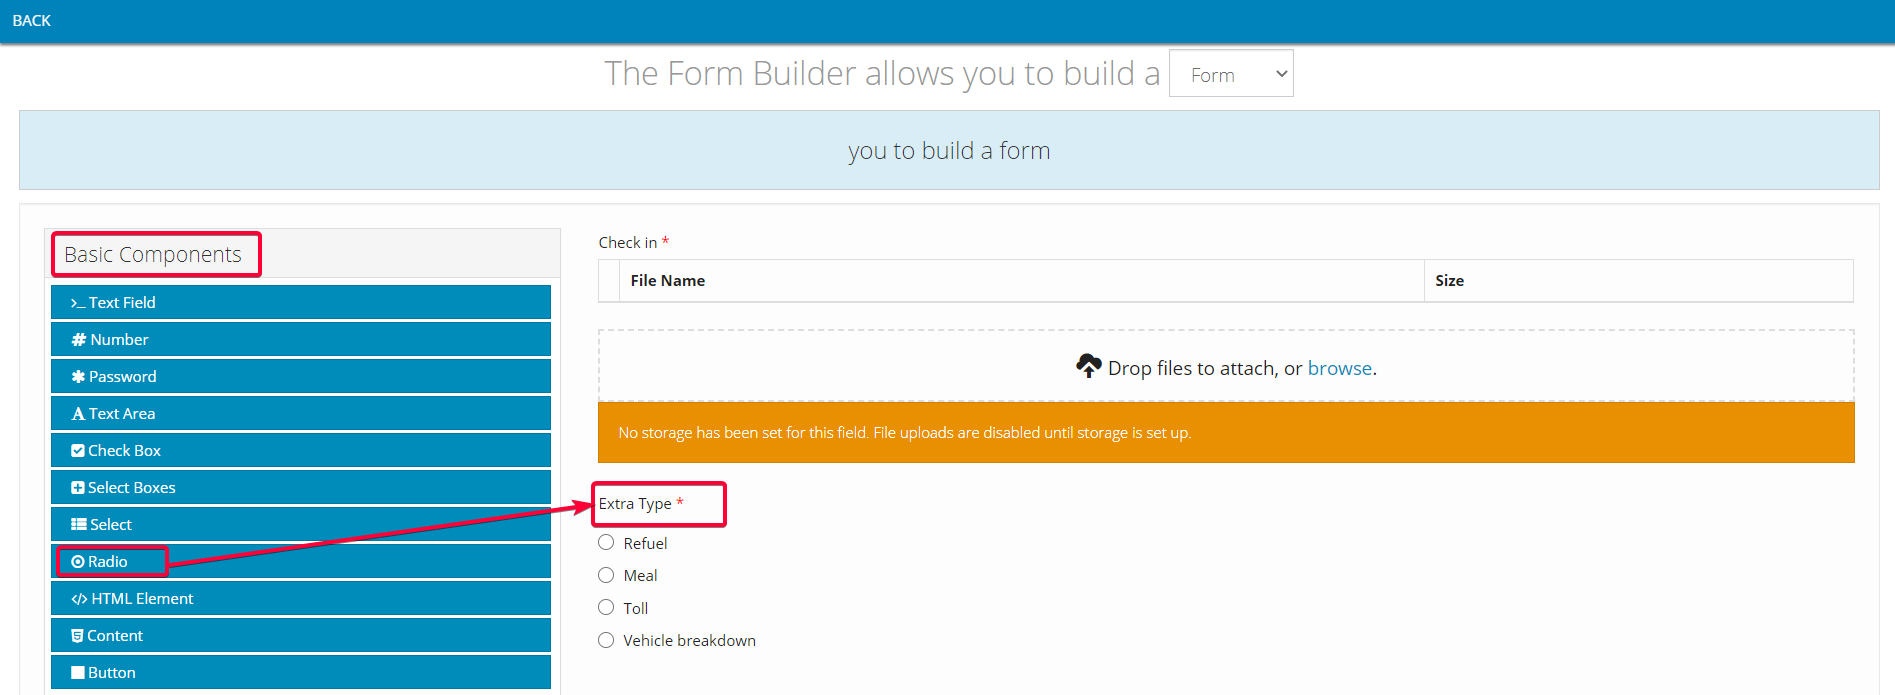
Illustration (English)
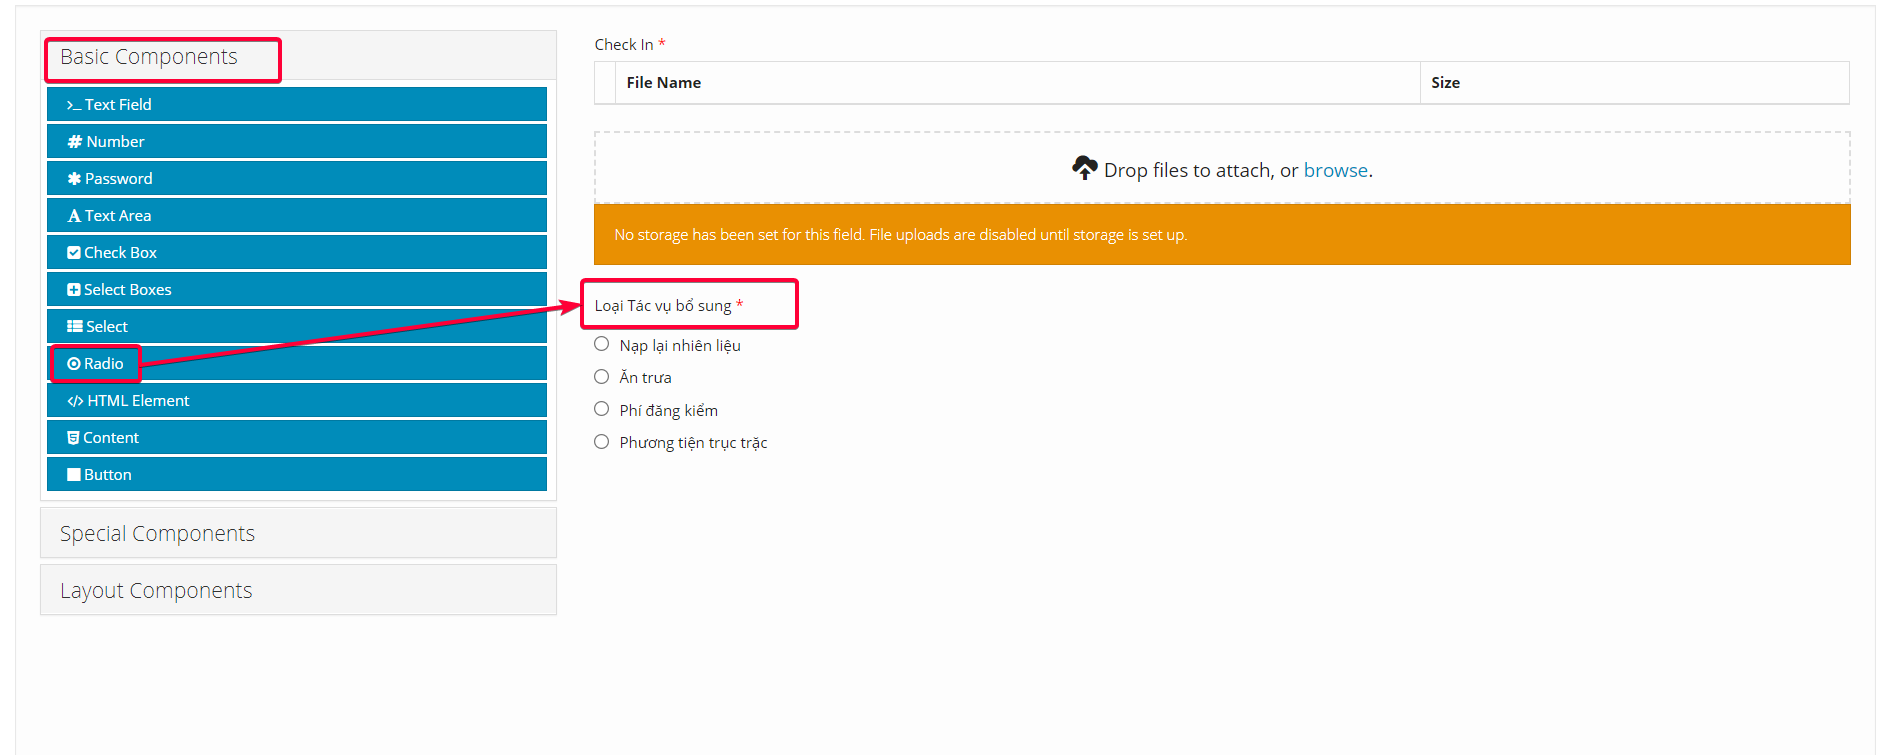
Illustration (Vietnamese)
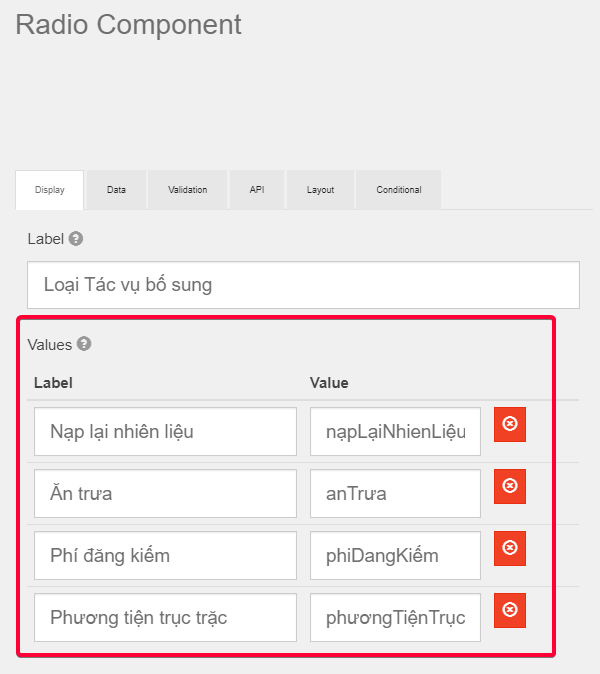
- Component content:
- Note: The value input into Label field can be changed freely
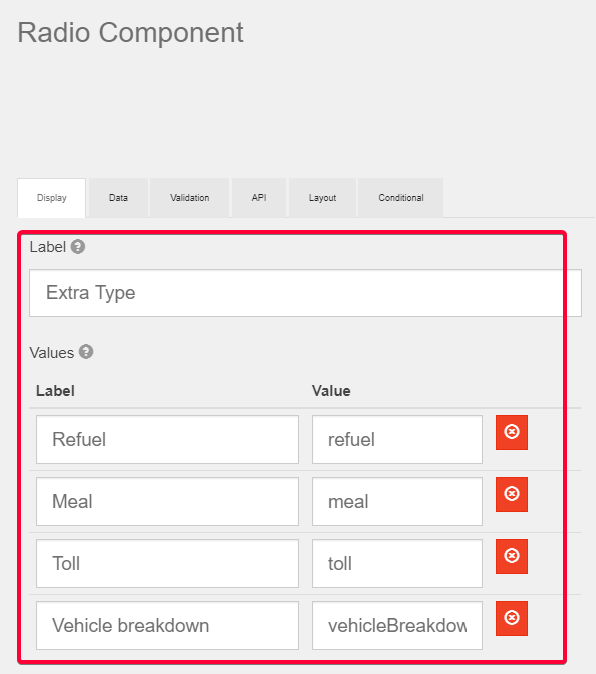
Illustration (English)
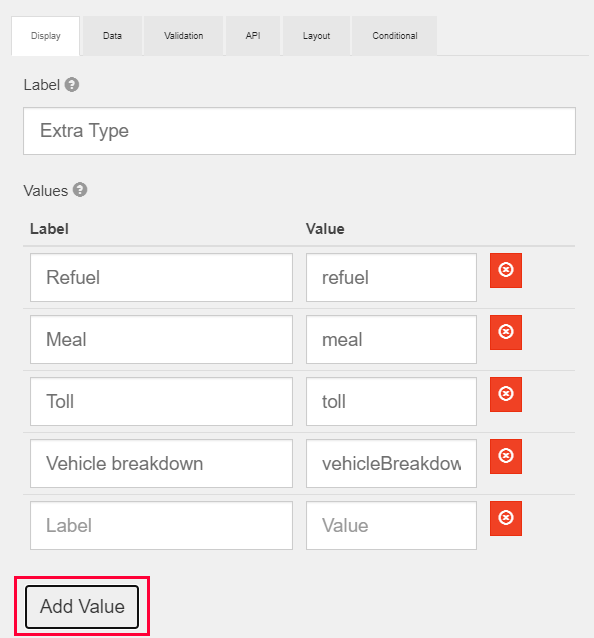
- You can also add more options to the list by clicking the button Add Value below the list
7.3. Input Description
- Component used: Basic Components > Text Field
- Position: Below Extra Task Type component
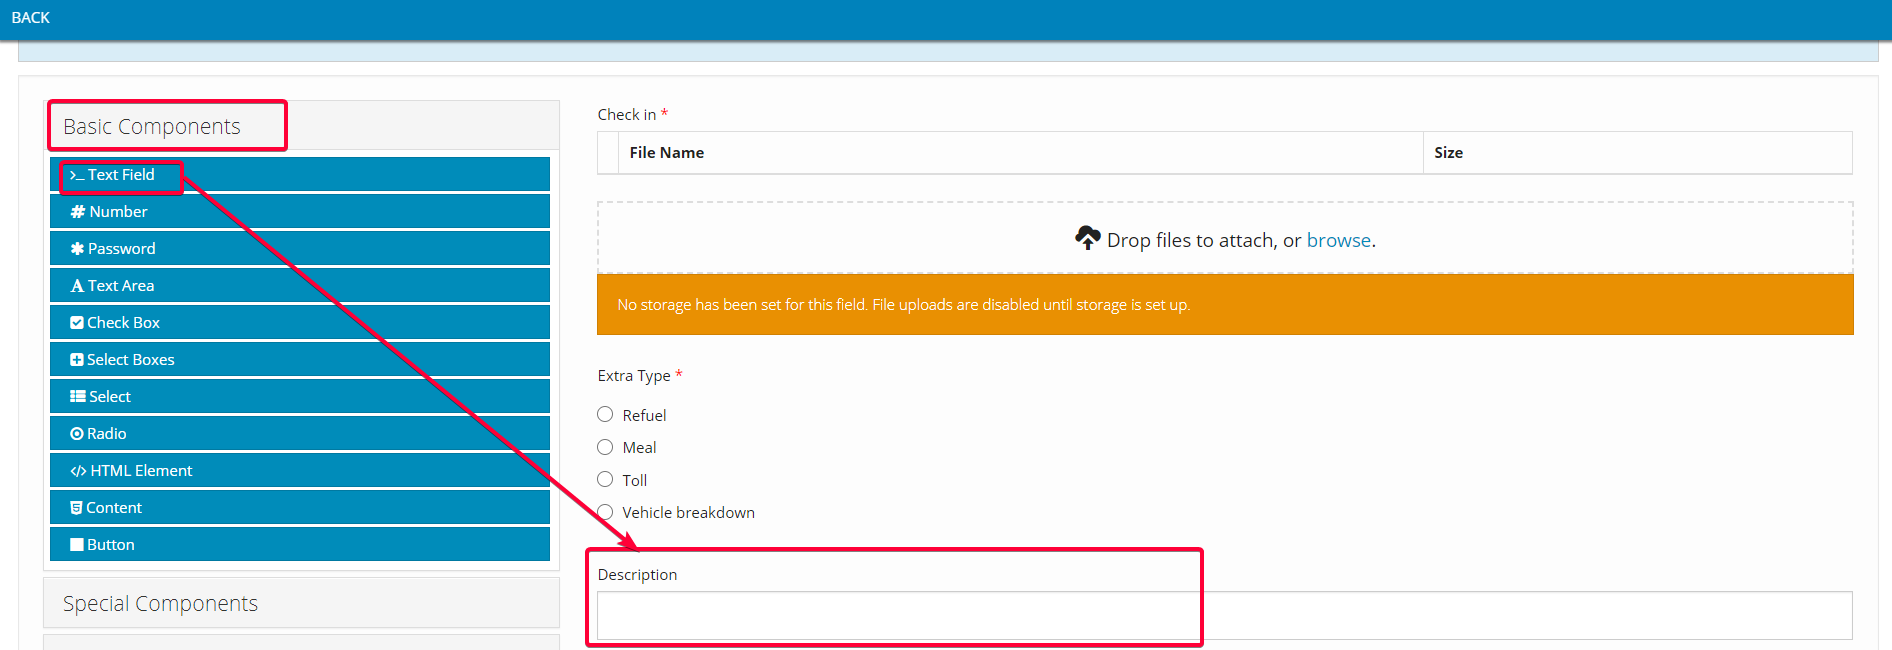
Illustration (English)
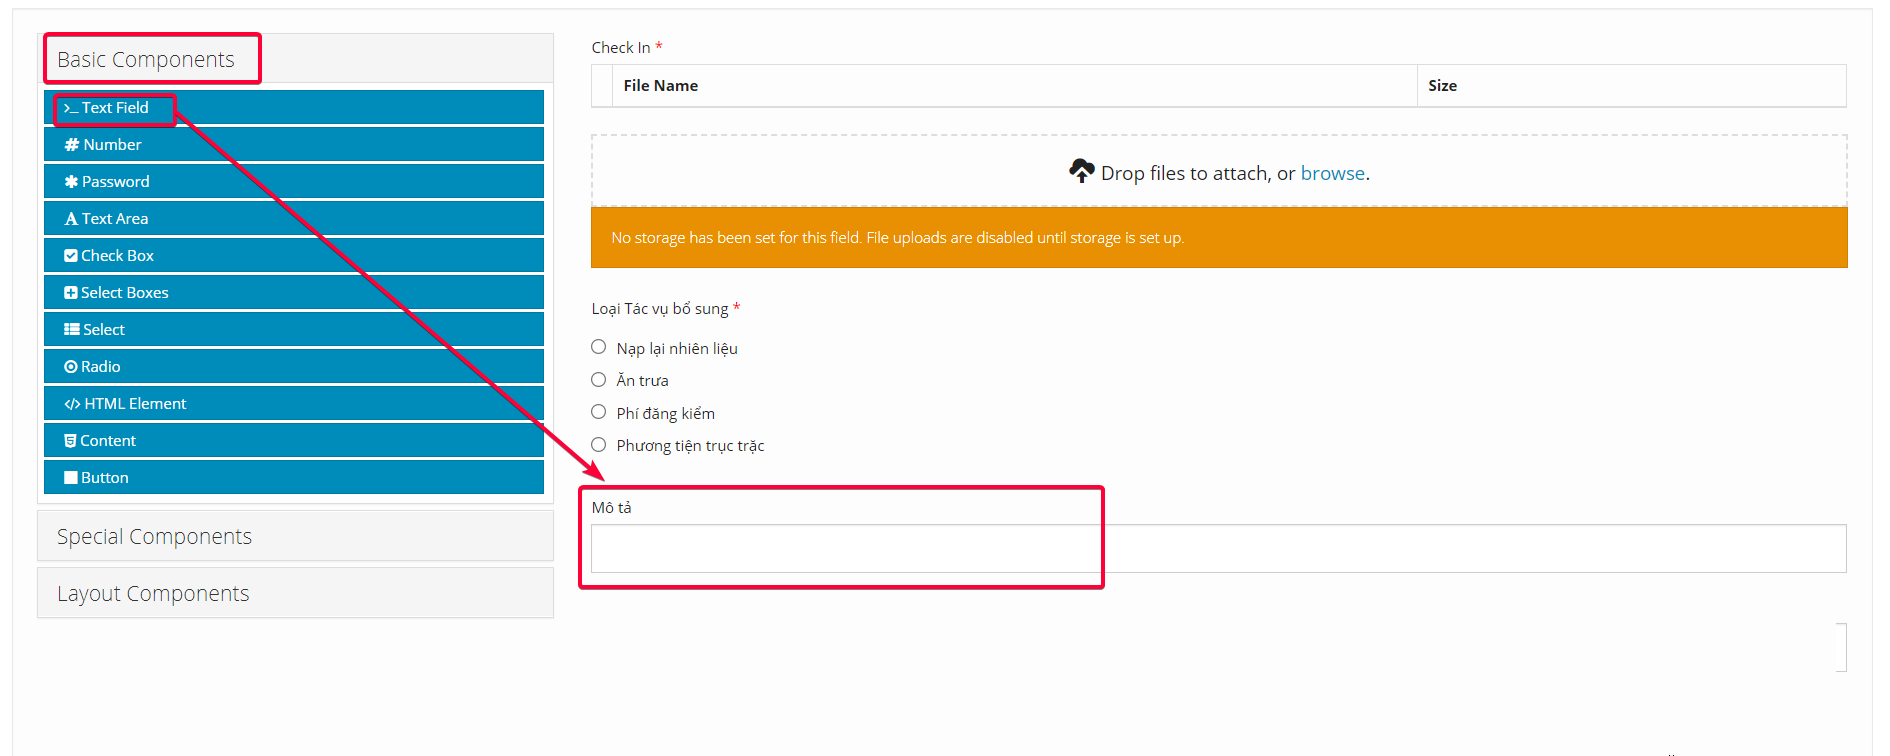
Illustration (Vietnamese)
- Component content:
- Note: The value input into Label field can be changed freely

Illustration (English)

Illustration (Vietnamese)
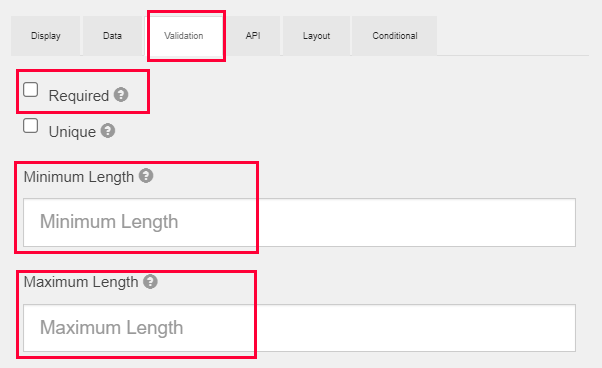
- In the Validation tab, if you tick the Required checkbox, the Drivers will not be able to submit the Extra task without entering the description of the extra task. If you leave this checkbox unticked, the Drivers will be able to submit this task without having to enter the description of the extra task.
- You could also set the Minimum Length and the Maximum Length of the description of the extra tasks by entering the number of characters in the corresponding fields. If you have no intention to restrict the length of the description, you could leave these two fields blank.
7.4 Input Cost
- Component used: Basic Components > Number
- Position: Below Description component
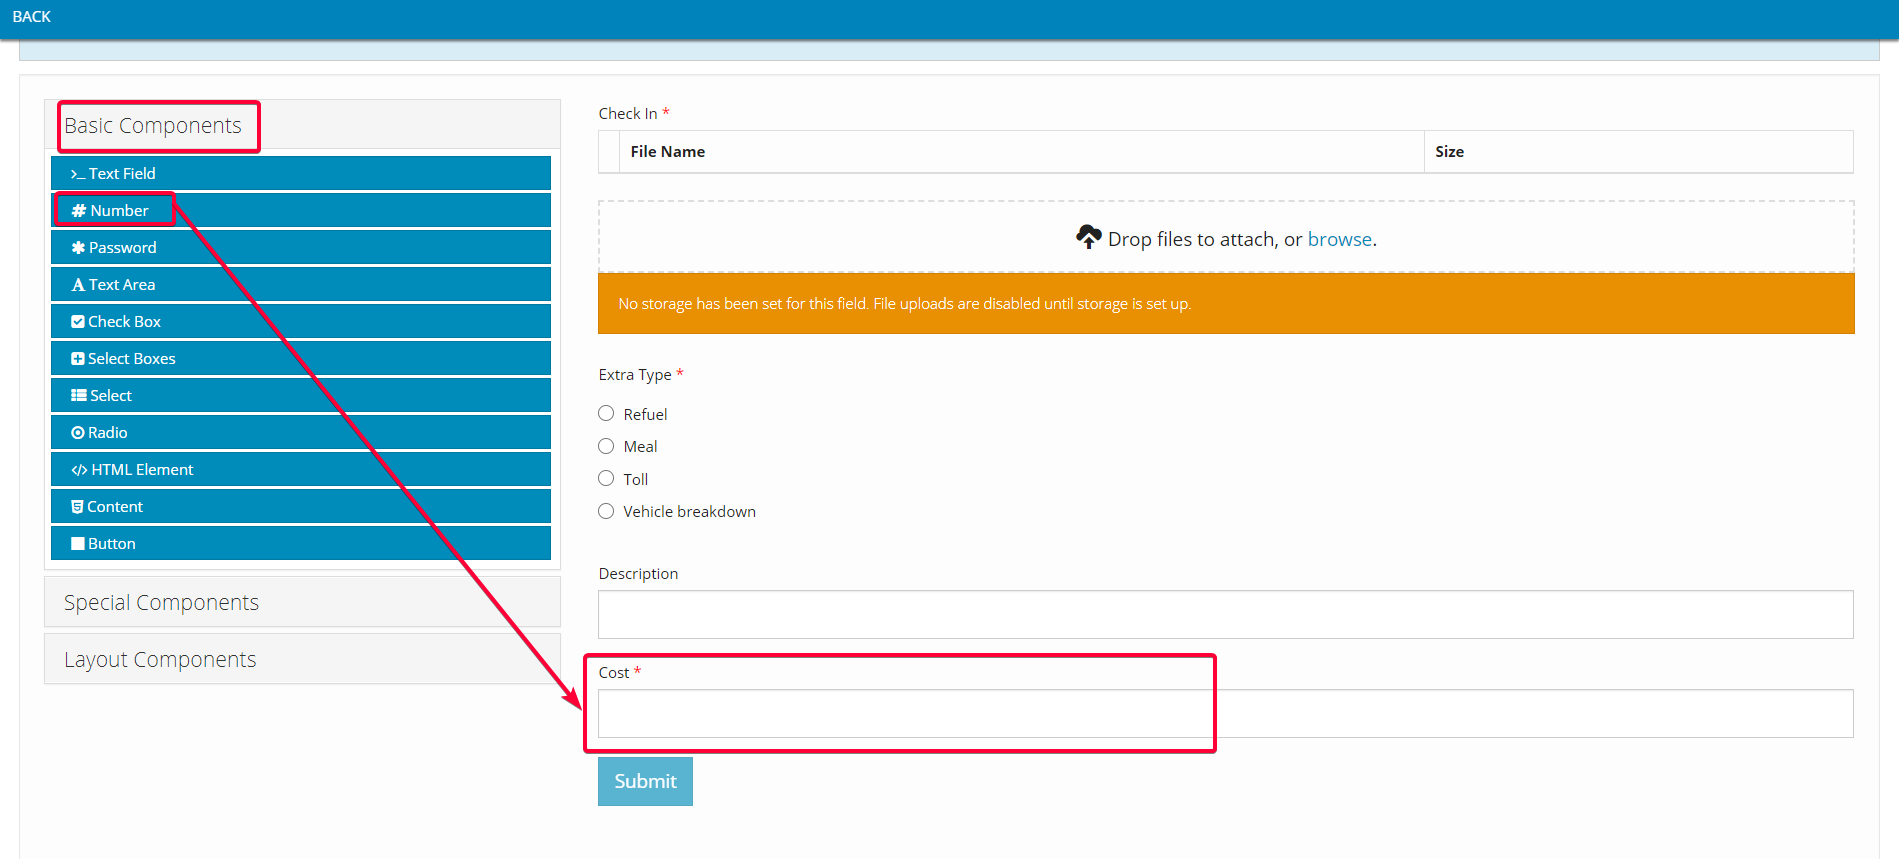
Illustration (English)
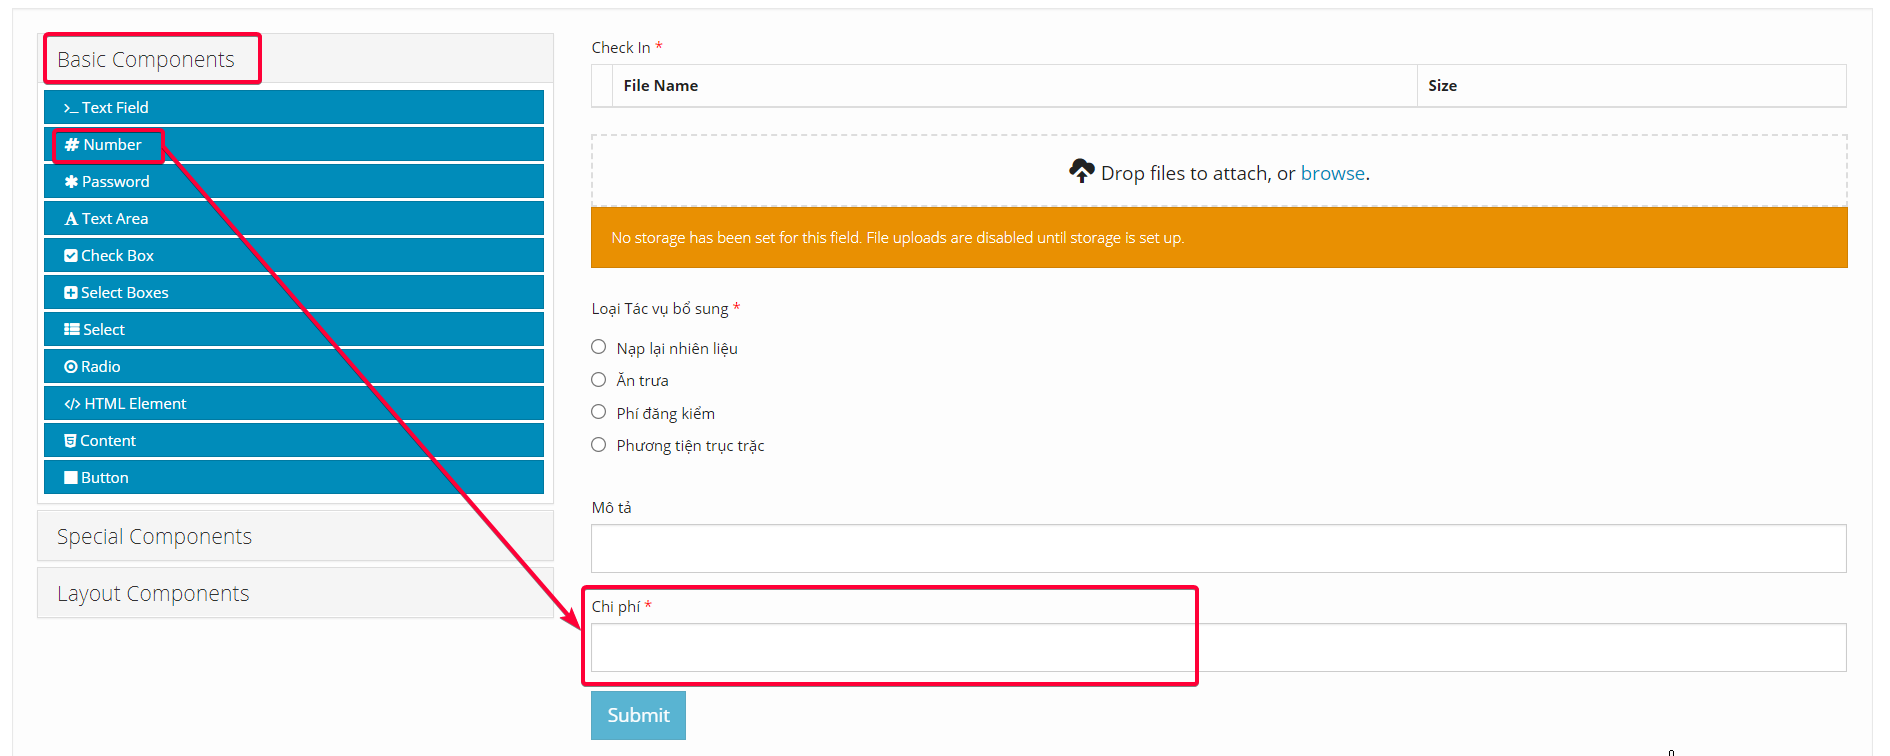
Illustration (Vietnamese)
- Component content:
- Note: The value input into Label field can be changed freely

Illustration (English)

Illustration (Vietnamese)
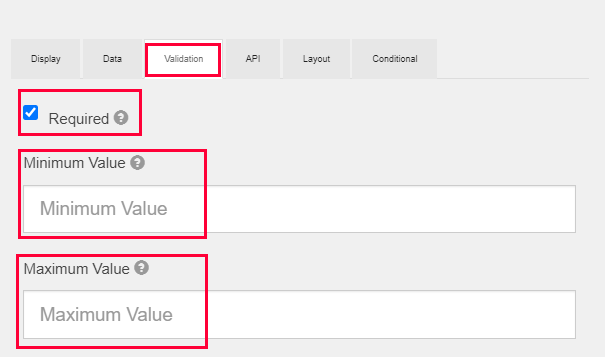
- In the Validation tab, if you tick the Required checkbox, the Drivers will not be able to submit the Extra task without entering the cost incurred. If you leave this checkbox unticked, the Drivers will be able to submit this task without having to enter the cost of the extra task.
- You could also set the Minimum Value and the Maximum Value of the cost incurred on the extra tasks by entering the amount in corresponding fields. If you have no intention to restrict the amount incurred, you could leave these two fields blank.
Updated about 2 months ago
