Route Plan Adjustment (Map View)
- During the Route Plan Optimization process, you can perform some adjustments to the Delivery Routes generated by the system. In this article, we will cover all functions that you can use to adjust the Delivery Routes to your requirements
Update customer coordinates
- When the Delivery shift of a vehicle is not yet locked, you can update the coordinates information of the customers on that shift
- On the Timeline panel, click on the icon to view the Delivery shift of that vehicle
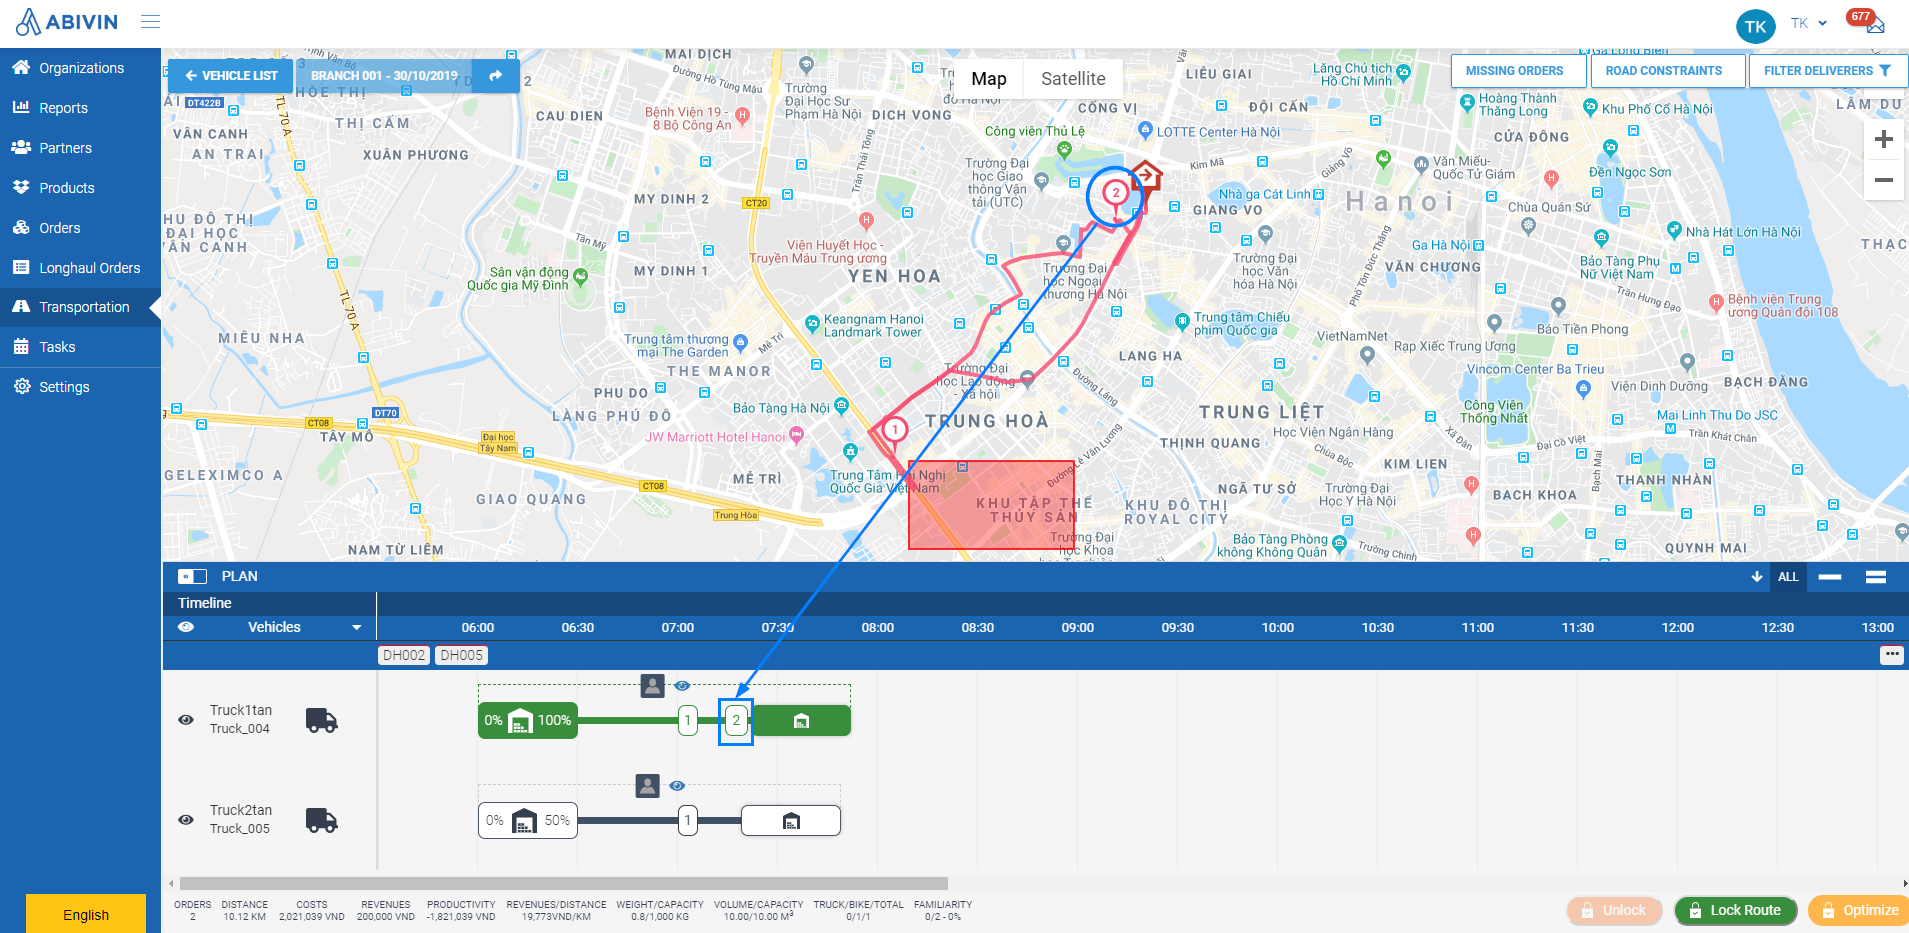
- Take note of the numerical order of the customer that you want to update coordinates on the route, then click on the corresponding time block of that customer on the Timeline panel
- The information panel of that customer will display on the right side of the route map
- Scroll down that panel, then click on the text Update Customer Location
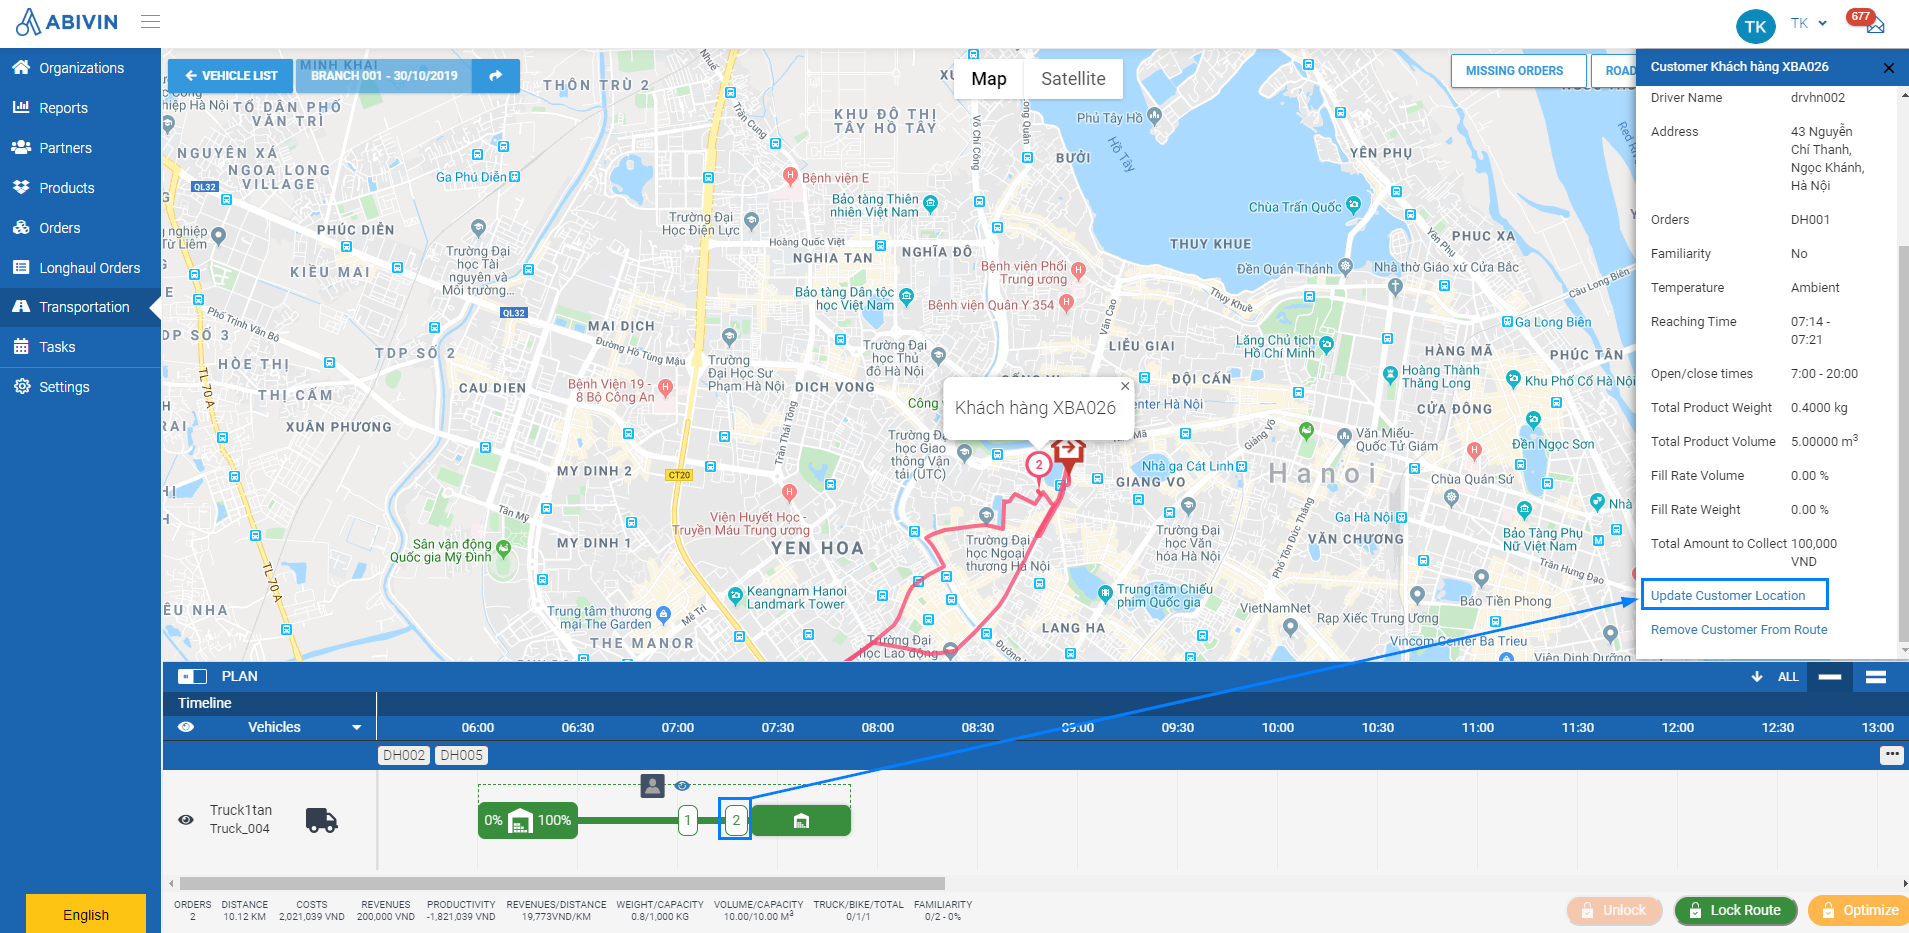
- The form Update Customer Location will appear. Input the new coordinates information of the customer into Latitude and Longitude fields, then click on OK to confirm
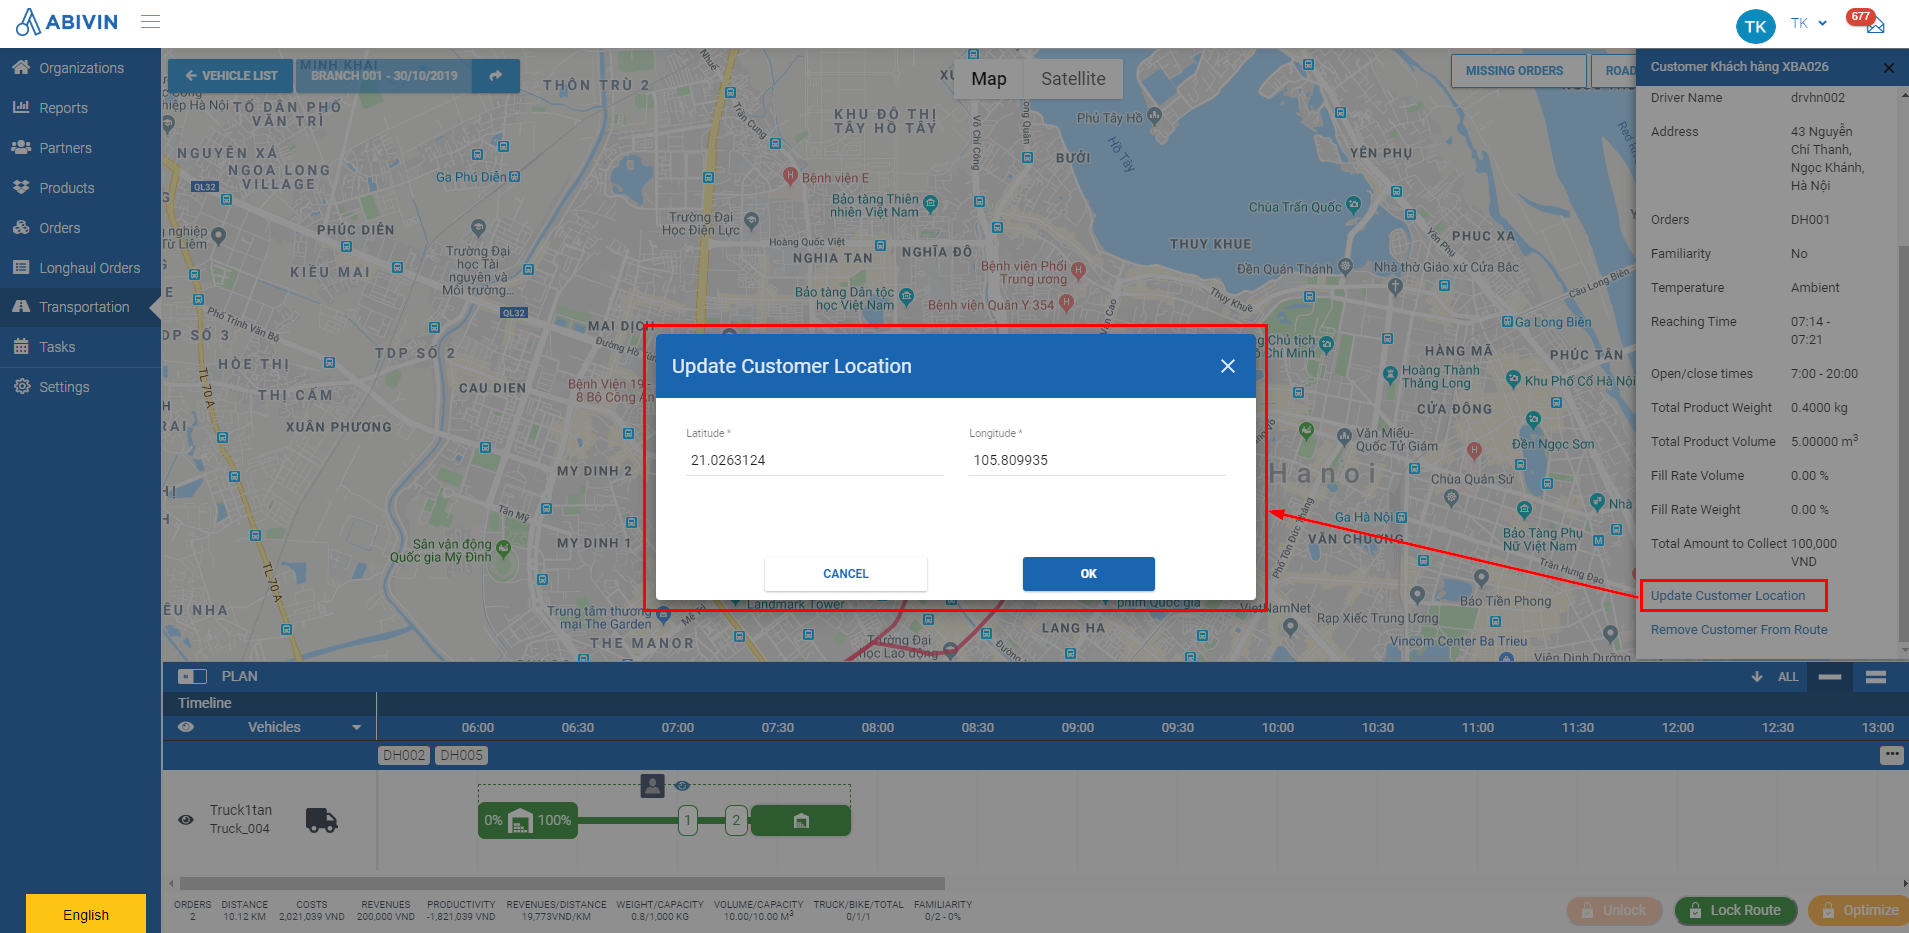
- After that, the route map screen will automatically refresh to update with the new coordinates information of that customer
- Note: The new coordinates information will be updated permanently for that customer, not just only for the current route optimization process
Coordinates formatThe coordinates of a customer must be in Decimal degrees format. Read the following article for instruction: Find Coordinates Of Locations
Remove customer from Delivery Shift
- If due to specific reasons, a customer on the current Delivery shift will not be able to receive deliveries, you can remove that customer from the shift by following the bellow steps:
- On the Timeline panel, click on the icon of the vehicle that delivers to that customer
- Take note of the numerical order of the customer who you want to remove from the shift, then click on the corresponding time block of that customer on the Timeline panel
- The information panel for that customer will display on the right side of the map
- Scroll down that panel, then click on the text Remove Customer From Route
- A confirmation form will appear. Click OK on that form to confirm the removal
- The route map will automatically refresh. Now, all orders of that customer will be moved to the Missing Orders bar on the Timeline panel
- You can repeat the steps above to remove other customers
- Now you can click on Lock Route. The locked Delivery shift will not include orders of the customers who have just been removed
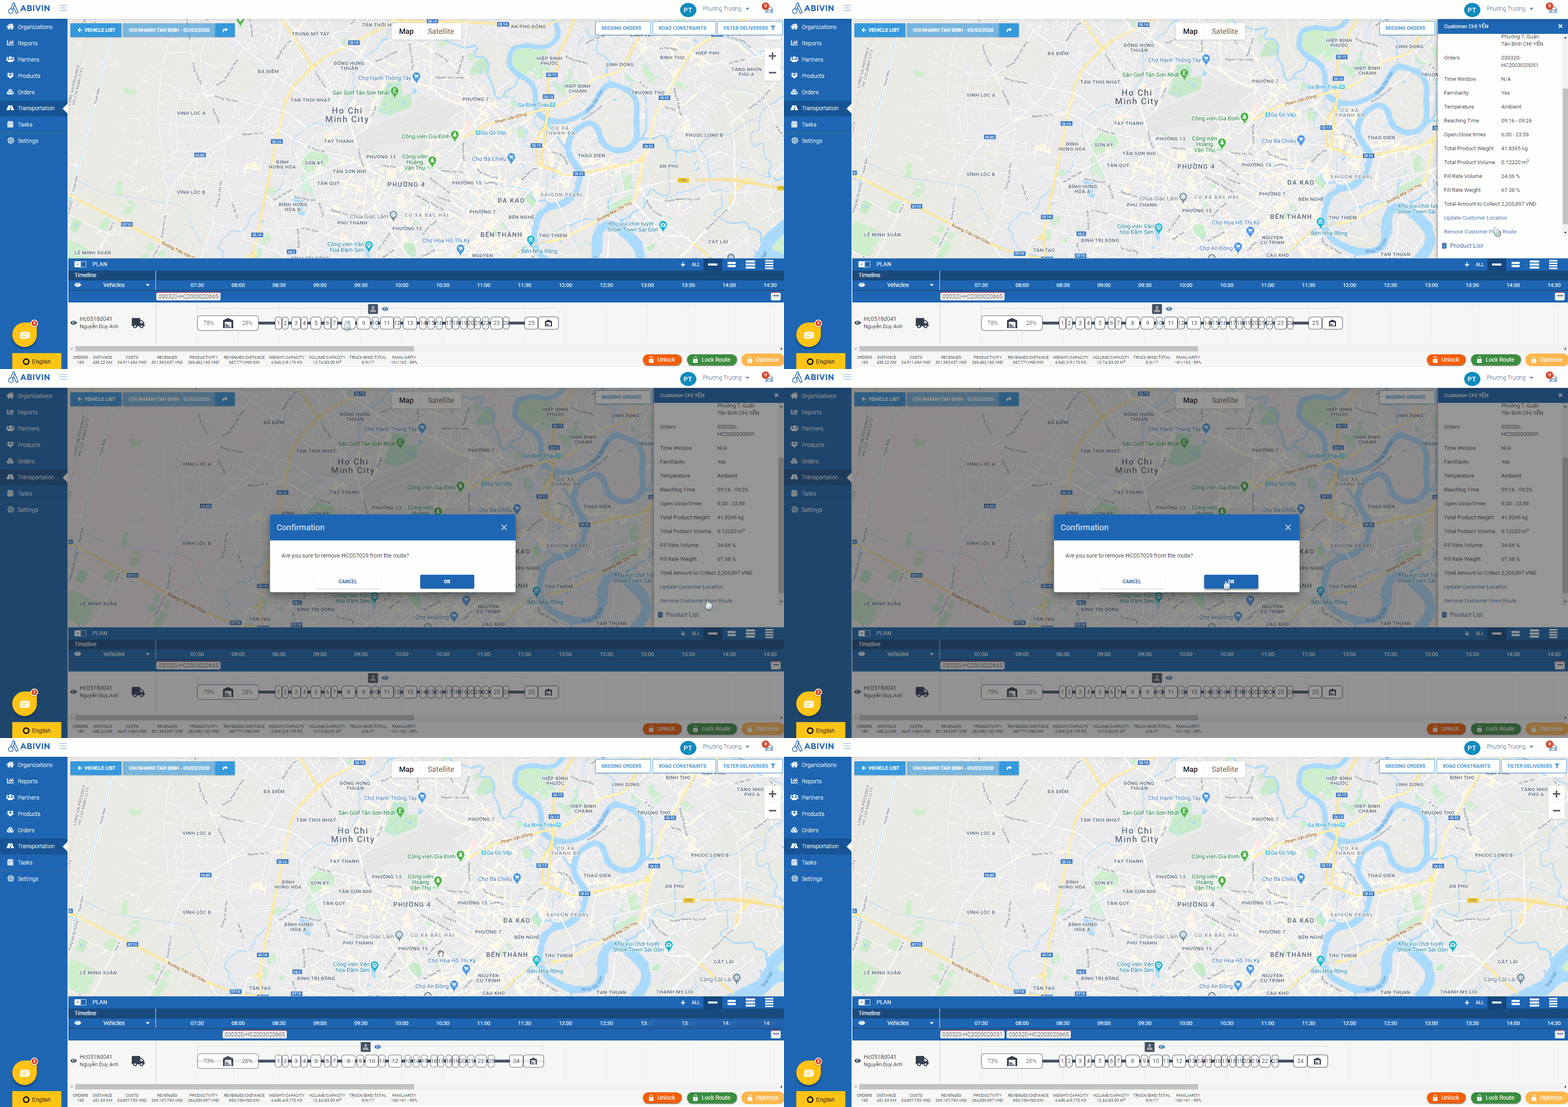
If after removing a customer, you don't click on Lock Route button but instead click on Optimize button, that customer will be moved back to the Delivery shift
Adjust customer sequence on Delivery Shift
- You can manually adjust the customer sequence on the Delivery route to better meet your requirements
General steps to adjust customer sequence
- Below are the general steps to adjust customer sequence
- Step 1: On the Timeline panel, left click on the time block of the customer you want to adjust
- Step 2: With the left mouse button still pressed, drag the time block of that to the a new desired position on the route, then release the left mouse button
- After a short moment, the time block of that customer will be moved to the position you desired, and will be highlighted with the color green
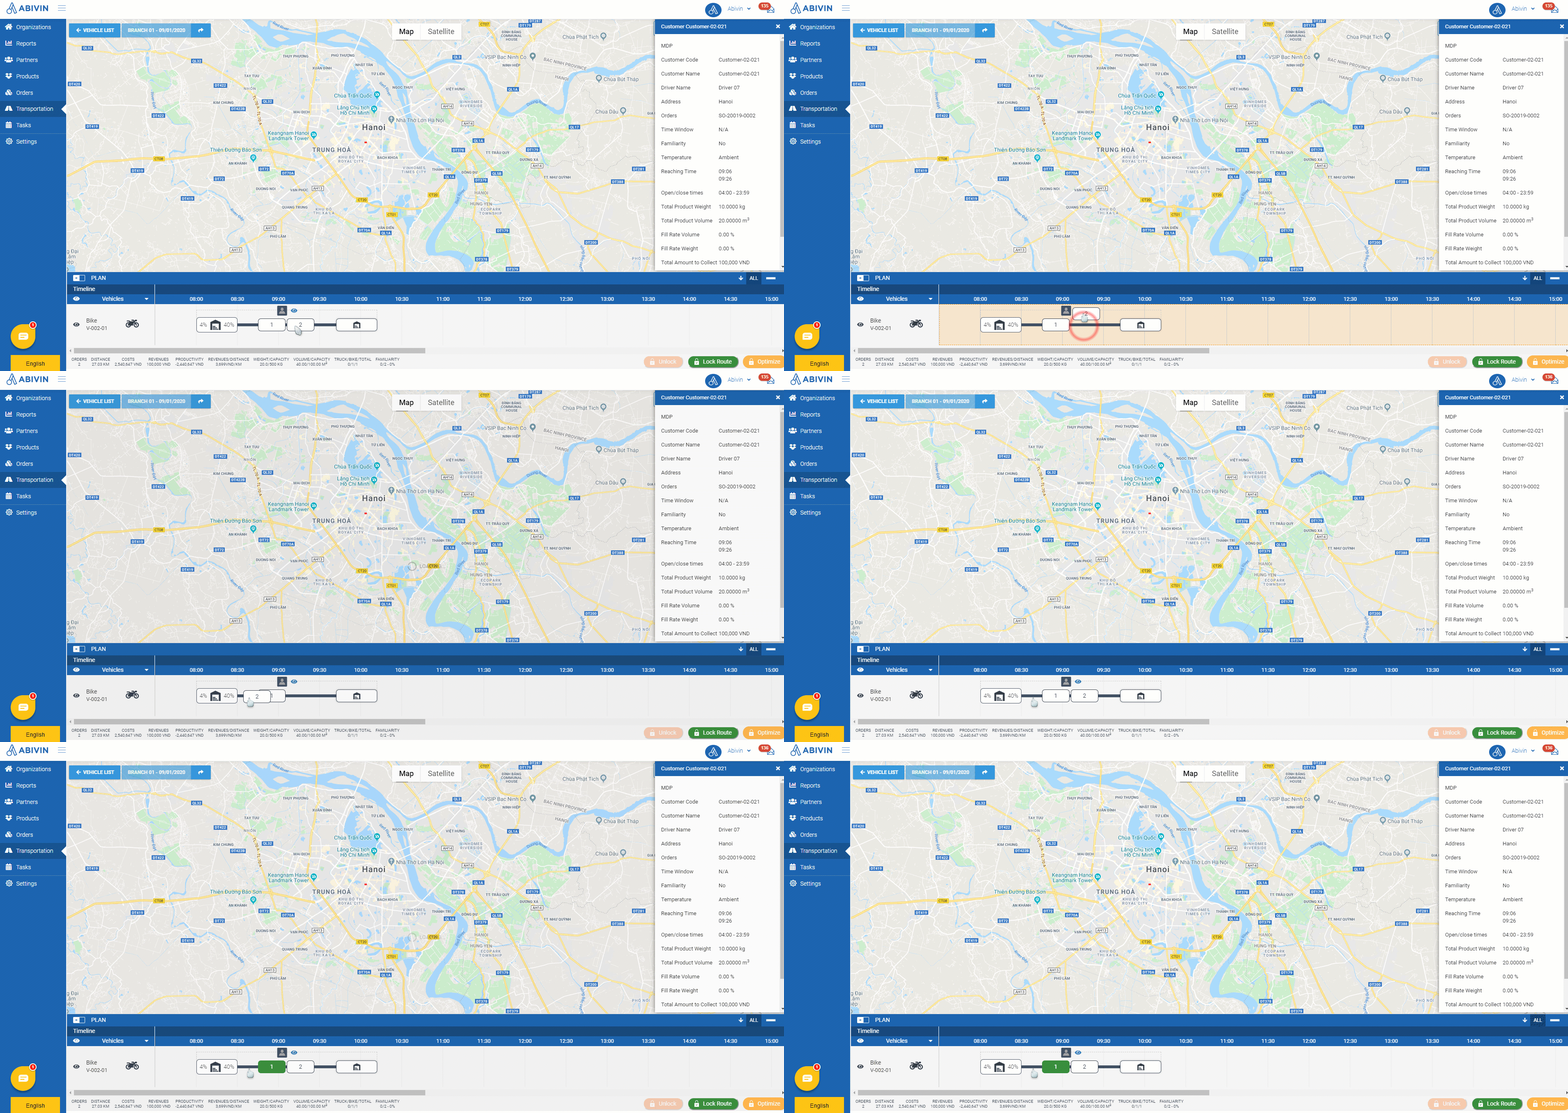
- Below are all instances when you can and can not adjust the customer sequence
Adjust customer sequence before locking Delivery shift
- If a Delivery shift is not yet locked, you can change the customer sequence on that shift freely
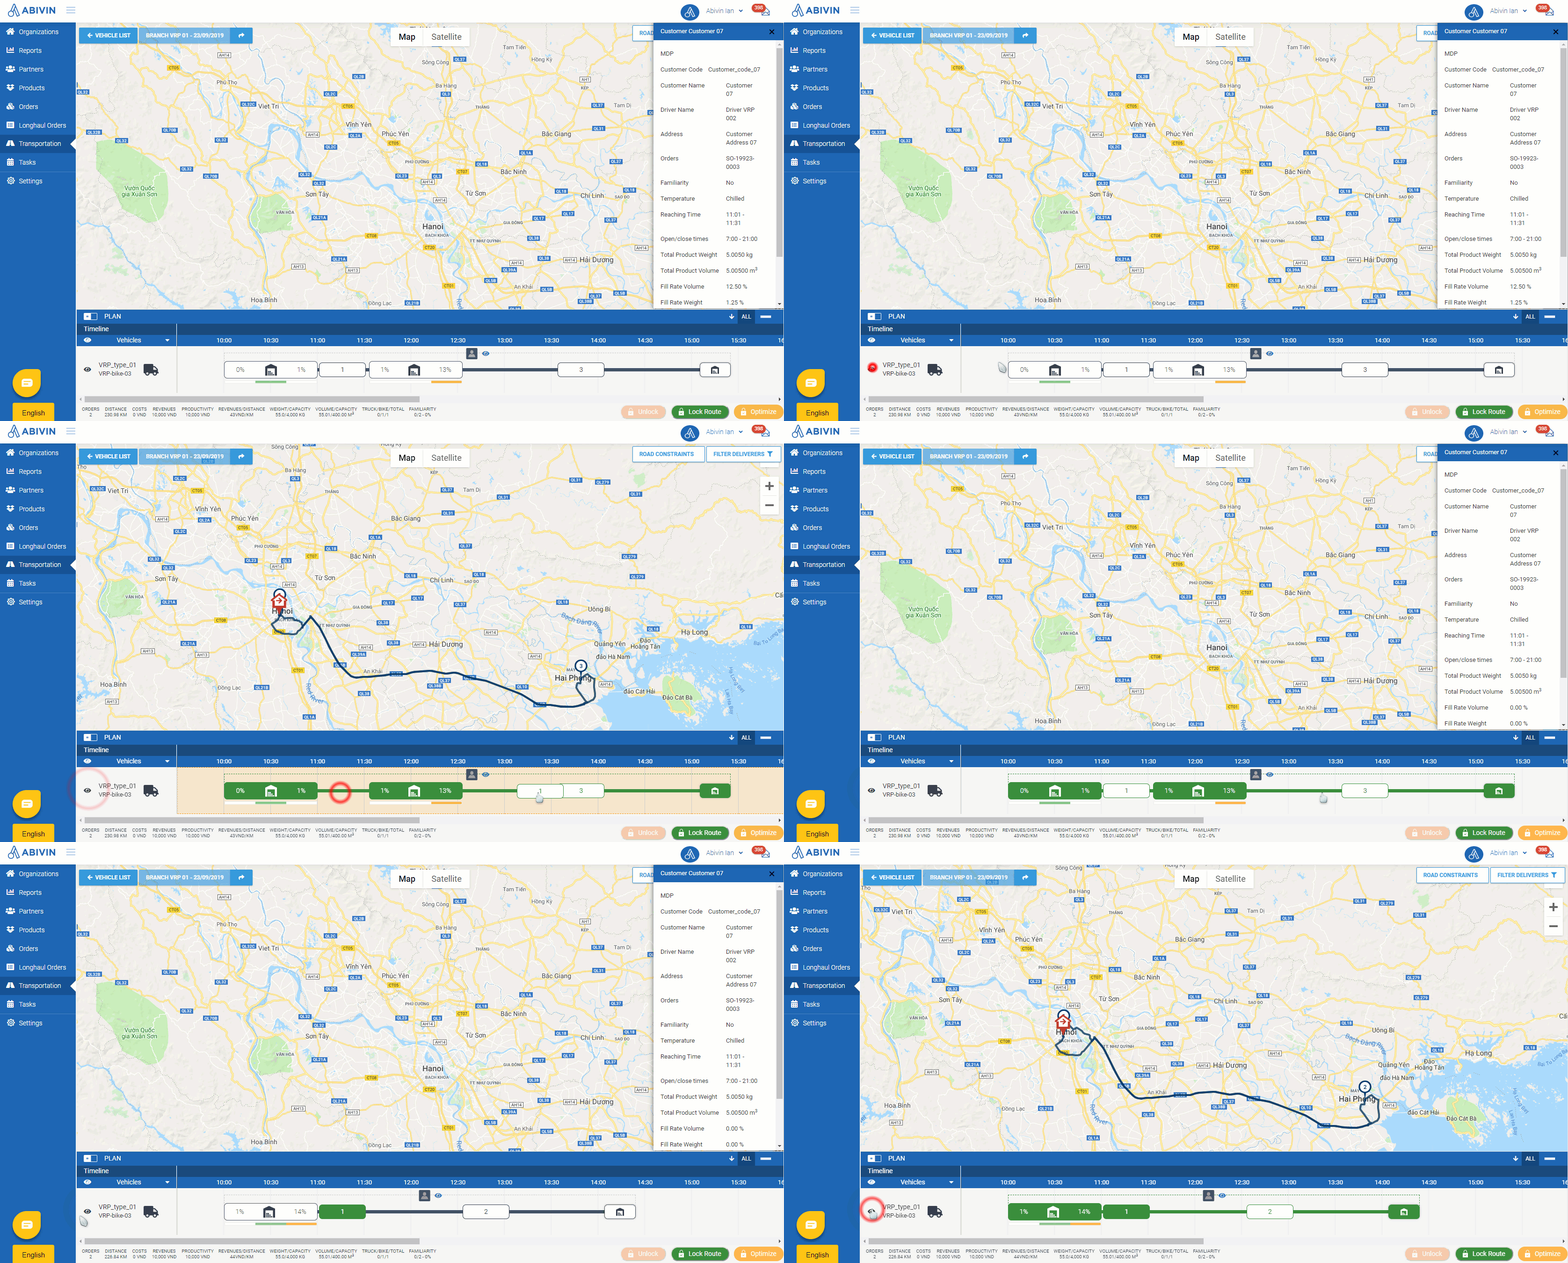
- If during the route optimization process, the system returns some Missing Orders due to the weight and/or volume of those orders exceed the weight/volume capacity of all active vehicles in the Depot/Sun, you can drag those missing orders into the most recent, not yet locked Delivery shift of a vehicle from the same Depot/Sun with the customers of those missing orders. The weight/volume limit rule will be ignored (Notice the vehicle fill rate by volume/weight percentage indicators on the time block of the manufacturing warehouse will exceed the value 100%)
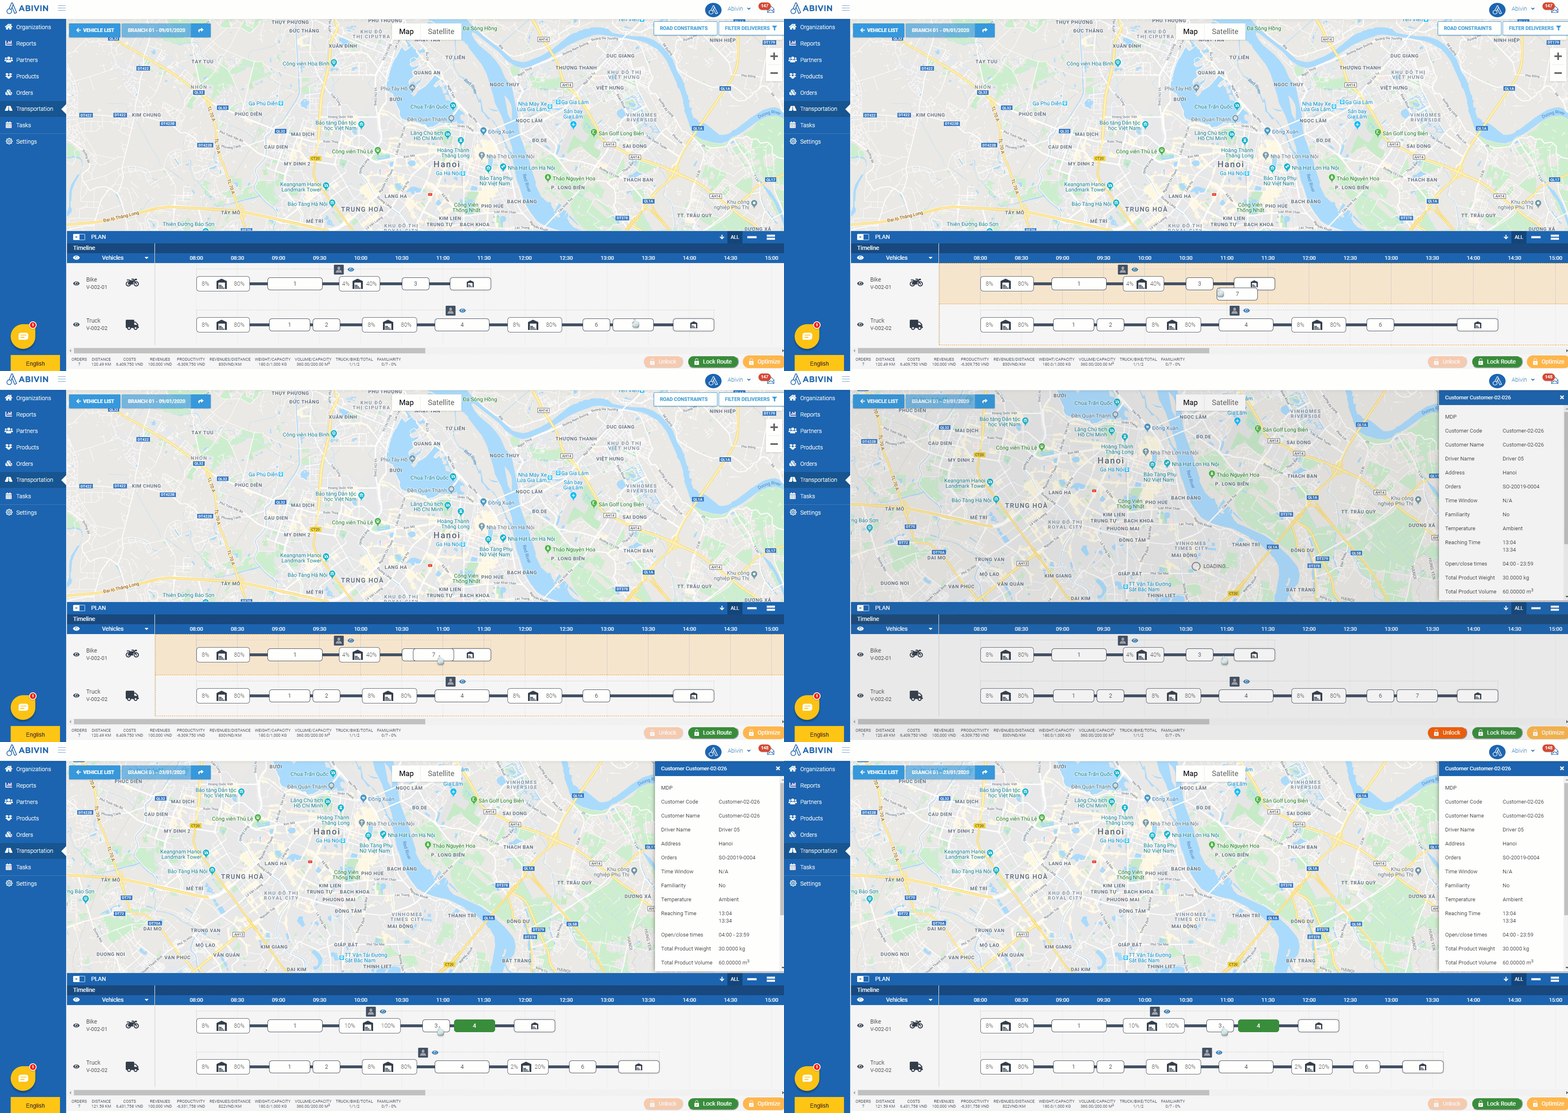
- You can drag customers between the most recent not yet locked Delivery shifts of vehicles that belong to the same Depot/Sun, providing that those vehicles are allowed to deliver to those customers, and they still have enough weight/volume capacity to carry the orders of customers which you want to assign
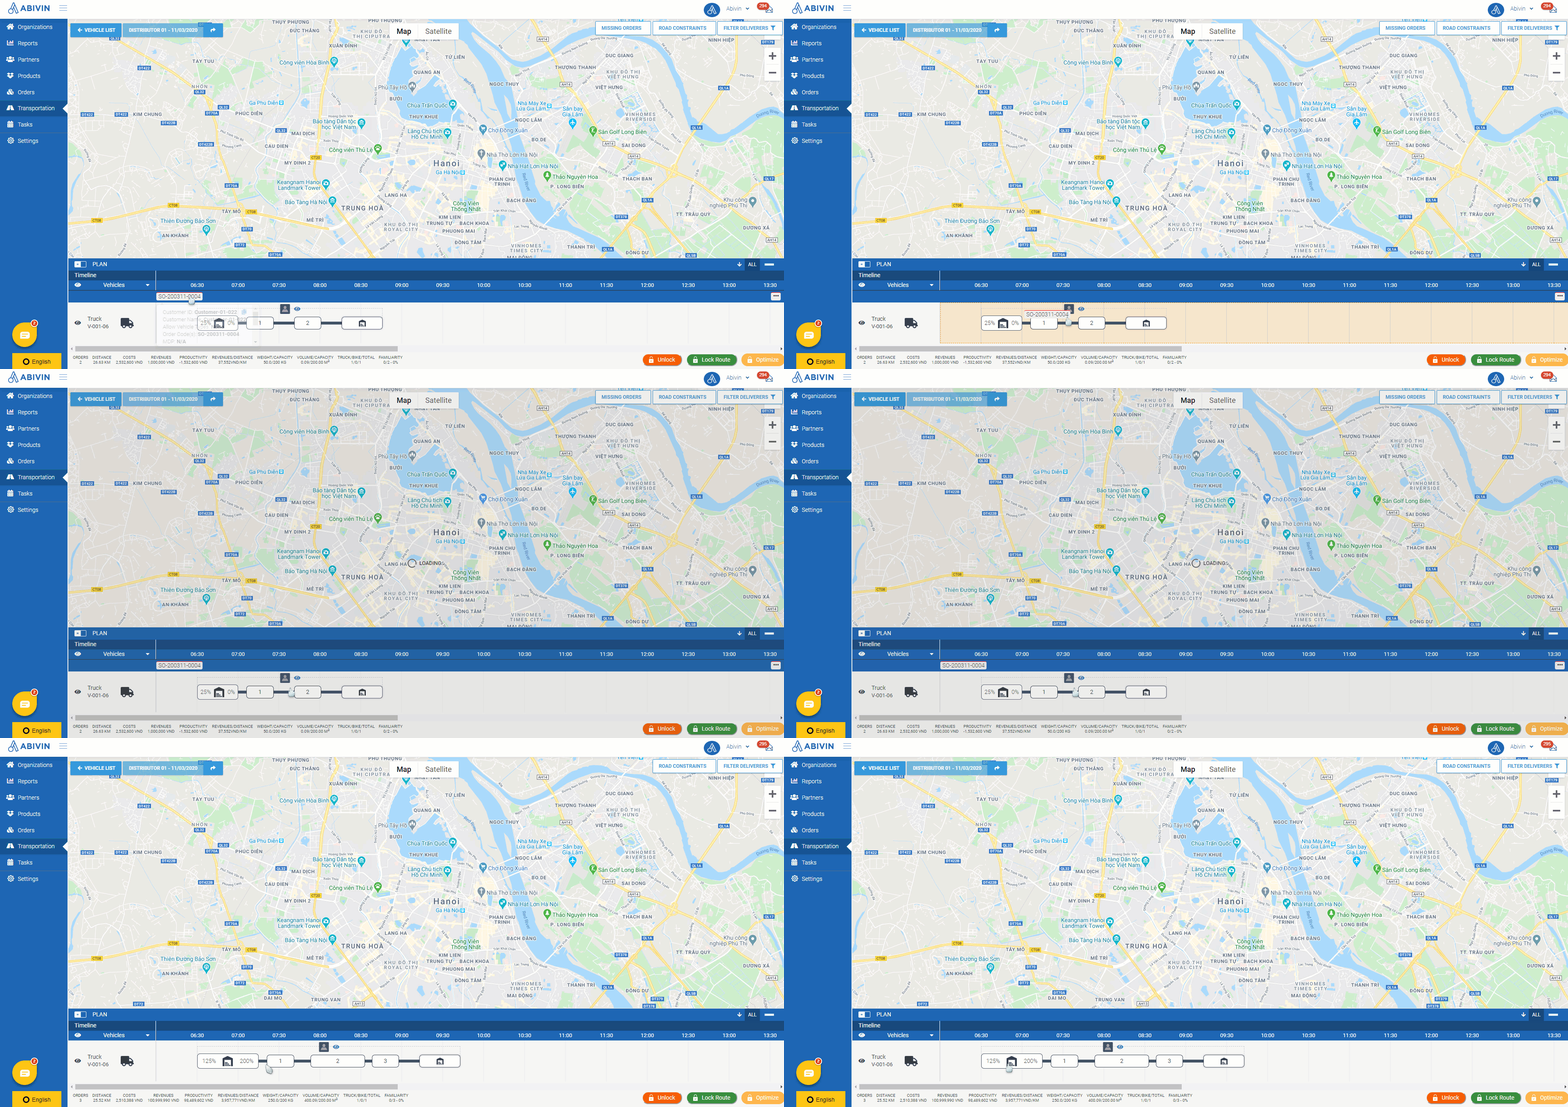
- You can drag a customer to outside the current Delivery shift (To the left of the first manufacturing warehouse time block or To the right of the last manufacturing warehouse time block). This will make the system create a new Delivery trip only for orders of that customer
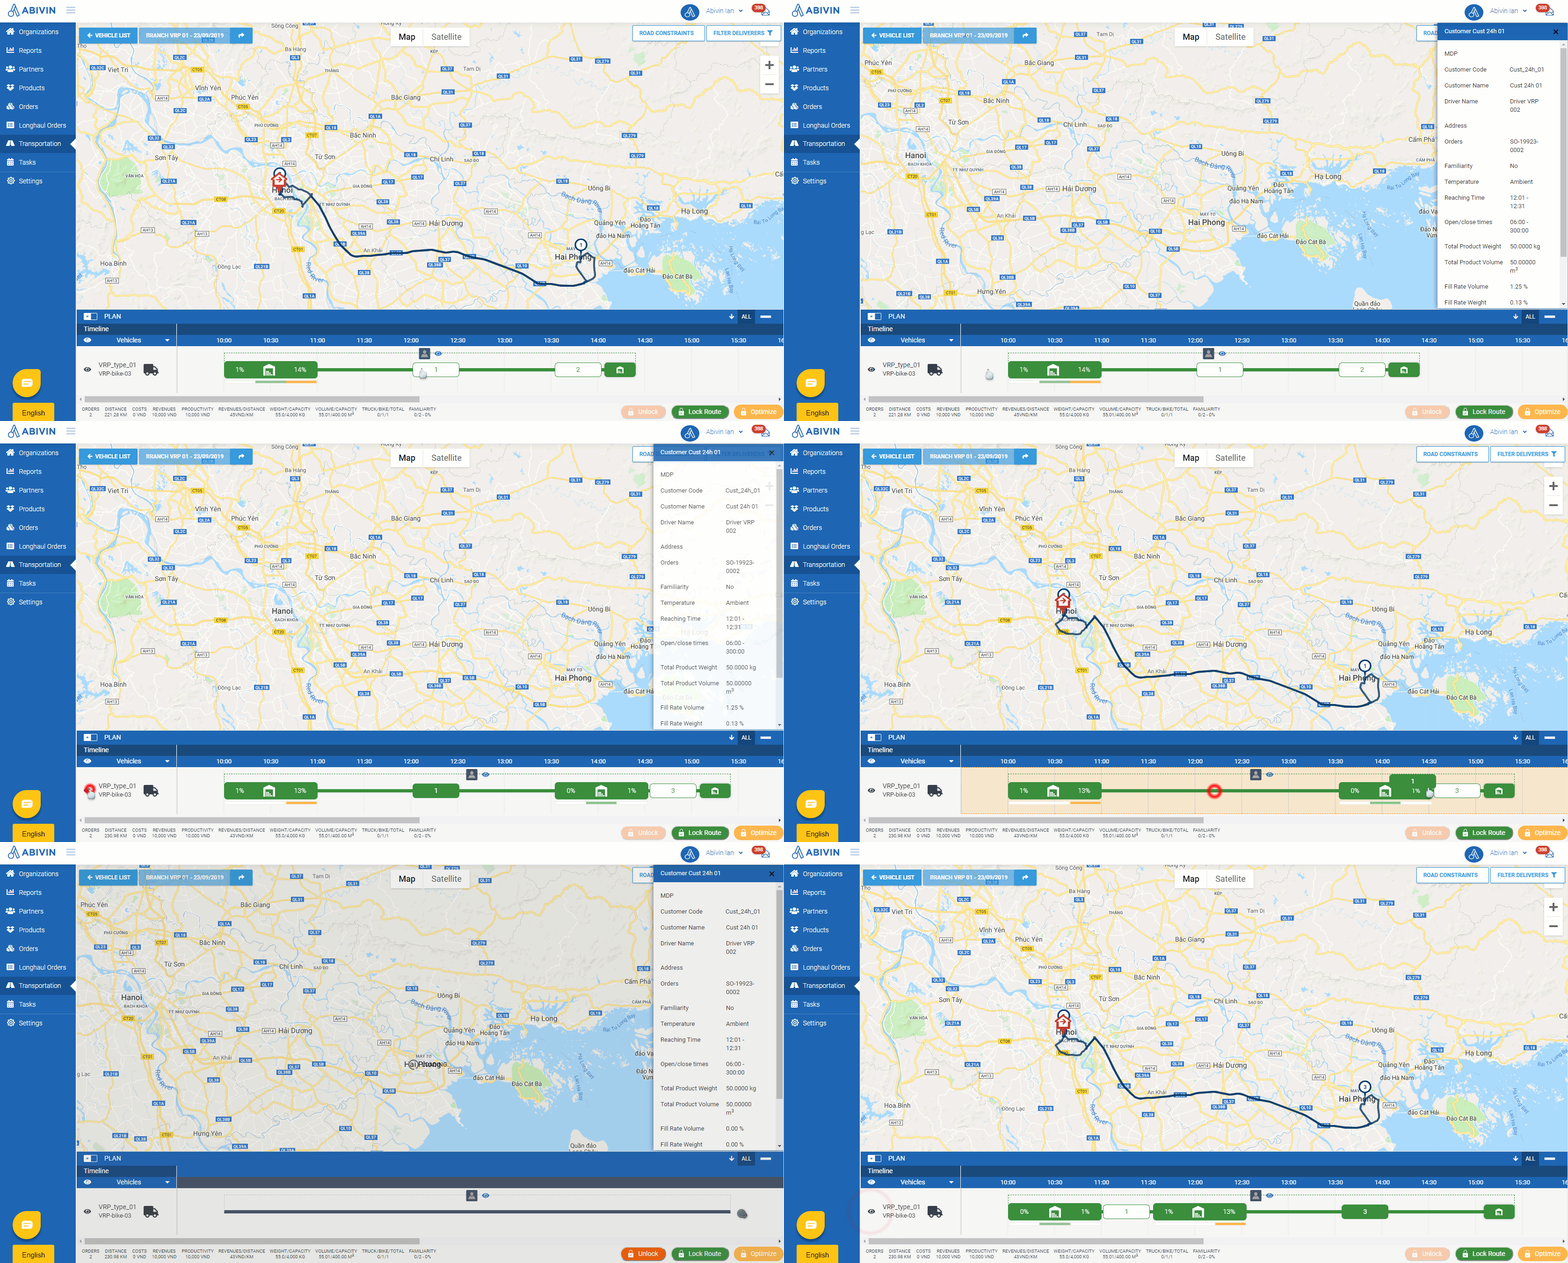
Adjust customer sequence after locking Delivery shift
- In the most recently locked Delivery shift of a vehicle, if there are some customers whose Check In tasks have not been submitted to the Web app (Which means the vehicle has not yet arrived at those customers), then you can still change the sequence of those customers
- To know which customers have been checked in, read the instruction in the following article: Track Delivery Progress
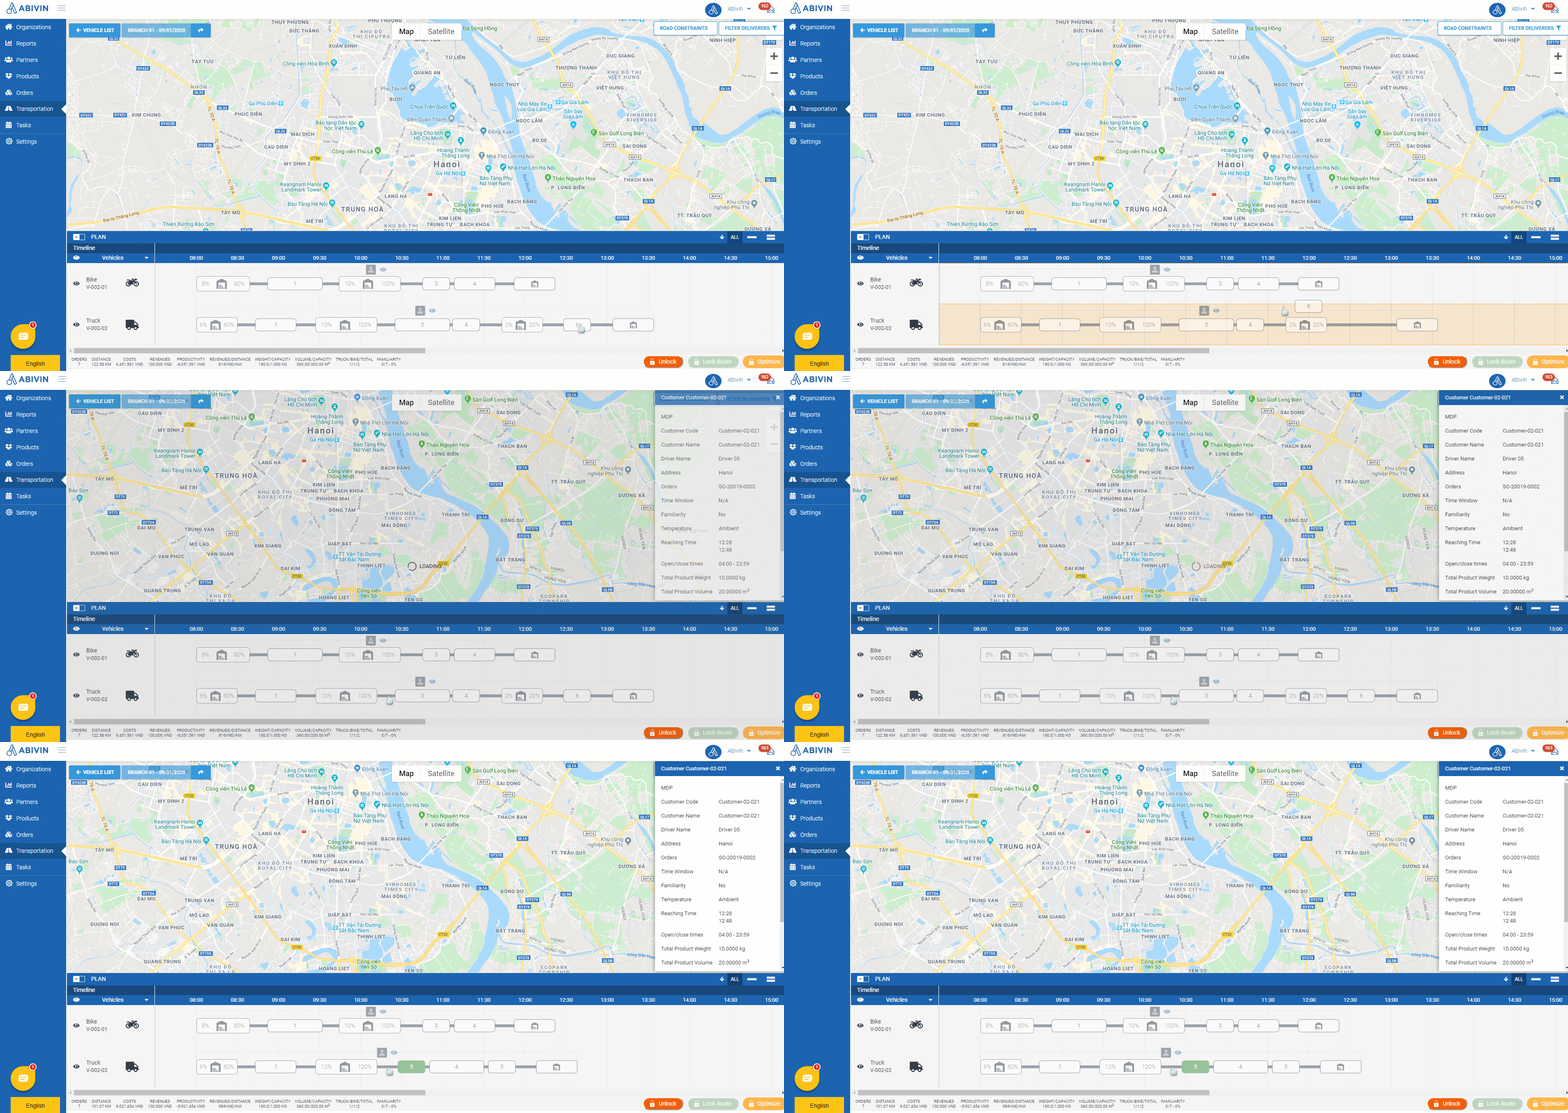
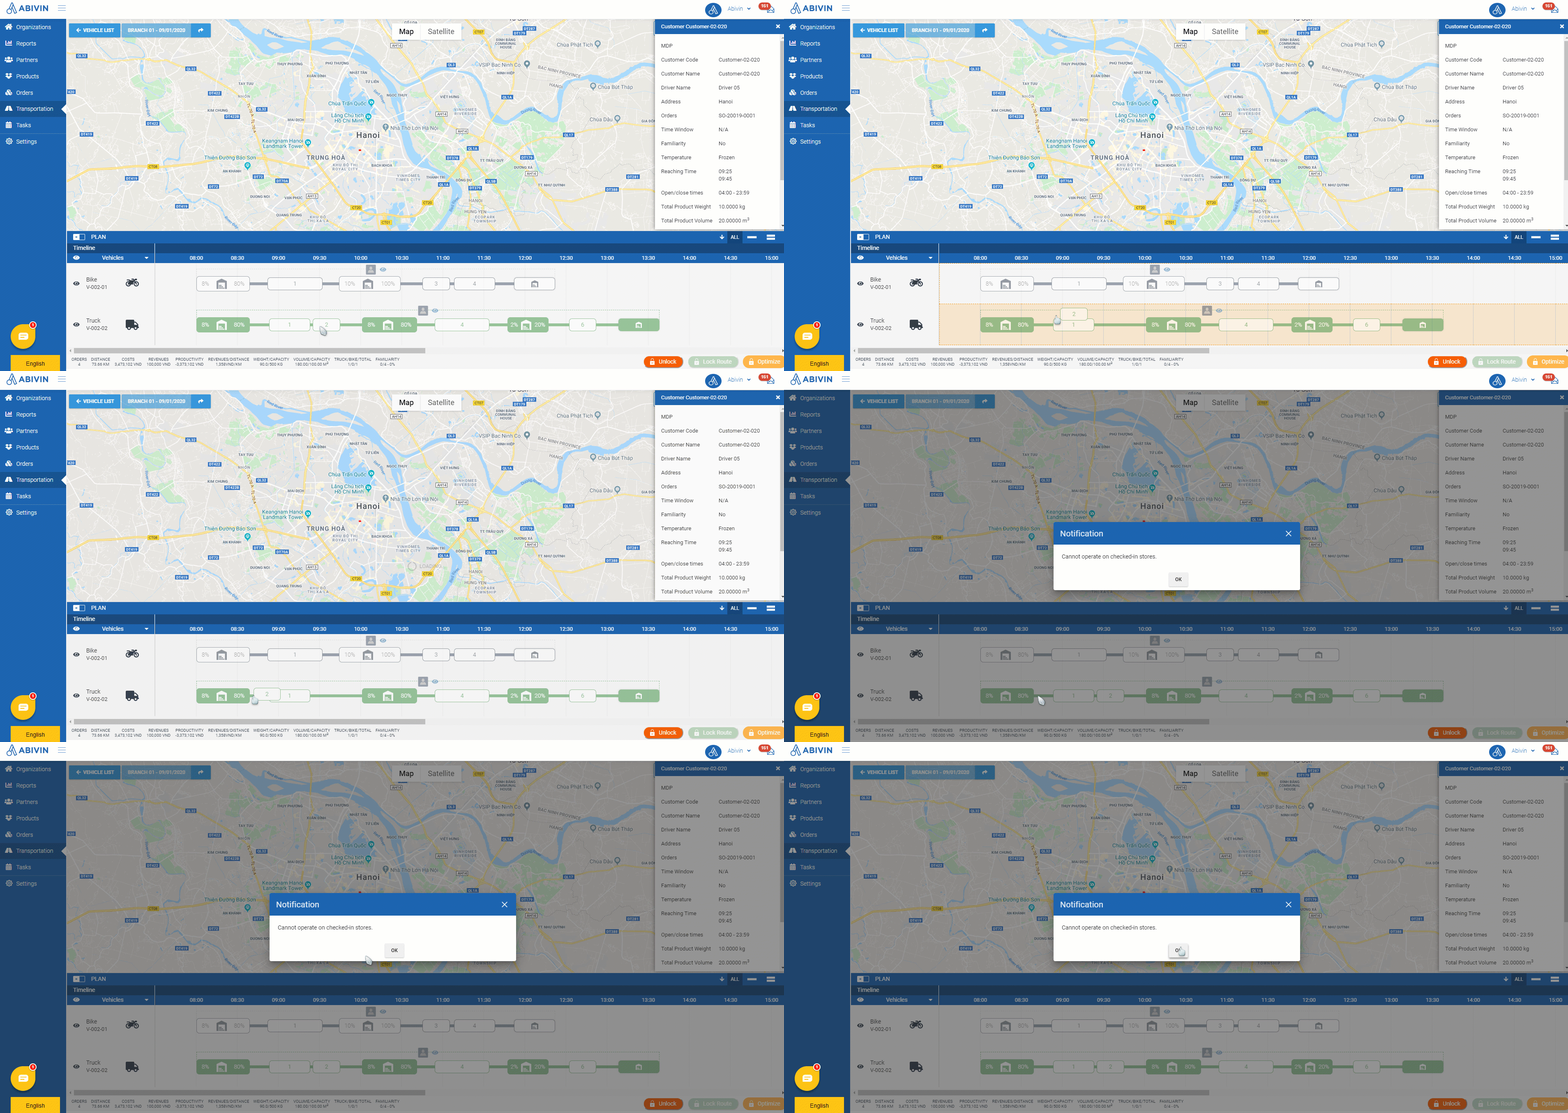
- If on a locked Delivery shift, there are some customers that have been checked in, then you can not drag any customer who has not been checked in to the left of the checked in customers
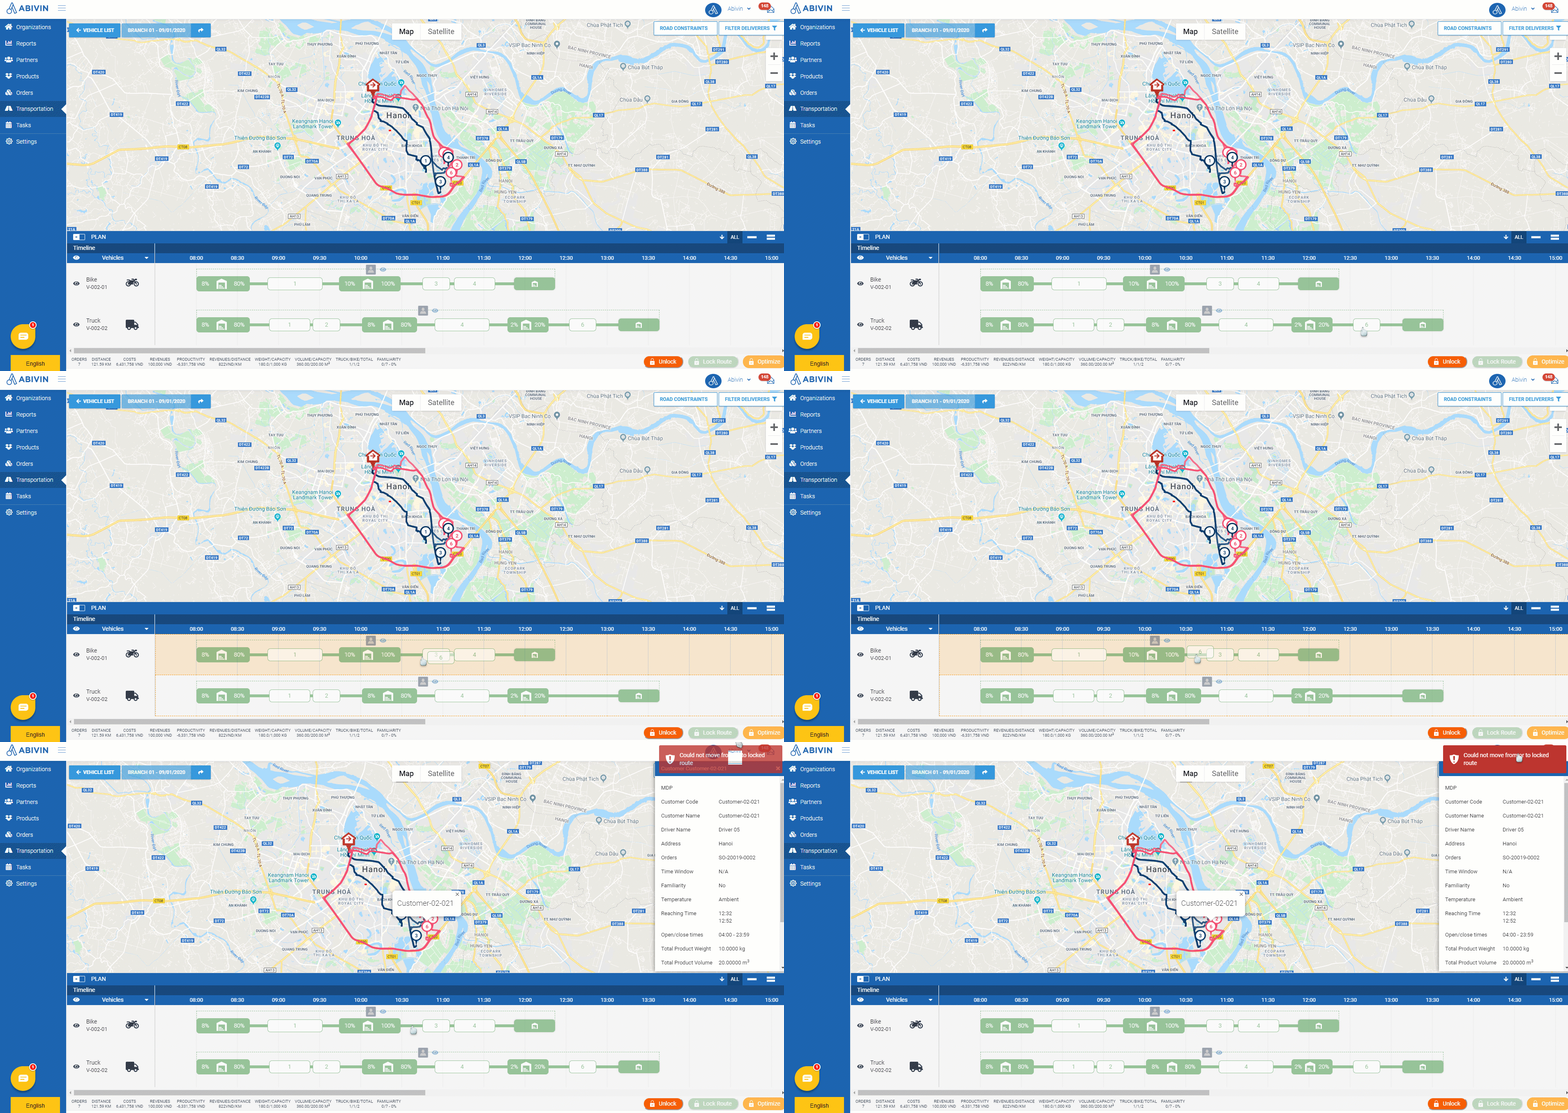
- You can not change customer sequence in a locked Delivery shift if after that Delivery shift there are other Delivery shifts (Both Locked or Unlocked). The reason is doing this will change the planned time of the Delivery shift you're attempting to adjust, and this will definitely interfere with the next Delivery shifts
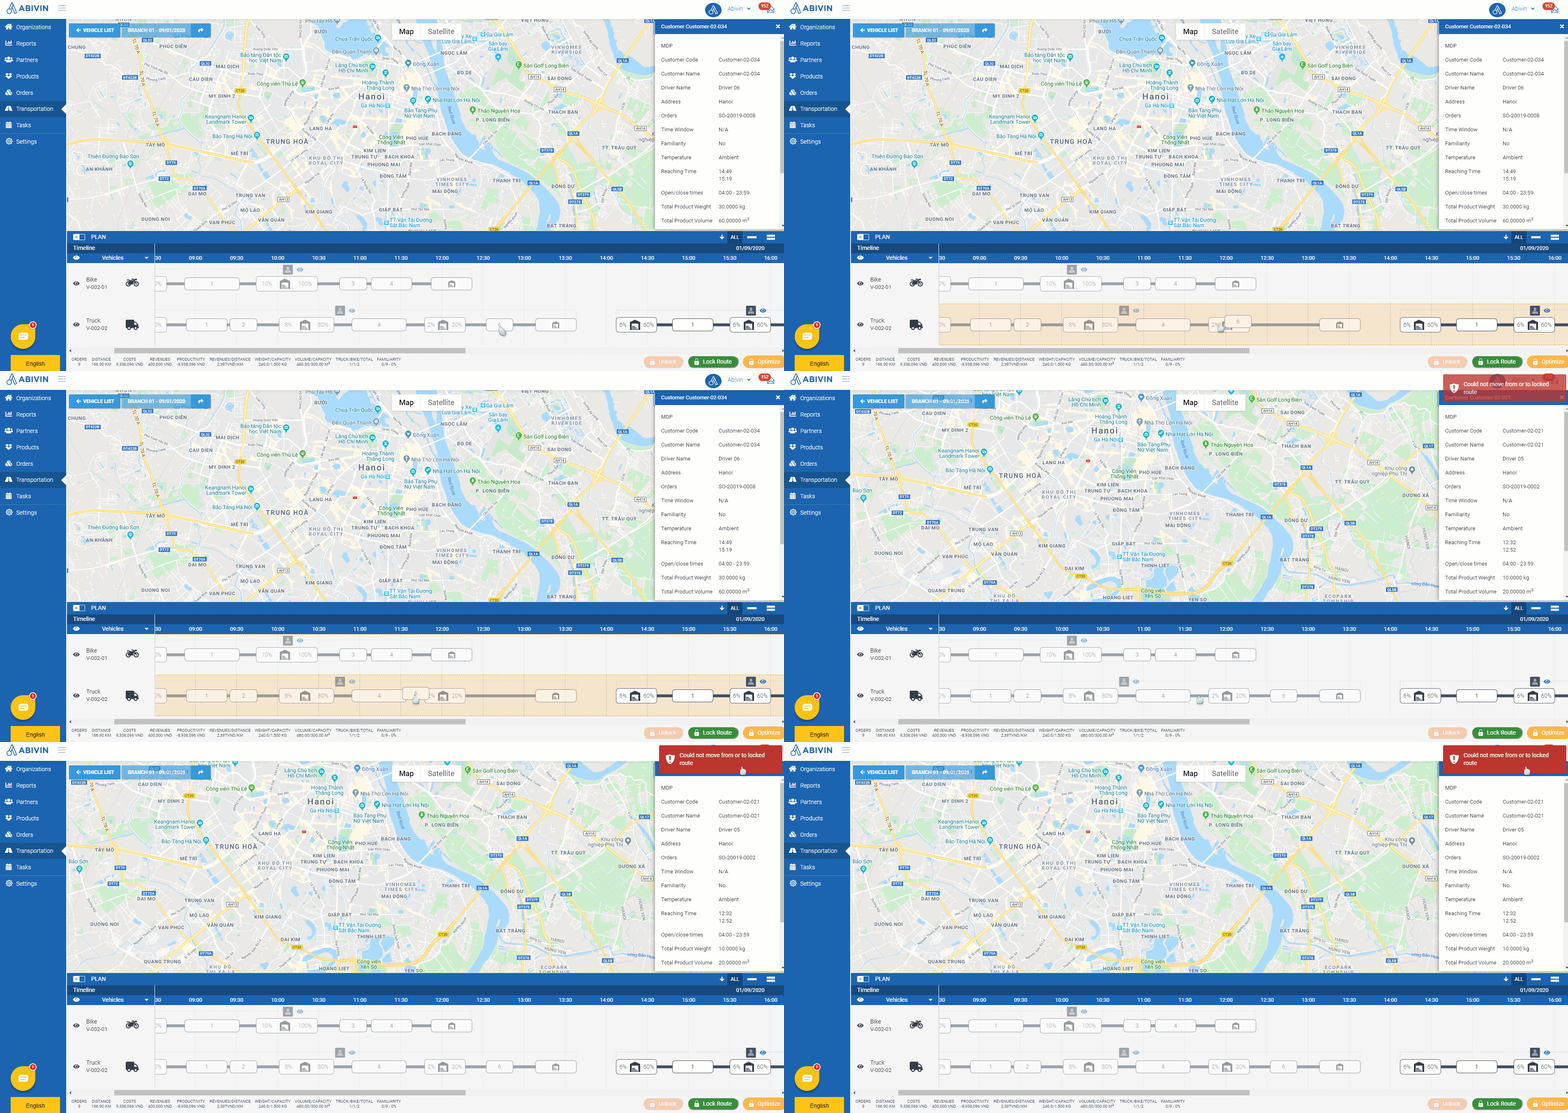
- You can not drag customers from a Delivery shift to any Delivery shift before and after it, also because of the reason above
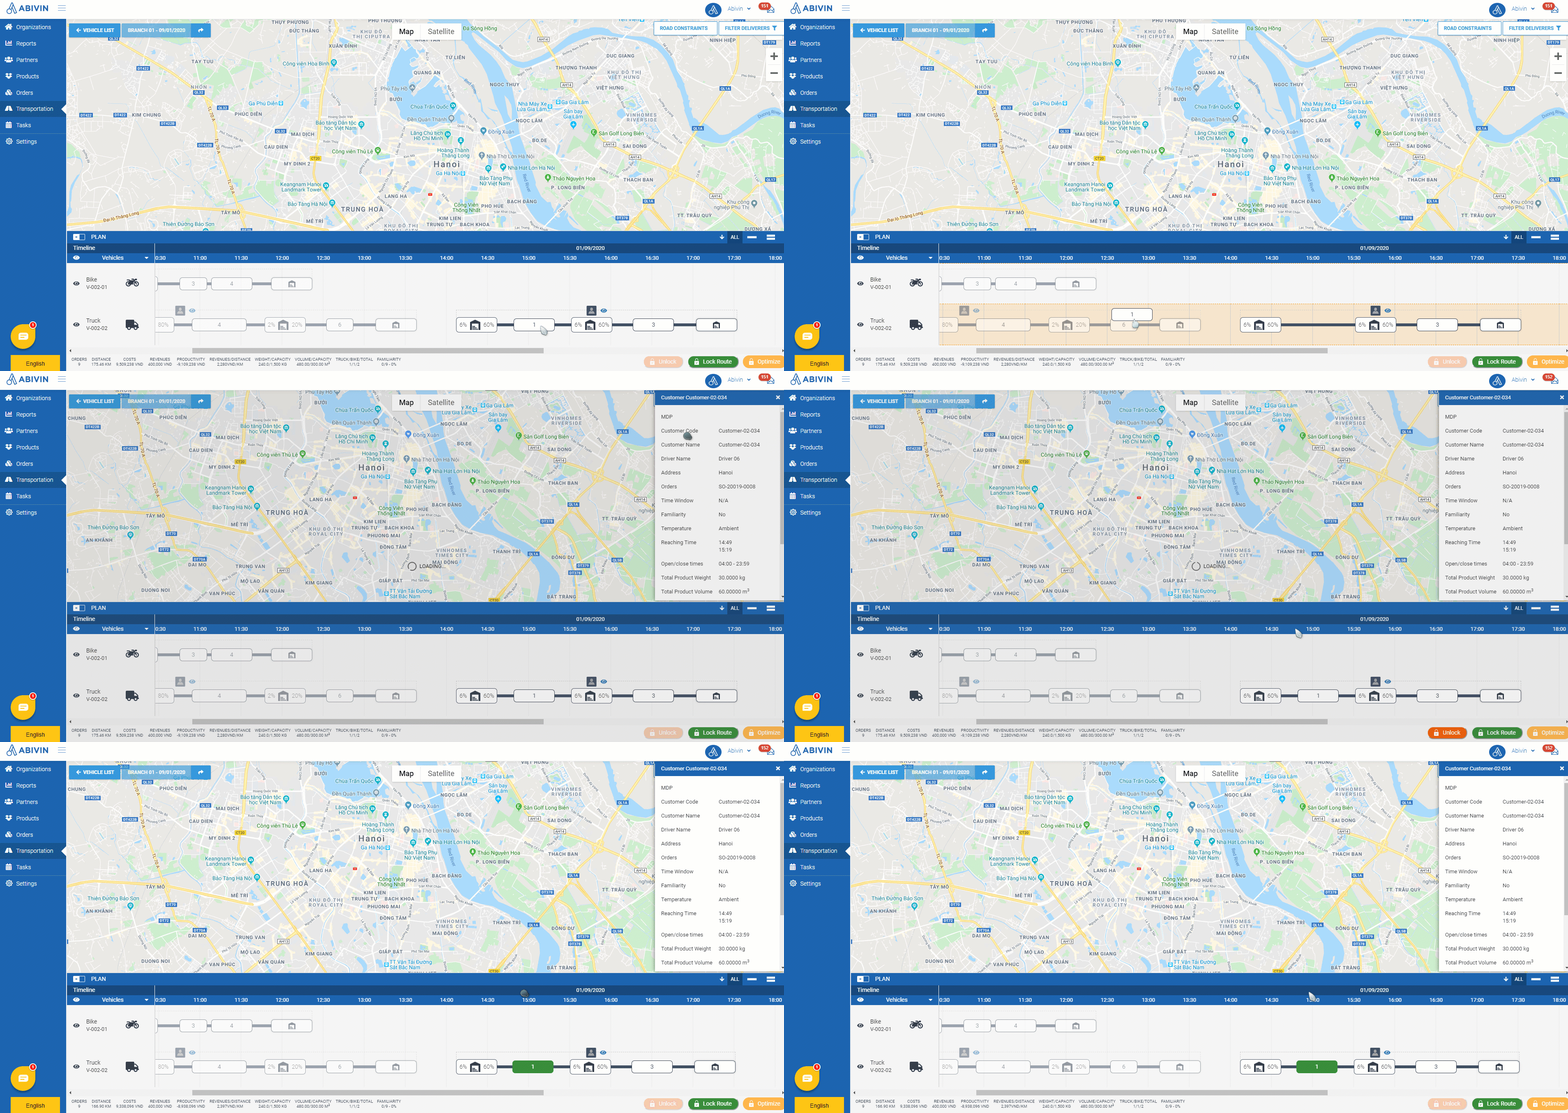
- You can not drag customers between locked Delivery shifts of two vehicles
Unlock locked Delivery Shifts
Unlock most recently locked Delivery Shifts of all vehicles
In order to be able to use this function, you need to enable the configuration Enable Unlock Route at the Branch
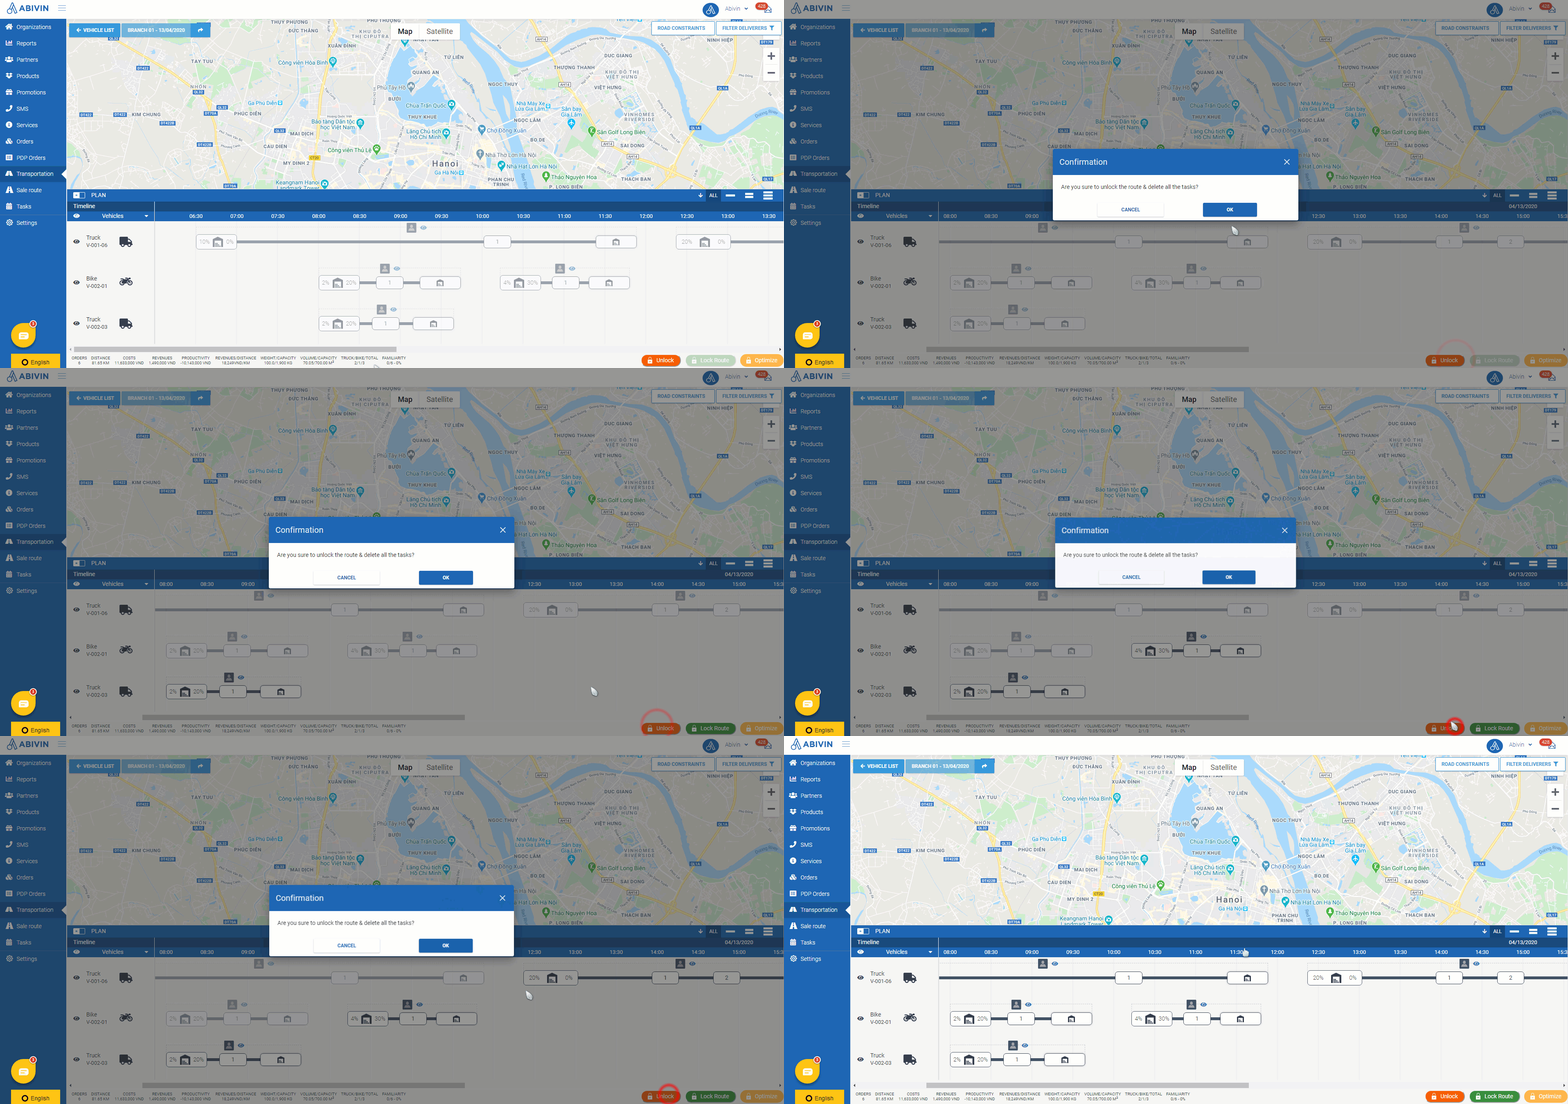
- To unlock the most recently locked Delivery shifts, click on the button Unlock at the bottom right of the screen
- All orders of the most recently locked Delivery shifts (according to the route locking sequence) will be unlocked
- To understand this function better, let's take an example:
- In the picture below, there are three vehicles: V-001-06 (The vehicle at the top of the Timeline panel); V-002-01 (The vehicle at the middle of the Timeline panel) and V-002-03 (The vehicle at the bottom of the Timeline panel)
- The Delivery routes of these vehicles have been locked in a total of four route locking turns:
- First route locking turn: The first Delivery shift of vehicle V-001-06 and the first Delivery shift of vehicle V-002-01 were locked
- Second route locking turn: The second Delivery shift of vehicle V-001-06 was locked
- Third route locking turn: The second Delivery shift of vehicle V-002-01 was locked
- Fourth route locking turn: The first (and only) Delivery shift of vehicle V-002-03 was locked
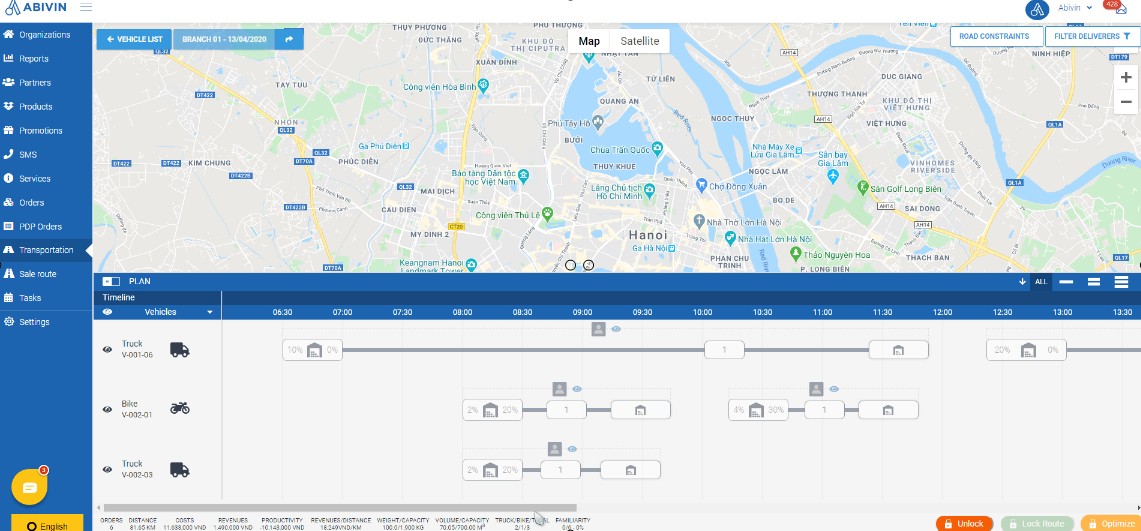
- Therefore, in order to unlock all the Delivery shifts of these vehicles, you will also need a total of four route unlocking turns:
- First route unlocking turn: The Delivery shift of vehicle V-002-03 will be unlocked
- Second route unlocking turn: The second Delivery shift of vehicle V-002-01 will be unlocked
- Third route unlocking turn: The second Delivery shift of vehicle V-001-06 will be unlocked
- Fourth route unlocking turn: The first Delivery shift of vehicle V-001-06 and the first Delivery shift of vehicle V-002-01 will be unlocked
- See the below illustration to understand more about this function
Unlock most recently locked Delivery Shifts/whole Delivery Routes of only selected vehicles
In order to be able to use this function, you need to enable the configuration Allow Unlock One VRP route at the Branch
- You can unlock the most recently locked Delivery shifts of some vehicles by clicking on the corresponding icons of those Delivery shifts (Located at the middle of those Delivery shifts, next to the driver icon ), then click on Unlock button
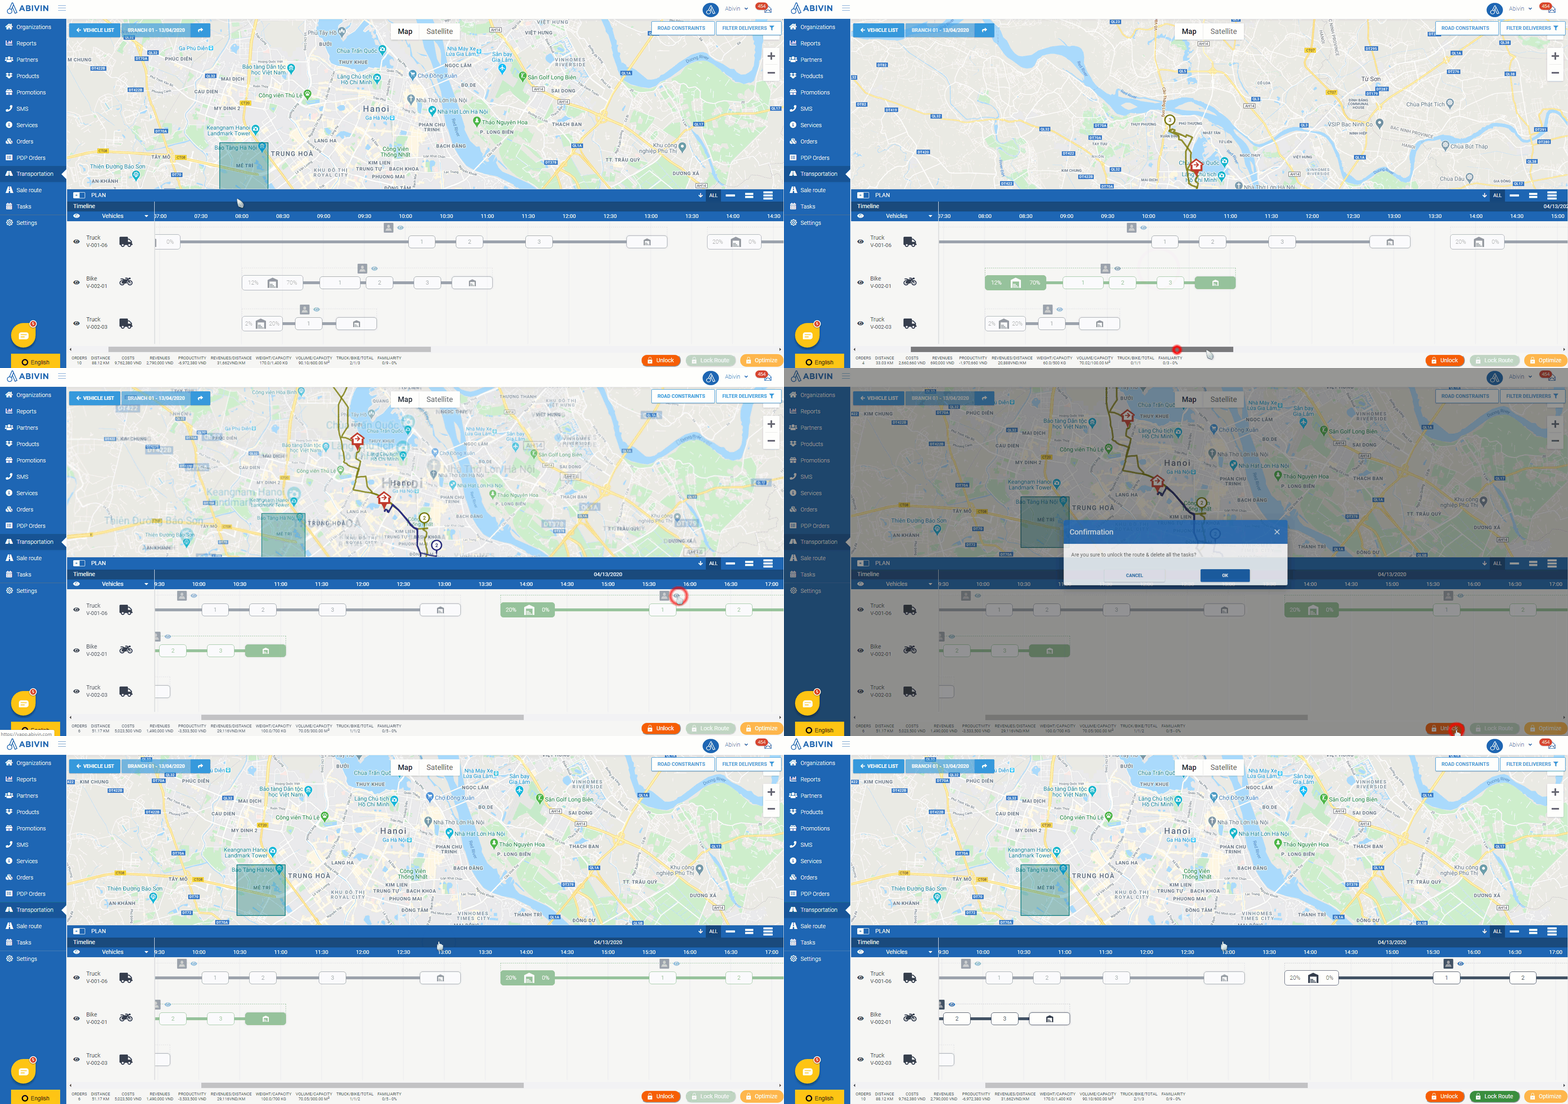
- If you select the whole Delivery routes of the vehicles by clicking on the corresponding icons of those vehicles (Located at the left side of the Timeline panel, next to the vehicle codes), then you can unlock the whole Delivery routes of those vehicles
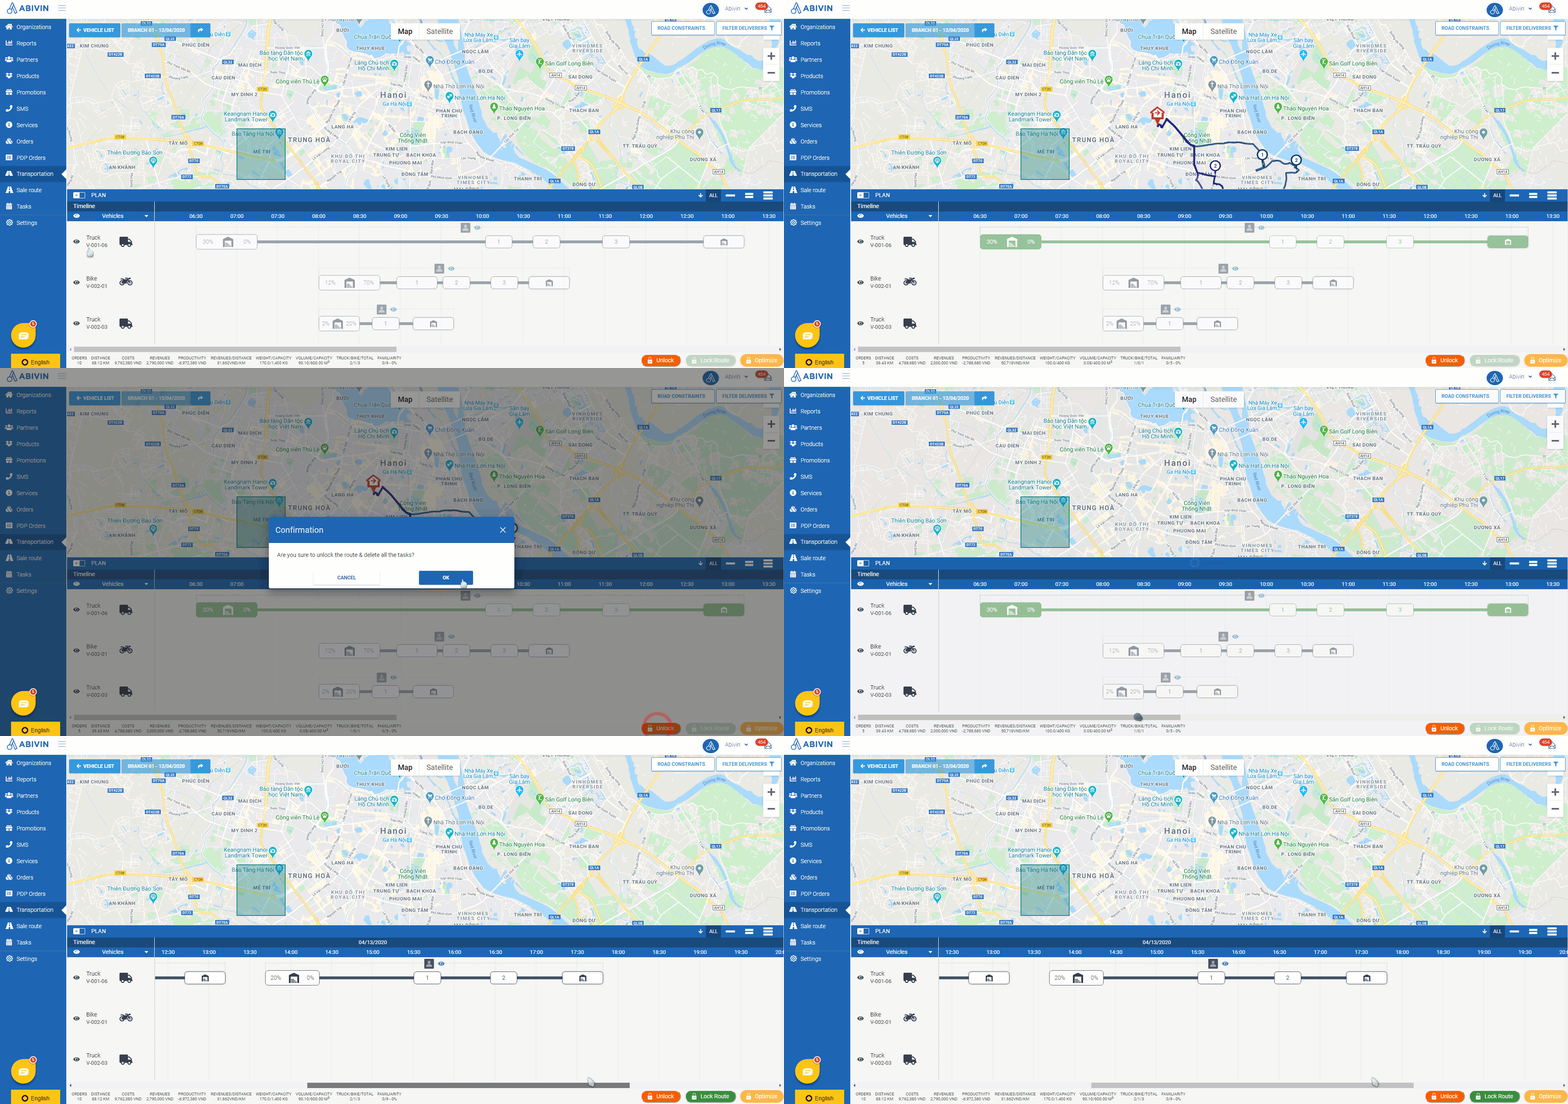
Be cautios when using this function!If you unlock a locked Delivery route, then all the delivery tasks of that Delivery route will be removed from the Mobile app, even if the driver has submitted some tasks
Remove not yet locked/unlocked Delivery Shifts
- On the current Route Plan, you can remove not yet locked/unlocked Delivery Shifts by following the steps below
- Click the button Actions at the bottom of the Timeline panel. A list will pop out. On this list there is the option Remove Shifts. Click that option
- Upon clicking that option, gray rectangles will appear over the not yet locked/unlocked Delivery Shifts. In the middle of those rectangles are the buttons Remove. There's also the button Remove All (x) on the toolbar on top of the Timeline panel, with the digit x indicating the number of not yet locked/unlocked Delivery Shifts on the current Route Plan
- To remove the not yet locked/unlocked Delivery Shifts one by one, click the respective Remove button of each Delivery Shift. To remove all not yet locked/unlocked Delivery Shifts at once, click the button Remove All (x)
Create additional Delivery shifts
- After a Delivery shift of the vehicles has been locked, you could proceed to create additional Delivery shift(s) for those vehicle on the same day by following the steps below
- Navigate to Orders > Sales Orders tab to create new sales orders
- Navigate to Transportation > Vehicle List tab to perform route optimization as usual
- During the route optimization process, as you click on Optimize button, a form will appear. On this form, you need to select the Cut-off time - The planned start time of the next Delivery shift. To select the Cut-off time, click on this field and select an appropriate time point from the drop down menu. Next, click on Optimize. The system will generate the optimized route for the next orders, then put them on a new Delivery shift at the selected Cut-off time point
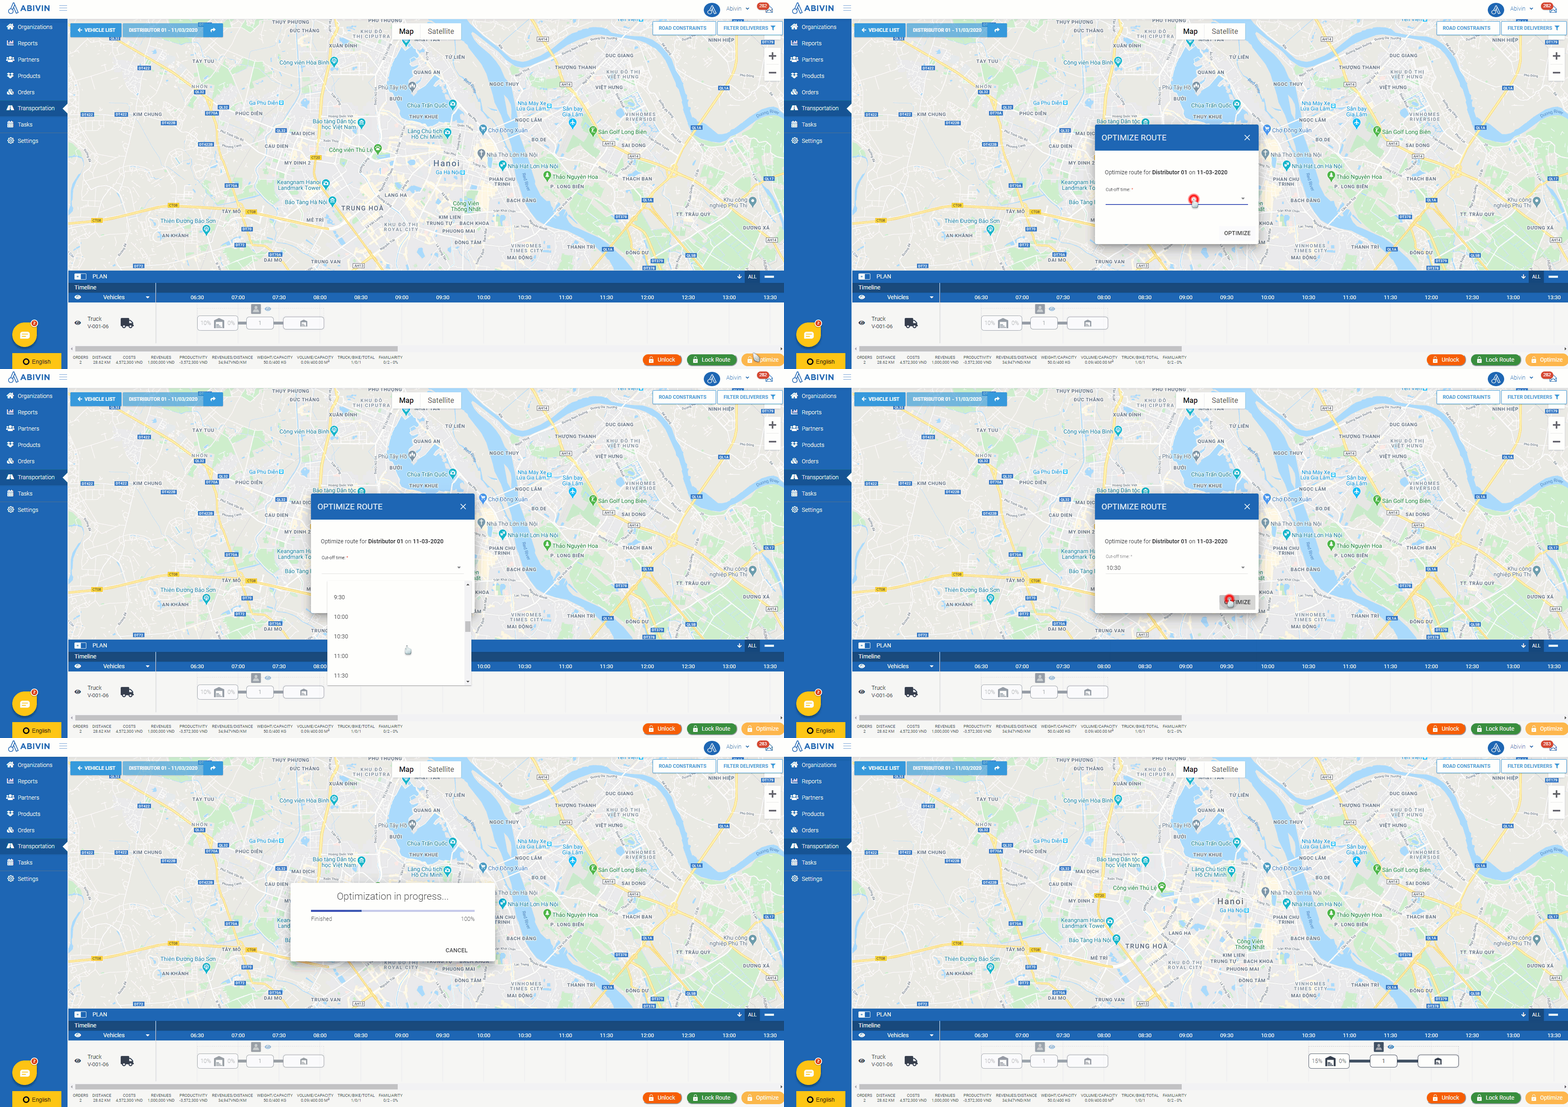
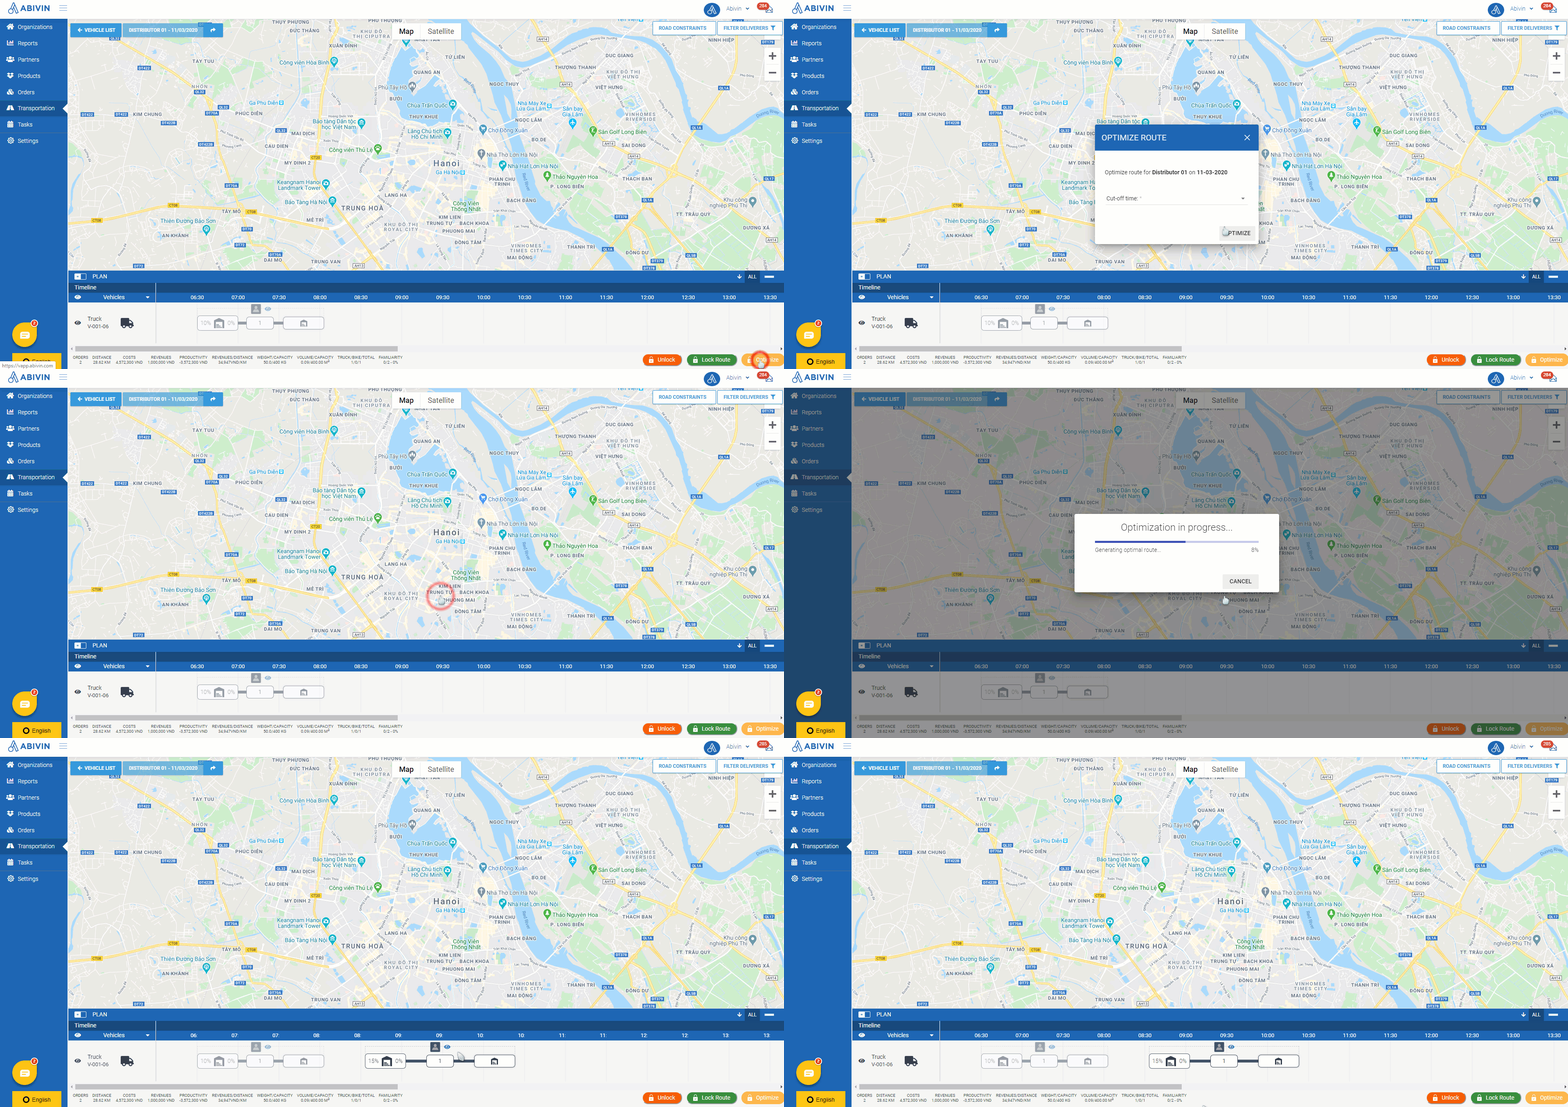
- If you didn't select the Cut-off time on this form and just went on to click Optimize, or accidentally selected a Cut-off time point that is earlier than the planned finish time point of the previous Delivery shift, the system will automatically select the Cut-off time of the next Delivery shift by adding 30 minutes to the planned finish time point of the previous Delivery shift
Reassign drivers for Delivery Shifts
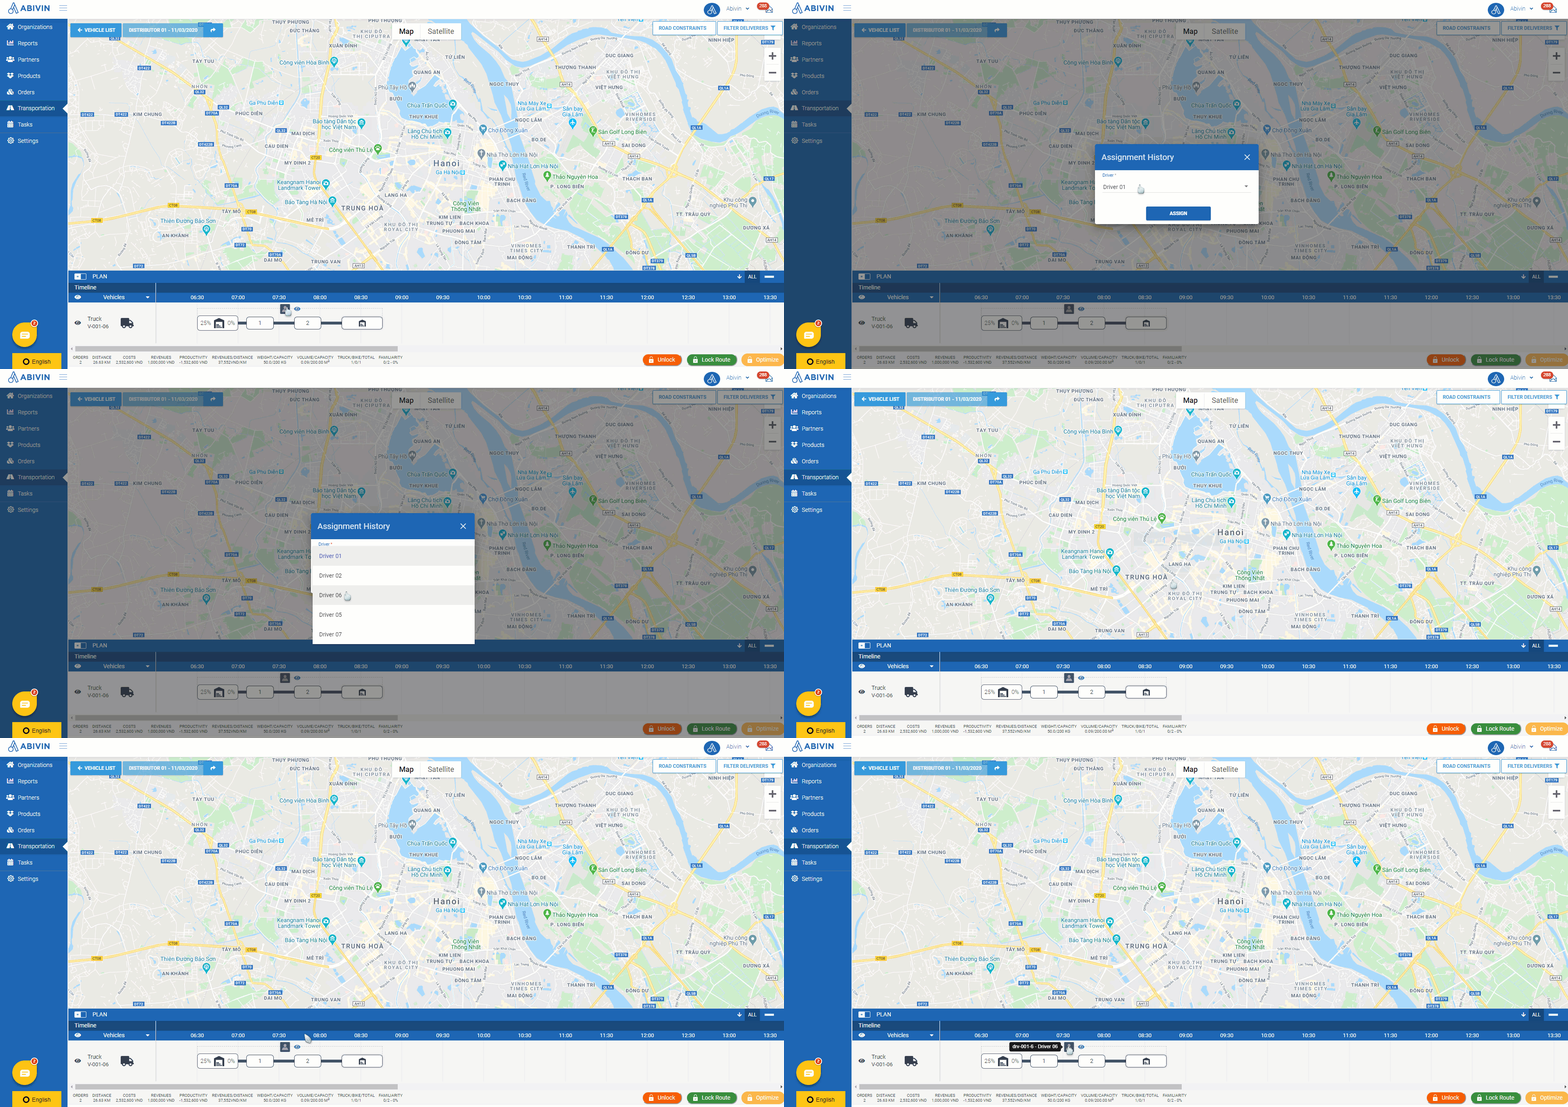
- Before locking a Delivery shift, if the current driver of a vehicle for some reasons can not perform that shift, then you can assign that Delivery shift to another driver by following the steps below
- On the Timeline panel, click on the driver icon on the middle of the Delivery shift which you want to reassign driver
- The form Assignment History will appear. On this form, click on the field Driver. A drop down menu will appear, listing the Usernames of all drivers that: 1. Can operate the vehicle planned to perform this Delivery shift (Have the same Vehicle Type attribute value at the vehicle); 2. Have the active status to be Active; and 3. Are not currently assigned any Delivery shift. Select the appropriate driver from that menu, then click on the button Assign. The delivery task will be reassigned to the new driver
Change Vehicles of Delivery Shifts
- If the Delivery Shift of a vehicle is still in Planned, not yet Locked, status, then you can change the vehicle of that Delivery Shift
To change Delivery Shift's vehicle in the Route Plan (List View), refer to this article: Route Plan (List View)
- In order to use this function, first you need to enable the Change Vehicle configuration of the User Group to which your account belongs. This configuration is located in the Other Permissions section
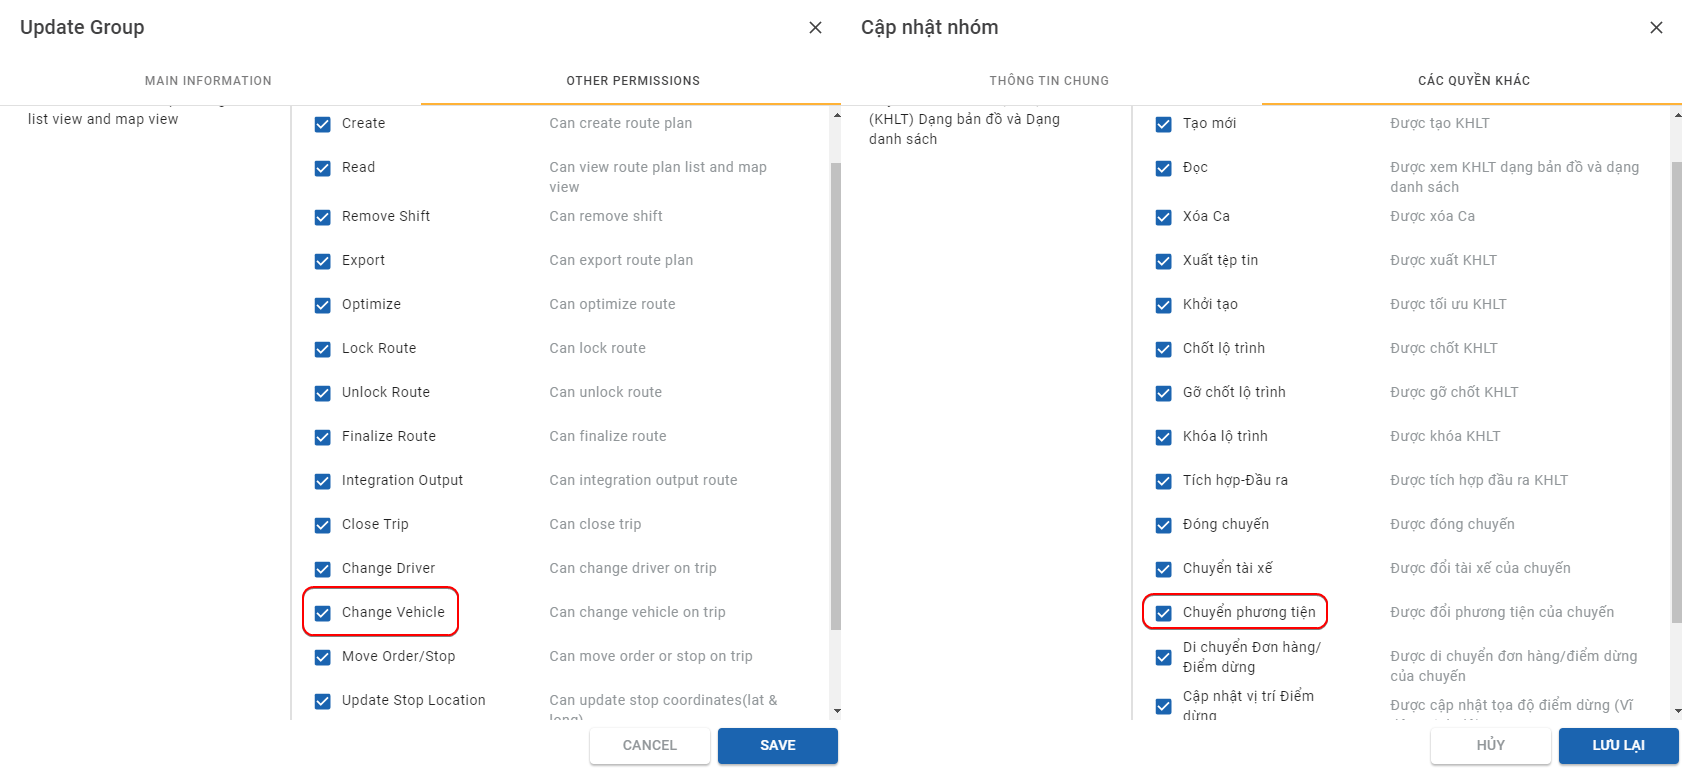
- After enabling this configuration, please log out then log in to your account again in order for the configuration to take effect
- After that, navigate to the Route Map screen. Scroll to the middle of each vehicle's Delivery Route and you'll see an icon that looks similar to this: . This is the Change Vehicle icon
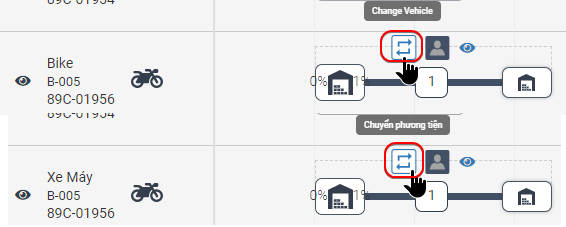
- To change the vehicle, click that icon. The Change Vehicle form will appear

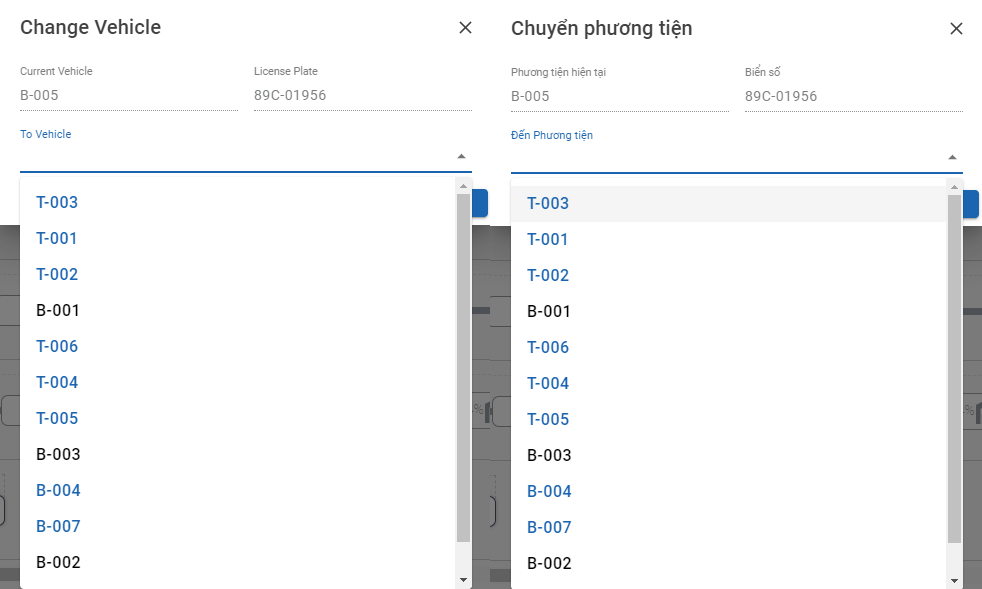
- To change to another vehicle, click the To Vehicle field. The drop-down list will show the vehicles which are under the same managing Depot as the current vehicle and are currently in Active status
- The vehicles in blue text are the ones that are not used in the current day's Route Plan (Though they might have been used in other days' Route Plans), while the ones in black text are being used in the current day's Route Plan
-
Select the vehicle to which you want to change then click Change. The system will check the vehicle status of the selected vehicle. There would be several scenarios:
-
Scenario 1: The target vehicle is being used in the current day's Route Plan, and its most recent Delivery Shift has not yet been locked
-
Scenario 2: The target vehicle is neither used in the current day's Route Plan nor any other day's Route Plan. Its vehicle status will be Open (Under the Vehicle Status column in Transportation > Vehicles tab)
-
Scenario 3: The target vehicle is not being used in the current day's Route Plan but is being used in other days' Route Plans (Both in the past and in the future). Its vehicle status will either be Planned or Locked (Under the Vehicle Status column in Transportation > Vehicles tab)
-
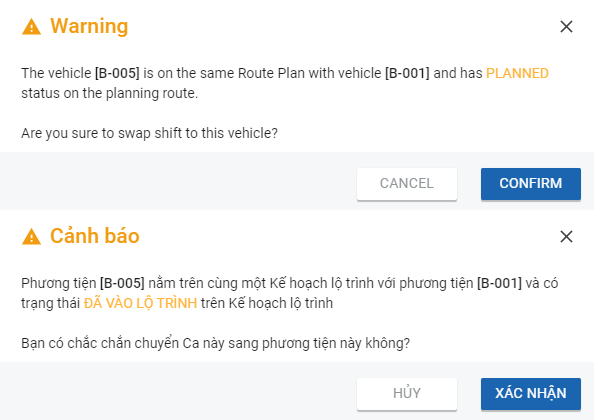
In Scenario 1, the system will display this message
-
If you wish to continue swapping the Delivery Shifts of the two vehicles, click Confirm, otherwise click Cancel
-
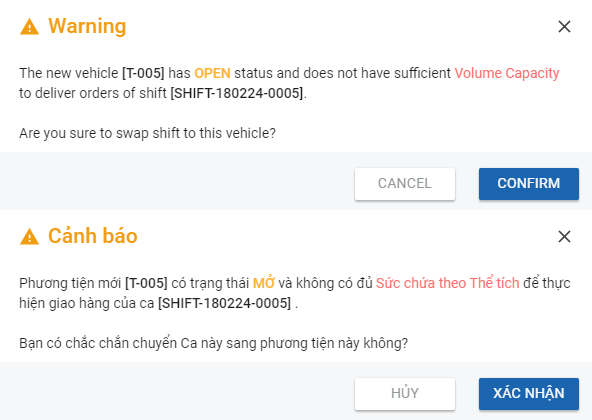
In all of the above scenarios, the system will also check whether the selected vehicle has enough capacity in terms of weight and/or volume to carry the heaviest Delivery Trip on the current Delivery Shift. If the selected vehicle does not have enough capacity, the system will also add warnings similar to these
Route Plan Adjustments By The Drivers
- If you enable the Move Order/Stop permission for the Driver User Group, then the Drivers can actively adjust the Delivery Stop sequence of their assigned Delivery Shifts on their Mobile App. The detailed content is presented in the following article: Driver (Deliverer)
- If a Driver adjusts the Delivery Stop sequence of his assigned Delivery Shift on his Mobile App, you will also be notified on the Web App
At the moment, you will only receive the notifications on the Route Plan (Map View), not yet on the Route Plan (List View)
- The notification will appear on the middle top of the Route Map screen
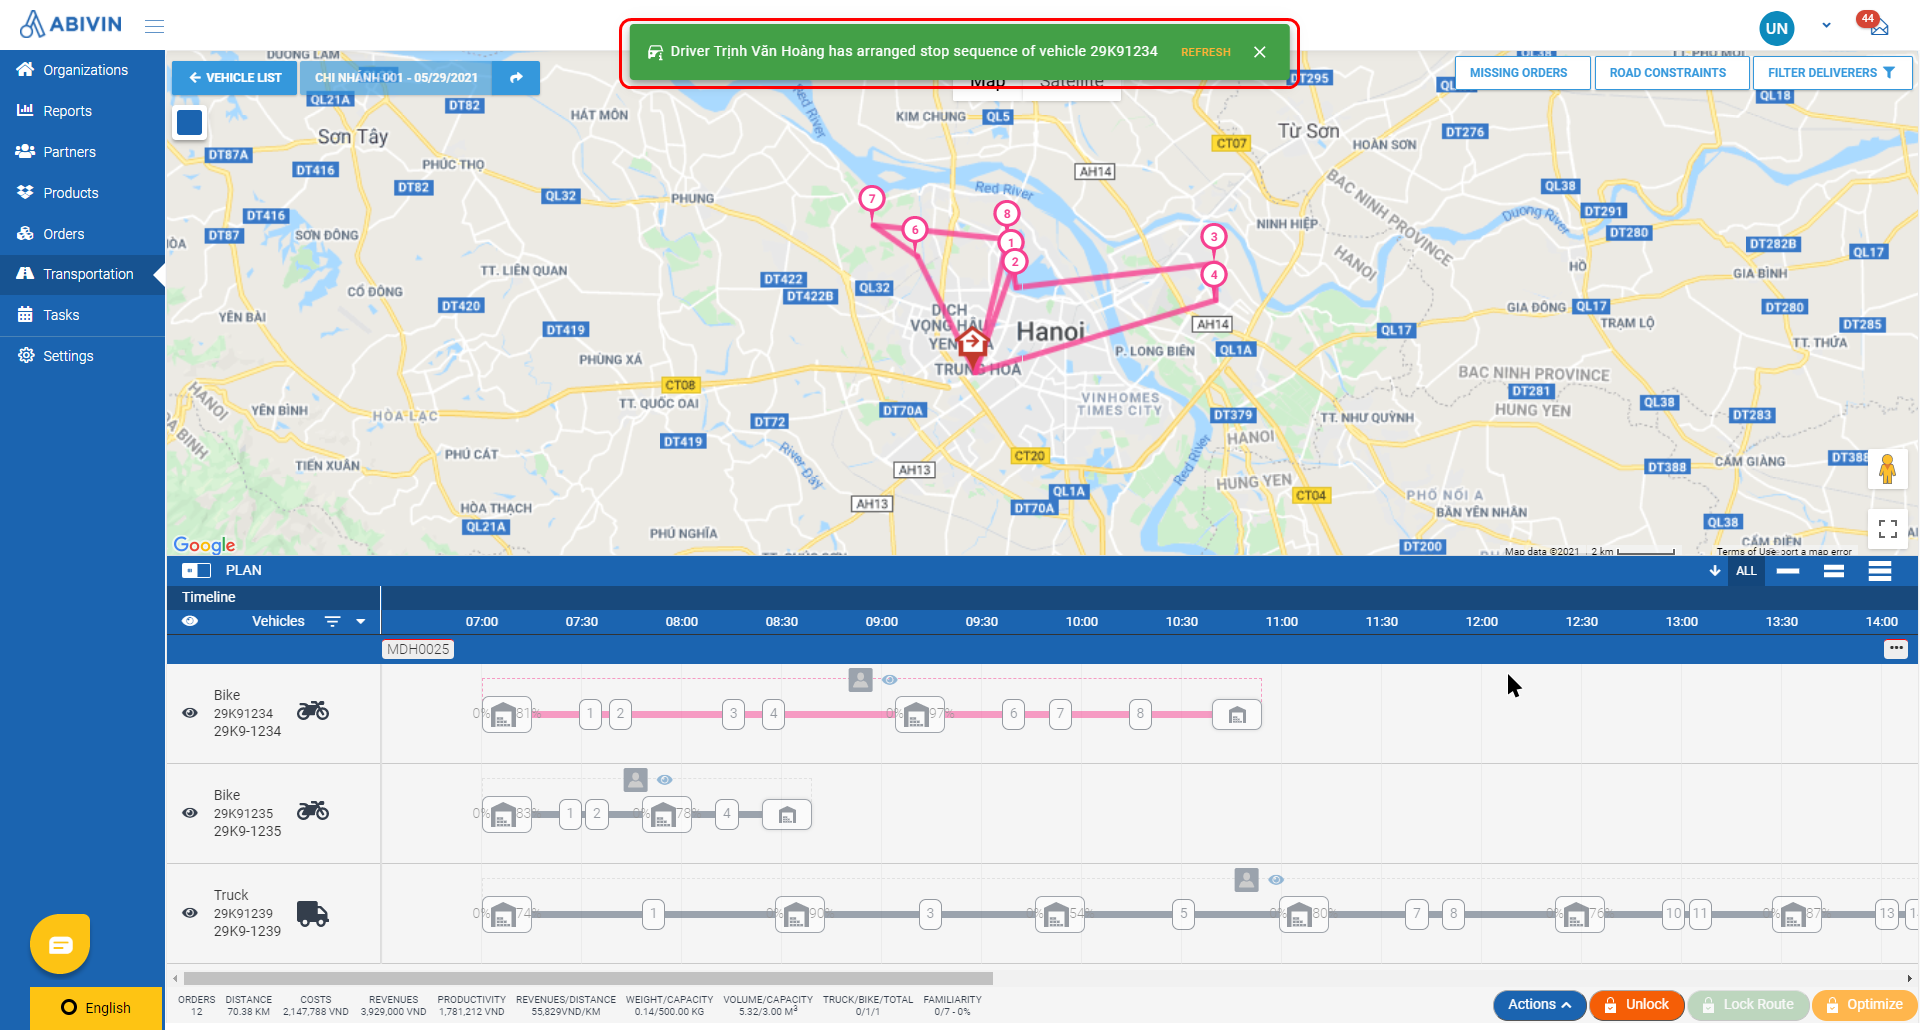
Illustration (English)
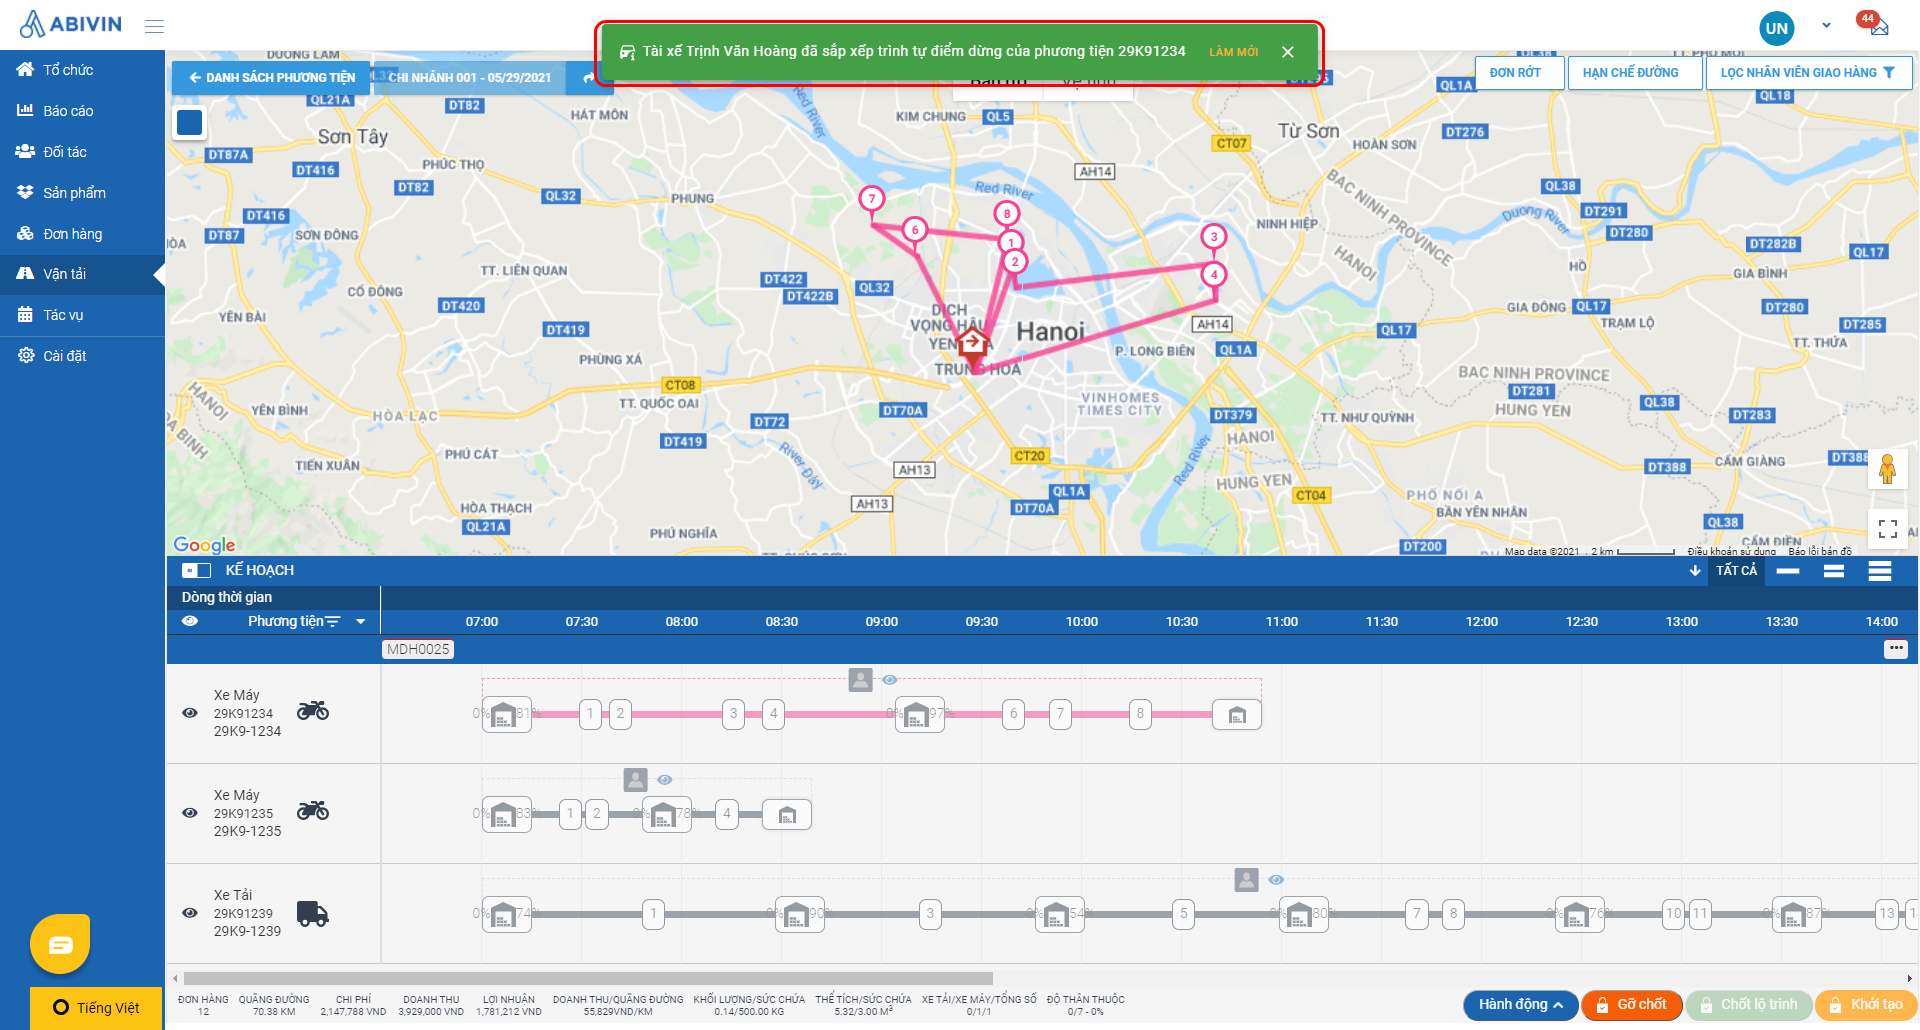
Illustration (Vietnamese)
- As you refresh the screen, the Timeline Panel and the Map Area will also update to reflect the adjusted Delivery Stop sequence
Updated about 2 months ago
