Manage Users
User and User Group definition
- User is a person that utilizes the Abivin vRoute Web app or Mobile app
- User Group is a group consisting of Users who share the exact same level of permission within Abivin vRoute
Types of User
- In this model, there are two compulsory types of Users: Administrators and Drivers.
Administrator Users
- Administrators are the users who will manage the Web app
- Each organization will have its own Administrator User group
Driver (Deliveryman) Users
- Drivers are the users who will directly operate the delivery vehicles to deliver Orders to the Customers. During the delivery process, they will use the Mobile app to submit the delivery tasks to Web app
- Each Depot/Sun will have its own Driver User group
- To know how the Drivers user the Delivery Mobile app to perform delivery tasks, refer to the following article: Drivers (Deliverymen)
- Below is an illustration of the compulsory User groups hierarchy of this model
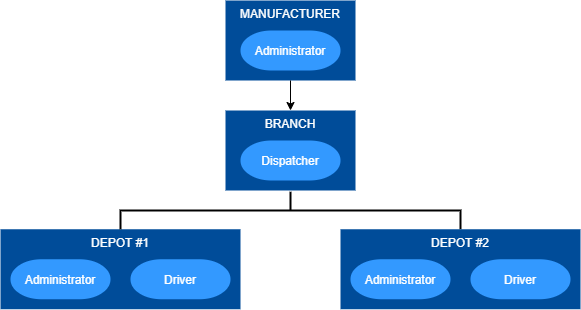
Illustration (English)
Manage User group
Locate User Group list
- User groups are listed on Organizations > User Groups tab

Illustration (English)

Illustration (Vietnamese)
Create User Groups
- You would notice that after an Organization is created, the Administrator User Group of that Organization will also be automatically created. The Administrator User Groups will have their User Group Code attribute equal to the Organization Code attribute plus the prefix AD-, and the User Group Name attribute equal to the Organization Name plus the prefix Admin_
- For example: A Branch has the Organization Name attribute to be Branch New and Organization Code attribute to be Branch-New. The Administrator User Group of that Branch will have the User Group Name attribute to be Admin_Branch New and the User Group Code attribute to be AD-BRANCH-NEW
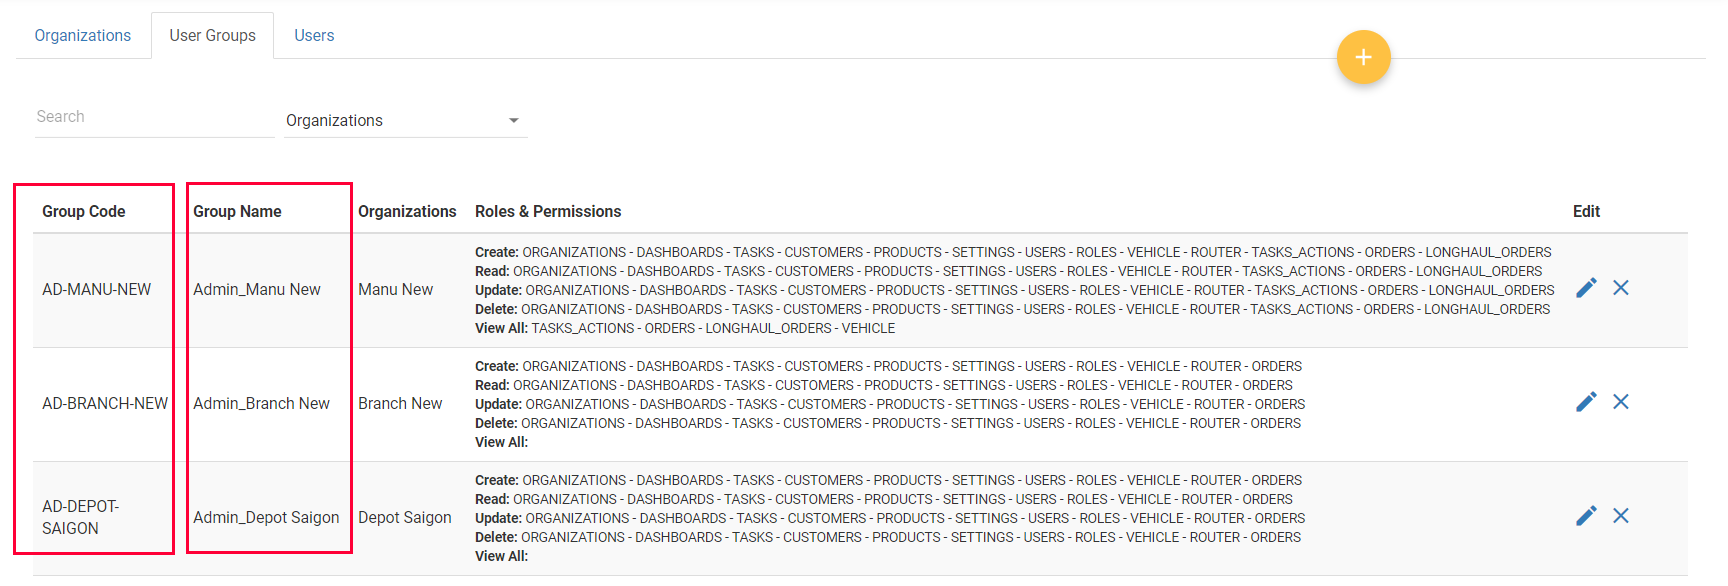
Illustration (English)
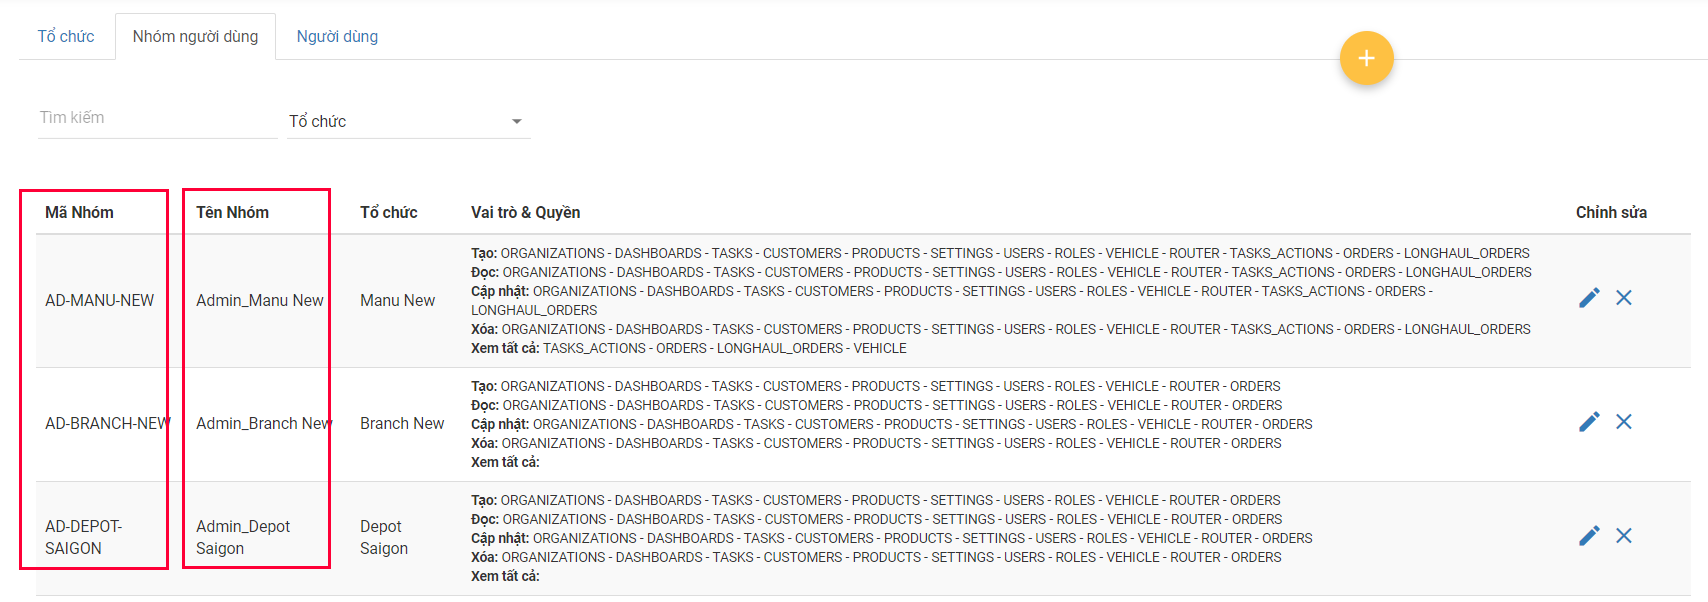
Illustration (Vietnamese)
- If you create Organizations of Depot Organization Type using Web form, the Driver User Group - with the User Group Code DELIVERER would also be created automatically
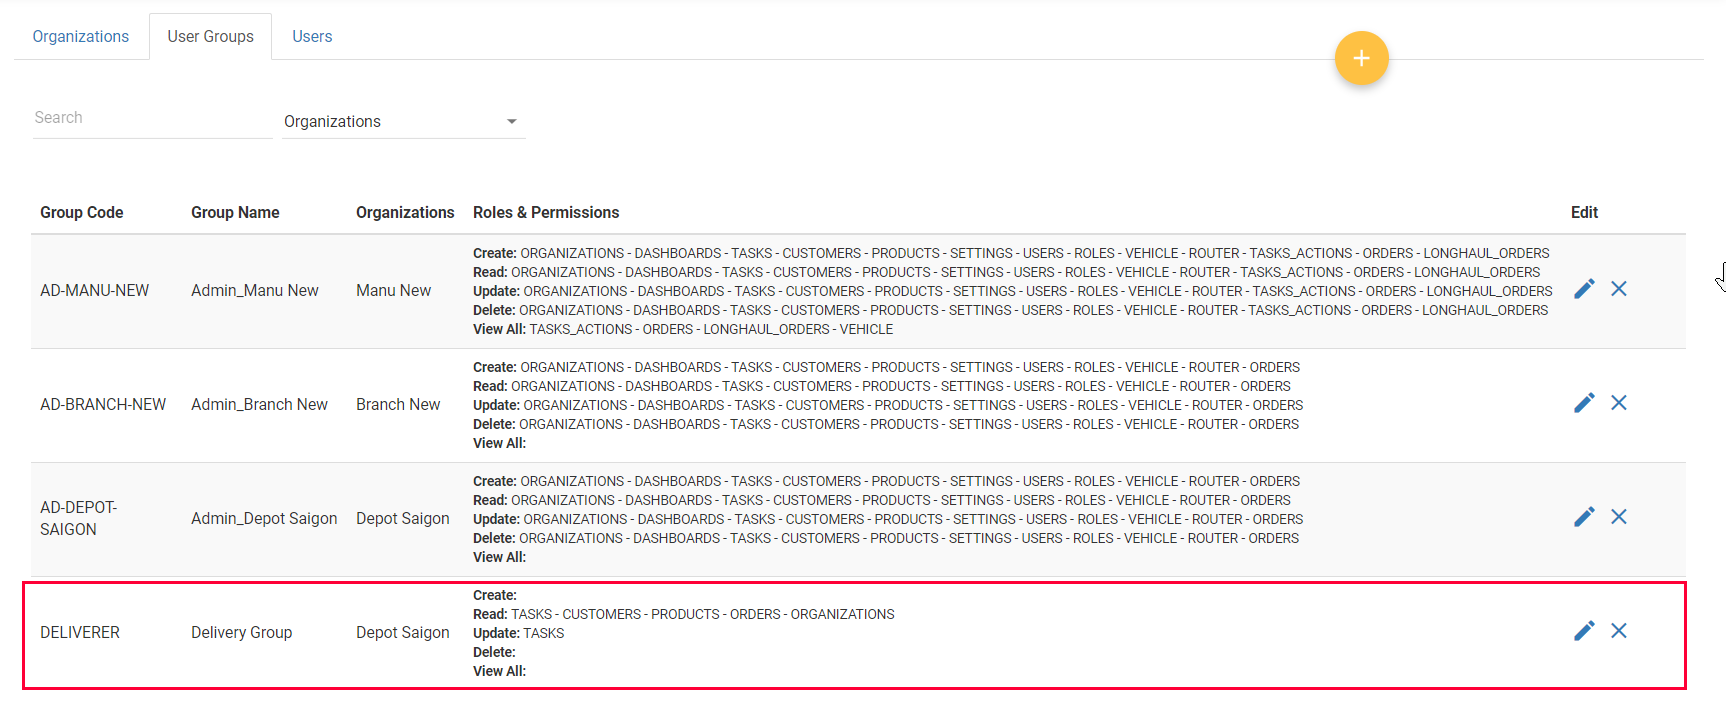
Illustration (English)
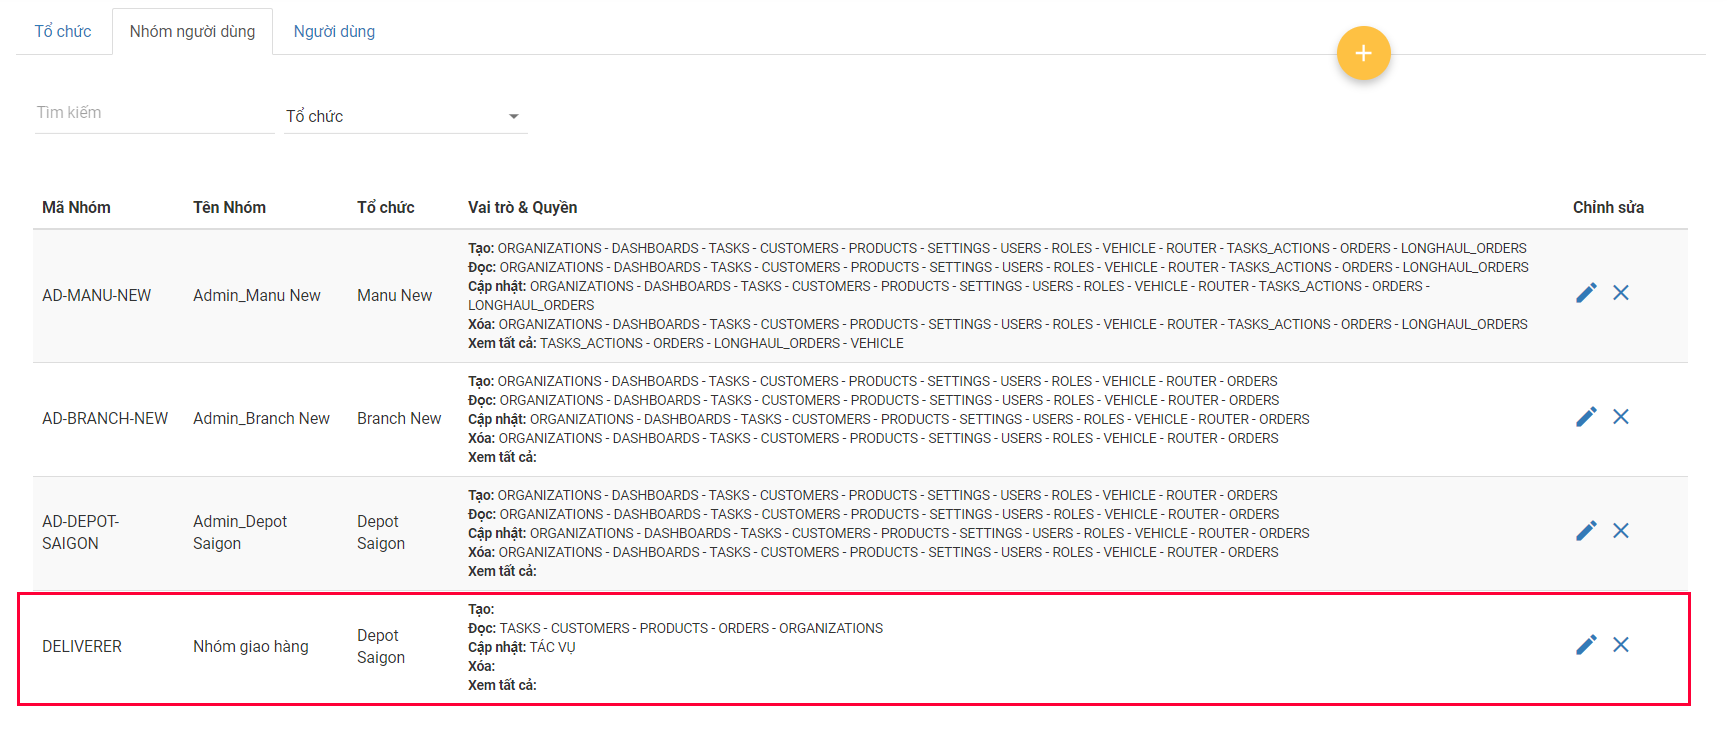
Illustration (Vietnamese)
- Apart from the User Groups that are automatically created, if you wish to create more User Groups, you need to create them manually using Web form. Please refer to the CRUD functions article to know the general steps about creating single objects using Web form
- The User Groups of optional User Types (Salesmen; Consumer) will not be created automatically. You have to create those User Groups manually
User Group Information
- Typically, the information of a User Group will be input in two sections:
- 1 - Basic User Group Information Section. This section specifies the most essential information of the User Group such as User Group Code, User Group Name. Click here for instruction
- 2 - Modules Section. This section specifies the modules that the User Group will have access to and the corresponding CRUD rights over the modules that are allocated to that User Group. Click here for instruction
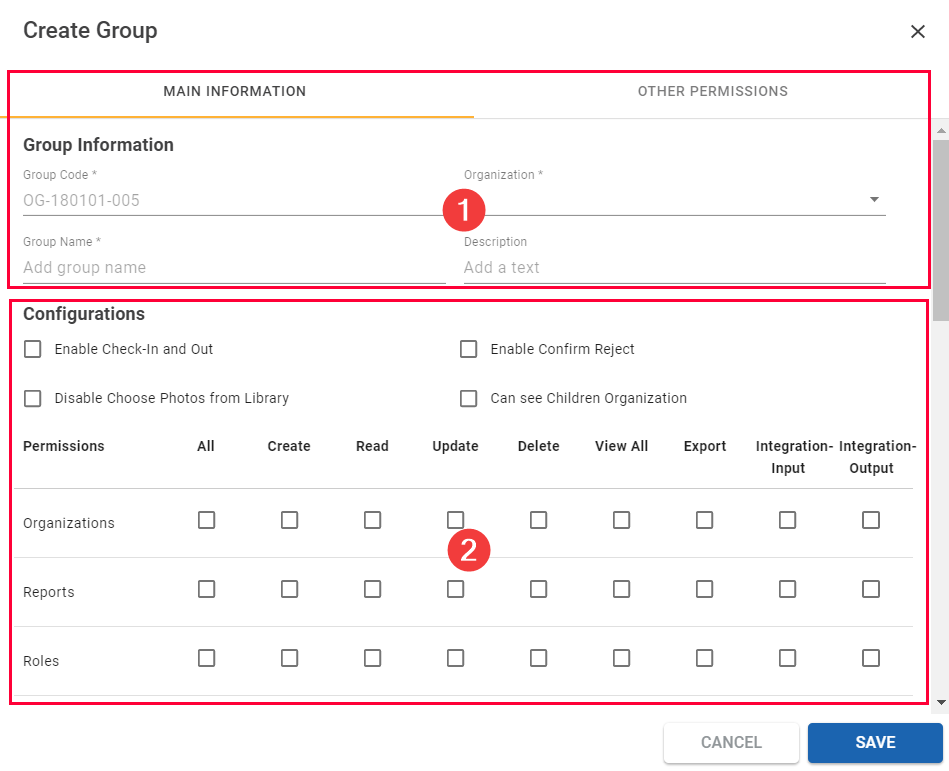
Illustration (English)
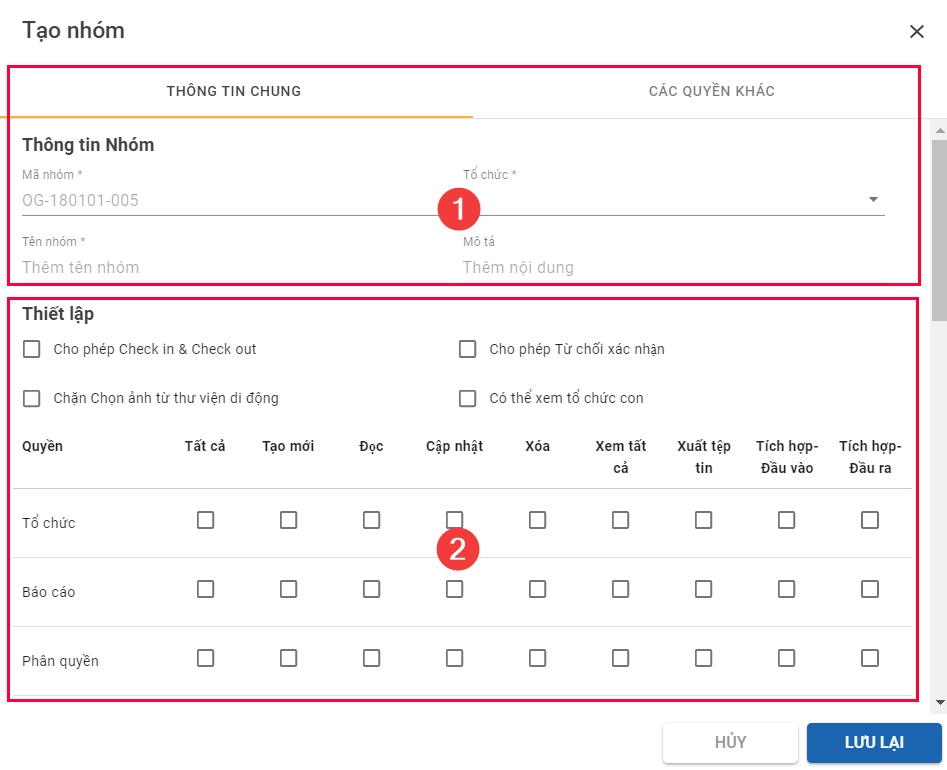
Illustration (Vietnamese)
- Apart from these two sections, there is also the Route Plan Rights Section. This section is intended for the Route Planner User Groups, which specifies the functions the Route Planner Users can perform to the Route Plan. Click here for instruction
Basic User Group Information Section
- Below is the list of basic information fields of a User group
Information field | Description & Input |
|---|---|
Organization (Required) | 1. Description: |
Group Code | 1. Description: |
Group Name | 1. Description: |
Description | 1. Description: |
Modules Section
- This section is where you can set up the modules that the User Group can get access to, and the corresponding level of authority over those modules
- Below is the description for each permission
- Note: There are certain permissions that are not yet available for some modules
Module Permission | Permission Description |
|---|---|
Create | Can create the resources of that module |
Read | Can read the resources of that module |
Update | Can update/edit the resources of that module |
Delete | Can delete the resources of that module |
View All | Can view the resources of that module from other Organizations of the same level |
Export | Can export the resources of that module to Excel spreadsheet |
All | All of the above permissions |
Integration-Input | Can pull the resource of that module from external databases (TMS; ERP etc.) into Abivin vRoute database |
Integration-Output | Can push the resource of that module from Abivin vRoute database to external databases (TMS; ERP etc.) |
- Furthermore, in order for the User Group of an upper-level Organization to view the resources of all lower-level Organizations below that upper-level Organization, you need to tick the Can see Children Organization checkbox
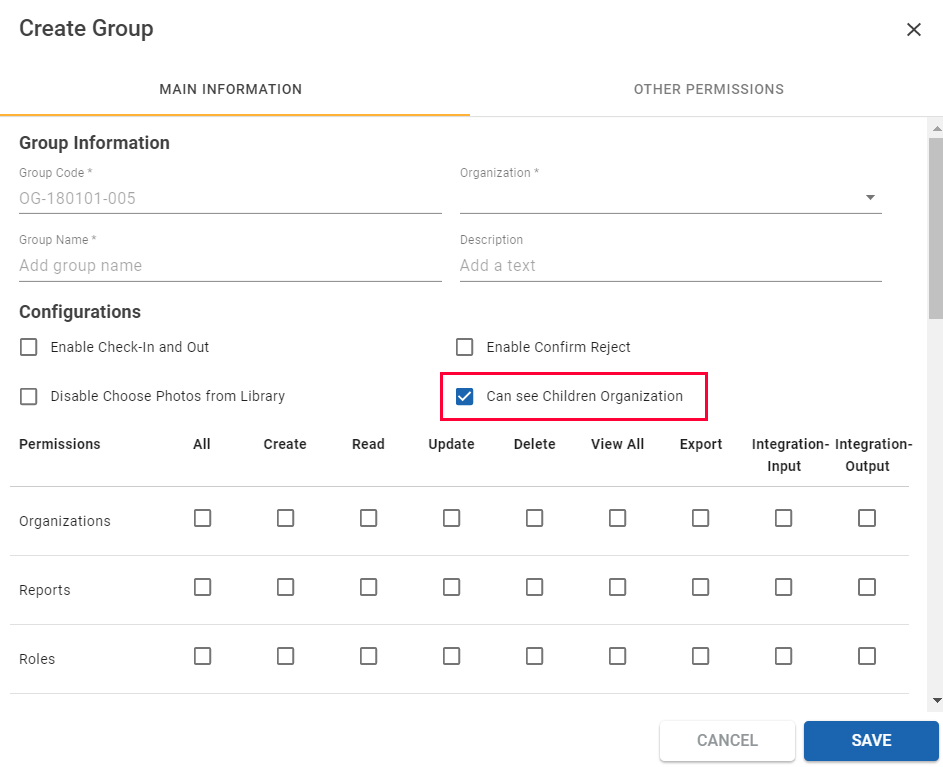
Illustration (English)
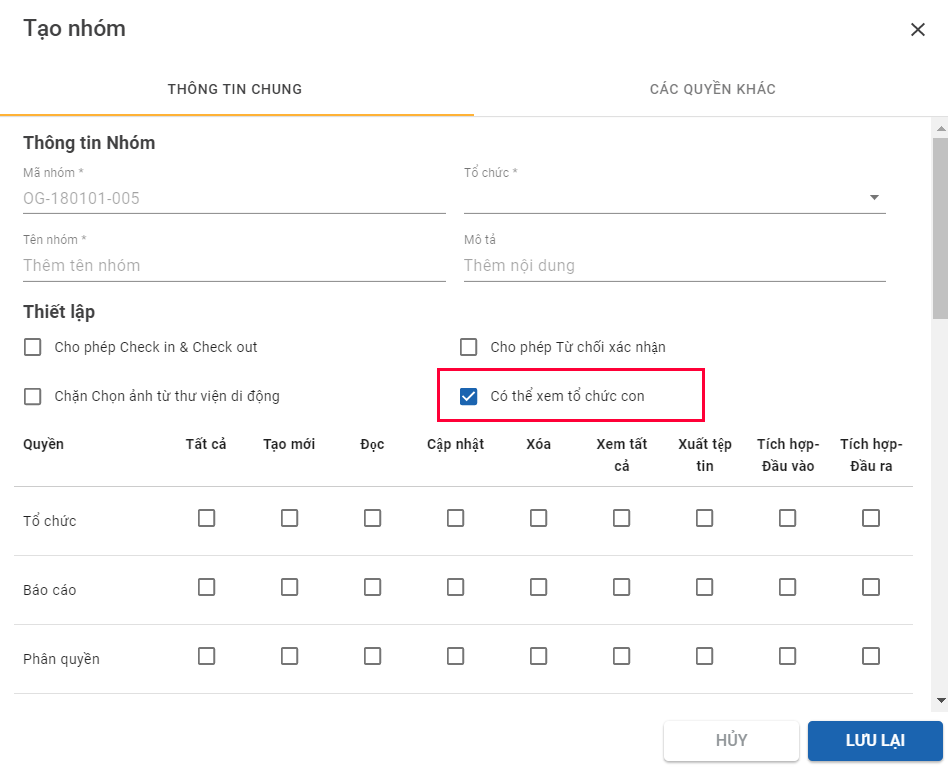
Illustration (Vietnamese)
- Below are the essential rights you are recommended to set for each User Group of this model
- Note: The Users who belong to the automatically created Administrator User Group of an Organization will always be able to see all resources of every lower level Organizations of that Organization, regardless of whether the Can see Children Organization checkbox is ticked or not. For example, a User who belongs to the automatically created Administrator User Group of a Branch will always be able to see the resources of all Depots under that Branch.
Manufacturer Administrator User group
- The table below list the essential modules and permissions you need to enable for the Manufacturer Administrator User Group of this model
Module | Module Permission |
|---|---|
Organizations | All |
Reports | All |
Roles | All |
Users | All |
Customers | All |
Products | All |
PDP orders | All |
Vehicle | All |
Tasks | All |
Task actions | All |
- Below are the optional permissions that can be enabled depending on your needs:
- If you wish to use the function to retrieve Unplanned (Missing) Orders and Failed Orders from past dates, you also need to tick the Integration - Input checkbox of the Orders module
- If your operation involves using Discounts and Promotions, tick the All checkbox of the Promotion module
- If you wish to use the Custom Import Tool to convert your Delivery Order files to Abivin vRoute data format, tick the All checkbox of the Mapping Profile module
Branch Administrator User group
- The table below list the essential modules and permissions you need to enable for the Branch Administrator User Group of this model
Module | Module Permission |
|---|---|
Organizations | All |
Reports | All |
Roles | All |
Users | All |
Customers | All |
Products | All |
PDP orders | All |
Vehicle | All |
Tasks | All |
Task actions | View All |
Depot Administrator User Group
- The table below list the essential modules and permissions you need to enable for the Depot Administrator User Group of this model
Module | Module Permission |
|---|---|
Organizations | All |
Reports | All |
Roles | All |
Users | All |
Customers | All |
Products | All |
Orders | All |
Vehicle | All |
Tasks | All |
Driver User group
Module | Module Permission |
|---|---|
Organizations | Read |
Customers | Read |
Products | Read |
Orders | Read |
PDP orders | Read |
Vehicle | All |
Tasks | Read |
Task actions | Read |
- After you have completed creating User groups, let's move on to create Users
Manage Users
Locate User List
- Users are listed on Organizations > Users tab

Illustration (English)

Illustration (Vietnamese)
Create Users
- Users can be created using two methods: Web form and Excel template
Method 1: Create single user using Web form
- Please refer to the CRUD functions article to know the general steps about creating single objects using Web form
- When using Web form to create user, the basic information fields of a new user must be input in the following sequence to ensure no mistake:
-
- Organization Name (Note: You can assign one User to multiple Organizations)
-
- Groups (Note: You can assign one User to multiple User Groups within the Organizations selected above)
-
- Username (See this article for instruction: User Account Setup)
-
- Password, Re-password (See this article for instruction: User Account Setup)
-
- Email (You should use real email addresses in order to reset password when forgetting)
-
- Phone Number
-
- Full Name
- If the user being created is a Driver, you also have to fill some specific information fields
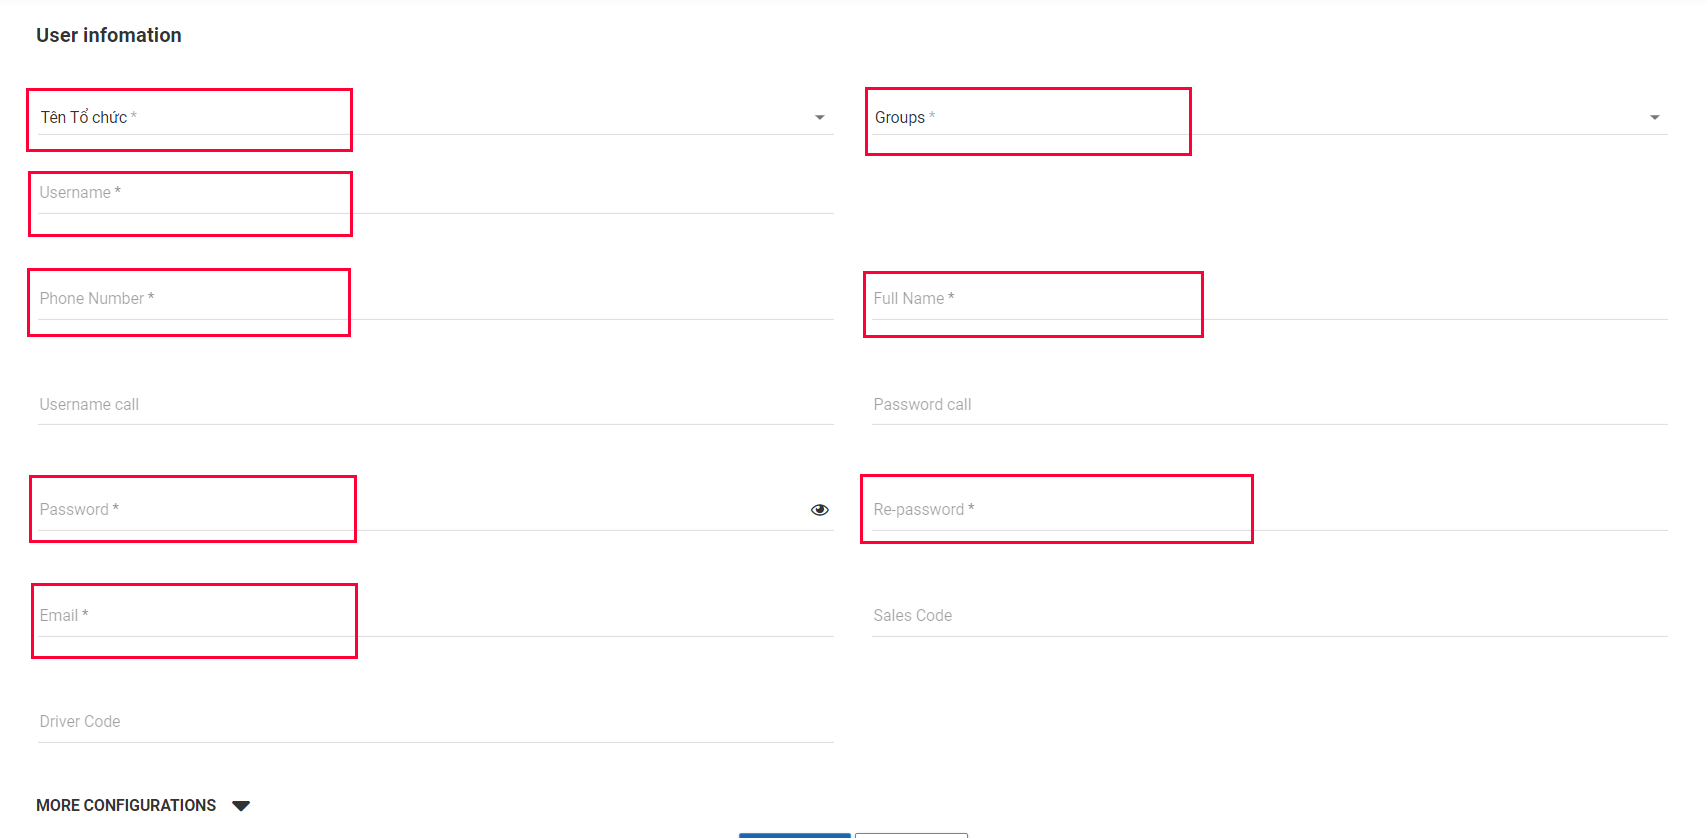
Illustration (English)
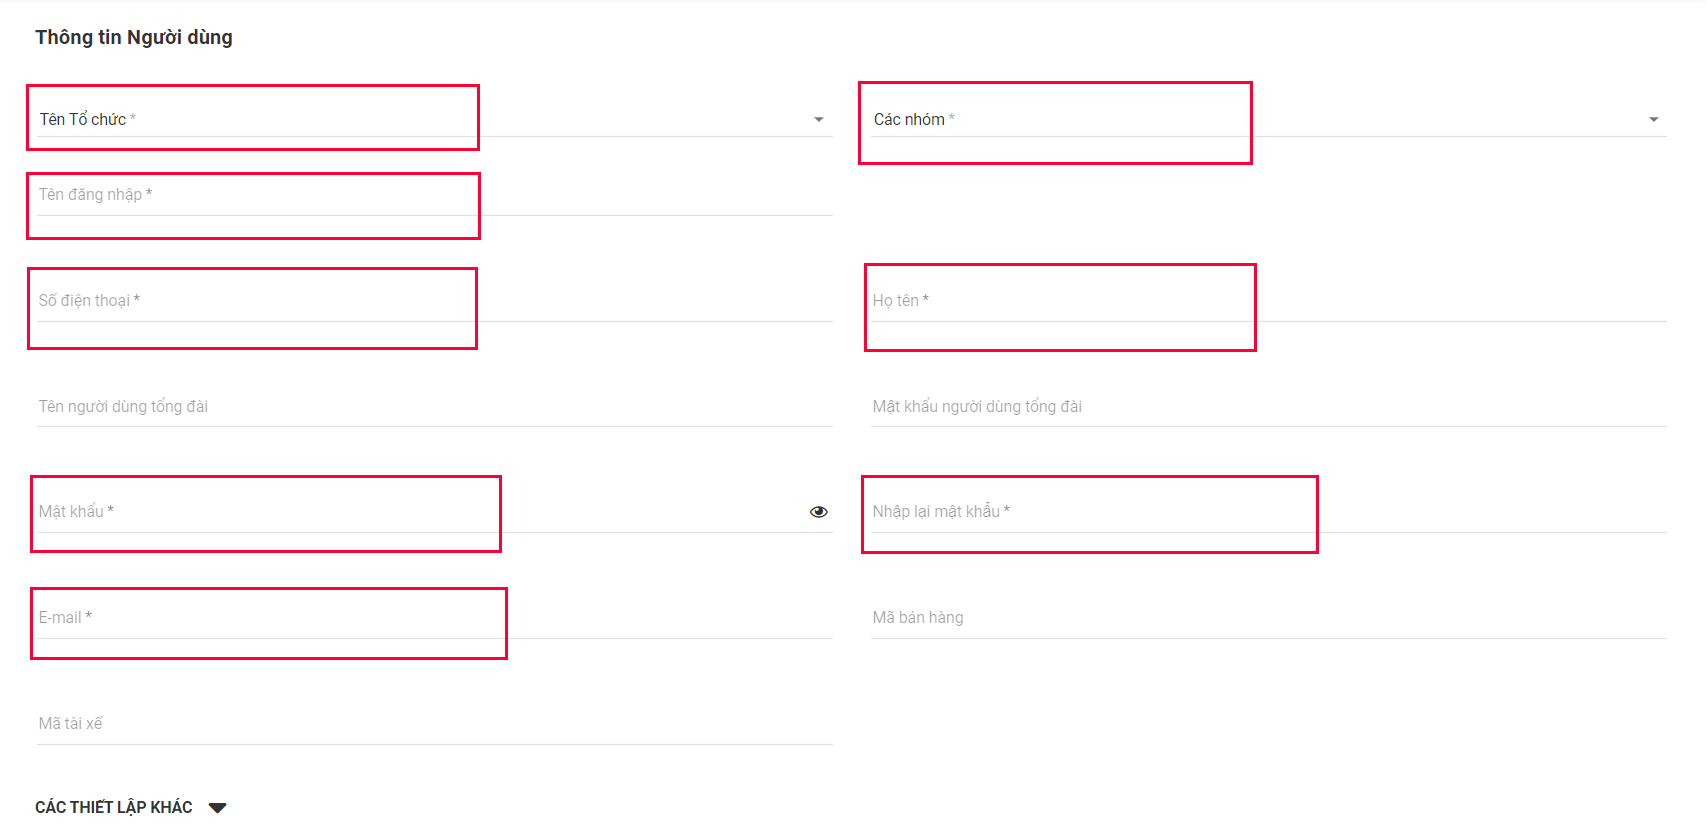
Illustration (Vietnamese)
Method 2: Create multiple users using Excel template
- Please refer to the CRUD functions article to know the general steps about creating multiple objects using Excel template
- You will notice that in the Excel template, there is no Password field. This is because upon uploading the Excel template onto the Web app, each user will receive an email enclosed with a password in the email addresses linked with their accounts. They have to use those passwords to login for the first time. After logging in, they can change their passwords to new ones (Note that the new passwords must adhere to the Strong Password rules)
How to change password?
- For Web app users, please click on this link
- For Mobile app users, please click on this link
Basic User information
- Below are the basic information fields of a User
Apart from the information fields mentioned below, other information fields can be left blank during the creation/update processes
Information field | Description & Input |
|---|---|
Organization Name (Web form); Organization Code (Excel template) (Required) | 1. Description: |
Groups (Web form); User Group Code (Excel template) | 1. Description: |
Username | 1. Description: |
Password; Re-password | 1. Description: |
Email | 1. Description: |
Phone Number | 1. Description: |
Full Name | 1. Description: |
Specific information of Driver
- Apart from the basic information fields above, there will be some additional information fields for users who are Deliverymen (Drivers)
- On Web form, these information fields will be visible when you click on MORE CONFIGURATIONS

Illustration (English)

Illustration (Vietnamese)
Information field | Description & Input |
|---|---|
Vehicle Type (Web form); Type Of Vehicle (Excel template) (Required) | 1. Description: |
Position | 1. Description: |
Driver License Number | 1. Description: |
License Class | 1. Description: |
Medically Cleared | 1. Description: |
Secret | 1. Description: |
sub scription Code | 1. Description: |
sub scription Expiry | 1. Description: |
Change Active Status of Drivers
- Besides Organizations > Users tab, users who are drivers can also be managed in Transportation > Drivers tab

Illustration (English)

Illustration (Vietnamese)
- On this tab, you can change the active status of the drivers - Specify whether the driver is currently active and can be assigned delivery tasks or the driver is currently inactive
- By default, after being created, all drivers will have the active status to be Active, represented by the icon under the column Active. This means the drivers can be assigned delivery tasks during the route optimization process

Illustration (English)

Illustration (Vietnamese)
- To change the active status of a driver, click on that icon. When that icon turns to , that means the active status of the driver has been converted to Inactive. That driver will not appear anymore in the route optimization process, unless you have locked a Delivery shift with that driver assigned before changing the active status of that driver

Illustration (English)

Illustration (Vietnamese)
Updated about 1 month ago
