Custom Import Tool
- Custom Import is a useful tool in our Web app. It is developed to help our users directly convert data from their proprietary data formats into Abivin vRoute standard data formats without having to use the usual object creation methods (Web form; Excel templates)
- At the moment, this Custom Import tool is developed for converting Delivery Order files (Delivery Order, shortened as DO). In this article, we will use the acronym DO file to refer to the Delivery Order file
Precondition to Use Custom Import
- To be able to use the Custom Import tool, you must make sure you are given permission or you have given permission to the Custom Import tool to the intended user groups. To grant permission to the Custom Import tool, please follow these steps below
- Step 1: Navigate to tab Organizations > User Groups
- Step 2: Click the Edit icon of the User Groups that you would like to grant the permission to use the Custom Import tool
- Step 3: A form named Update Group will show up on the screen. On the tab Main Information, scroll down to find the Mapping Profile and tick the boxes of permissions you want to grant access to the selected user group. Please refer to this link to get detailed information on types of permission Modules Sections
- Step 4: Click Save for changes to take effect.
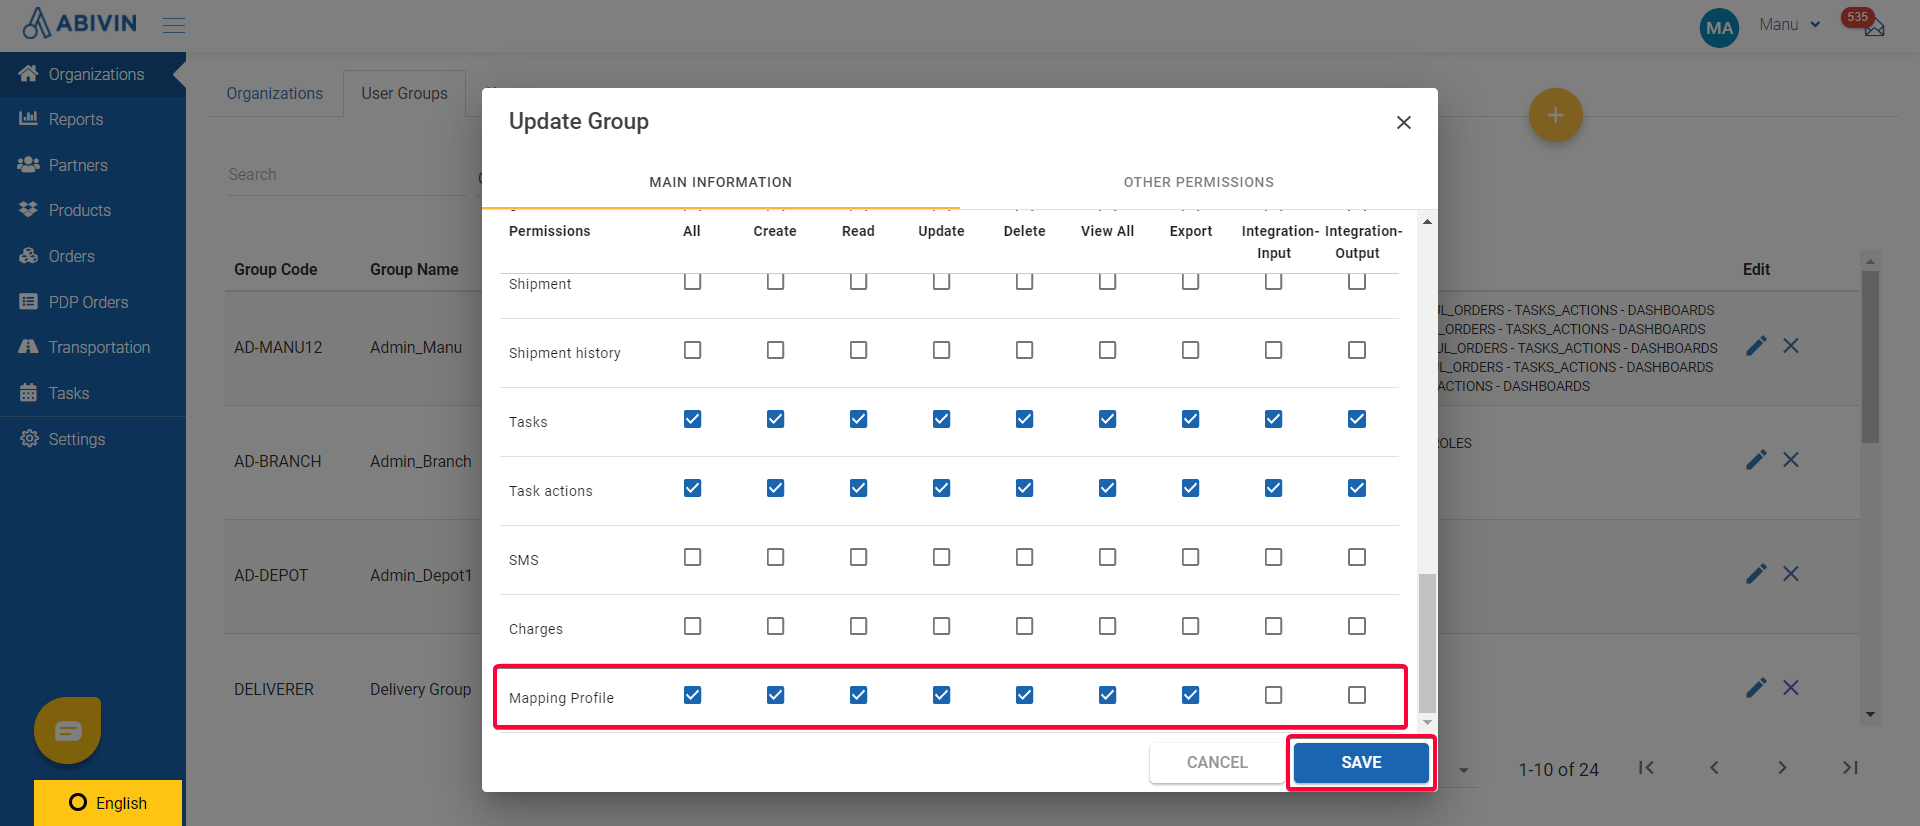
Illustration (English)
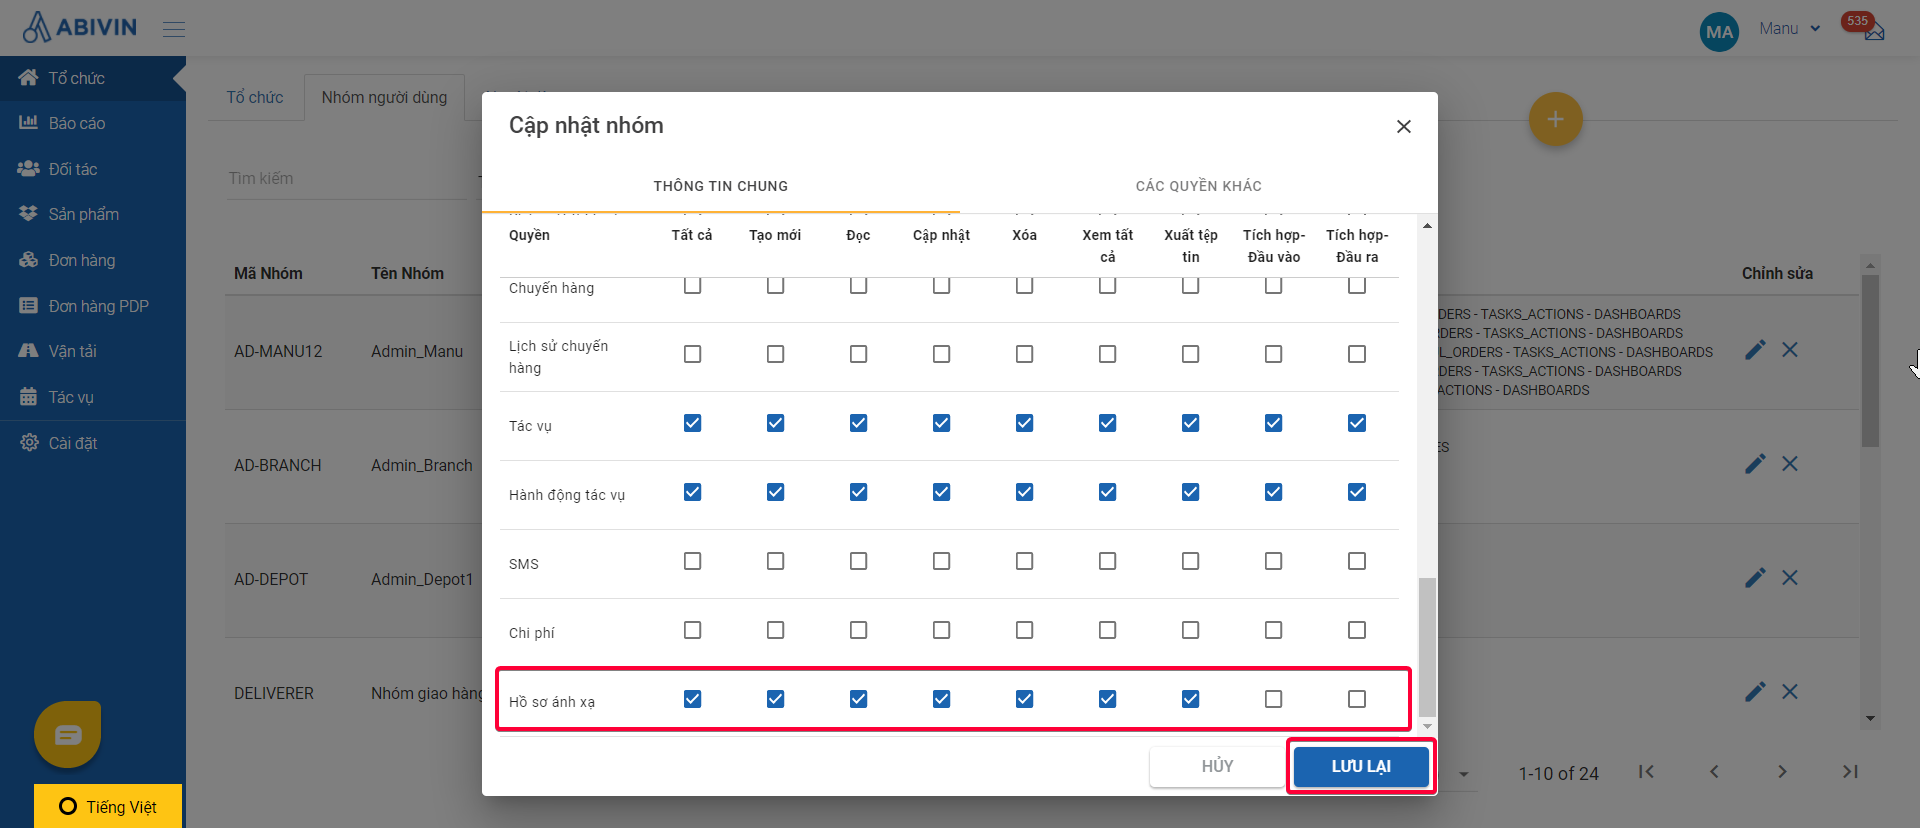
Illustration (Vietnamese)
General Steps to Use Custom Import tool
Step 1: Access Custom Import tool & Upload DO file
- To access the Custom Import tool, first navigate to the tab Settings > Custom Import. On this tab, hover your mouse on the orange plus circle icon , then click on the icon Import Data
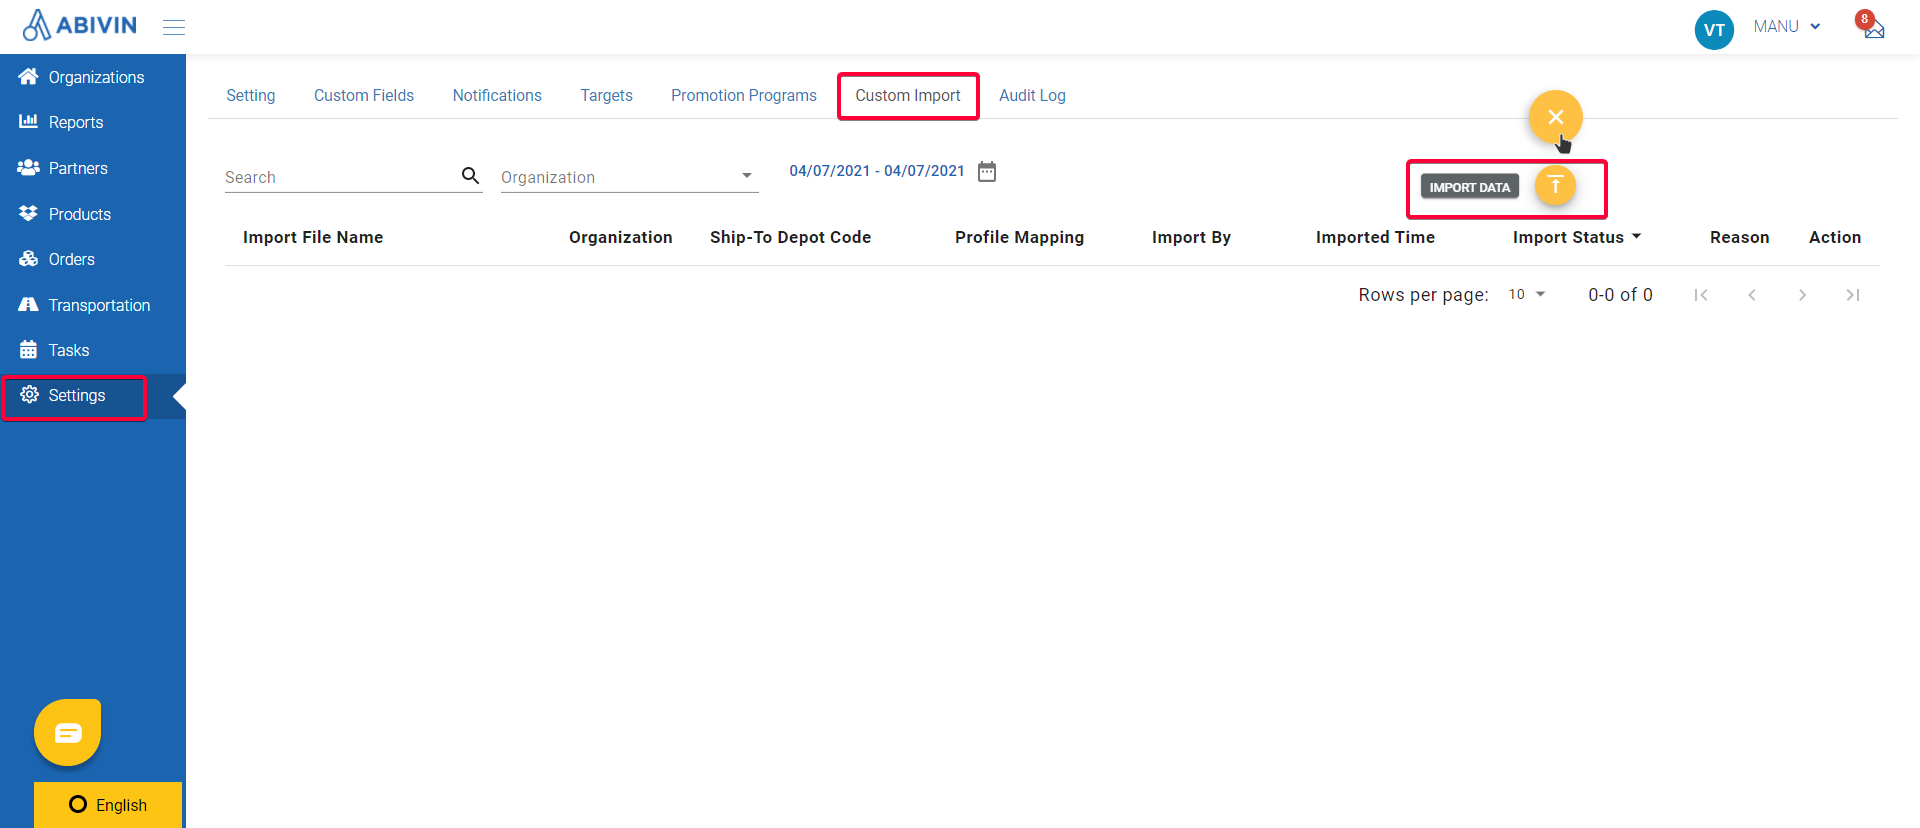
Illustration (English)
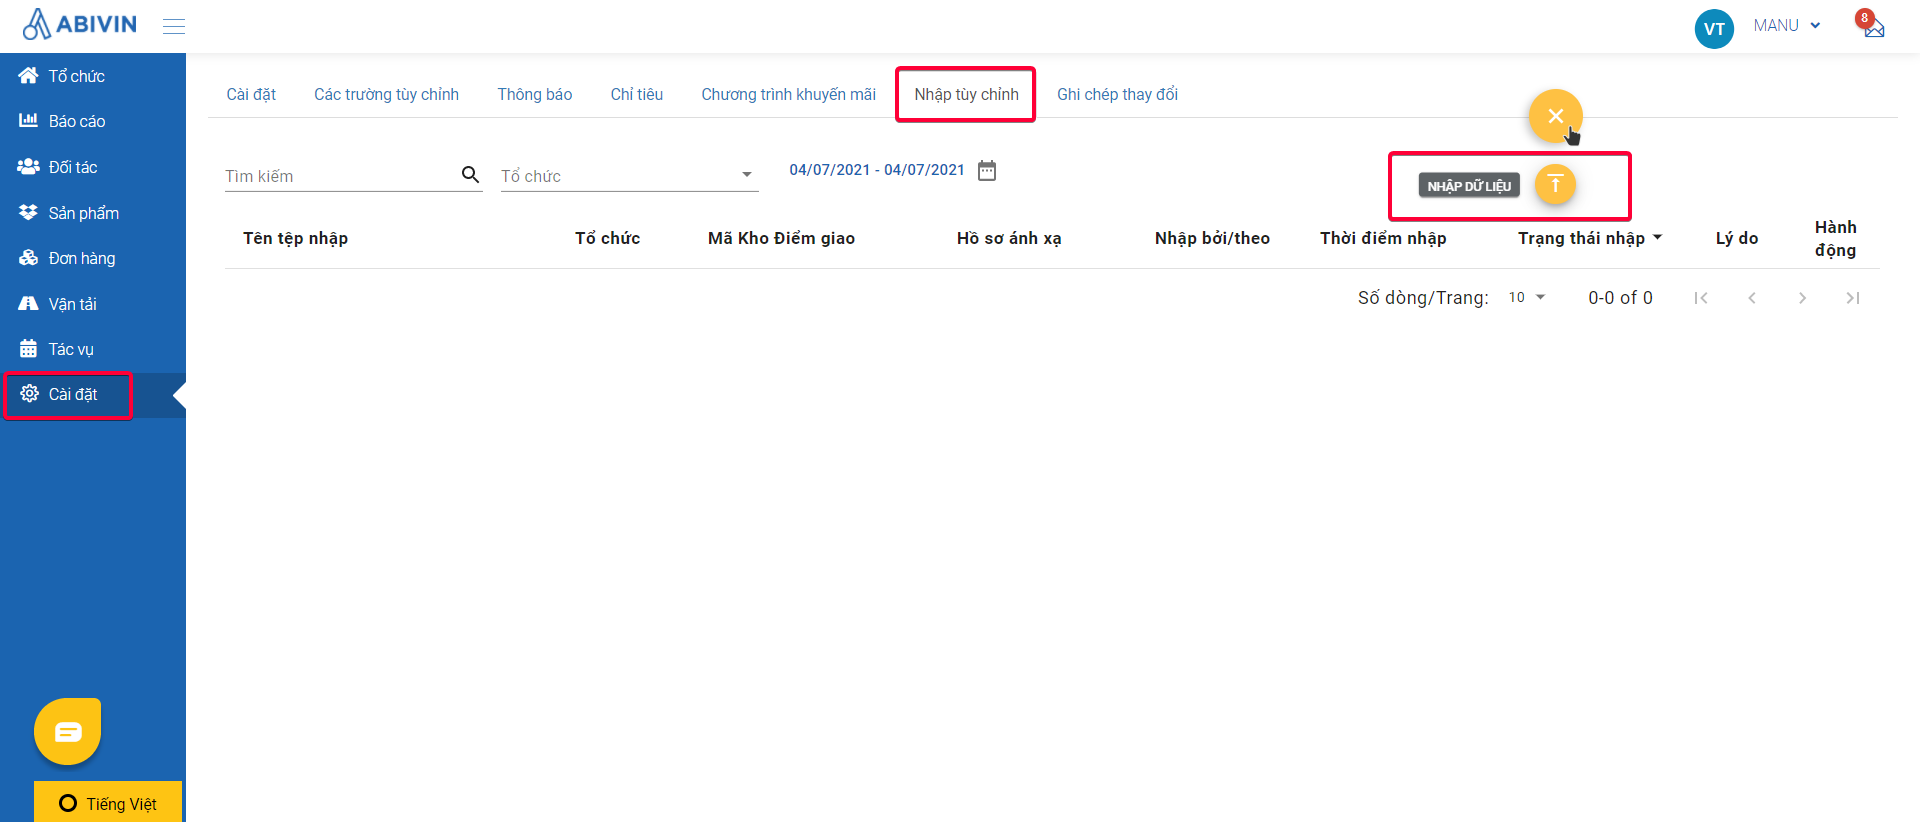
Illustration (Vietnamese)
- The form Import From CSV/XLSX will appear
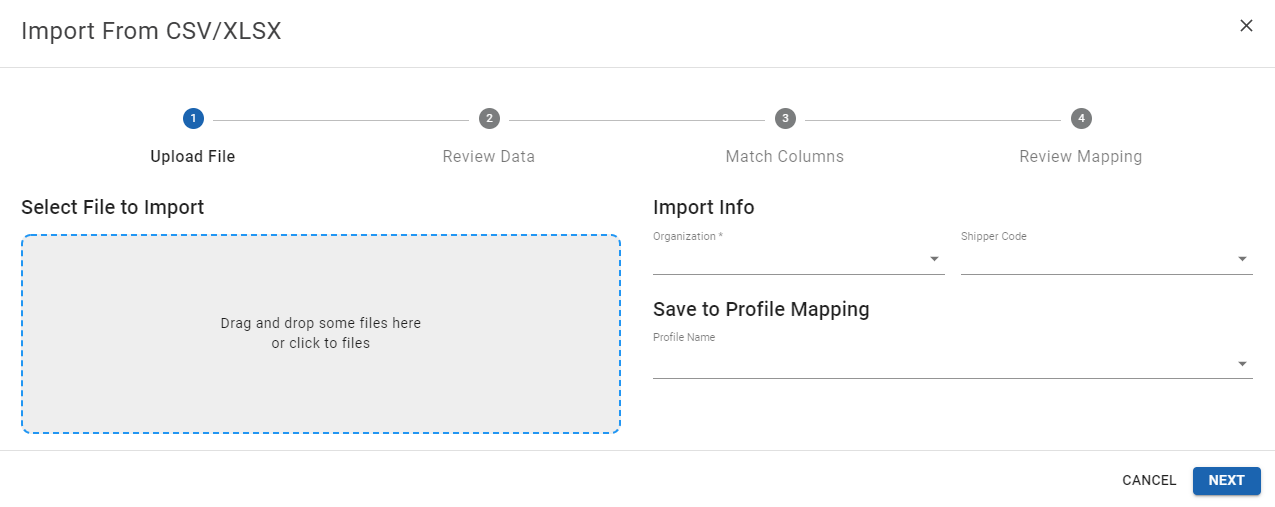
Illustration (English)
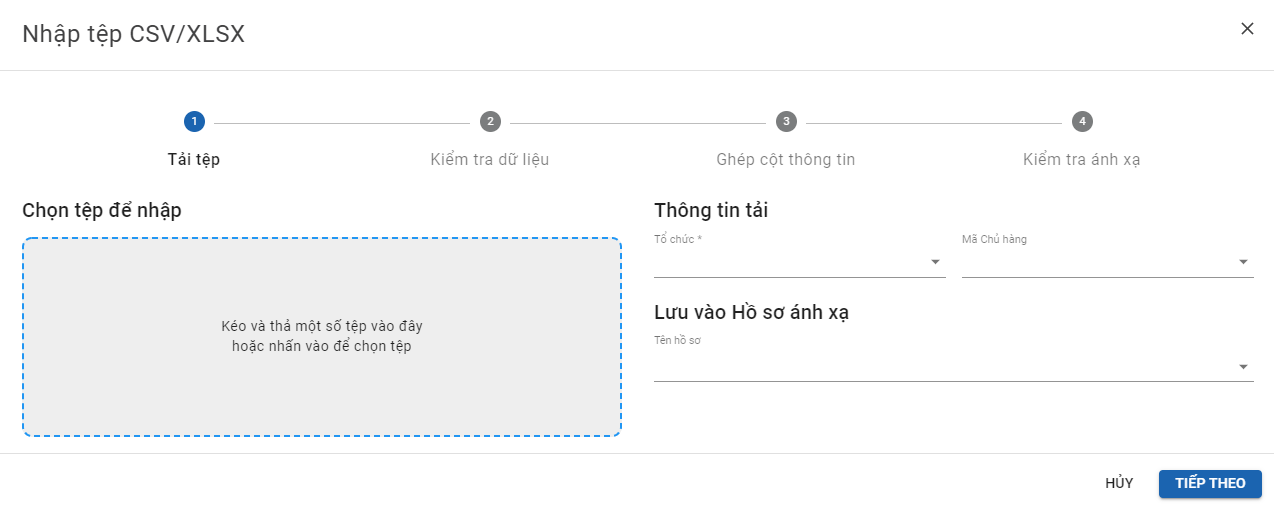
Illustration (Vietnamese)
- Click on the area Drag and drop some files here or click to files, select the appropriate CSV/XLSX DO file from your computer (Note: We strongly suggest using XLSX format to prevent unwanted inaccurate text decode)
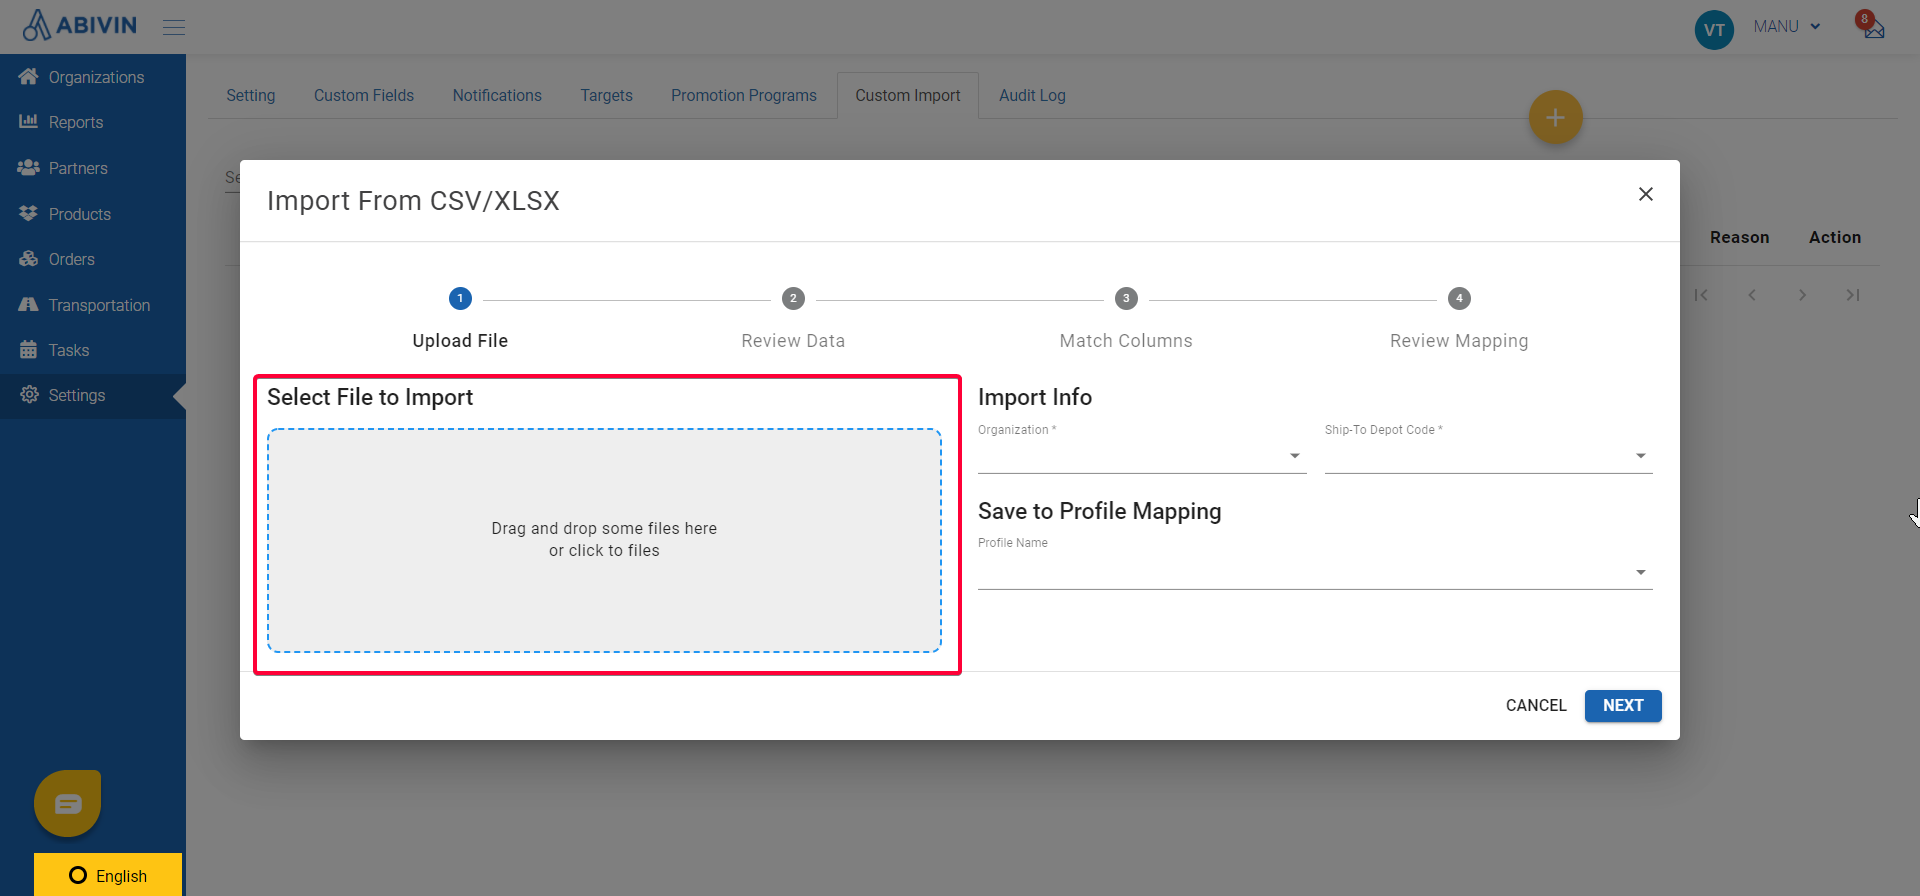
Illustration (English)
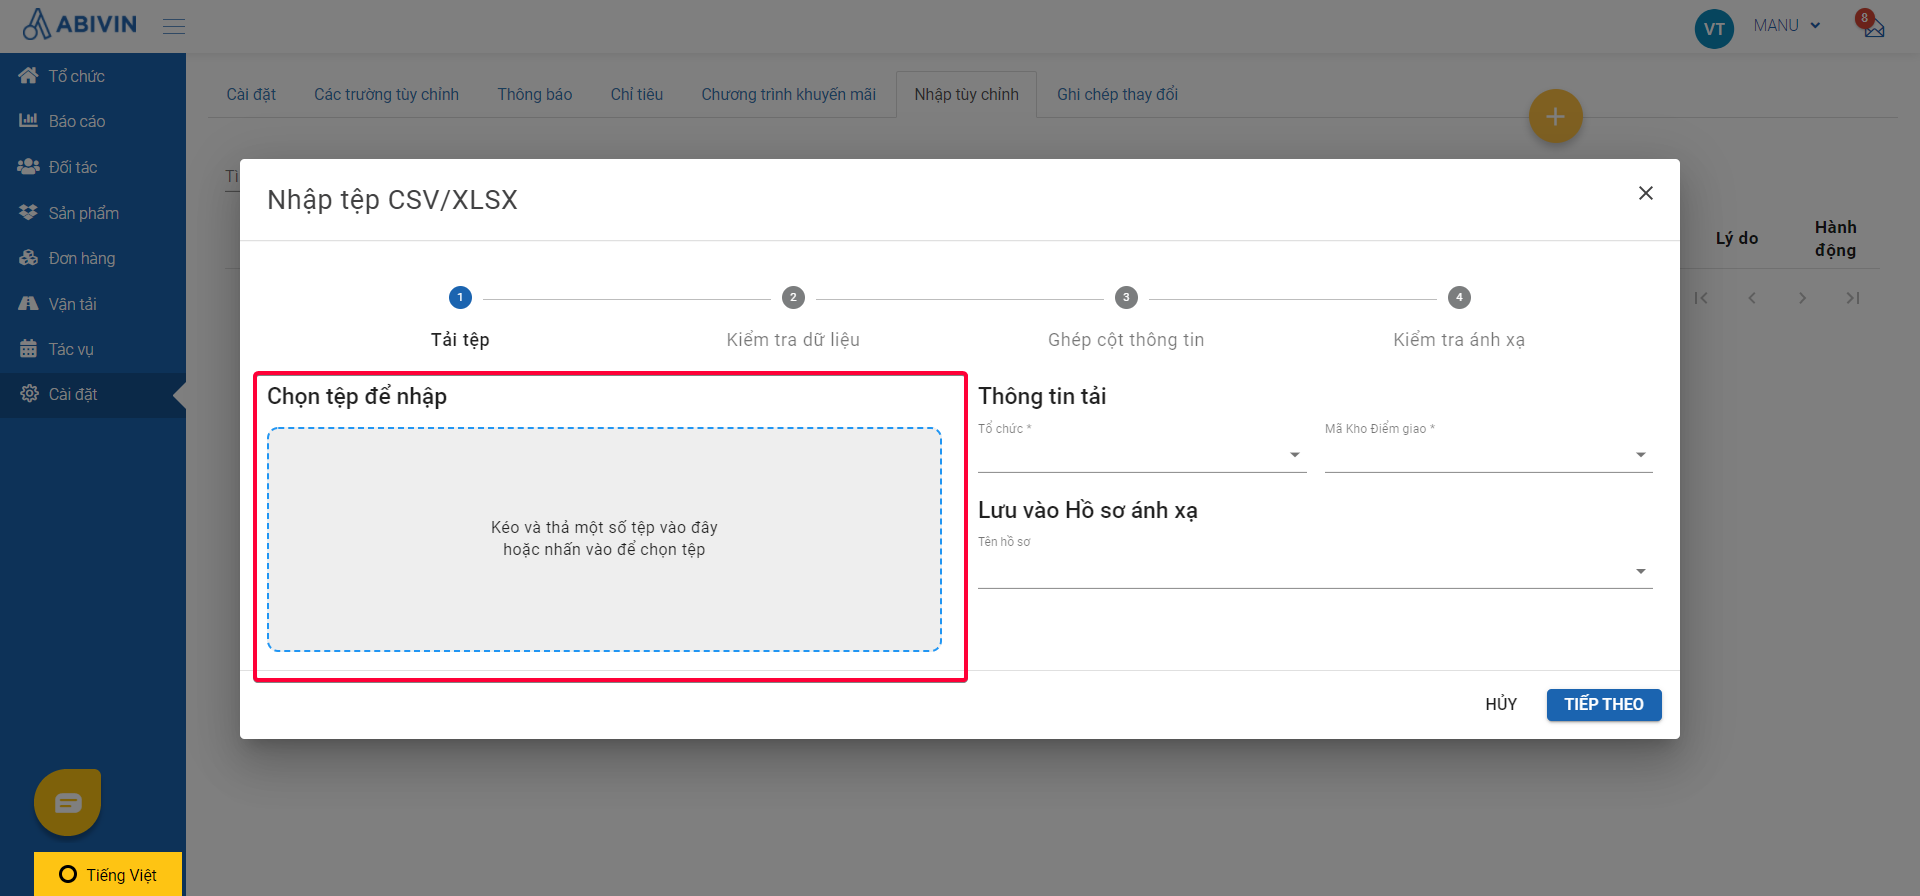
Illustration (Vietnamese)
Step 2: Declare Mapping Profile
Mapping Profile definition
-
Mapping Profiles are records that store the correct data mapping mechanism between user proprietary data formats and Abivin vRoute data formats
-
After uploading a DO file as in Step 1, you need to declare the Mapping Profile for that DO file
-
Here there are two scenarios:
-
Scenario 1: The Mapping Profile for the DO file hasn’t been created yet. In this scenario, you need to create a new Mapping Profile
-
Scenario 2: The Mapping Profile for the DO file has already been created. In this scenario, you only need to select the correct Mapping Profile from the list of existing Mapping Profiles
-
Depends on whether your account is Shipper-oriented or Carrier/Distributor oriented, the Mapping Profile declaration process will differ in certain steps
-
If your account is Shipper-oriented, when you use the Custom Import tool, you only need to do the following to declare a new Mapping Profile
-
1 - Select a DO file then upload it to the Custom Import tool as in Step 1
-
2 - Select a Depot that manages the products listed in the DO file
-
3 - Name a Mapping Profile
-
If your account is Carrier/Distributor-oriented, when you use the Custom Import tool, you need to do the following to declare a new Mapping Profile
-
1 - Select a DO file then upload it to the Custom Import tool as in Step 1
-
2 - Select a Depot that manages the products listed in the DO file
-
3 - Select a Shipper (owner/supplier of the products listed in the DO file)
-
4 - Name a Mapping Profile
Scenario 1: Create a new Mapping Profile
- After the DO file has been uploaded, click on the field Organization to select the Depot that will directly manage the Order being uploaded (The organizations of Depot type on Abivin Web app for both Shipper-oriented and Carrier/Distributor-oriented accounts)
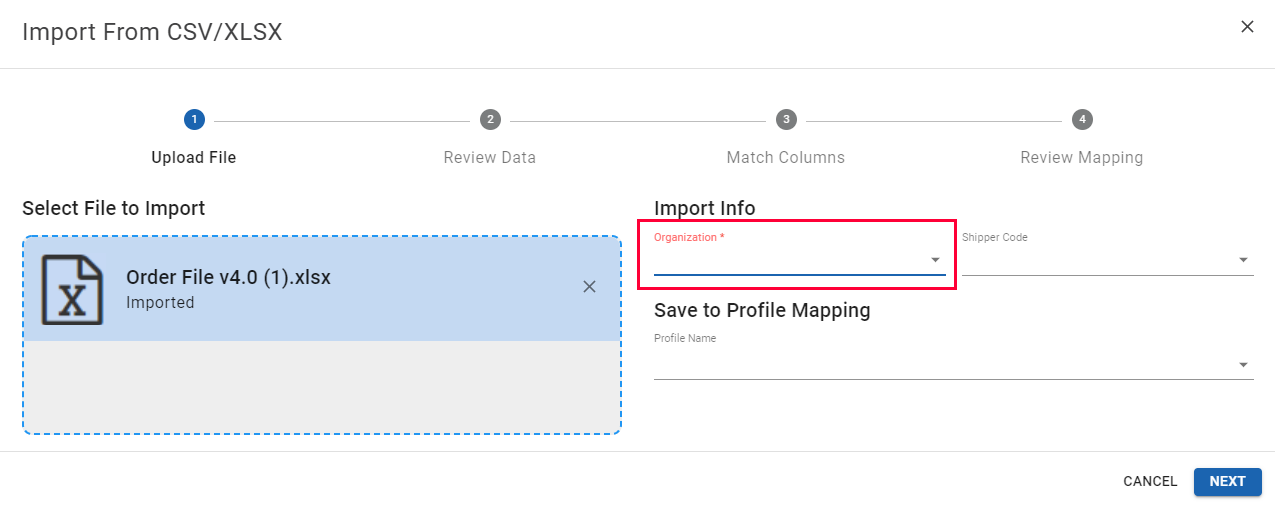
Illustration (English)
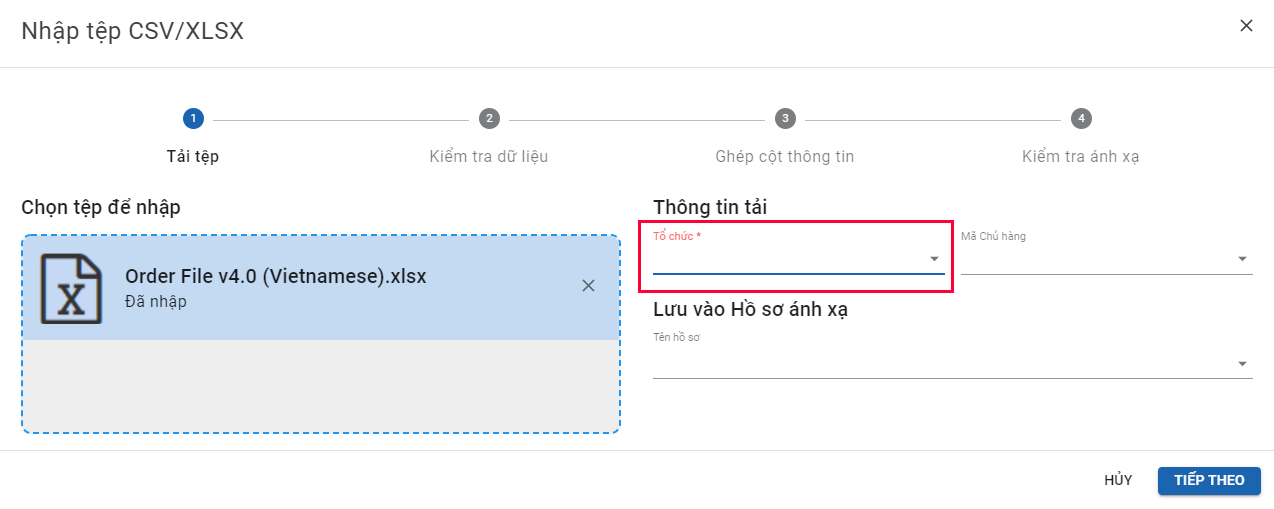
Illustration (Vietnamese)
- If your account is Carrier/Distributor-oriented, you will need to specify the Shipper that is associated with the Customer in the DO file. To do this, then click on the field Shipper Code and select the intended Shipper on the drop-down list. Alternatively, you could enter the Organization Name/Organization Code of the desired Shipper into the search bar then select the returned value.
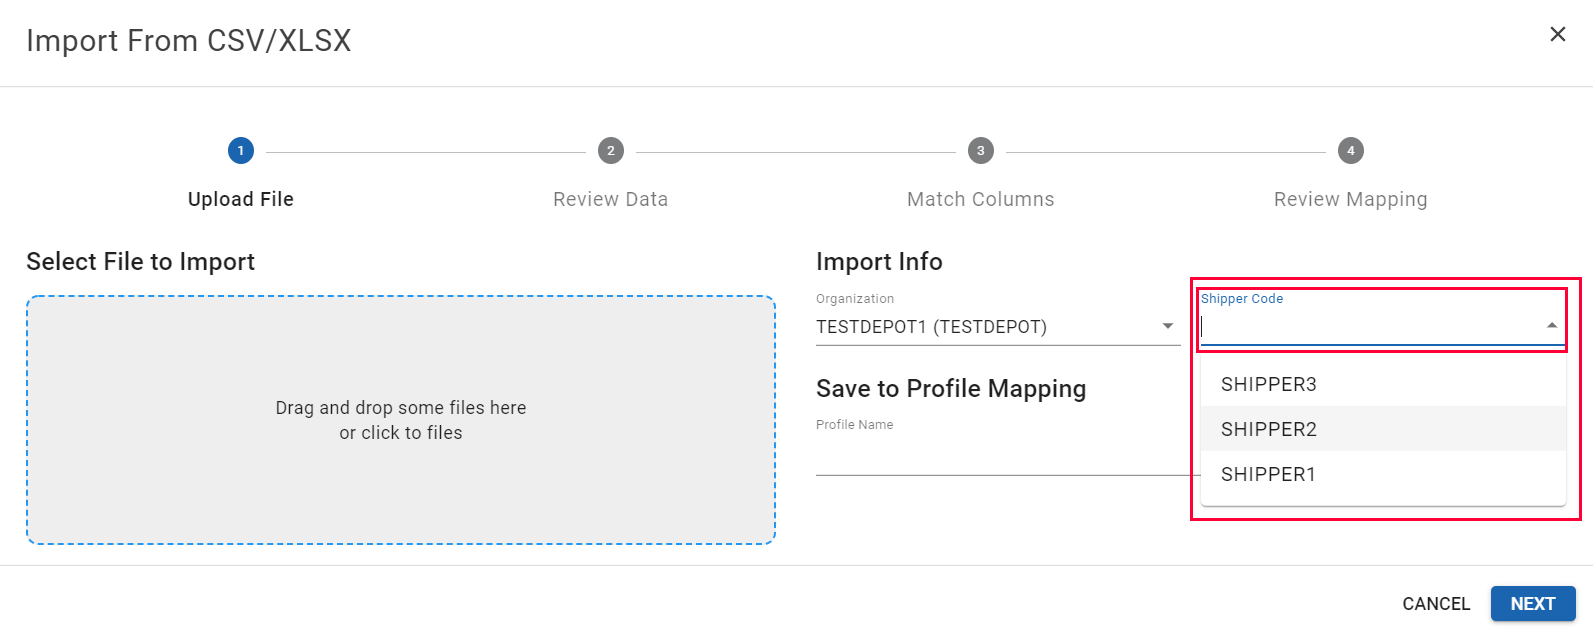
Illustration (English)
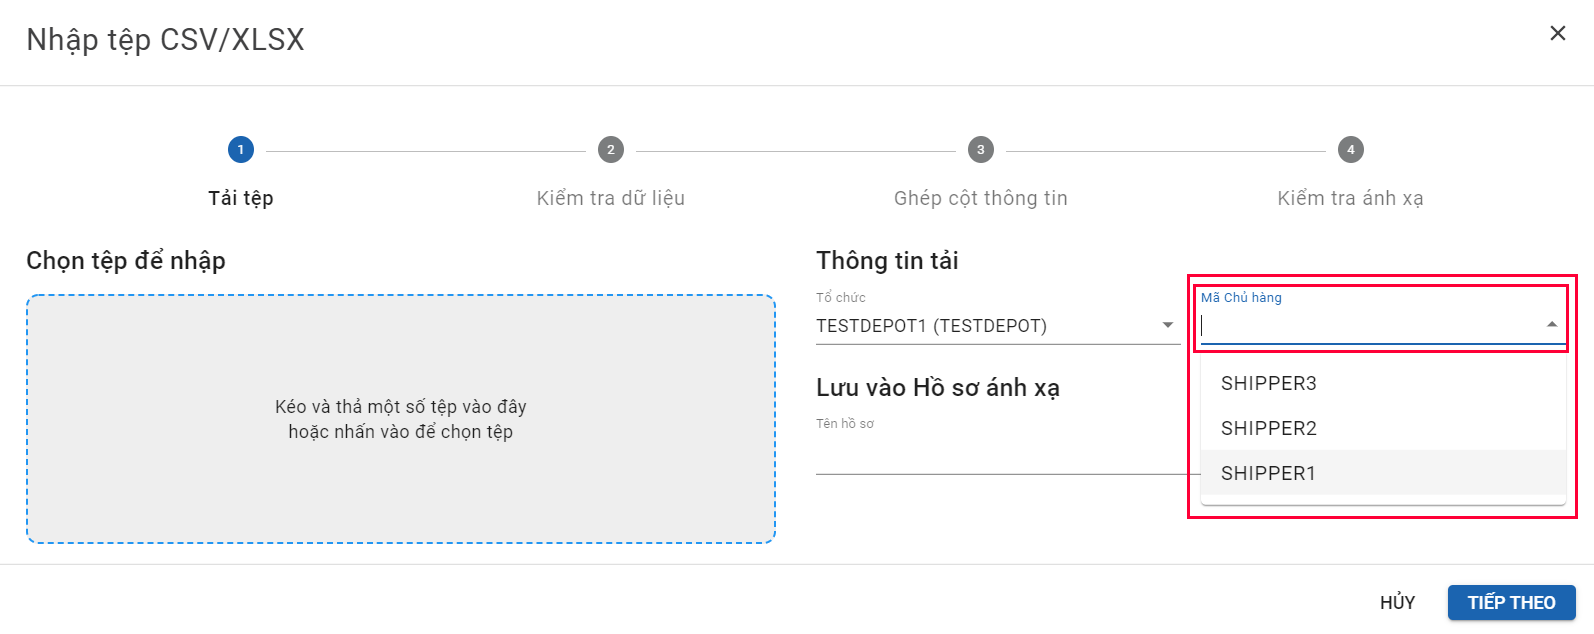
Illustration (Vietnamese)
- If your account is Shipper-oriented and you don't use Shipper Code, you could leave this field blank
- Next, click on the field Profile Settings, select the option Create New Profile to create a new Mapping Profile. A new field named Profile Name will appear on the right. Enter the name of the new Mapping Profile into the field Profile Name
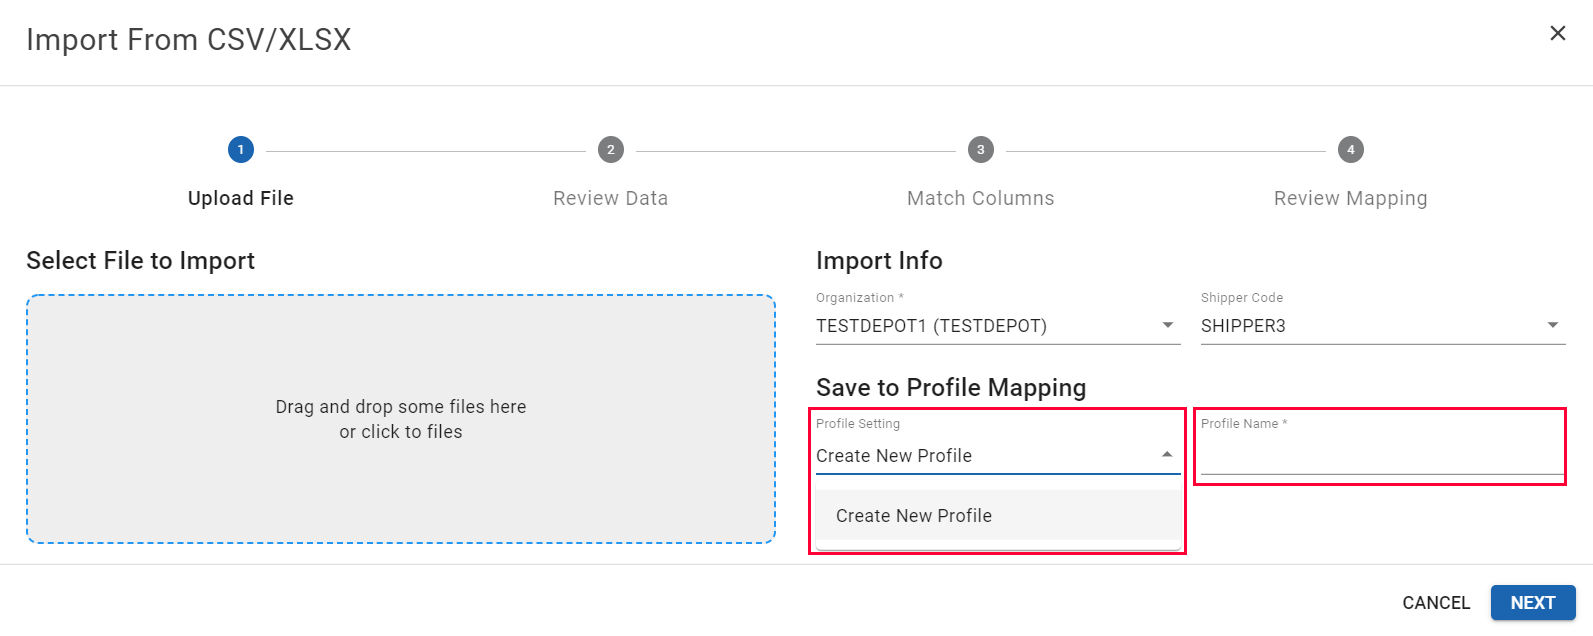
Illustration (English)
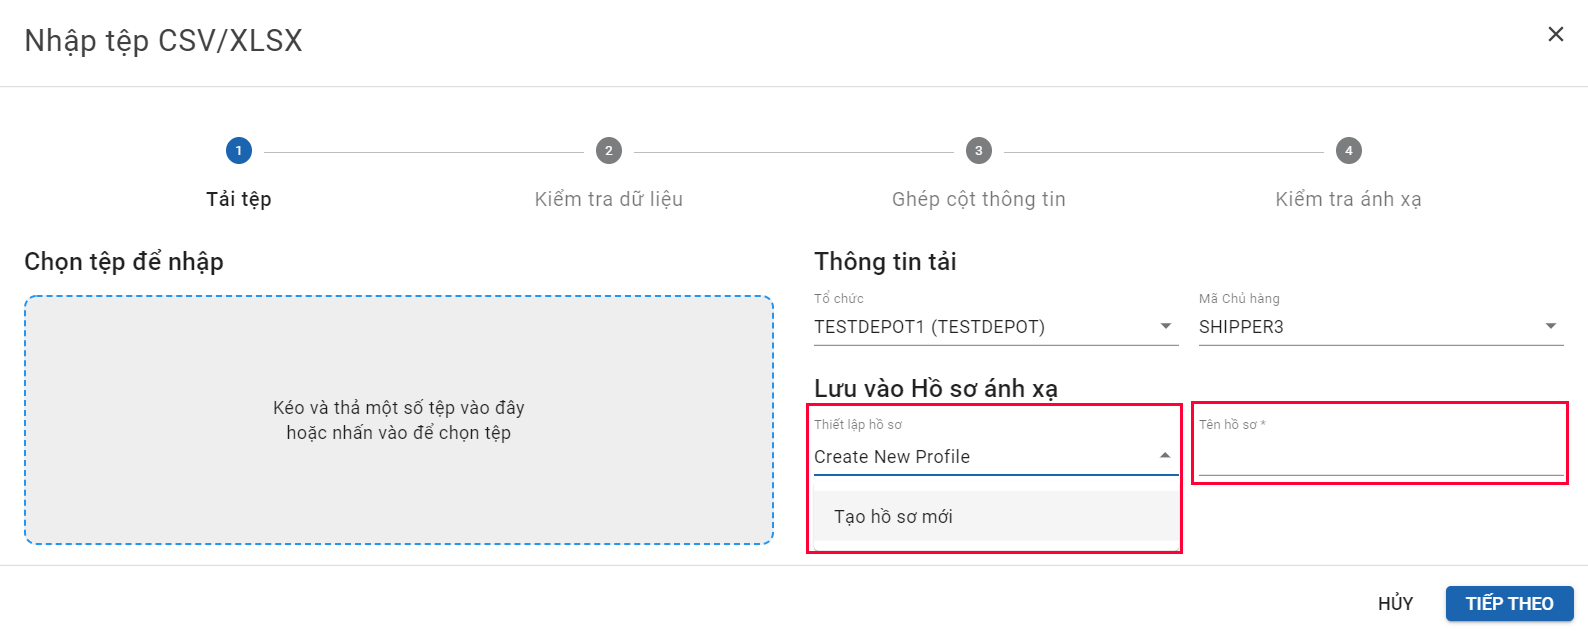
Illustration (Vietnamese)
- Mapping Profile Name format can contain letters, text, numbers, spaces and special characters (for example: Test @ Depot 1). The name of the new Mapping Profile should not be the same as any of the existing Mapping Profiles'.
- After you have created a new Mapping Profile, click Next. You will be navigated to the tab Review Data
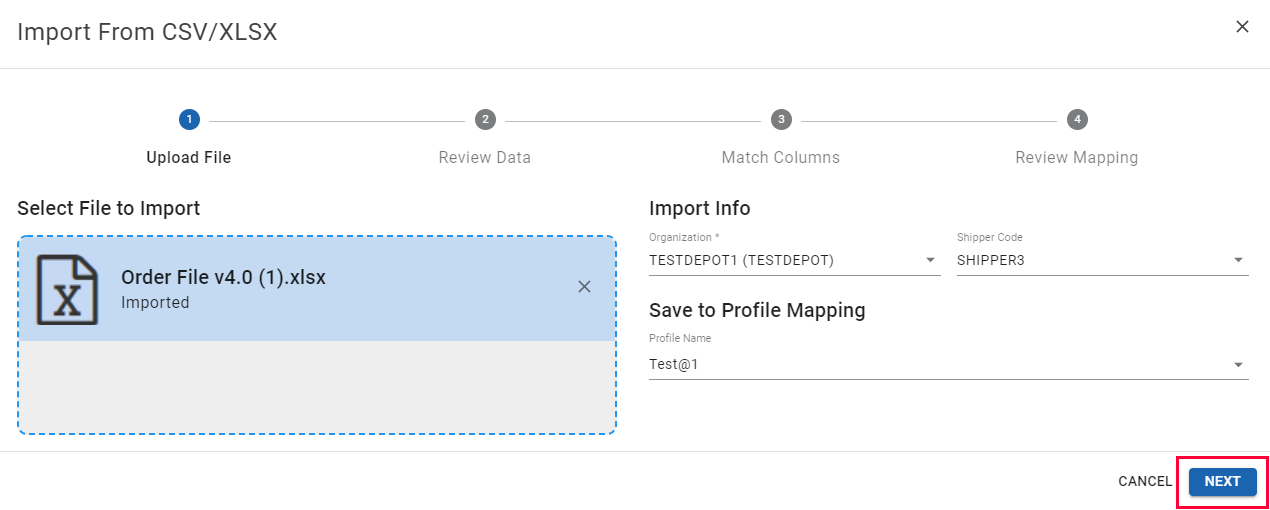
Illustration (English)
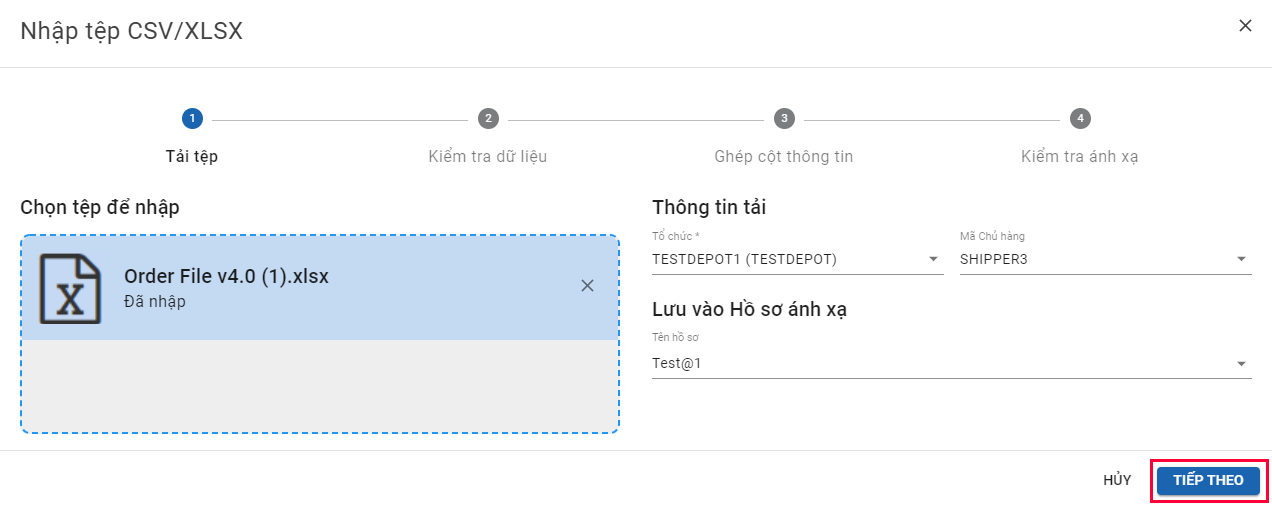
Illustration (Vietnamese)
- On the tab Review Data, you need to select the Header row in the uploaded DO file. The Header row contains the name of the data fields in the DO file, which you will use to map with the Abivin vRoute standard data fields later. You need to move your mouse onto the preview, click on the row that contains the columns' name in the DO file. The row you clicked on will be highlighted in blue. If you are sure that the row you selected is the column name in the Abivin vRoute DO file, then click Confirm. The button Confirm will change to Confirmed
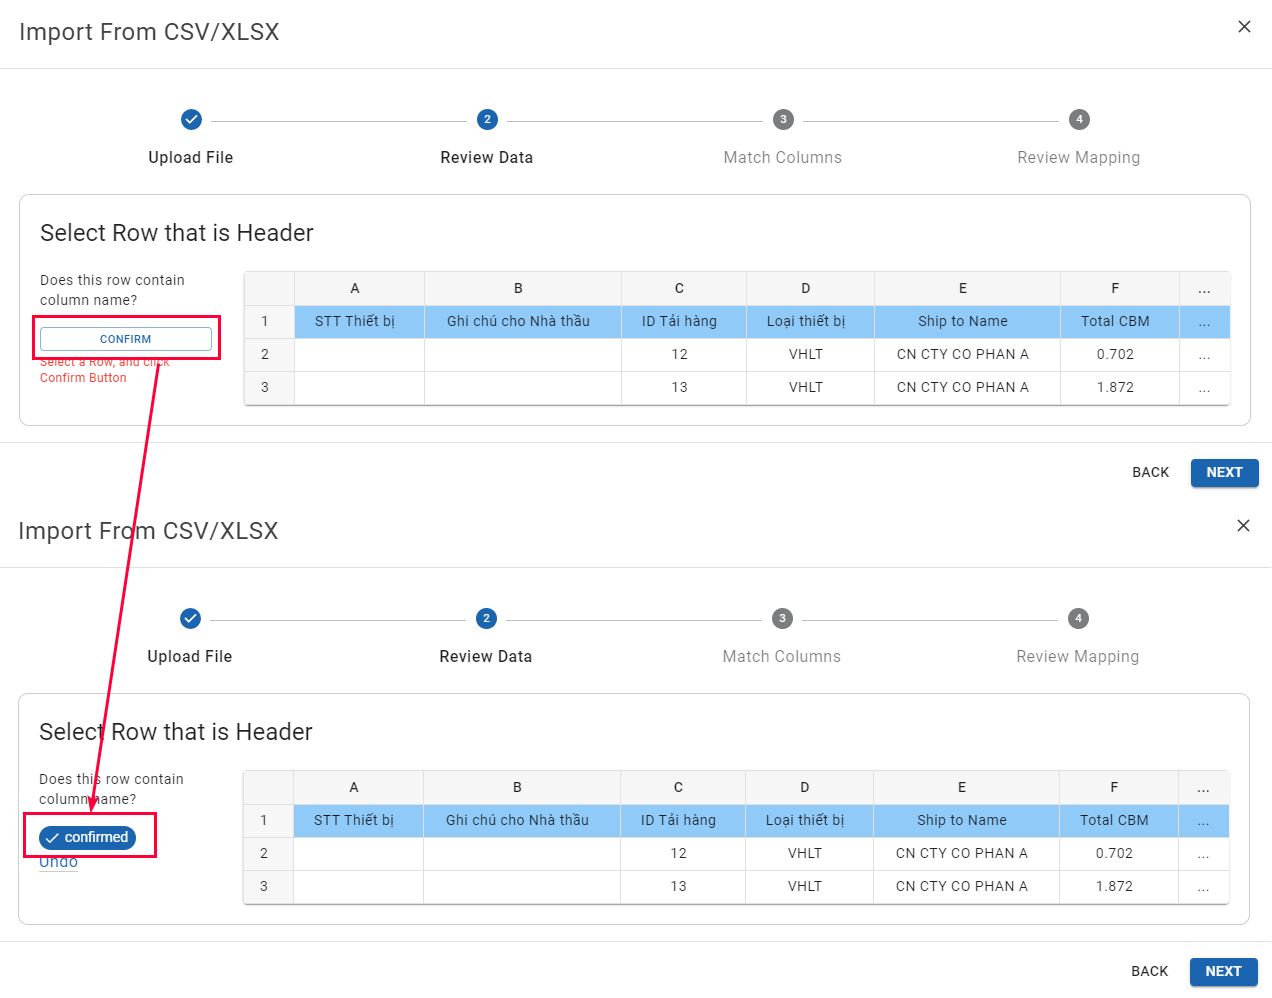
Illustration (English)
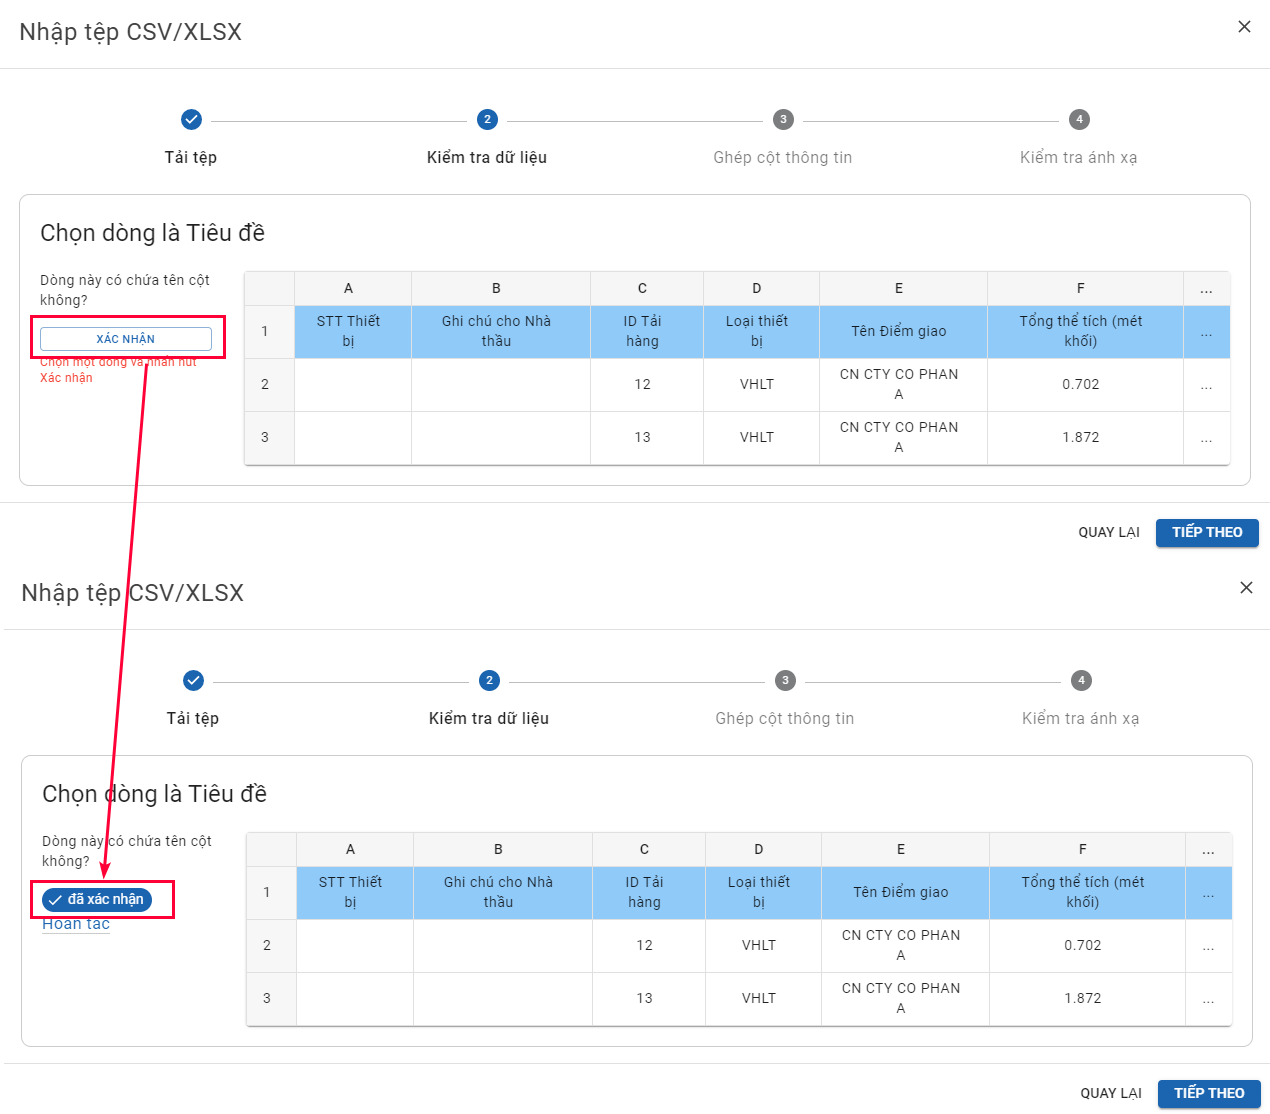
Illustration (Vietnamese)
- If you mistakenly selected the incorrect row, click on the text Undo (Below the text Confirmed), then reselect the correct row
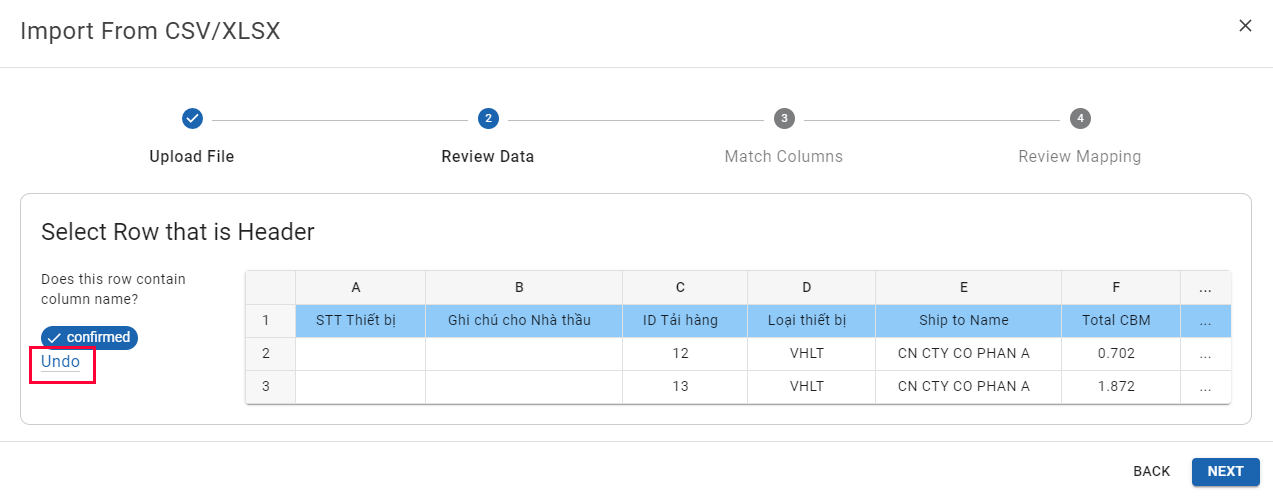
Illustration (English)
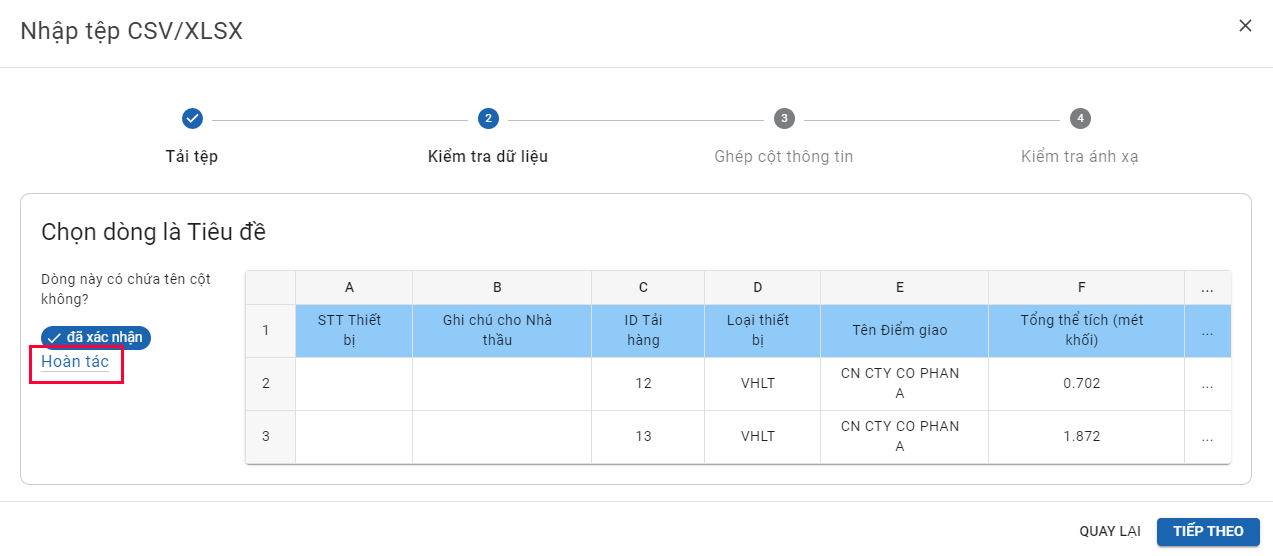
Illustration (Vietnamese)
- After you have selected and confirmed the correct row that contains the headers, click Next
- You will be navigated to the tab Match Columns
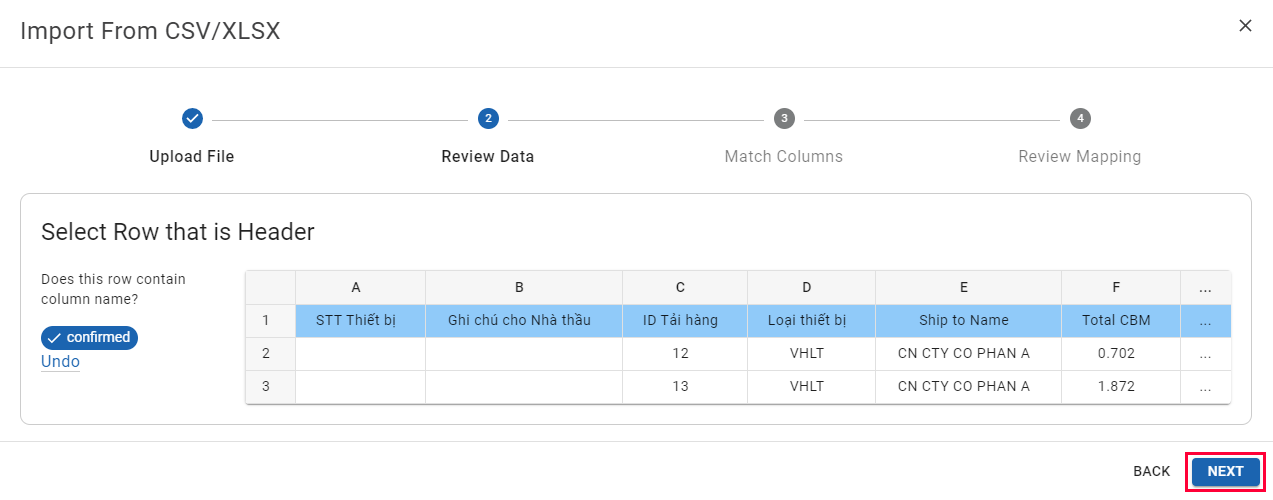
Illustration (English)
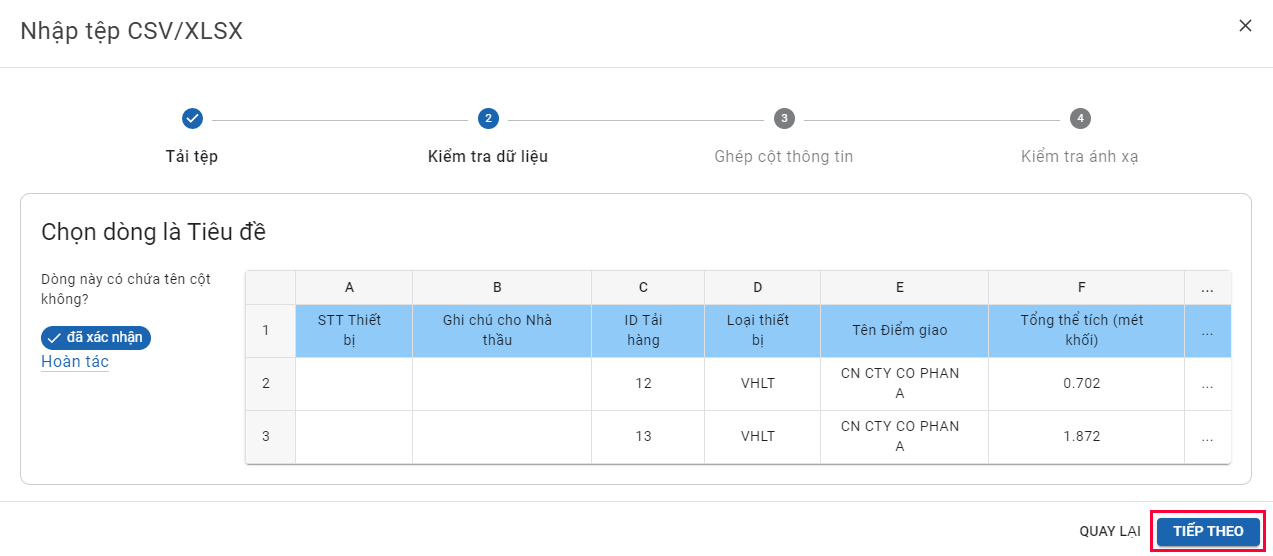
Illustration (Vietnamese)
Scenario 2: Select existing Mapping Profile
- If the Mapping Profile for the DO file has been created earlier, then you only need to select that Mapping Profile instead of having to create a new Mapping Profile
- Click on the field Organization to select the appropriate Depot, then move on to the field Shipper Code to select the Owner/Supplier of the goods listed in the DO file. Then, click on the field Profile Name. On the drop-down list, select the appropriate Mapping Profile which has been created earlier. After these three fields have been selected, click Next
- You will be navigated to the tab Match Columns
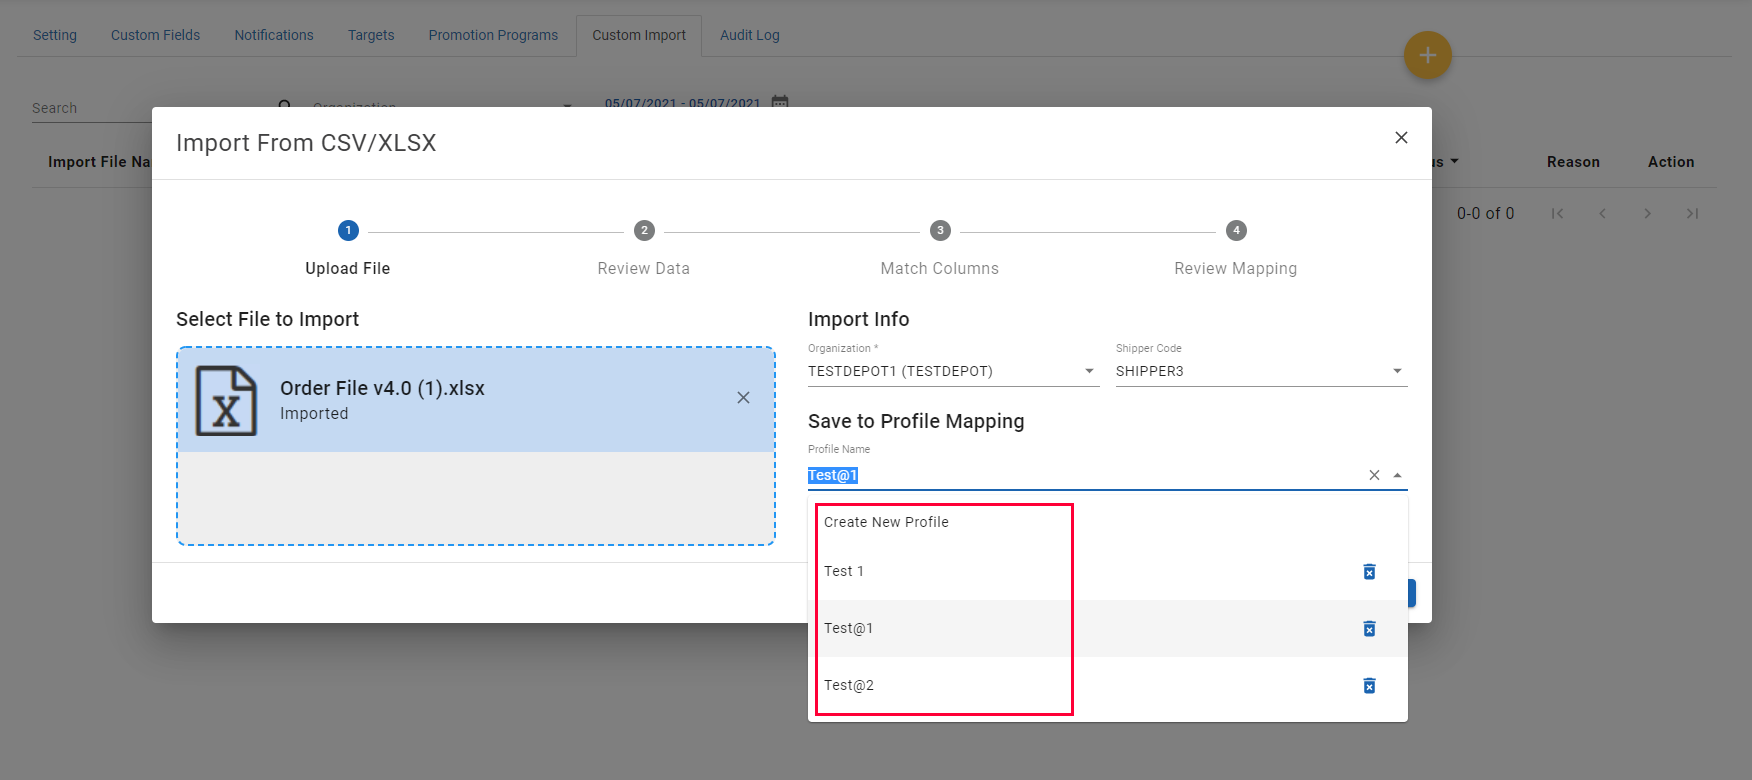
Illustration (English)
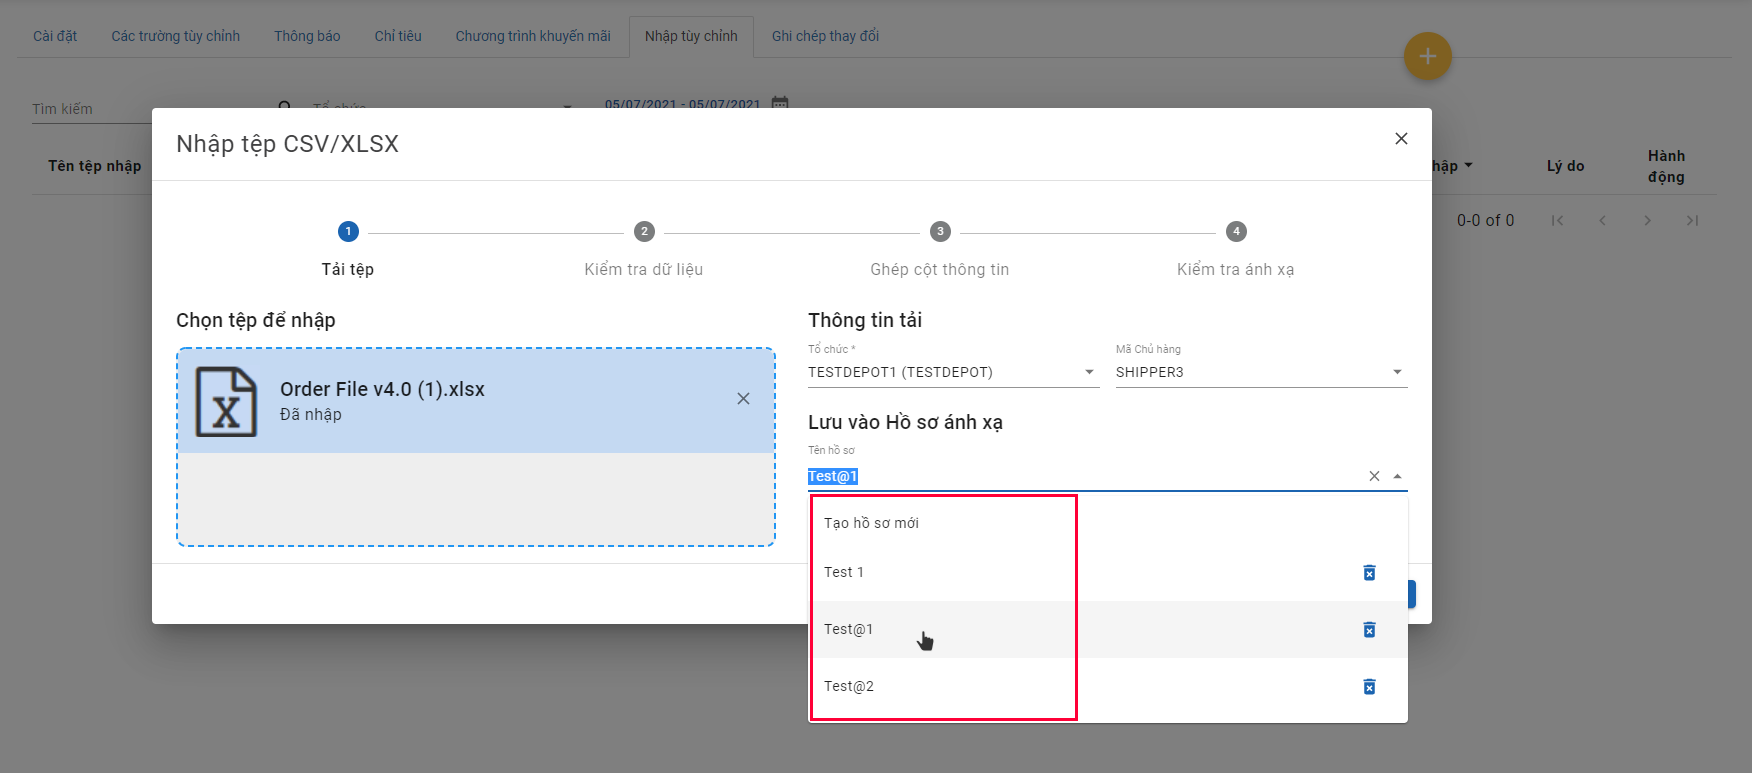
Illustration (Vietnamese)
Step 3: Map data fields
- On the tab Match Columns, you will need to map the data fields in the DO file uploaded to the corresponding data fields in the Abivin vRoute formats. Here, if you are creating a new Mapping Profile, you will need to match the data fields in the DO file with the corresponding data fields in Abivin vRoute database. If you’re using an existing Mapping Profile, then the data fields have already been mapped before
- You will see two data field columns.
- 1 - Data fields column on the left (1) is in Abivin vRoute format
- 2 - Data field column on the right (2) shows the data fields in your proprietary DO format
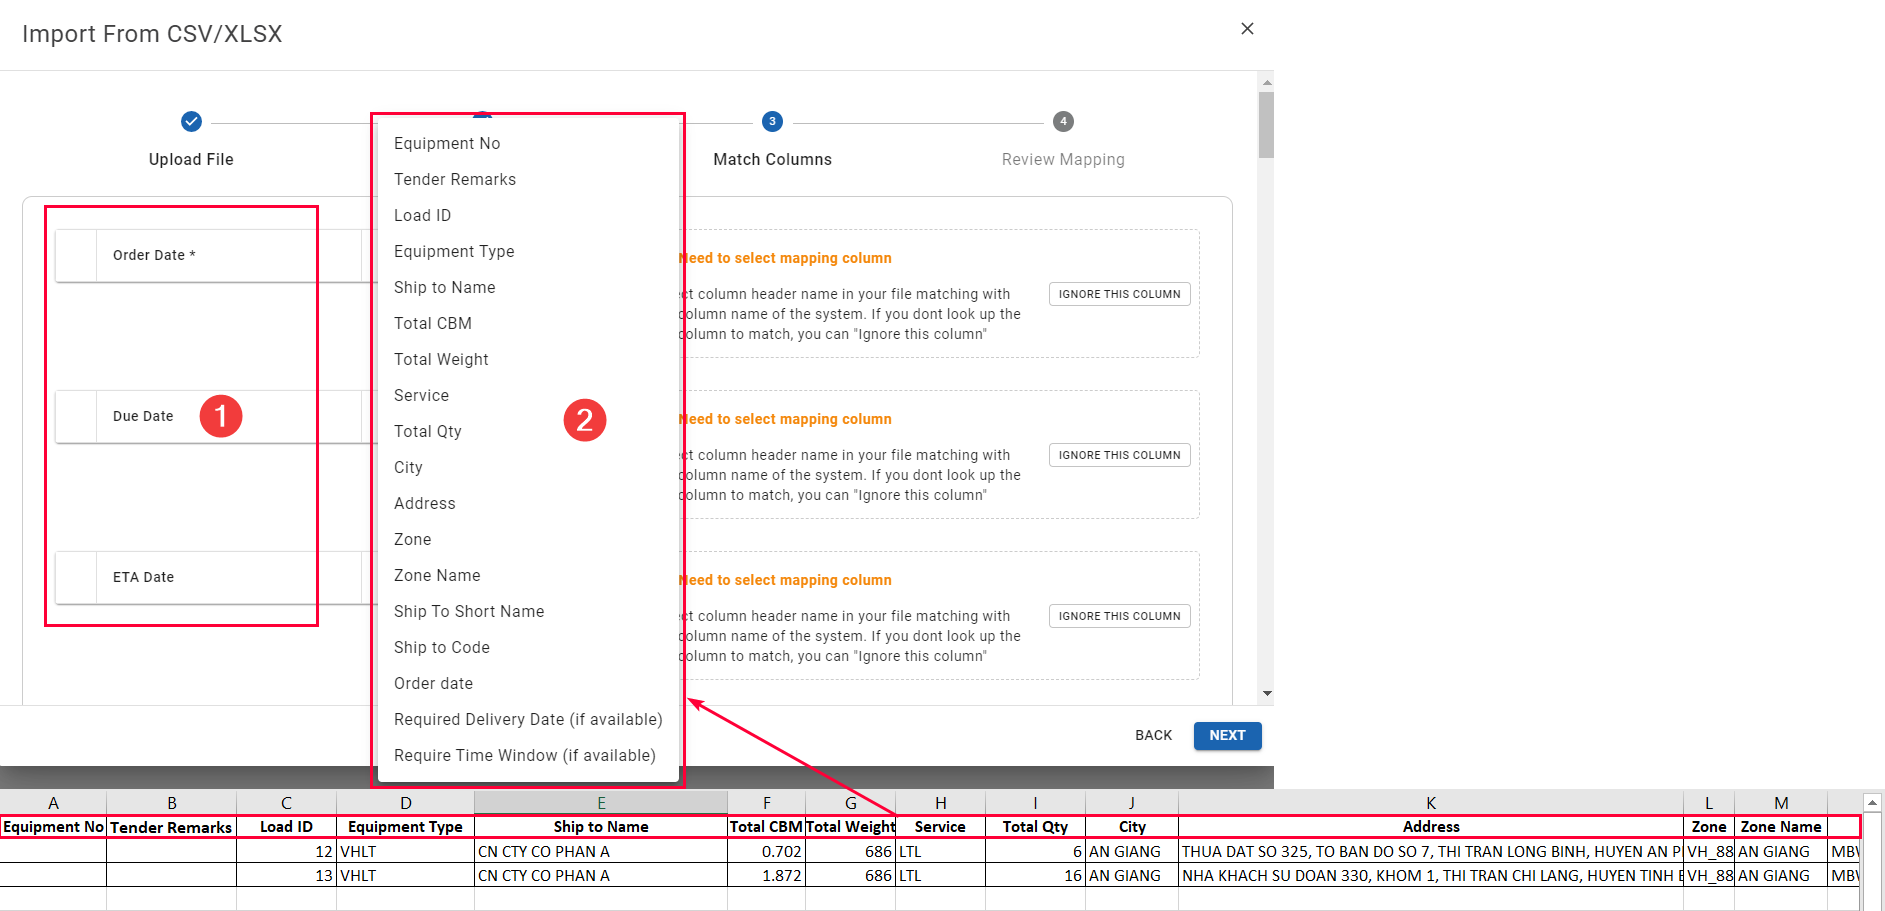
Illustration (English)
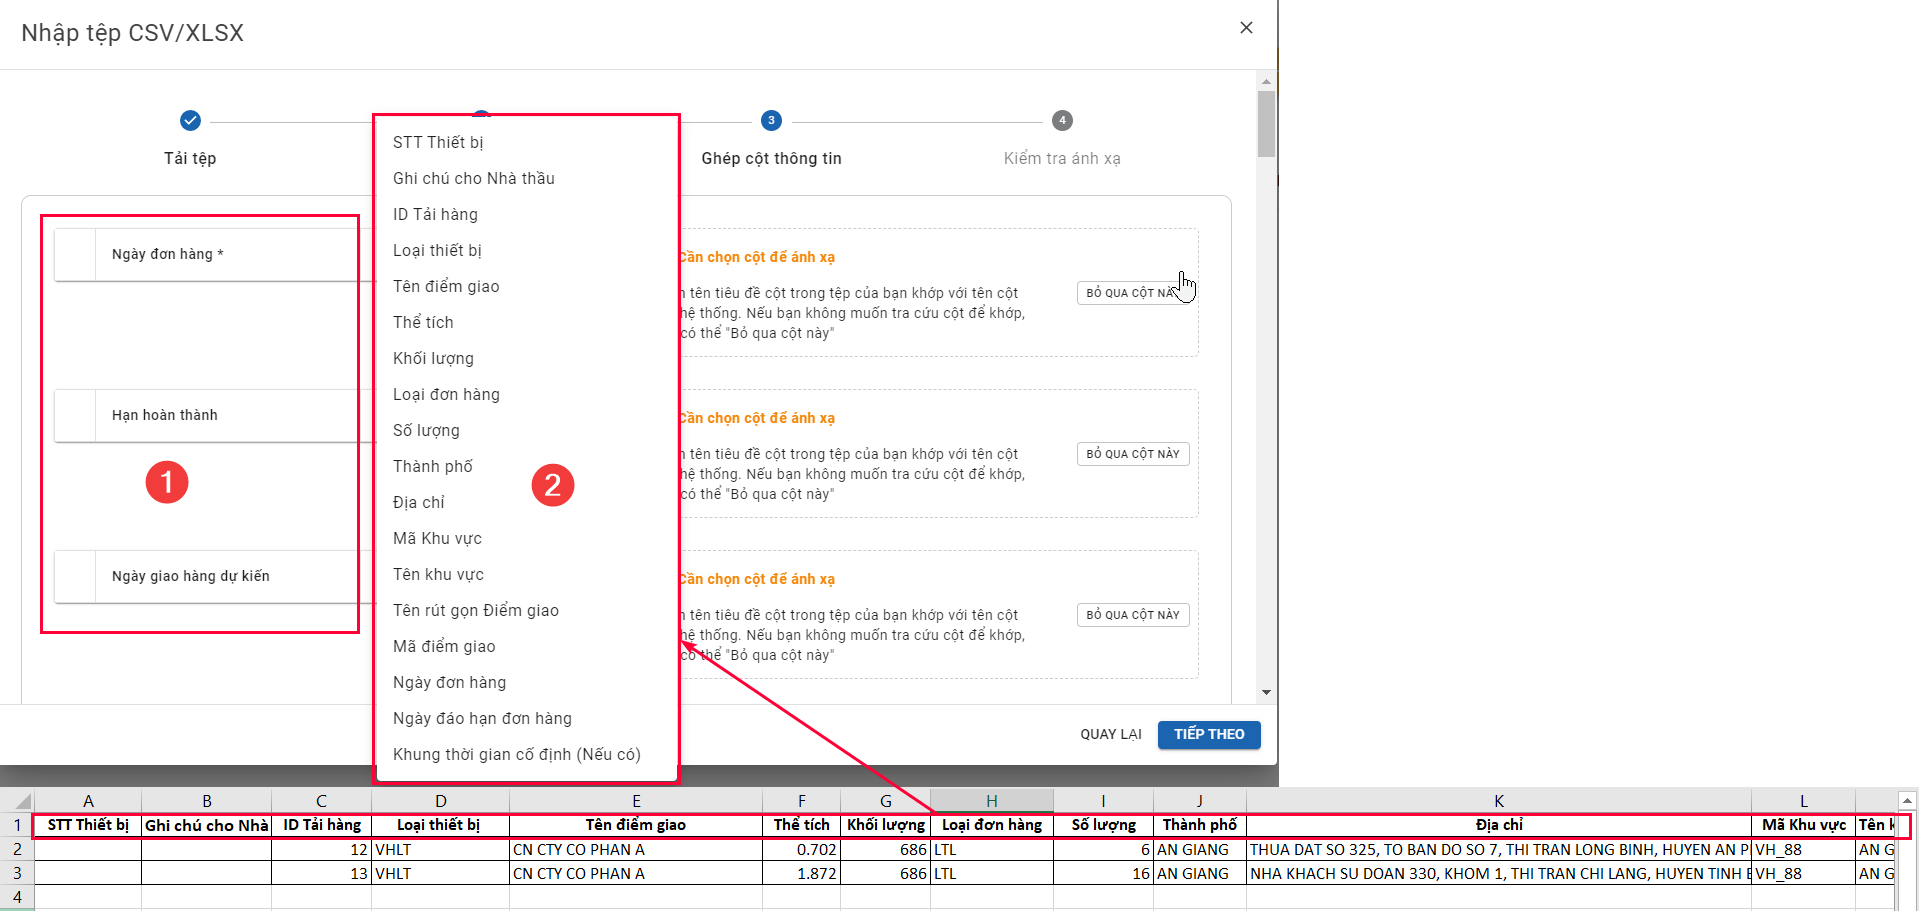
Illustration (Vietnamese)
- To map a data field, first click on that field on the data field column on the right. A drop down list will appear, showing the data fields in the DO file that you have uploaded earlier. Select the appropriate data field from the drop down list, then click on the button Confirm Mapping
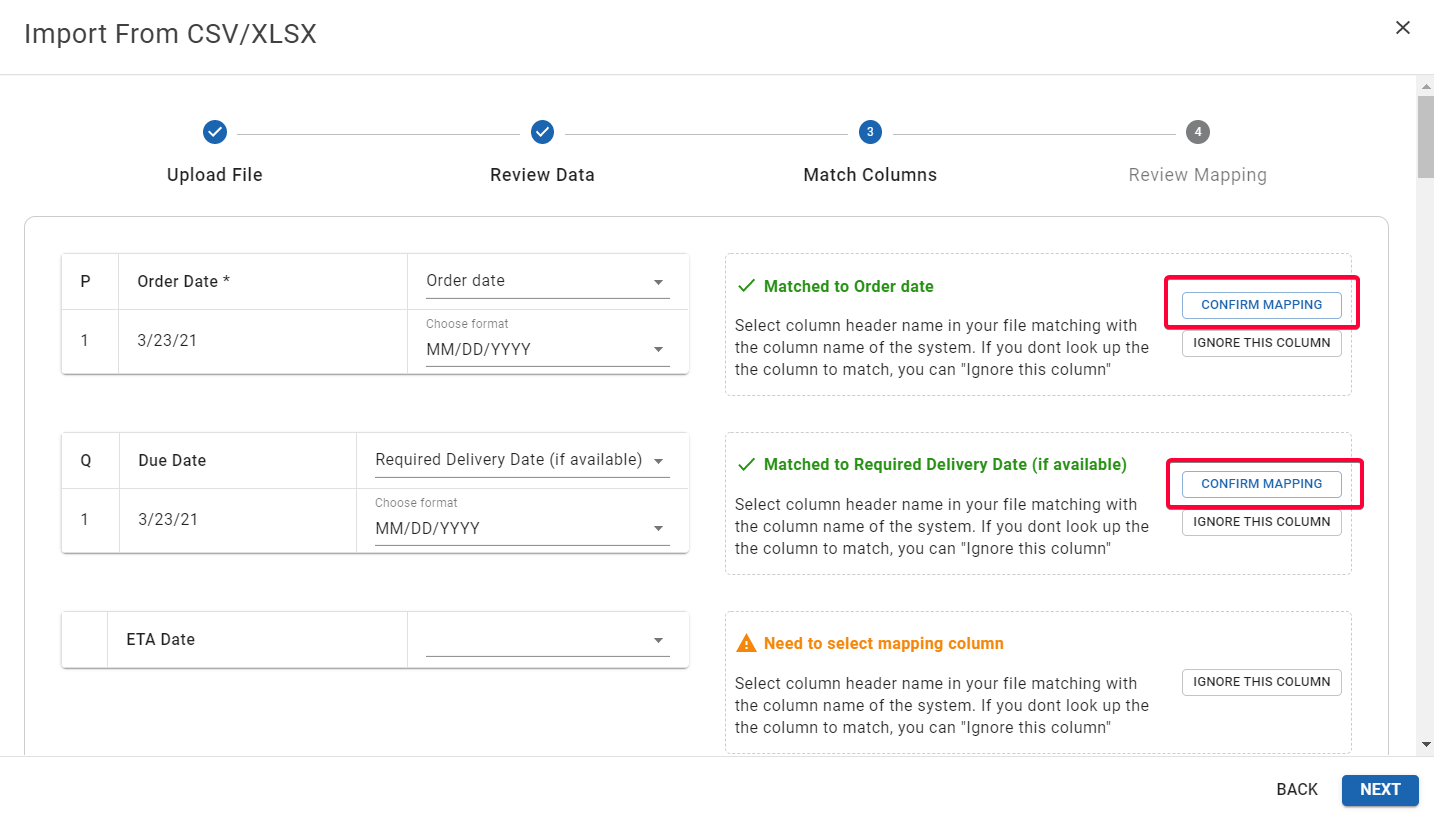
Illustration (English)
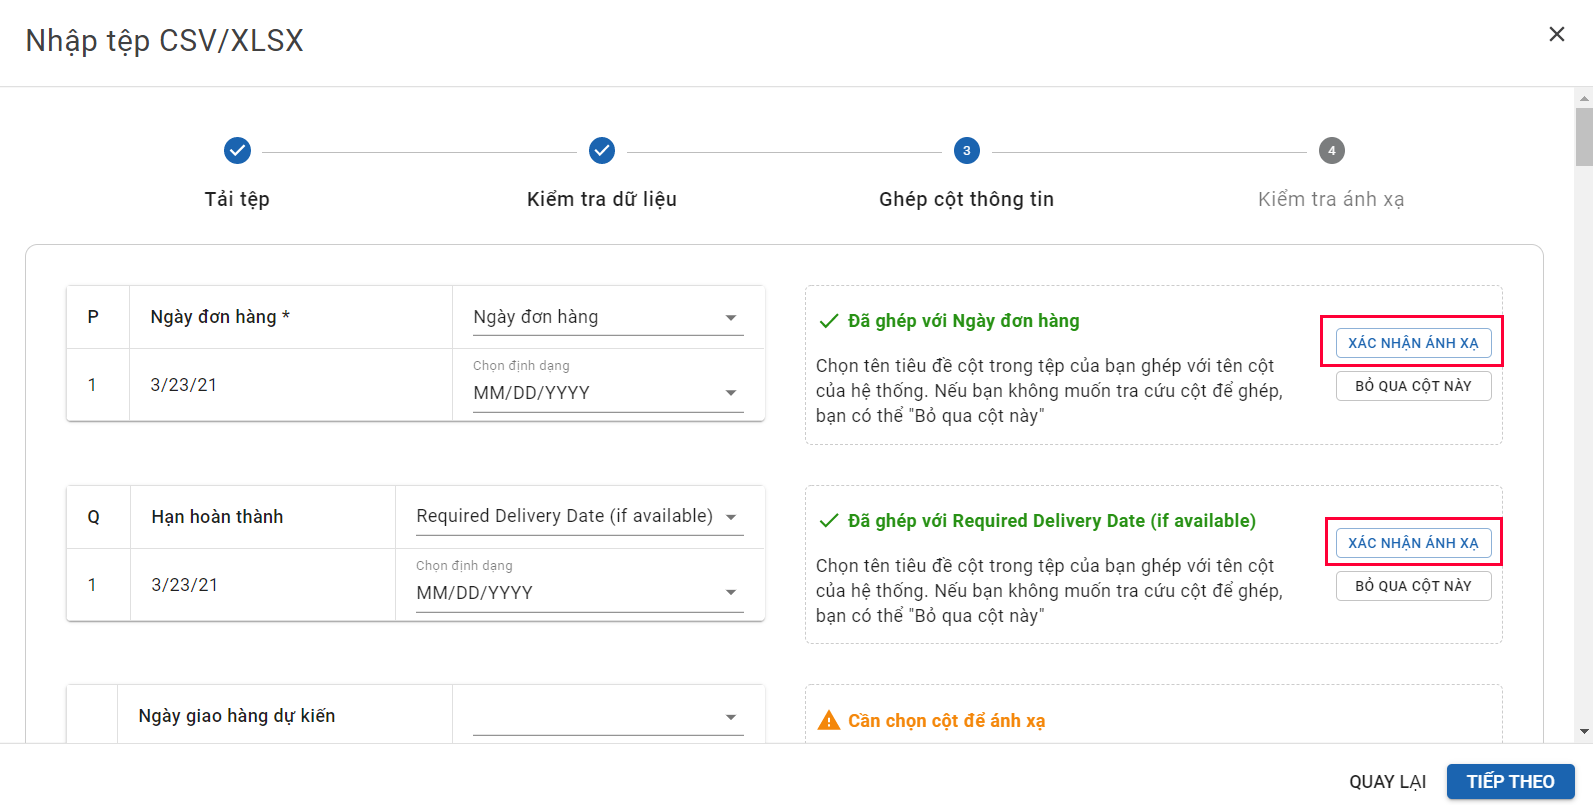
Illustration (Vietnamese)
- Note: If the type of data field being mapped is Date (Order Date; Due Date, etc.), then right after you select that data field, below that data field will appear the field Choose format. To do this, you need to click on this field, select the date format similar to the current date format in the DO file

Illustration (English)

Illustration (Vietnamese)
- For example: In the DO file, the date format of the field Order Date is date/month/year (dd/mm/yyyy) (for instance, 10/05/2021) then you need to select this date format on the Custom Import tool
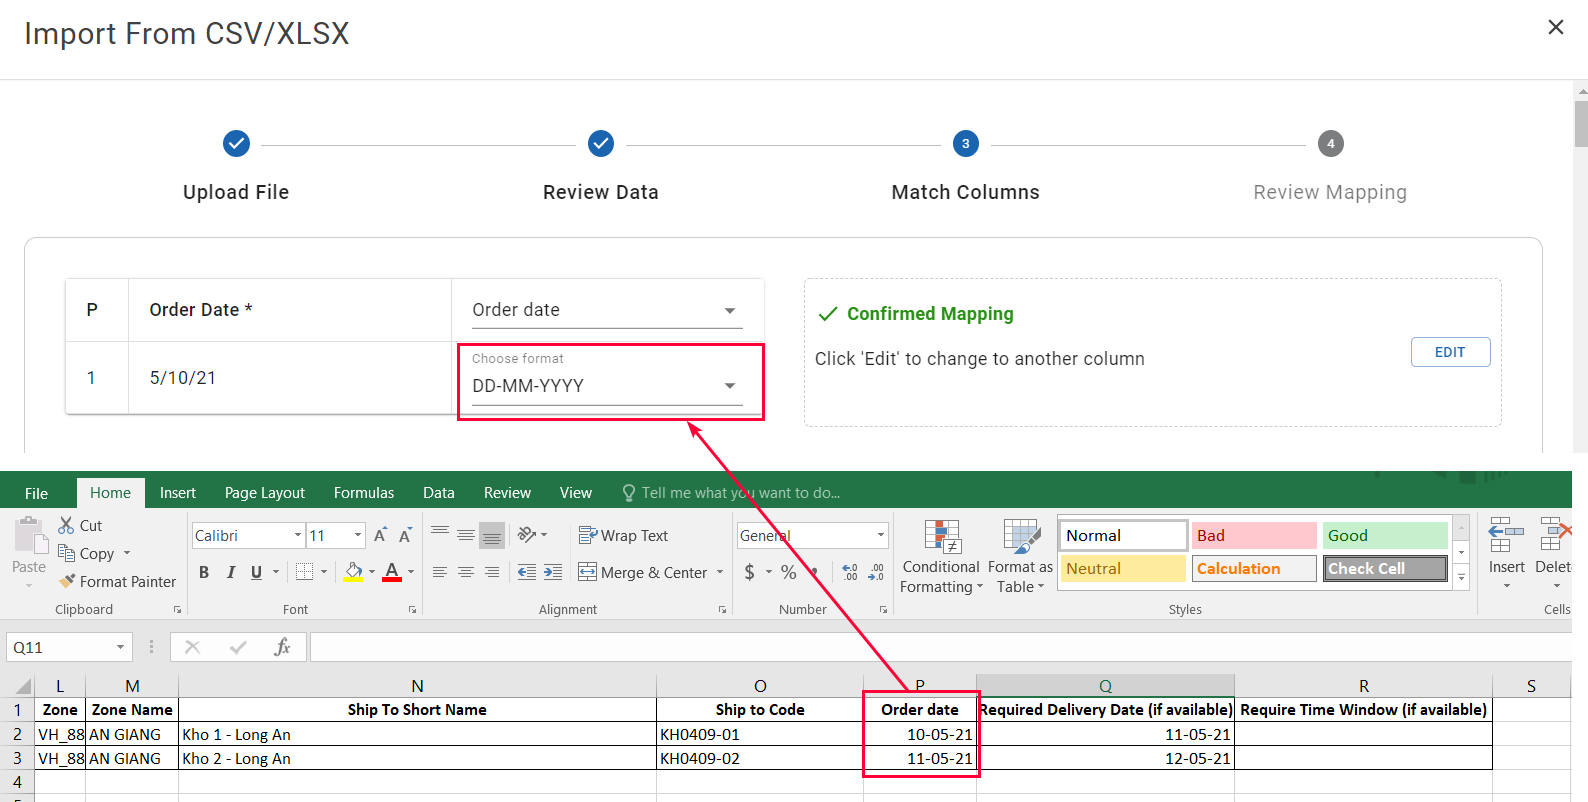
Illustration (English)
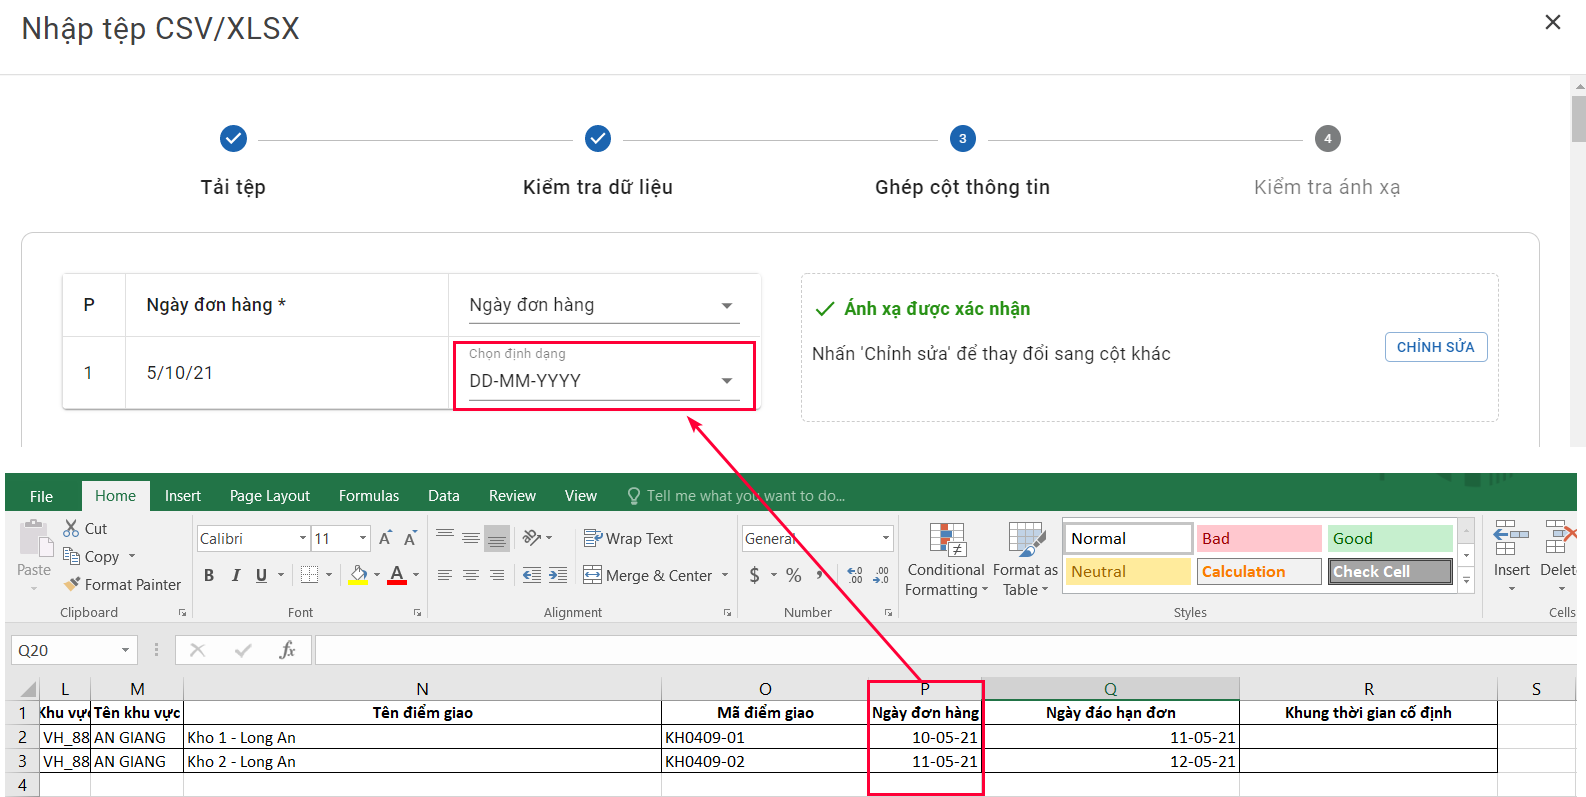
Illustration (Vietnamese)
- If you mistakenly mapped the wrong data fields, please click on the button Edit to remap them
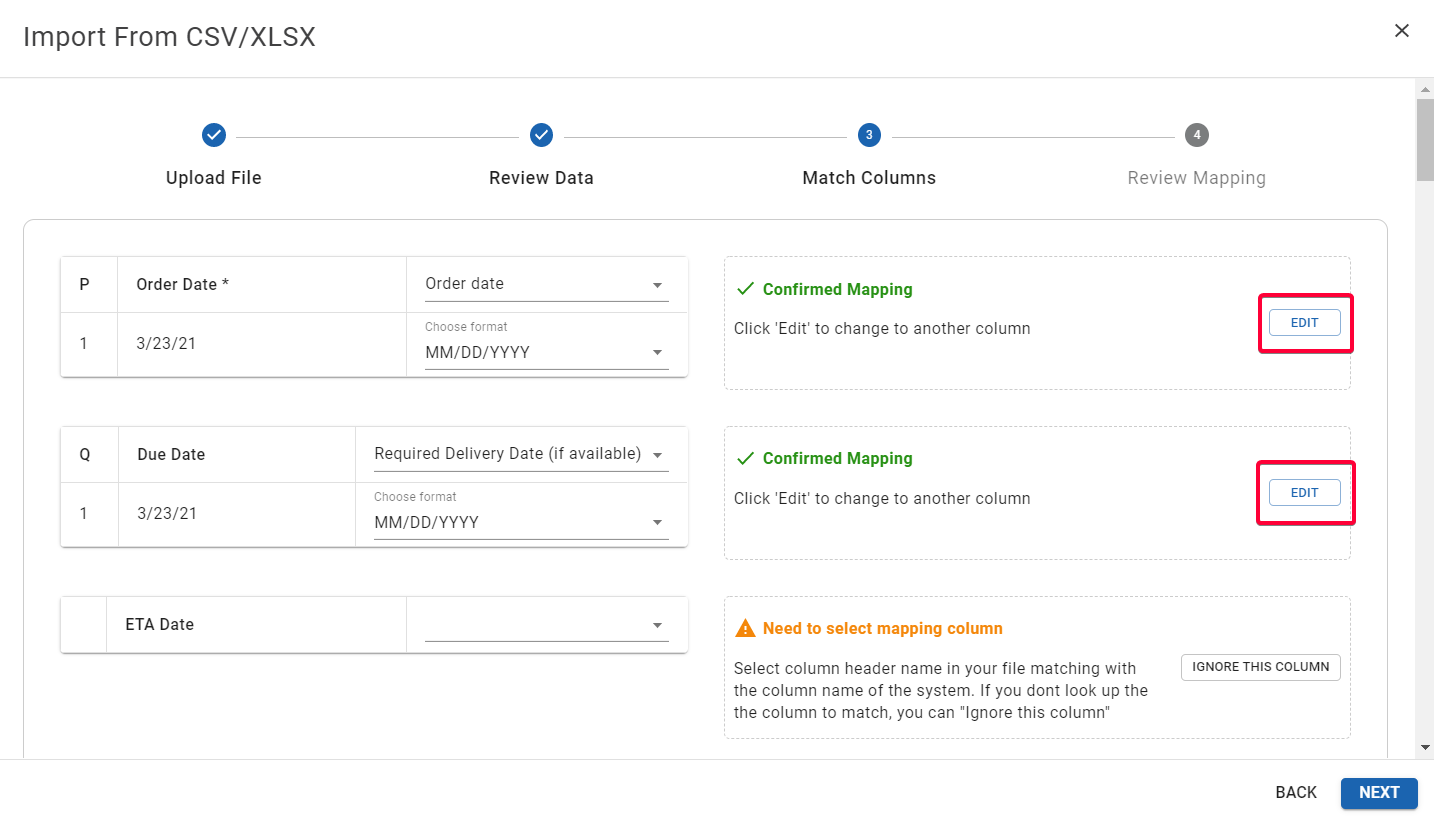
Illustration (English)
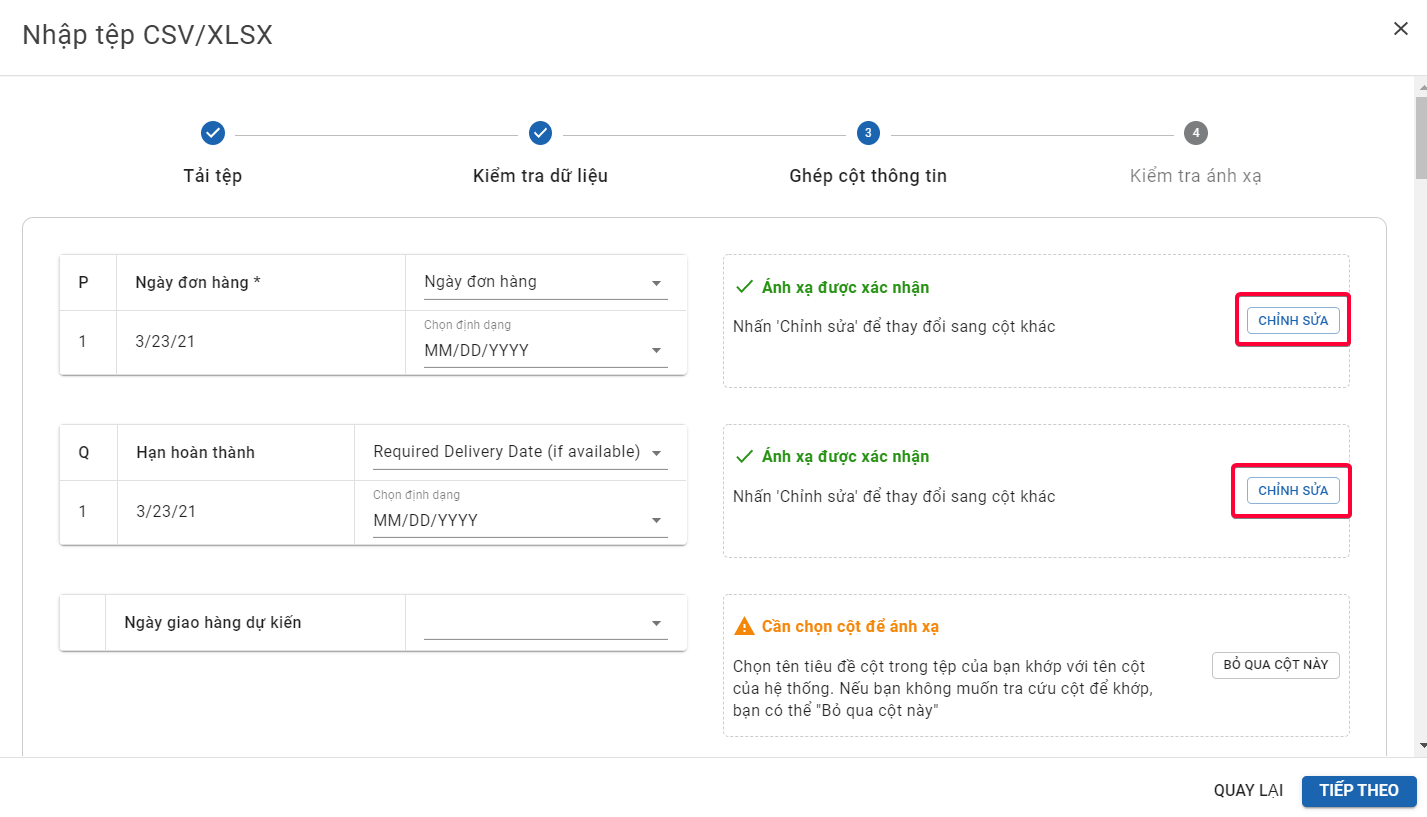
Illustration (Vietnamese)
- If you do not wish to map a particular data field, click on the corresponding button Ignore this column
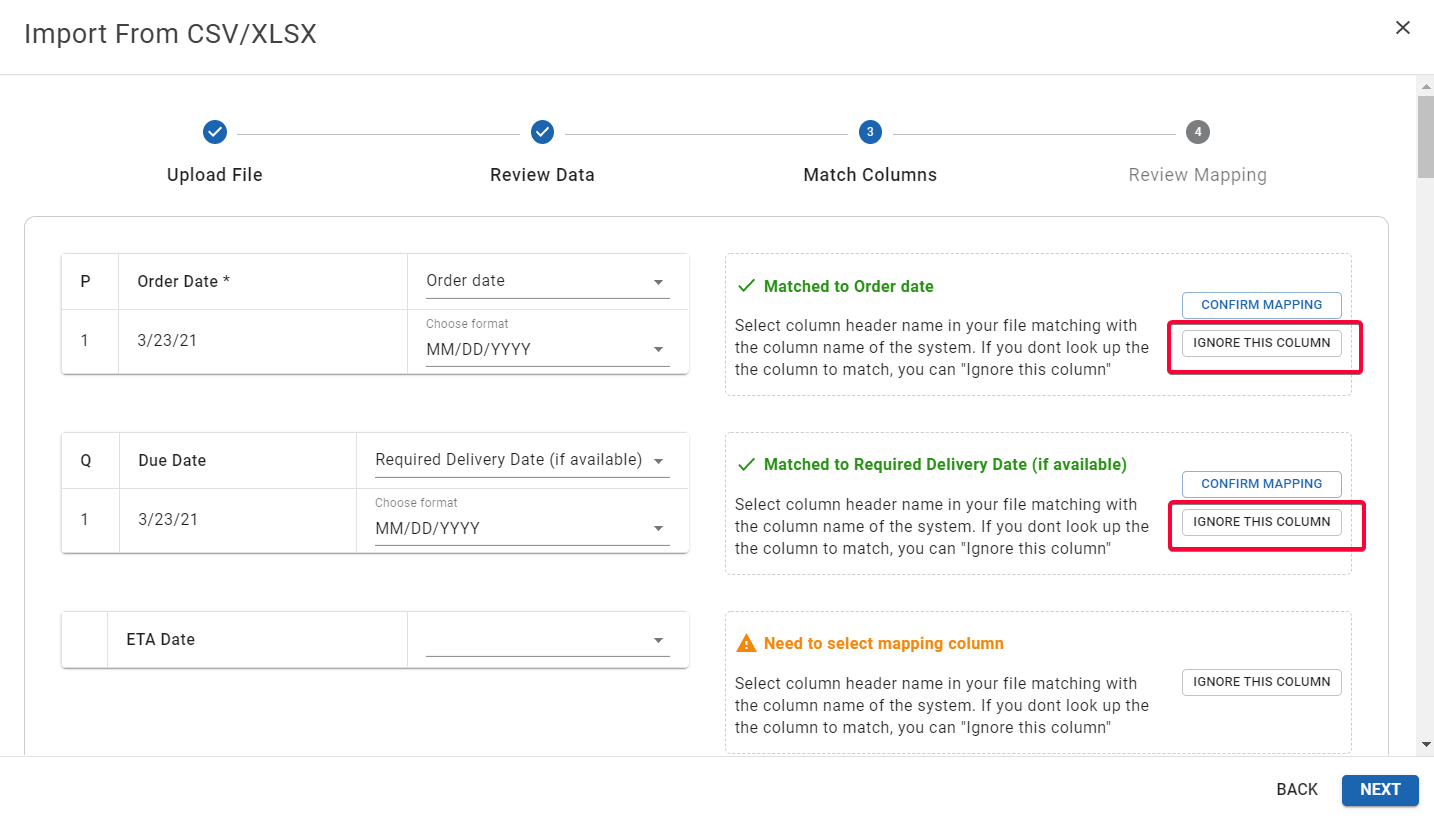
Illustration (English)
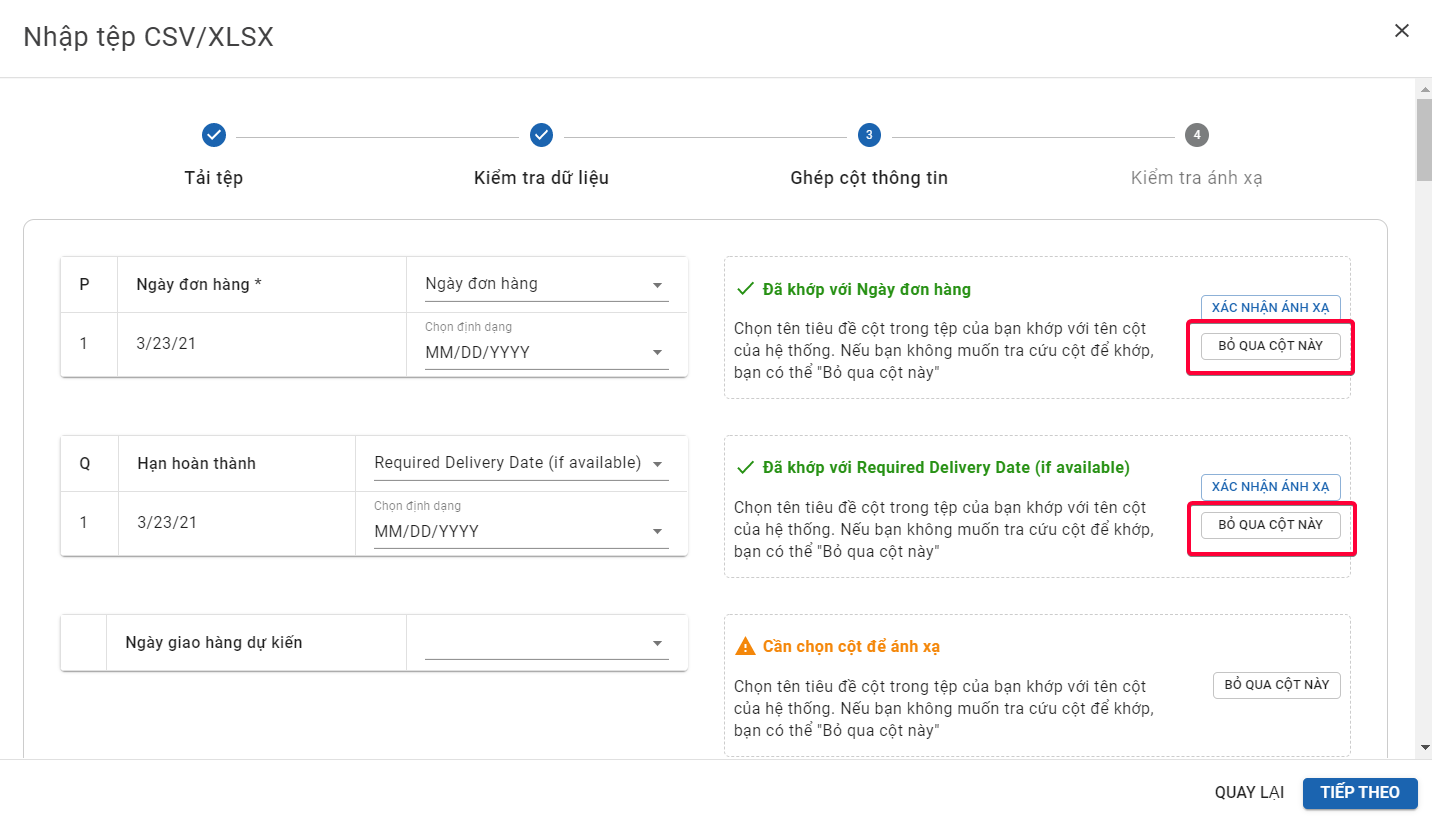
Illustration (Vietnamese)
- In the left column (the column of data in Abivin vRoute format), some data fields cannot be ignored and require you to map information, which are
-
- Order Date
-
- Order Code
-
- Product Code
-
- Product Name
-
- Number of Items
- In case your account is Shipper-oriented, in the left column, there are also other 2 compulsory data fields that require mapping, which are
-
- Customer Code
-
- Customer Name
- In case your account is Carrier/Distributor-oriented, in the left column, there are other 3 compulsory data fields that require mapping, which are
-
- Ship-to Code
-
- Ship-to Name
-
- Ship-to Address
- All the compulsory data fields that require mapping have the asterisk at the end of their field name.
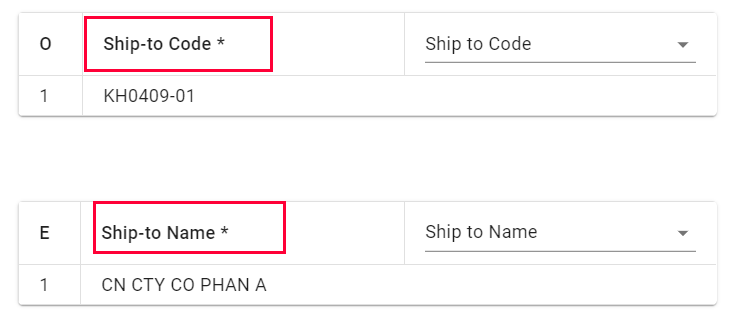
Illustration (English)
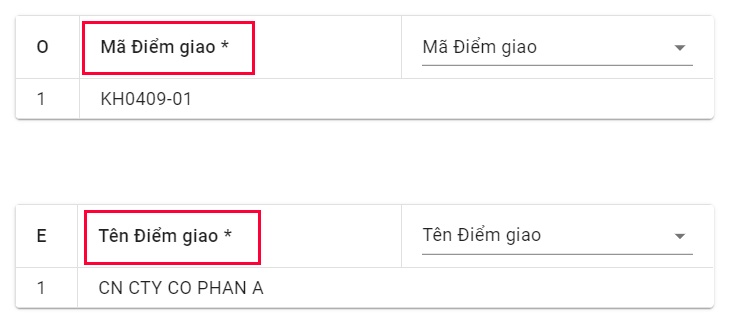
Illustration (Vietnamese)
- After you have completed mapping all the necessary data fields, click on the button Next
- You will be navigated to the tab Review Mapping
Step 4: Review and import data
- On this tab Review Mapping, you could see a preview of the mapping result. The header row (first row) shows the data fields in Abivin vRoute format, while the data row (second row) shows the actual data fields from the DO file
- If you don’t see any error with the mapping, click on the button Finish
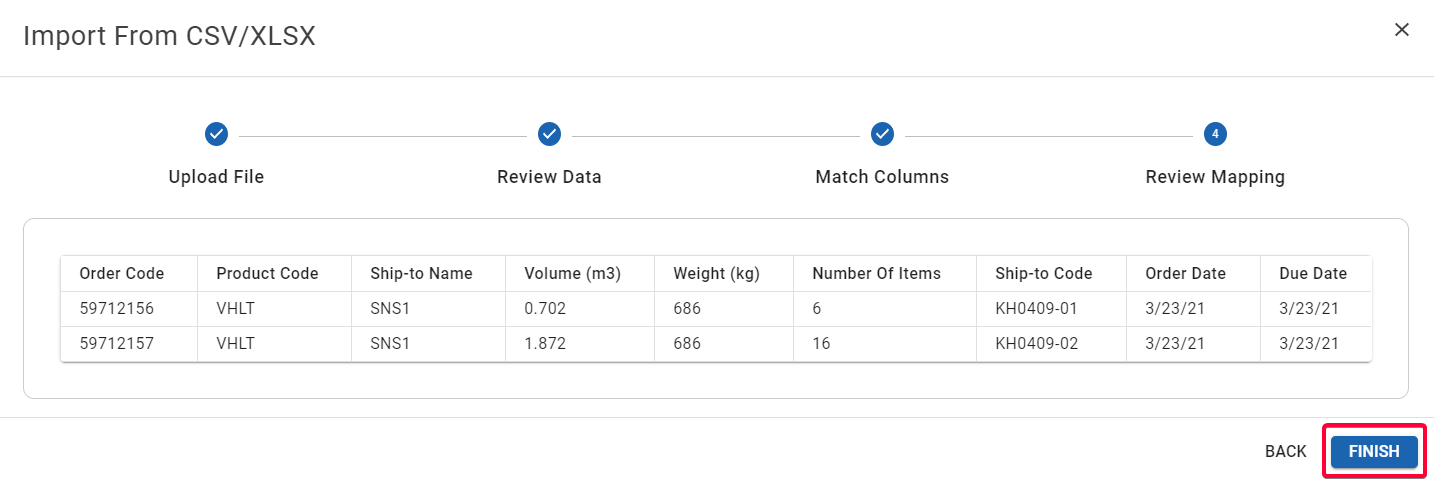
Illustration (English)
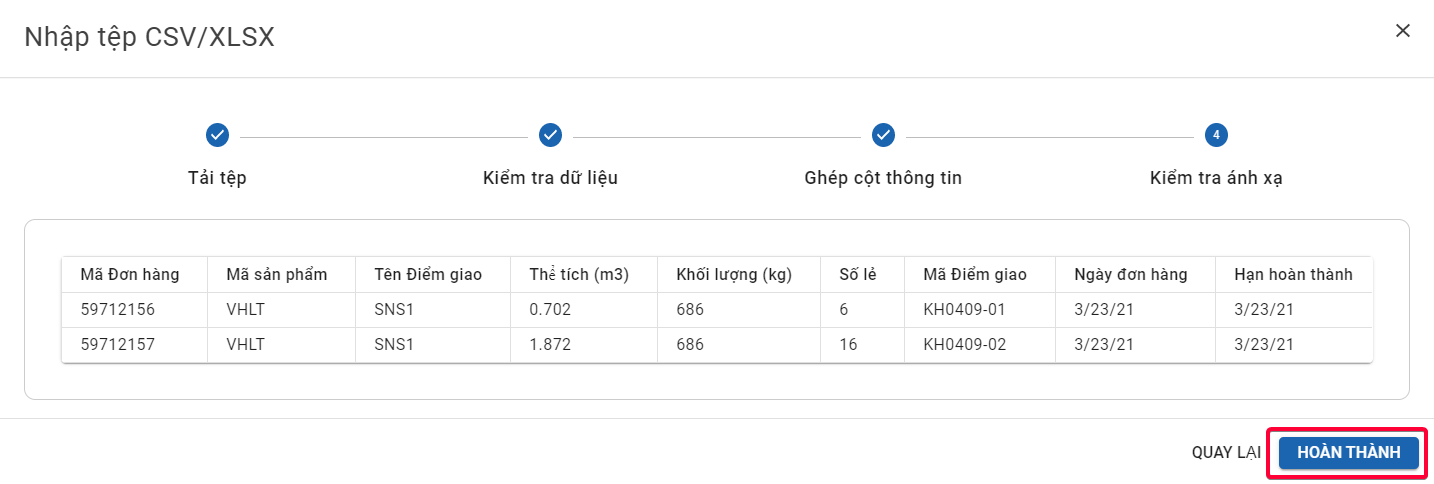
Illustration (Vietnamese)
- Upon clicking on this button, the system will immediately check the data in the DO file. If the data satisfies all import rules, then the DO file will be successfully converted, and the data in the DO file will be imported into Abivin vRoute database for the following three resources (In chronological sequence): Products; Customers; Orders. There will be a popup to announce the successful conversion

Illustration (English)

Illustration (Vietnamese)
- Note: If in the DO file being uploaded, there are Orders/Customers/Products that have already existed on Abivin vRoute system, then the data in the DO file will not overwrite Abivin vRoute data. Instead, the system will display the error message notifying the errors. For example, if an Order has been available in the system before and you mistakenly import it with the Custom Import tool once again, the system will display the error message as in the photos below.
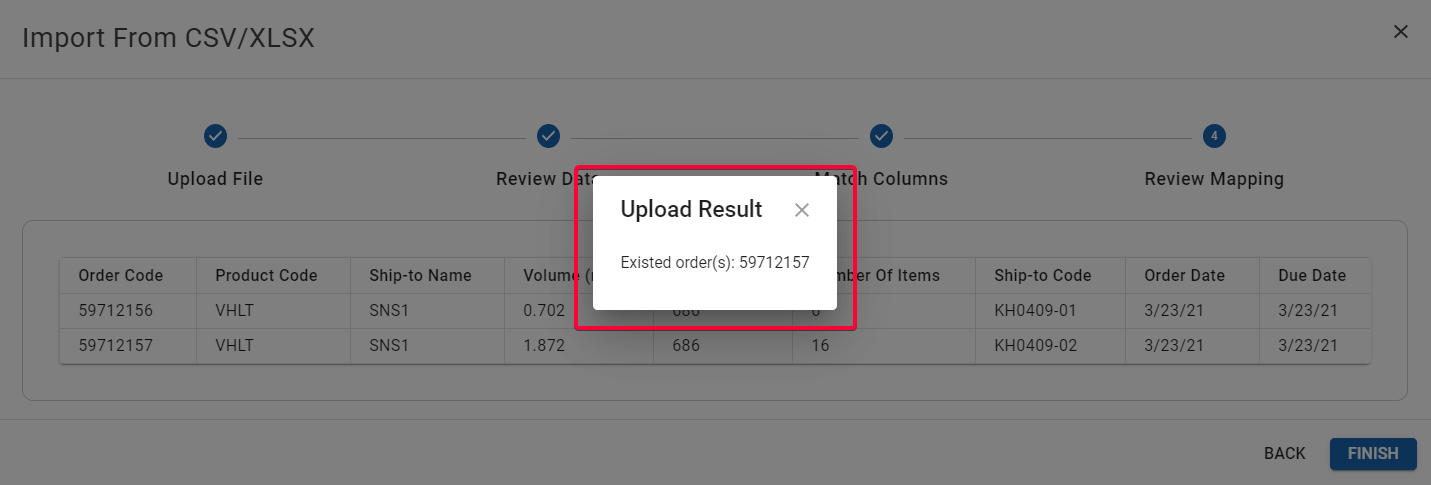
Illustration (English)
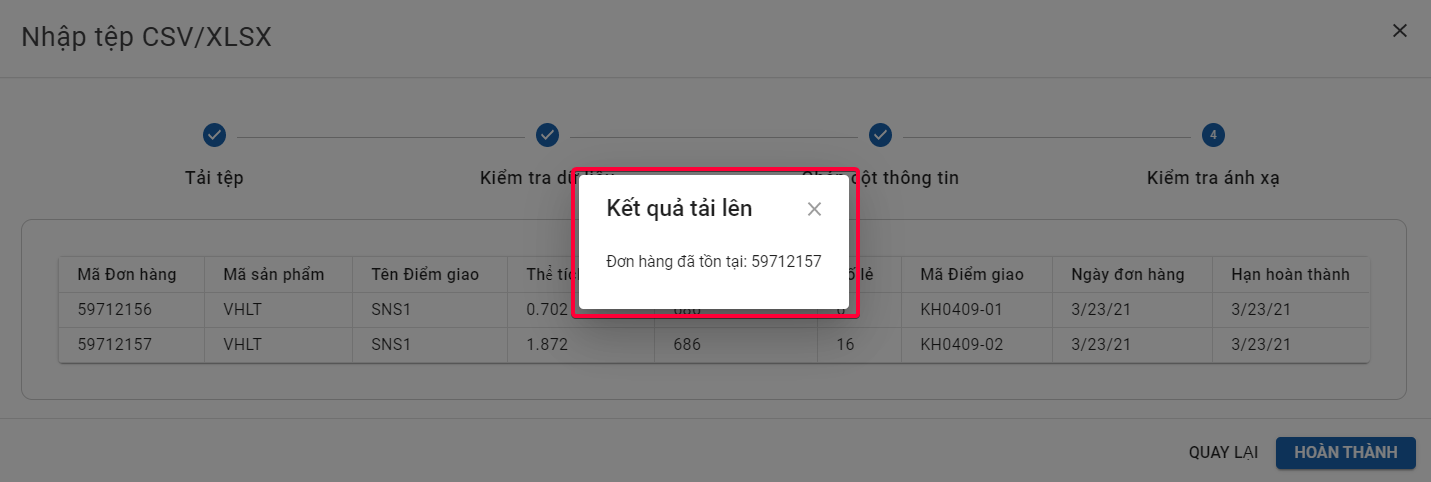
Illustration (Vietnamese)
- If the information on Orders/Customers/Products has not been available in the database of Abivin vRoute before, the system will generate records. The most recently generated information of the new Orders/Customers/Products will be displayed on top of the first page of the corresponding tab for each resource.
- For example: Your DO file has two orders with two Products and you use the Custom Import tool to import information to Abivin vRoute. The information on Products from your DO file will be gathered, converted and displayed on the top of the first page in tab Products as in the photo below.
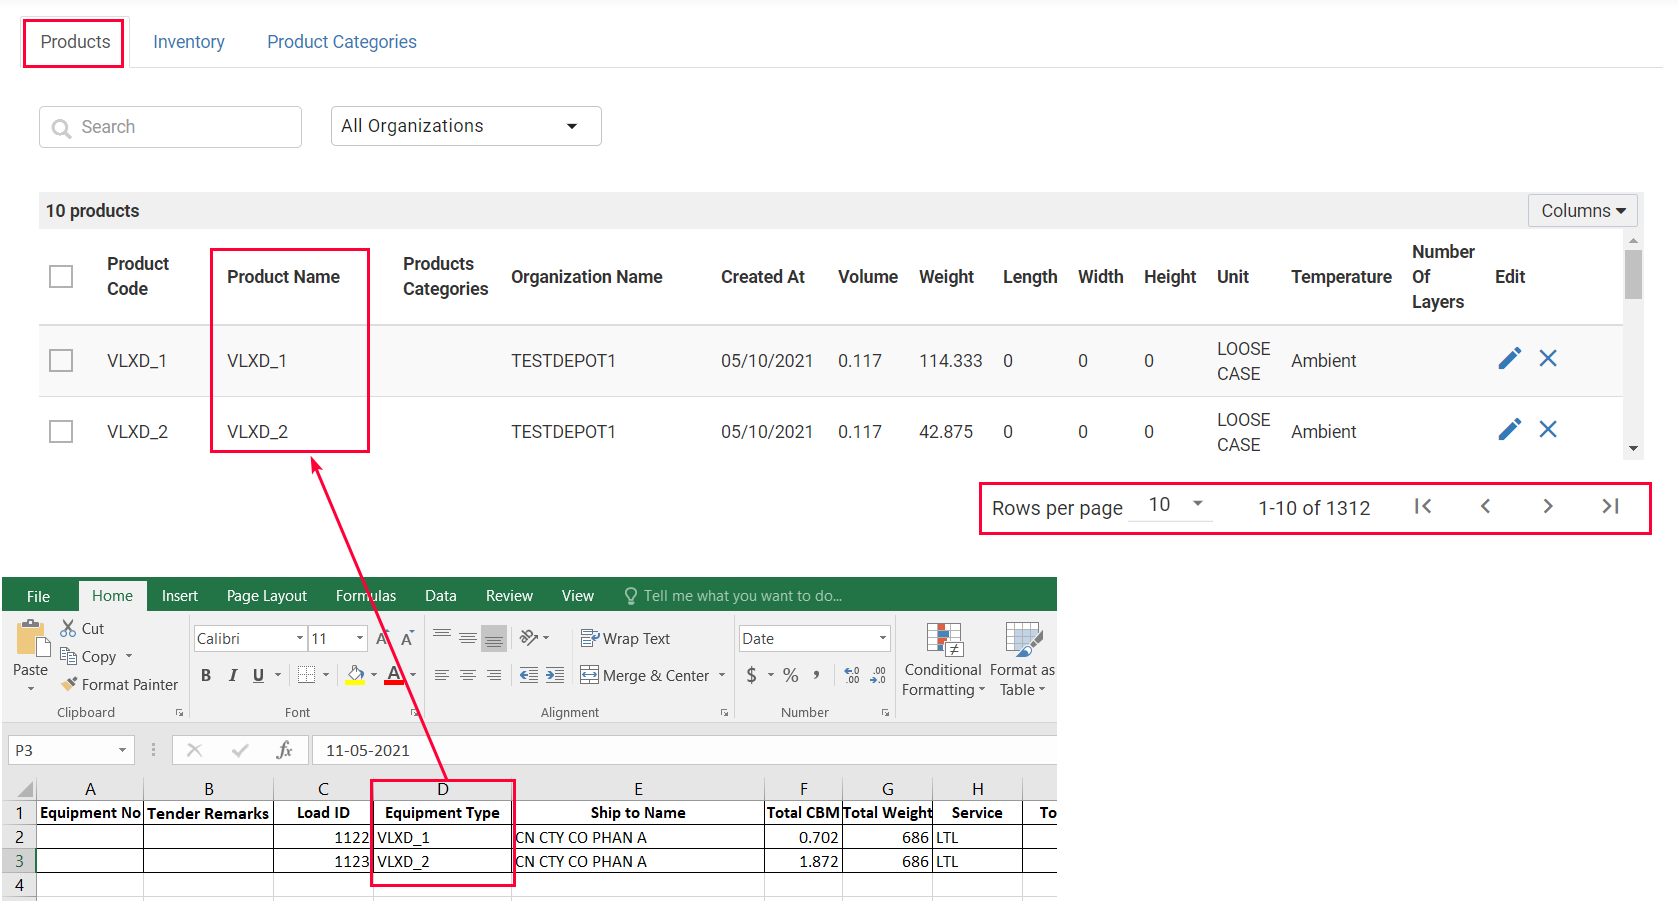
Illustration (English)
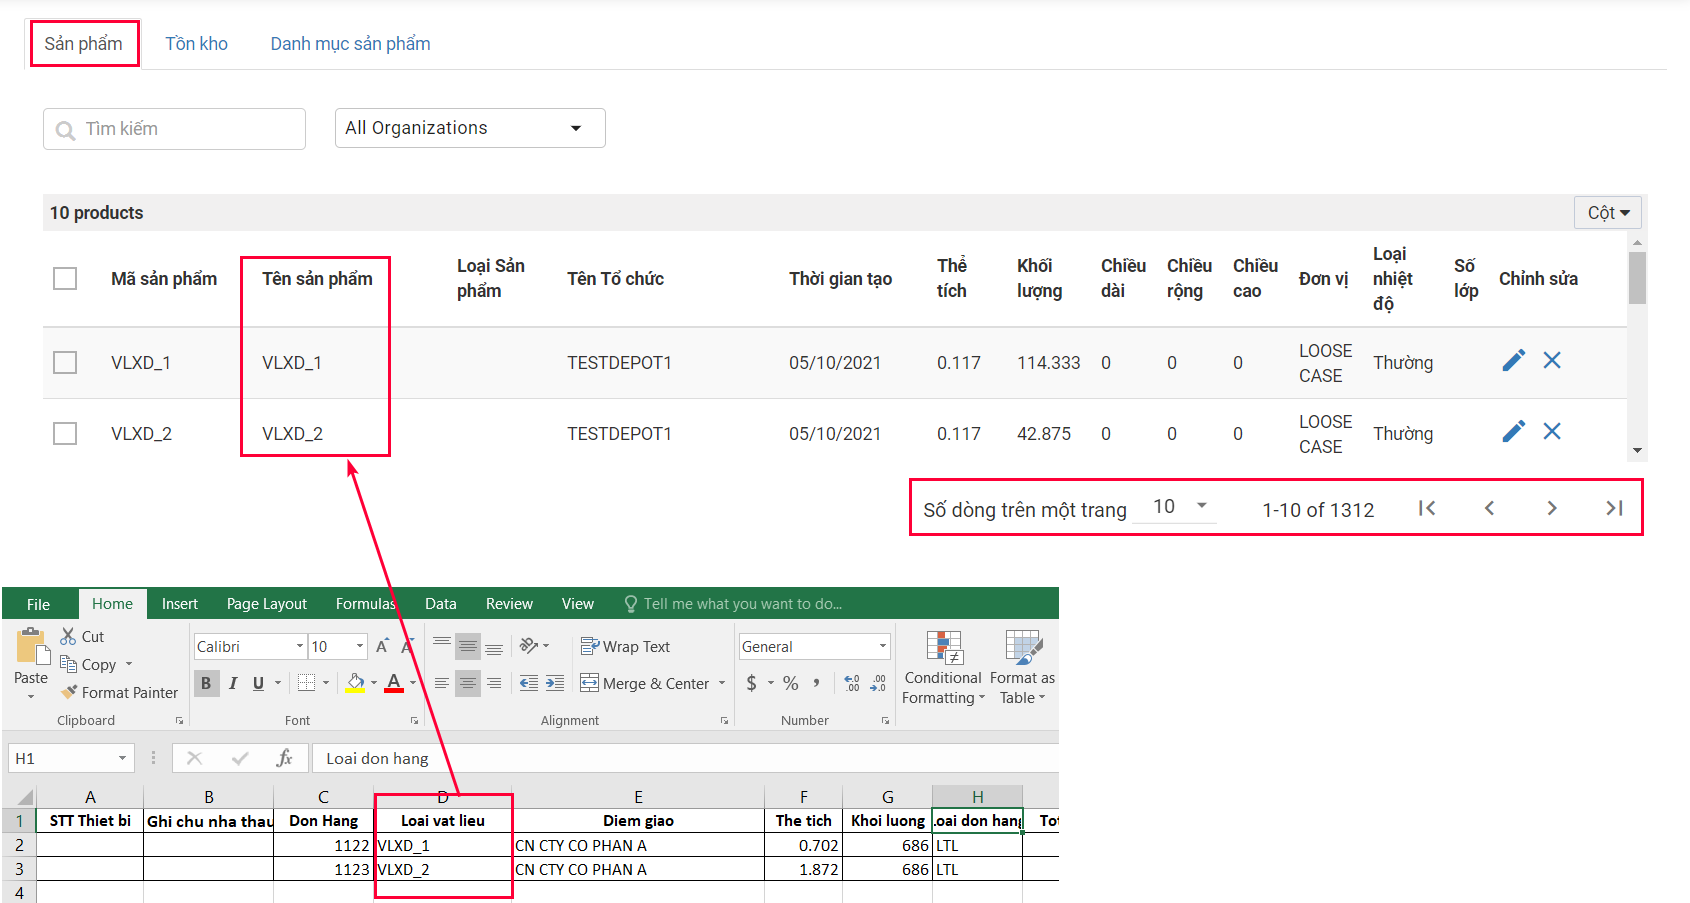
Illustration (Vietnamese)
Custom Import Tool History
- Each time you import a CSV/XLSX file into Abivin vRoute database using the Custom Import tool or directly import via FTP server, the system will store the import history of that file right on the tab Settings > Custom Import

Illustration (English)

Illustration (Vietnamese)
- To search for a specific import file, import the correct Import File Name into the search bar

Illustration (English)

Illustration (Vietnamese)
- To filter import files by organizations, click on the field Organization and select the appropriate organization (Of Depot type)
- To filter the files by their import status, click on the column Import Status. On the drop-down menu, tick the checkboxes of the wanted statuses (Progressing; Success; Failed)

Illustration (English)

Illustration (Vietnamese)
- To see the reason why a specific file was failed to be imported, click the respective text Details of that file. On the right side of the screen will appear the tab Import Detail, citing the fail reason
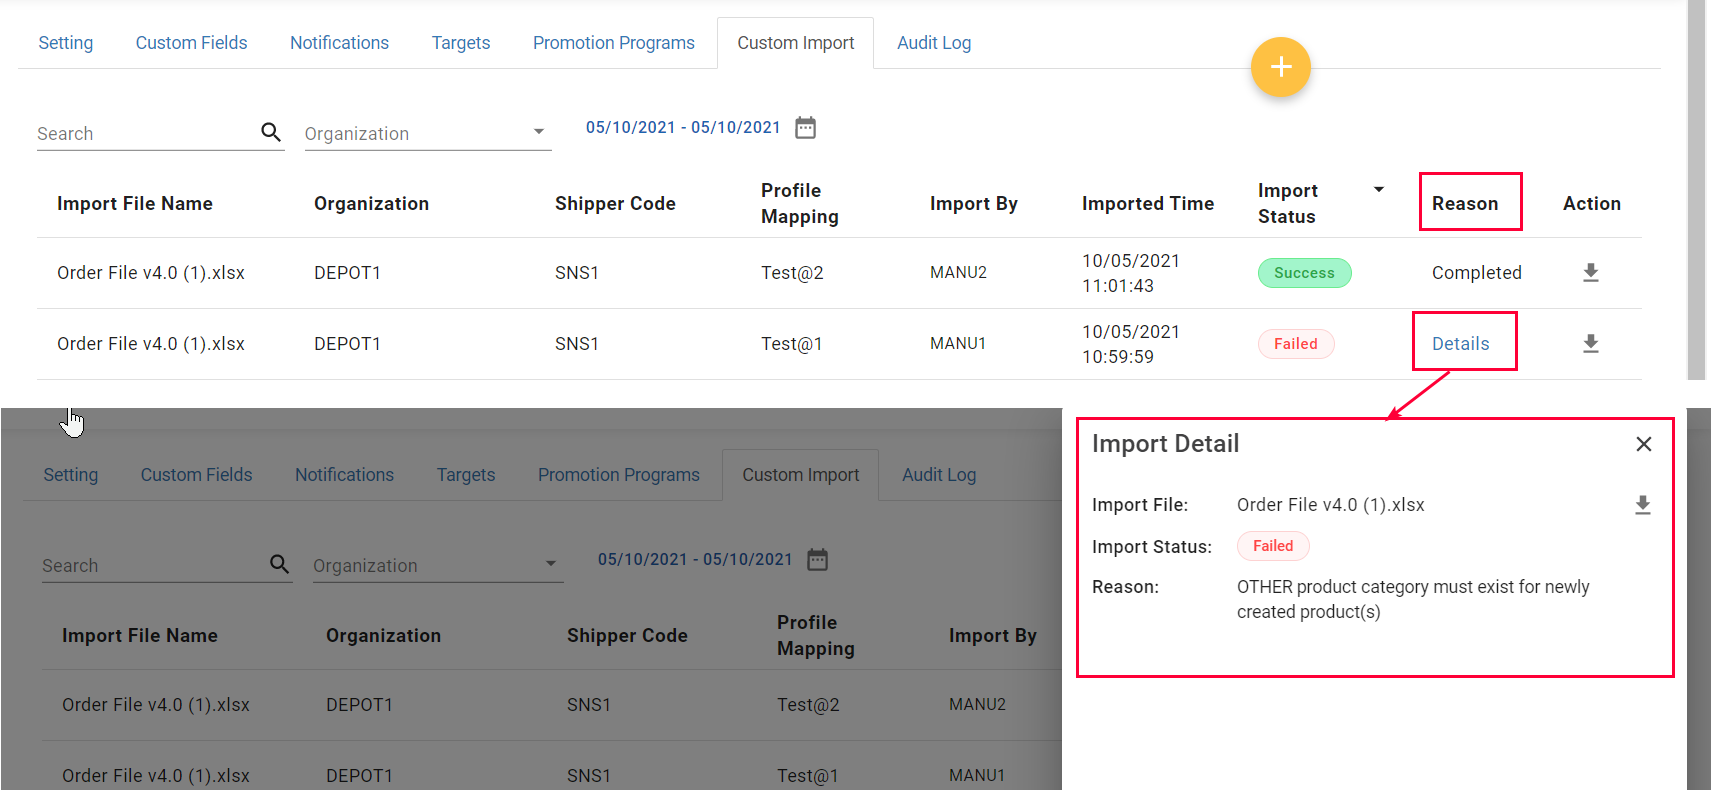
Illustration (English)
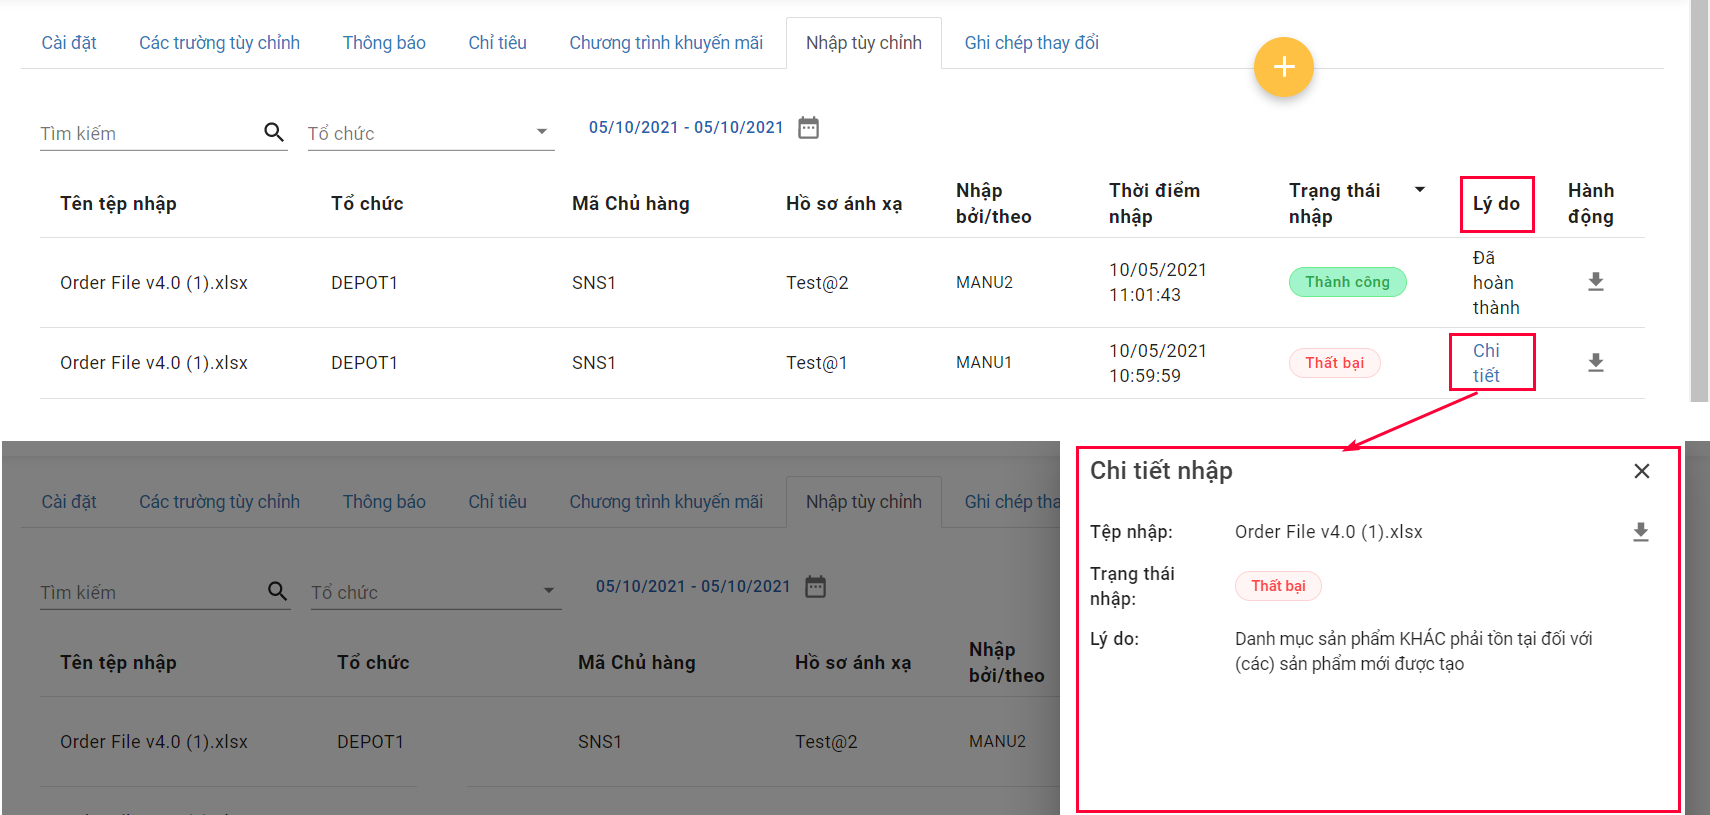
Illustration (Vietnamese)
- To download a file, click the respective download icon of that file under the column Action

Illustration (English)

Illustration (Vietnamese)
Updated about 2 months ago
