Road Constraints
- In the delivery process, the vehicles may not be allowed to travel through certain roads because of some policies imposed by the officials. This is defined in Abivin vRoute as Road constraints. At the moment, Abivin vRoute has been able to provide solutions to some common road constraints:
- Road constraint based on Vehicle gross weight
- Road constraint based on Time window
- Road constraint based on Vehicle license plate number
Manage Road constraint
Create road constraints
- Navigate to Transportation > Vehicle List tab, then click on View map icon on the toolbar
- You will be navigated to the Route map screen. The form to select Branch and Execution date will appear. Click on the icon on that form to close it
- Next, click on the button Road constraints on the top right of the route map screen
- The form to select Branch and Execution date will appear again. Now, instead of closing it, click on the field Branch. From the drop down menu, select the appropriate Branch for which you want to create road constraint, then click Select
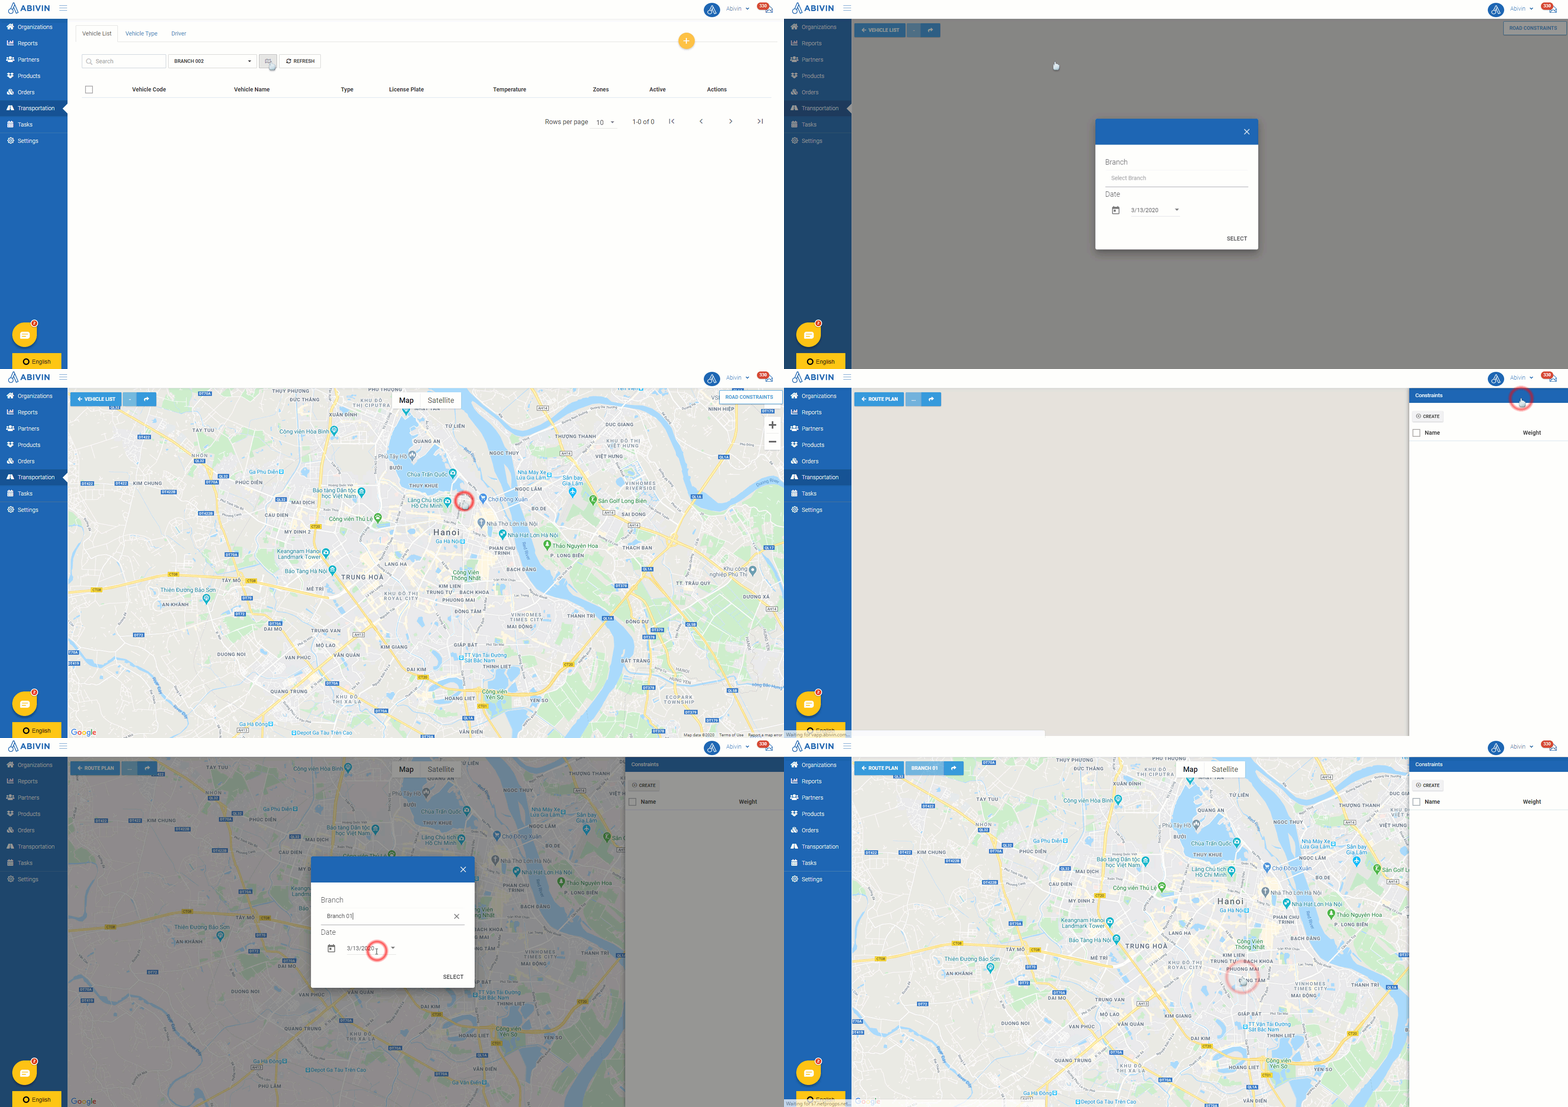
- You will see the panel Constraints on the right side of the route map screen. On this panel, click on the button Create
- Now, move your mouse onto the route map. Left click on a point on the map to mark the top left corner of the road constraint you want to create. A red location mark icon will appear on the point you've just clicked. Then, move your mouse onto another point on the map and left click again to mark the bottom right corner of the road constraint
- A rectangular will appear on the map. That is the road constraint
- You can adjust the position of the road constraint by left clicking inside it, then, with the left mouse still pressed, drag it to the desired position on the map. To change the road constraint dimensions, you can click and drag its anchor points. You can also change the color of the road constraint by selecting from the color palette on the right panel
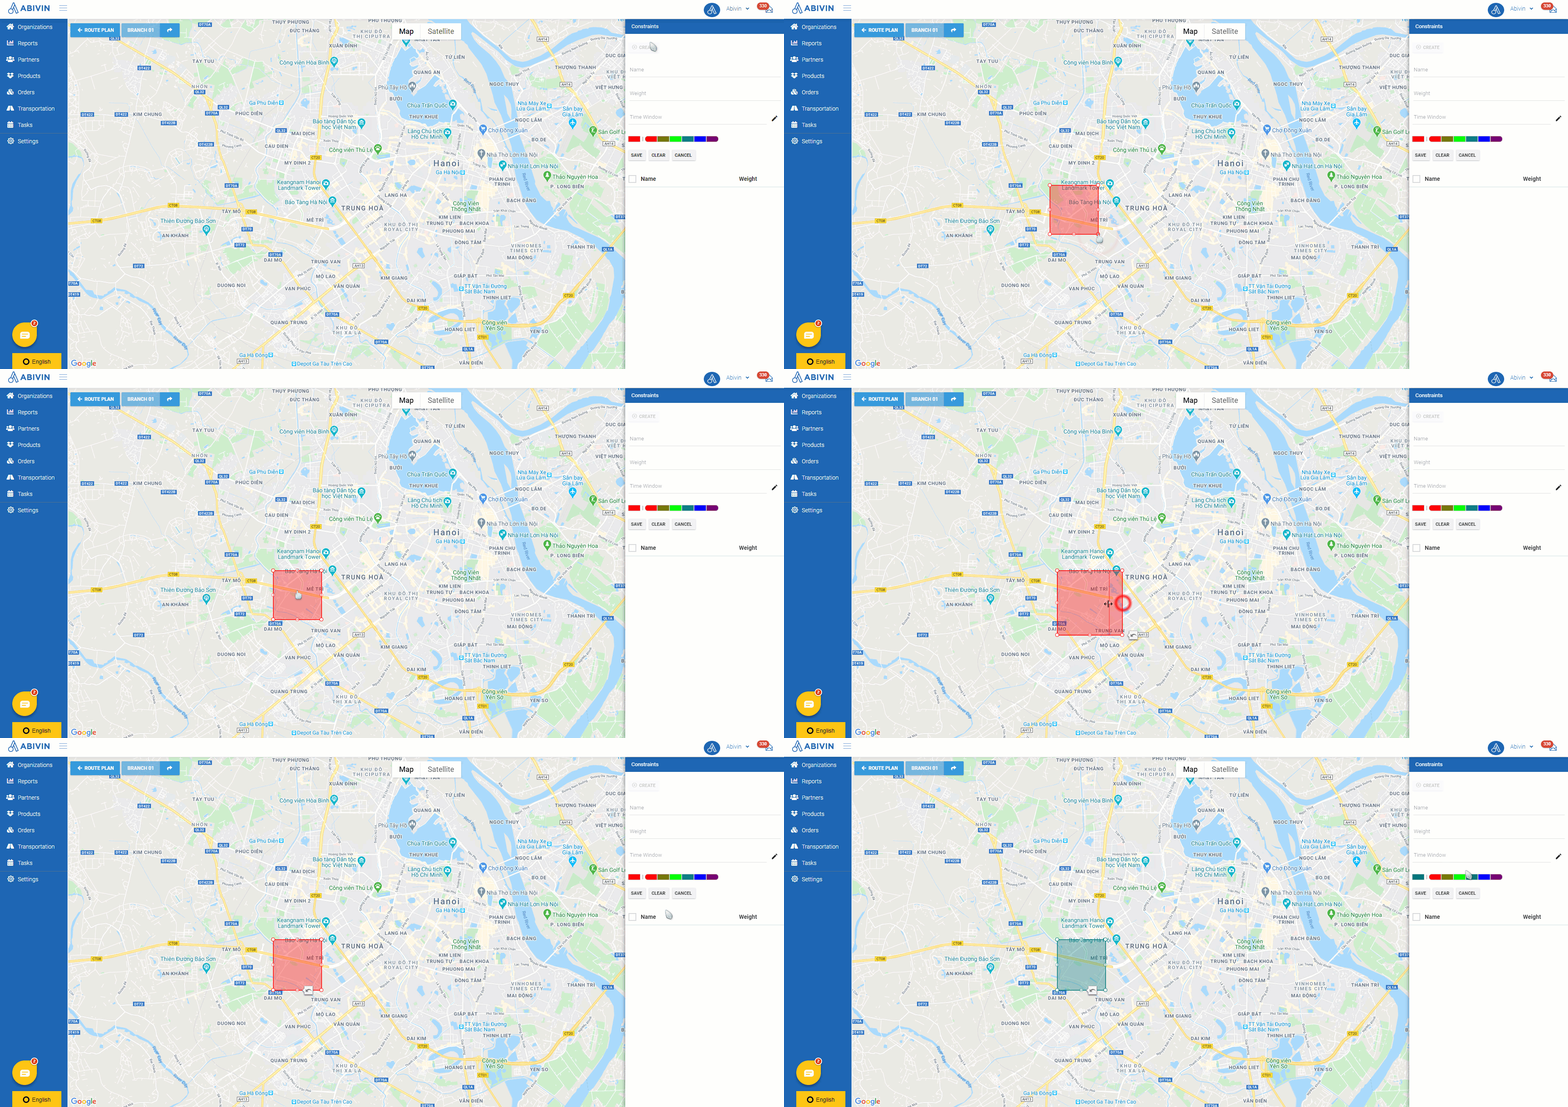
- Next, after setting the position and the sizes of the road constraint, you need to input the information for that road constraint on the right side panel. Below are the information fields of a road constraint
Information field | Description & Input |
|---|---|
Name (Required) | 1. Description: |
Weight | 1. Description: |
Time Window | 1. Description: |
- After you have input the necessary information of the road constraint, click Save to confirm creating the Road constraint. The recently created Road constraint will show up on the panel
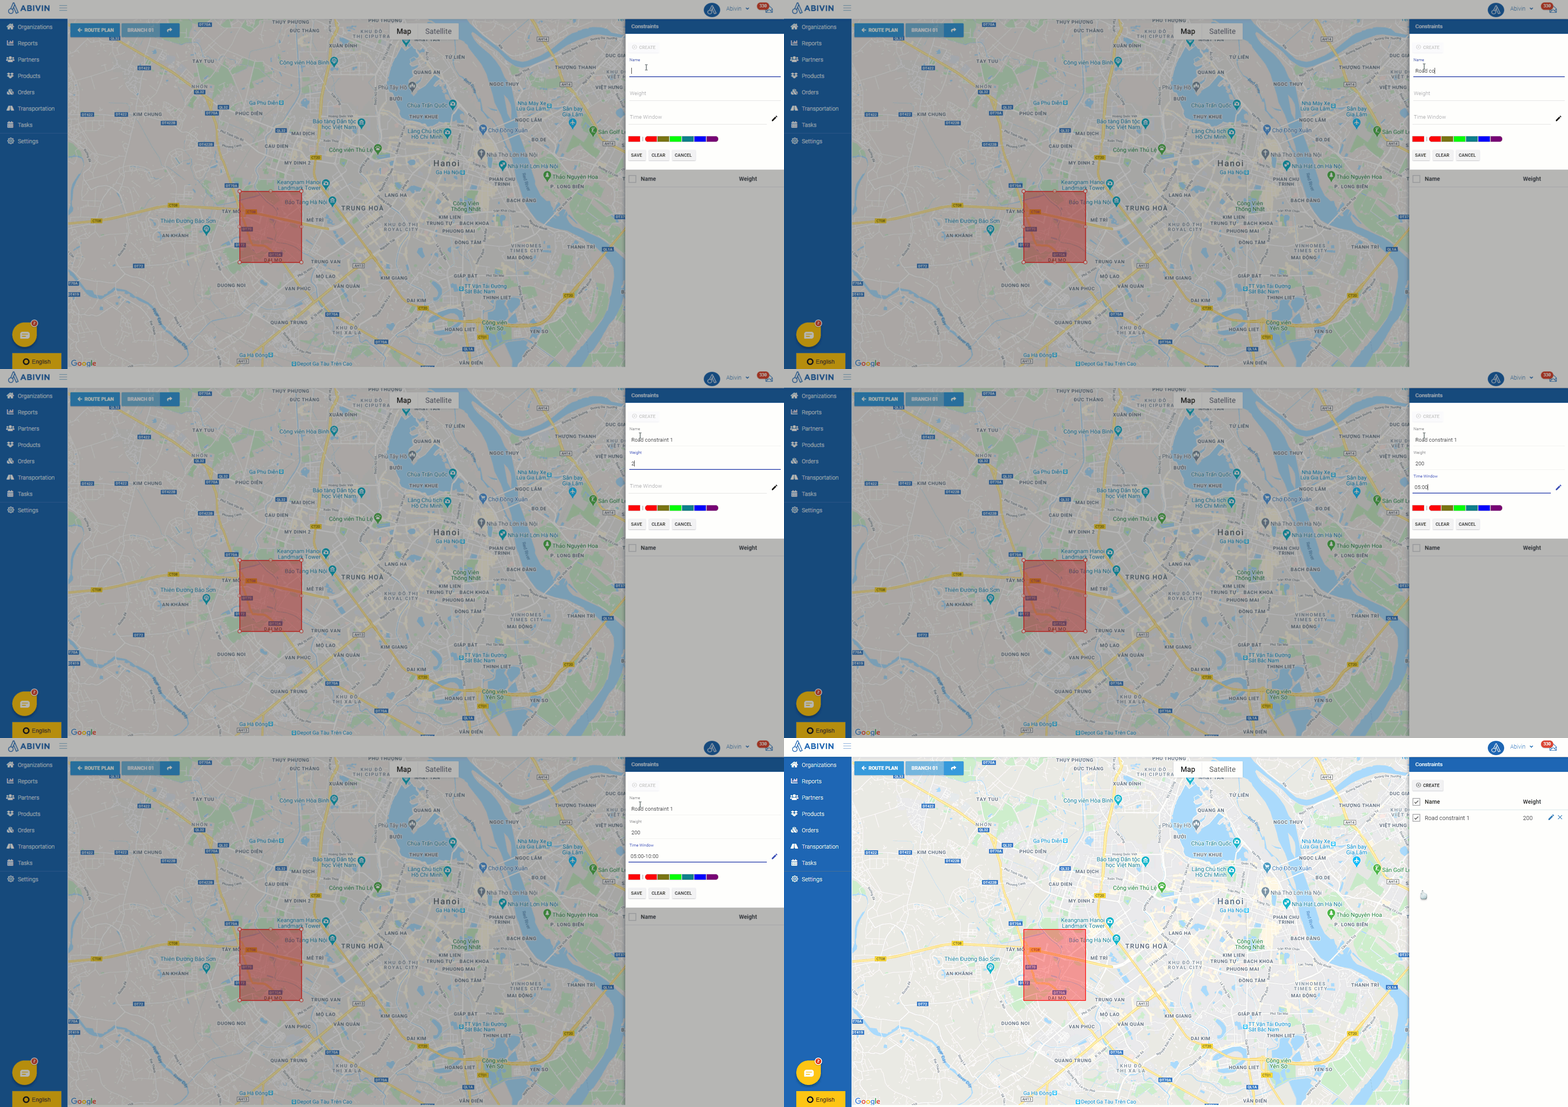
- After you have created the road constraints, click on the button Route Plan near the top left of the screen to get back to the route optimization screen. Now you can proceed to optimize routes as usual. The road constraint you have just created will be taken into account when the system optimize routes for all customers of all warehouses (Depot/Sun/Crossdock) directly under the management of the selected Branch above
Road constraint quantity limitationYou can only create up to twenty Road constraints. Pass that value, you would have to delete some Road constraints before being able to create new ones
Enable/Disable Road constraint
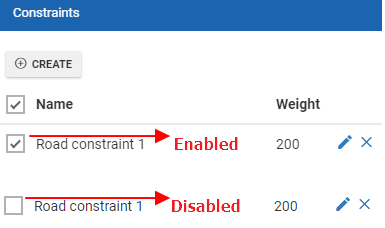
- By default, a road constraint will be enabled right after it is created, represented by the icon on the Road constraint panel. During the route optimization process, the routing algorithm will take into account that road constraint
- If you want to disable a road constraint, you can click on the corresponding check box icon of tha road constraint. When that icon turns to , that means the road constraint has been disabled, and will not take effect during the route optimization process
Edit Road constraint
- To edit a road constraint, click on the icon Edit of that road constraint. After editing, click Save to confirm the changes
Delete Road constraint
- To delete a road constraint, click on the icon Delete of that road constraint. A confirmation form will appear. Click OK to confirm deleting the road constraint
Road constraint based on Vehicle gross weight
- With this road constraint, the routing algorithm will compare the Gross weight attribute of each vehicle with the Weight attribute of the road constraint. Only vehicles which have the Gross weight attribute to be equal to or larger than the Weight attribute of the road constraint will be allowed to travel through the road constraint area
Road constraint based on Time window
- This road constraint does not only constrains vehicles by Gross weight, but also by Time window. During the time window of the road constraint, no vehicle will be allowed to travel through that road constraint, even if the vehicle meets the gross weight requirement of the road constraint
At the moment, the routing algorithm will prioritize the deliveries to customers which are located in the road constraints. Their orders will always be performed first before orders of customers who are not located in the road constraint areas
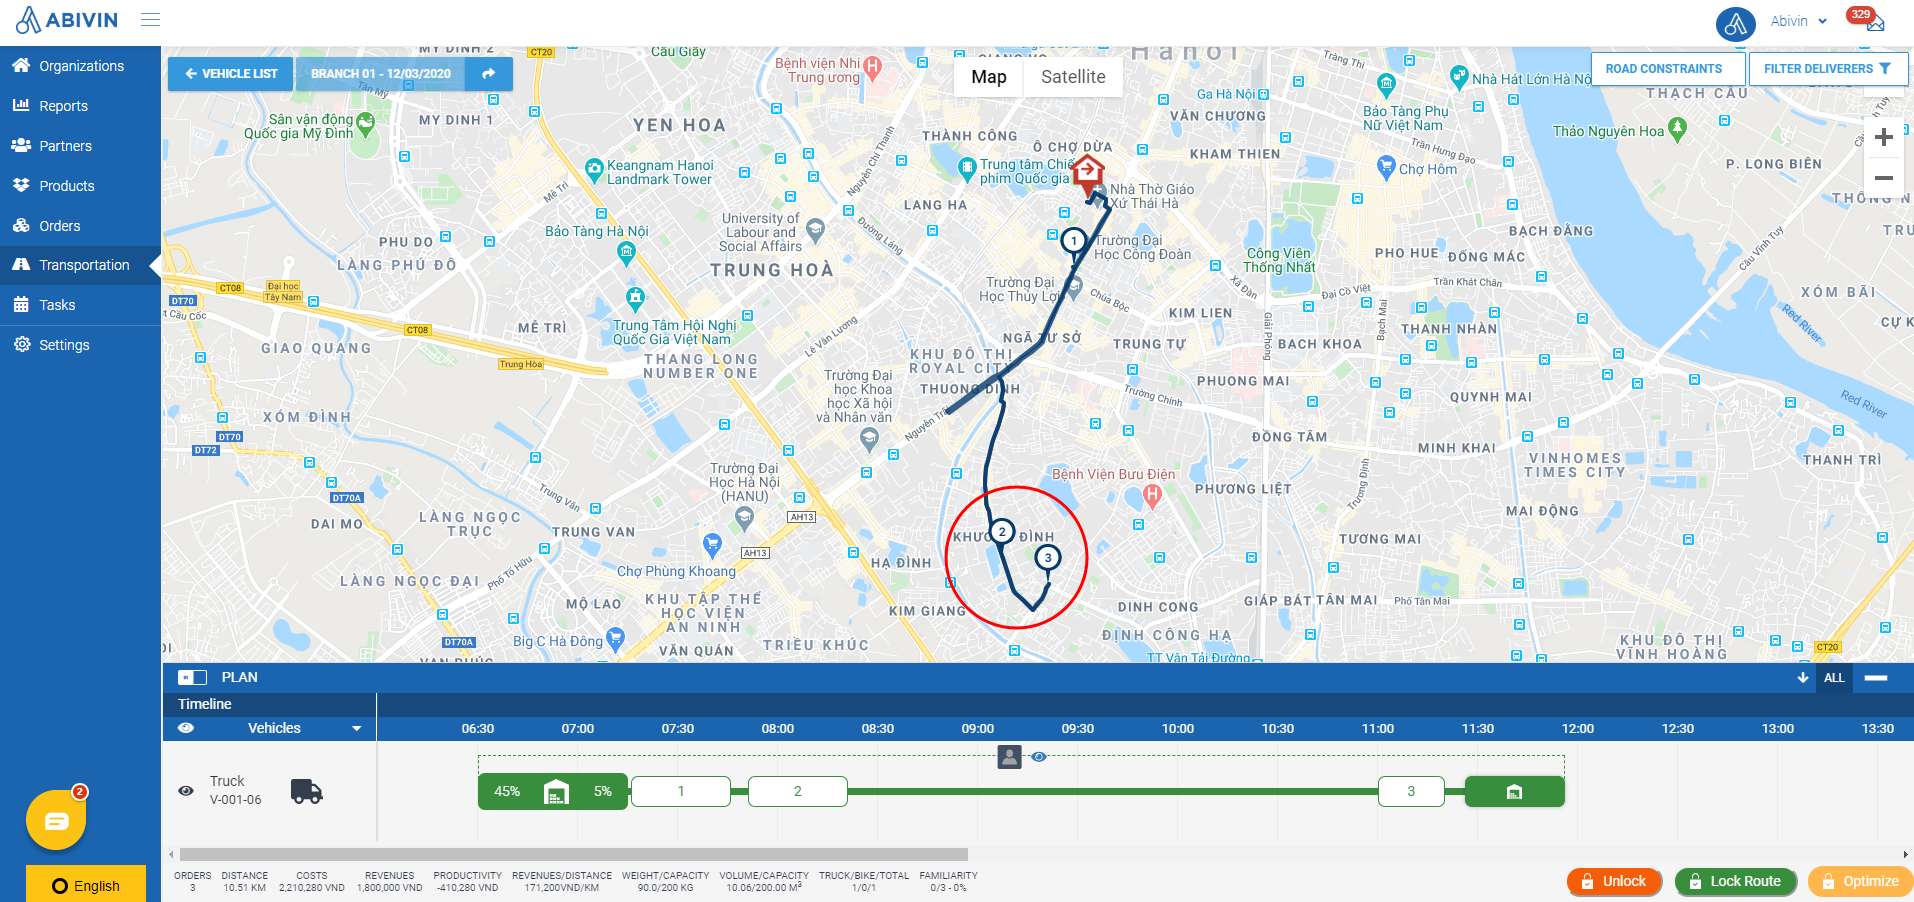
Before enabling road constraint, orders of these customers are not prioritized
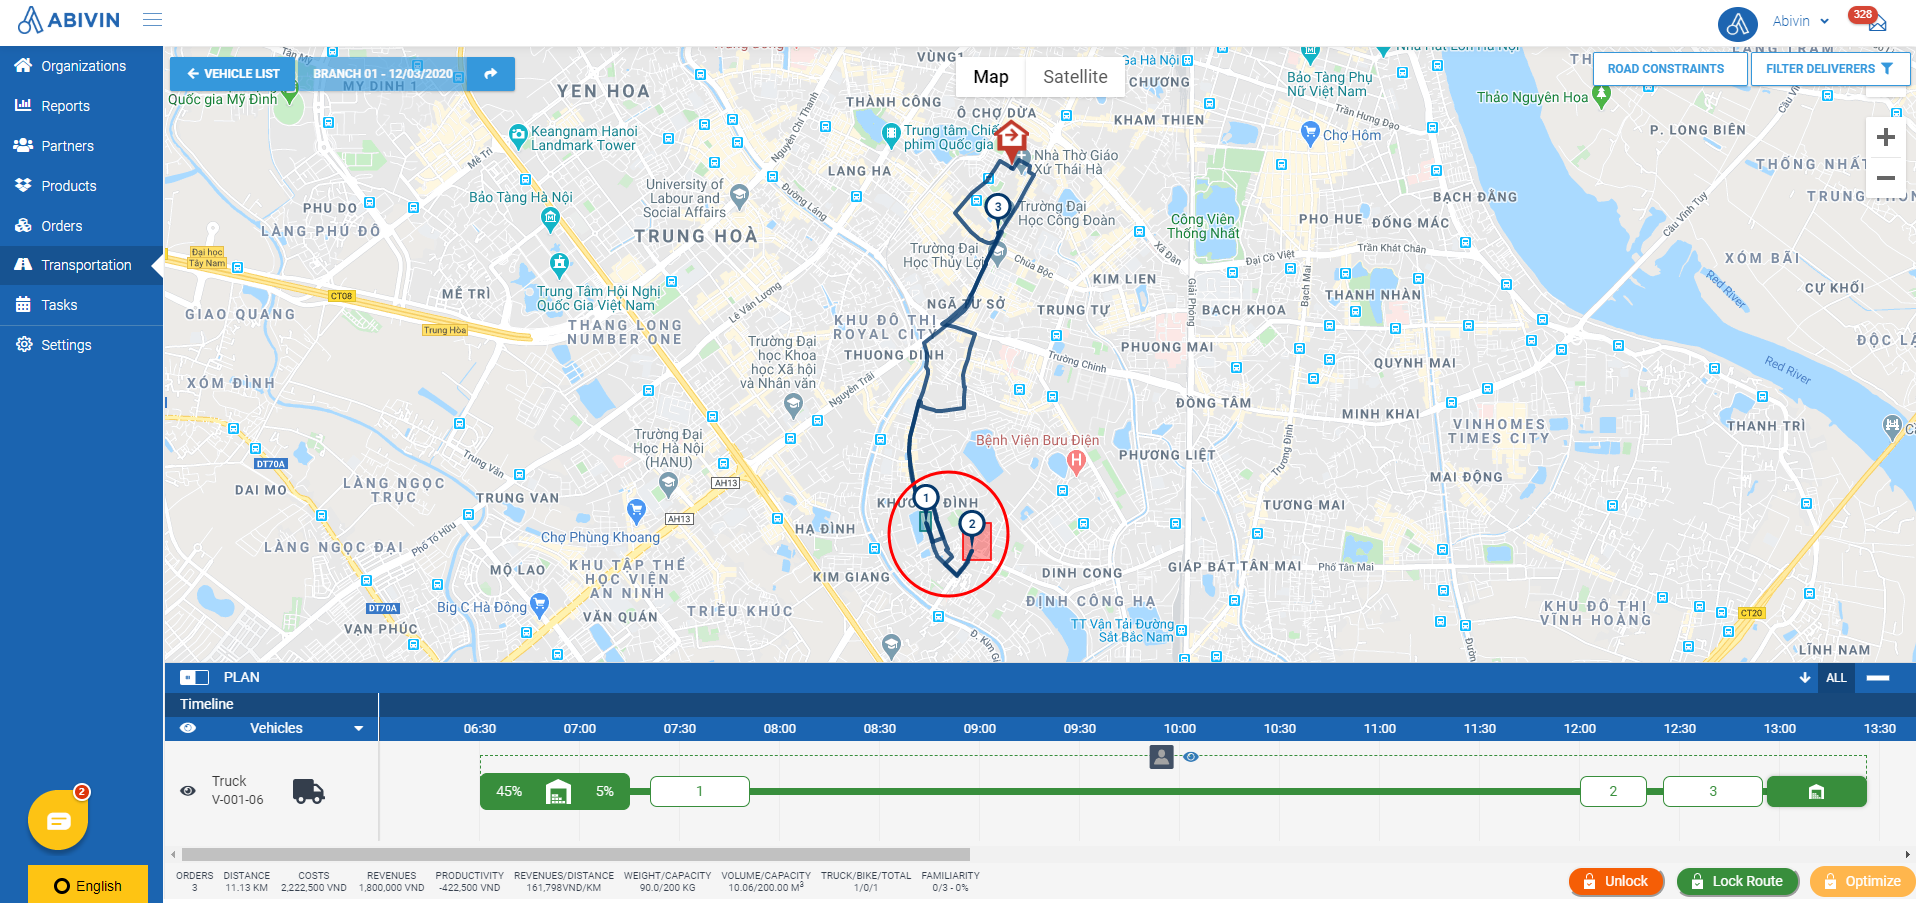
After enabling road constraint, orders of these customers will be prioritized because they are located in the road constraint areas
Road Constraint based on Vehicle License Plate
Compulsory Configurations
- In order for this Road Constraint type to work, you need to enable the configuration Odd Even Policy at the Branch
- The attribute License Plate of the vehicles must not contain dots. For example: 30K3.5555 is invalid; 30K35555 is valid
How the Road Constraint based on Vehicle license plate number works
- This Road Constraint does not only constrain vehicles by the the attribute Gross Weight, but also by the attribute License Plate. Vehicles with the License Plate numbers ending in odd numbers (1, 3, 5, 7, 9) are only allowed to travel through the road constraint on odd-numbered dates. Vice versa, vehicles with License Plate numbers ending in even numbers (0, 2, 4, 6, 8) are only allowed to travel through the Road Constraint on even-numbered dates
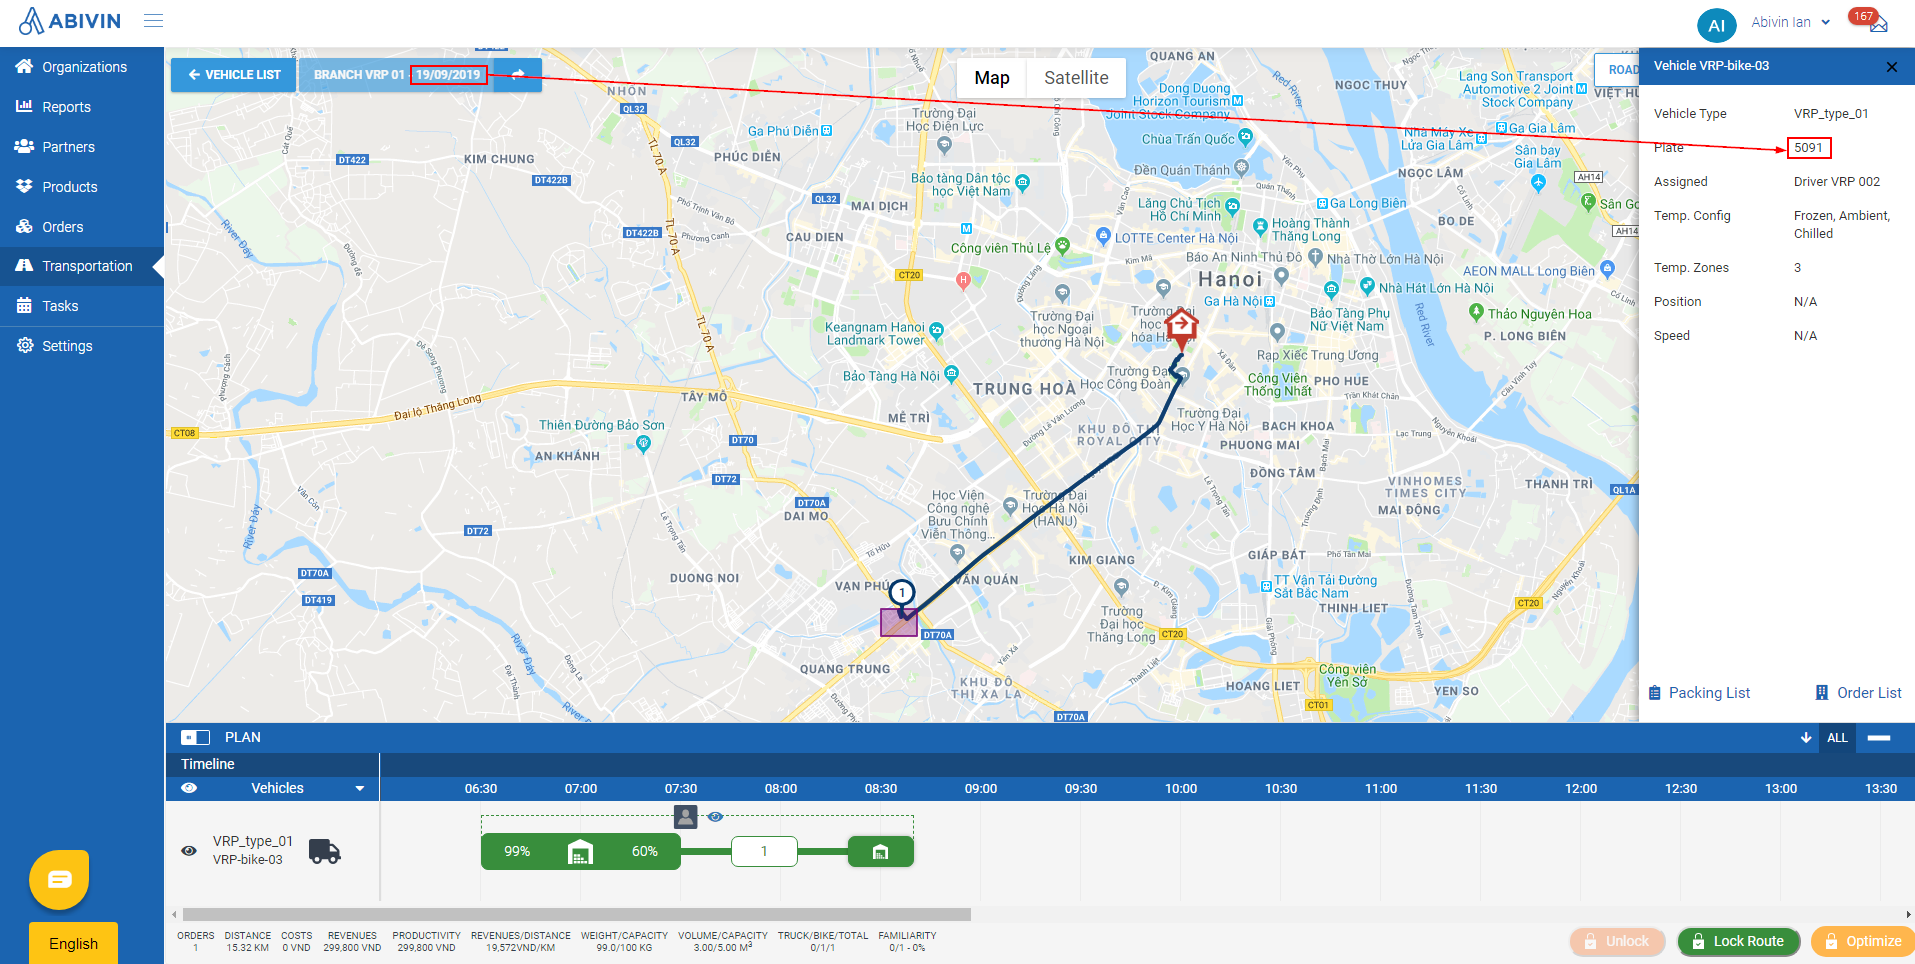
Vehicle with odd-numbered license plate 5091 delivers on odd date 19/09/2019
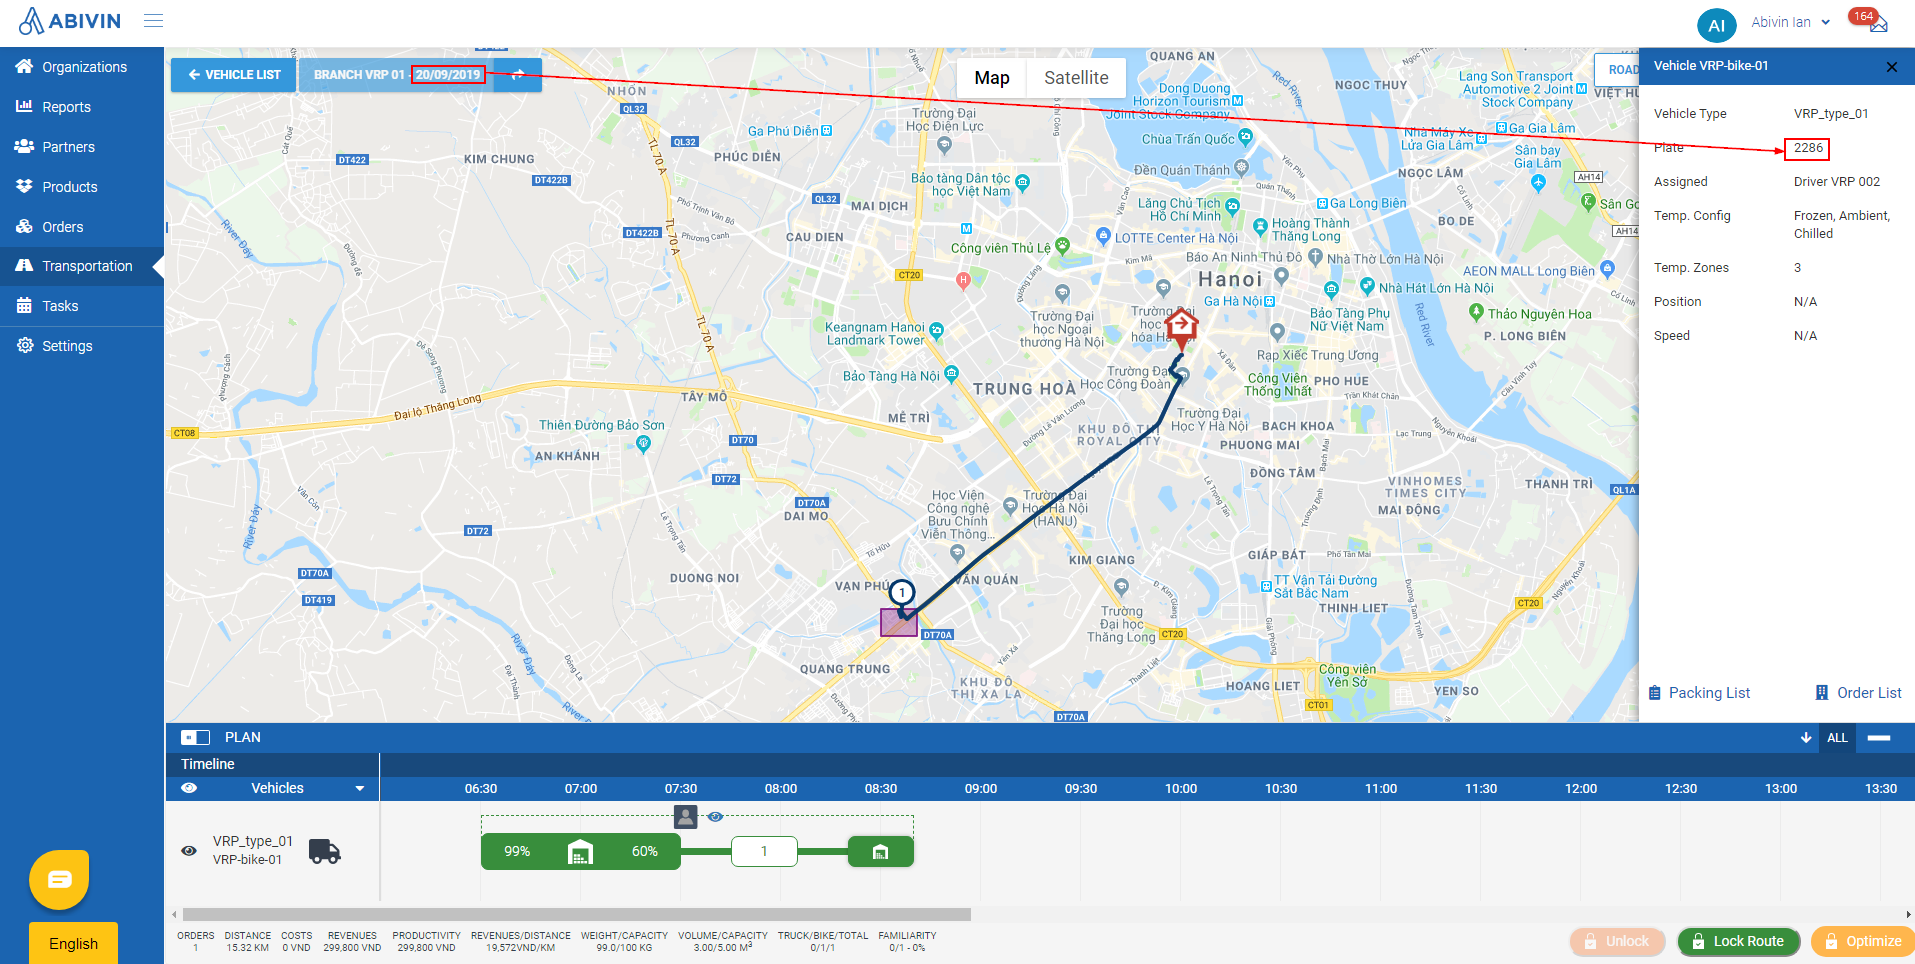
Vehicle with even-numbered license plate 2286 delivers on even date 20/09/2019
Updated about 1 month ago
