Manage Sales Orders
Locate Sales Orders List
- Sales Orders are listed on Orders > Sales Orders tab
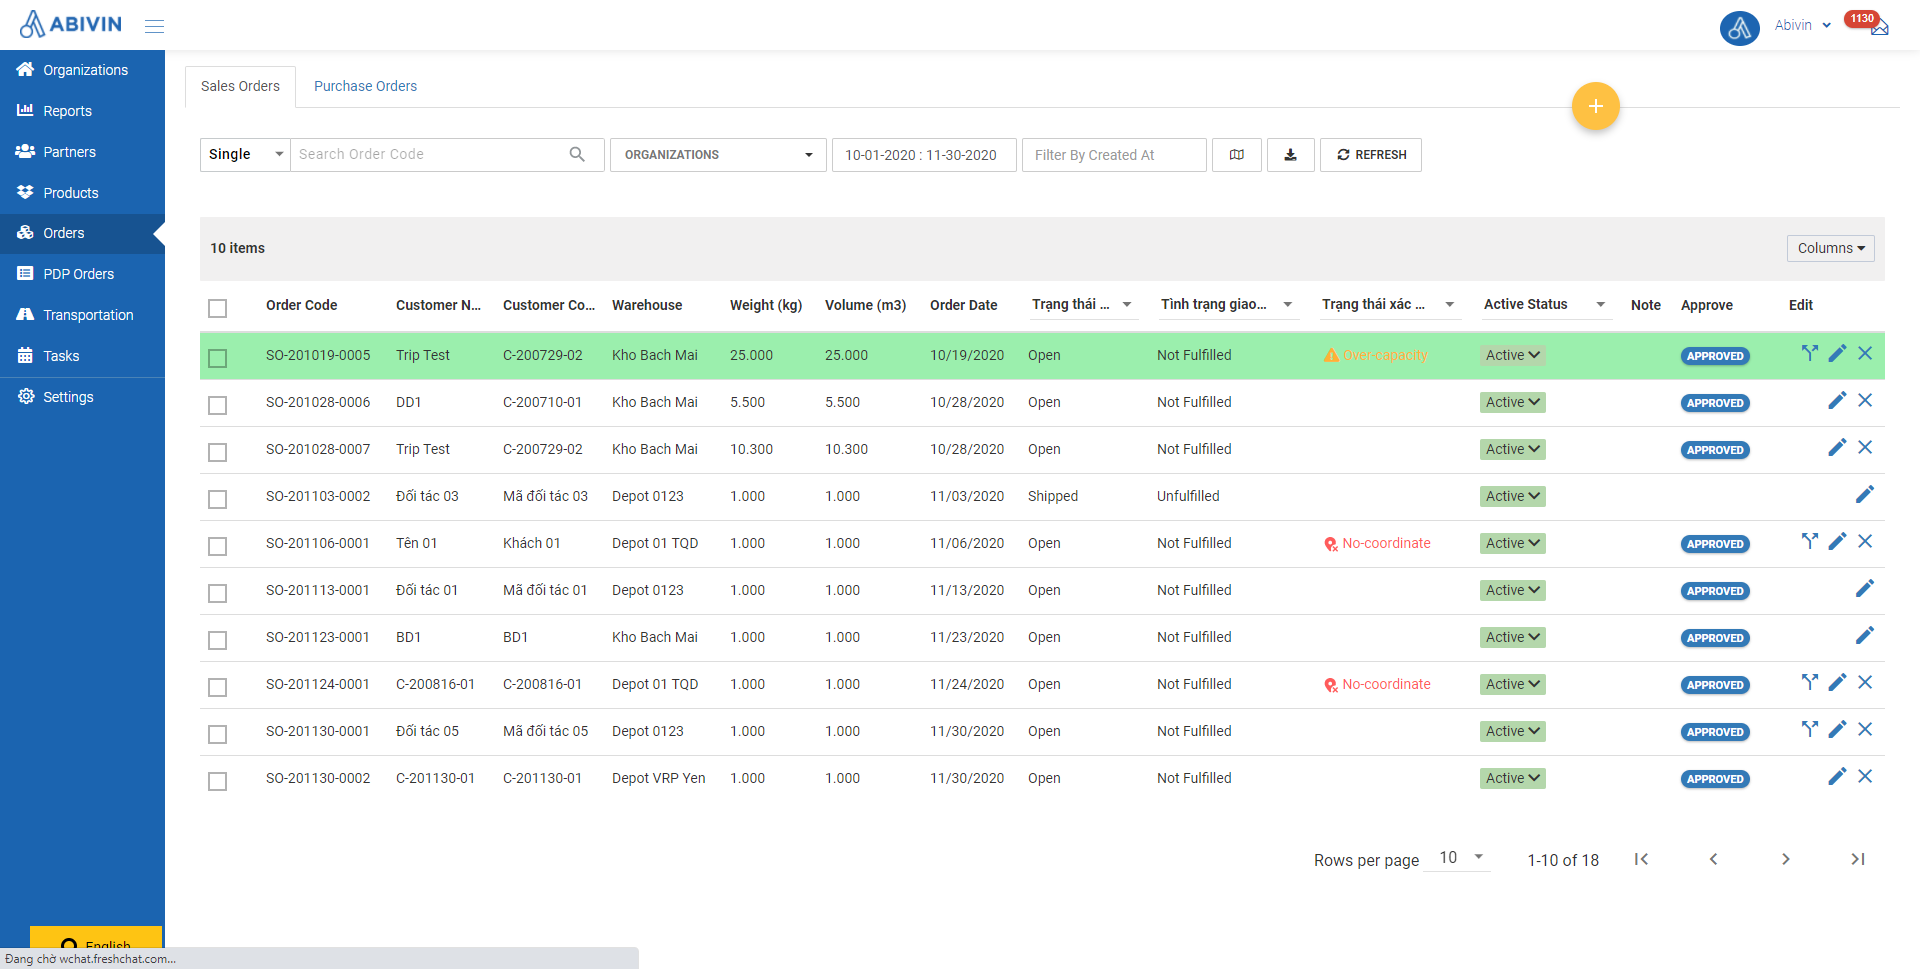
Illustration Image (English)
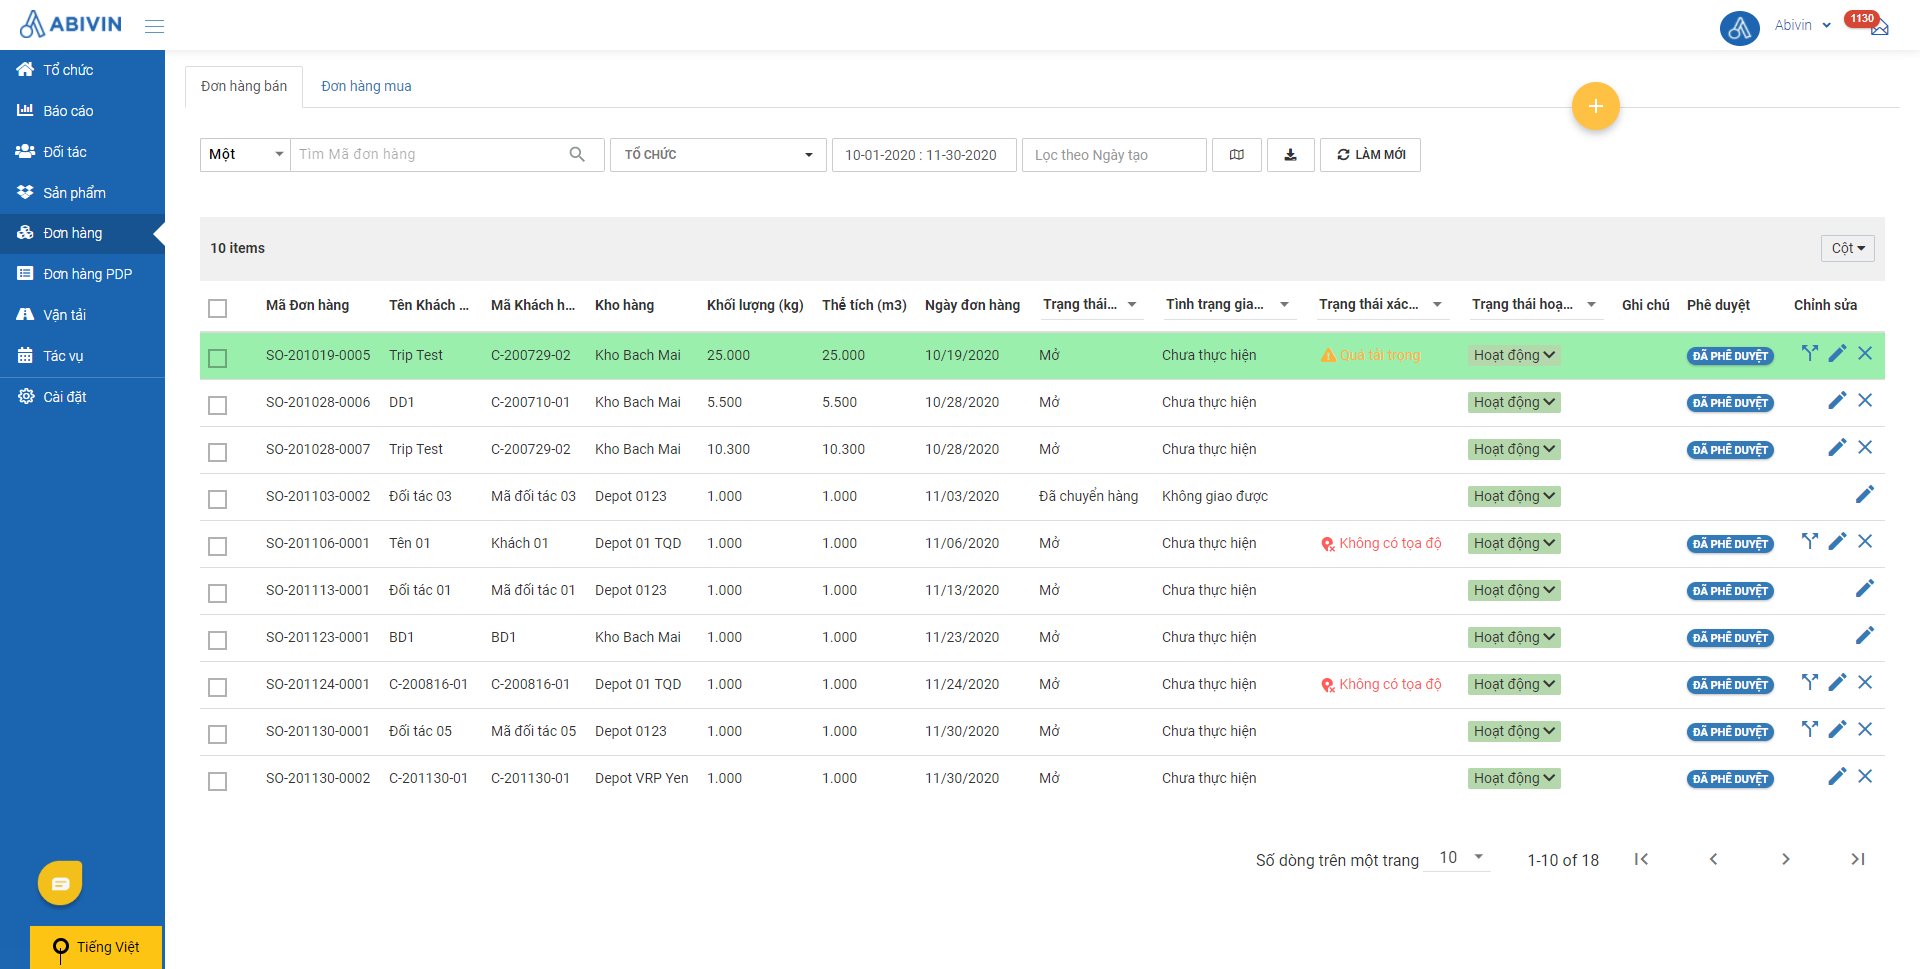
Illustration Image (Vietnamese)
Create Sales Orders
- Orders can be created using two methods: Web form & Excel template
Sales Order information fields
- Below are all information fields of a Sales Order
Information field | Description |
|---|---|
Created On (Web form) | The date on which the Order was created |
From Depot | The Depot from where the Order will start |
Order Date | The date on which the Order is planned to be performed and completed |
Due Date | This information field is only intended for certain user accounts which use external TMS |
ETA Date | This information field is only intended for certain user accounts which use external TMS |
ETD Date | This information field is only intended for certain user accounts which use external TMS |
Manually | This information field is only intended for certain user accounts |
Order Code | Management code assigned to the Order |
Order Type | Specify the Type of the Order |
Customer Code (Web form); Partner Code (Excel template) | Customer Code of the customer that creates the Sales Order |
Invoice Code | Code of the commercial invoice associated with the order |
Check by | Name of the personnel who performs checking errors of the order |
Order Time Window (Web form); Time Window (Excel template) | The time period(s) the customer can receive the Order |
Product Code | Code of the product assigned by the customer |
Number Of Cases | The case quantity of a particular product loaded in the order being created |
Number Of Items | The single item quantity of a particular product loaded in the order being created |
Customer Discount | The money value to be discounted for the customers, will be subtracted from the field "Total price" of the order being created (If the total price is automatically calculated) |
Order Discount (Web form) Sale Discount (Excel template) | Sales Discount, will be subtracted from the field "Total price" of the order being created (If the total price is automatically calculated) |
Promotion Discount | Promotion Discount, will be subtracted from the field "Total price" of the order being created (If the total price is automatically calculated) |
IMVD Discount | IMVD Discount, will be subtracted from the field "Amount" of the product on Web form |
Total Price | The total price of the order |
Lot Number | The ordinal number of the product lot from where the products loaded in the Order were picked up |
Service Time | The manually input unloading time period of the Order being created at the customer warehouse |
Pickup Order | Specify whether the order being created is a Pickup Order or not |
Separate Vehicle (Web form); Splitted (Excel template) | Specify whether the Orders placed by the same customer will be delivered by separate vehicles or not |
Expired Date | The Date when a product loaded in the order being created is deemed expired, no longer usable |
Note | A short note about the order being created |
Ship-To Depot Code | This information field is only intended for certain user accounts which use external TMS |
Ship-to Code | This information field is only intended for certain user accounts which use external TMS |
Active Status | Specify whether the Orders being created will be put into the Route Plan Optimization process after being imported or not |
Estimated Distance | The estimated driveway distance for vehicles of Truck type between the Depot location to the Customer location as suggested by Google Map engine |
Create single Order using Web form
- Please refer to the System Operations article to know the general steps about creating single object using Web form
- Below are the input rules when using Web form
1.1. From Depot
- Click on this field. On the search bar, input the Organization Code/Organization Name of the appropriate Depot, then select the returned value
1.2. To Customer
The field From Depot must be input before this field
- Click on this field. On the search bar, input the Customer Code/Customer Name of the appropriate Customer, then select the returned value
1.3. Order Code
- The Order Code is automatically generated in the following format:
SO-yymmdd-xxxxx - In which:
- 1 - SO stands for Sales Order
- 2 - yy are the last two digits of the current year. For example: The current year is 2019, then the yy value would be 19
- 3 - mm is the current month. For example: The current month is October, then the mm value would be 10
- 4 - dd is the current date. For example: The current date is Sixteenth, then the dd value would be 16
- 5 - xxxxx is the ordinal number of the Order. This ordinal number will automatically increase each time you open the form Create Sales Order. For example: 00001; 00023; 11111 and so on
- You can also change the Order Code to your own format. Note that the Order Code must not contain spaces
1.4. Product
- Click on the field on the same row with the button Add Product (Below the text Search). On the search bar, input the Product Name/Product Code of the wanted Product, then select the returned value. Click on the button Add Product to add that Product to the Order
- The recently added Product will appear on the Product table below
- Repeat these steps to add more Products
- If you accidentally add a wrong Product, click on the respective recycle bin icon of that Product (Under the column Remove on the Product table) to remove it
- Input the whole case/single item quantity of the Product into the fields Cases and Items on the Product table
- If the Product has an Expiry Date, click on the calendar icon of the field Expired Date then select the appropriate date on the drop down calendar. Alternatively, you can directly input the Expiry Date in the format mm/dd/yyyy. If you don't have this information, just leave that field blank
- If the Product whole cases/single items were taken from a specific Product Lot in the warehouse, input in the field Lot Number. If you don't have this information, just leave that field blank
- Notice the value in the field Line Price will change accordingly to the whole case/single item quantity. The Line Price is calculated using the following formula:
- Line Price = Whole Case Quantity x Whole Case Price + Single Item Quantity x Single Item Price
1.5. Order Time Window
- If the Customer demands a specific Time Window for the Order, input in this field.
- The time window format is HH:mm-HH:mm, for example 11:00-13:00
- The Order Time Window will be taken into account during the Route Plan Optimization process
- Important Note: The Order Time Window must have overlapping period with the Customer Time Window, else the Order will not be optimizable
1.6. Customer Discount; Sales Discount; Promotion Discount
- If the Order has these discounts, input in the respective fields, else you can leave them blank
1.7. Total Price
- By default, the Total Price of the Order is automatically calculated using the following formula:
- Total Price = Aggregated Line Price of all Products - sum of (Customer Discount; Sales Discount; Promotion Discount)
- If you wish to manually set a Total Price for the Order, tick the checkbox Manual Total Price then manually input your desired Total price
1.8. Pickup Order; Separate Vehicle
- If you want the Order to be a Pickup Order, tick the checkbox Pickup Order
- If a Customer places multiple Orders, and you want each of those Orders delivered by separate vehicles, then tick the checkbox Separate Vehicle
- Note: The checkbox Separate Vehicle will not be visible if the configuration Split Delivery is enabled at the Branch
1.9. Invoice Code; Check By; Note
- These information fields are optional. If you don't have information, just leave these fields blank
1.10. Ship-to Code; Ship-to Depot Code; Due Date; ETA Date; ETD Date
As has been mentioned above, these fields are only intended for certain user accounts which use external TMS
-
If the Customers has Ship-to locations, click on the field Ship-to Code, select the appropriate Ship-to location from the drop down list
-
Note: Refer to the following article to know how to create Ship-to locations for Customers: s**]
Create multi
Create multiple Orders using Excel template
- Please refer to the CRUD functions article to know the general steps about creating multiple objects using Excel template
- Below is the instruction to input in the information fields
2.1. Order Date
- Input in either dd/mm/yyyy or mm/dd/yyyy format, based on the current Date format of your computer
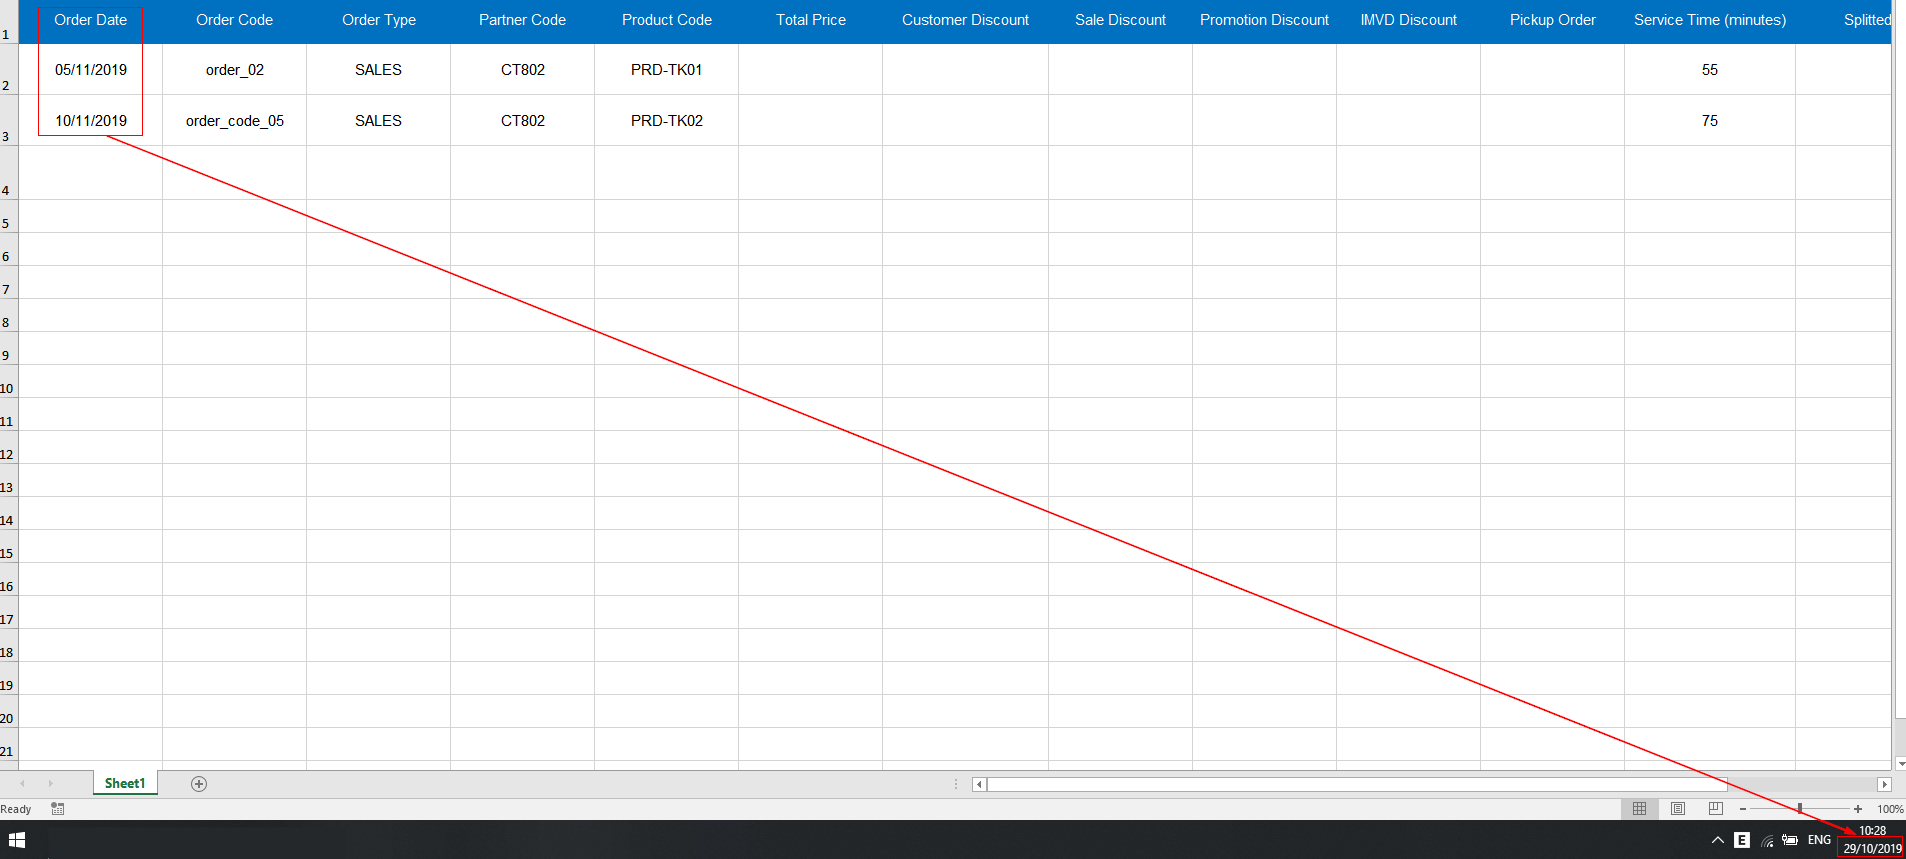
Illustration Image (English)
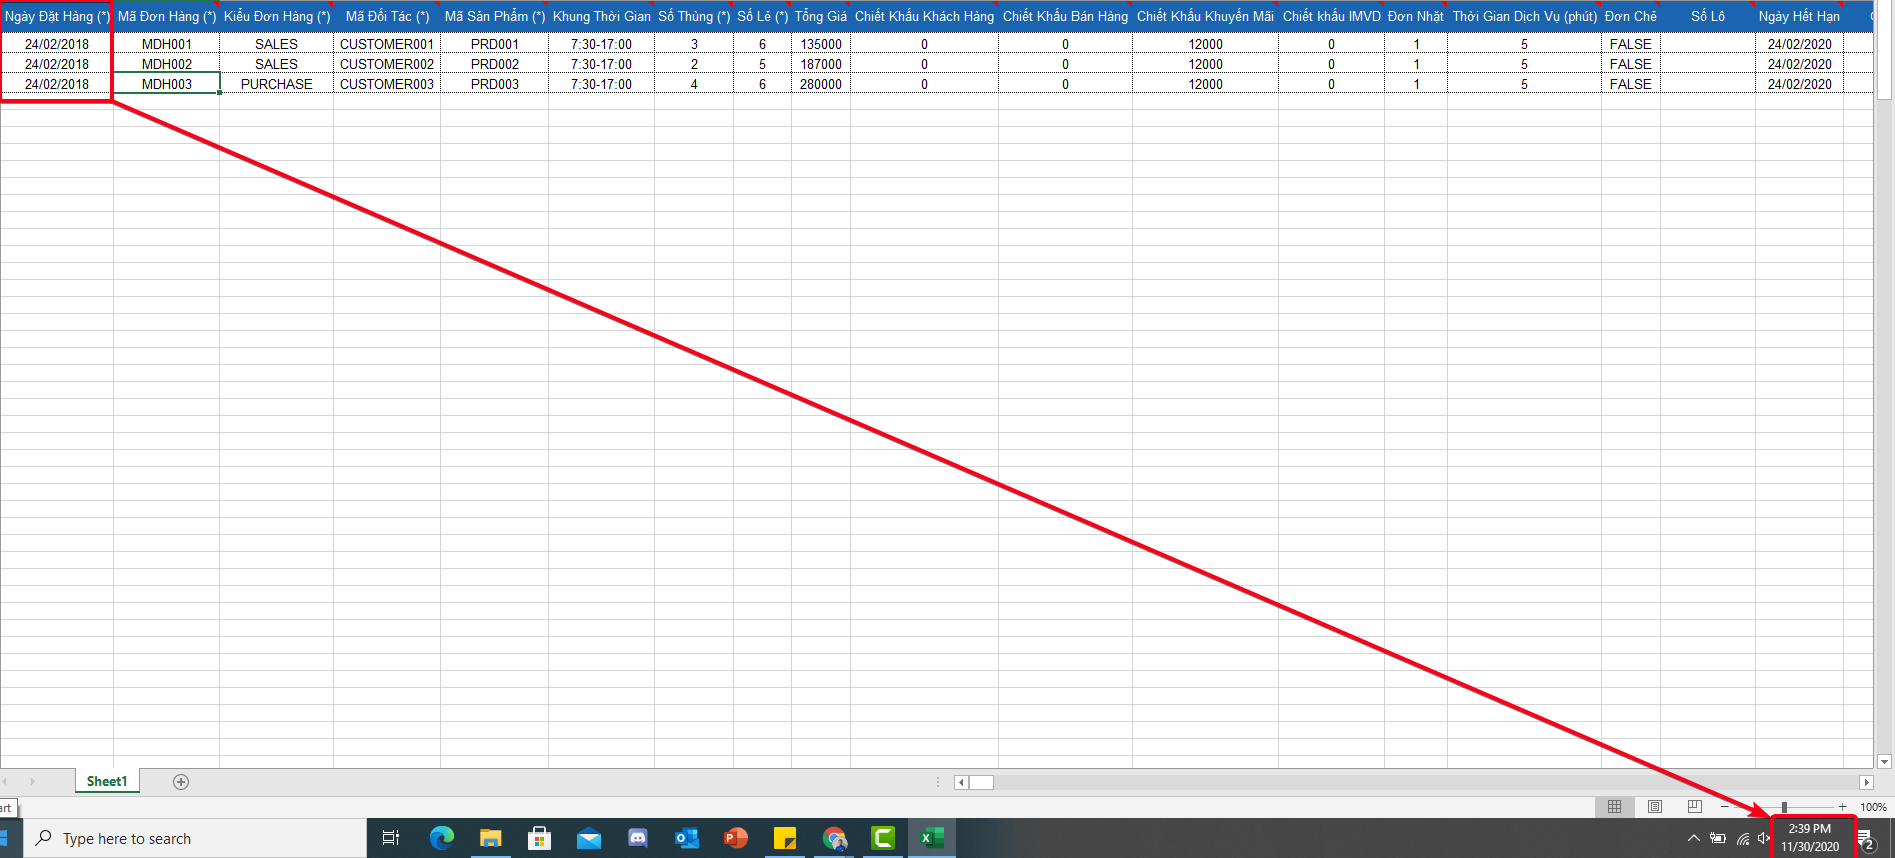
Illustration Image (Vietnamese)
2.2. Order Code
- The Order code must not contain spaces
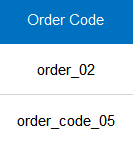
Illustration Image (English)

Illustration Image (Vietnamese)
2.3. Order Type
- Always input the following value into this cell: SALES
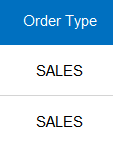
Illustration Image (English)

Illustration Image (Vietnamese)
2.4. Partner Code
- Copy the Customer Code of the appropriate customer on Web app, then paste into this cell
- The Customer Code can be found under Customer Code column in Partners > Customer List tab
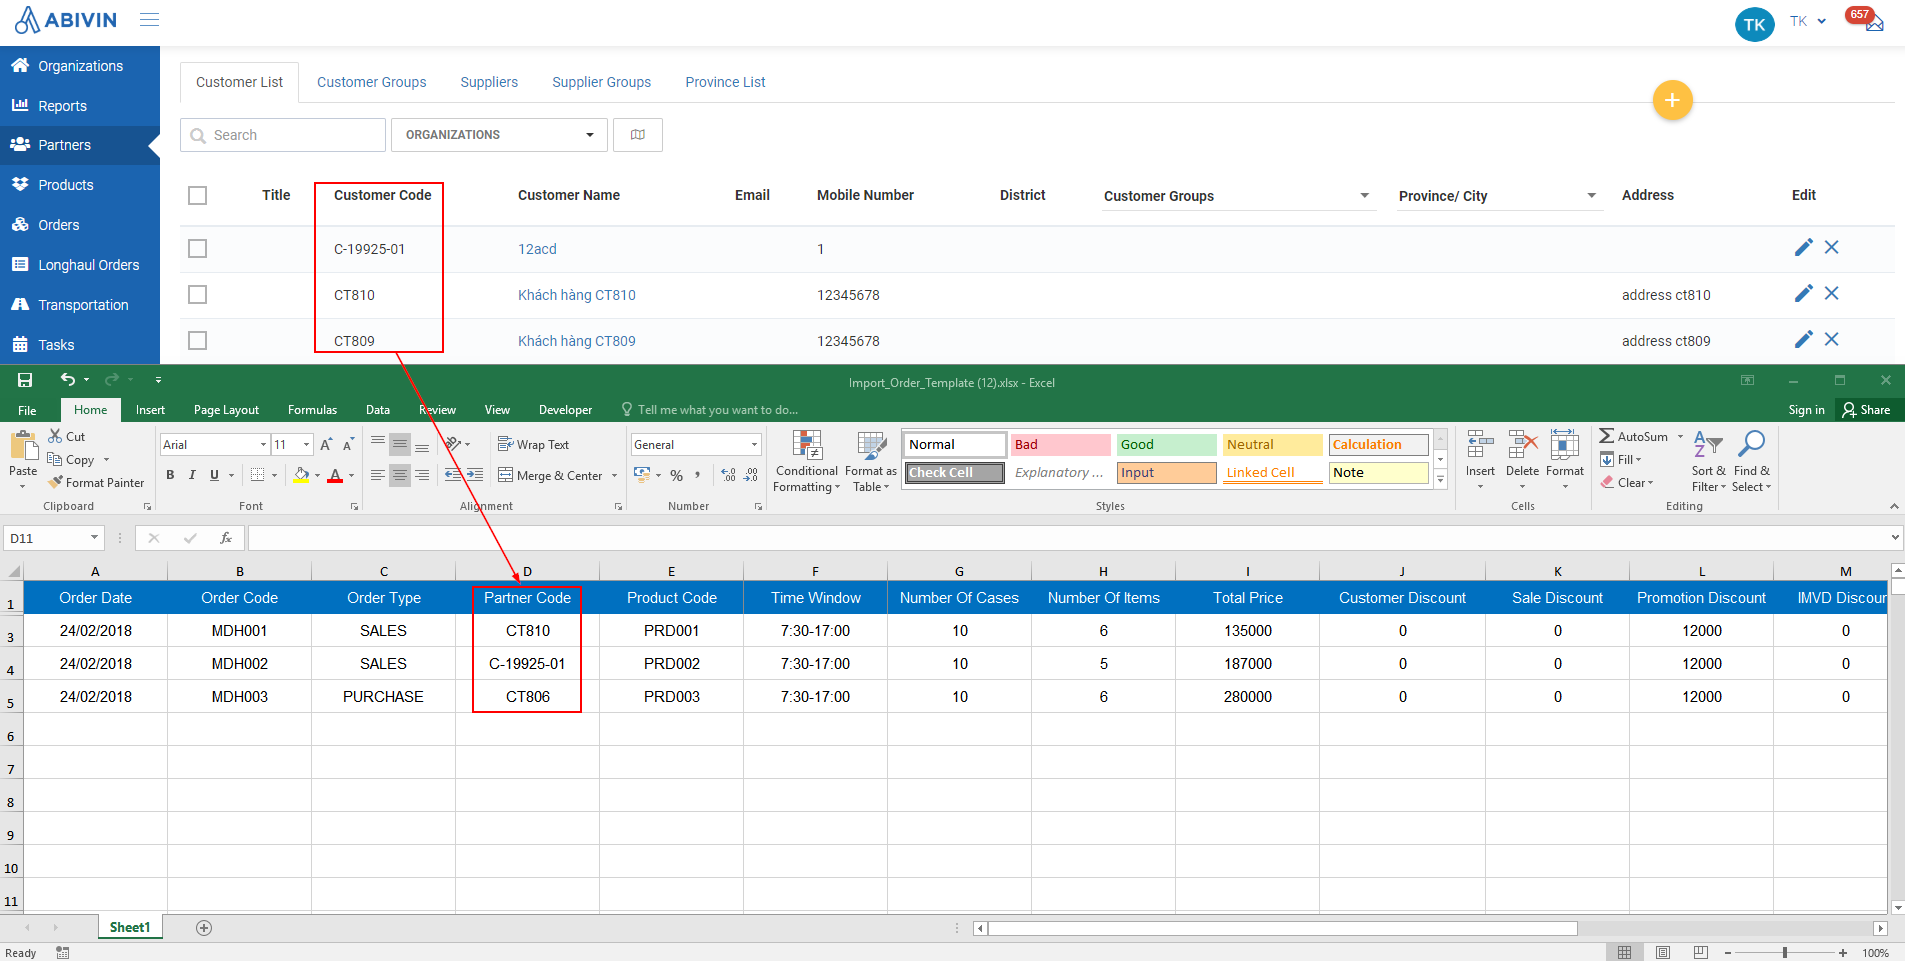
Illustration Image (English)
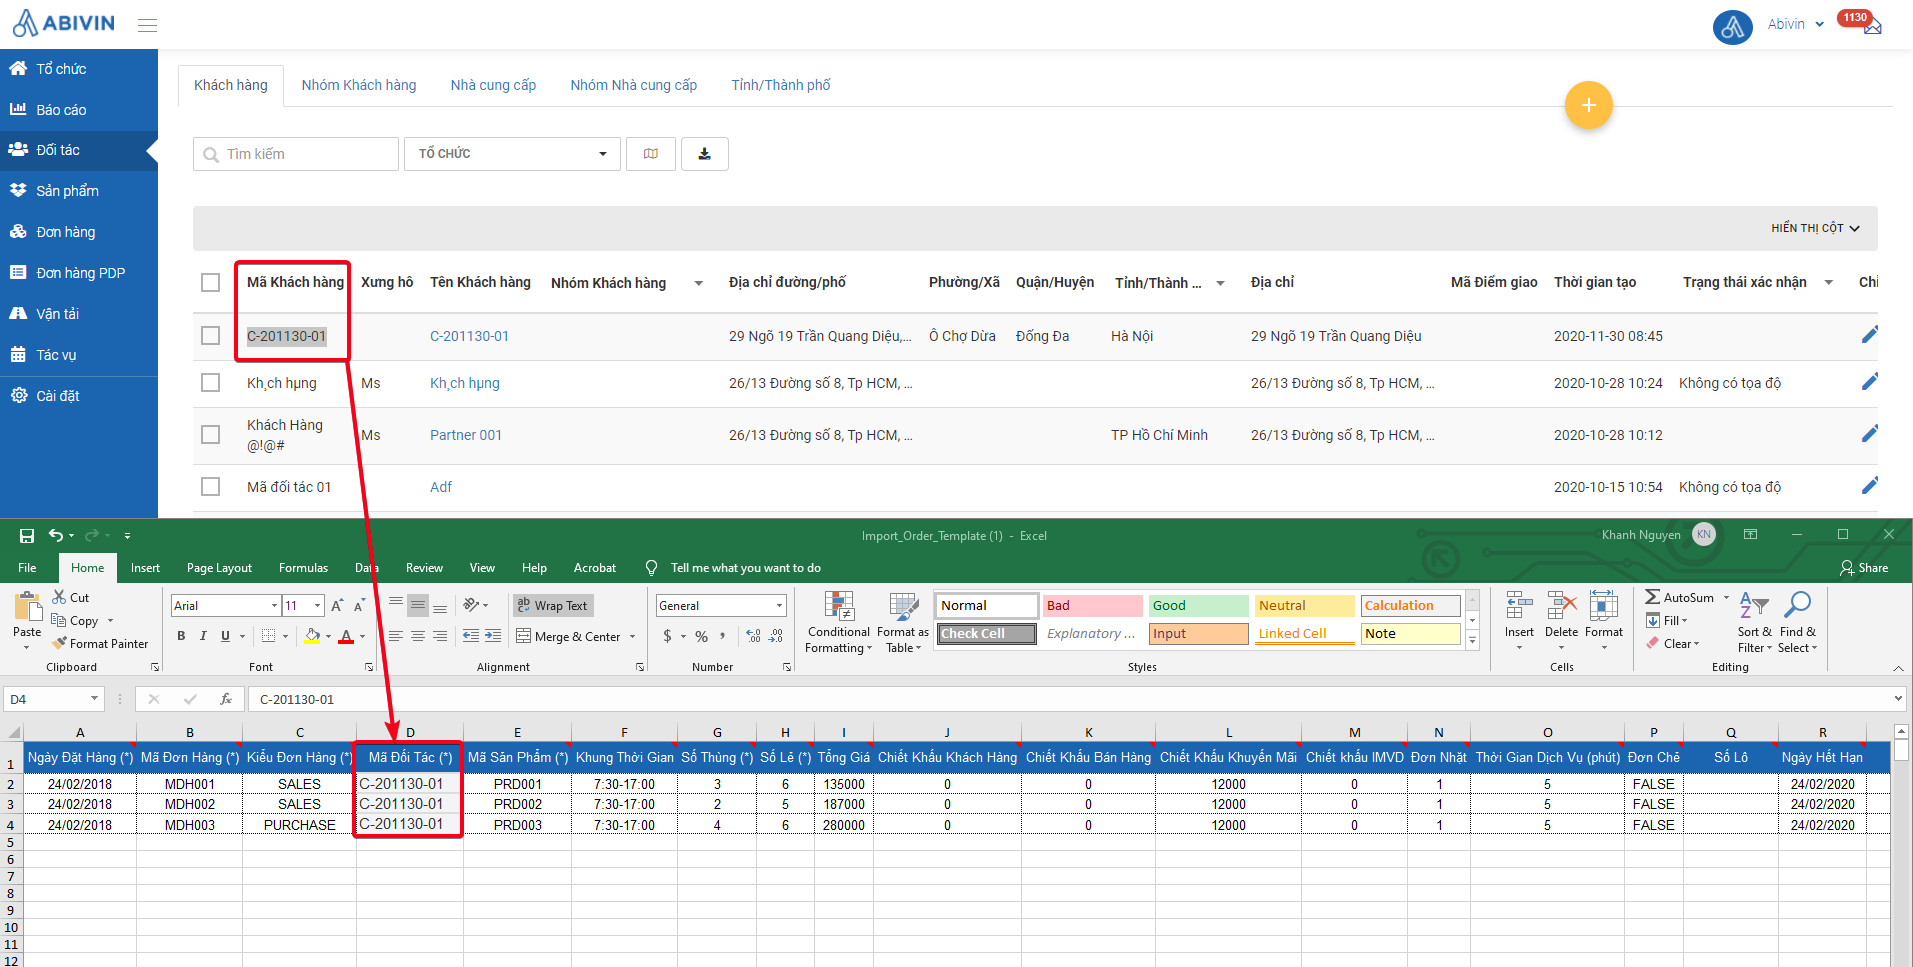
Illustration Image (Vietnamese)
2.5. Product
2.5.1. Product Code
- Copy the Product Code of the product on Web app, then paste into this cell
- The Product Code can be found under Product Code column in Products > Inventory tab
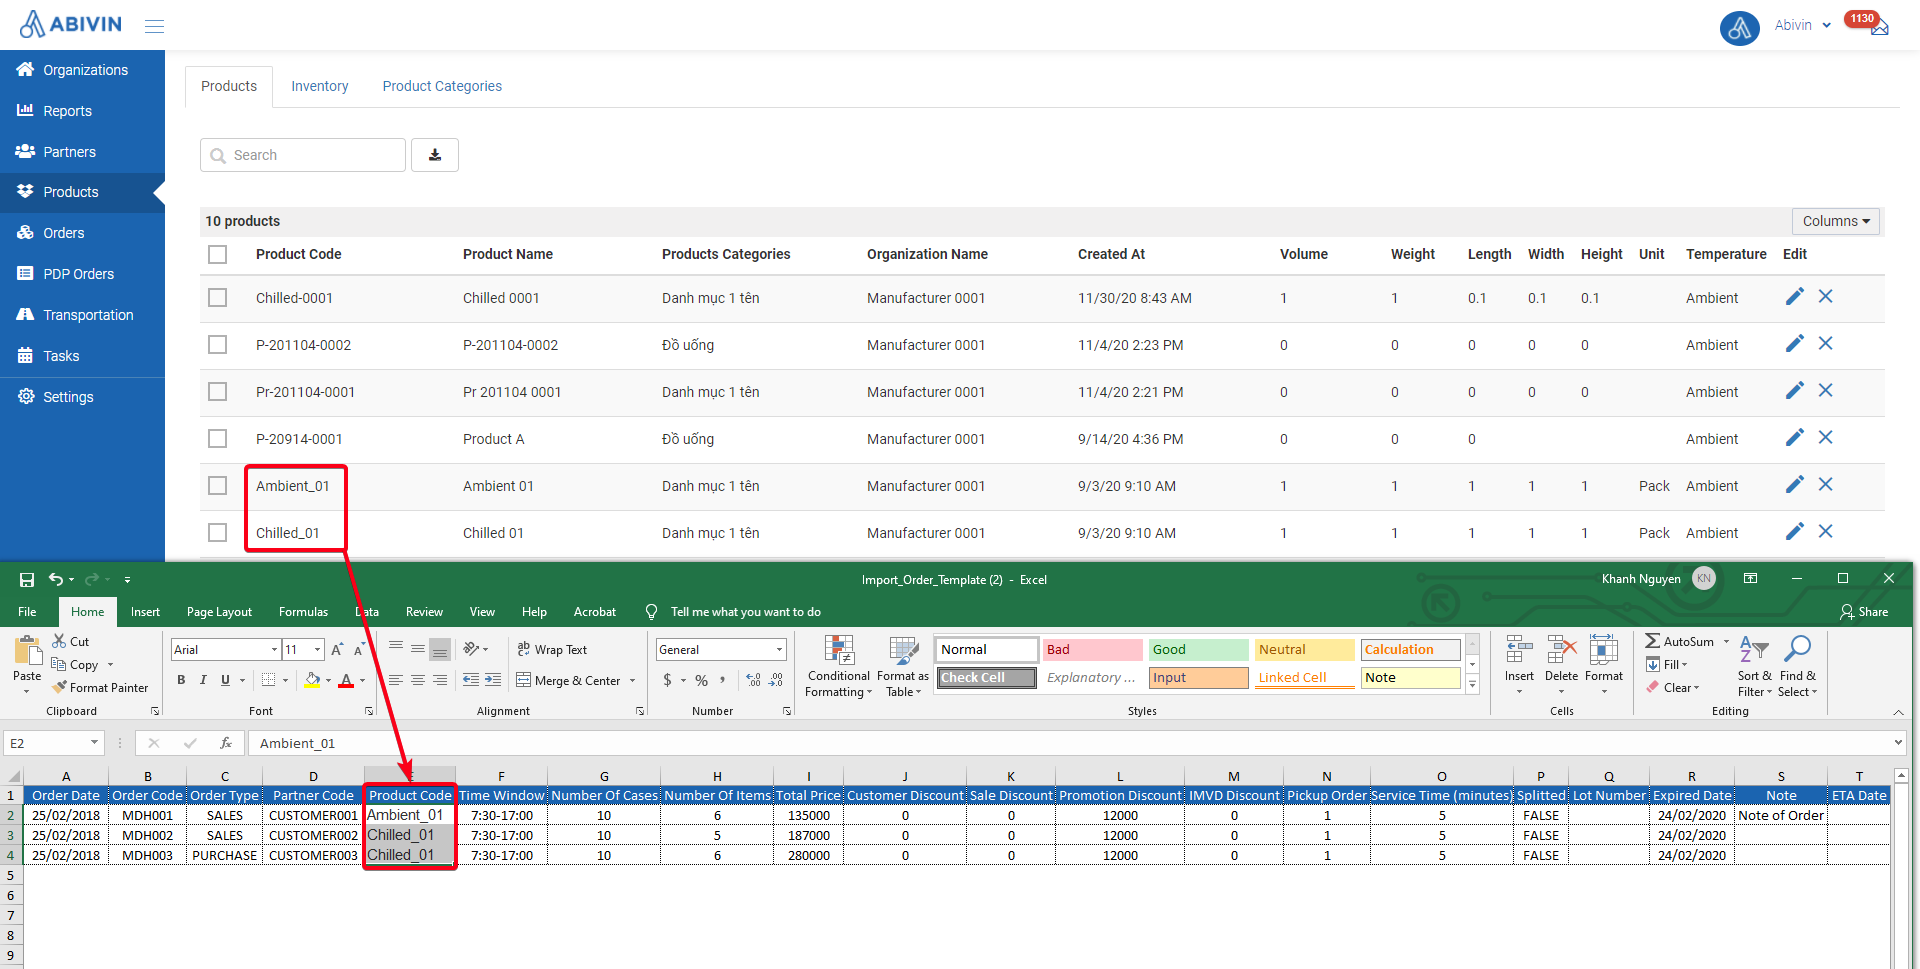
Illustration Image (English)
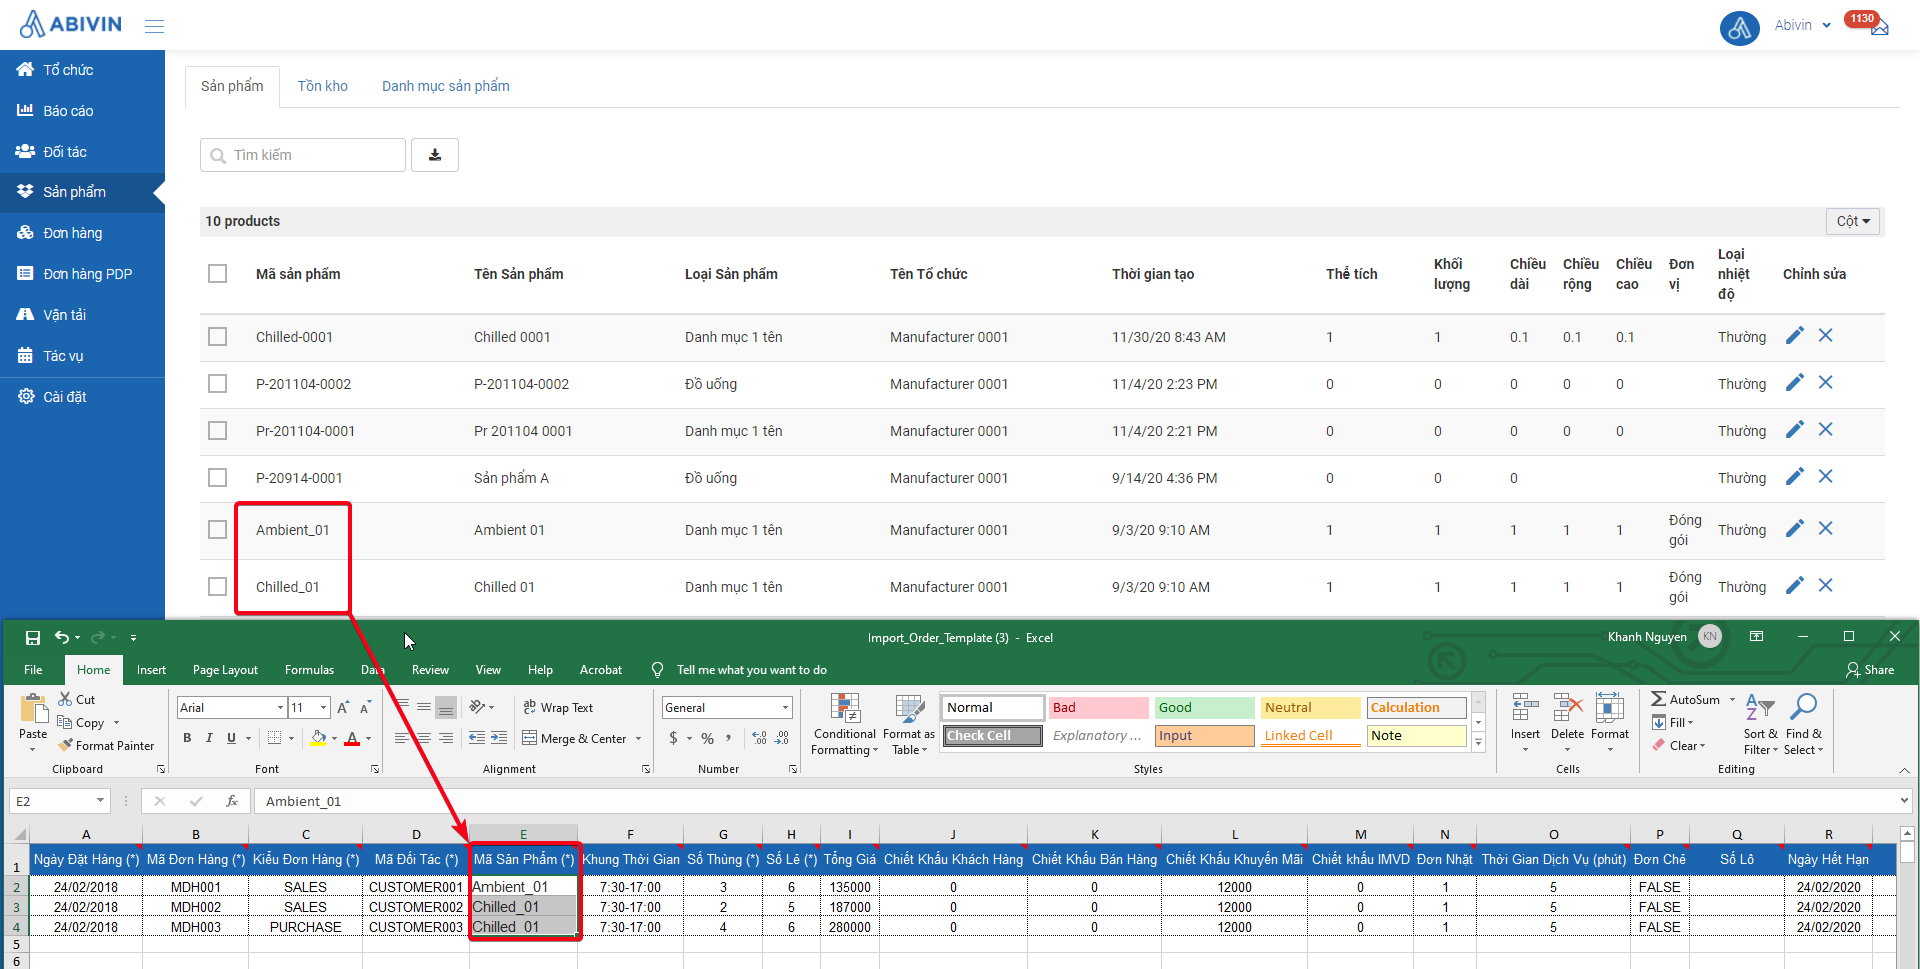
Illustration Image (Vietnamese)
- If the Order contains multiple producs, you need to place each product on a separate row. Note that you have to copy and paste the all commom attributes of the Order across all product rows, such as: Order Code; Order Type; Partner Code, Order Type etc.

Illustration Image (English)

Illustration Image (Vietnamese)
2.5.2. Number of Cases; Number of Items
- Input the quantity of cases and single items of each product into their corresponding Number of Cases and Number of Items cells

Illustration Image (English)

Illustration Image (Vietnamese)
- If there is zero case of a particular product being loaded, input the value 0 into the corresponding cell Number of Cases of that product. Do not leave that cell blank
- If there is zero single item of a particular product being loaded, input the value 0 into the corresponding cell Number of Items of that product. Do not leave that cell blank
2.5.3. Lot Number; Expired Date
- If the product loaded in the order has an Expired Date, input in either dd/mm/yyyy or mm/dd/yyyy format, based on the current Date format of your computer
- These fields are optional. Leave them blank if you don't have information
2.6. Time Window
- If there is a time window, always input in the following format: hh:mm-hh:mm (24 hour format)
- The time point must not exceed 23:59
- If there is no time window, leave the cell blank
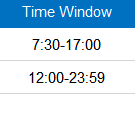
Illustration Image (English)

Illustration Image (Vietnamese)
2.7. Total Price
- If you want the system to automatically calculate the order price, leave this cell blank

- If you don't want the system to automatically calculate the Total price, input your own Total price into this cell. If the Order contains multiple products, input the same Total price value on all the product rows

2.8. Customer Discount; Sale Discount; Promotion Discount; IMVD Discount
- Note: These discounts will only take effect if you let the system automatically calculate the total price of the order
- The IMVD discount will be subtracted directly from the price of each product (See blue rectangles)
- The Customer Discount; Sale Discount; Promotion Discount must be input the same for every products of an order (See red rectangles)
- The total price will be calculated in this formula: Sum of product prices (After subtracting the IMVD discounts) - (Sum of Customer Discount; Sale Discount & Promotion Discount) = Total Order Price (See green rectangle)

2.10. Pickup Order
- If the order being created is a Pickup Order, input the following value into this cell: 1
- If the order being created is not a Pickup Order, input the following value into this cell: 0. You could also just leave this cell blank

2.9. Splitted Order
- If the order being created is a Split Order, input the following value into this cell: TRUE
- If the order being created is not a Split Order, input the following value into this cell: FALSE into the cell. You could also just leave this cell blank

2.10. Service Time (minutes)
- Input only the value in numbers. Do not input the unit
- For example: If the order being created has the service time at five minutes, input the following value into this cell: 5
- If the order does not have a service time, leave this cell blank
2.11. Note
- These fields are optional. Leave them blank if you don't have information
- If the product has an Expired Date, input in either dd/mm/yyyy or mm/dd/yyyy format, based on the current Date format of your computer
2.12. Active
- If you want to change the status of the orders. Input Active into this cell
- Note: You can also change the Active status of the Orders after they have been uploaded onto the Web app
Update unlocked order
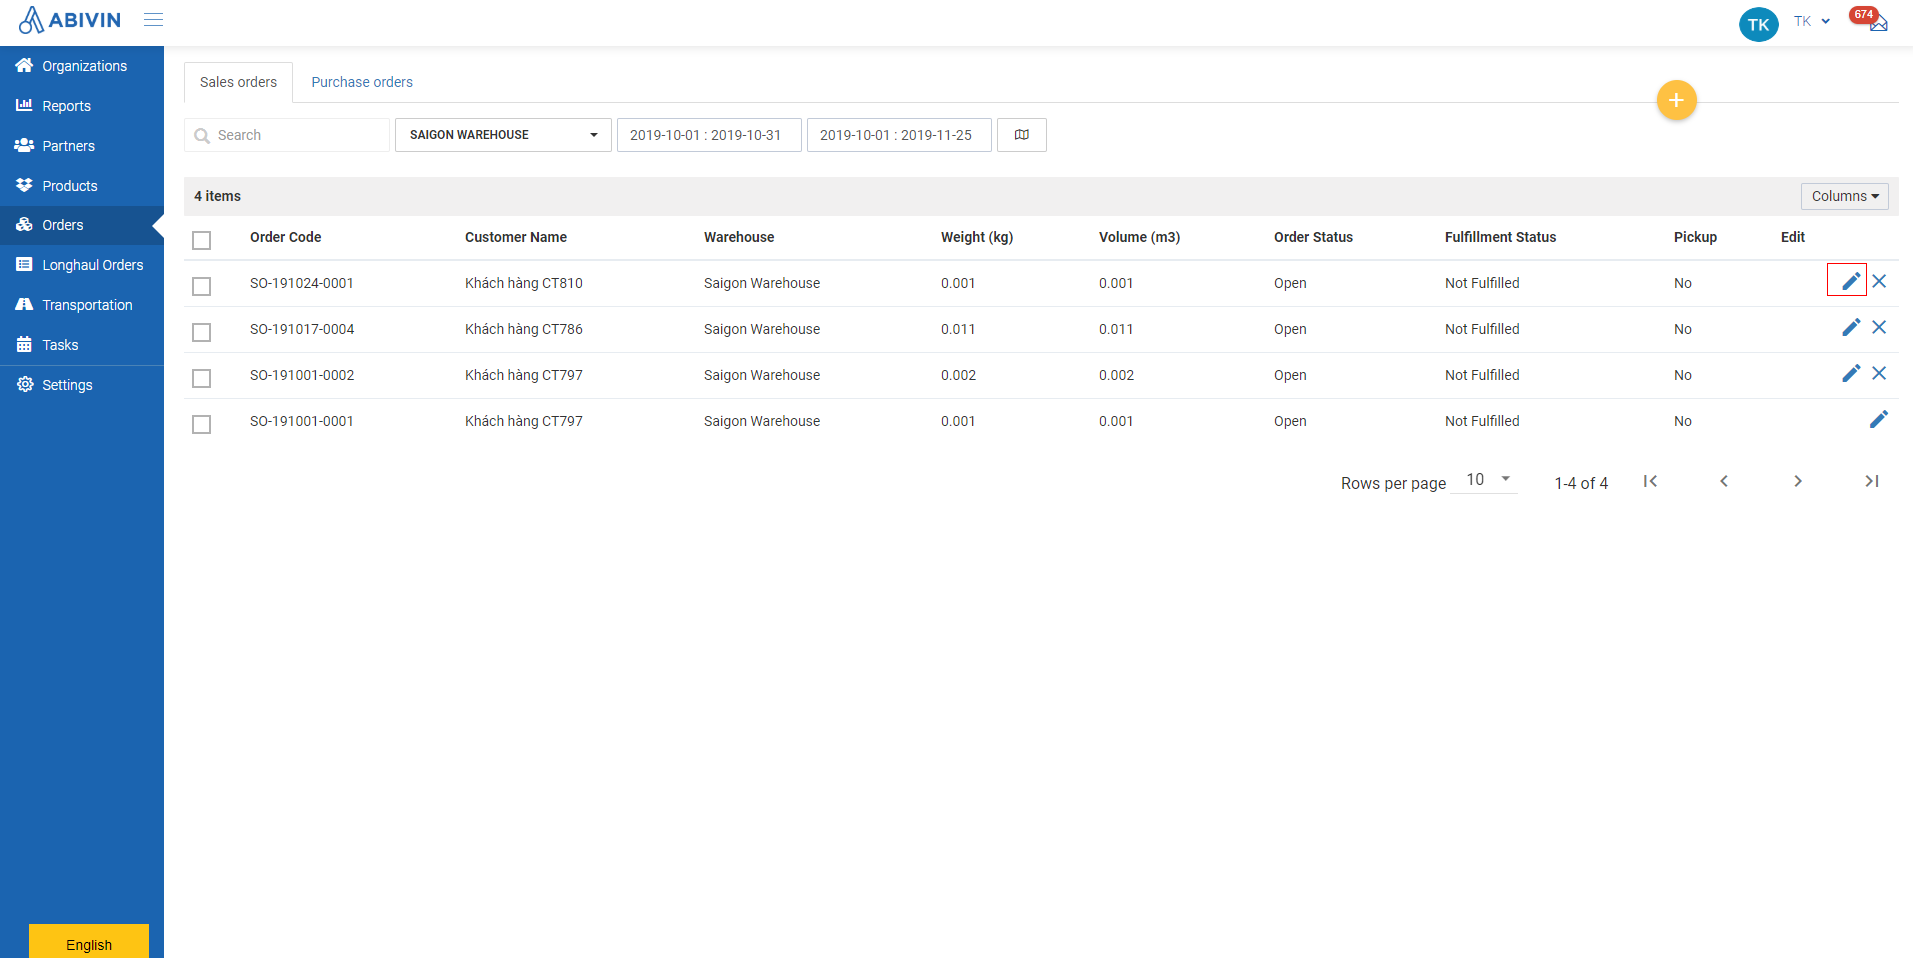
- If an order has not been locked, you can edit its information
- Please refer to the CRUD functions article to know the general steps about updating objects in Abivin vRoute
Delete unlocked order
- If an order has not been locked, you can delete it
Delete single order
- Please refer to the CRUD functions article to know the general steps about deleting single object in Abivin vRoute
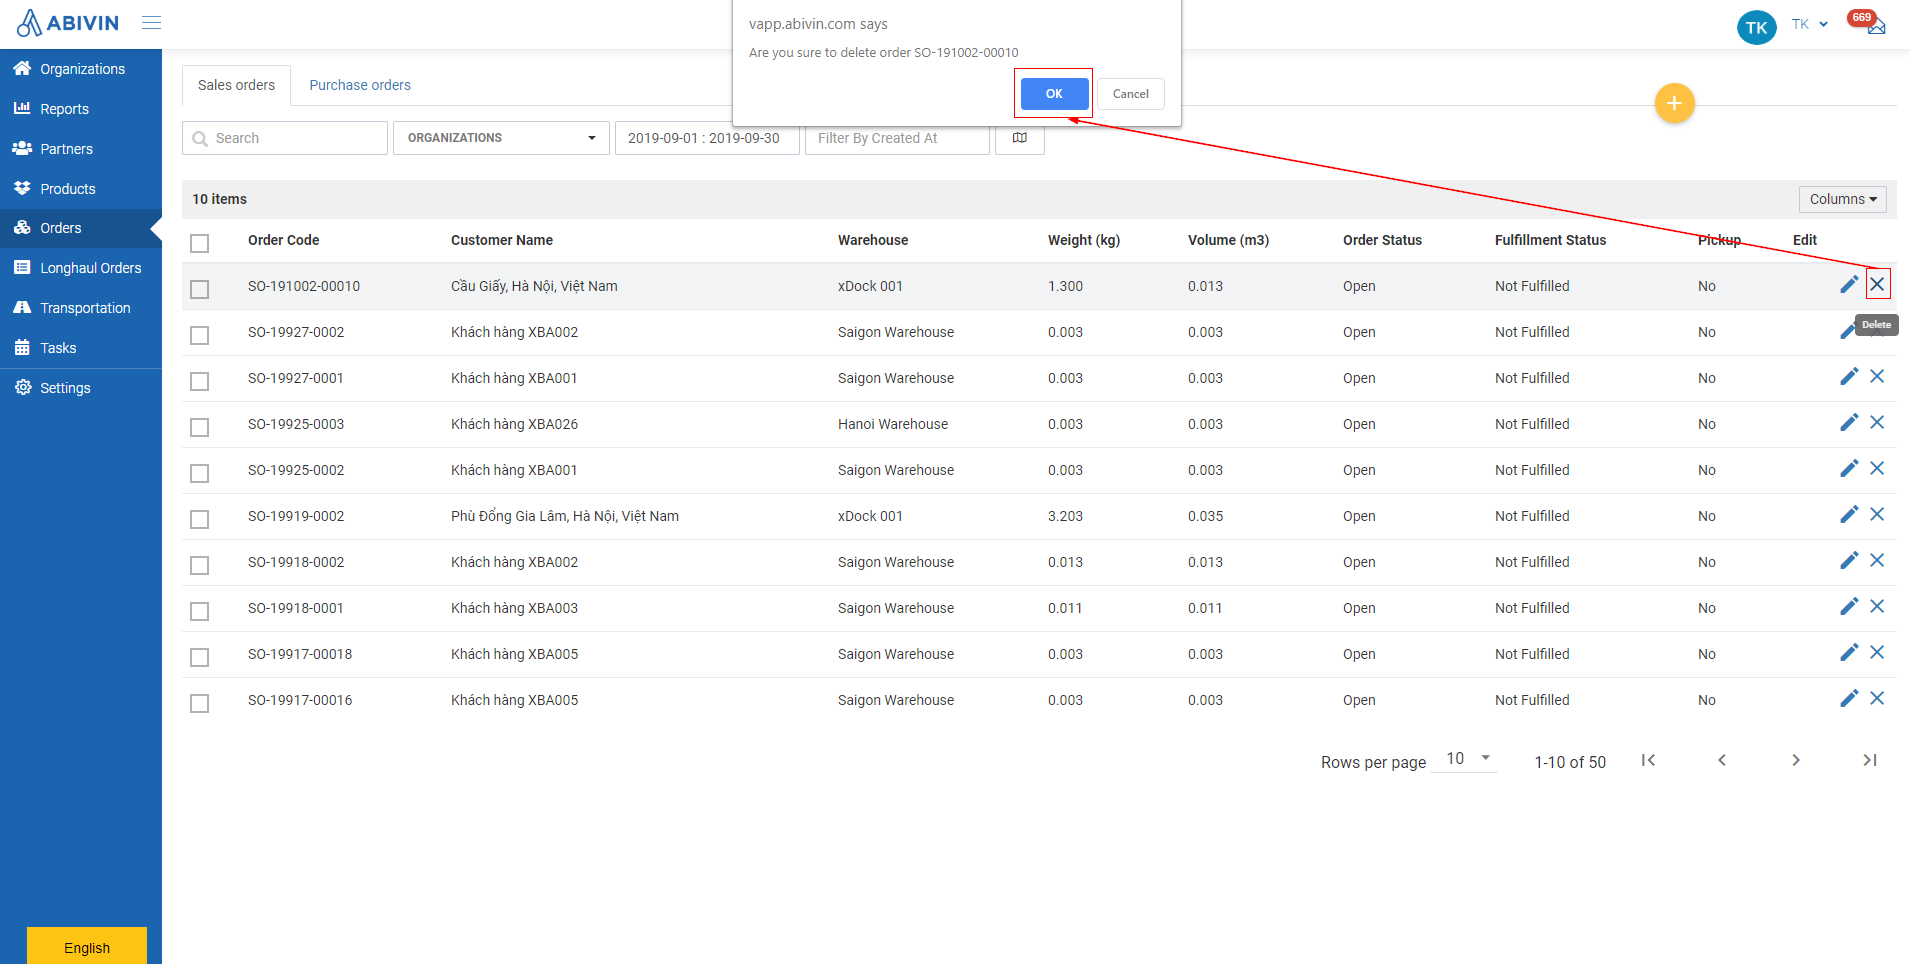
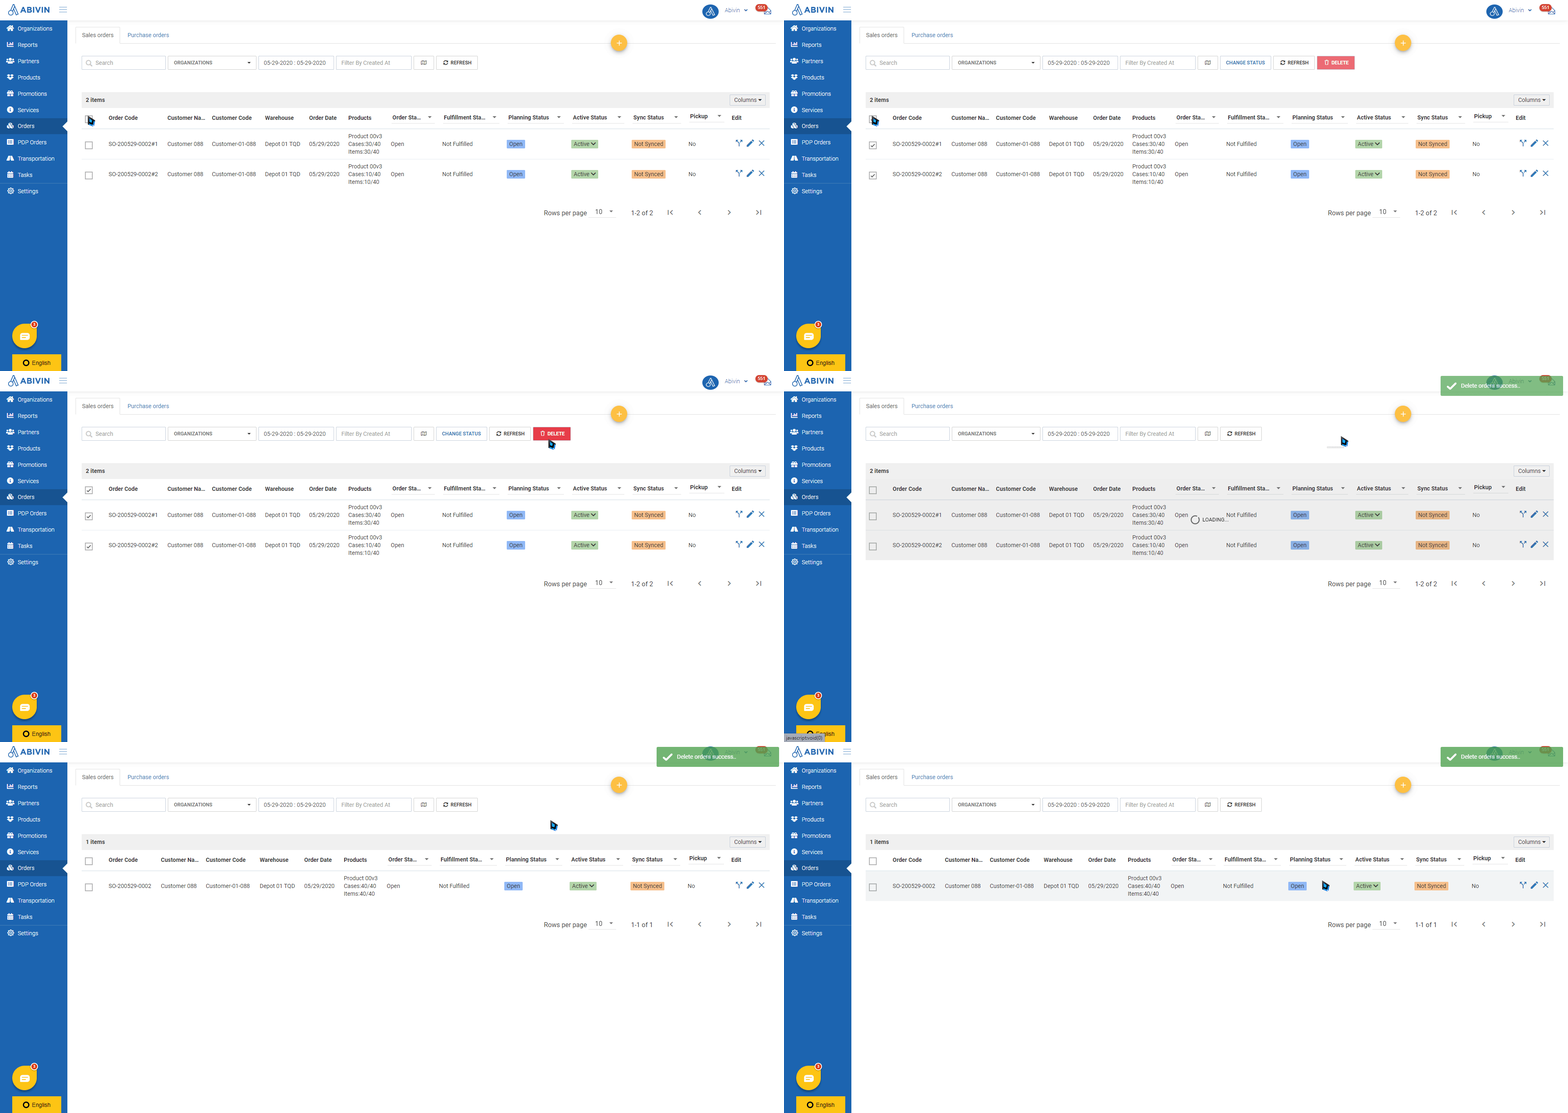
Delete multiple orders
- Please refer to the CRUD functions article to know the general steps about deleting multiple objects in Abivin vRoute
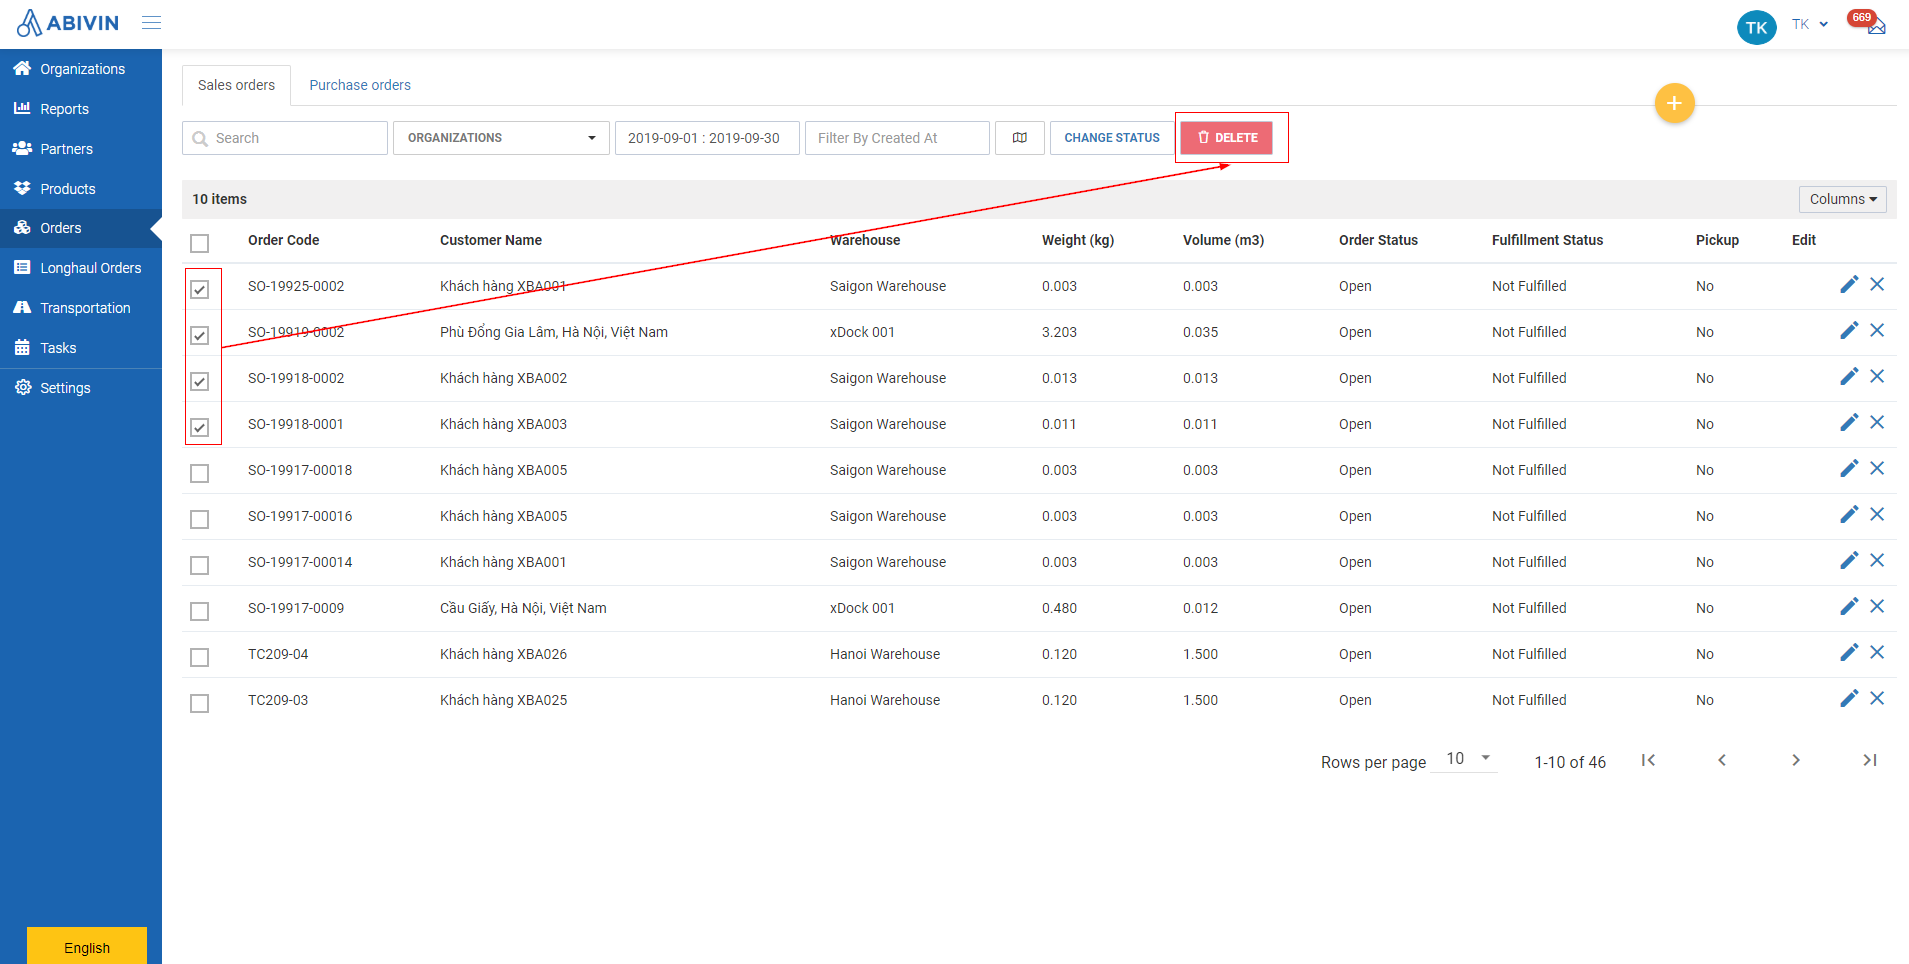
Delete several orders at once
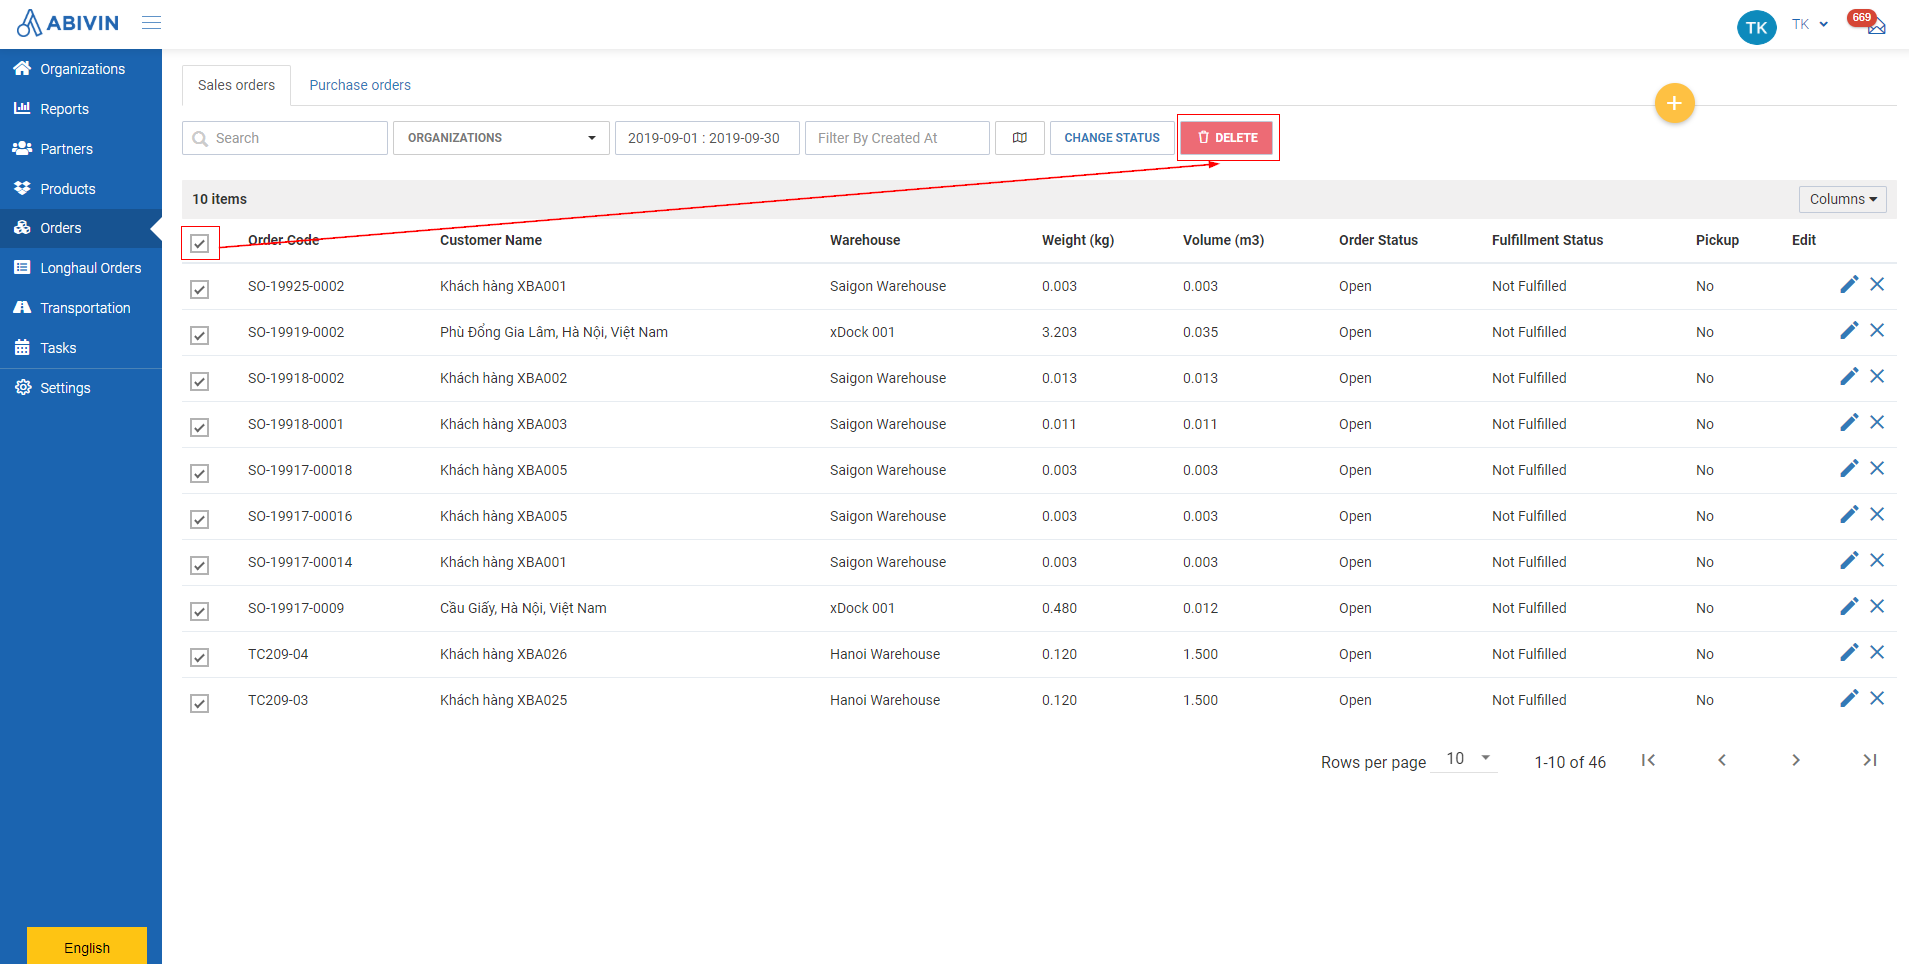
Delete all orders of a page at once
Refresh Orders
- To get the latest statuses of the Orders, or to make the Orders' details show with the changes you've just made to their elements (Partners; Products), you can use the function Refresh Orders
- To refresh the Order List, click on the button Refresh on the toolbar above the Order List
- Note: The refresh function will get the lastest update of the entire Order List, not just the Orders currently displayed
Search and Filter Orders
Search Orders
- You have two Order searching methods:
- Method 1: Single search method, used to search for a single Order
- Method 2: Multiple search method, used to search multiple Orders at once
- To switch between these two searching methods, click on the text box to the left of the search bar and select the preferred method from the drop-down list

Illustration (English)

Illustration (Vietnamese)
- If the current searching method is Single search, you can search for a single Order by inputting one of the following attributes of the wanted Order into the search bar: Order Code; Customer Name; Customer Code
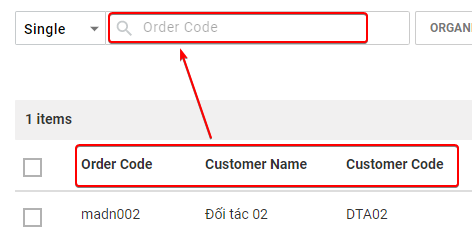
Illustration (English)
- If the searching method is Multiple search, you can search for multiple Order Codes at once. To do this, sequentially input each of the wanted Order Codes into the search bar, with each two adjacent Order Codes separated only by a comma (,). If earlier you have imported the Orders using the Order Excel import file, you can simply copy the Order Codes from the file and paste them into the search bar, the system will automatically separate the Order Codes for you
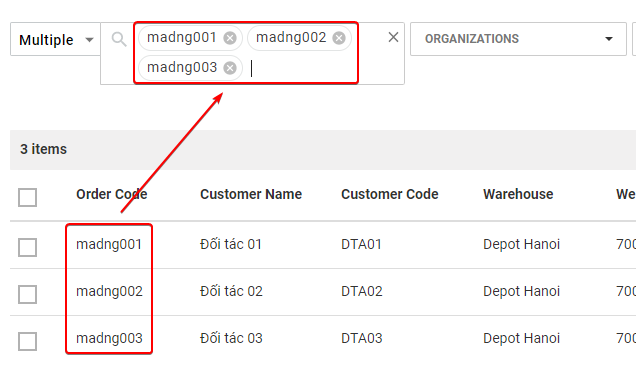
Illustration (English)
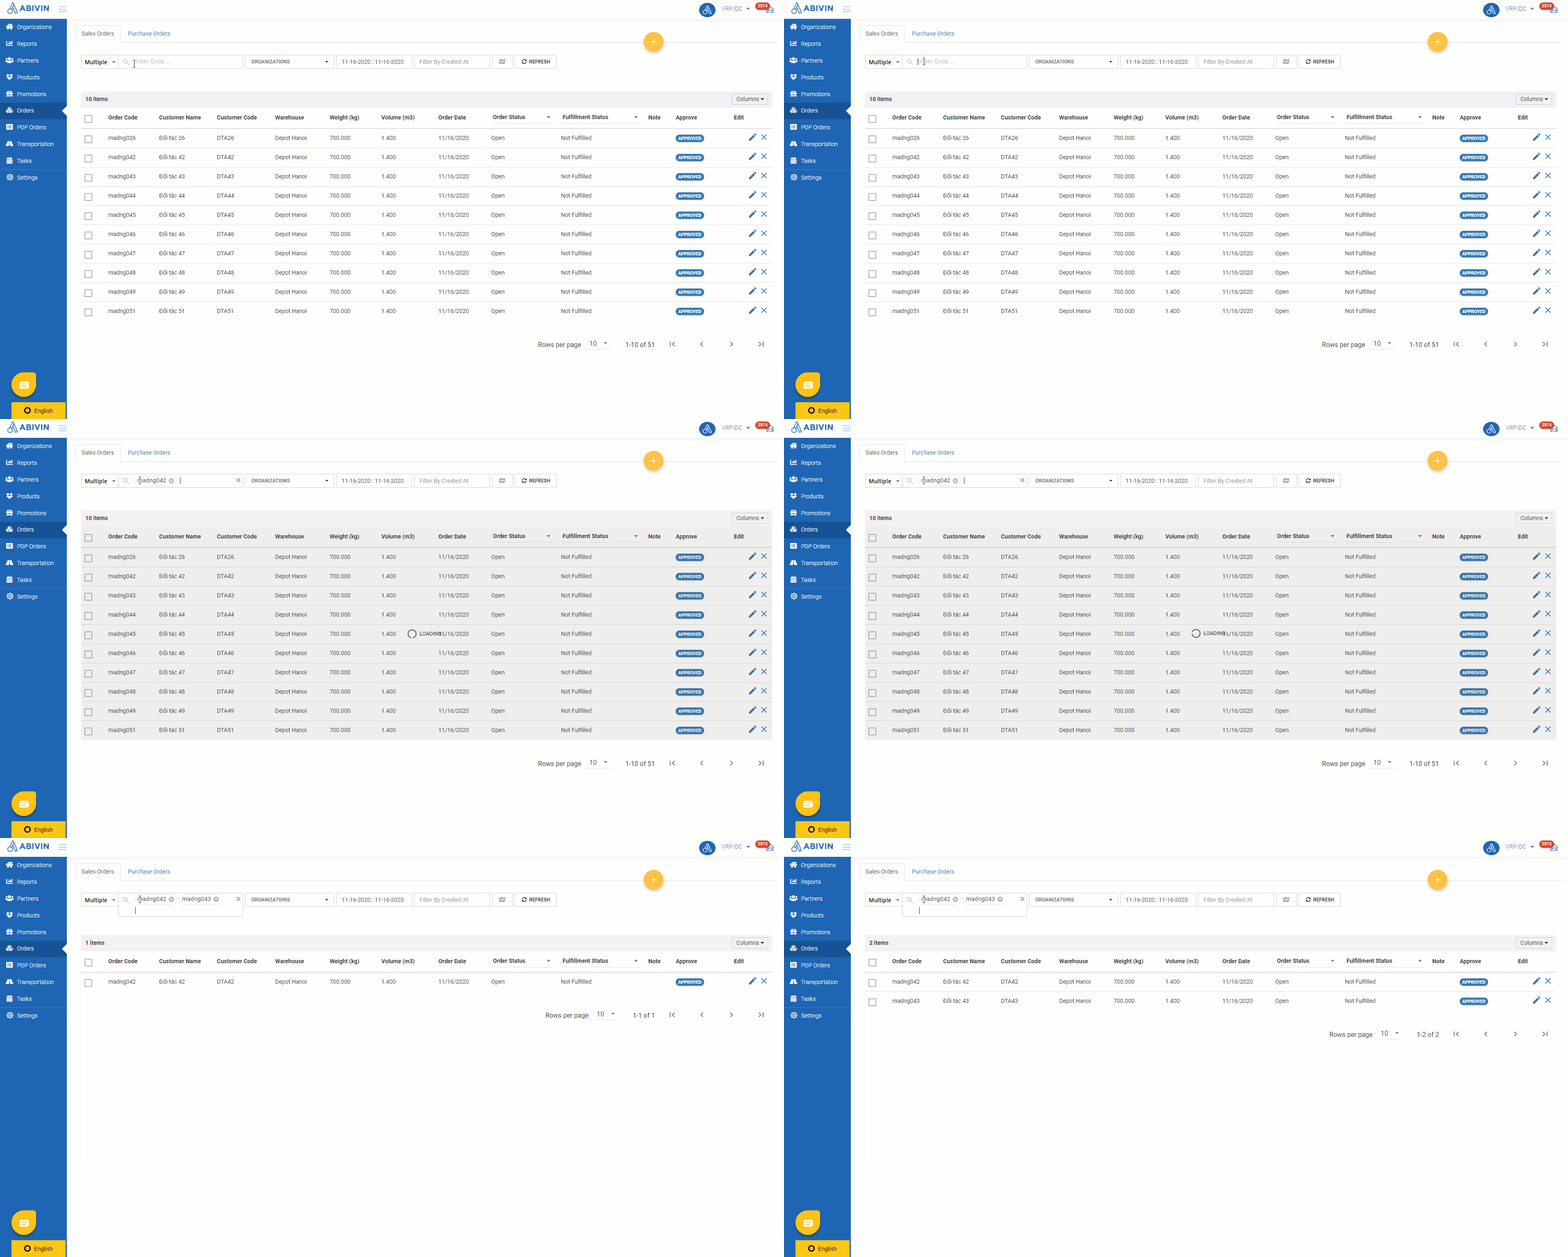
- Note: You can only search for a maximum of 50 Order Codes each time. If you input more than 50 Order Codes into the search bar, the system will display a warning

- When searching multiple Orders, you can remove a specific Order from the search bar by clicking its respective remove icon . To remove all Order Codes from the search bar, click the clear icon at the top right corner of the search bar

Filter orders
- You can filter orders originated from a specific Depot/Sun or xDock via the Organization field on the toolbar
- Type the Organization Code or Organization Name of the Depot/Sun/xDock in the search bar, then select from the drop down menu
- Orders that originated from the selected Depot/Sun/xDock will show up
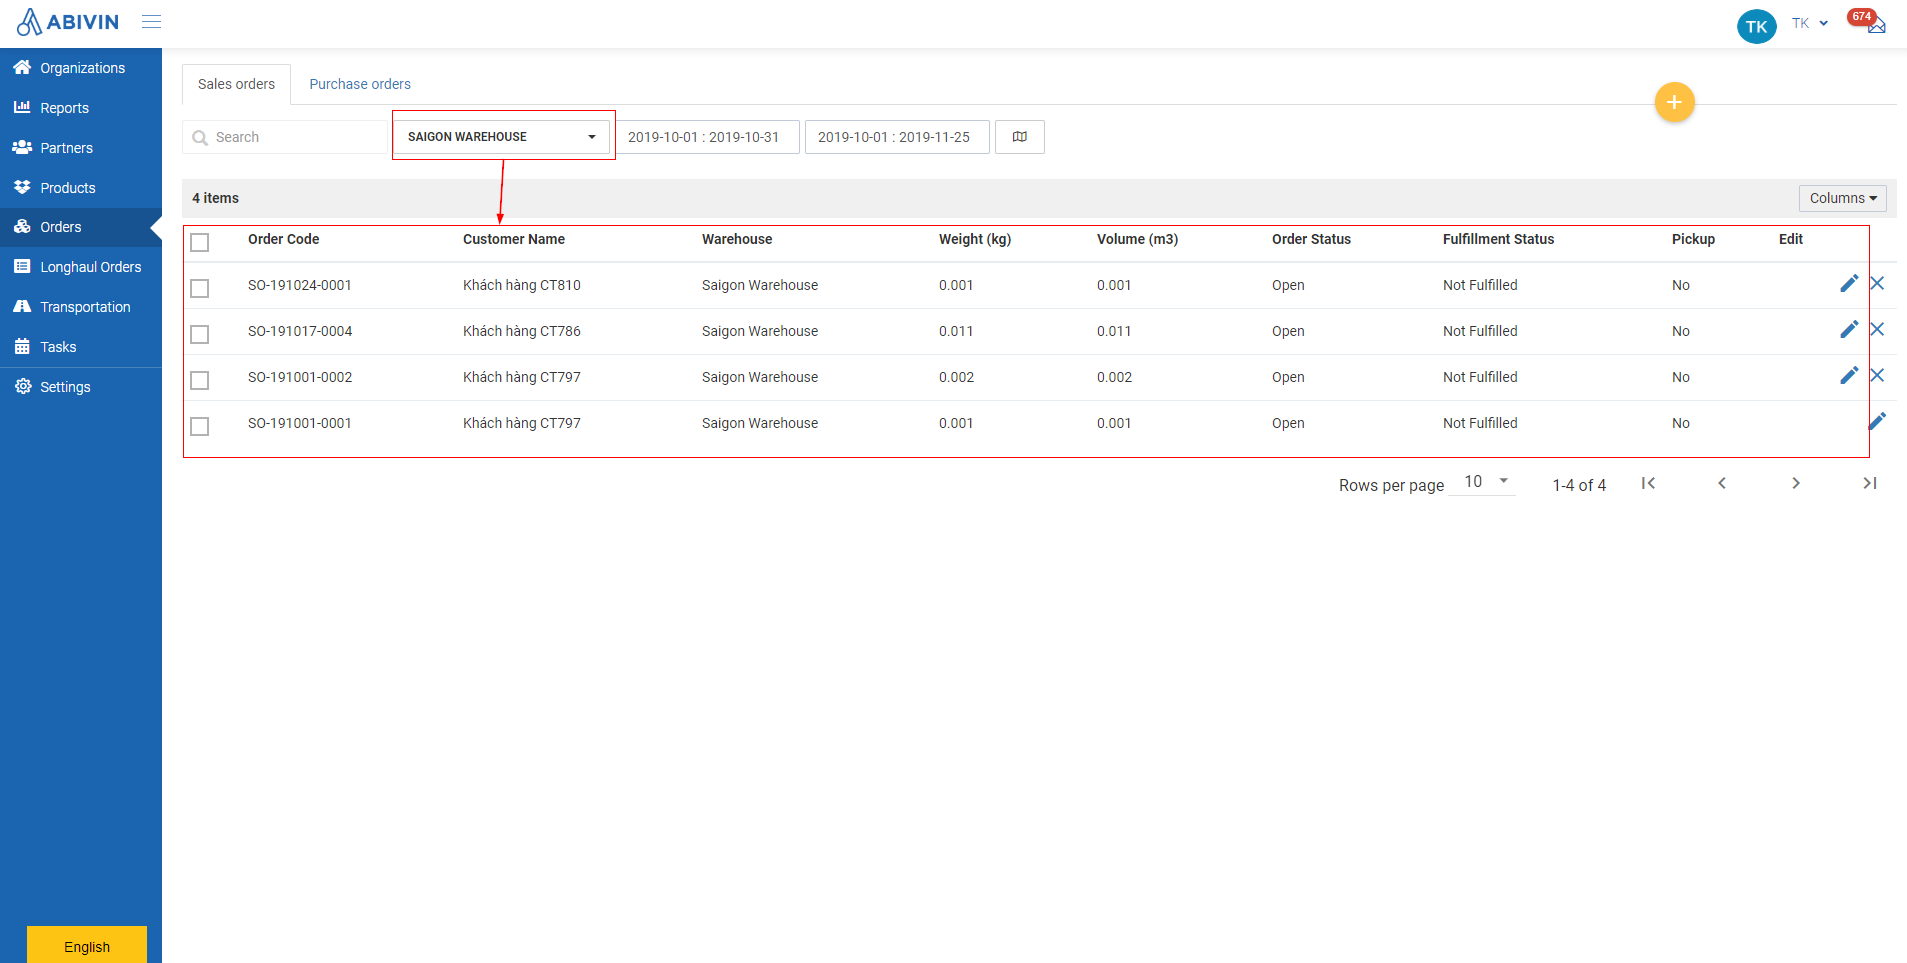
Filter orders by Execution date or Creation date
- Please refer to the Search & Filter Functions article to know the general steps about filter objects by date in Abivin vRoute
- Notice there are two calendar fields on the toolbar. The calendar on the left is used to filter the Execution date of the orders; while the calendar on the right is used to filter the Creation date of the orders
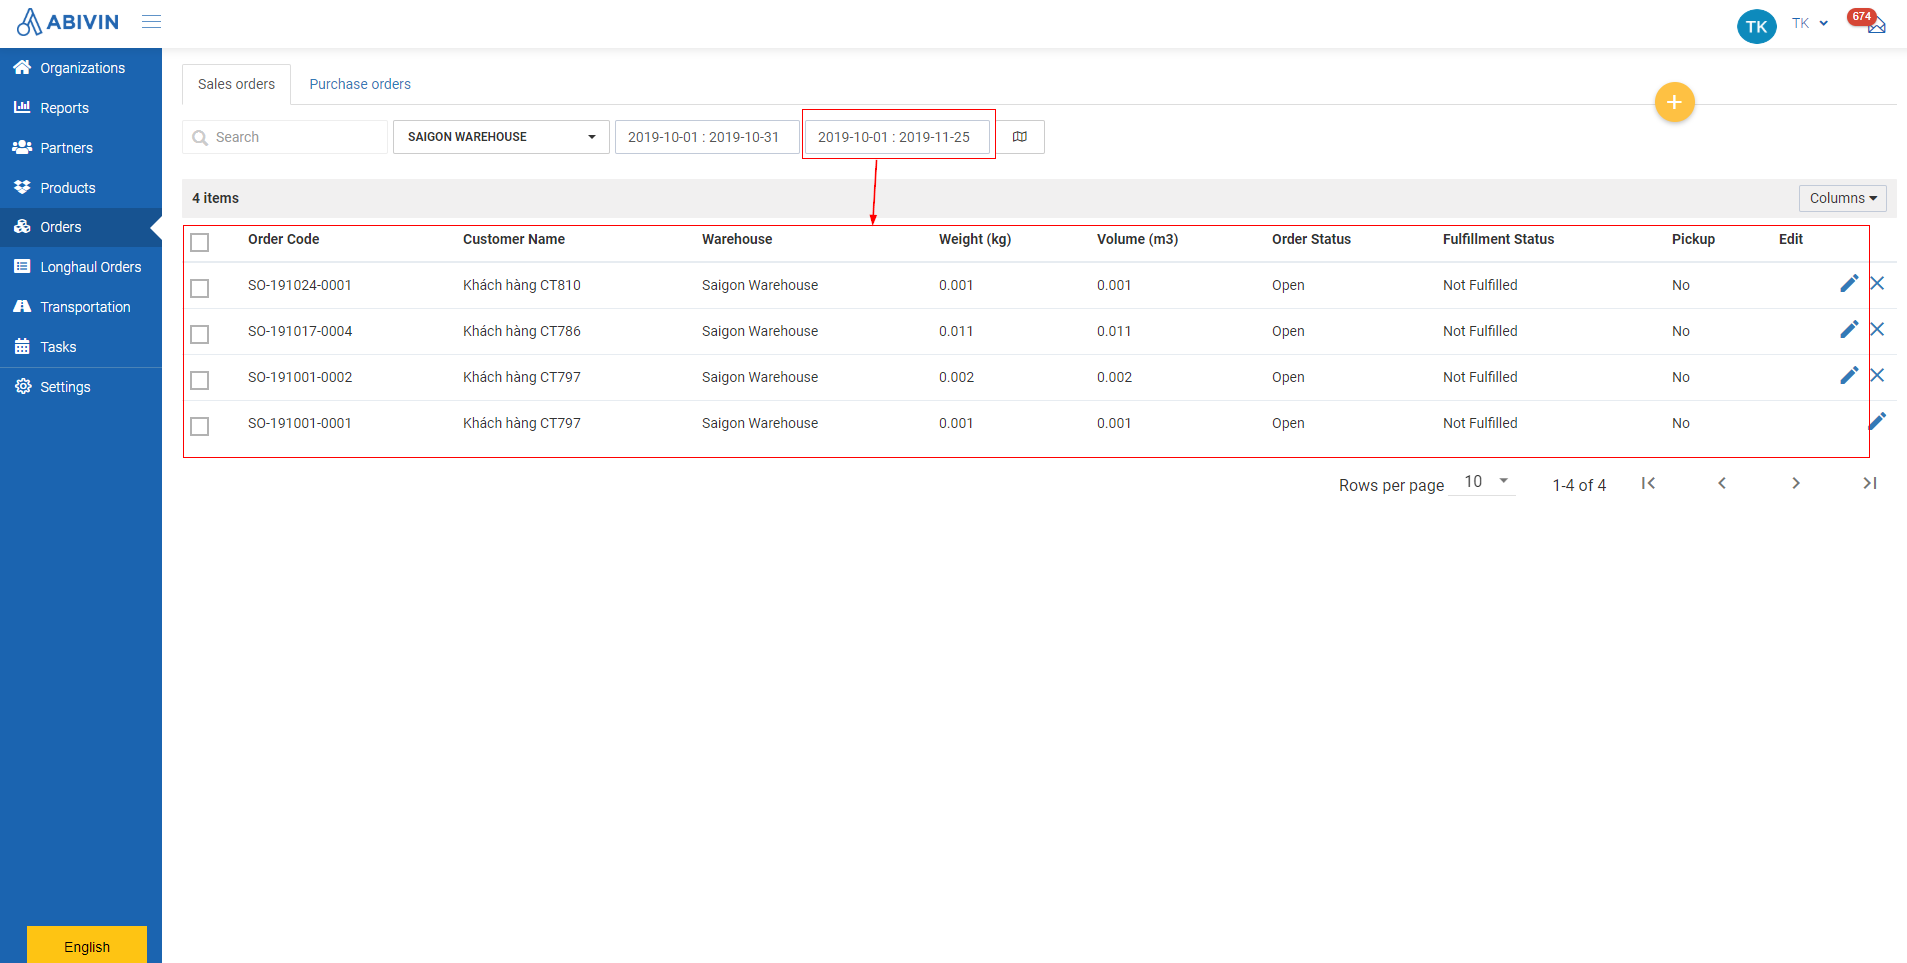
Filter orders that have the creation dates within the selected date range
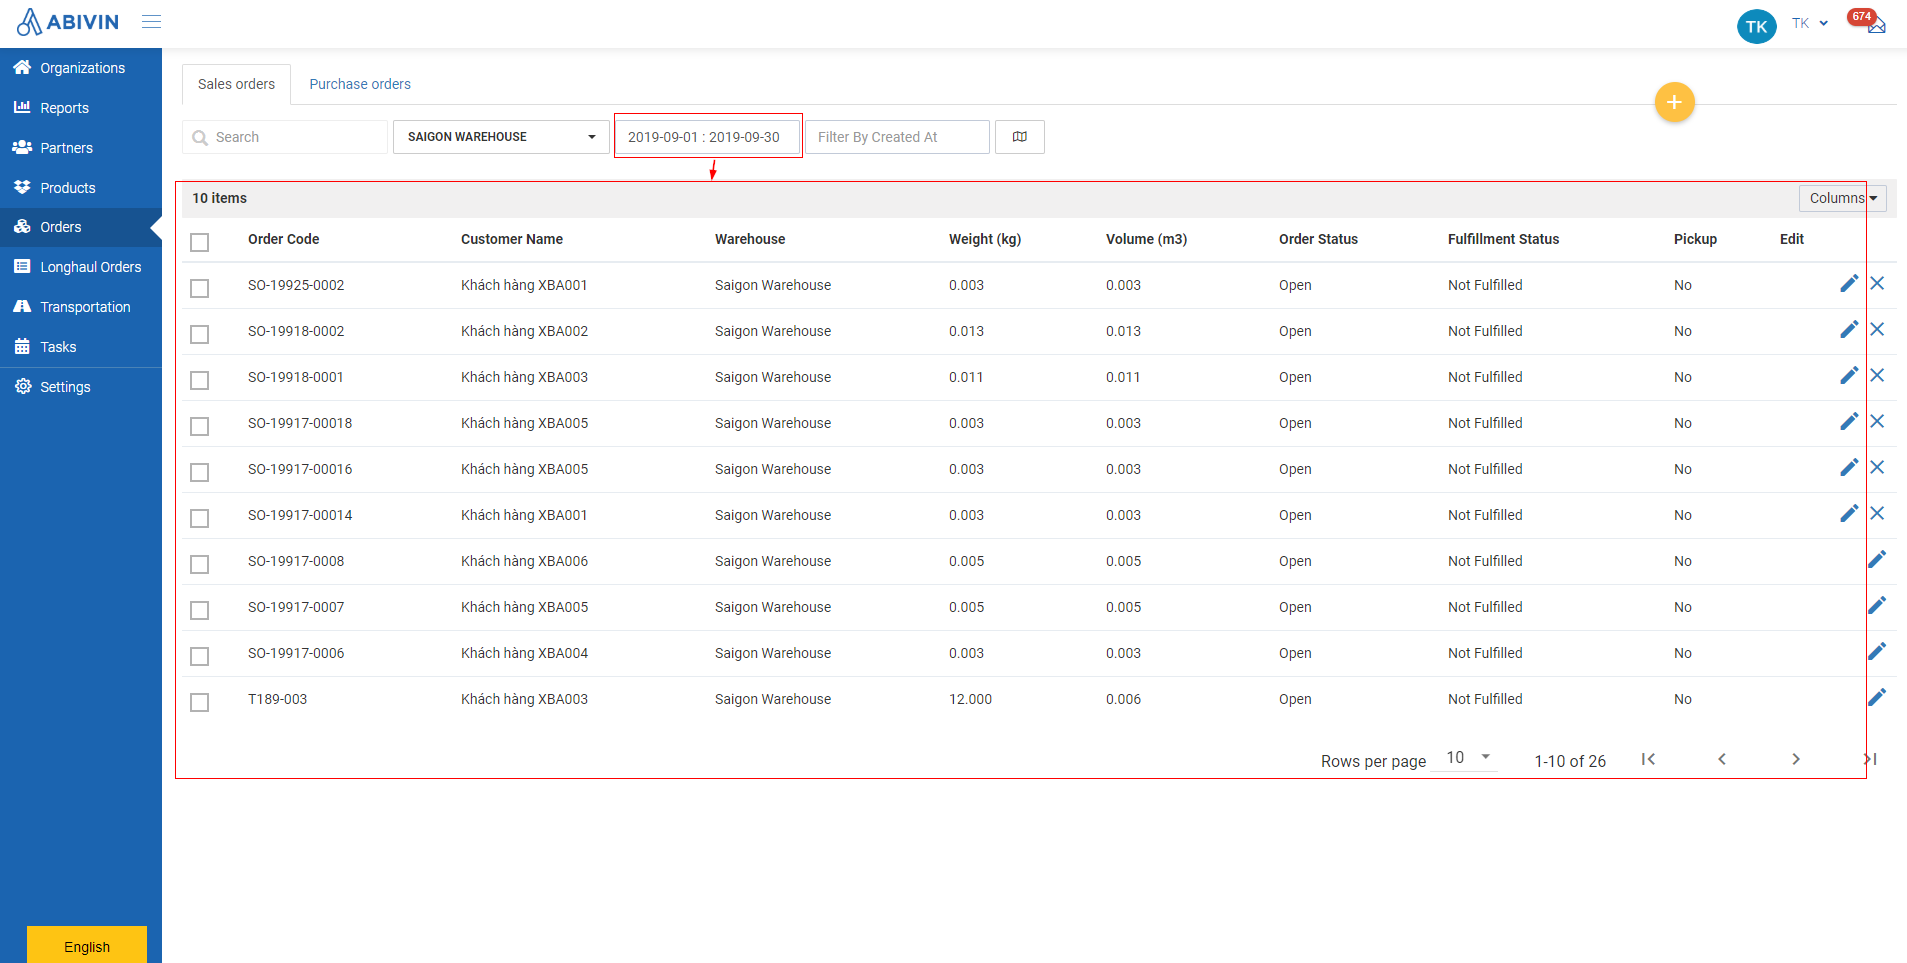
Filter orders that have the execution dates within the selected date range
Bulk Update Orders
- Bulk update, as its name suggests, is the function to mass update a certain attribute of multiple Orders at once
- At the moment, the Bulk update function allows you to update the following attributes:
- 1 - Order Date
- 2 - Active Status
- 3 - Expected
Bulk Update Order Date
- You can update the Order Date attribute of multiple Orders at once. To do that, follow the steps below:
- Step 1: Tick the corresponding checkbox icons of the wanted Orders
- Step 2: Click the Action button located above the top right corner of the Order table
- Step 3: Click the Update Order Date option on the drop-down menu
- Step 4: The Update Order Date form will appear. On this form, click the calendar icon at the end of the date field. On the drop-down calendar, select the appropriate date. Alternatively, you can input the date directly on the date field following the mm/dd/yyyy (Month/Date/Year) format
- Step 5: Click Update to confirm the change
Bulk Update Order Active Status
- You can update the Active Status of multiple Orders which have the Open/Planned Planning Status
- To do that, follow the steps below:
- Step 1: Tick the corresponding checkbox icons of the wanted Orders
- Step 2: Click the Action button located above the top right corner of the Order table
- Step 3: Click the Update Active Status option on the drop-down menu
- Step 4: The Update Active Status form displays. On this form, click on the field below the Active Status text. Select between the two statuses Active and Inactive
- Step 5: After selecting the appropriate Active Status, click Update
- The system will update the Active Status of the selected Orders
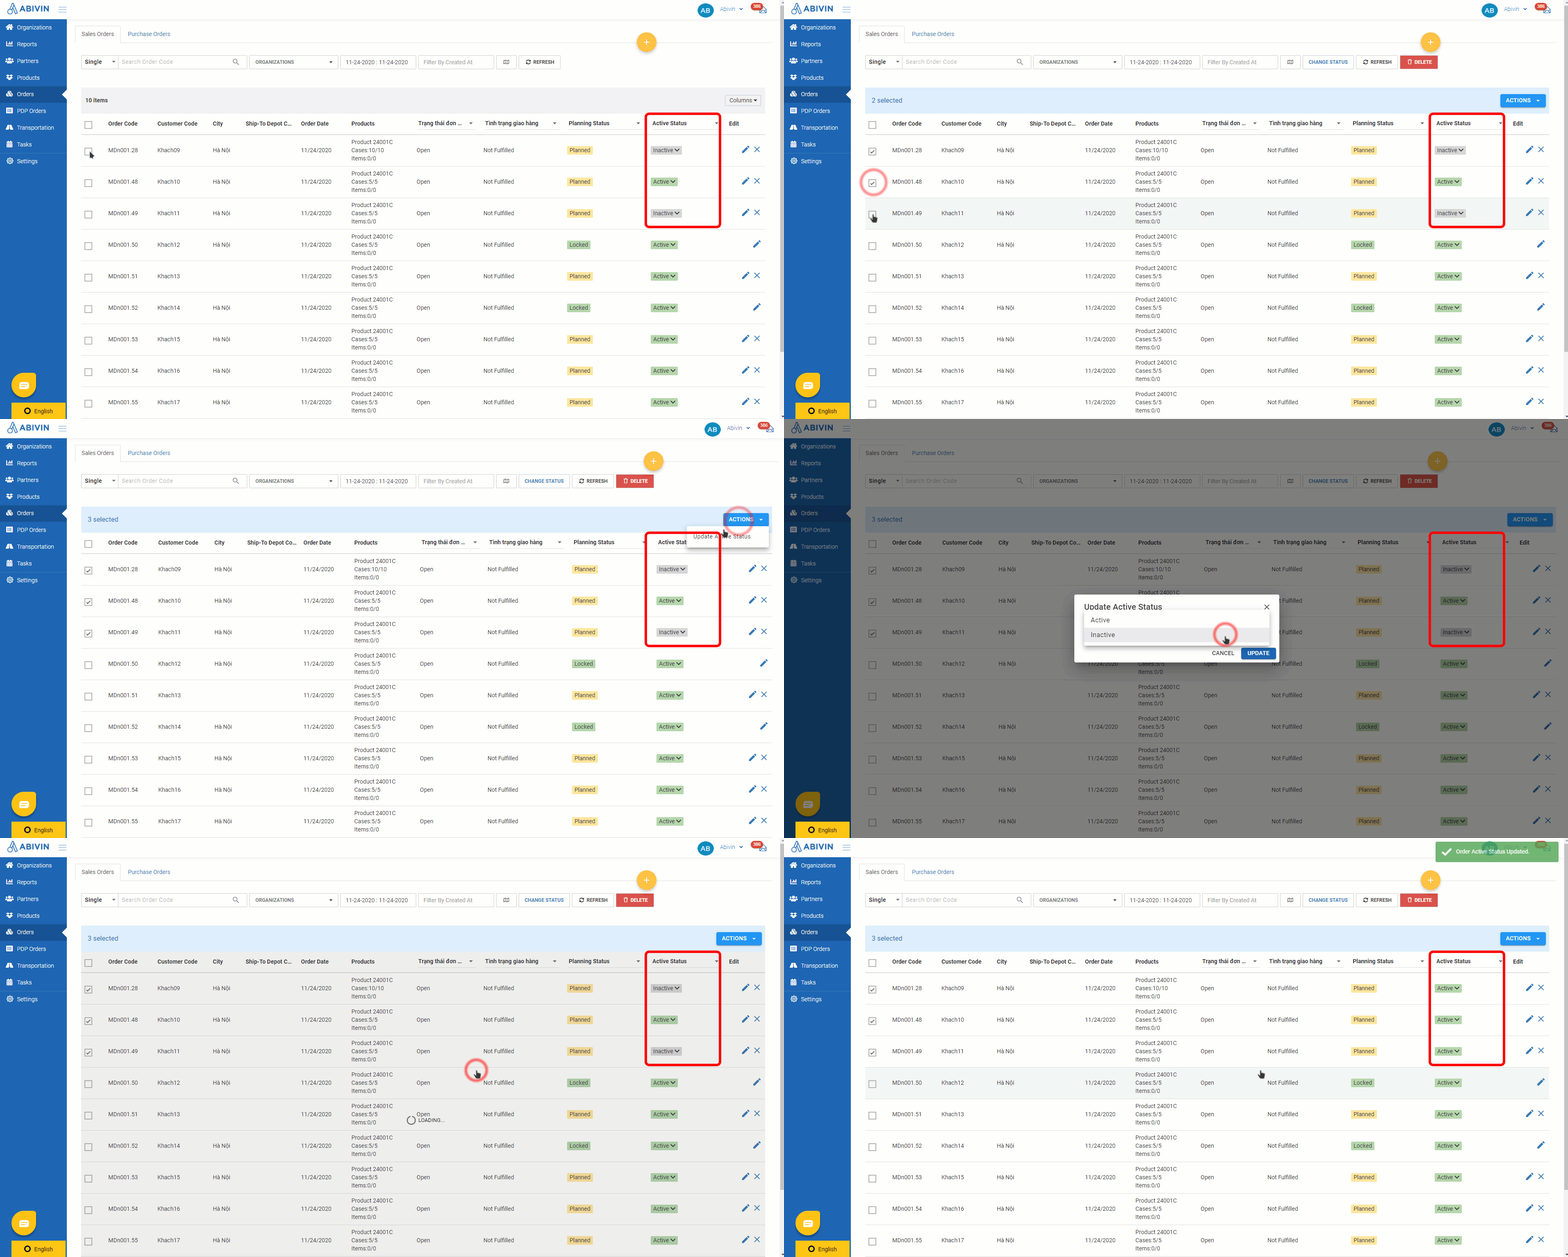
Illustration GIF (English)
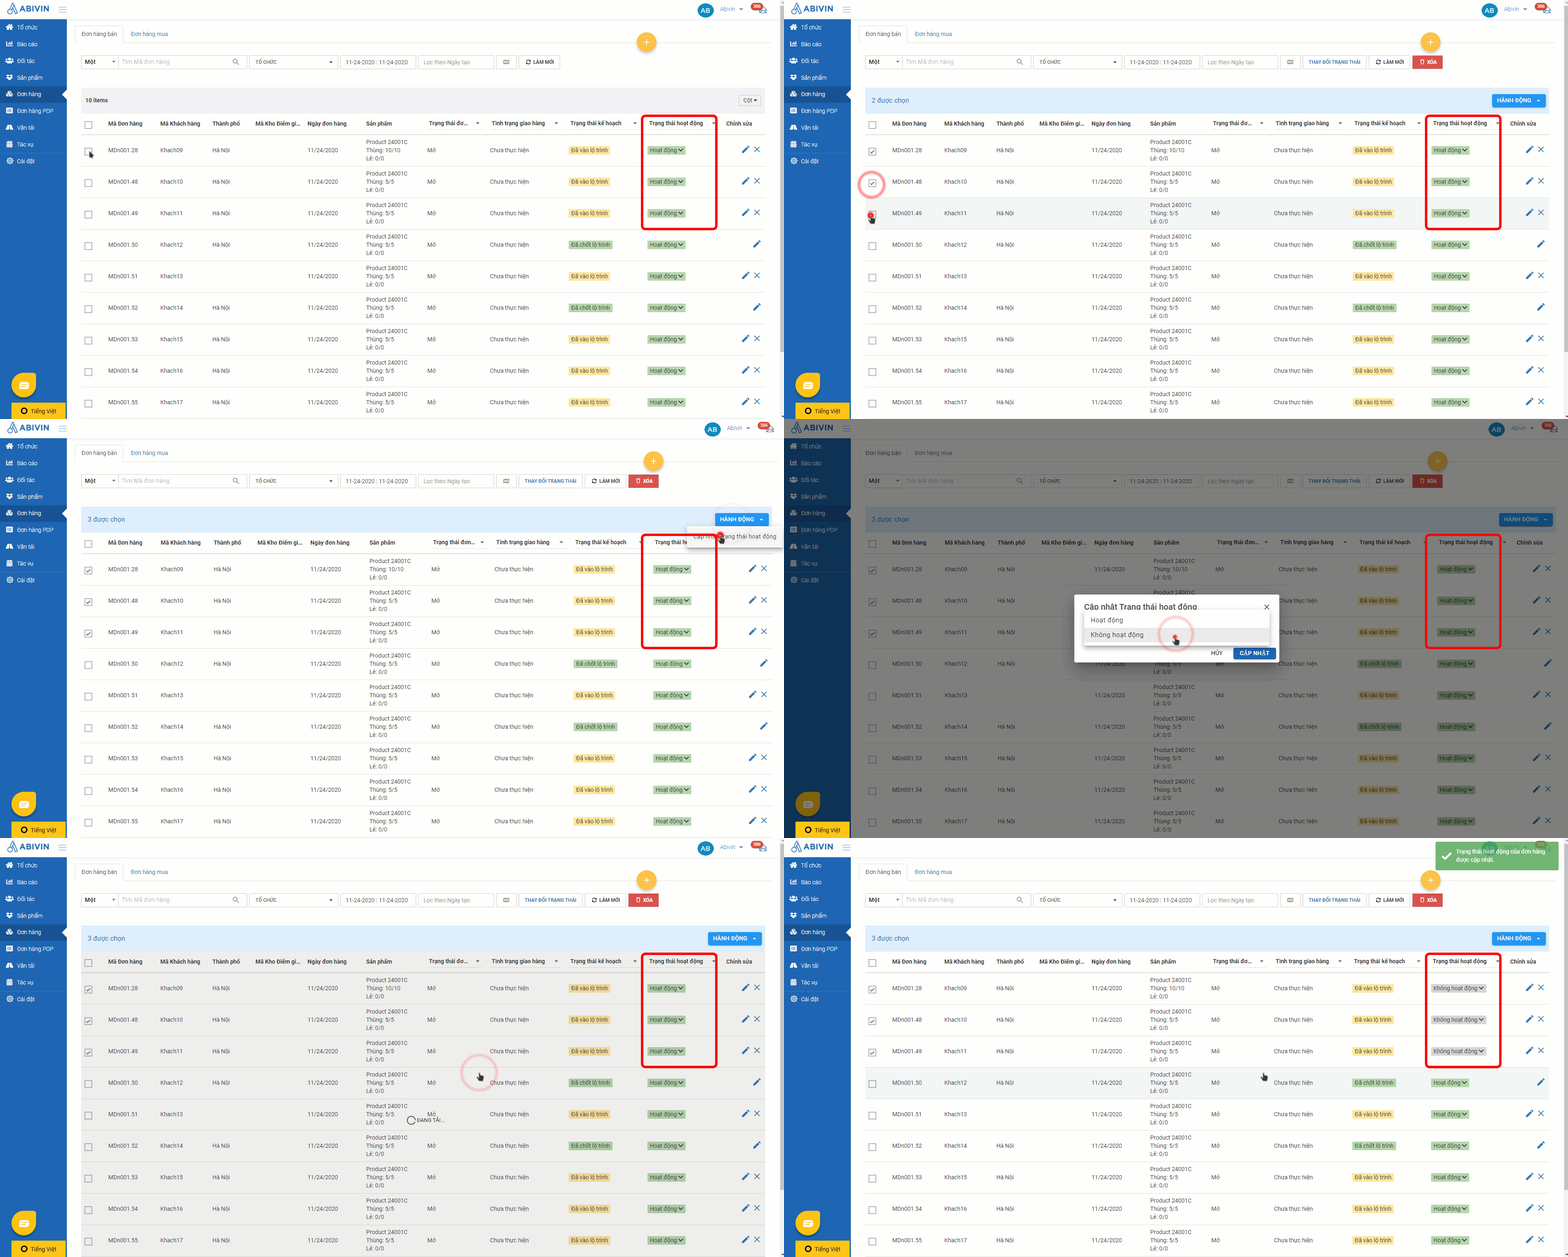
Illustration GIF (Vietnamese)
- Note:
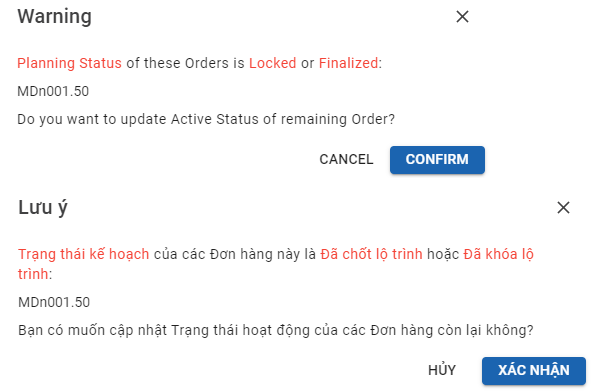
- 1 - If the Planning Status of all selected Orders is Locked/Finalized, you will not be able to change their Active Status. The system will display the following message:
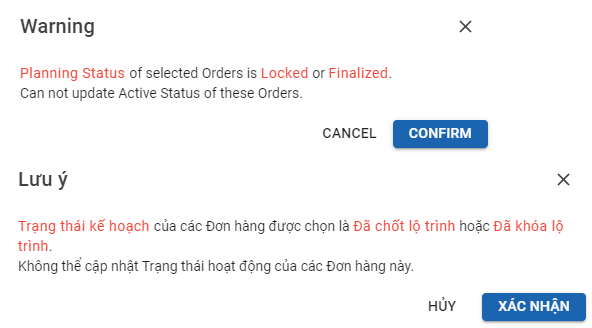
- 2 - If among the selected Orders, some have the Planning Status to be Locked/Finalized and some have the Planning Status to be Open/Planned, you will still be able to change the Active Status of the Open/Planned Orders. The system will display the following message:
- If you click Confirm, you can continue changing the Active Status of the Open/Planned Orders
Types Of Order Status
- An Order has various kind of statuses. Below are the list of all kinds of Order status, their meanings and possible values
Order Status
- This status indicates the current state of the Order during the Delivery process
- Below are the possible statuses
Possible statuses | Status description |
|---|---|
Open | The default status of all newly created Orders |
Picking & Packing | Products of the Orders are being picked from the warehouse shelves and packed into delivery boxes |
Picked & Packed | Products of the Orders have been fully picked and packed into delivery boxes, ready to be loaded onto the delivery vehicles |
Shipping | The Order is being carried by the delivery vehicles to the customers location |
Shipped | The Order is being processed (Regardless of the delivery result) |
Canceled | The Order is canceled by the dispatchers on Web app |
Fulfillment Status
- This status indicates the delivery result of the Order
- Below are the possible statuses
Possible statuses | Status description |
|---|---|
Not Fulfilled | The default status of all newly created Orders |
Fulfilled | All products in the Order were handed to the customer |
Partially Fulfilled | Some, not all products in the Order were handed to the customer |
Unfulfilled | There were no product handed to the customer |
Planning Status
- This status indicates the current state of the Order within the Routing Plan
- Below are the possible statuses
Possible statuses | Status description |
|---|---|
Open | The default status of all newly created Orders |
Planned | An Order will have this status if it was successfully put on an optimized Delivery Route, but the optimized Delivery Route hasn't been locked yet |
Locked | An Order will have this status if it was successfully put on an optimized Delivery Route, and the optimized Delivery Route has been locked |
Finalized | An Order will have this status if the Delivery Route on which that Order was put has been finalized |
Validation Status
- This status acts as a warning sign when the data of an Order violates a certain compulsory condition for it to be optimized
- Below are the possible statuses
Possible statuses | Status description |
|---|---|
No-coordinate | The customer who placed the Order lacks coordinates information (Latitude; Longitude) |
Over-capacity | The weight and/or volume of the Order exceeds the weight and/or volume capacity of all active vehicles in the Depot |
No-weight/volume | Both the weight and volume of the Order equals zero, which means there is zero product loaded in that Order |
Active Status
- This status determines whether an Order will be forwarded to the Route Planning process or not
- Below are the possible statuses
Possible statuses | Status description |
|---|---|
Active | The default status of all newly created Orders |
Inactive | Orders with this status will not be forwarded to the Route Planning process |
Synchronization Status
This status is only intended for user accounts which use the external Transportation Management Systems (TMS)
- Displays the synchronization result of the Orders between Abivin vRoute and the external Transportation Management System (TMS)
- Below are the possible statuses
Possible status | Status description |
|---|---|
Synced | The orders were synced with the external TMS |
Not Synced | The orders weren't synced with the external TMS |
Pickup
- This status determines whether an Order is a Pickup Order or not
- Below are the possible statuses
Possible status | Status description |
|---|---|
Yes | The Order is a Pickup Order |
No | The Order is not a Pickup Order |
Order statuses during external TMS integration
This sections is only intended for user accounts that use external TMS
- Below is the changes in each Type of statuses of a particular Order during the integration with the external TMS
Planning Status | Active Status | Order Status | Fulfillment Status | Sync Status | |
|---|---|---|---|---|---|
Before Route Planning | Open | Active | Open | Not Fulfilled | No |
During Route Planning (Not yet locked Delivery Routes) | Planned | Active | Open | Not Fulfilled | No |
During Route Planning (Locked Delivery Routes) | Locked | Active | Picked & Packed | Not Fulfilled | No |
During Route Planning | Finalized | Active | Picked & Packed | Not Fulfilled | No |
After TMS synchronization | Finalized | Active | Shipping | Fulfilled | Yes |
When TMS sends "Delivered" (Status-Out) | Finalized | Active | Shipped | Fulfilled | Yes |
When TMS sends "Canceled" (Status-Out) | Finalized | Active | Canceled | Unfulfilled | Yes |
When Planner manually closes Delivery Routes | Finalized | Active | Shipped | Fulfilled | Yes |
Unplanned (Missing) Orders & Failed Orders
Unplanned (Missing) Orders
- Unplanned (Missing) Orders are Orders that the system automatically doesn't put into the optimized any Delivery Route during the Route Optimization process due to various reasons or have been successfully put into the optimized Delivery Routes but have later been manually removed off the optimized Delivery Routes by the users
- Please refer to the following article for in-depth details: Unplanned (Missing Orders)
Failed Orders
- Failed Orders: Orders that were successfully put into the optimized Delivery route during the Route Optimization process. However, during the Delivery process, the drivers could not deliver them to the customers for various reasons, which lead to them selecting Not Completed delivery result on the Mobile app. On the Order list, the Fulfillment Status of Failed Orders are Unfulfilled
- Please refer to the following article for in-depth details: Failed Orders
Salesmen & Consumers Orders Approval
In order for this function to work, the configuration Allow Approve Order must be enabled at the Branch
- If there are Orders submitted from the Mobile app by the Salesmen or by the Consumers, then you, as the dispatcher, have to make decisions whether to Approve - Allow those Orders to be performed, or Reject - Not allow those Orders to be performed. After you have made decisions about the Orders, you have to decide whether to put the approved Orders into the Route Plan Optimization process or not
Approve/Reject orders
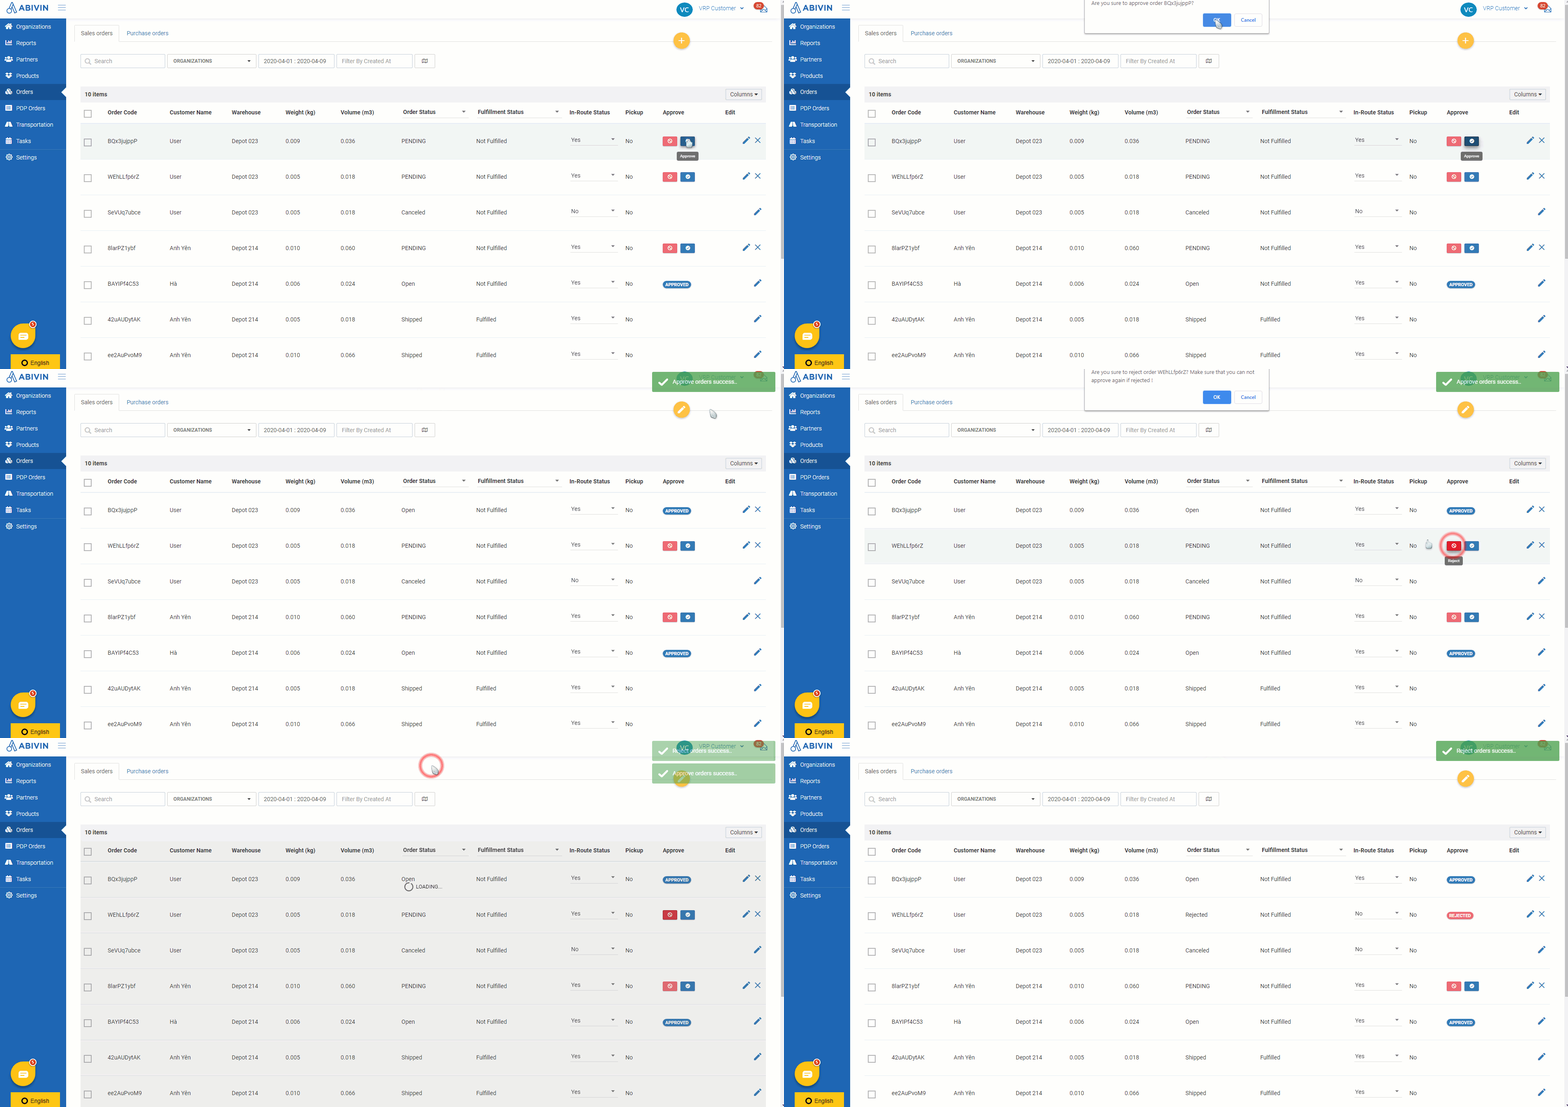
- Under Approve column, the recently submitted Orders will have two buttons: Reject (Red button with the symbol ) and Approve (Blue button with the symbol )

- To reject or approve an Order, simply click on the appropriate button and click OK on the confirmation dialog
Put approved Orders into the Route Plan Optimization process
- By default, all approved Orders will be put into the Route Plan Optimization process, indicated by the value Active under the column Active Status
- If you do not wish to put certain Orders into the route optimization process, click on the value Active then select the value Inactive on the drop-down list

Automatically Split Over-capacity Orders
You have to enable the configuration Split Delivery at the Branch
- Over-capacity Orders are Orders which have the attribute Weight and/or Volume to exceed the carrying capacity of all active vehicles from the same Depot of those Orders
- During the Route Plan Optimization process, the system can automatically split those over-capacity Orders into smaller Orders to fit the capacity of the available active vehicles. If there are multiple over-capacity Orders, the system will start splitting from the largest over-capacity Orders to the highest capacity vehicle, and will continue to split lesser over-capacity Orders to lesser capacity vehicles
- The Orders automatically split from the original over-capacity Orders will be assigned Order Codes that equals to the Order Code of the original over-capacity Orders plus the suffix sharp symbol (#) and ordinal number
- For example: The original over-capacity Order has the Order Code to be Order_01. The first Order split from tha original over-capacity Order will have the Order Code to be Order_01#1, the second Order split from the original over-capacity Order will have the Order Code to be Order_01#2 and so on
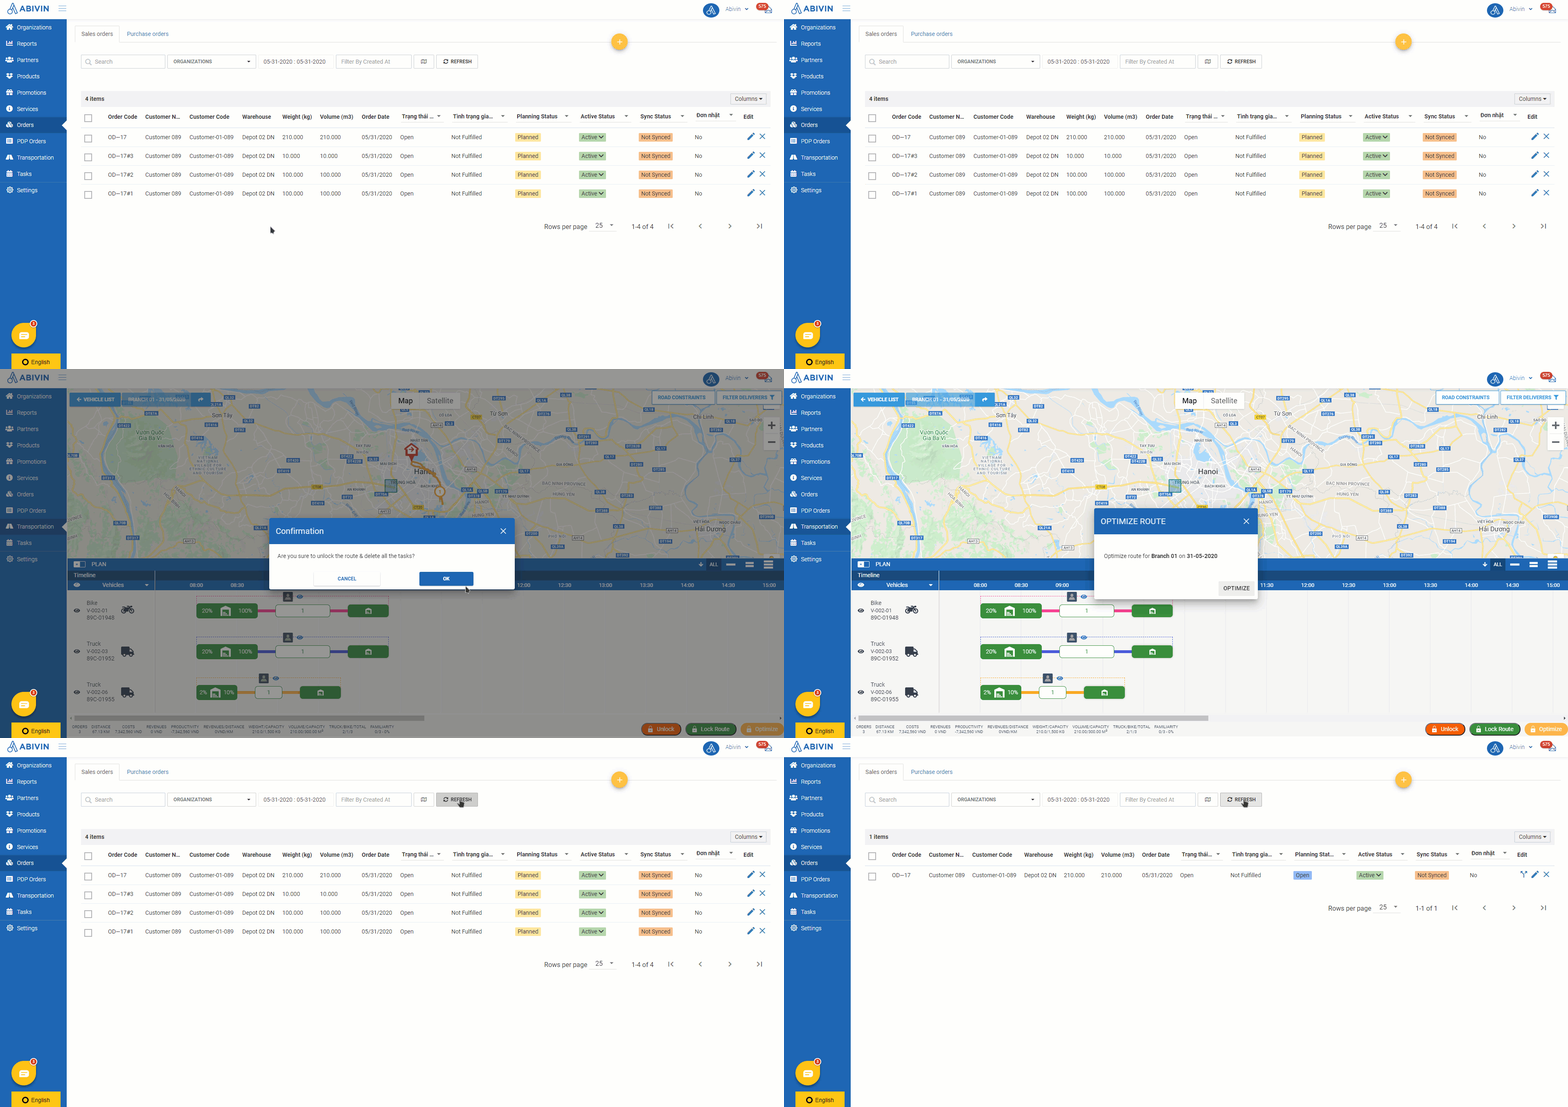
- Below is an illustration of an original over-capacity Order OD—17 and three automatically split Orders off that original over-capacity Order: OD—17#1; OD—17#2; OD—17#3

- Notes:
- During the Route Plan Optimization process, if you haven't locked the Delivery Routes on which exist the Orders that have been automatically split off the original over-capacity Orders, and you click on the button Unlock, then over at the tab Orders > Sales Orders, all the automatically split Orders will disappear, only the original Orders will remain
Manually split Orders
- You can manually split Orders before and during the Route Plan Optimization process
Complusory configurations
- You have to enable the configuration Allow Manual Split Order at the Manufacturer. After enabling, make sure to log out then log in again in order for the configuration to take effect
Only Orders created AFTER this configuration has been enabled will be splitable (Having the icon Split)
Manually split Orders before Route Plan Optimization process
- If the current Planning Status of an Order is Open, which means that Order has not been put into any optimized Delivery Route, then you can split that Order into smaller Orders
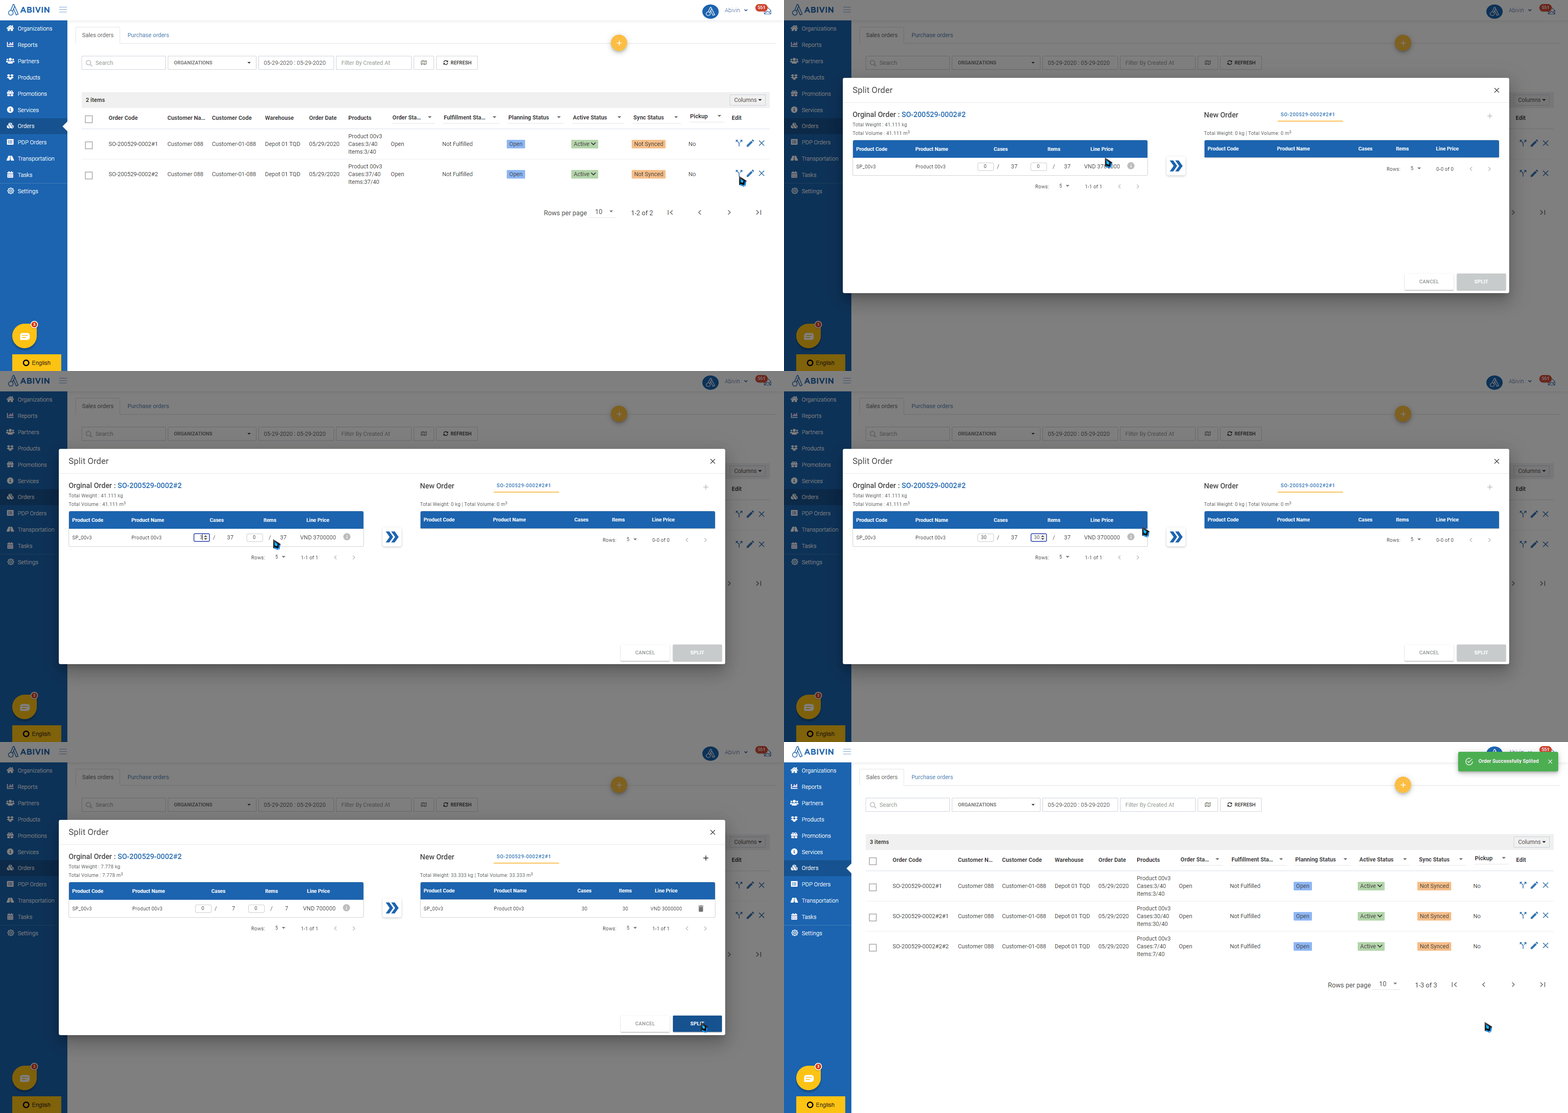
- Click on the icon Split (Under the column Edit) of the Order you want to split

Split icon
- The form Split Order will appear
- On the left of the form is the Original Order, and on the right of the form is the list of small Orders split from the Original Order

- To split the whole case/single item quantity of a particular product, input the desired value into the input box on the left of the current whole case/single item quantity. Perform the same step with other products. After you have input the appropriate whole case/single item quantity to be split, click on the double right angle icon fa-angle-double-right on the middle of the form
- As you click on that icon, a new Order will appear on the list New Order

- The recently split Order will automatically be assigned an Order code that equals to the Order code of the Original Order plus the suffix sharp symbol (#) and an ordinal number
- For example: The Original Order has the Order Code to be Order_01. The first Order split from the Original Order will have the Order Code to be Order_01#1, the second Order split from the Original Order will have the Order Code to be Order_01#2 and so on
- Notice that the whole case/single item quantity and the Total Weight/Total Volume of the Original Order will decrease accordingly each time you split an Order off that Original Order
- You can continue to split new Orders off the Original Order by clicking on the plus icon on the top right corner of the list New Order. As you click on this icon, a new tab will appear on the right of the previously split Order. Now you need to click on the tab title of the new to switch to the details of the that new Order. Now continue to split the whole case/single item quantity off the Original Order for that new Order using the steps described above

- On this form, you can remove a new Order that have been split off the Original Order by clicking on the remove icon on the tab title of that Order. After removing, the whole case/single item quantity that were allocated to that Order will automatically be added back to the remaining whole case/single item quantity of the Original Order

- After you have finished splitting the Original Order, click on the button Split on the form

- Once you finish splitting Orders and save, the Original Order Code will disappear. The remaining whole case/single item quantity of the Original Order will be saved into a new Order. The Order Code of the new Order equals to the Order Code of the Original Order, adding the suffix # plus the ordinal number right after the ordinal number of the last Order split off the Oiginal Order code
- For example: The Original Order has the Order Code SO-200414-00027. You have split two (2) Orders off that Original Order in one turn. After saving, the remaining whole case/single item quantity of the Original Order will be saved into a new Order with the Order Code SO-200414-00027#3

- Note:
- You can also split an Order that was earlier been split off from another Order
- If you delete all Orders that have been split off from an Original Order, the system will revive the Original Order
Manually split Orders during Route Plan Optimization process
- When you use the Route Plan (List View) feature to optimize the Orders, you can manually split Orders after the Delivery Routes on which those Orders are put have been locked
- Read more at the following article: Route Plan (List View)
Sales Order Master Filter Tool
- We have a powerful Order filter tool called Master Filter which can assist you greatly when you want to filter the Sales Order based on various attributes
Access Order Master Filter Tool
- To access the Master Filter tool, click on the funnel icon to the left of the Columns button, located over the top right corner of the Order list table
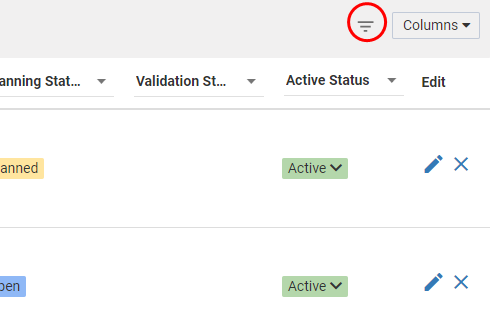
Illustration (English)
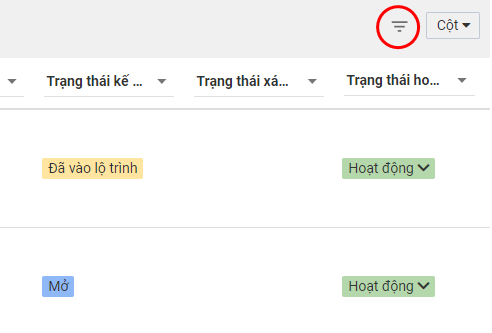
Illustration (Vietnamese)
- Upon clicking, the Master Filter tool will appear like so
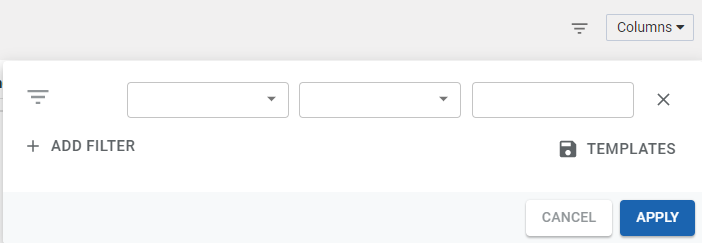
Illustration (English)
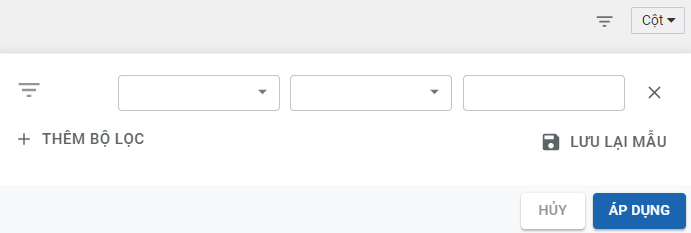
Illustration (Vietnamese)
Create Filter On The Order Master Filter Tool
- On the tool, you will see three drop-down boxes.

Illustration (English)

Illustration (Vietnamese)
- The first drop-down box lets you select the Order attribute from the following: Order Date; ETA at Delivery Stop; ETD at Delivery Stop; Estimated Distance; Planning Status; Active Status
- The second drop-down box lets you select the operator related to the selected attribute
- The operator list will be different for different attributes:
Operators For The "Order Date; ETA at Delivery Stop; ETD at Delivery Stop" Attributes
- If the selected attribute is one of the following: Order Date; ETA at Delivery Stop; ETD at Delivery Stop, then the possible operators would be: Is; Is Today; Is Before Date; Is After Date; Is Today & Earlier; Is Today & Later
- The operator Is means you want to filter out the Orders of which the selected Order attribute (For example, Order Date) is a specific date. To select the date, click on the calendar icon on the third drop-down box and select the desired date. Alternatively, you can directly input the date into the box following the Month/Date/Year mm/dd/yyyy format
- The operator Is Today means the current date on your computer. If this operator is selected, the third drop-down box will gray out
- The operator Is Before Date means you want to filter out the Orders of which the selected Order attribute is within the range of a specific selected date and all the past dates (No limit) before the selected date
- The operator Is After Date means you want to filter out the Orders of which the selected Order attribute is within the range of a specific selected date and all the future dates (No limit) after the selected date
- The operator Is Today & Earlier means you want to filter out the Orders of which the selected Order attribute is within the range of the current date and all the past dates (No limit) before the current date
- The operator Is Today & Later means you want to filter out the Orders of which the selected Order attribute is within the range of the current date and all the future dates (No limit) after the current date
Operators For The "Estimated Distance" Attribute
- If the selected attribute is Estimated Distance, then the possible operators would be: Is; Is Greater Than; Is Smaller Than
- The operator Is means you want to filter out the Orders of which the estimated distance between the Depot and the Customer is a specific distance. Input the desired value (In kilometer, km) into the third box
- The operator Is Greater Than means you want to filter out the Orders of which the estimated distance between the Depot and the Customer is greater than a specific distance. Input the desired value (In kilometer, km) into the third box
- The operator Is Smaller Than means you want to filter out the Orders of which the estimated distance between the Depot and the Customer is smaller than a specific distance. Input the desired value (In kilometer, km) into the third box
Operators For The "Planning Status; Active Status" Attributes
- If the selected attribute is Planning Status; Active Status, then the possible operators would be: Is
- For the Planning Status attribute, the possible values from the third box would be: Open; Planned; Locked
- For the Active Status attribute, the possible values from the third box would be: Active; Inactive
Create Additional Filters On The Order Master Filter Tool
- You can use a combination of more than one filter to filter out the desired Orders more precisely. To create an additional filter besides the existing ones, click the + ADD FILTER button. Another row will appear below the previous filter
- At the beginning of the next row, there is a box to let you choose the relationship between the previous filter and the current filter.
- If you choose the operator AND, that means the system will filter out the Orders that satisfy both the previous filter and the current filter
- If you choose the operator OR, that means the system will filter out the Orders that satisfy either the previous filter or the current filter
Use Filter/Group Of Filters
- After you have created the necessary filter/group of filters, click the Apply button to apply that filter/group of filters to the current Order list

Illustration (English)

Illustration (Vietnamese)
Remove Filter From The Order Master Filter Tool
- To remove a filter, click the remove icon at the end of the filter row

Illustration (English)

Illustration (Vietnamese)
Save Filter/Group Of Filters As Templates
- You can save a filter/group of filters as a template and use the template in the future without having to set up the filter/group of filters from scratch every time
- To save a filter/group of filters as a template, click the TEMPLATES button

Illustration (English)

Illustration (Vietnamese)
- Upon clicking, the Filter Template form will appear. On this form, click on the Save Active Filters text
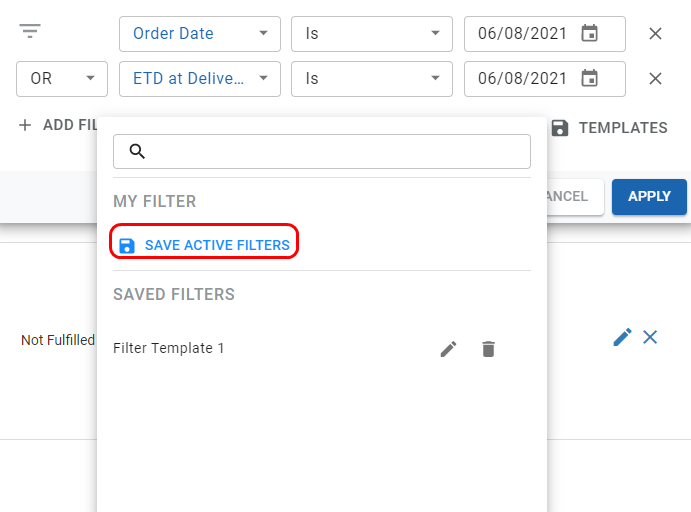
Illustration (English)
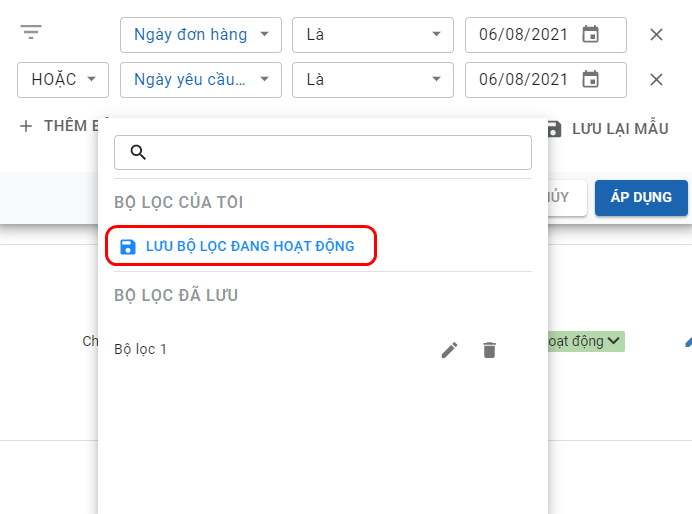
Illustration (Vietnamese)
- Upon clicking, a form titled Save New Filter will appear. Input the name for the filter/group of filters you want to save into the New Filter Name field then click Save
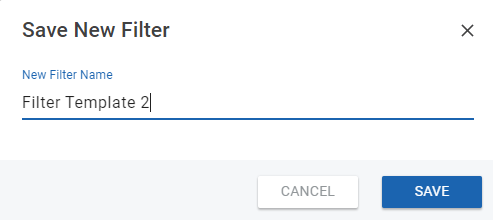
Illustration (English)
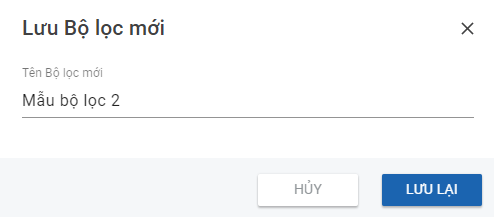
Illustration (Vietnamese)
- The template recently saved will appear under the SAVE FILTERS section
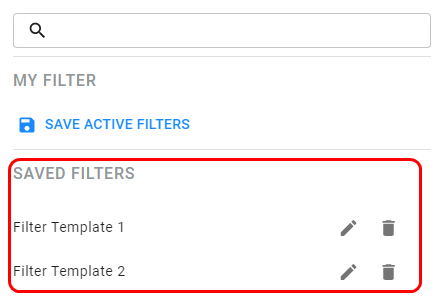
Illustration (English)
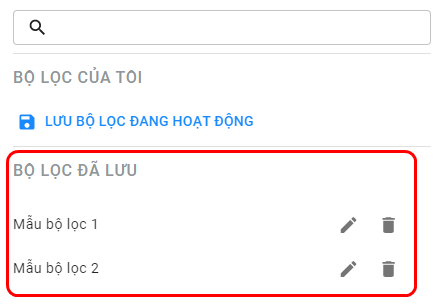
Illustration (Vietnamese)
Find Saved Filter Template
- To find a saved filter template, input the template name into the search bar at the top of the Filter Template form
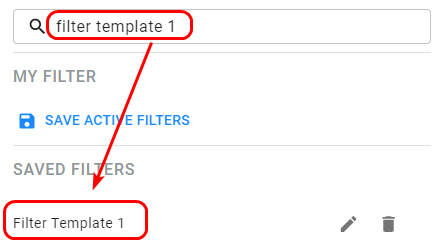
Illustration (English)
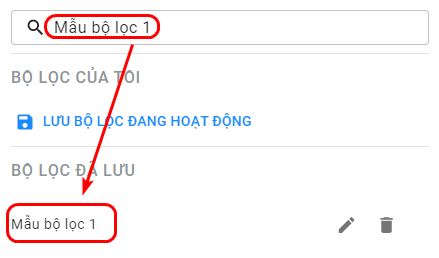
Illustration (Vietnamese)
Edit Name Of Saved Filter Template
- To edit the name of a saved filter template, click on its respective Edit icon . Upon clicking, the name field of the saved filter template will become editable. Edit as you wish then click the checkmark icon to save the new name. If you wish to discard the change and remain the current name, click the clear icon

Illustration (English)

Illustration (Vietnamese)
Delete Saved Filter Template
- To delete a saved filter template, click on its respective Remove icon
Beginner's Guide
Now that you have done creating Organization Modules, Users, Vehicles, Customers and Products, you are ready to create a Sales Order.
Create a Sales Order
- Creating a single sales order using Web form can be done through the following steps:
- Step 1: Navigate to Orders > Sales Orders tab.
- Step 2: Click on the symbol Create (the symbol).
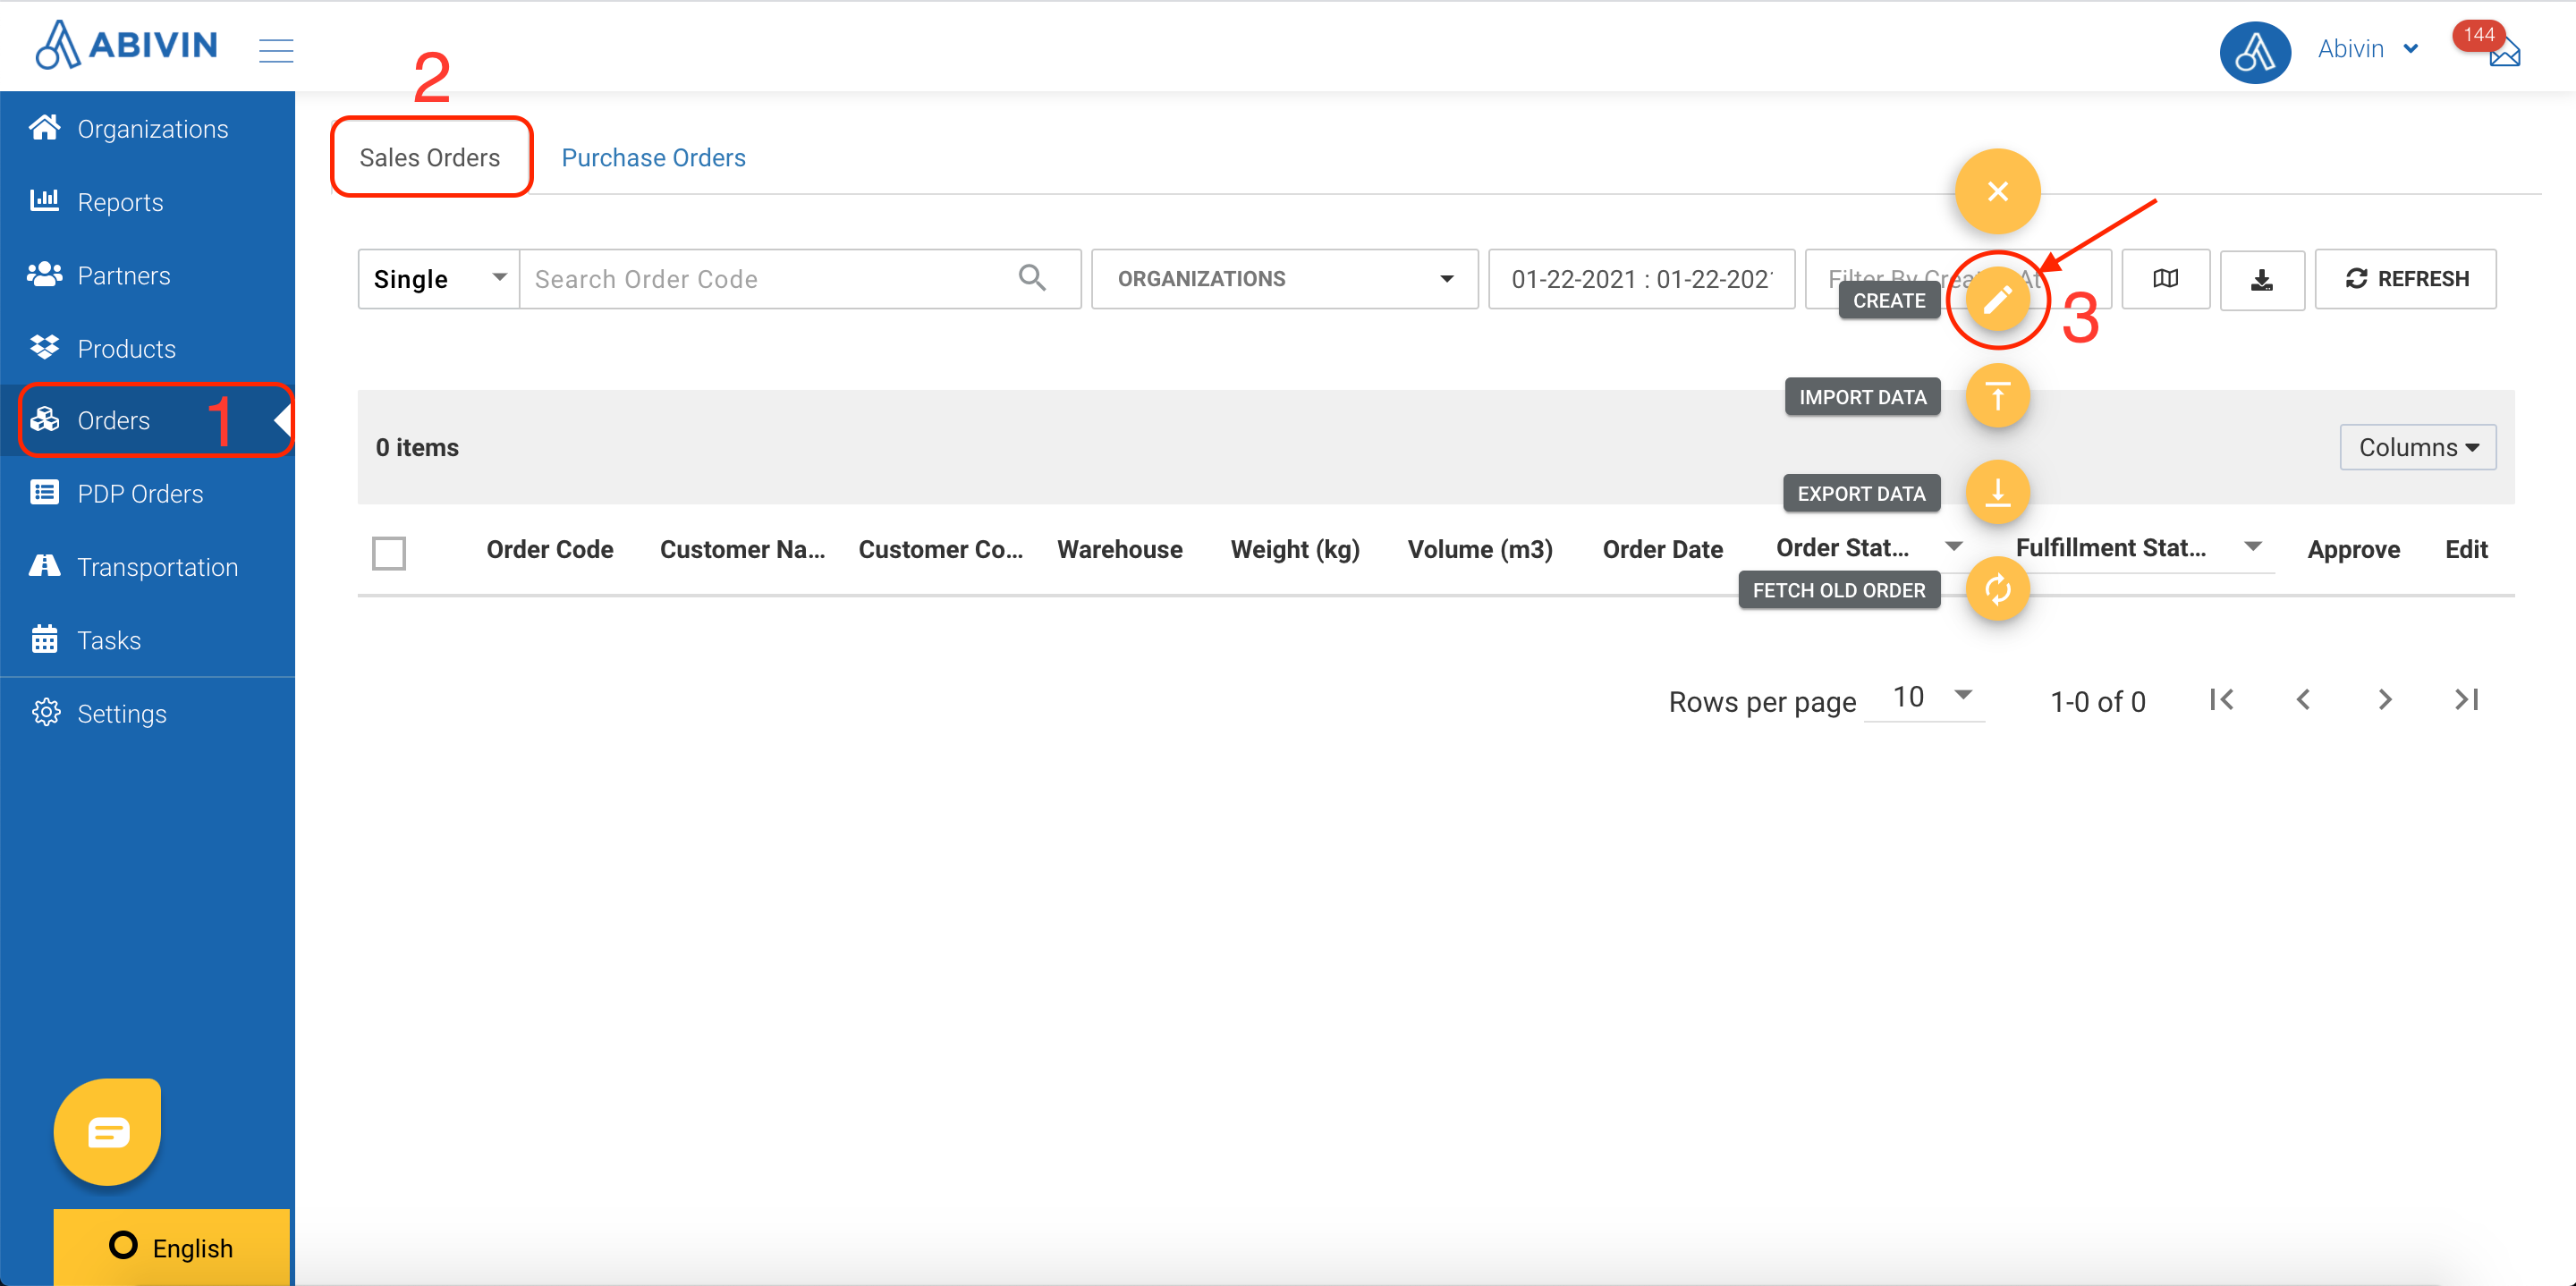
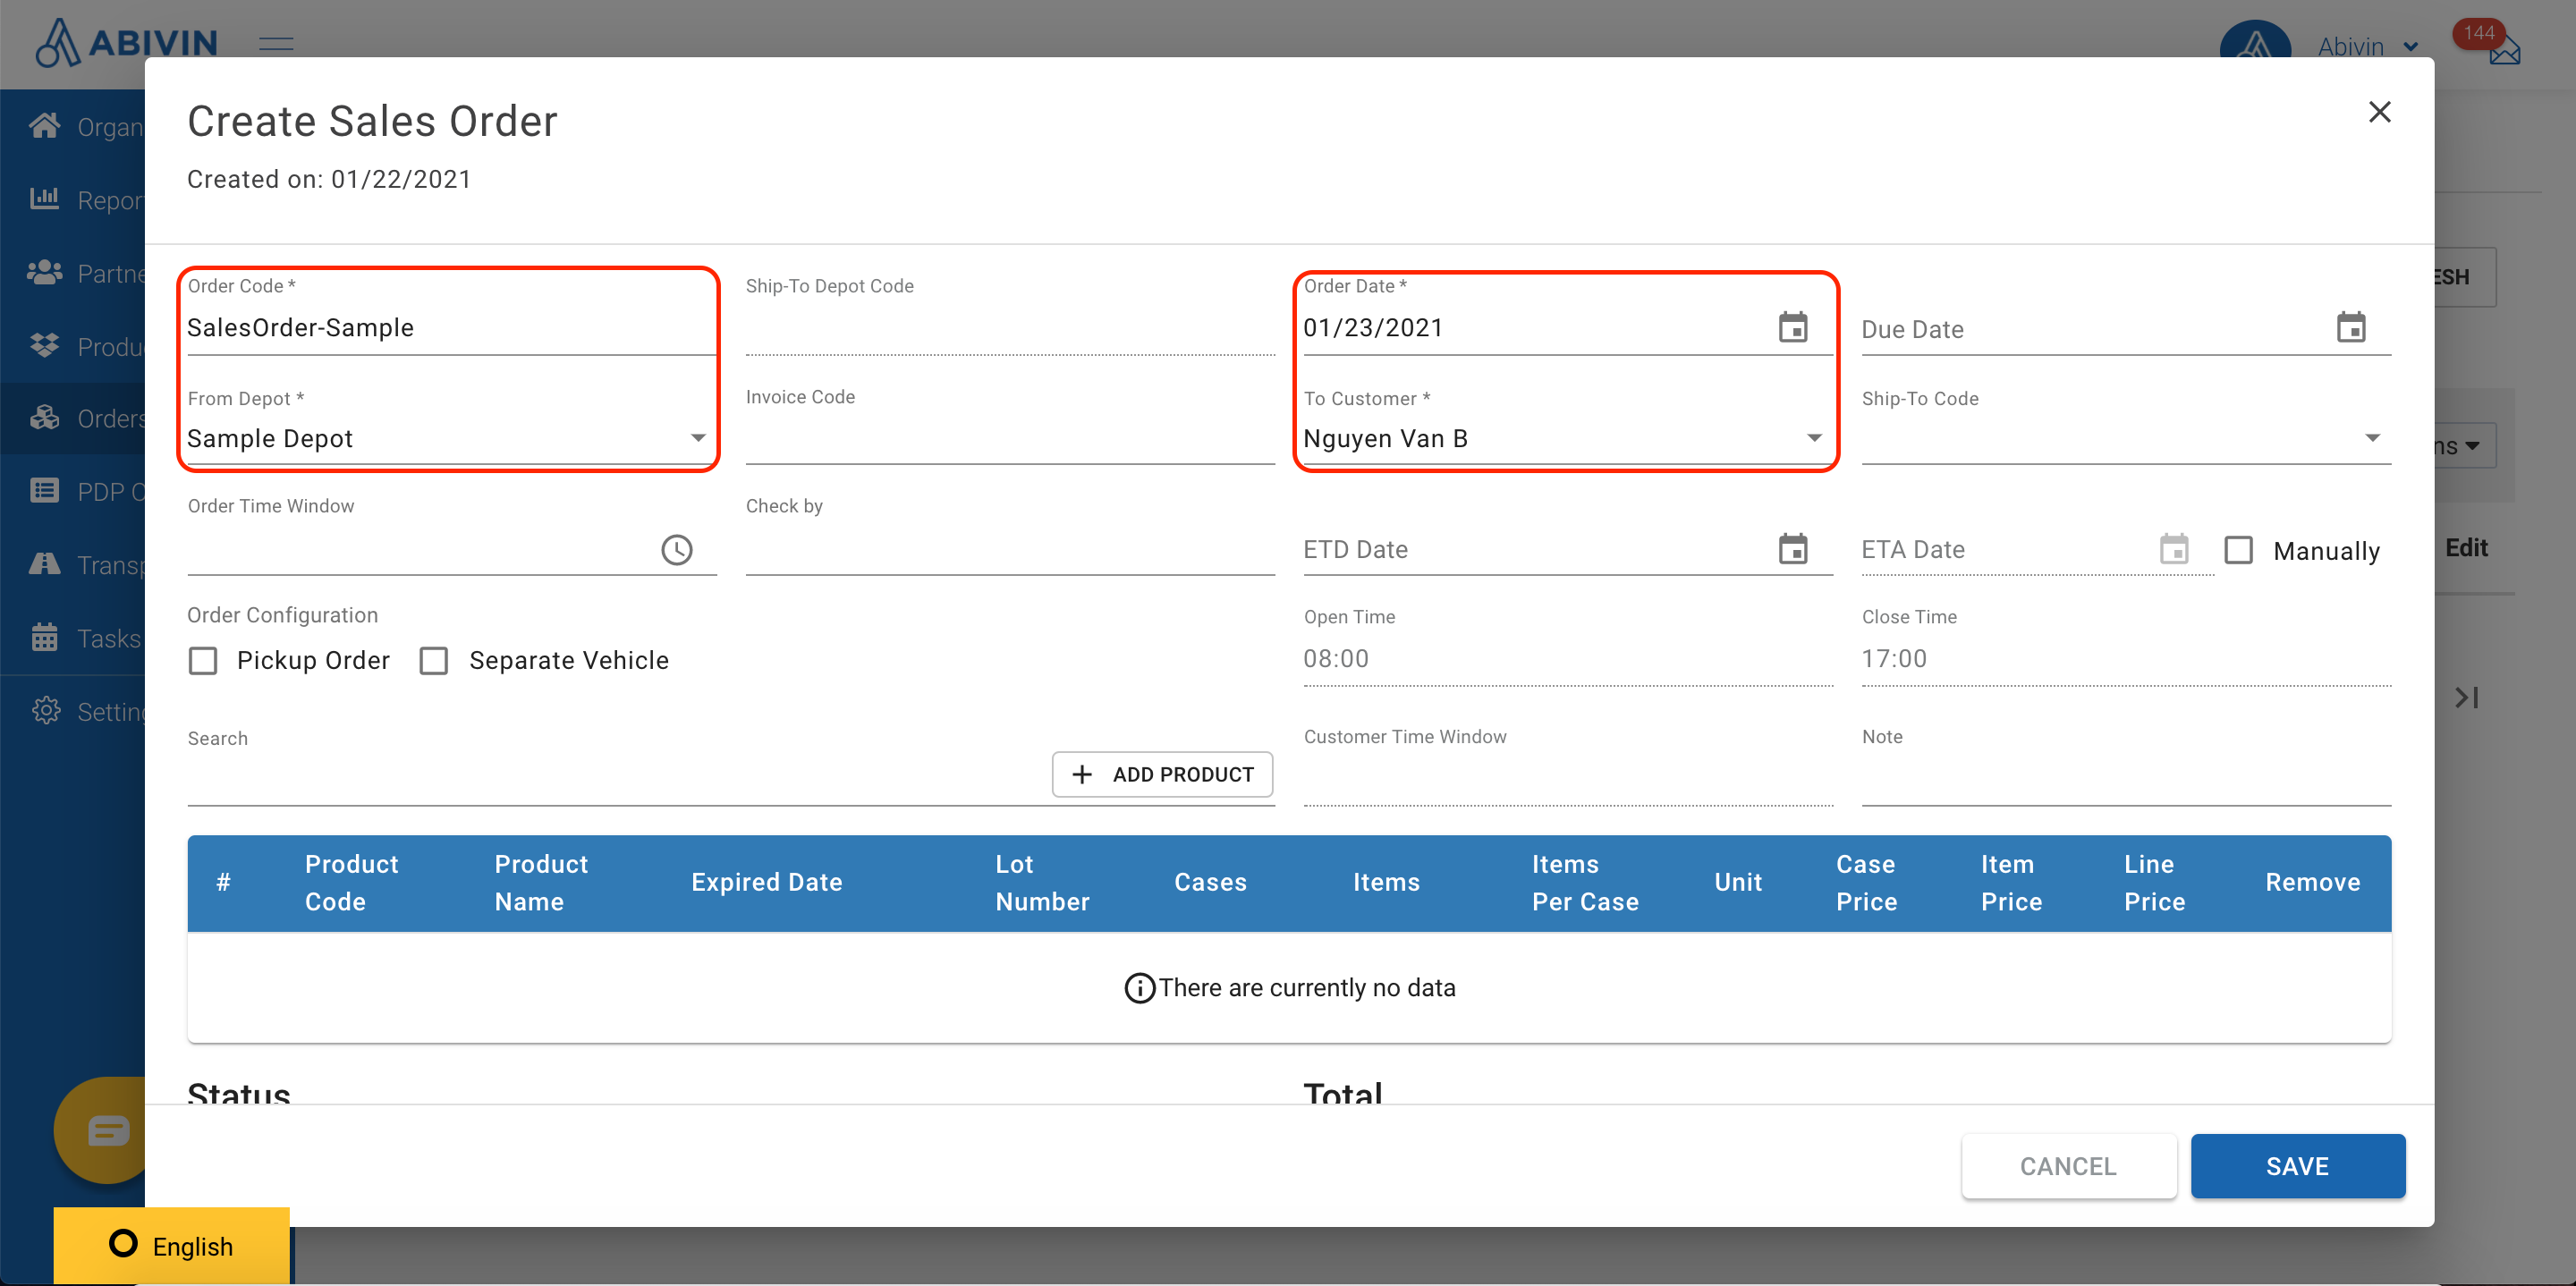
- Step 3: Input information into the required fields:
- Order Code: Input the management code assigned to the Order.
- Order Date: Input the date on which the Order is planned to be performed and completed.
- From Depot: Input the Depot from where the Order will start, then choose the suitable value from the drop down menu.
- To Customer: Input the Customer Code of the customer that creates the Sales Order, then choose from the drop down menu.
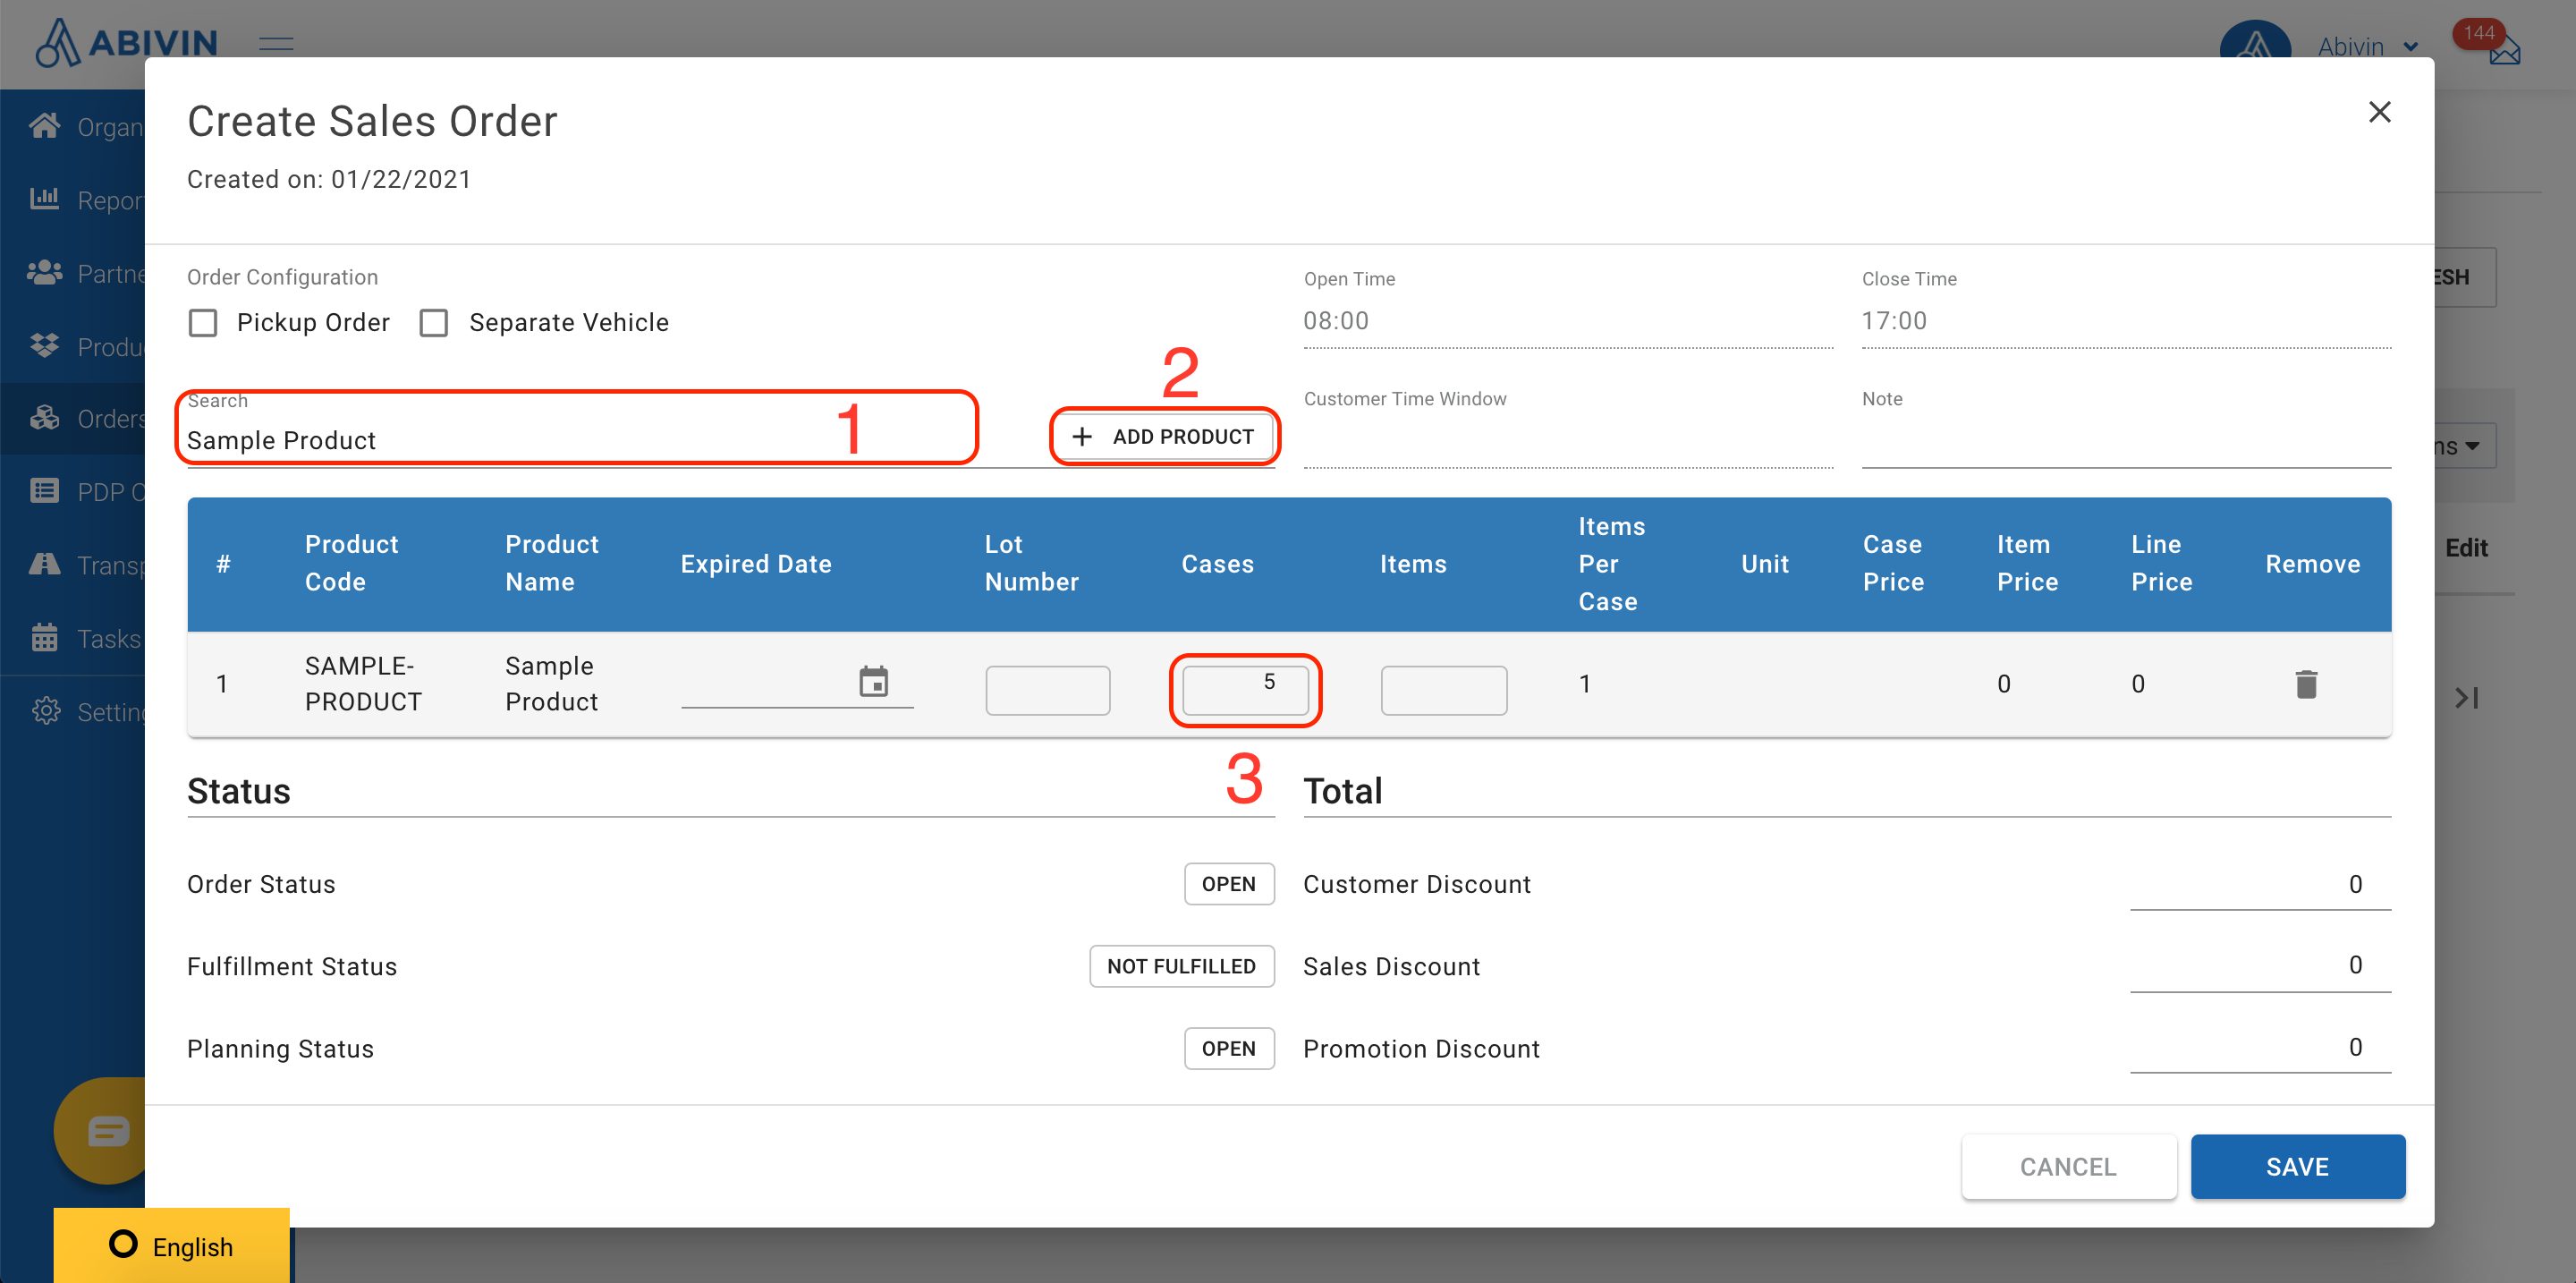
- Product: Click on the field on the same row with the button Add Product (Below the text Search). On the search bar, input the Product Name/Product Code of the wanted Product, then select the returned value. Next, click on the button Add Product to add that Product to the Order. The recently added Product will appear on the Product table below. Finally, input the number of Cases and Items (if any) into the table.
- Step 4: Click SAVE.
Updated 24 days ago
