Manage Sales Orders
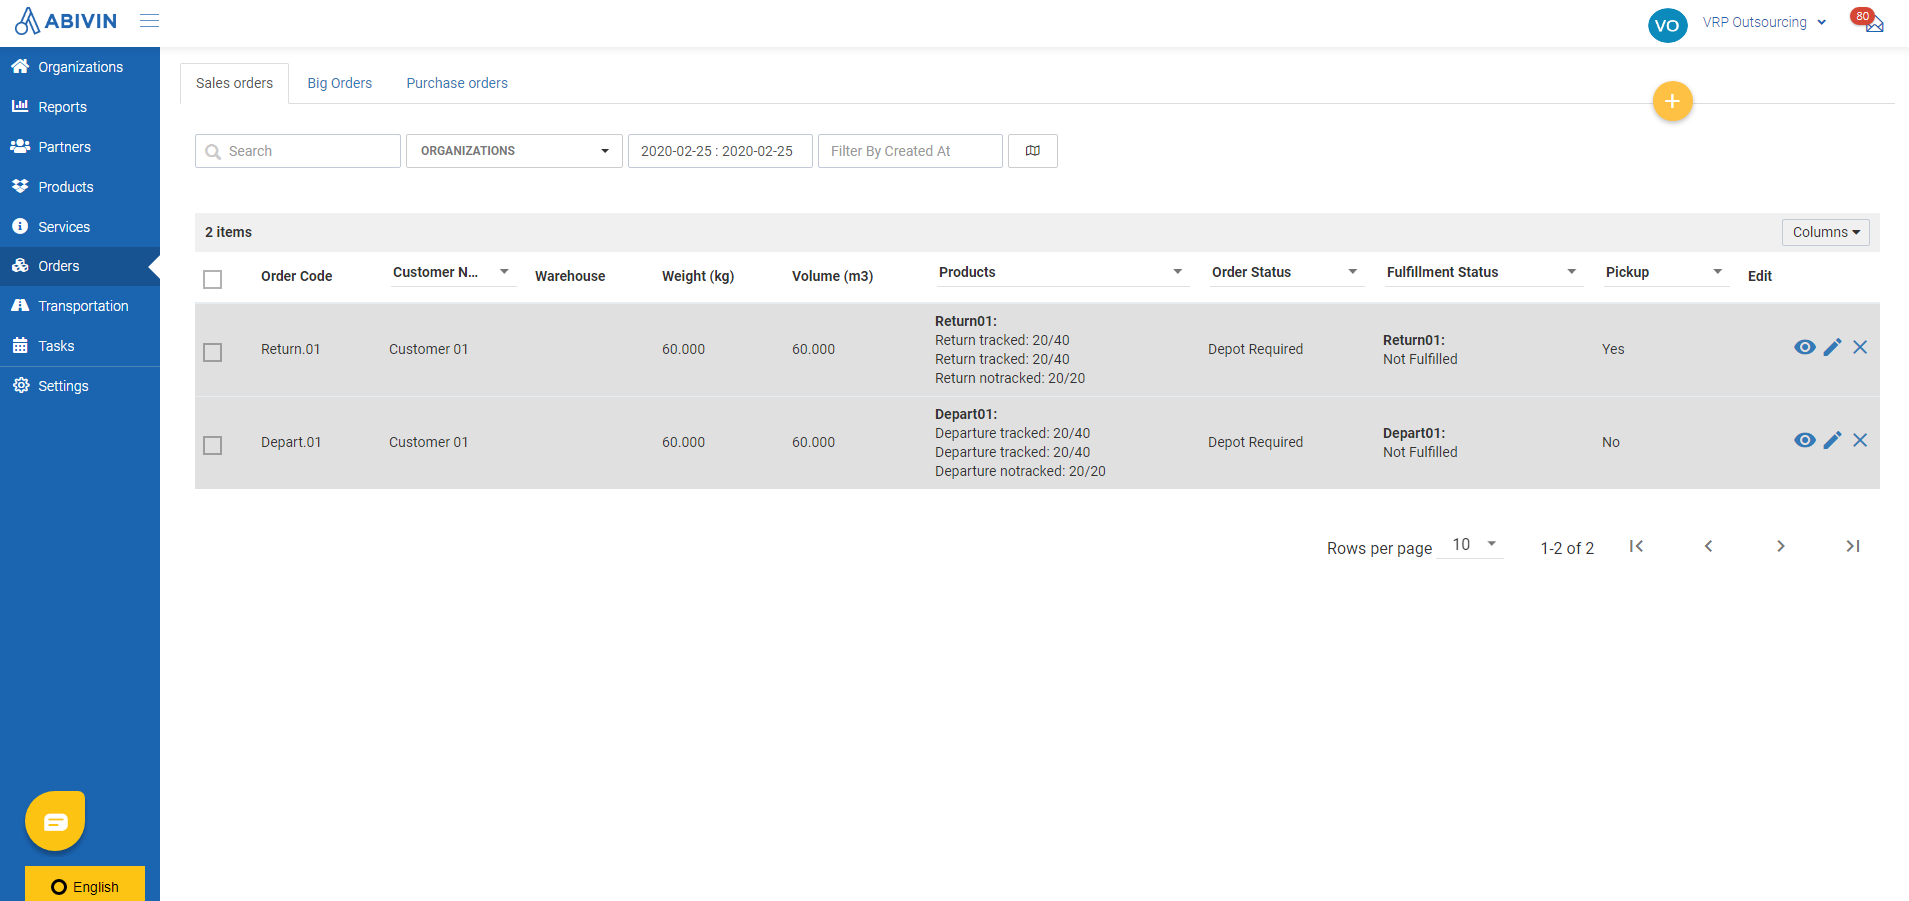
Locate orders tab
- Navigate to Orders > Sales orders tab
- This tab lists all Sales orders
Create orders
Order information fields
- Below are all information fields of a Sales order of VRP - Outsourcing Fleet Model
Information field | Description |
|---|---|
Order Code (Web form + Excel template) (Required) | 1. Description: |
Customer Code (Web form); Partner Code (Excel template) | 1. Description: |
Warehouse Code | 1. Description: |
Transporter Code | 1. Description: |
Single Way Code | 1. Description: |
Invoice Code | 1. Description: |
Invoice Date | 1. Description: |
Check by | 1. Description: |
Time Window | 1. Description: |
Create Date | 1. Description: |
Order Date | 1. Description: |
Product Code | 1. Description: |
Item Index | 1. Description: |
Type Way | 1. Description: |
Number Of Cases | 1. Description: |
Number Of Items | 1. Description: |
Customer Discount | 1. Description: |
Order Discount (Web form) Sale Discount (Excel template) | 1. Description: |
Promotion Discount | 1. Description: |
IMVD Discount | 1. Description: |
Total Price | 1. Description: |
Lot Number | This field is no longer used in the Excel template |
Service Time | 1. Description: |
Pickup Order | 1. Description: |
Splitted Order (Web form); Splitted (Excel template) | 1. Description: |
Expired Date | 1. Description: |
Create single order using Web form
- Please refer to the CRUD functions article to know the general steps about creating single object using web form
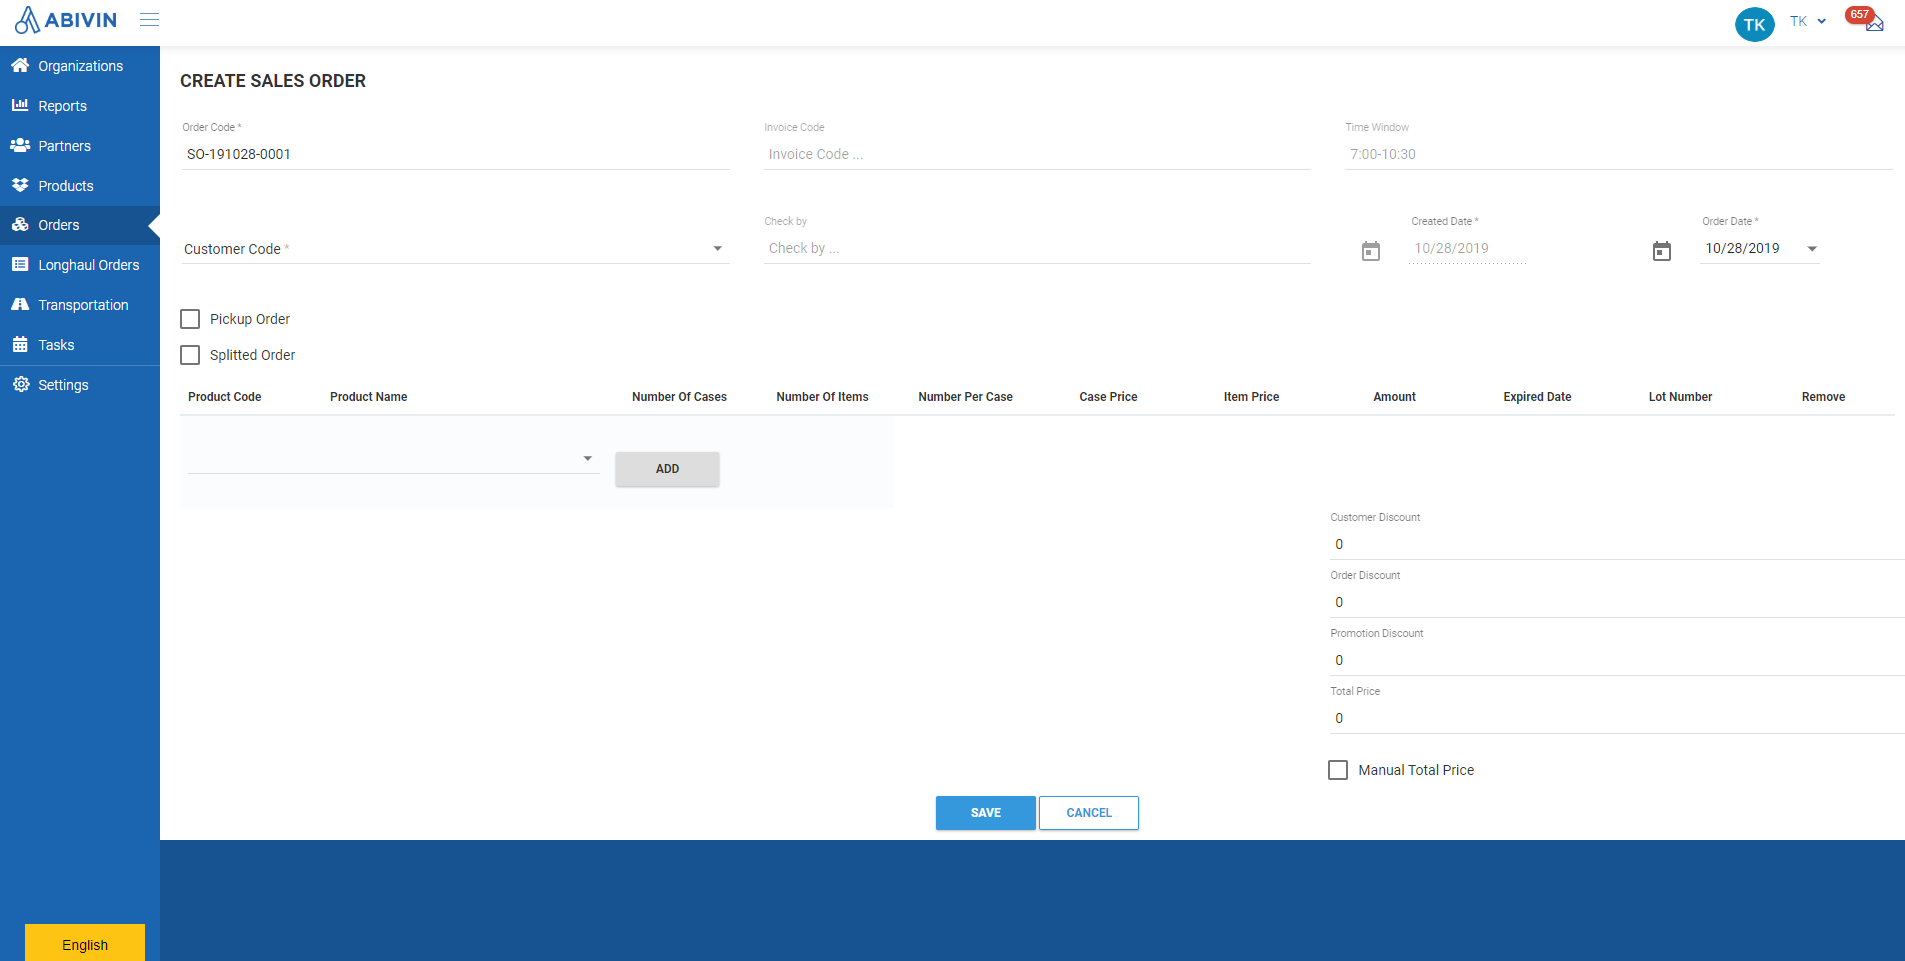
- When using Web form, the information must be input exactly in the following sequence:
1.1. Order Code
- The Order code is automatically generated in the following format:
SO-yymmdd-xxxxx - In which:
- SO stands for Sales Order
- yy is the last two digits of the current year. For example: The current year is 2019, then the yy value would be 19
- mm is the current month. For example: The current month is October, then the mm value would be 10
- dd is the current date. For example: The current date is Sixteenth, then the dd value would be 16
- xxxxx is the numerical order of the order. This numerical order will automatically increase each time you open the Create New Order screen. For example: 00001; 00023; 11111 and so on
- You can also change the order code to your own format. The order code must not contain spaces
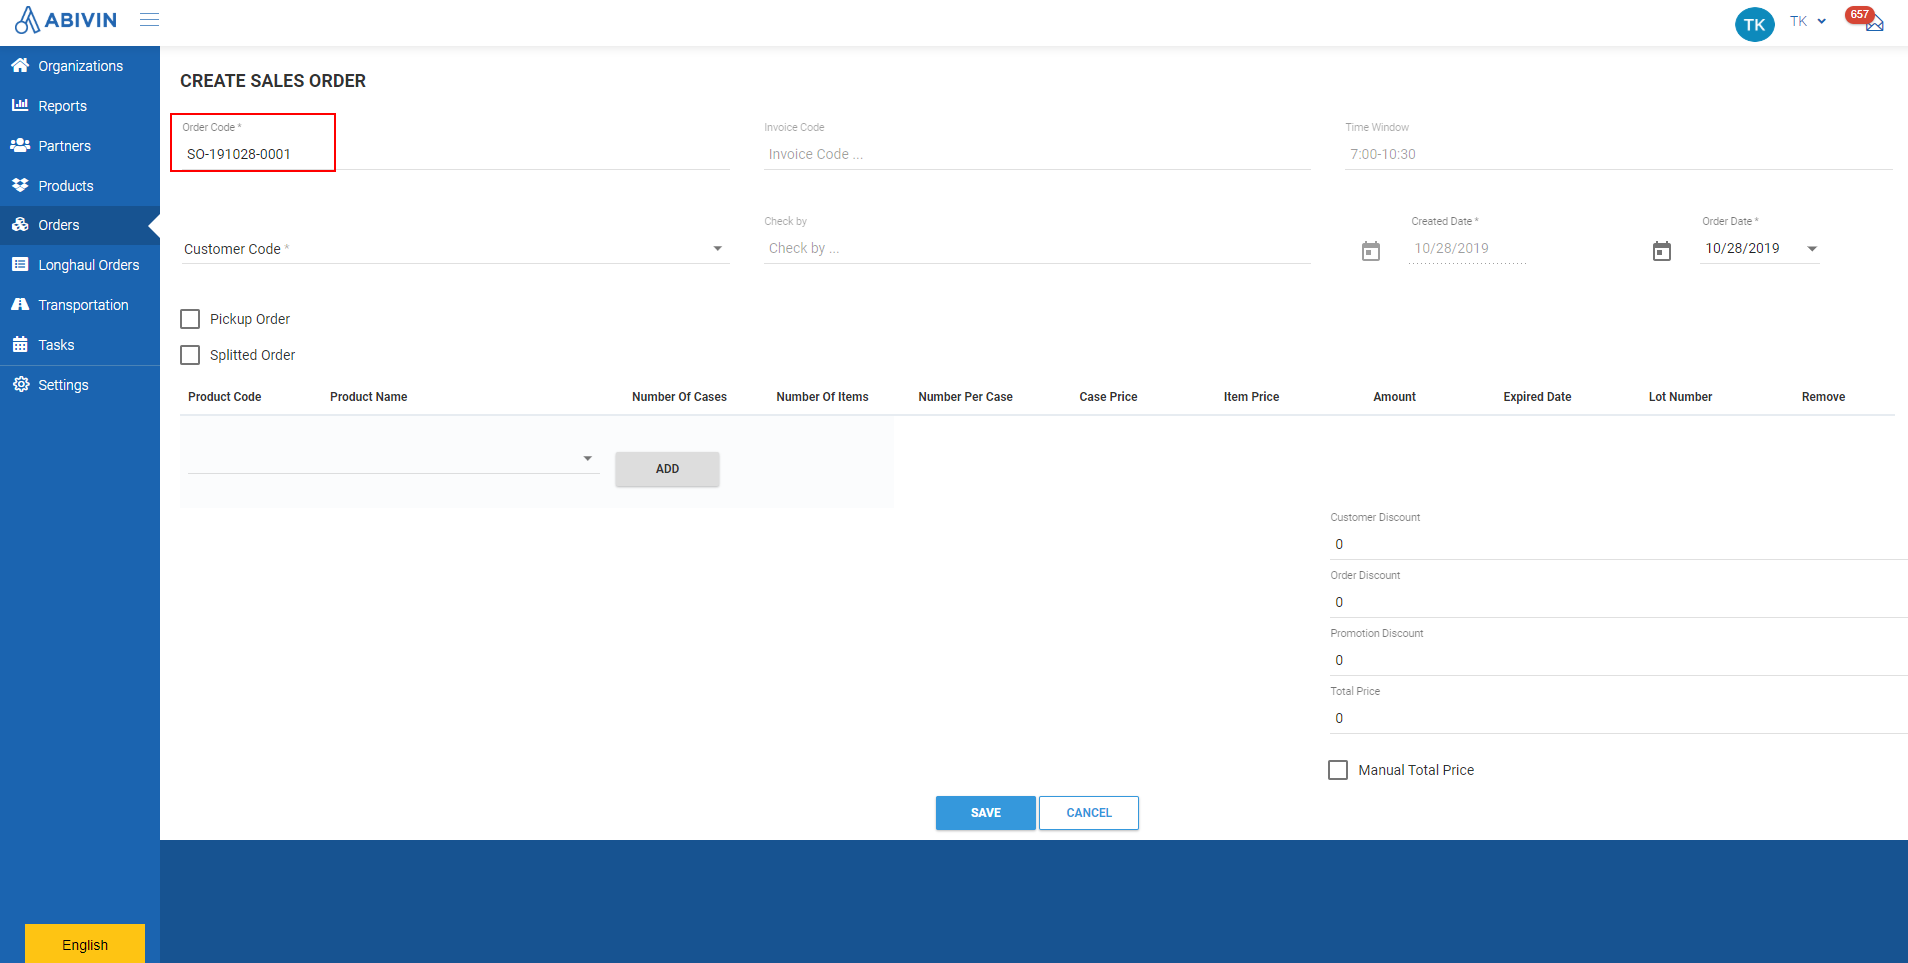
1.2. Customer Code
- Click on this field. Input the *Organization Name/Organization Code** of the appropriate customer into the search bar, then select from the drop down menu
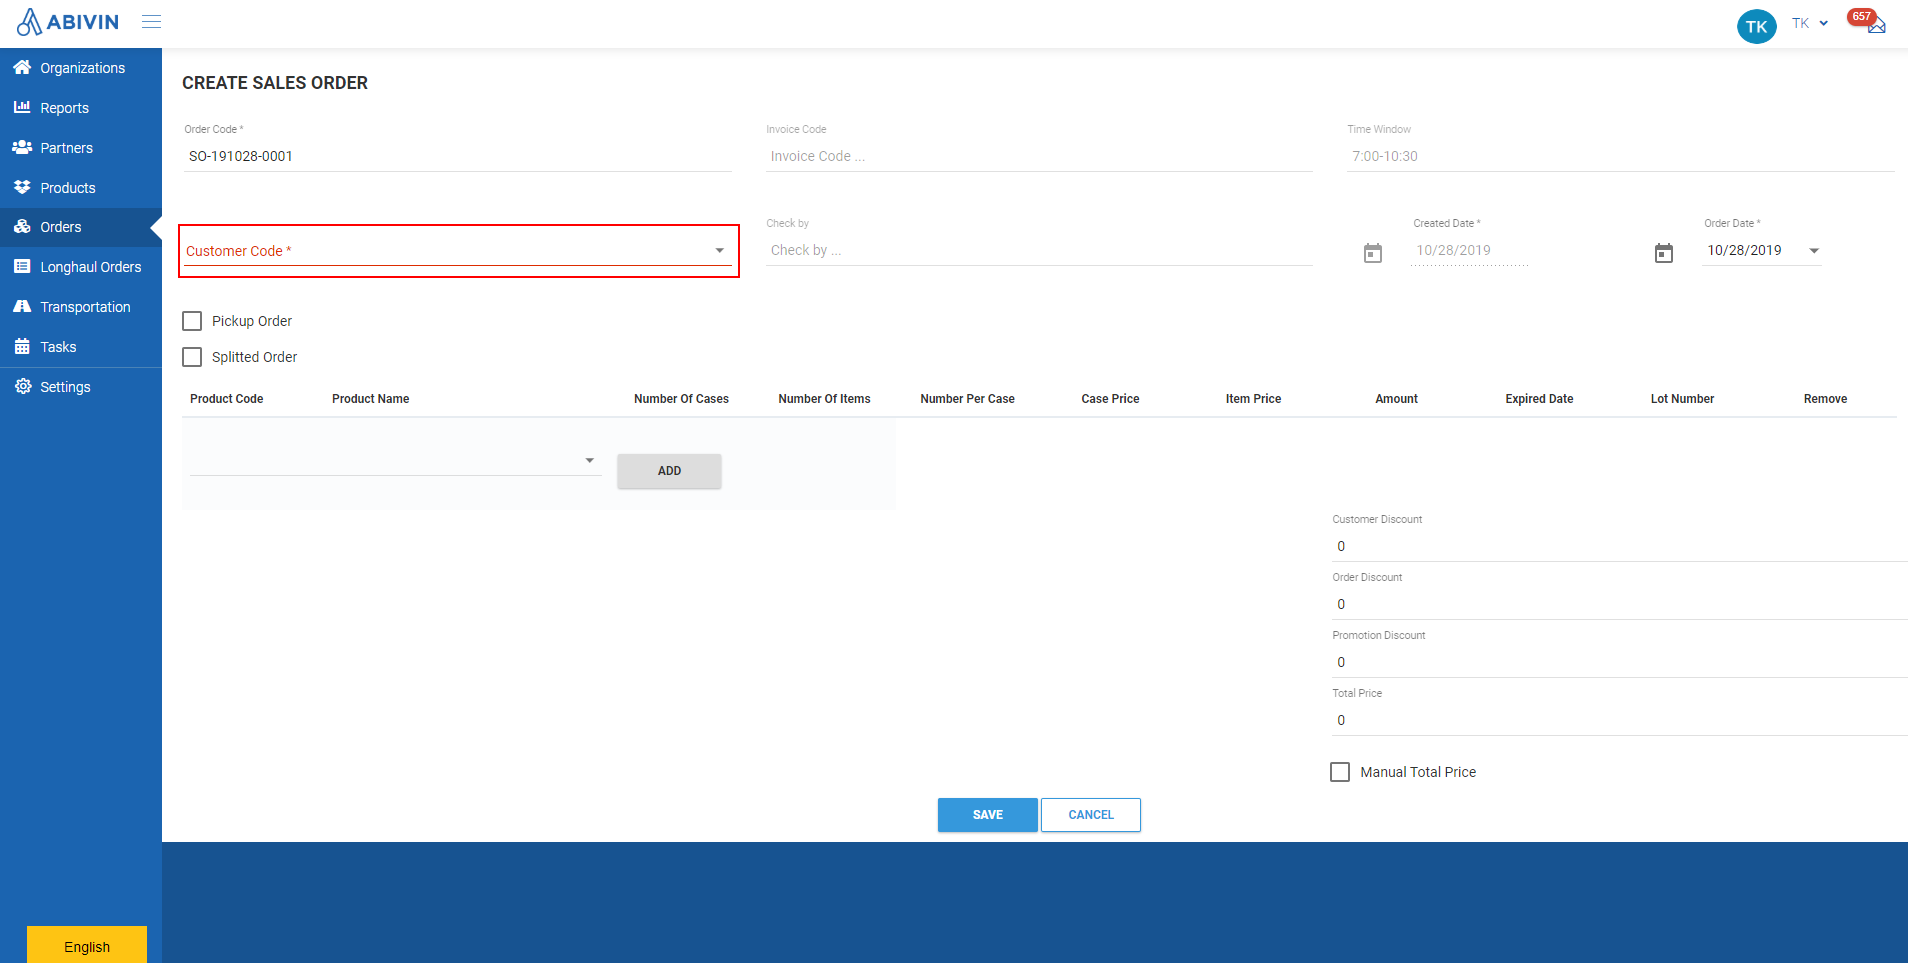
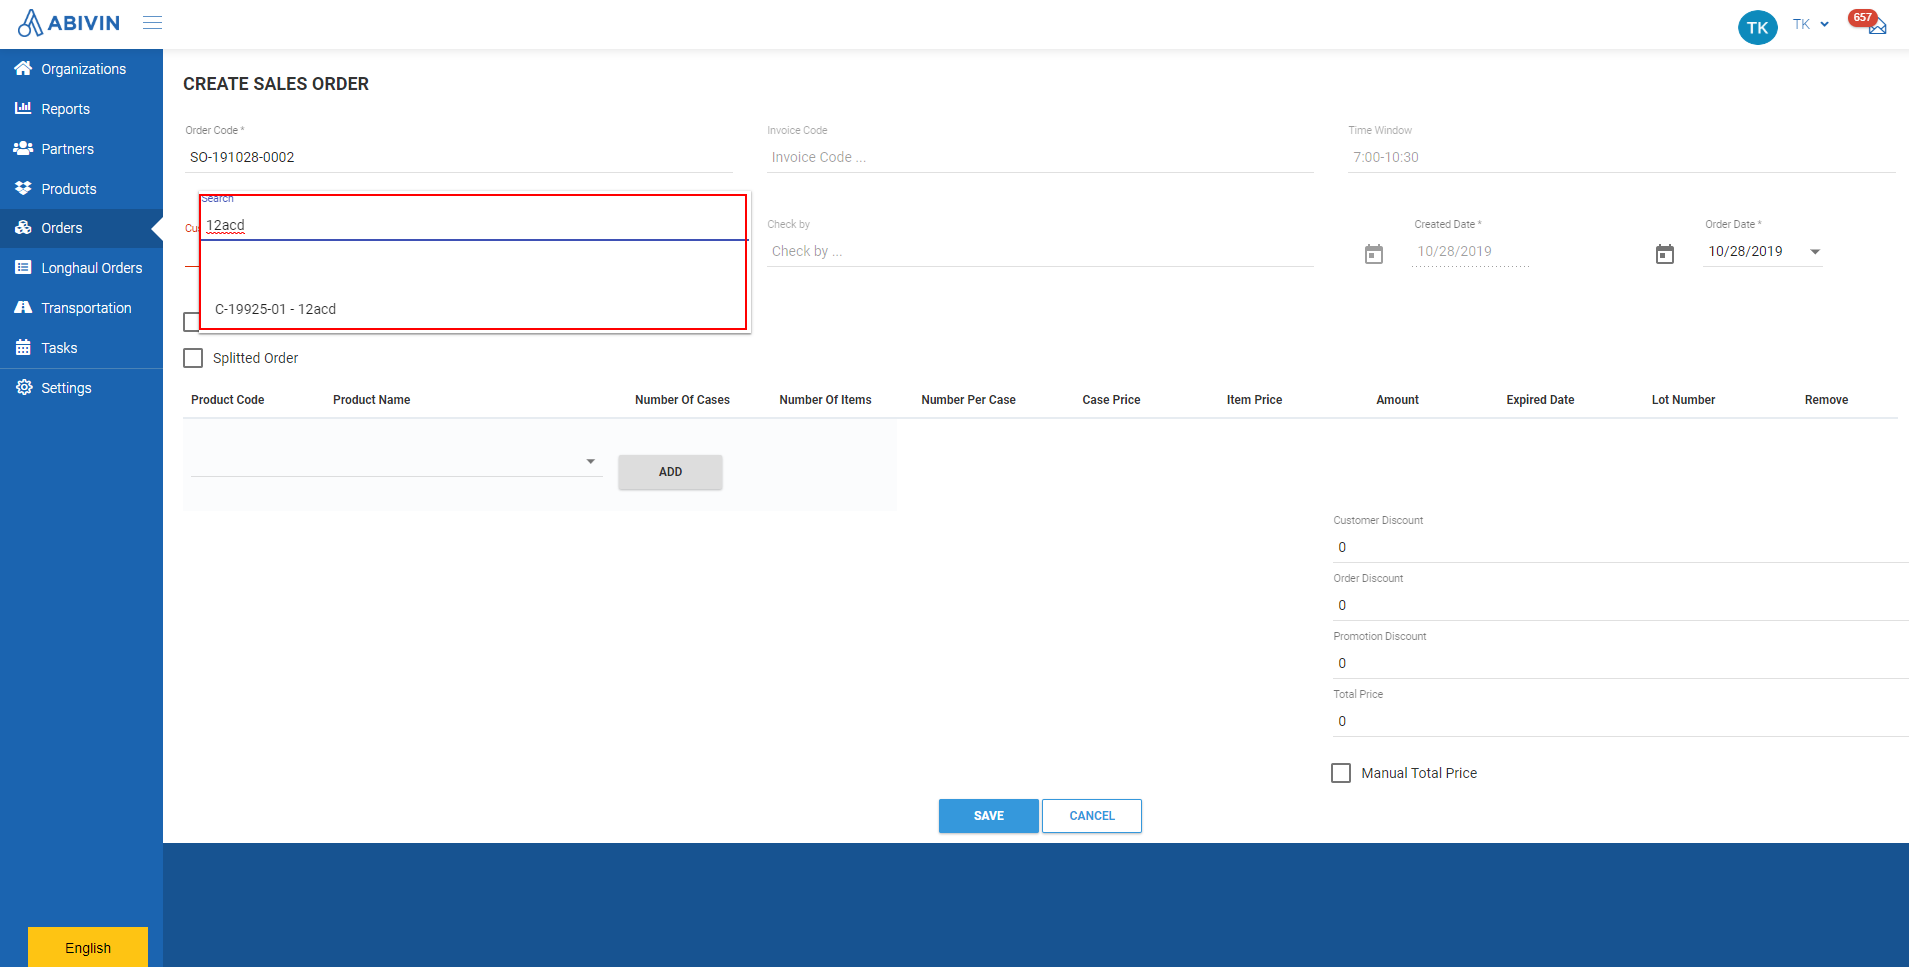
1.3. Warehouse Code
- Click on this field. The drop down menu will automatically show a list of Depots which have Transport services with the customer selected above. Select the appropriate Depot from the drop down menu
1.4. Product
- Click on this field. Input the Product Name/Product Code of the appropriate product into the search bar, then select from the drop down menu. Click on the button Add to add that product into the order
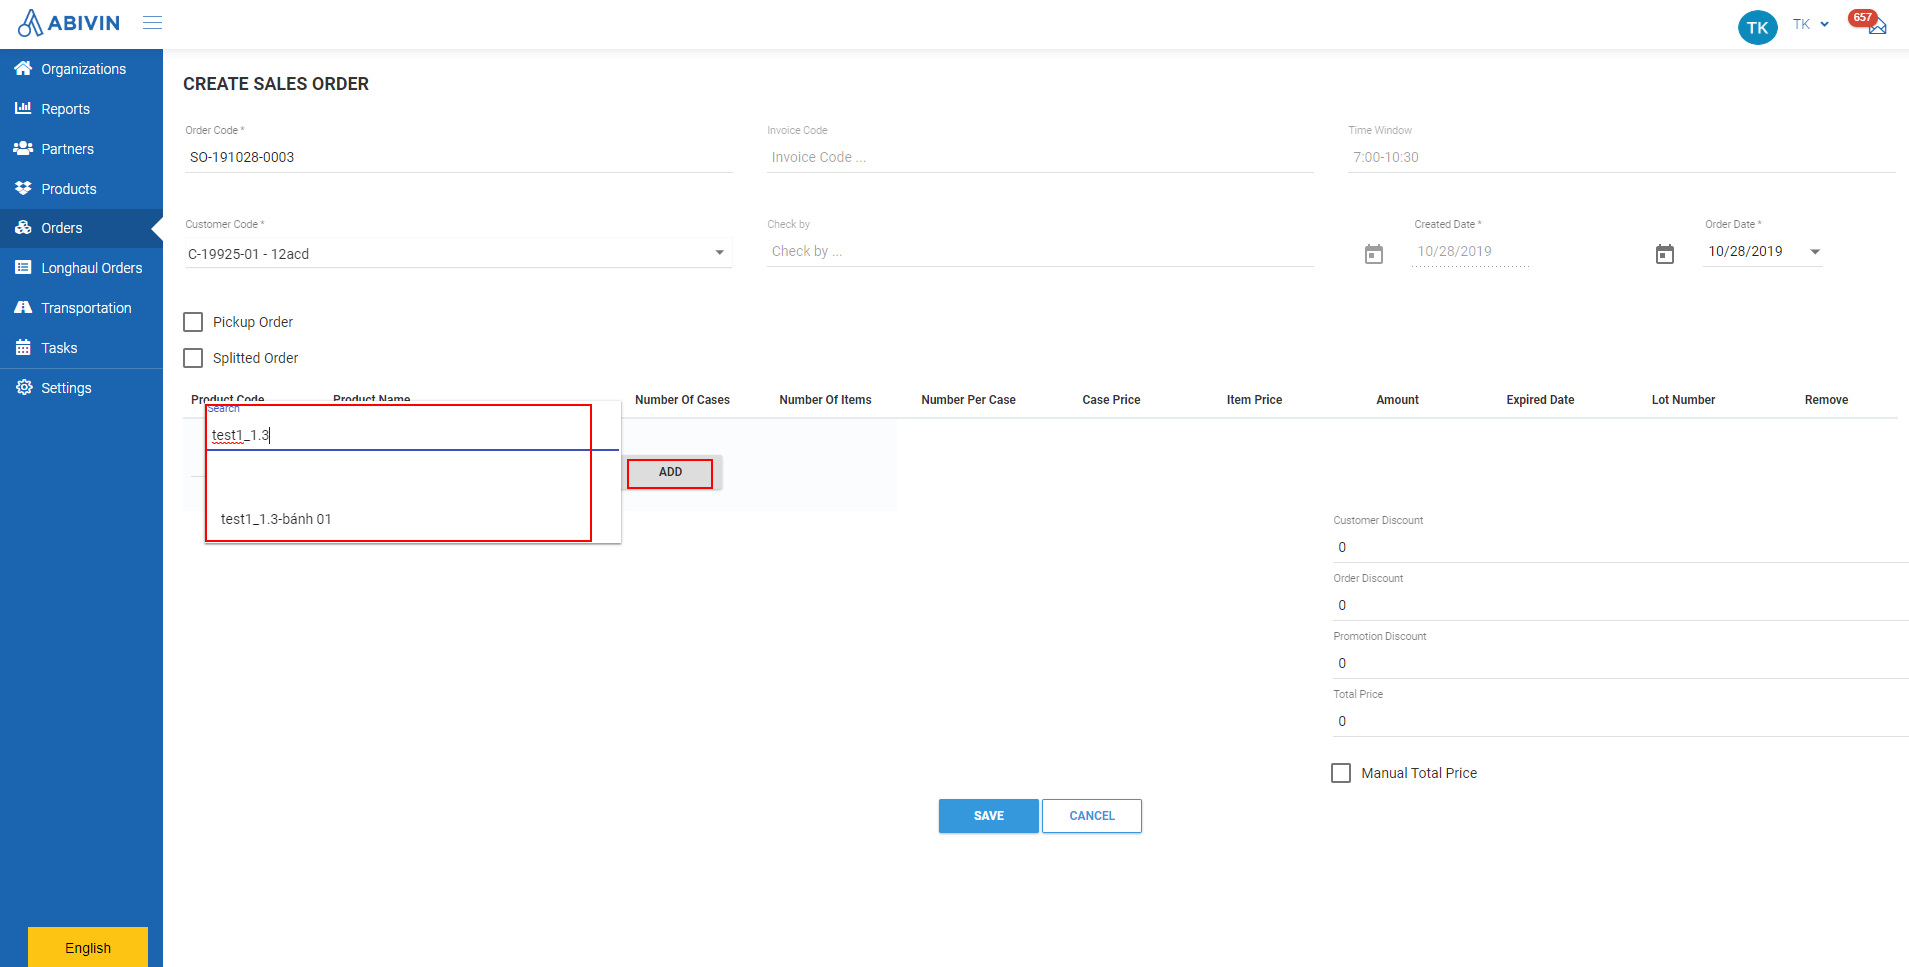
- Next, you have to input the number of cases and/or number of single items into the Number Of Cases and Number Of Items fields
- Note: If there is zero single item of a specific product in the order being created, you must input 0 into the Number Of Items field of that product. Similarly, If there is zero case of a specific product in the order being created, you must input 0 into the Number Of Cases field
1.4.1. Product Lot
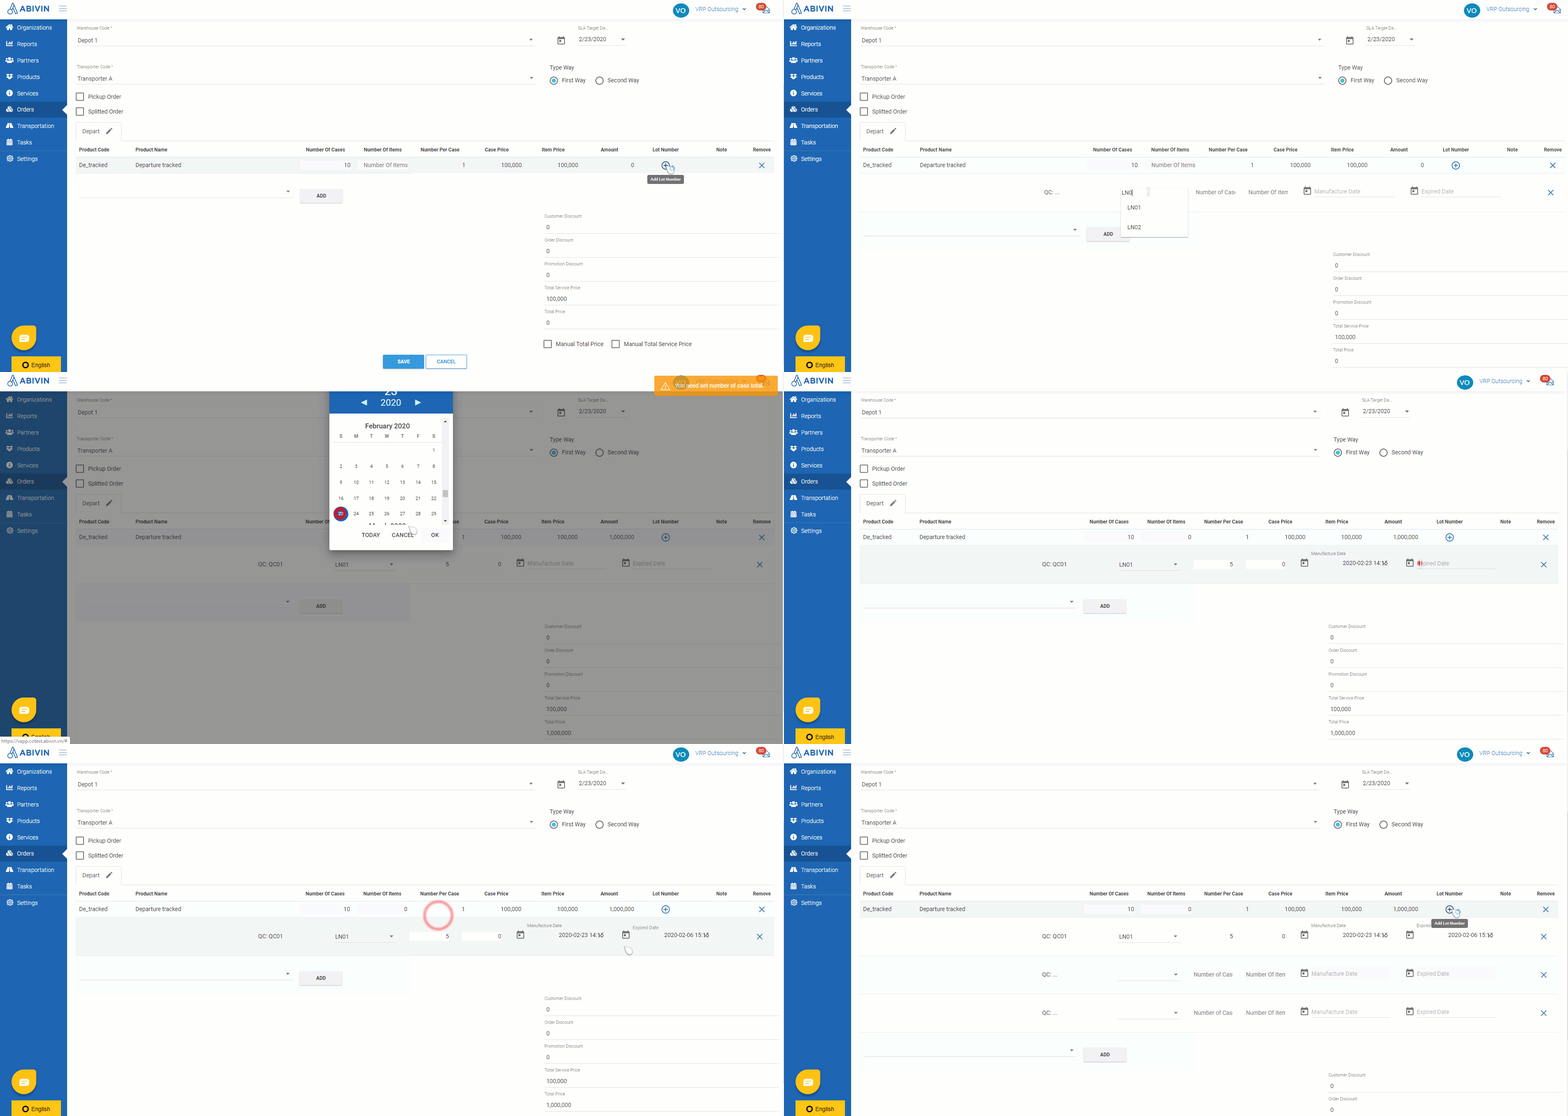
- If the cases/single items of the products are taken from different product lots, you need to specify the lot and the corresponding case/single item quantity of each product lot
- To do that, click on icon under Lot column
- An additional line will appear below the product

- Click on the leftmost field. This is the Product Lot number field. Select the appropriate lot number from the drop down menu. You could also input the lot number into the search bar to select faster
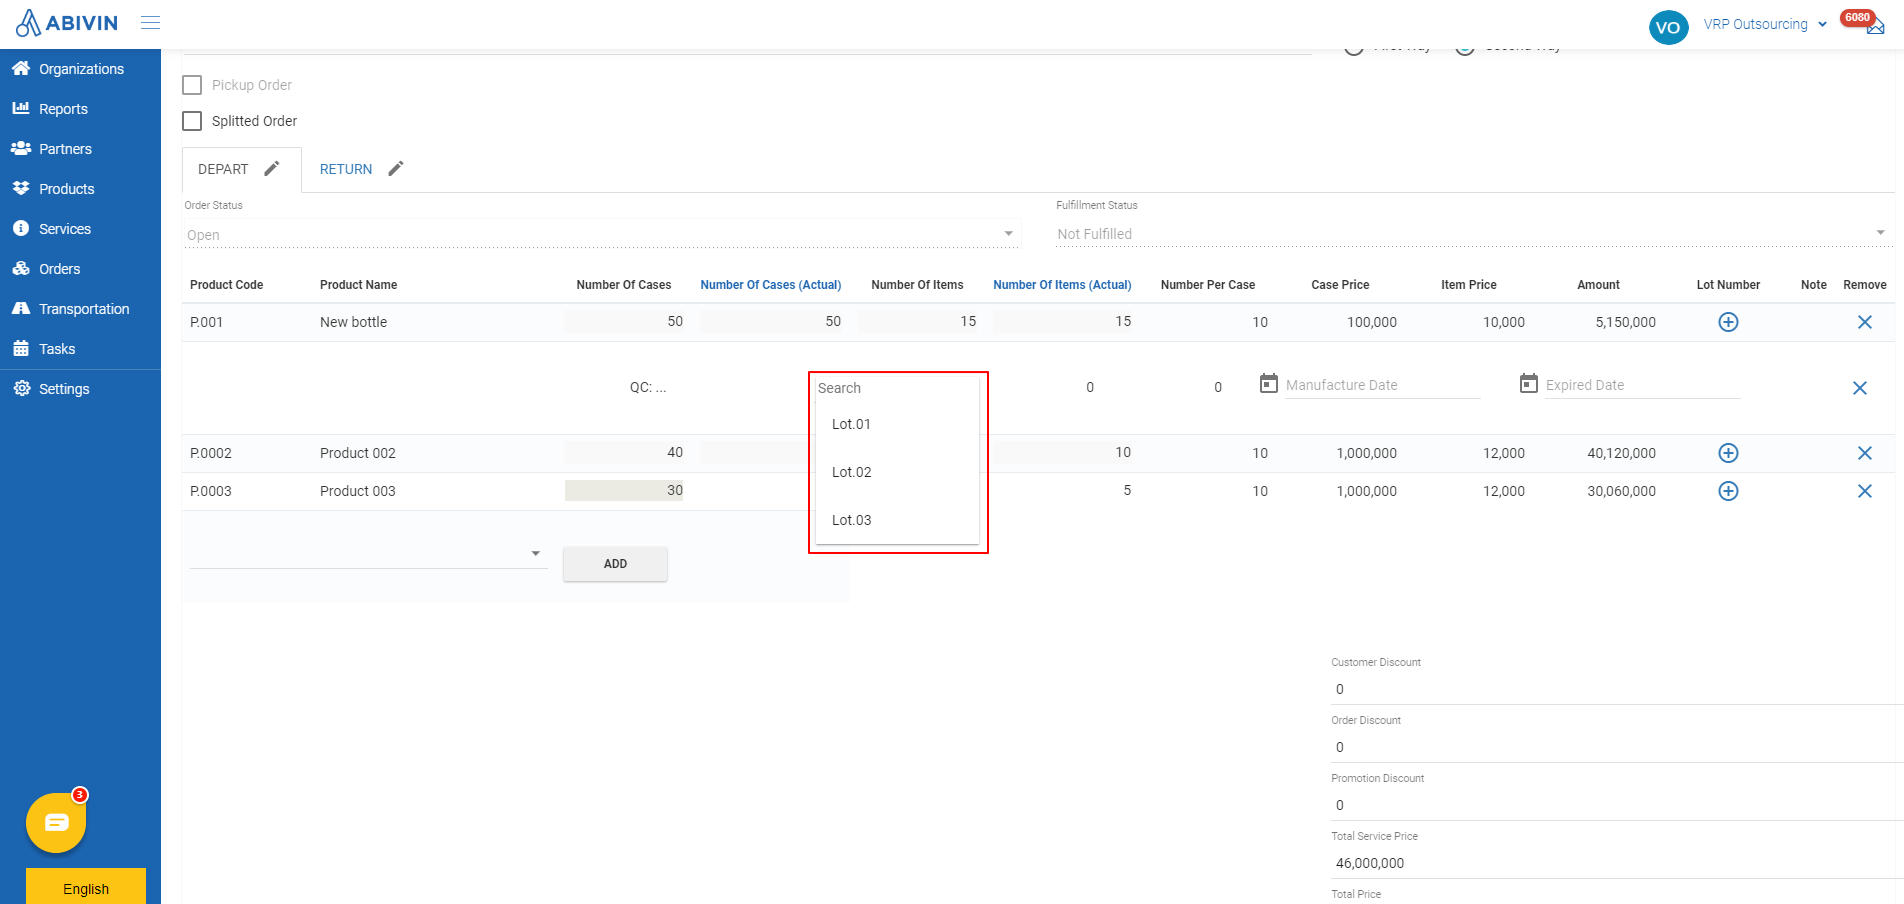
- Next, input the specific number of cases and/or number of single items of the product lot into the Number Of Cases and Number Of Items fields. These fields are placed next to Lot Number field

- Input the corresponding manufacturer date and expiry date of the product lot by clicking on Manufacturer Date and Expired Date fields, then select the correct date/time on the pop out calendars
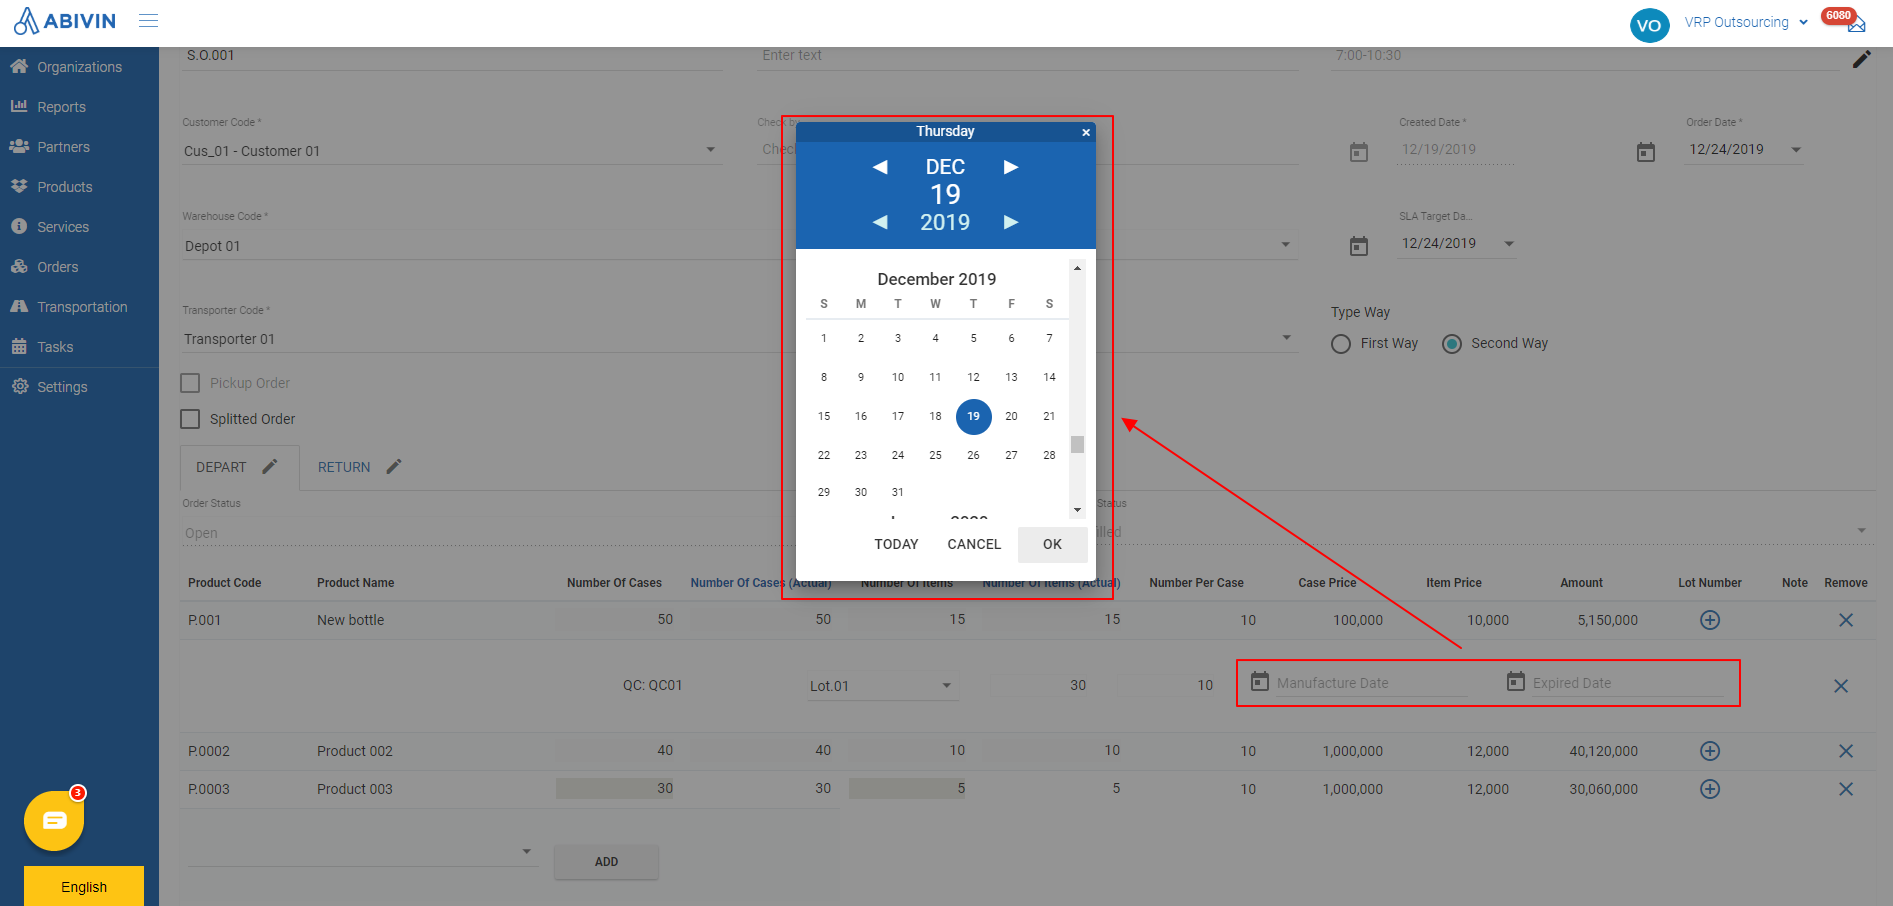
- Repeat the steps above for other product lots (If available)
- Below is an animated illustration of the whole process
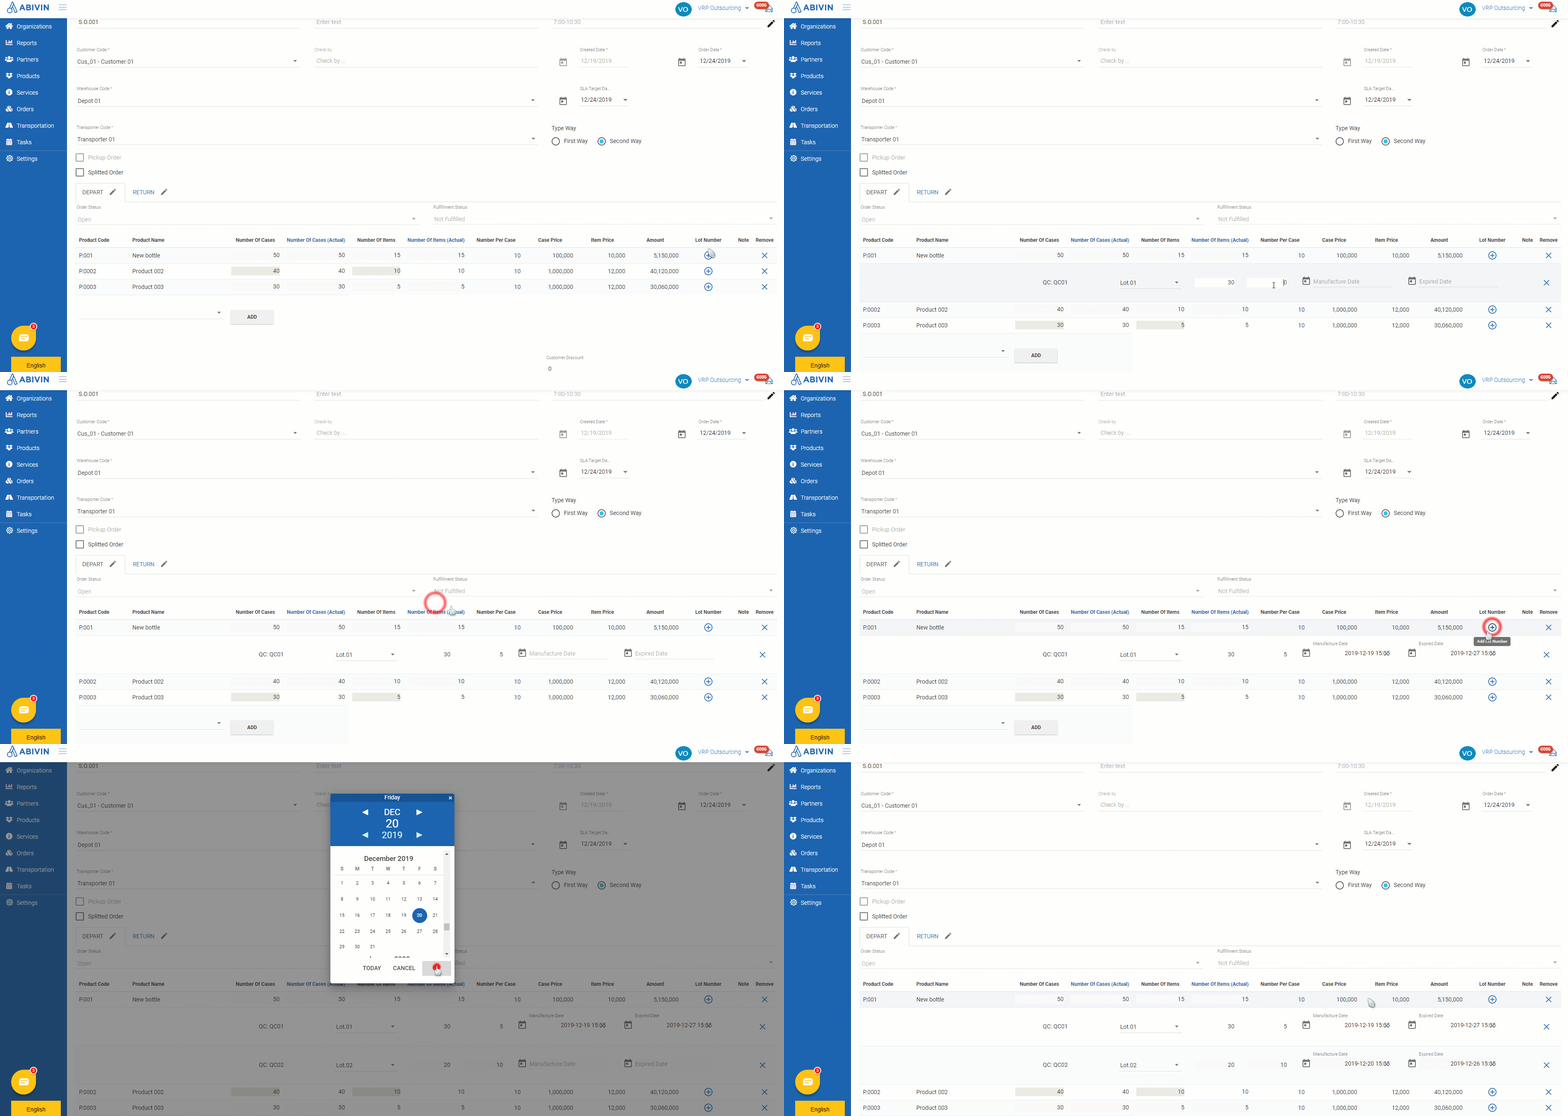
- If you accidentally added the wrong product/product lot, click on the Remove icon of that product/product lot to remove it from the order
- Note: When creating orders that have returned way, products that have the prefix #_ in their product codes will not be synchronized with the external resource planning system
1.5. Transporter Code
- The system will automatically filter out the appropriate transporter(s) after you have selected the product above
- If there are multiple transporters that can deliver the selected product from the selected warehouse to the selected customer, click on this field and select the appropriate transporter from the drop down menu
1.6. Type Way & Pickup Order
- If the order being created only has the new product cases/items that will be picked up from the manufacturer warehouse and delivered to the customer, click on First Way radio box
- If the order being created only has the empty product cases/items that will be picked up from the customer and delivered back to the manufacturer warehouse, click on First Way radio box and Pickup Order check box
- If the order being created has both new product cases/items picked up from the manufacturer warehouse and delivered to the customer (Depart Way), as well as empty product cases/items that will be picked up from the customer and delivered back to the manufacturer warehouse (Returned Way), click on Second Way radio box
1.7. Single Way Code
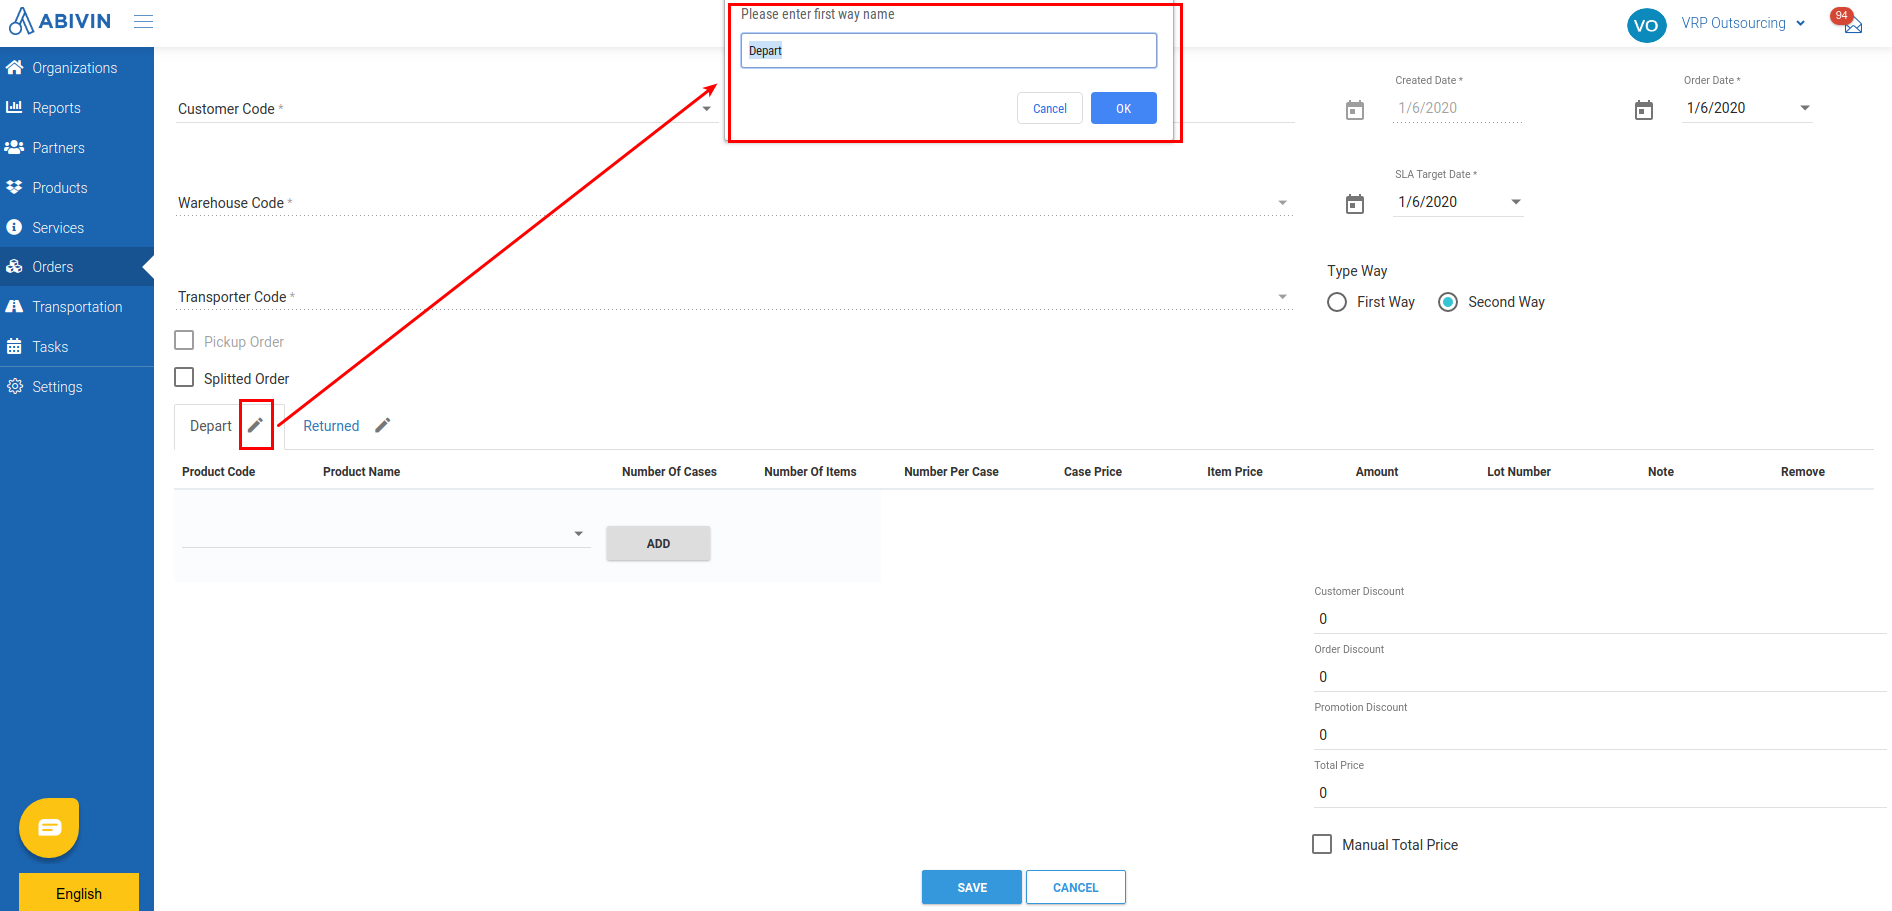
- Click on the icon on the title of each single way code
- A pop up will appear on top. Input the appropriate code into the field, then click OK
1.8. Created Date; Order Date; SLA Target Date
- The Created Date field automatically takes the current date as displayed on your computer
- For Order Date and SLA Target Date, click on the corresponding calendar icons and select the appropriate dates from the drop down calendars
1.9. Total Service Price; Total Price
- The system will automatically calculate the total service price and total price of the order being created
- If you want to manually input the total service price/total price, click on Manual Total Price and/or Manual Total Service Price check boxes, then input the desired values into these fields
1.10. Time Window
- Input the Time window exactly in this format: hh:mm-hh:mm
- This field is optional. If there is no information, just leave this field blank
1.11. Invoice Code; Check By
- These information fields are optional. If you don't have information, just leave these fields blank
- After inputting all necessary information, click on Create to finish creating the sales order
1.12. Invoice Date
1.12.1 Depart way
- For the Depart way of the order, the value of this field automatically takes the same value as the Order Date field. The headquarter administrator as well as the warehouse manager can change the value of this field before the status of Depart way is updated to Pick & Packed
1.12.2 Returned way
- For the Returned way of the order, the value of this field is empty on default when the order is being created. The headquarter administrator as well as the warehouse manager can change the value of this field before the status of Returned way is updated to Shipped
- As the status of Returned way is updated to Shipped, Abivin vRoute will push this information field to the External resource planning system. Here there are two scenarios:
- If this information field was filled on Abivin vRoute, the data will take the value filled
- If this information field was not filled on Abivin vRoute, the data will take the date when the Returned status was updated to Shipped
Create multiple orders using Excel template
- Please refer to the CRUD functions article to know the general steps about creating multiple objects using Excel template
- Below is the instruction to input in the information fields of the Excel template
2.1. Order Code
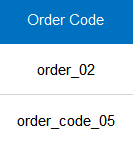
- The Order code must not contain spaces
2.2. Order Date
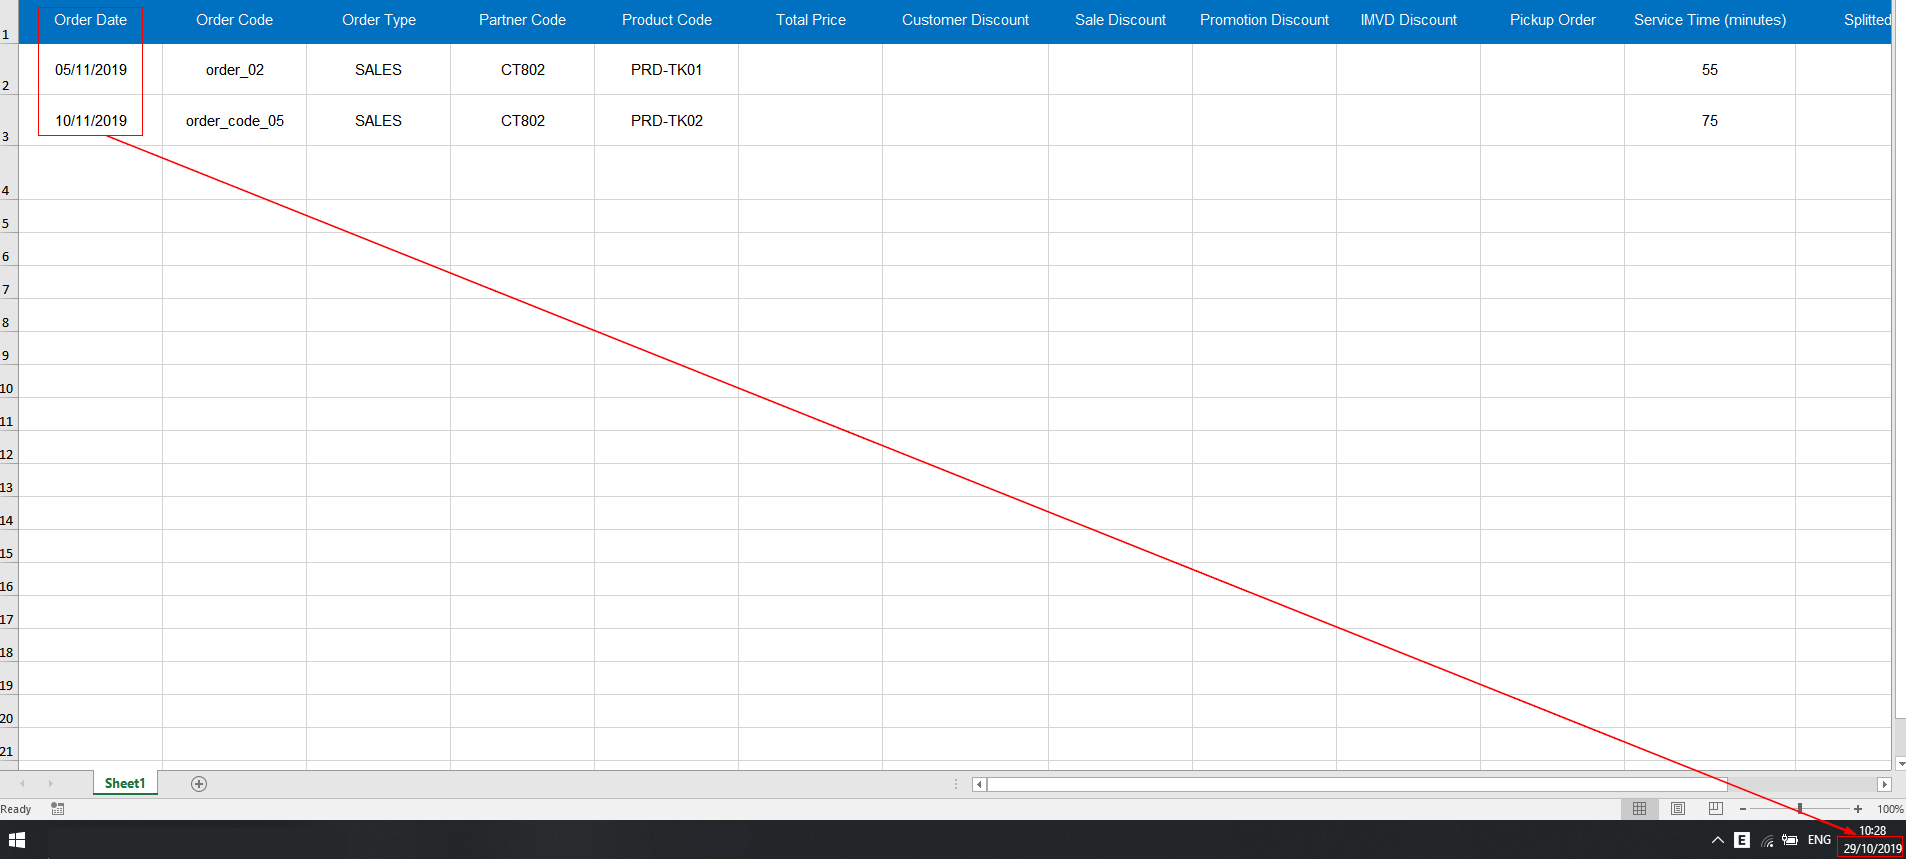
- Input in either dd/mm/yyyy or mm/dd/yyyy format, based on the current Date format of your computer
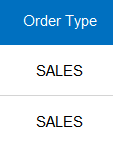
2.3. Order Type
- Always input this value: SALES
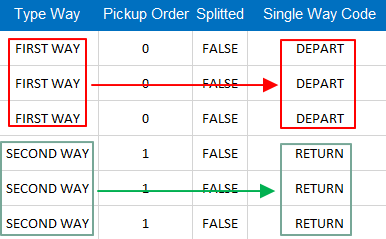
2.4. Type Way & Pickup Order
2.4.1. First Way order type, only Depart way
- If the order being created only has the new product cases/items that will be picked up from the manufacturer warehouse and delivered to the customer, input the following values into these cells correspondingly: FIRST WAY; 0

2.4.2. First Way order type, only Returned way
- If the order being created only has the empty product cases/items that will be picked up from the customer and delivered back to the manufacturer warehouse, input the following values into these cells correspondingly: FIRST WAY; 1

2.4.3. Second Way order type
- If the order being created has both new product cases/items that will be picked up from the manufacturer warehouse and delivered to the customer (Depart Way), as well as empty product cases/items that will be picked up from the customer and delivered back to the manufacturer warehouse (Returned Way), input as follow:
- Depart way: FIRST WAY; 0

- Returned way: SECOND WAY; 1

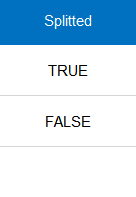
2.5. Splitted Order
- If the order being created is a split order, input the following value into this cell: TRUE
- If the order being created is not a split order, input the following value into this cell: FALSE
2.6. Single Way Code
- Copy the Single Way code from the external order management system then paste into the corresponding way cell of the order
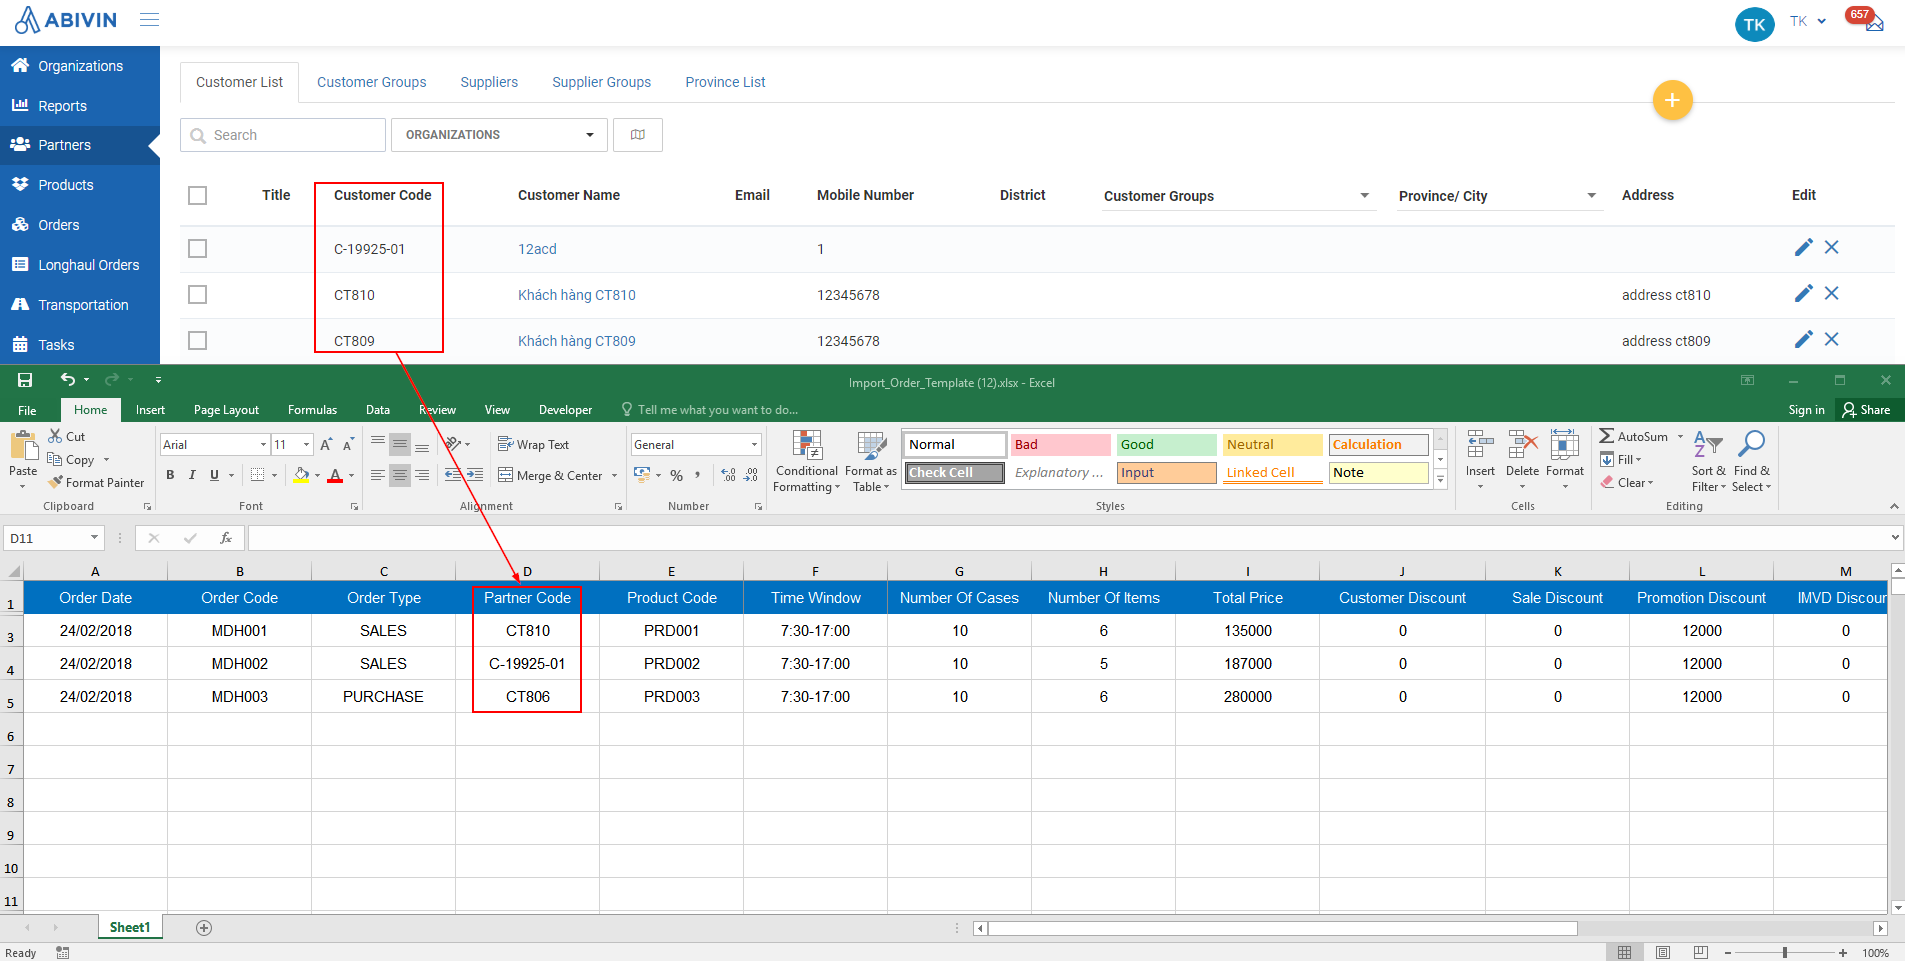
2.7. Partner Code
- Copy the appropriate Customer code on Web app then paste into this cell
- The Customer code can be found under Customer Code column in Partners > Customer List tab
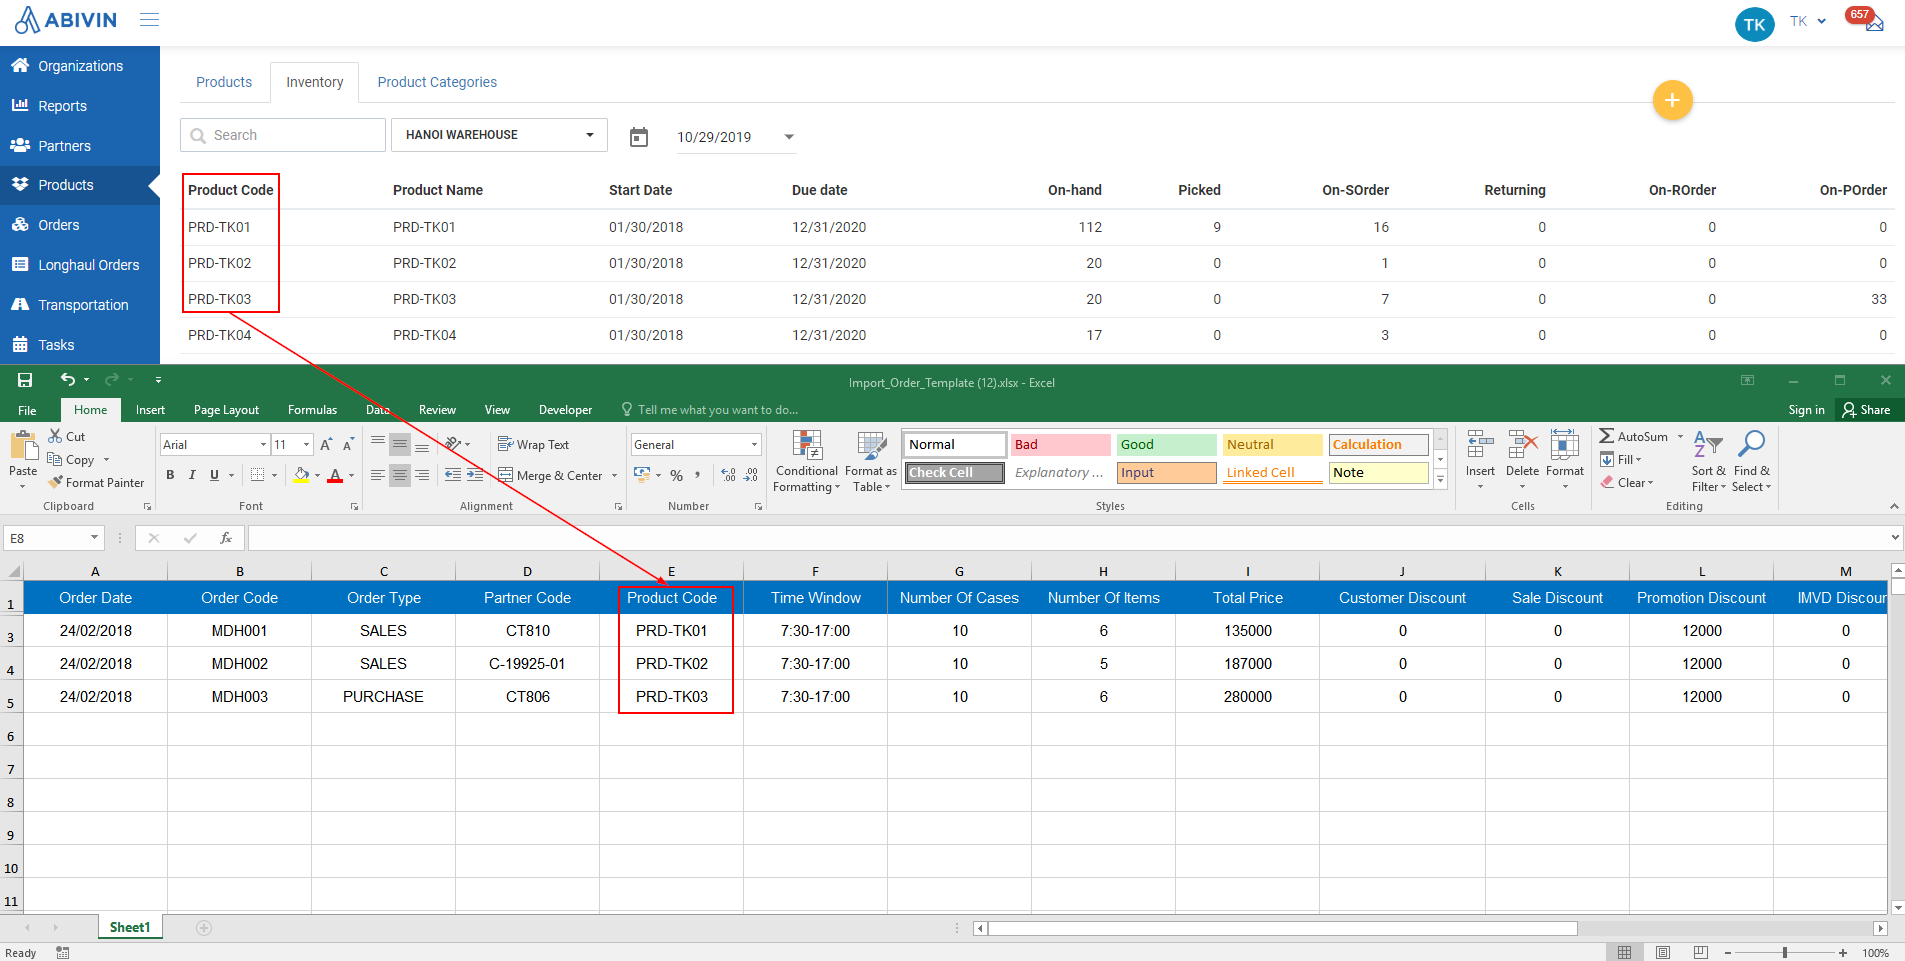
2.8. Product Code
- Copy the Product Code of the product on Web app, then paste into this cell
- The Product Code can be found under Product Code column in Products > Inventory tab
- If there are multiple product loaded in one order, each product will be placed on one dedicated row
- Note that since these products are of the same order, the following information fields must have the same values between all of those products:

2.9. Number of Cases; Number of Items
- Input the quantity of cases and single items of the product into the Number of Cases and Number of Items cells
- If there is zero case being loaded, input 0 into the Number of Cases cell. Do not leave that cell blank
- If there is zero single item being loaded, input 0 into the Number of Items cell. Do not leave that cell blank
- If there are multiple products, input the quantity of cases/single items of each product into its respective row

If the product being loaded are taken from different product lots, you have to specify the specify the quantity of cases/items for each product lot on Web app after uploading the Excel template
2.10. Time Window
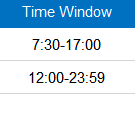
- If there is a time window, always input in the following format: hh:mm-hh:mm (24 hour format)
- The time point must not exceed 23:59
- If there is no time window, leave the cell blank
2.11. Total Price
- If you want the system to automatically calculate the order price, leave this cell blank
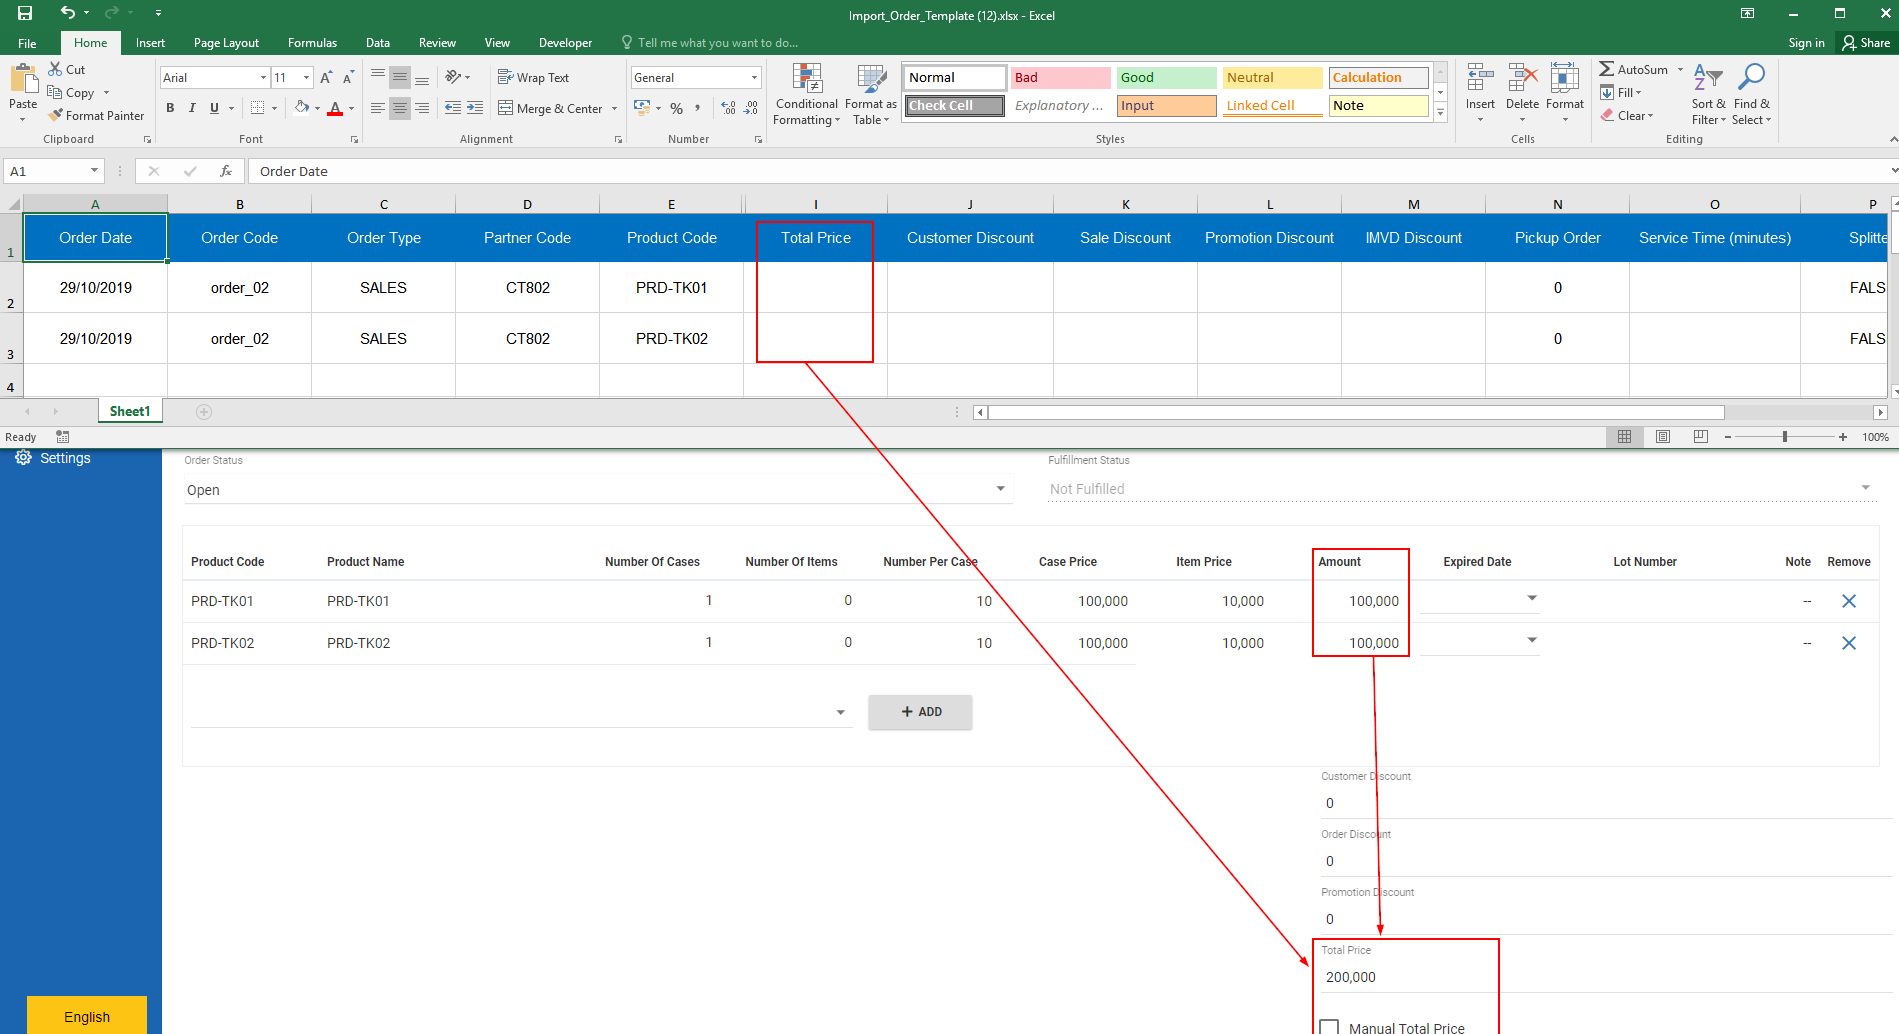
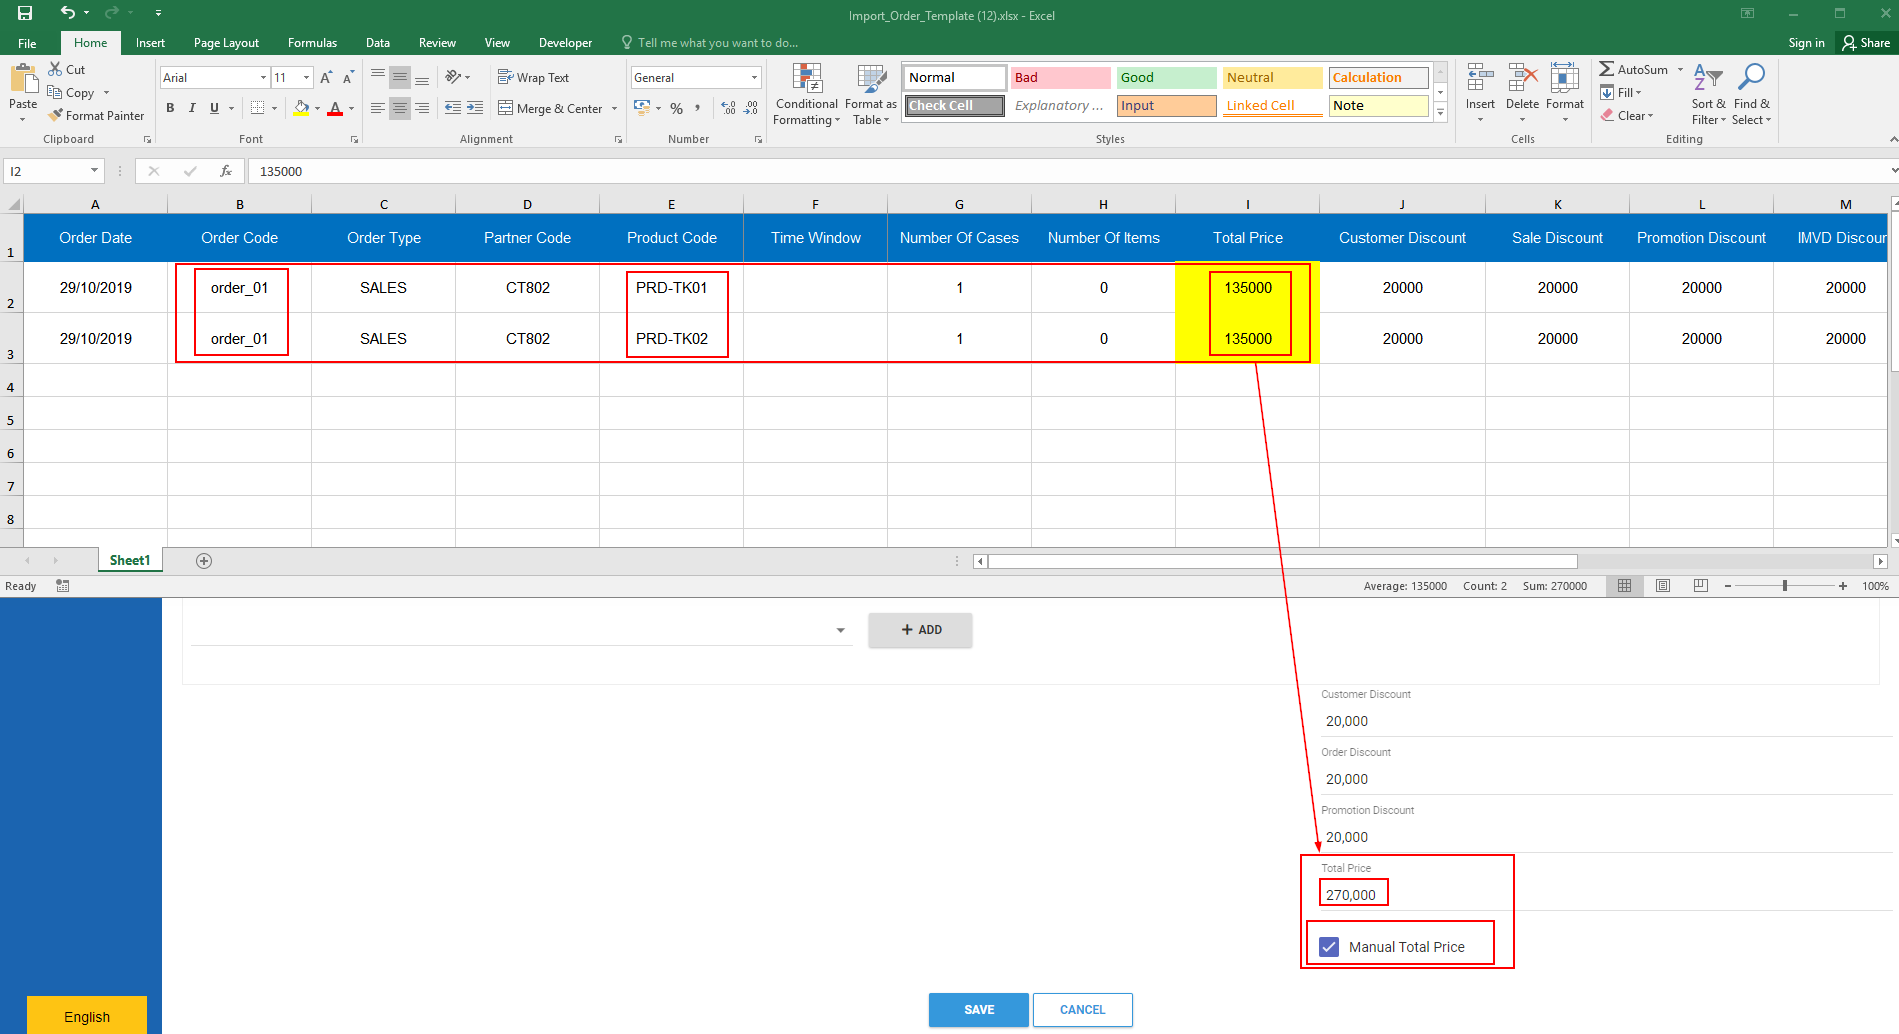
- If you don't want the system to automatically calculate the price, input your own price into the cell. If the order contains multiple products, input the price of each product into its respective cell. The values will be accummulated after uploading the Excel template onto Web app
2.12. Customer Discount; Sale Discount; Promotion Discount; IMVD Discount
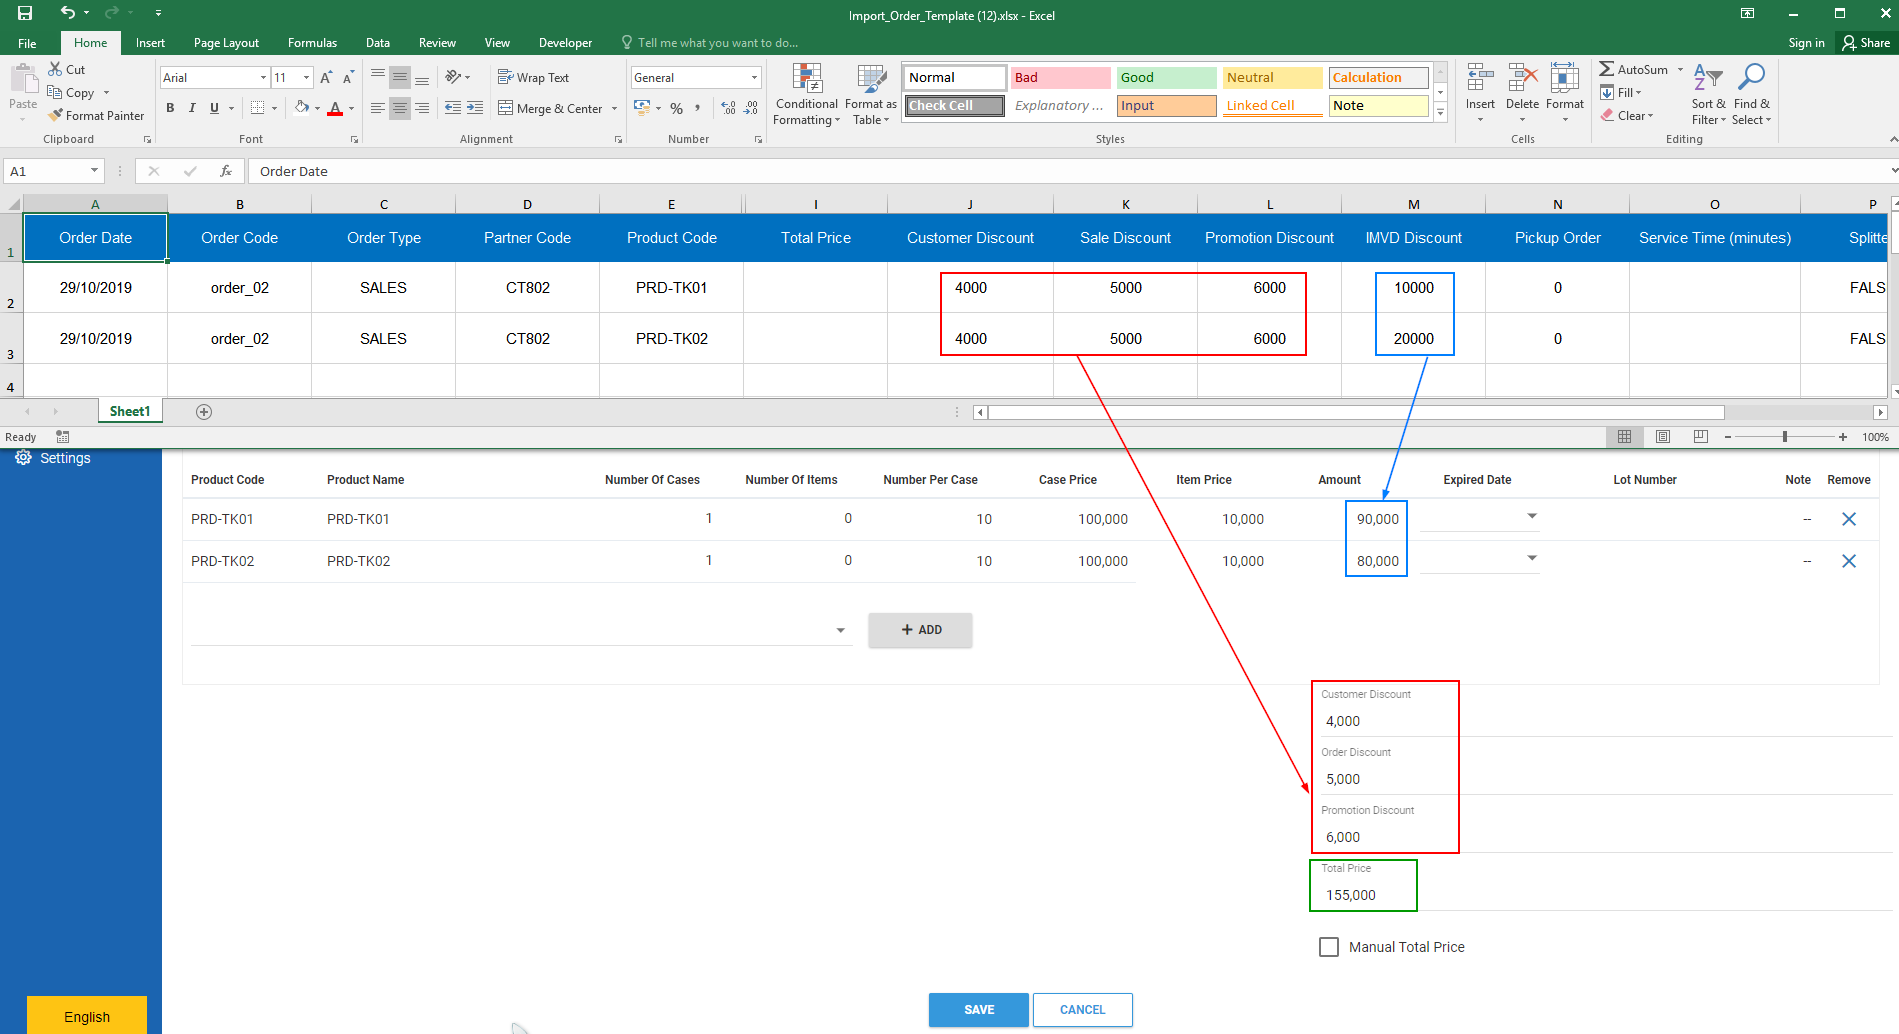
- Note: These discounts will only take effect if you let the system automatically calculate the total price of the order
- The IMVD discount will be subtracted directly from the price of each product (See blue rectangles)
- The Customer Discount; Sale Discount; Promotion Discount must be input the same for every products of an order (See red rectangles)
- The total price will be calculated in this formula: Sum of product prices (After subtracting the IMVD discounts) - (Sum of Customer Discount; Sale Discount & Promotion Discount) = Total Order Price (See green rectangle)
2.13. Service Time (minutes)
- Input only the value in numbers. Do not input the unit
- For example: You want to set the unloading time at the customer warehouse to be fifteen minutes. Input the following value into this cell: 15
2.14. SLA Target Date
- Input in either dd/mm/yyyy or mm/dd/yyyy format, based on the current Date format of your computer
2.15. Item Index
- Input the item index from the external order management system into this cell
Notes when creating Sales orders
- An order can still be created even if it contains a product that has no on-hand inventory stock on Abivin vRoute
Tasks of the Corporation Administrator
Fetch orders from the External resource planning system
- To fetch orders from the External resource planning system, follow the steps below:
- Hover your mouse over the icon , then click on the Fetch all data from SAP icon
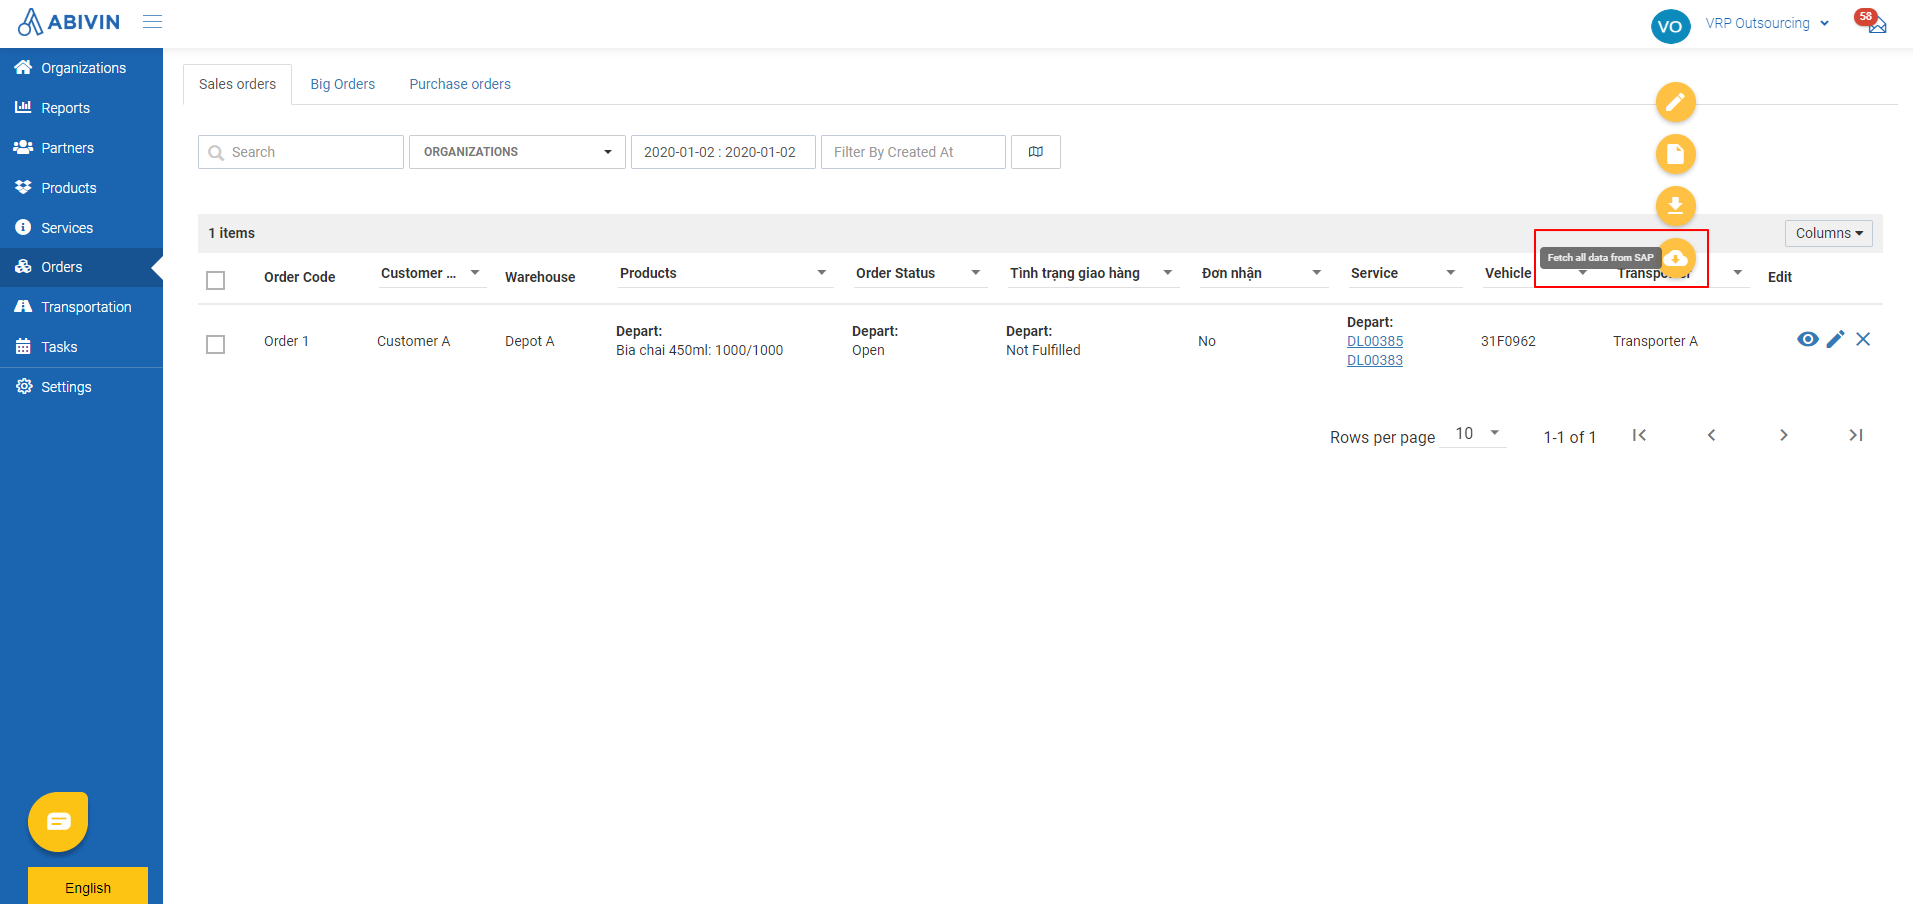
- The form Fetch order from SAP will appear. Click on the field below the text Delivery Date, select the appropriate date range from the drop down calendars, then click on the button Fetch
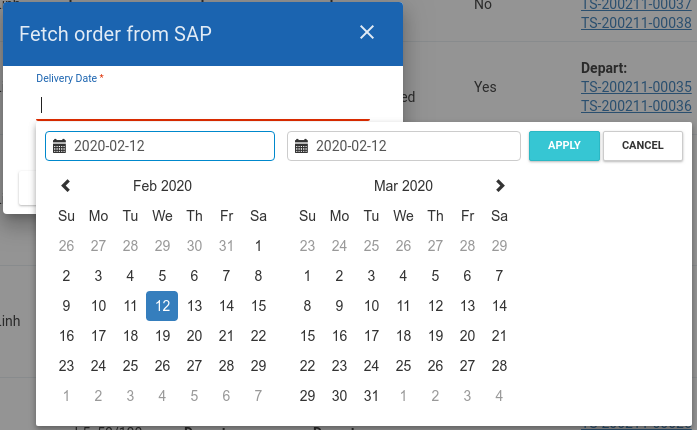
- The system will start fetching all orders that have the delivery date on the selected date above from the External resource planning system
Specify information for the order
- All orders fetched from the External resource planning system only have information about the customer and products. They do not have the following information:
- Name of the manufacturing Depot, from where new product cases/items will be issued and delivered to the customers and/or to where empty product cases/items will be imported from the customers
- The Transporter that will perform those orders
- The actual quantity of new product cases/single items to be issued by the manufacturing Depot (If the order has Depart Way), and/or the actual quantity of empty product cases/single items to be received from the Customer (If the order has Returned Way)
- You will have to specify those information for each order by following the steps below
- Navigate to Orders > Sales Orders tab
- Click on Edit icon of the order you want to specify information
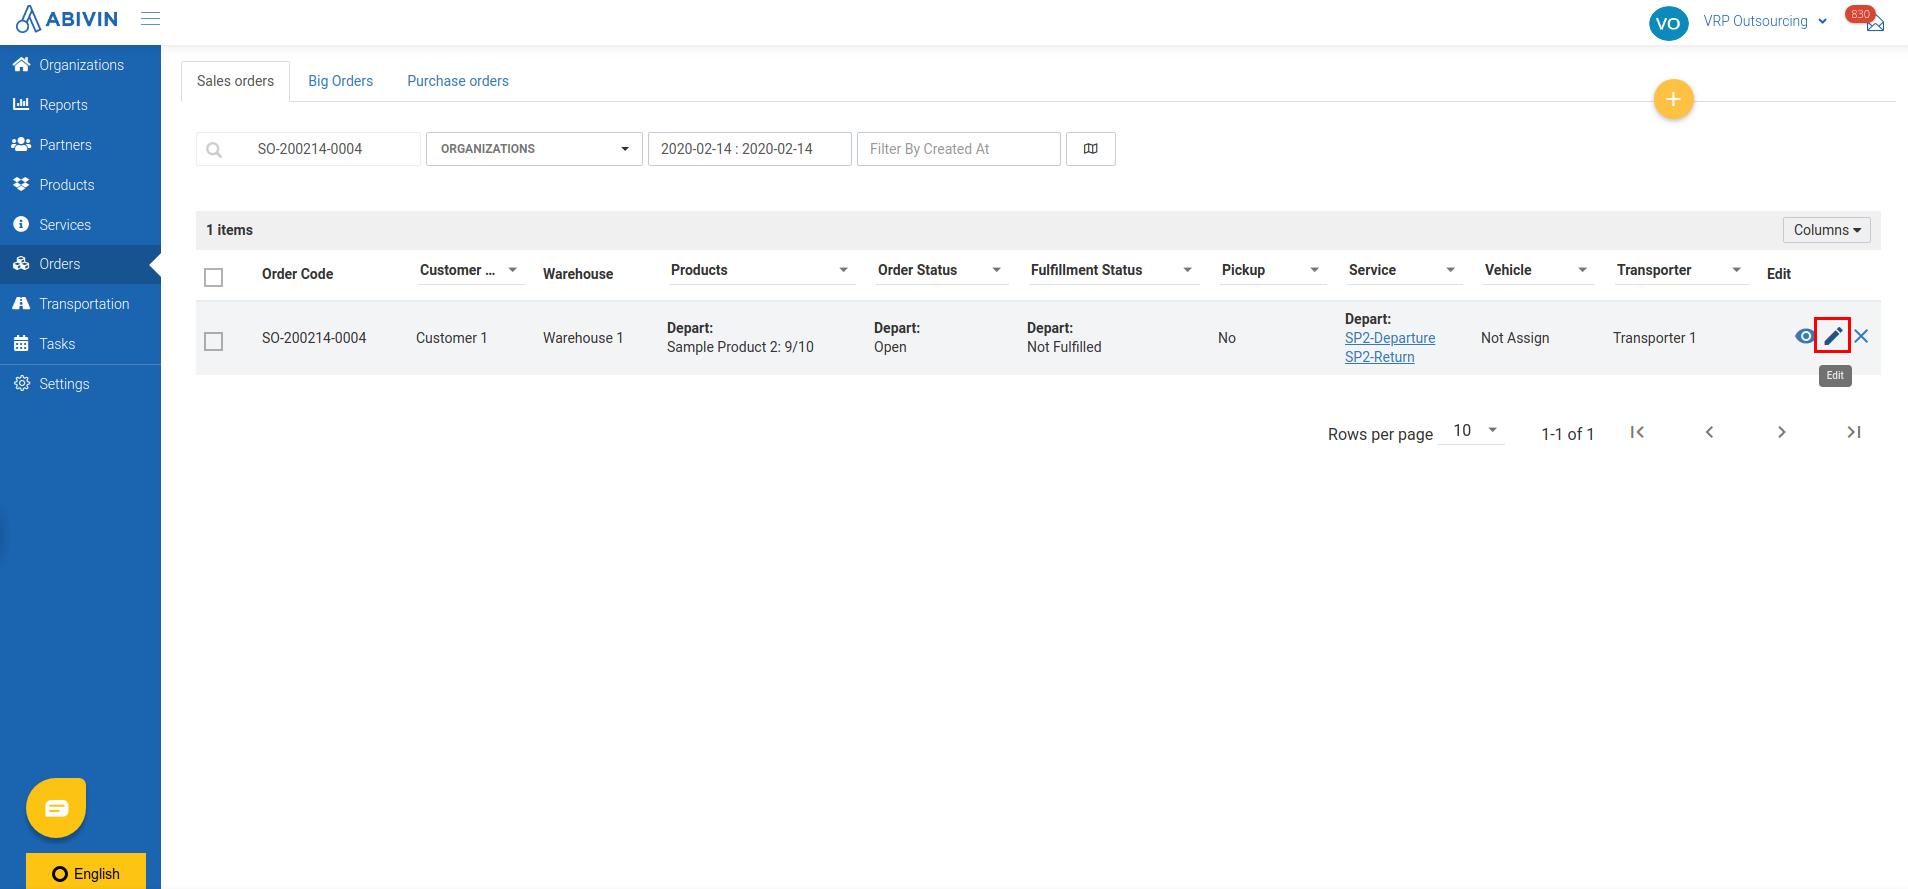
- On the Order Information screen, input necessary information, then click Save to confirm the change
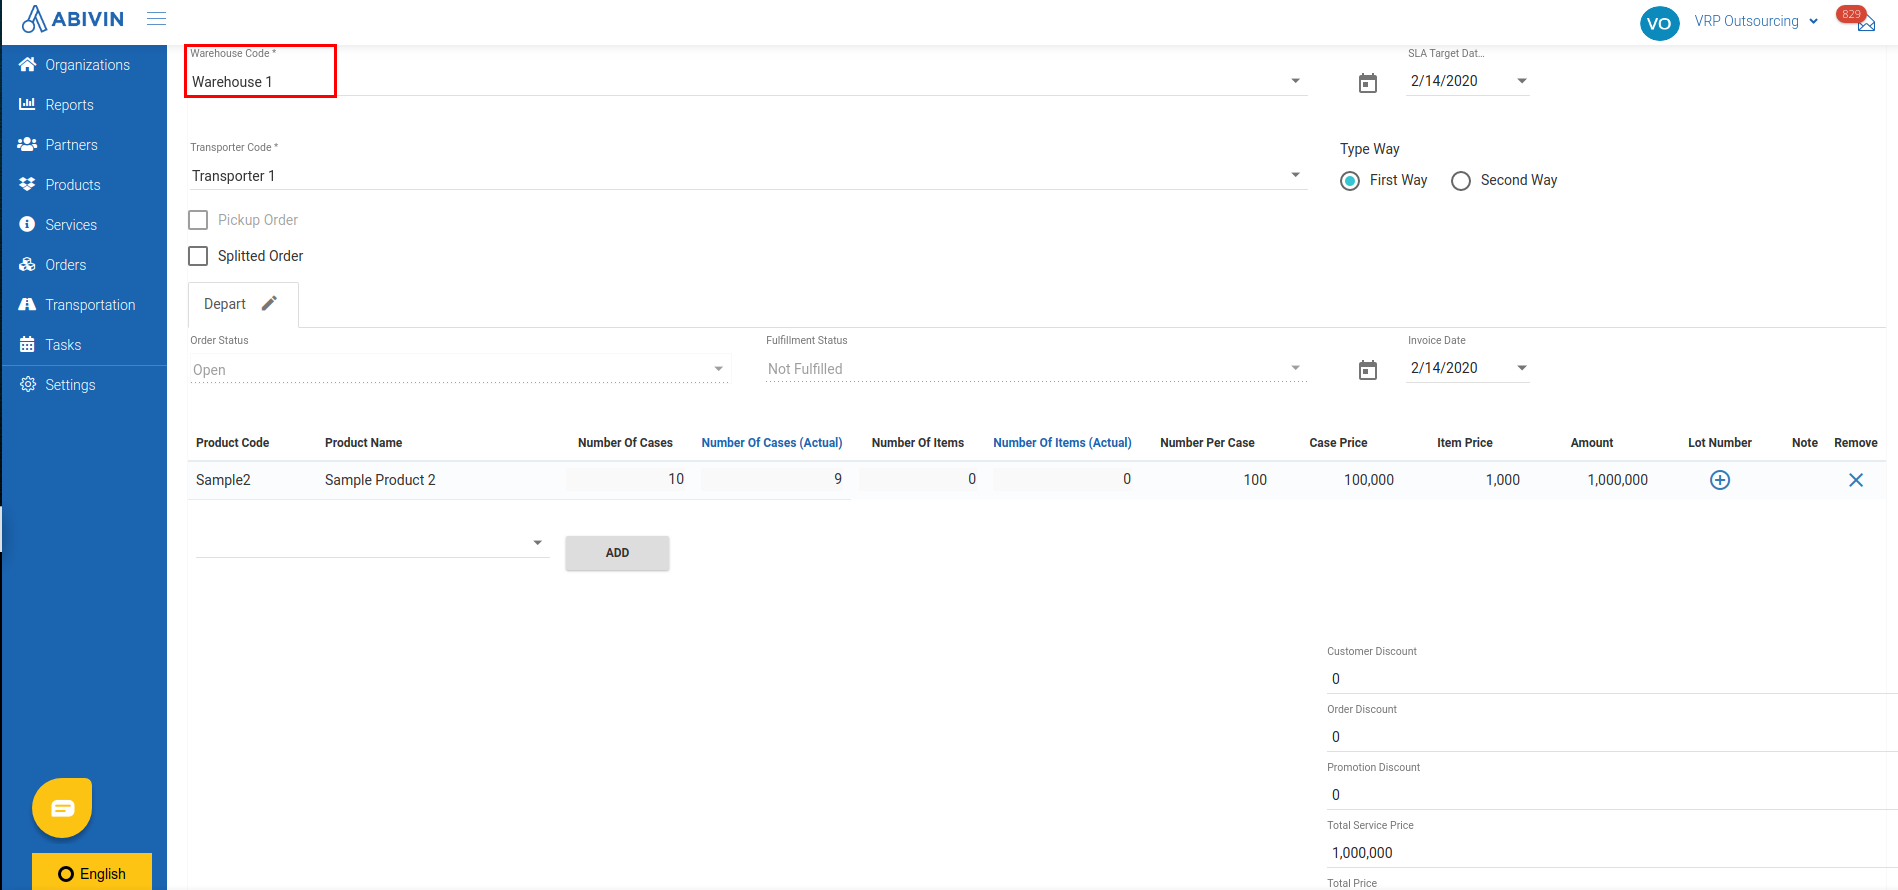
Select the manufacturing Depot
- Click on Warehouse Code field. On the search bar, input the Organization Name/Organization Code of the Depot which you want to assign this order to, then select from the drop down menu
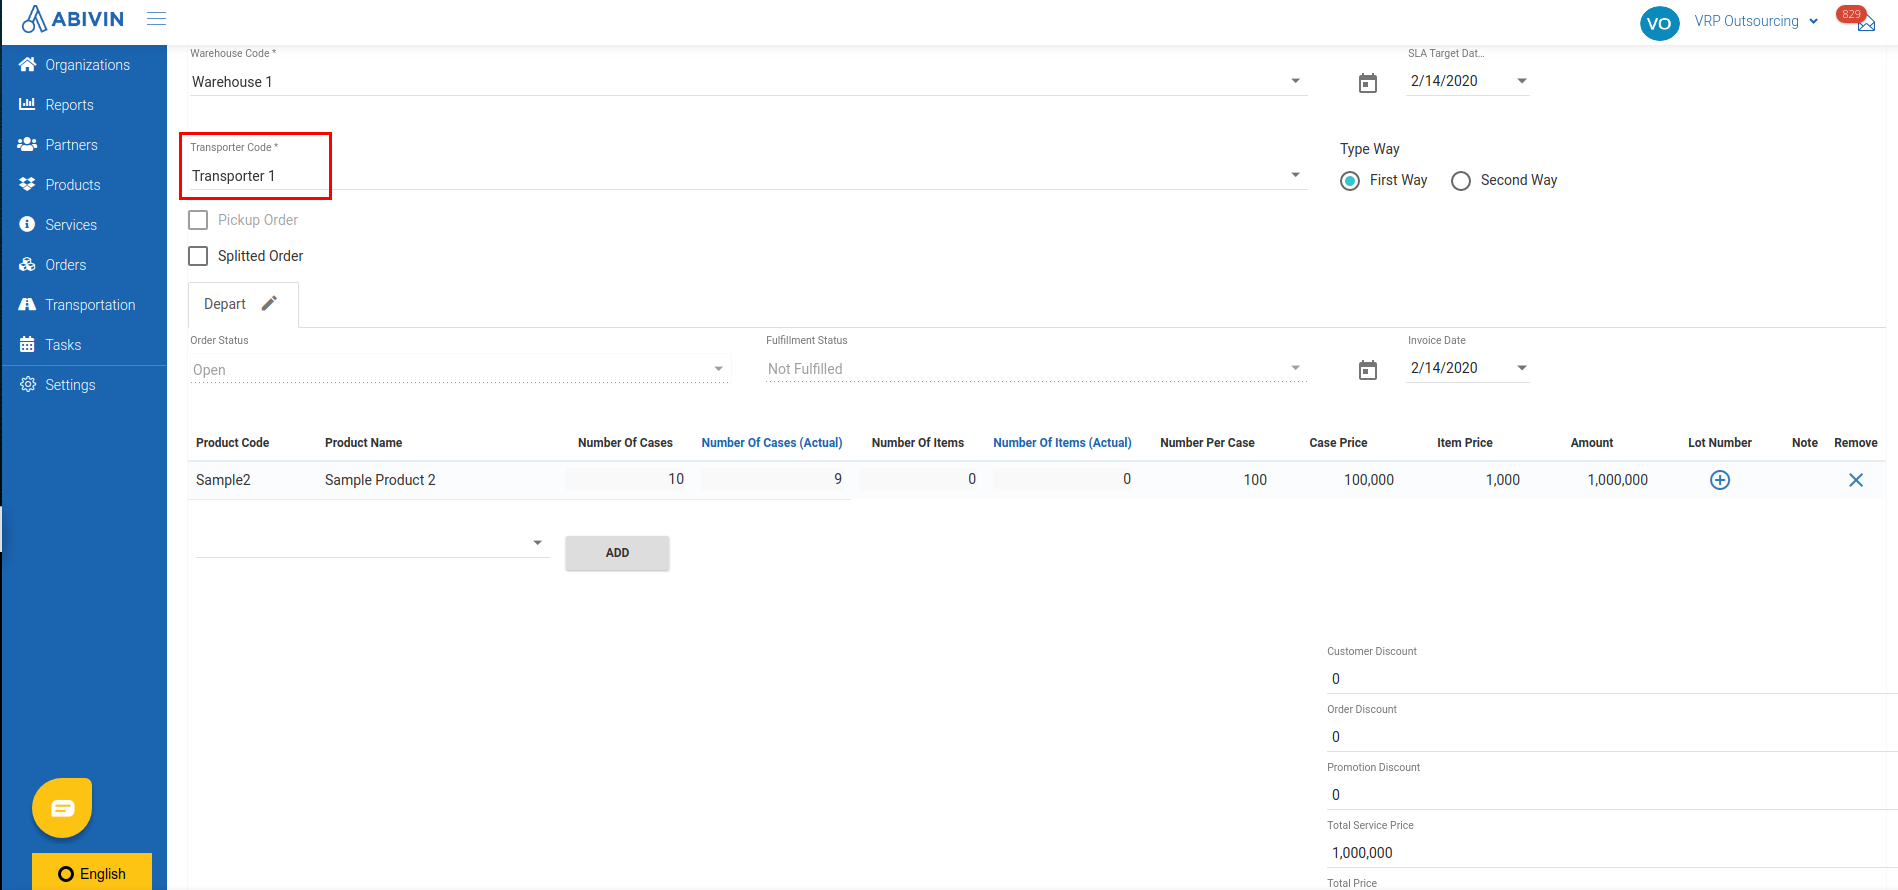
Select the Transporter
- The value of the Transporter Code field will automatically be updated. If there are multiple transporters that provide Transport services between the selected Depot and the Customer, you can select another Transporter by clicking on that field, then select the appropriate Transporter from the drop down menu
Specify the actual quantity of product cases/single items issued
- Next, you need to specify the actual quantity of new product cases/single items to be issued by the manufacturing Depot, by inputting the corresponding values into Number Of Cases (Actual) and Number Of Items (Actual) fields of Depart Way
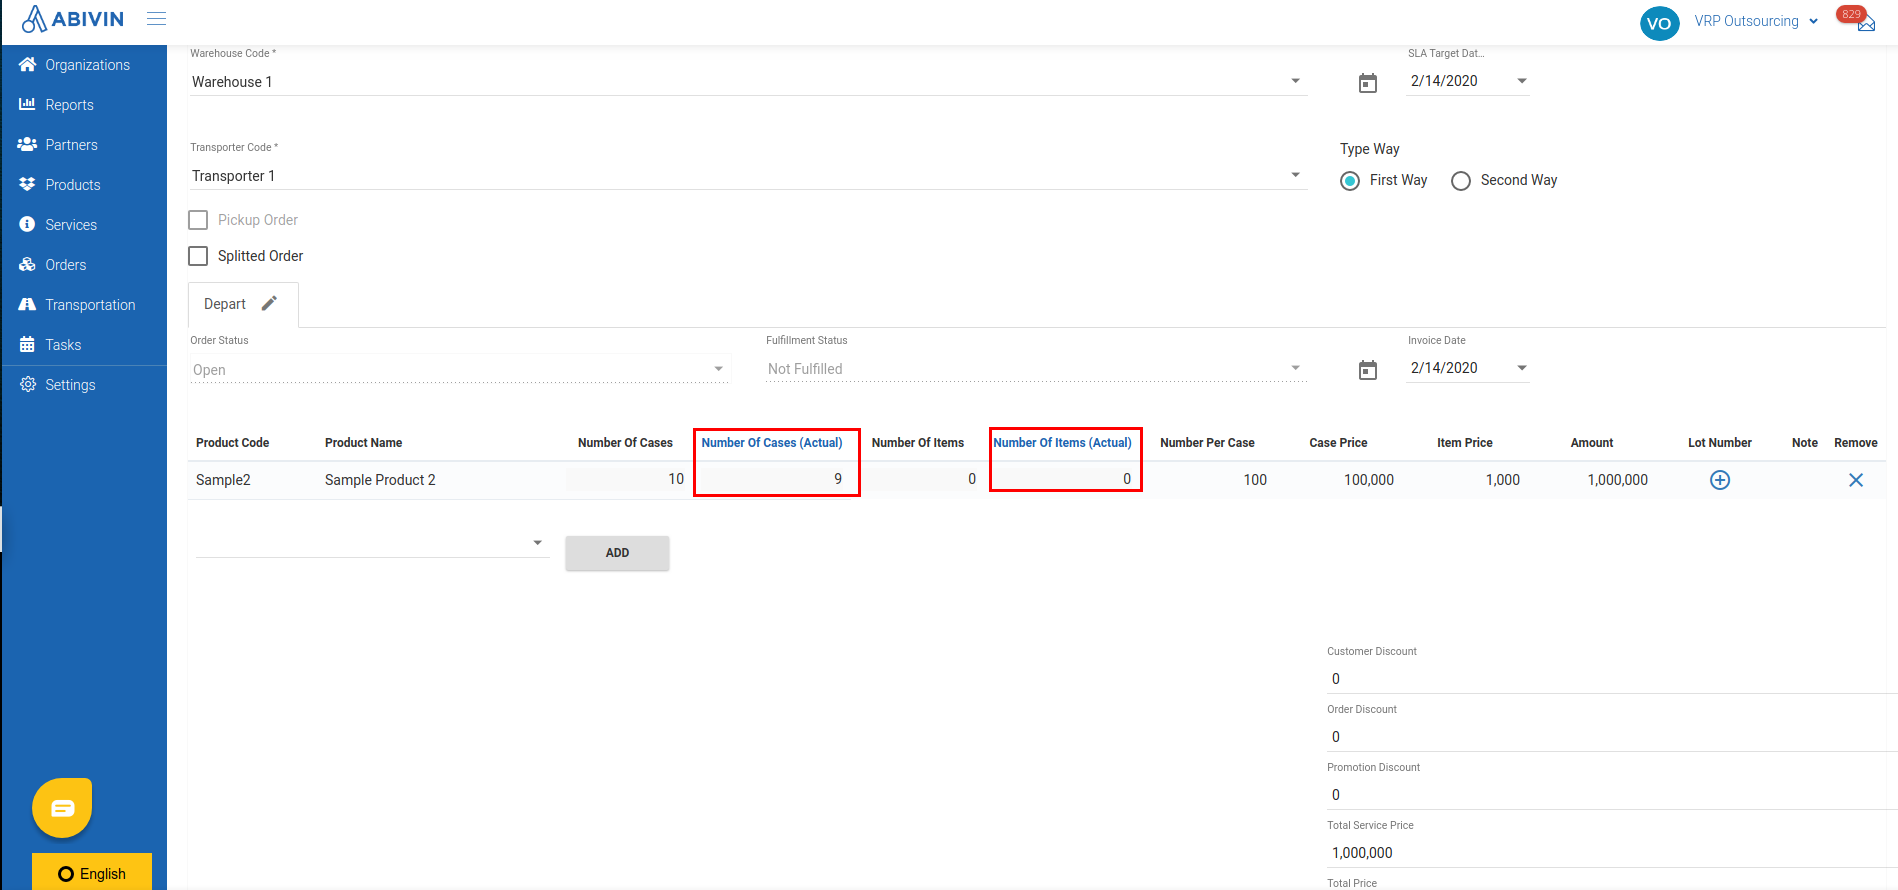
- Note that the values input must not be greater than the values in Number Of Cases and Number Of Items fields, otherwise there will be warnings, as shown below:

(Optional) Specify product lot
- There are scenarios when the new product cases/items or empty product cases/items belong to different product lots in the manufacturing Depot
- You can specify the product lot and the quantity of whole cases/single items of each product lot by following the steps below
- First, on the Order information screen, identify the products that are tracked by Product lot by looking at the product section. If a product has the icon , that means that product is tracked by product lot. If the icon is not present, that means that product is not tracked by product lot
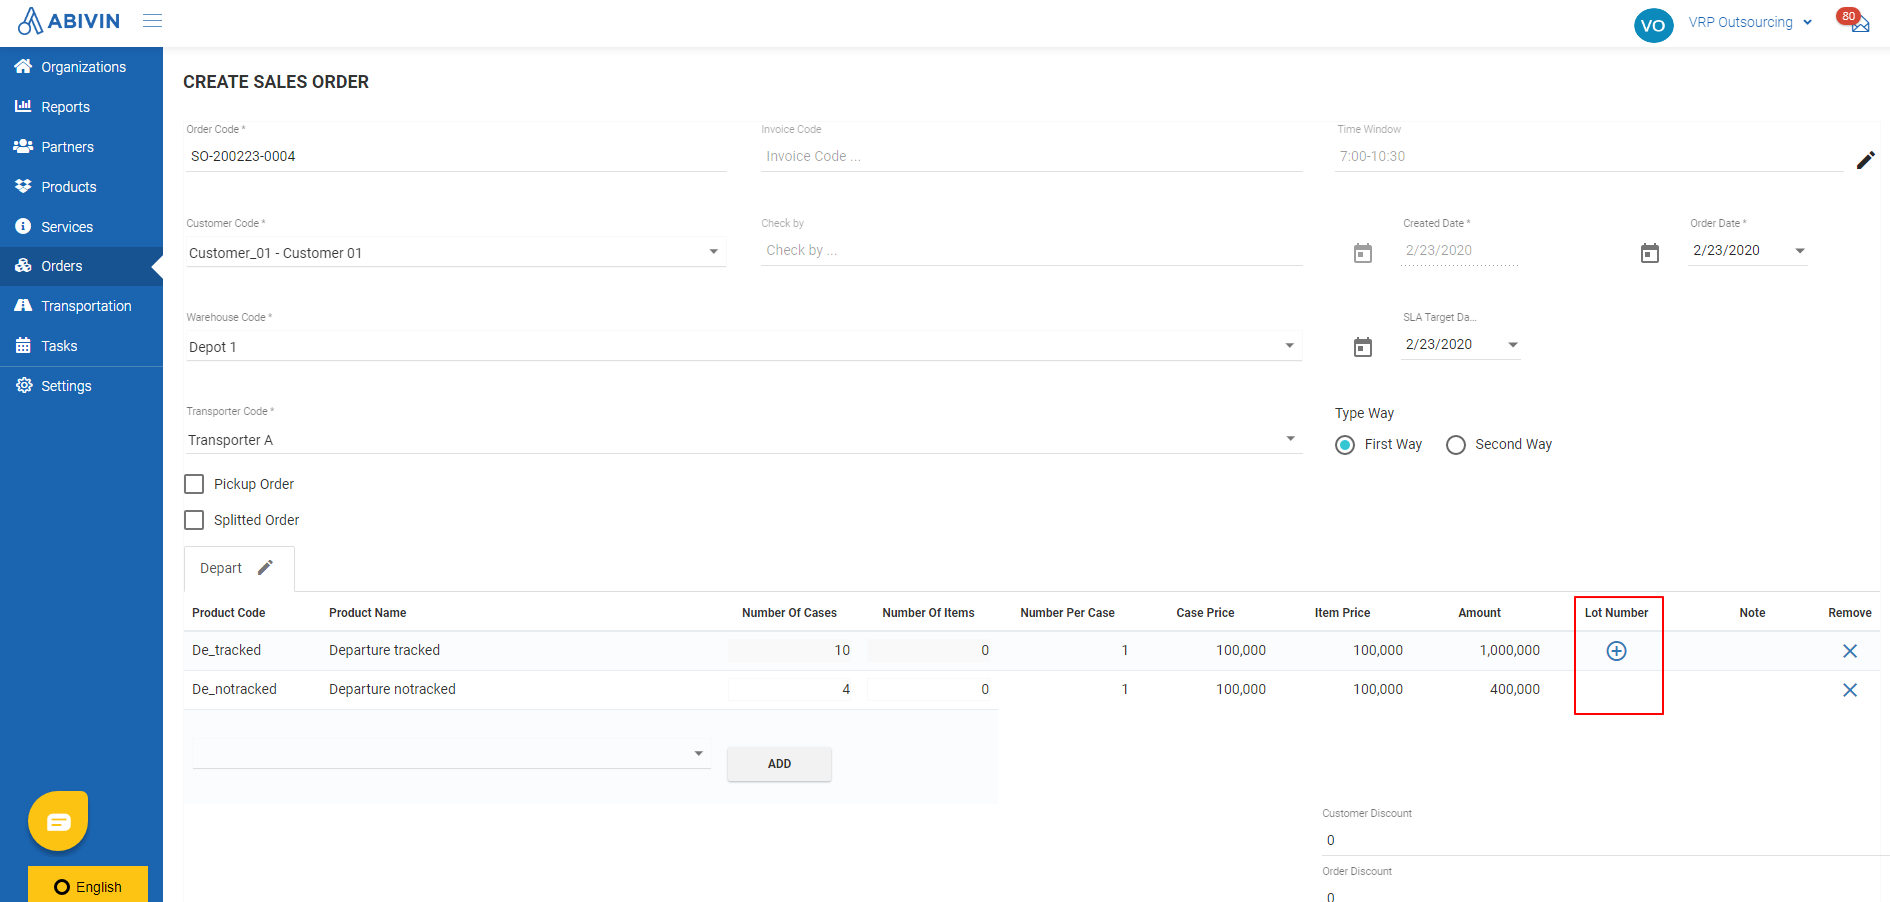
- To specify product lot for a product, click on that icon of the product.
- To specify product lot for a product, click on that icon. An additional row will appear right below that product row. The new row is where you can specify the product lot for that product
- On this row, the first information field on the left (with the prefix QC) is the Quality Checking Number of the product lot. The second field is the product lot code. The third field is the quantity of whole cases to be issued from that product lot. The fourth field is the quantity of single items to be issued from that product lot. The fifth field is the manufacture date of that product lot. The sixth field is the expiry date of that product lot. The seventh field is the note related to that product lot
Push order data to the External resource planning system
- You can push order data manually to the External resource planning system by following the steps below
- Select orders: Click on the icon of the order(s) you want to push. When that icon turns to , that means those orders have been selected
- Next, click on the button Sync up to SAP on the toolbar
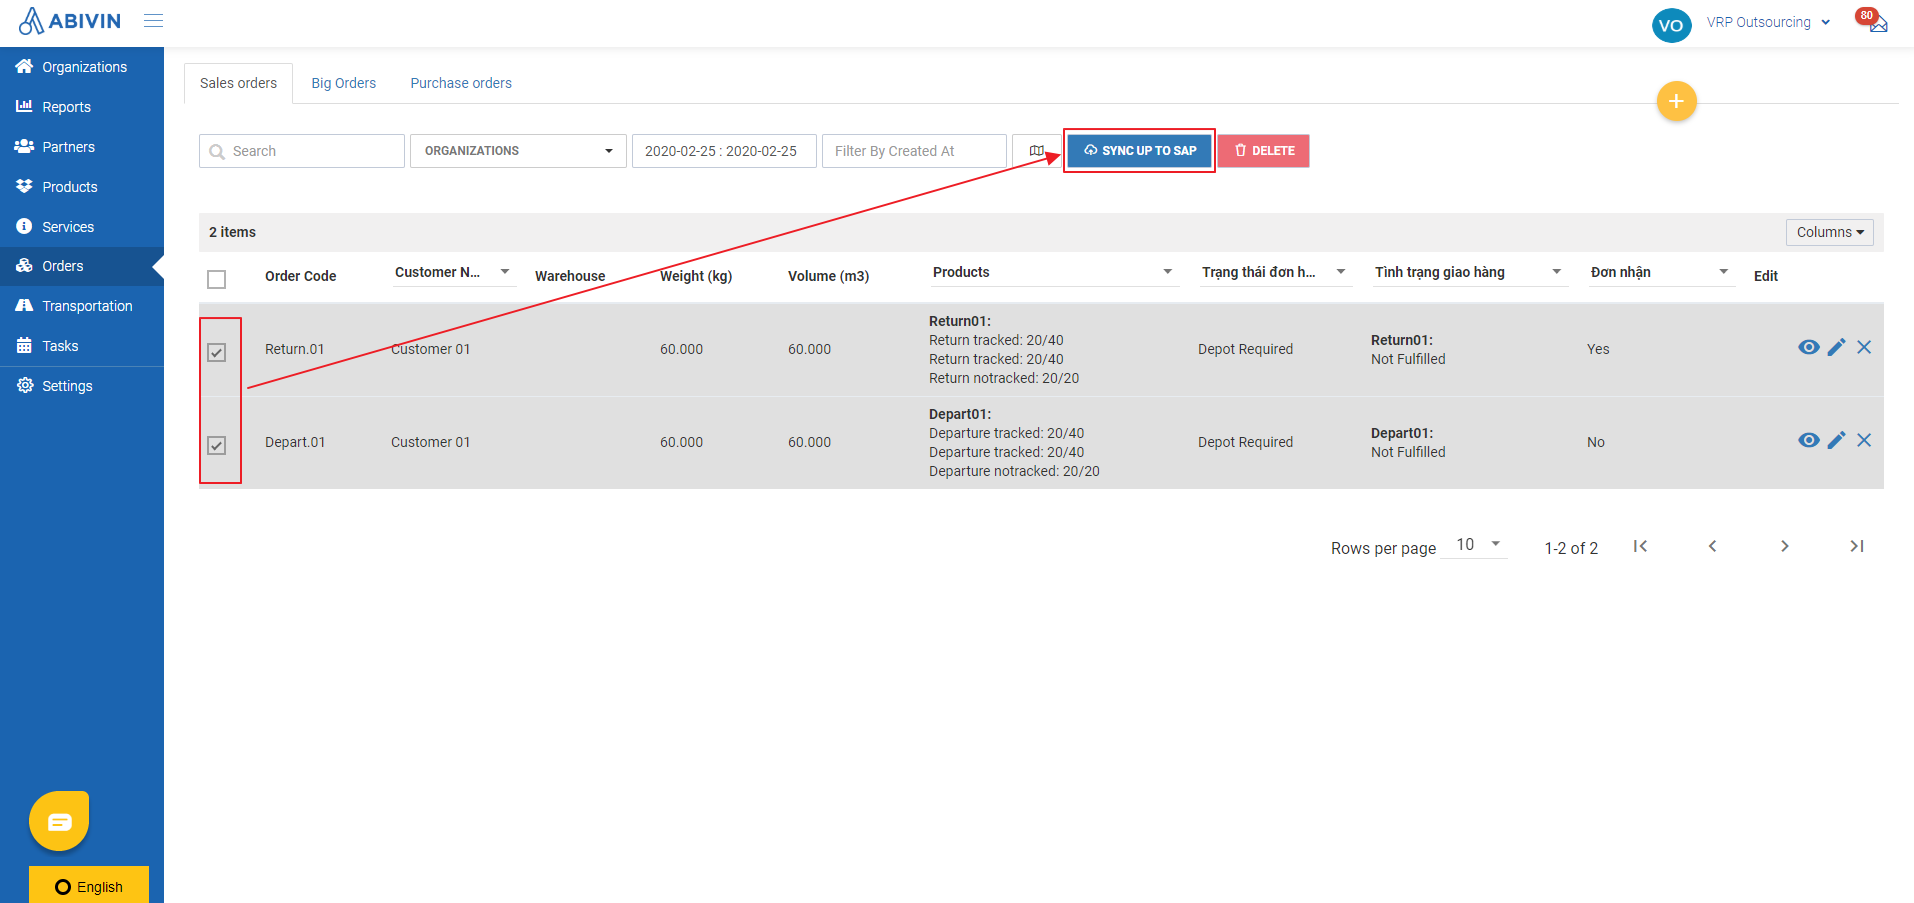
- The form Sync up to SAP will appear. Click on the button Sync up to begin the synchronization process
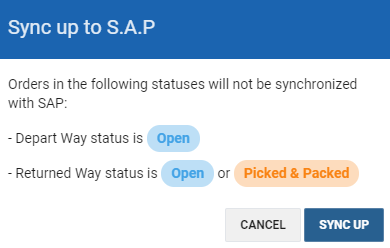
- Note
- As you can see on the form, orders in the following statuses will not be synchronized with the External resource planning system
- Depart Way status is Open
- Returned Way status is Open or Picked & Packed
- Orders of the following status will be synchronized:
- Two Way Orders that have the Depart Way status to be Picked & Packed; Shipped or Cancelled
- Two Way Orders that have the Returned Way status to be Shipped or Cancelled
- Pickup Order status is Shipped or Cancelled
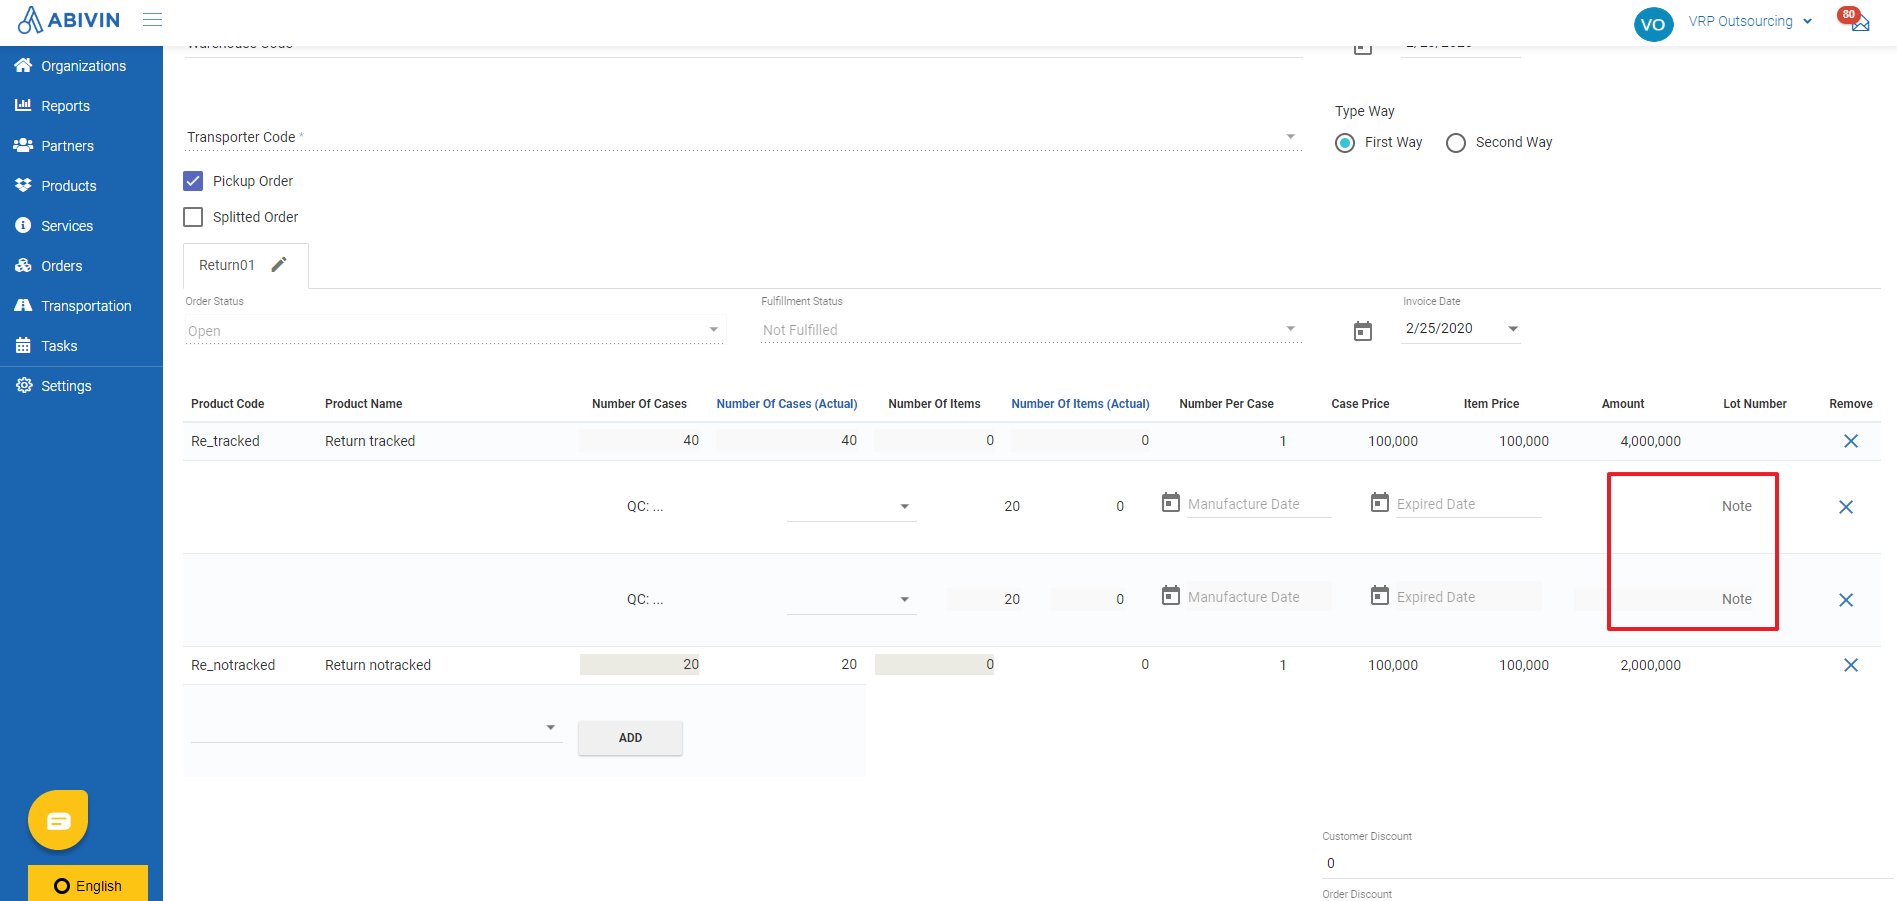
- Before syncing the order data, you could input some note to each product lot by clicking on the Edit icon of the order. On the Order information screen, scroll down to the product section. You will see that for each product lot, there will be a new information field Note. Input the note releated to that product lot there, then click Save to confirm the change
Update and Delete Orders
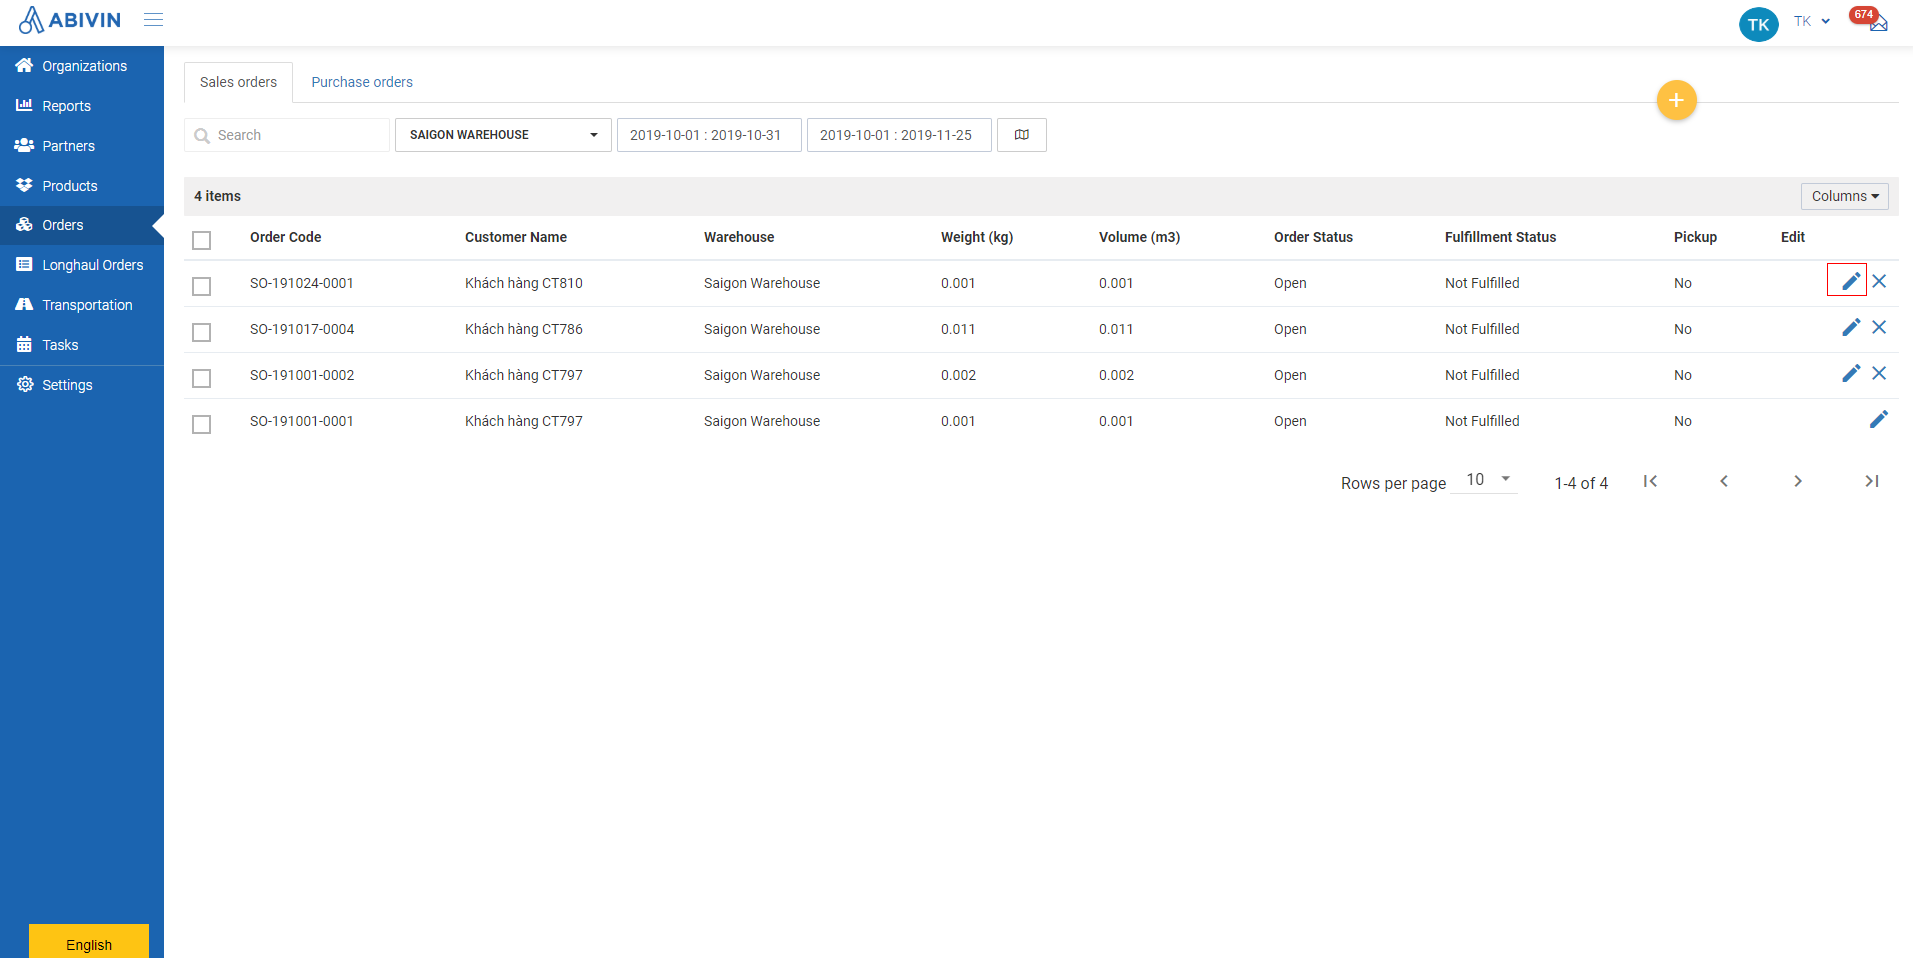
Update unlocked order
- If an order has not been locked, you can edit its information
- Please refer to the CRUD functions article to know the general steps about updating objects in Abivin vRoute
Delete unlocked order
- If an order has not been locked, you can delete it
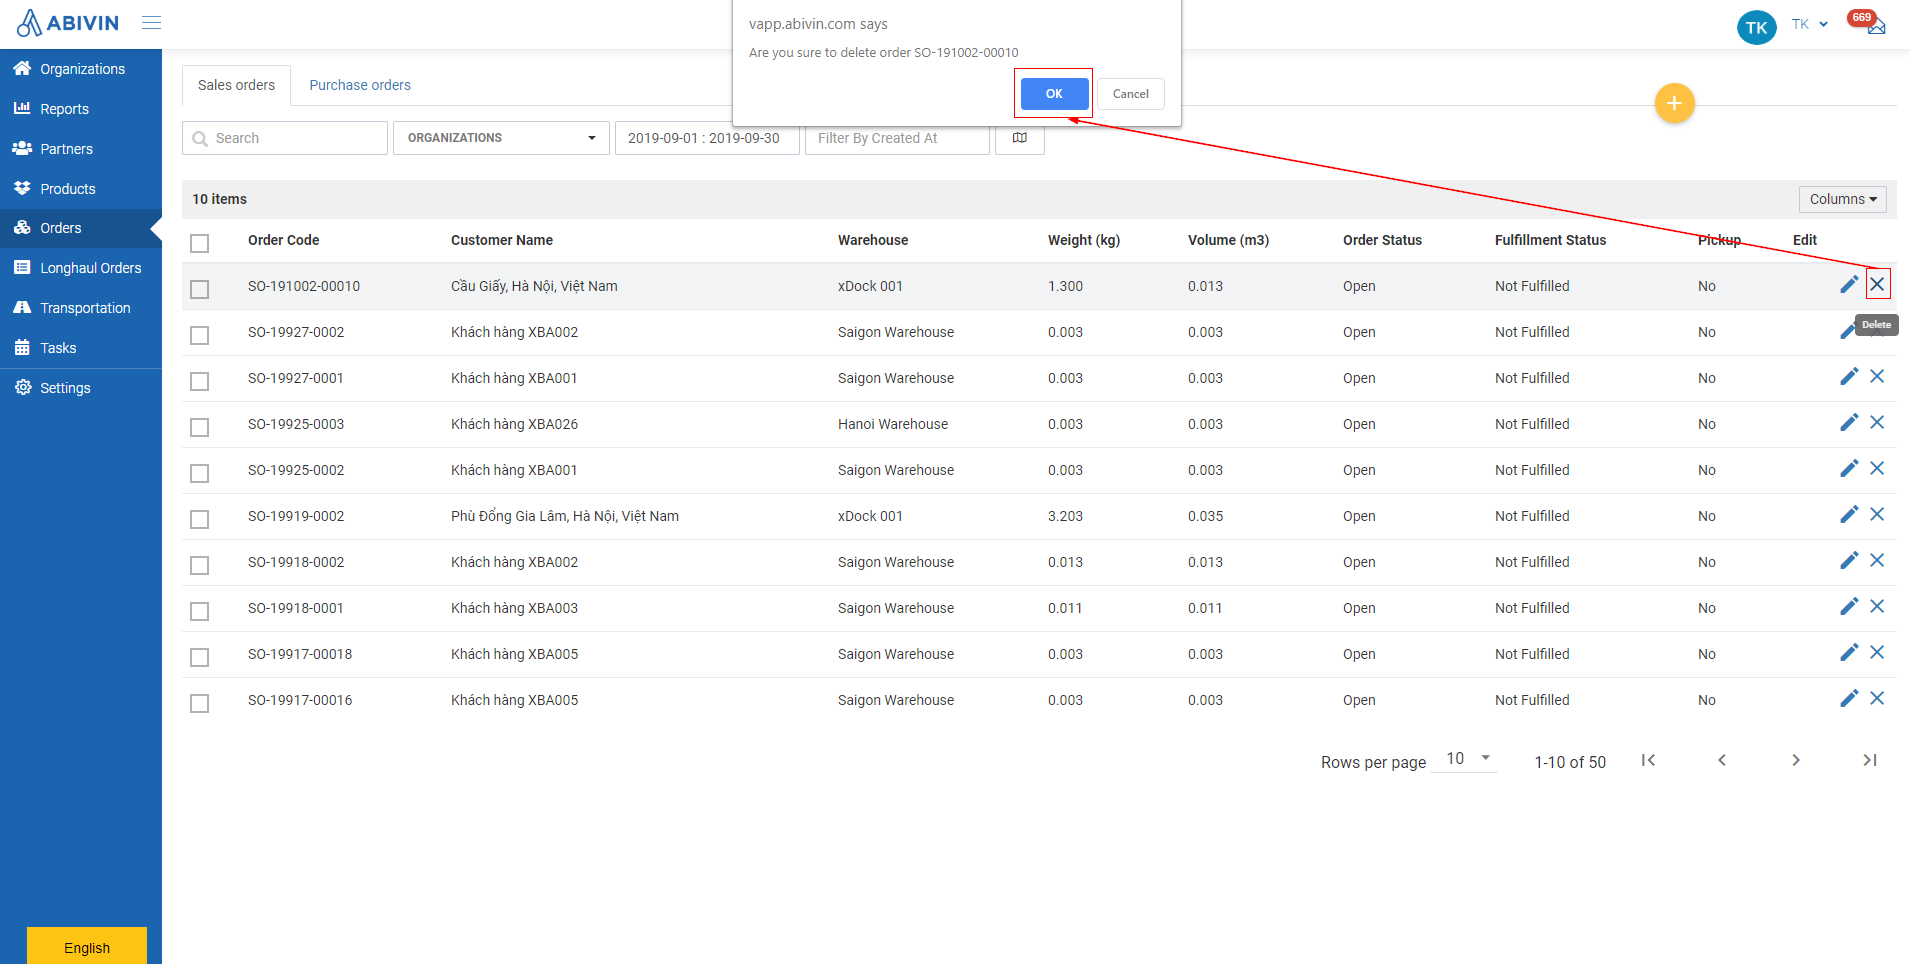
Delete single order
- Please refer to the CRUD functions article to know the general steps about deleting single object in Abivin vRoute
Delete multiple orders
- Please refer to the CRUD functions article to know the general steps about deleting multiple objects in Abivin vRoute
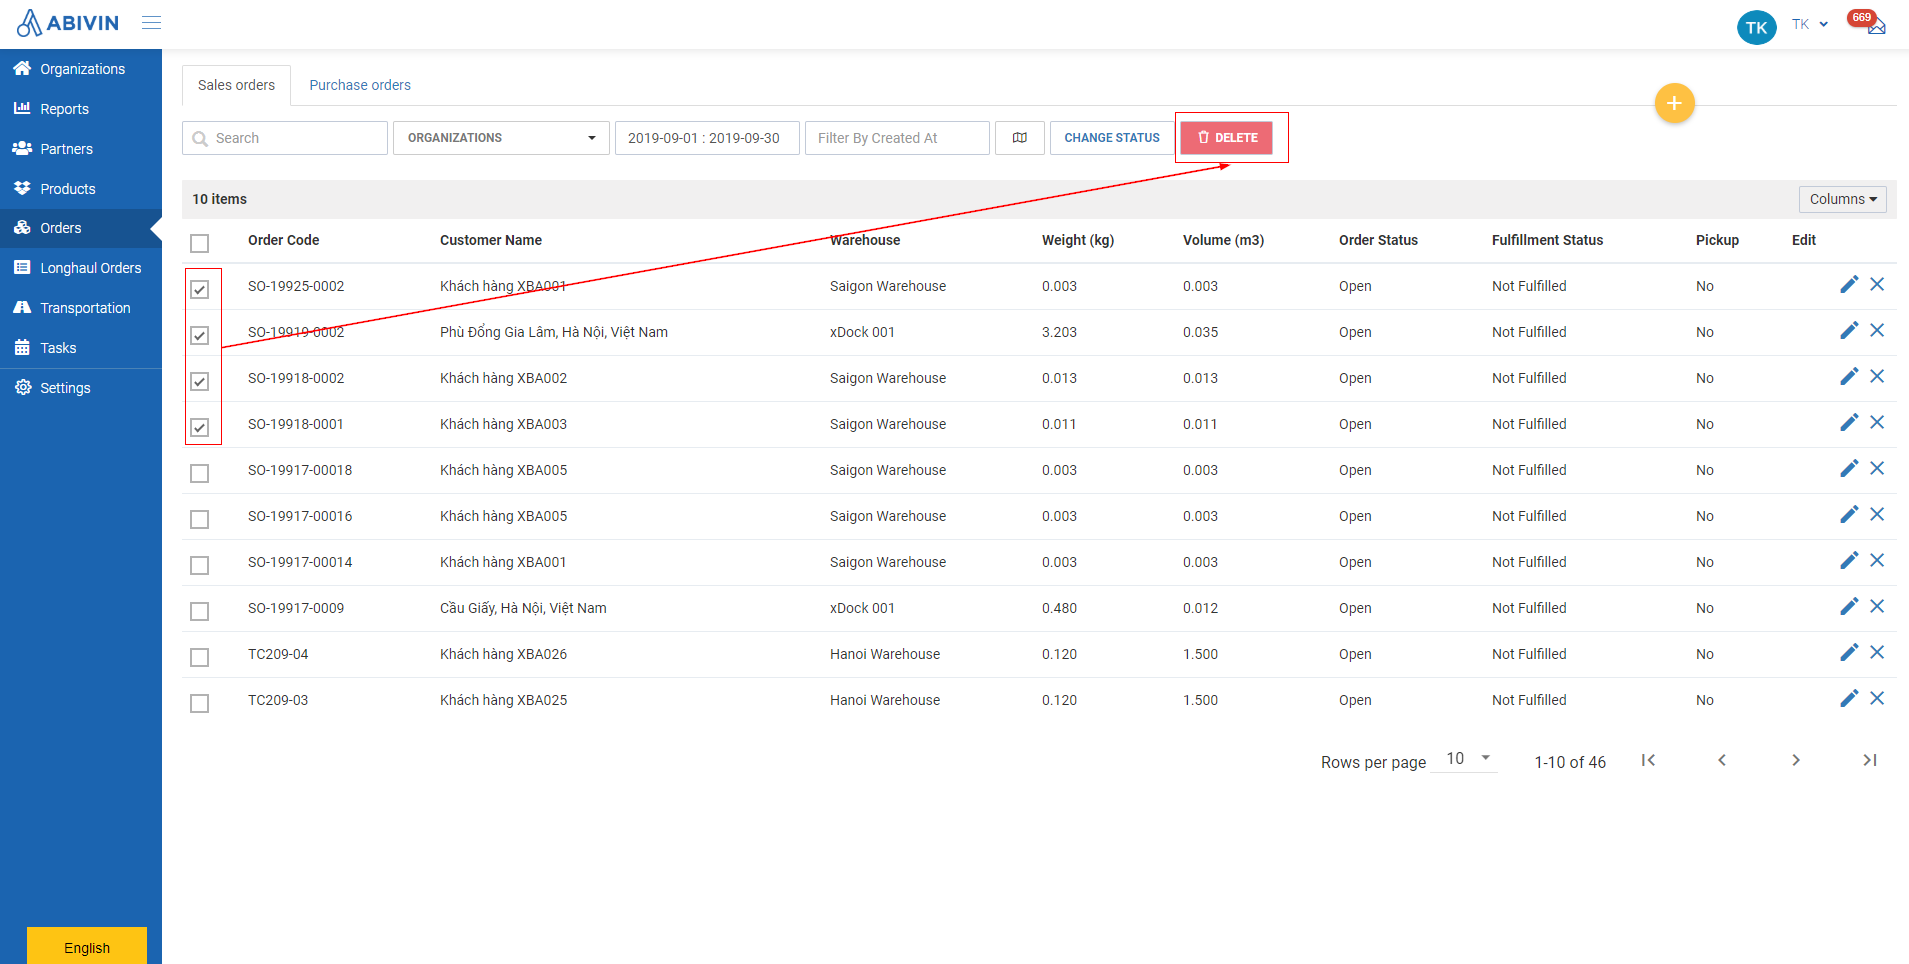
Delete several orders at once
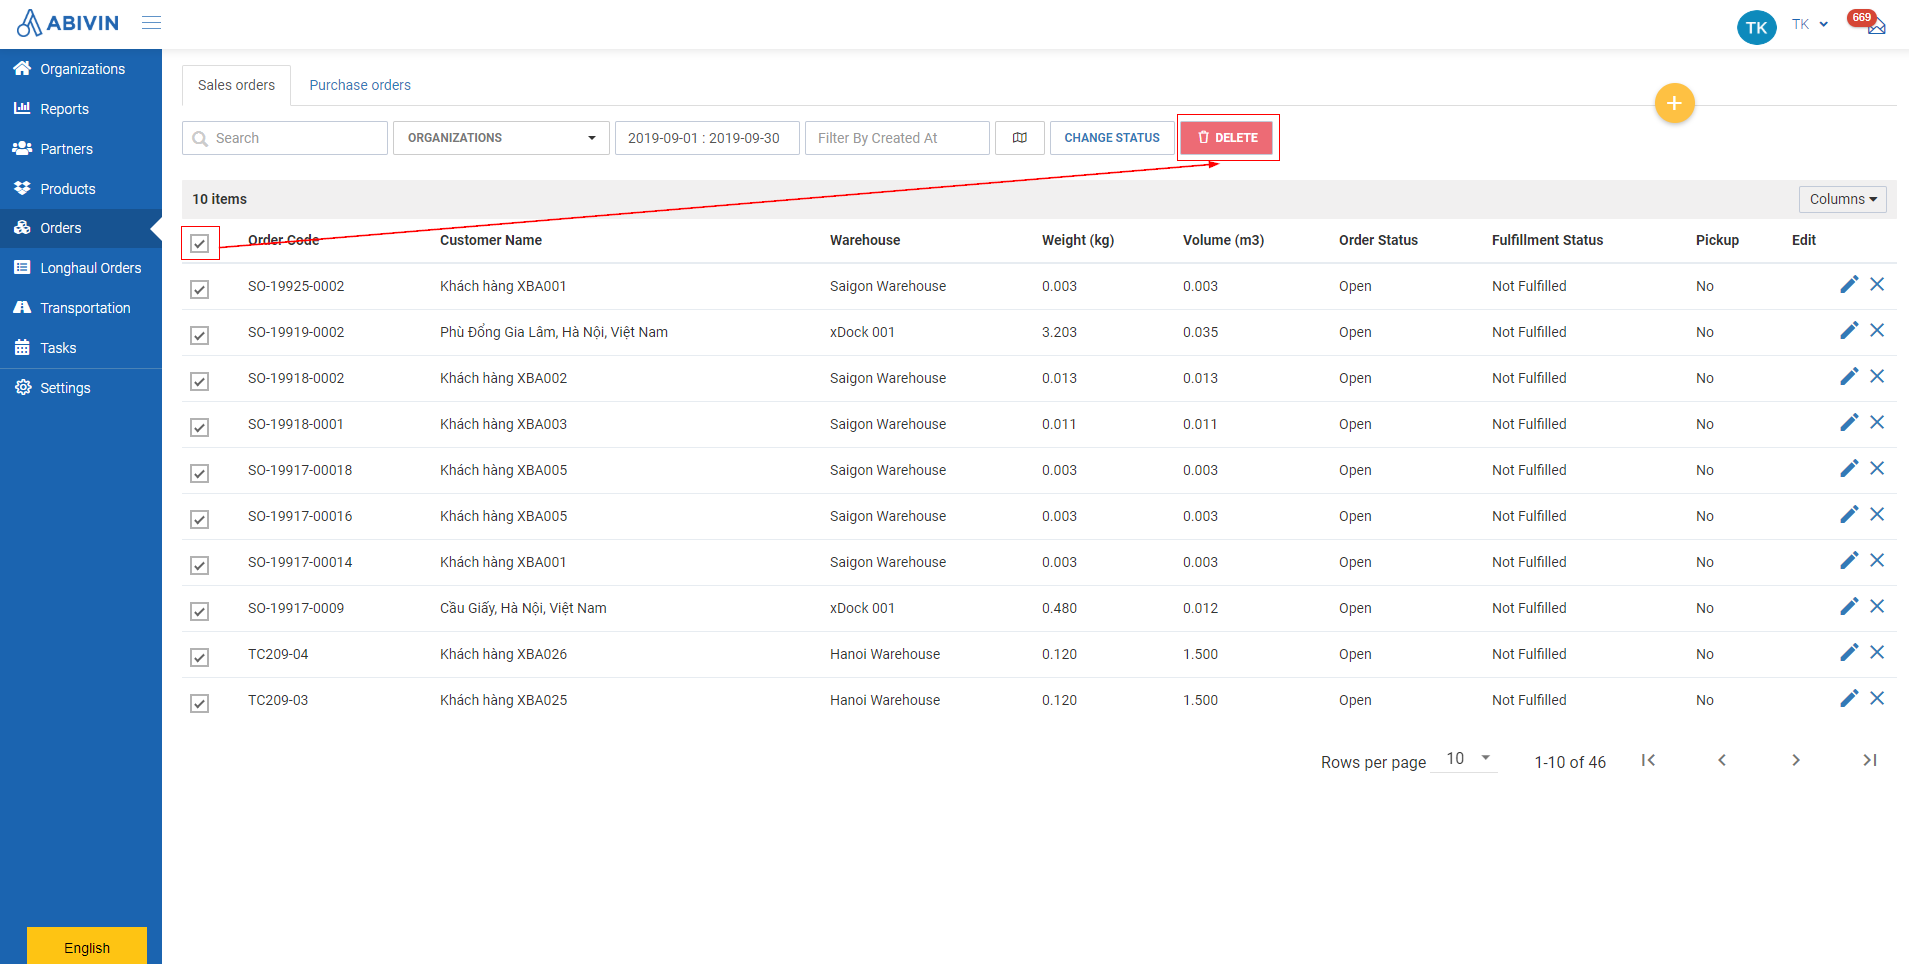
Delete all orders of a page at once
Export orders
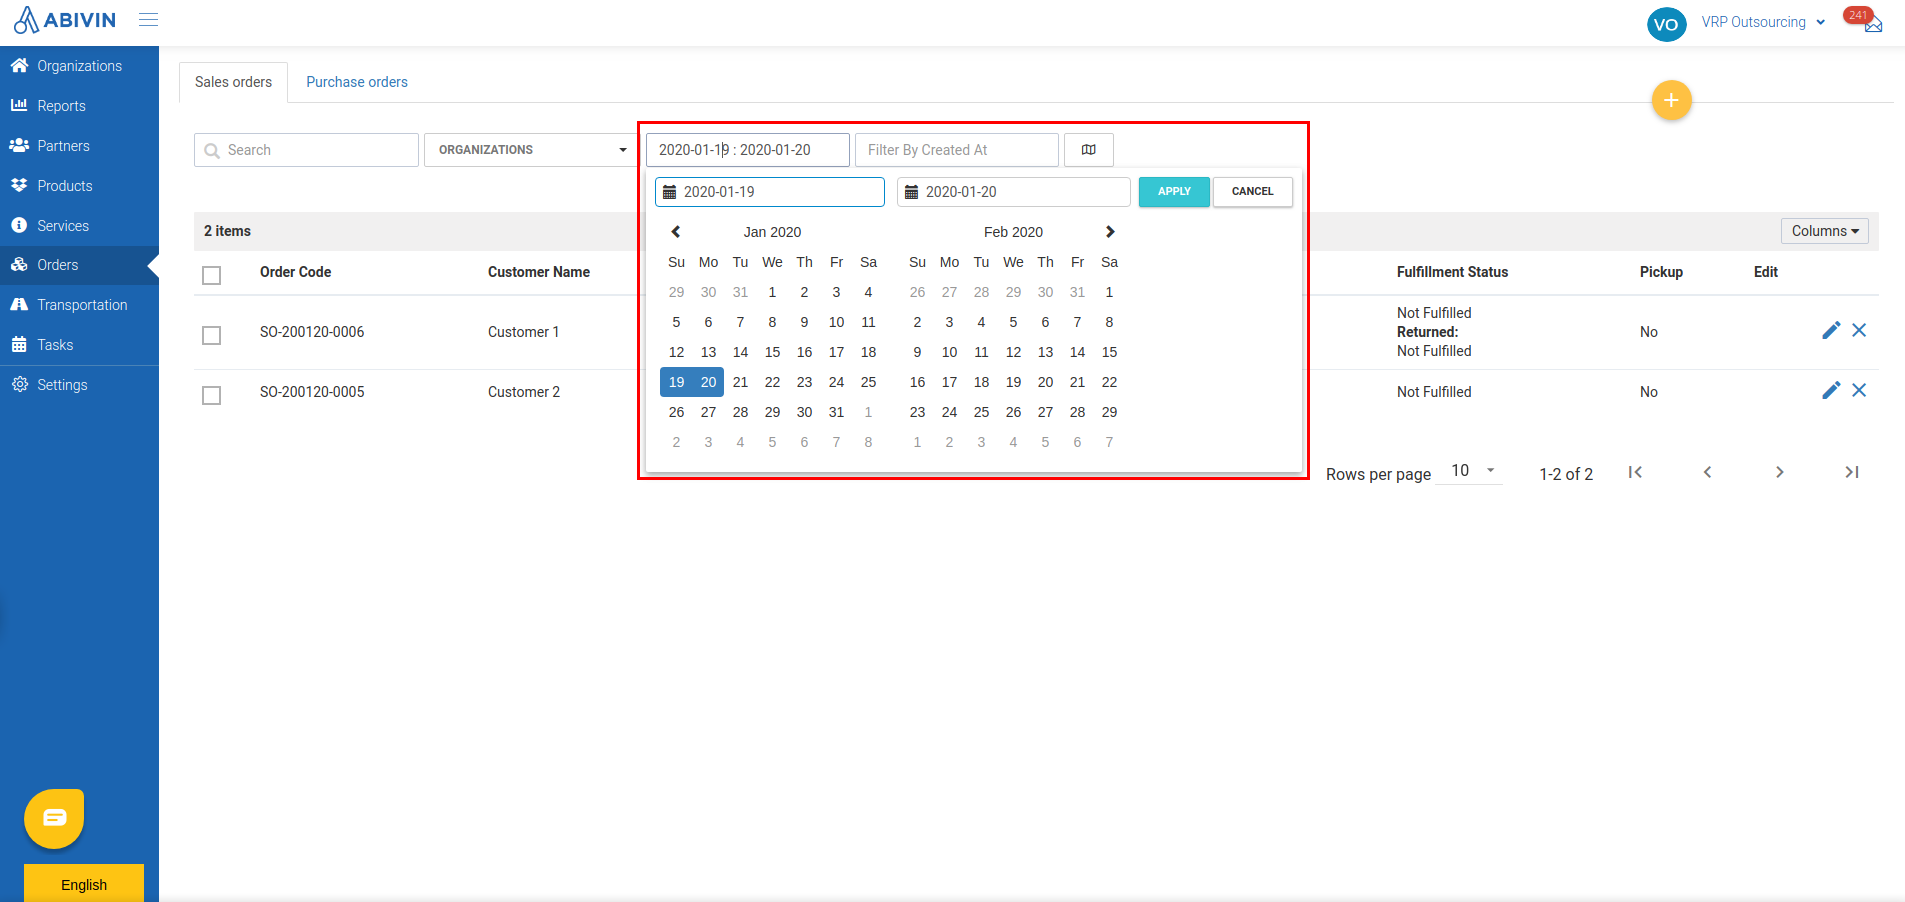
- You can export the list of orders during a date range by following the steps below
- Click on the field Date, select the appropriate date range on the drop down calendars, then click Apply
- Then, hover your mouse over the icon , then click on the icon Export
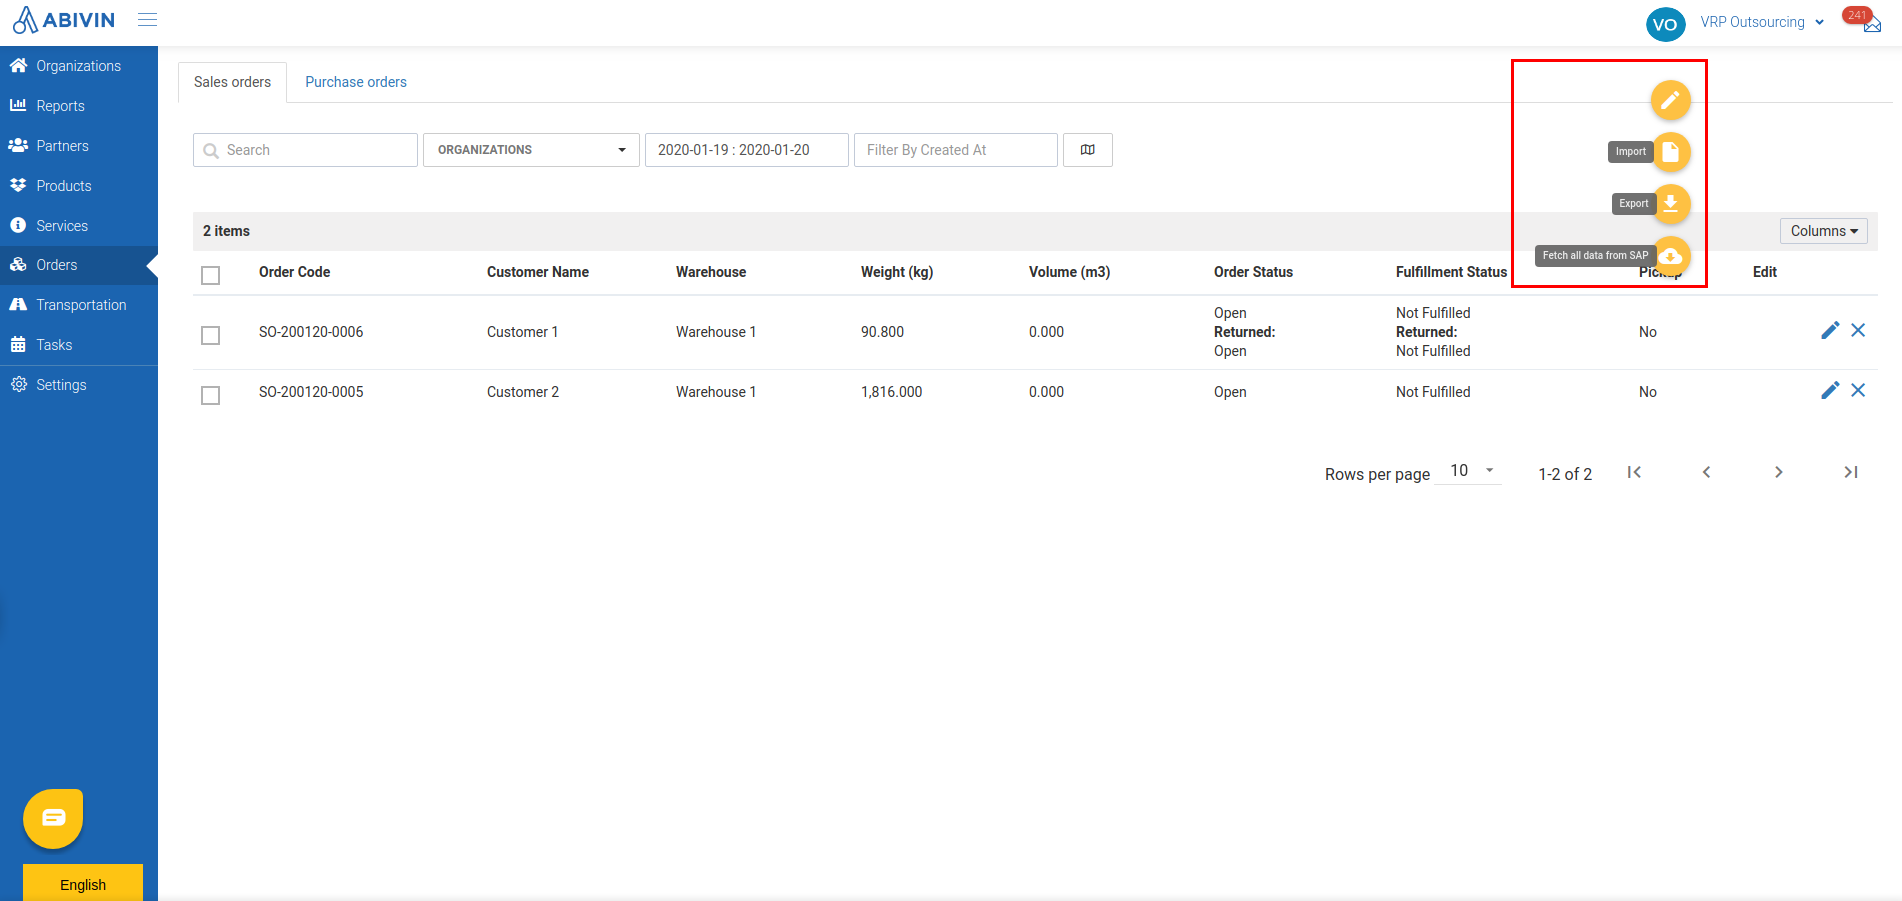
- All orders that fall into the selected date range will be gathered and will be downloaded as an Excel template
- Below are the information fields in the Excel template
Information field | Description |
|---|---|
Order Date | The date on which the order is performed |
Order Code | Management code of the order |
Partner | Customer code of the customer of the order |
Order Type | Order type of the order |
Sale Code | Sales code of the salesman associated with the customer of the order |
Product Code | Product code of the product loaded in the order |
Number Of Cases | Number of cases of the product loaded in the order |
Number Of Items | Number of items of the product loaded in the order |
Total Price | Total price of the order |
Customer Discount | The money value discounted for the customers, will be subtracted from the Total price field of the order being created (If the total price is automatically calculated) |
Sale Discount | Sales Discount, will be subtracted from the Total price field of the order being created (If the total price is automatically calculated) |
Promotion Discount | Promotion Discount, will be subtracted from the Total price field of the order being created (If the total price is automatically calculated) |
IMVD Discount | IMVD Discount, will be subtracted from the Amount field of the product on Web form |
Pickup Order | Specify if the order is a Pickup order or not |
Service Time (minutes) | Service time of the order (If available) |
Time Window | Time window of the order |
Splitted Order | Specify if the order is a Split order or not |
Lot Number | Lot number of the product loaded in the order |
Expired Date | Expiry date of the product loaded in the order |
Order Status | Order status of the order |
Payment Status | Payment status of the customer of the order |
Fulfillment Status | Fulfillment status of the order |
Search order
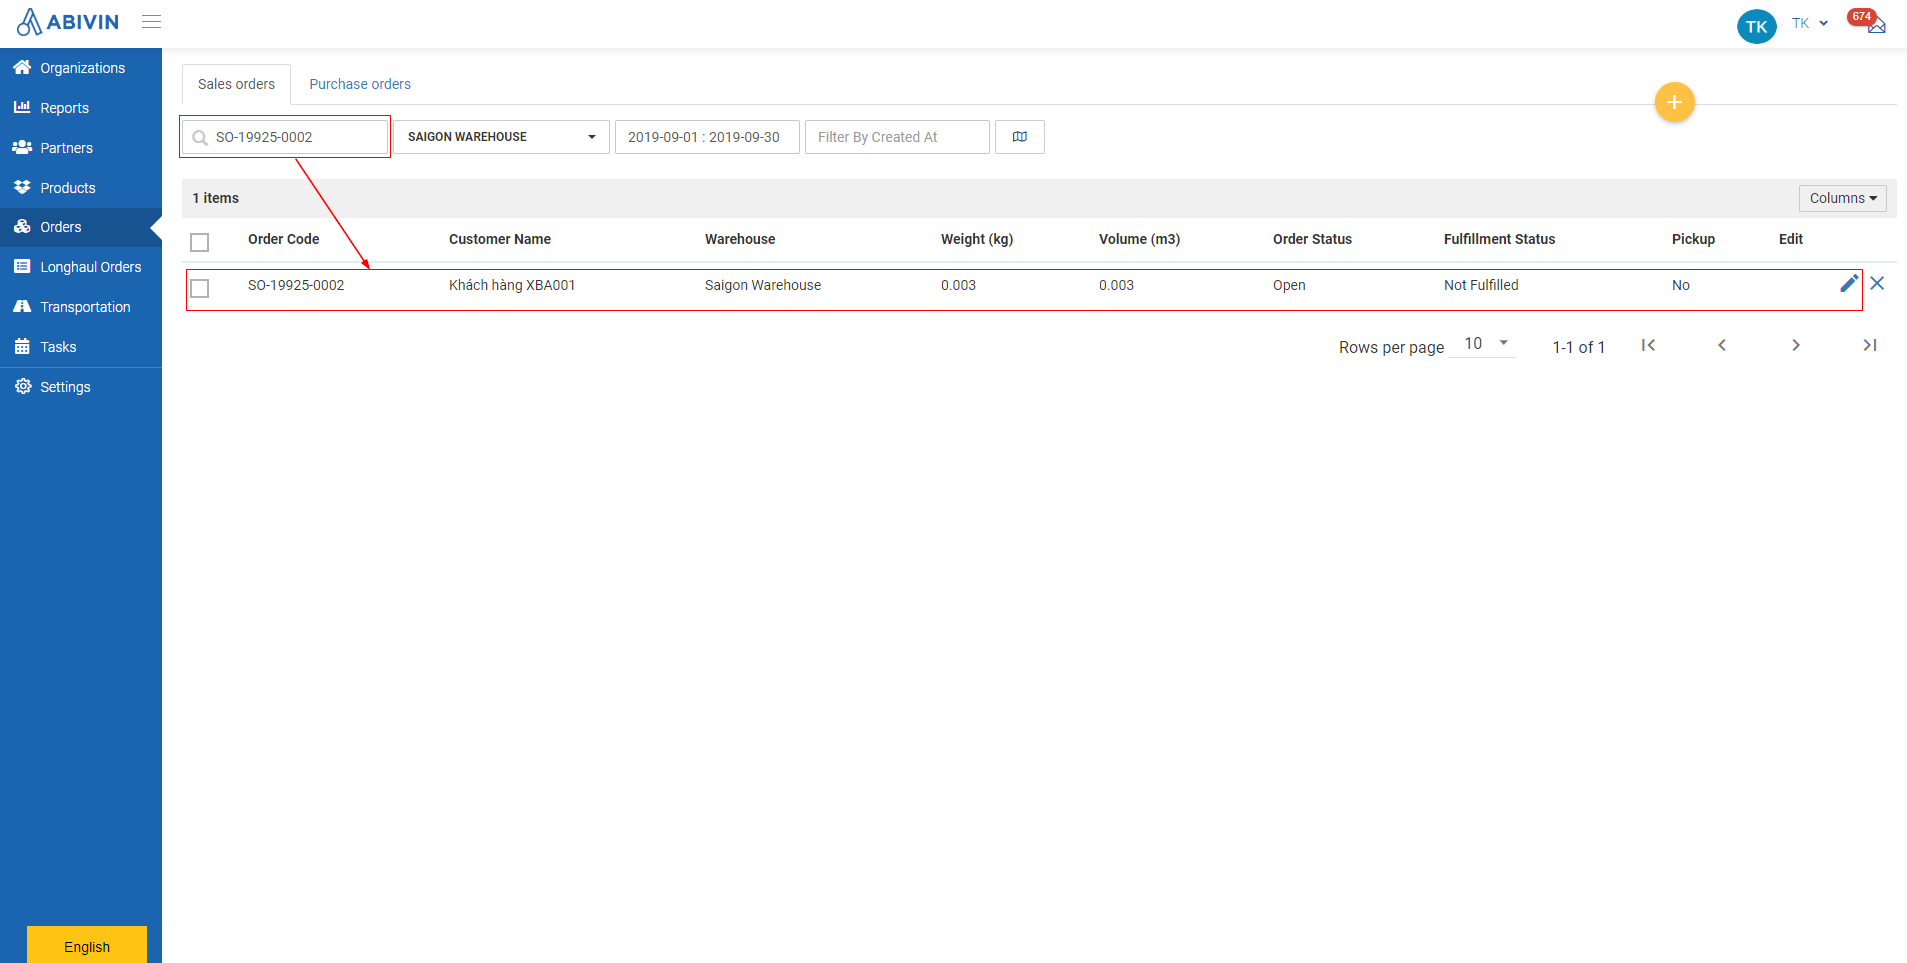
- You can search for an order using its Order Code
- Please refer to the Search & Filter Functions article to know the general steps about searching objects in Abivin vRoute
Filter orders
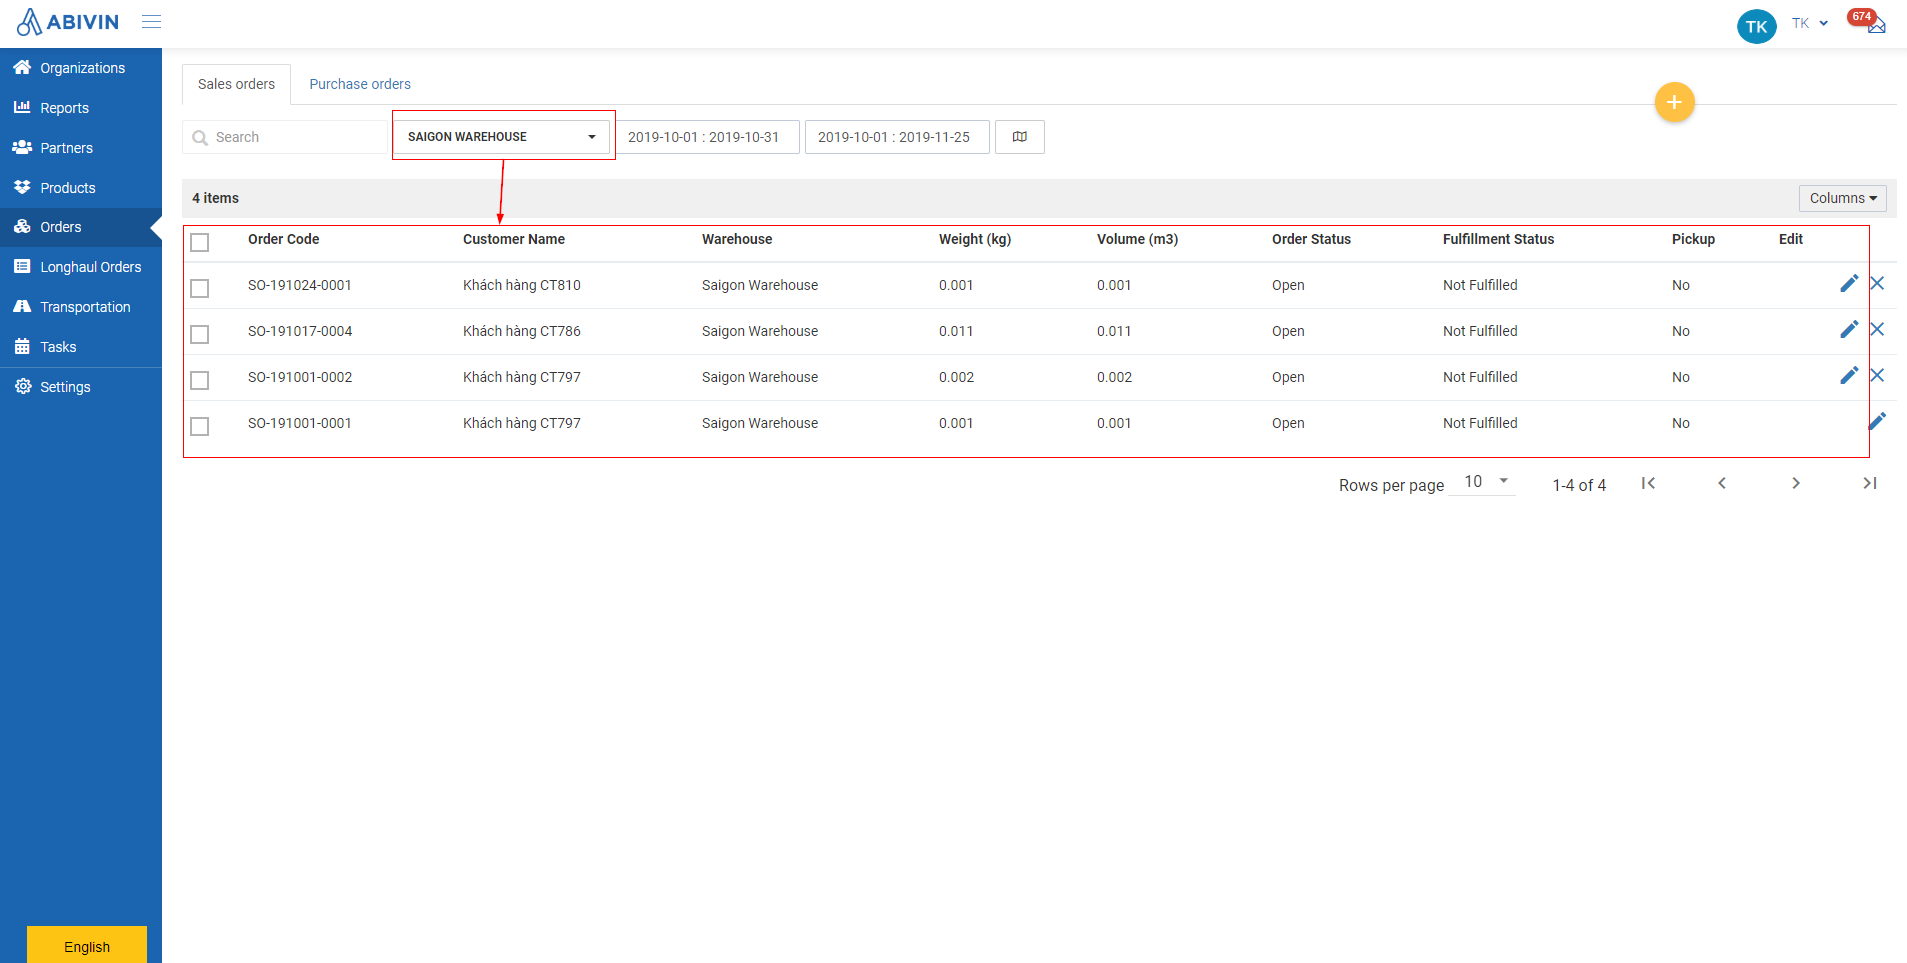
- You can filter orders originated from a specific Depot/Sun or xDock via the Organization field on the toolbar
- Type the Organization Code or Organization Name of the Depot/Sun/xDock in the search bar, then select from the drop down menu
- Orders that originated from the selected Depot/Sun/xDock will show up
Filter orders by Execution date or Creation date
- Please refer to the Search and Filter functions article to know the general steps about filter objects by date in Abivin vRoute
- Notice there are two calendar fields on the toolbar. The calendar on the left is used to filter the Execution date of the orders; while the calendar on the right is used to filter the Creation date of the orders
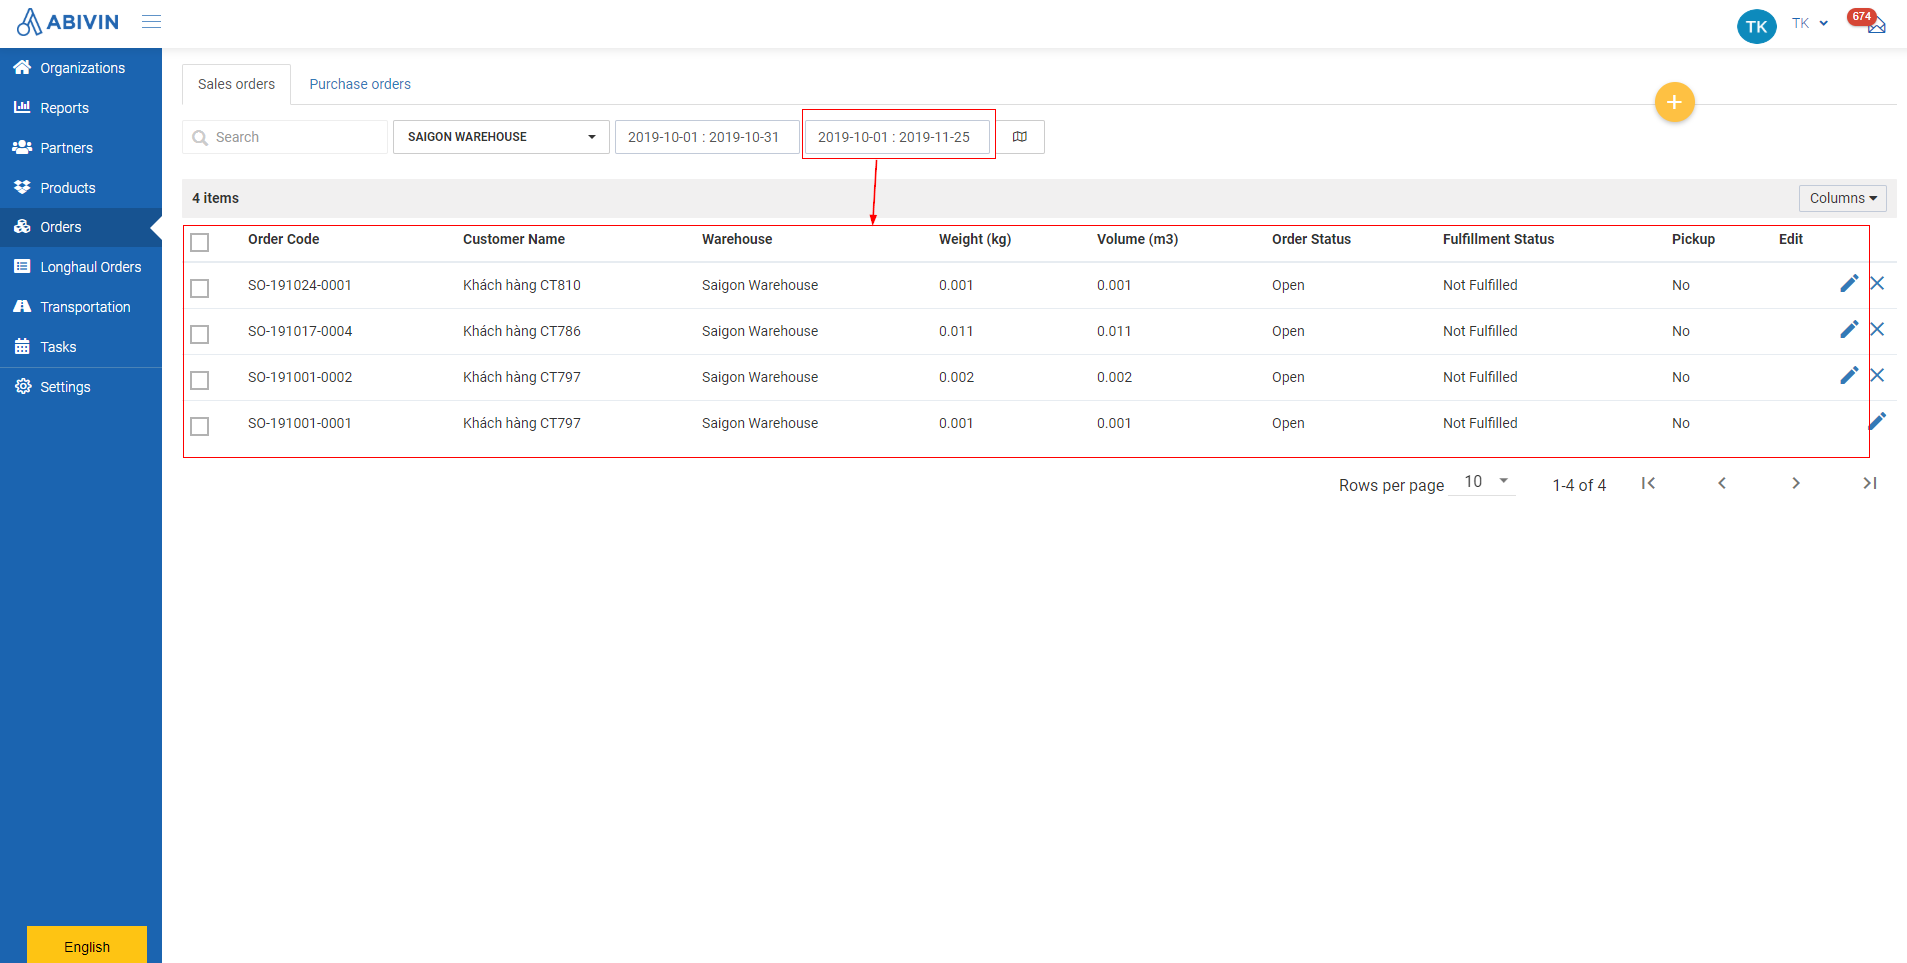
Filter orders that have the creation dates within the selected date range
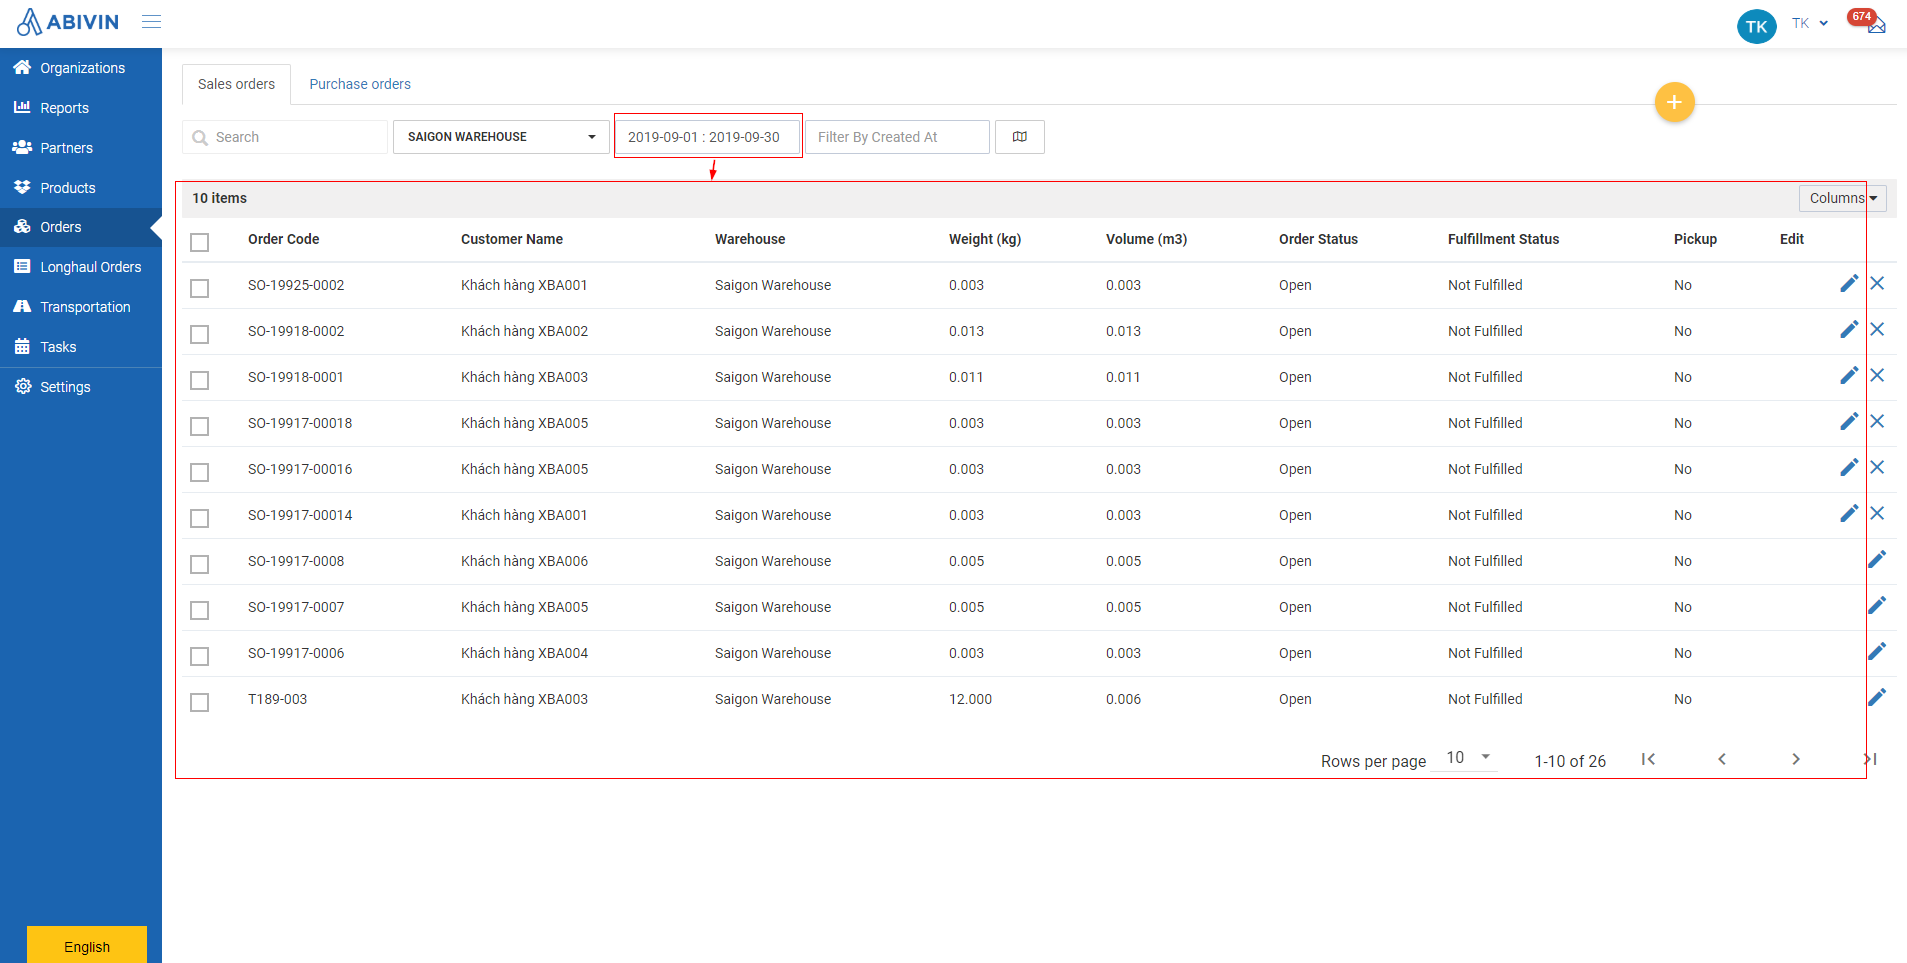
Filter orders that have the execution dates within the selected date range
Order color highlights
- On Orders > Sales Orders tab, the order will be highlighted with some background colors to indicate its status
- No highlight: Normal order (Both locked or unlocked)

- Red color highlighted: The Customer of the order has no coordinate information

- Yellow color highlighted: There are two cases
- Case 1. The order weight and volume is zero, meaning there is zero product case and product item in this order
- Case 2. The weight and/or volume of the order exceeds the weight and/or volume capacity of every available vehicle

- Green color highlighted: The order is a failed to delivery or missing order from the previous day and has been pulled to be perform on the current day

Tasks of the Depot manager
- You are the manager of a Depot. If the Corporation Administrator assigns Sales orders to your Depot, you will have to do the tasks below
Specify product lots for products
- There are two time points when you need to specify product lots
- Time point 1: When the Transporter's driver comes to your Depot to load new product cases/items of Depart Way before delivering to the customer (If the Corporation administrator has yet to do that)
- Time point 2: When the Transporter's driver comes back to your Depot to unload empty product cases/items of Returned Way that were picked up at the customer
- To specify the product lots for those products, following the steps below
- Navigate to Orders > Sales Orders tab
- Click on Edit icon of the order which you want to specify product lots
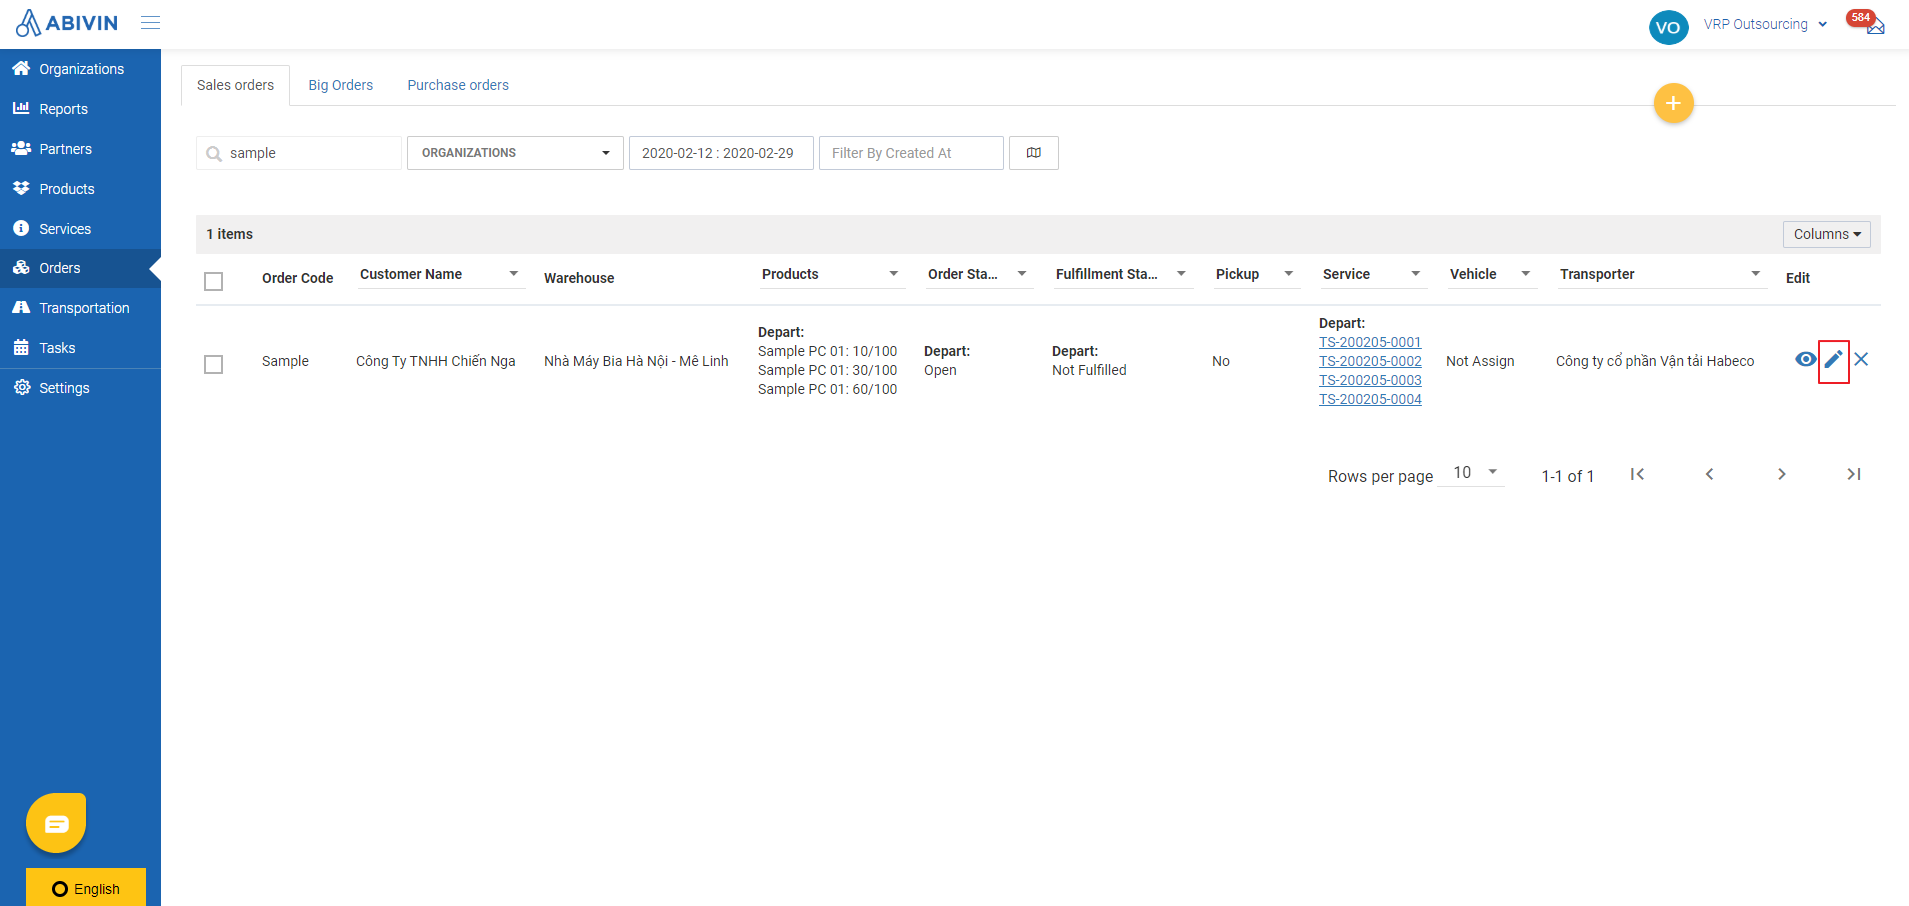
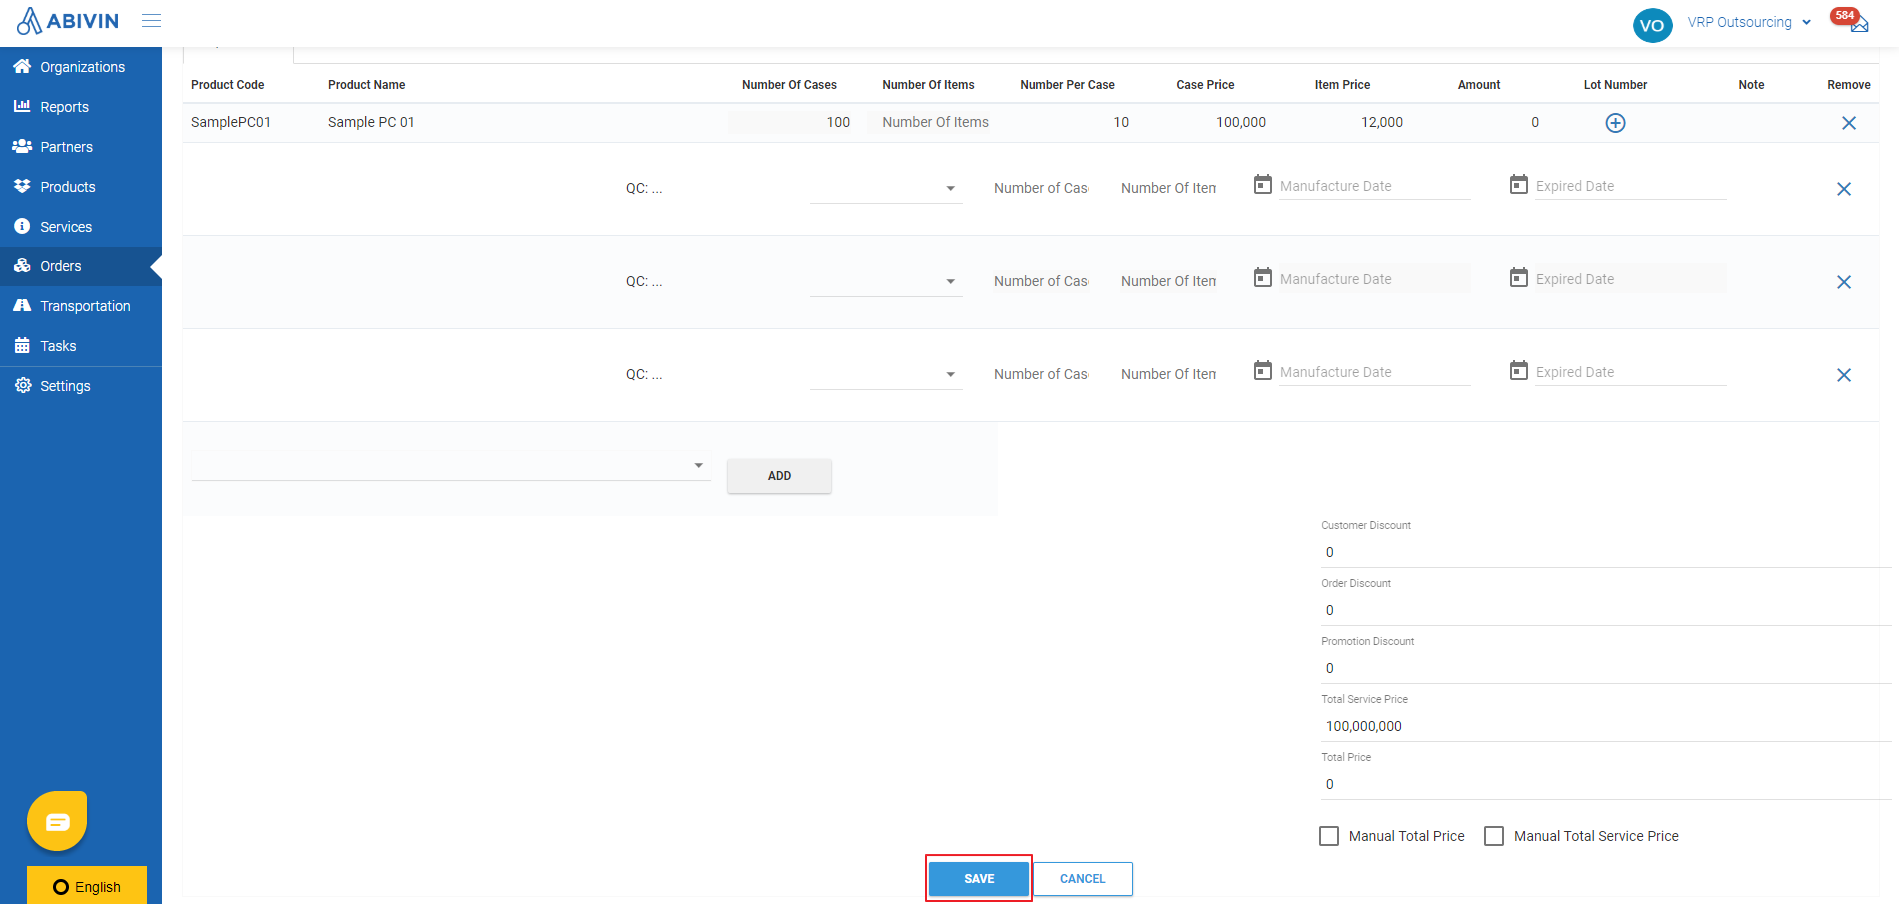
- On the Order Information screen, scroll down to the Product section. You will notice that for certain products, there will be an icon under the column Lot Number. That means those products are tracked by Product Lot. Products that don't have the icon are not tracked by Product Lot
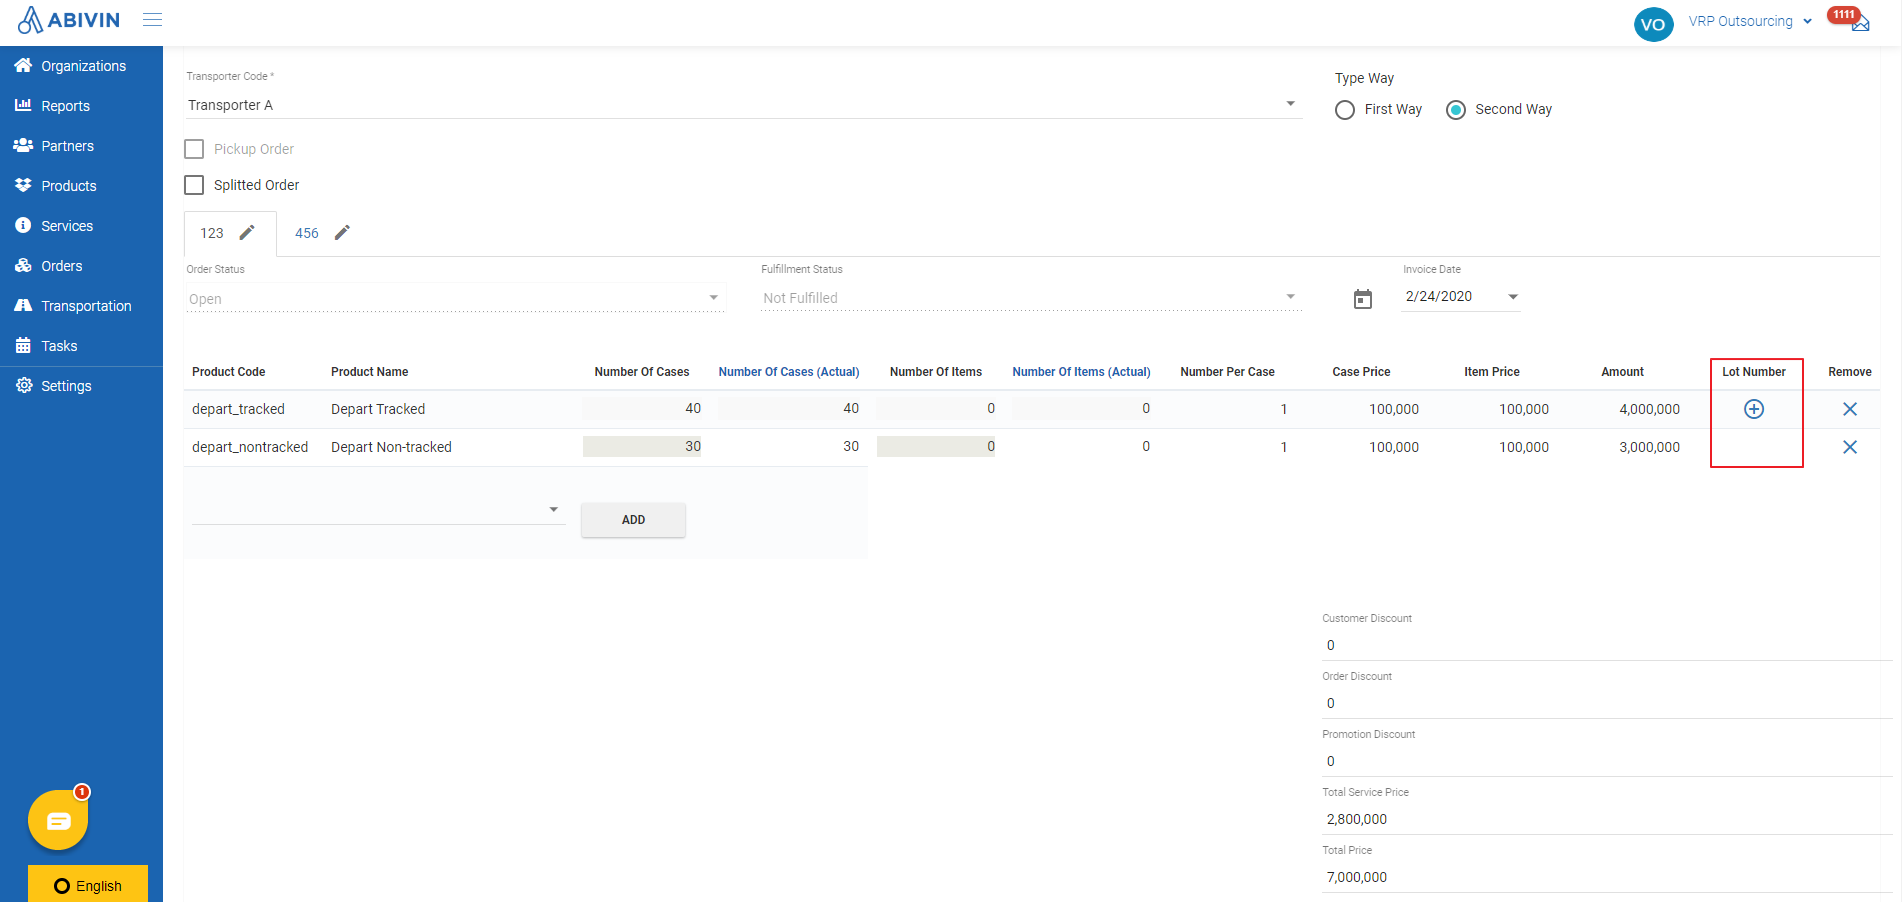
- To specify product lot for a product, click on that icon. An additional row will appear right below that product row. The new row is where you can specify the product lot for that product
- On this row, the first information field on the left (with the prefix QC) is the Quality Checking Number of the product lot. The second field is the product lot code. The third field is the quantity of whole cases to be issued from that product lot. The fourth field is the quantity of single items to be issued from that product lot. The fifth field is the manufacture date of that product lot. The sixth field is the expiry date of that product lot. The seventh field is the note related to that product lot
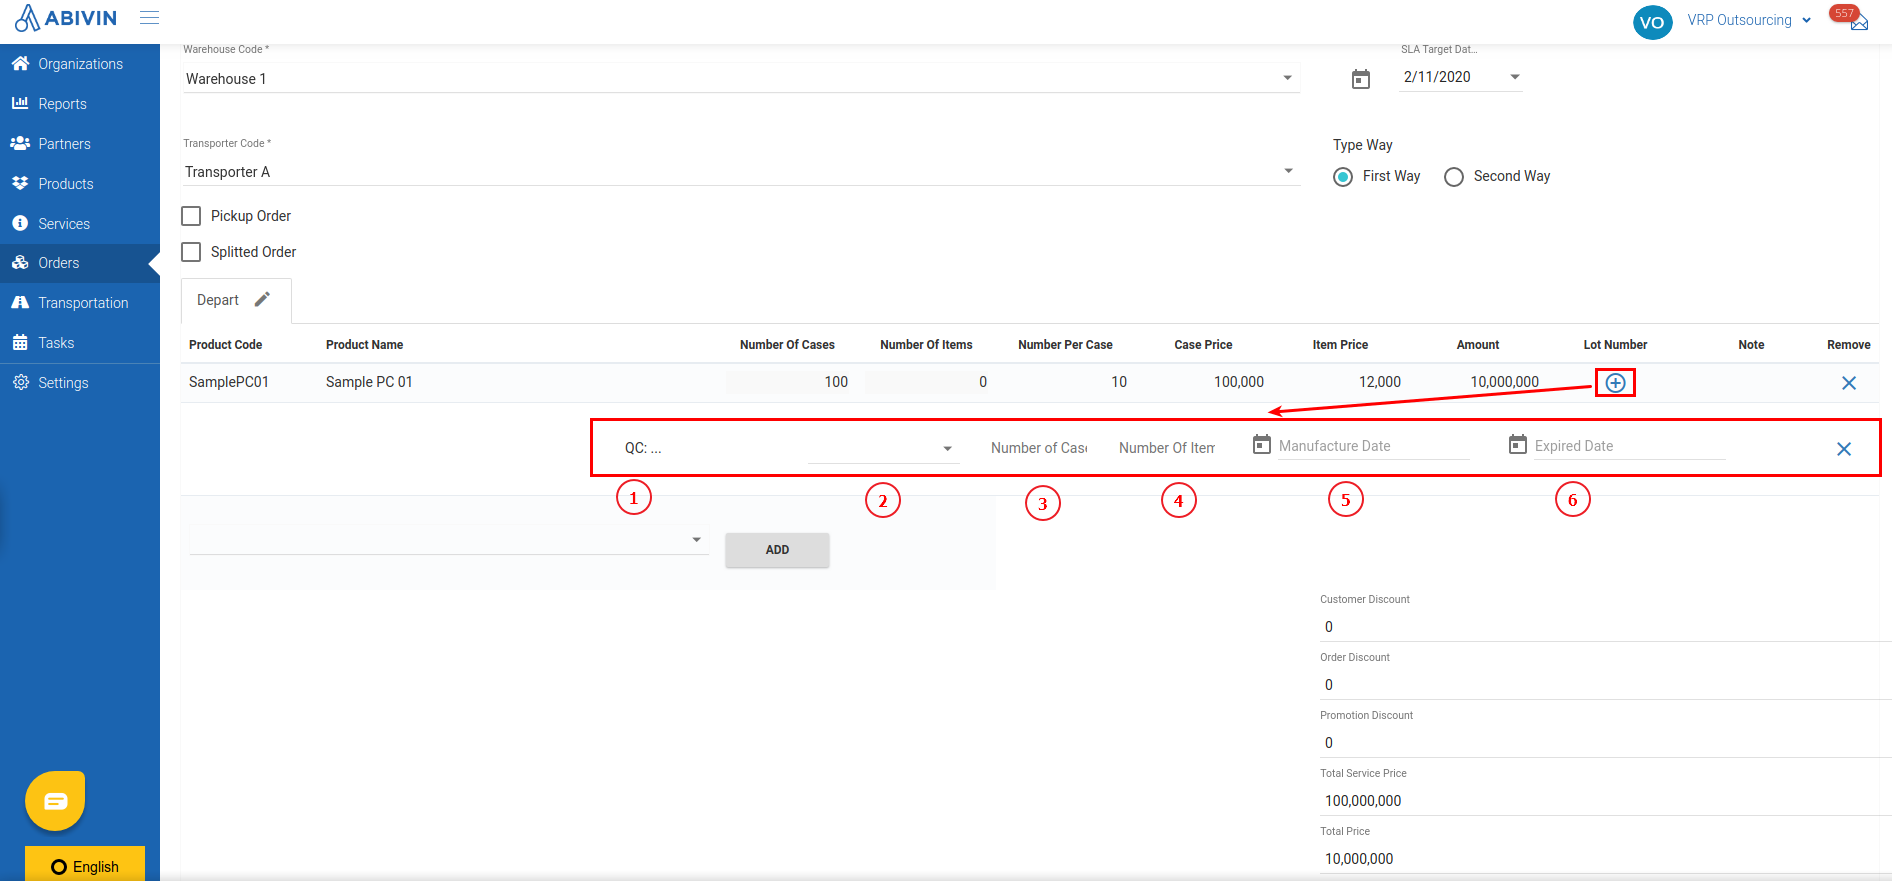
- To select the product lot, click on the product lot code field (The second field on the left). A list will pop out. On this list you can see all product lots of that product. Scroll the list up and down to find the appropriate product lot, then select it. Alternatively, you can input the Product Lot Code into the search bar to filter out faster
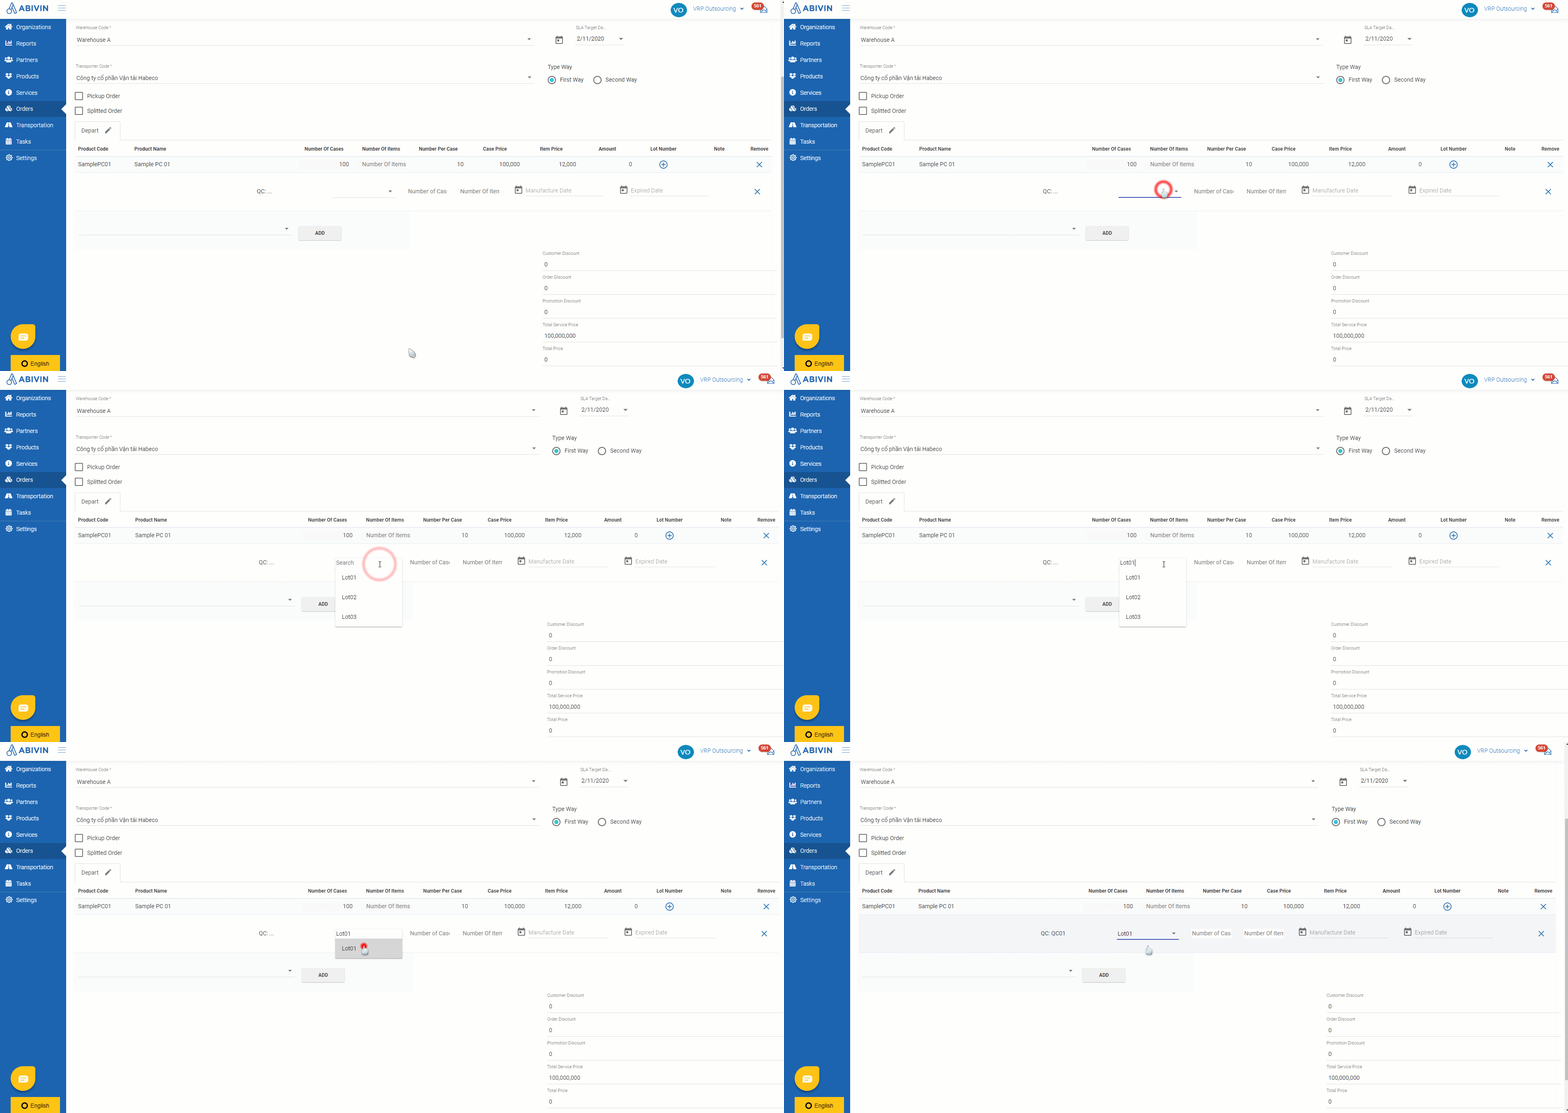
Find product lot
- The value in QC number field will automatically update
- Next, input into two fields Number of Cases, Number of Items the quantity of cases/items that you plan to take from that product lot

- Note that the values input into those fields can not be larger than the total cases/items quantity of that product. If you accidentally input values greater than the total cases/items quantity of that product, a warning will pop out

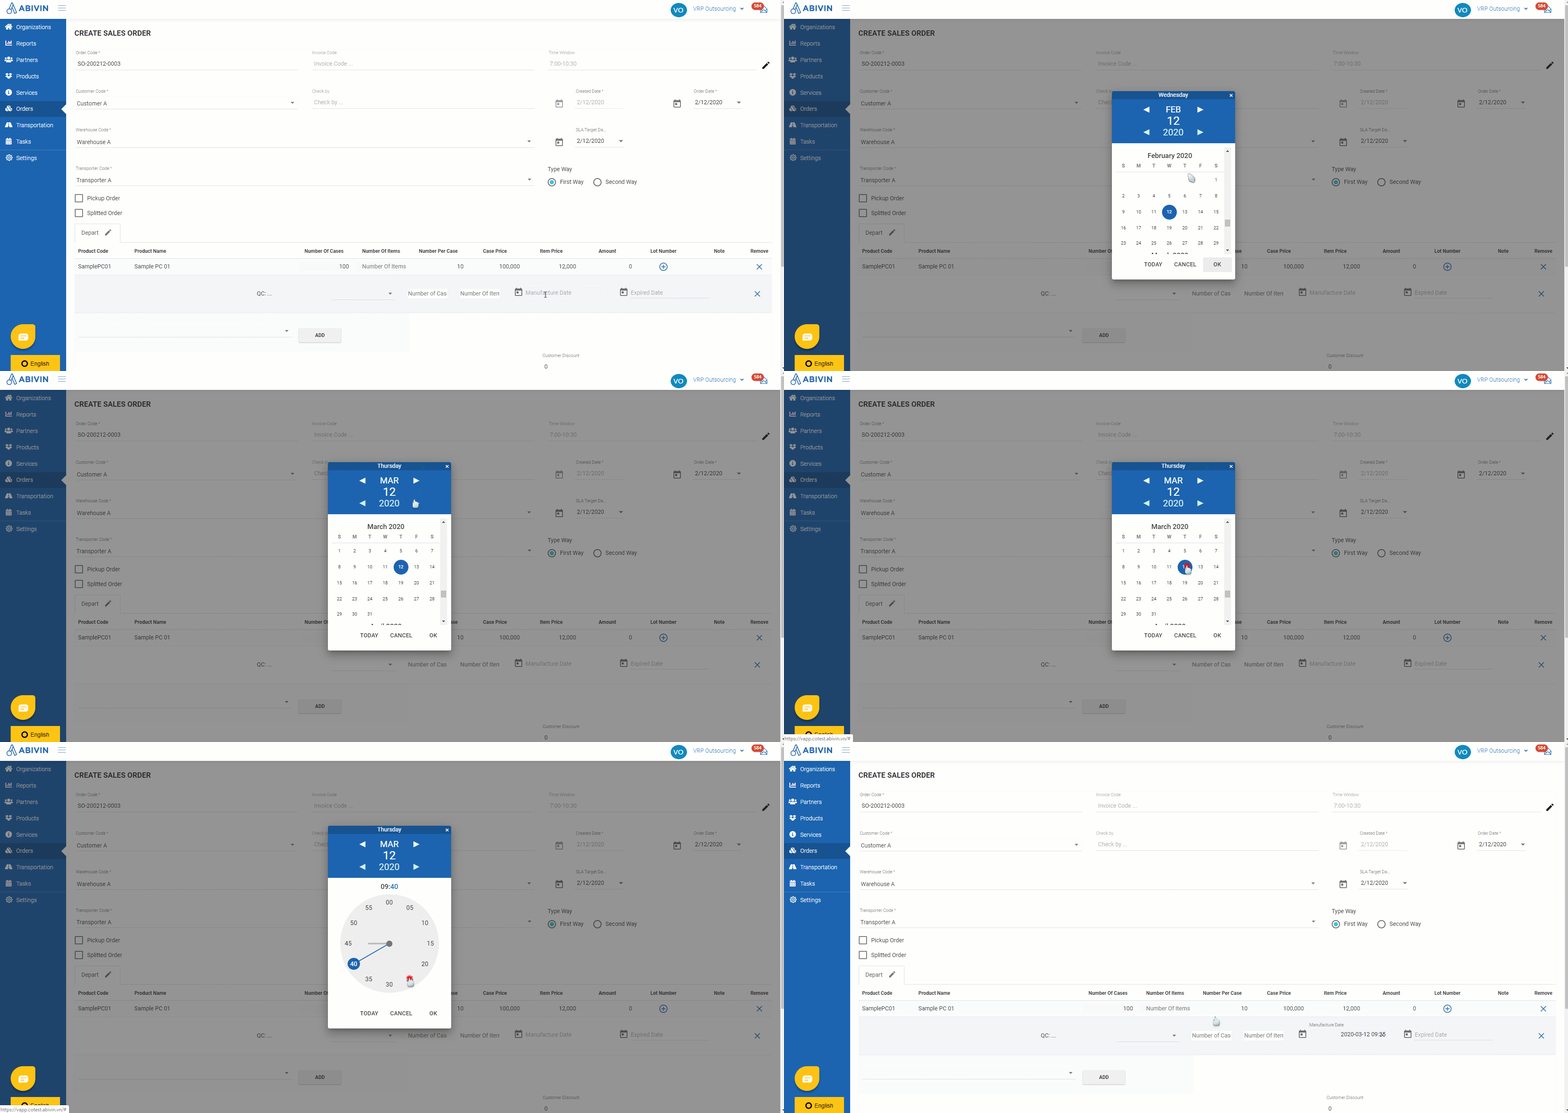
- Continue to click on the fields Manufacture Date and Expired Date. A calendar will pop out. Select the appropriate manufacture date and expiration date of the product lot from that calendar
- The pop out calendar will have three parts: On the first part, you have to select the year/month/date. On the second part, you have to select the hour. On the third part, you have to select the minute
- Below is an animated illustration on how to select the manufacture/expiration date for the product lot
- If the information you have just input is incorrect, you can remove the product lot by clicking on the icon at the end of the product lot row

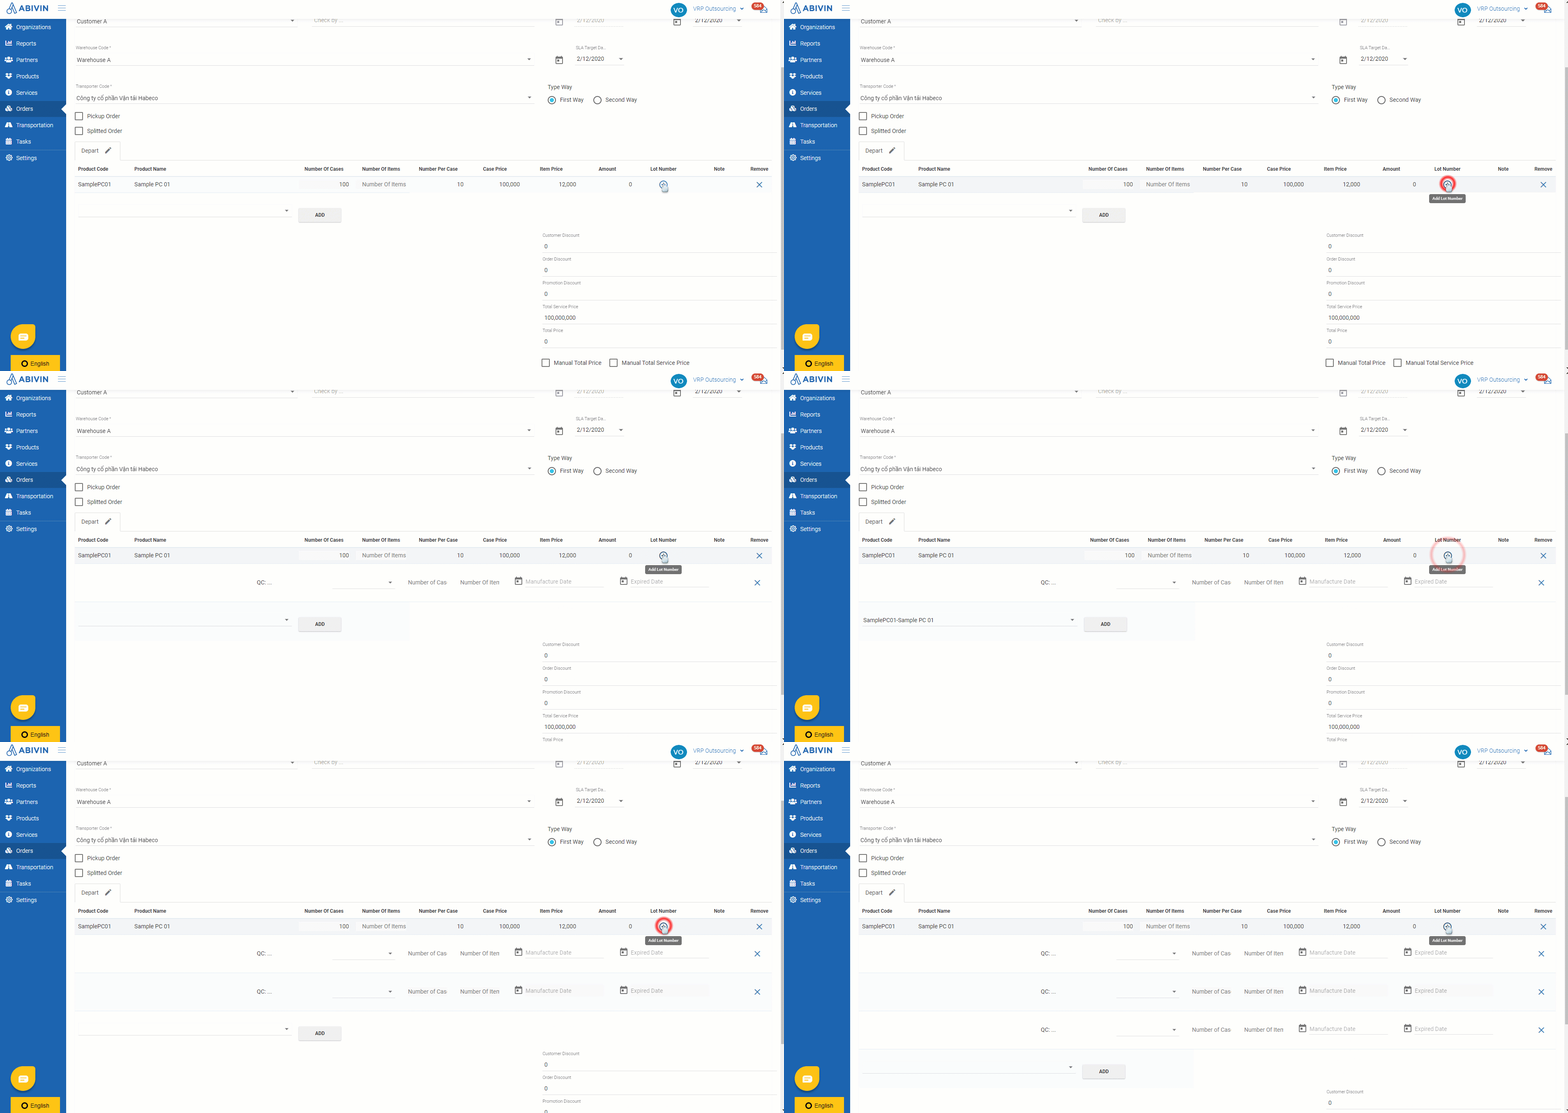
- You could add more rows for other product lots by clicking on the icon , then repeat the steps above
- After adding product lots for the order, click on the button Save to confirm the changes
Update Order status and Fulfillment status
- During the execution process of the order, you would need to update the Order status and Fulfillment status of that order
- There are two time points when you need to update Order status and Fulfillment status: 1. When the driver comes to your Depot to load new products of Depart Way, and 2. When the drivers comes back from the customer to unload empty/returned products of Returned Way
General steps to update order status
- Below are the general steps to update status:
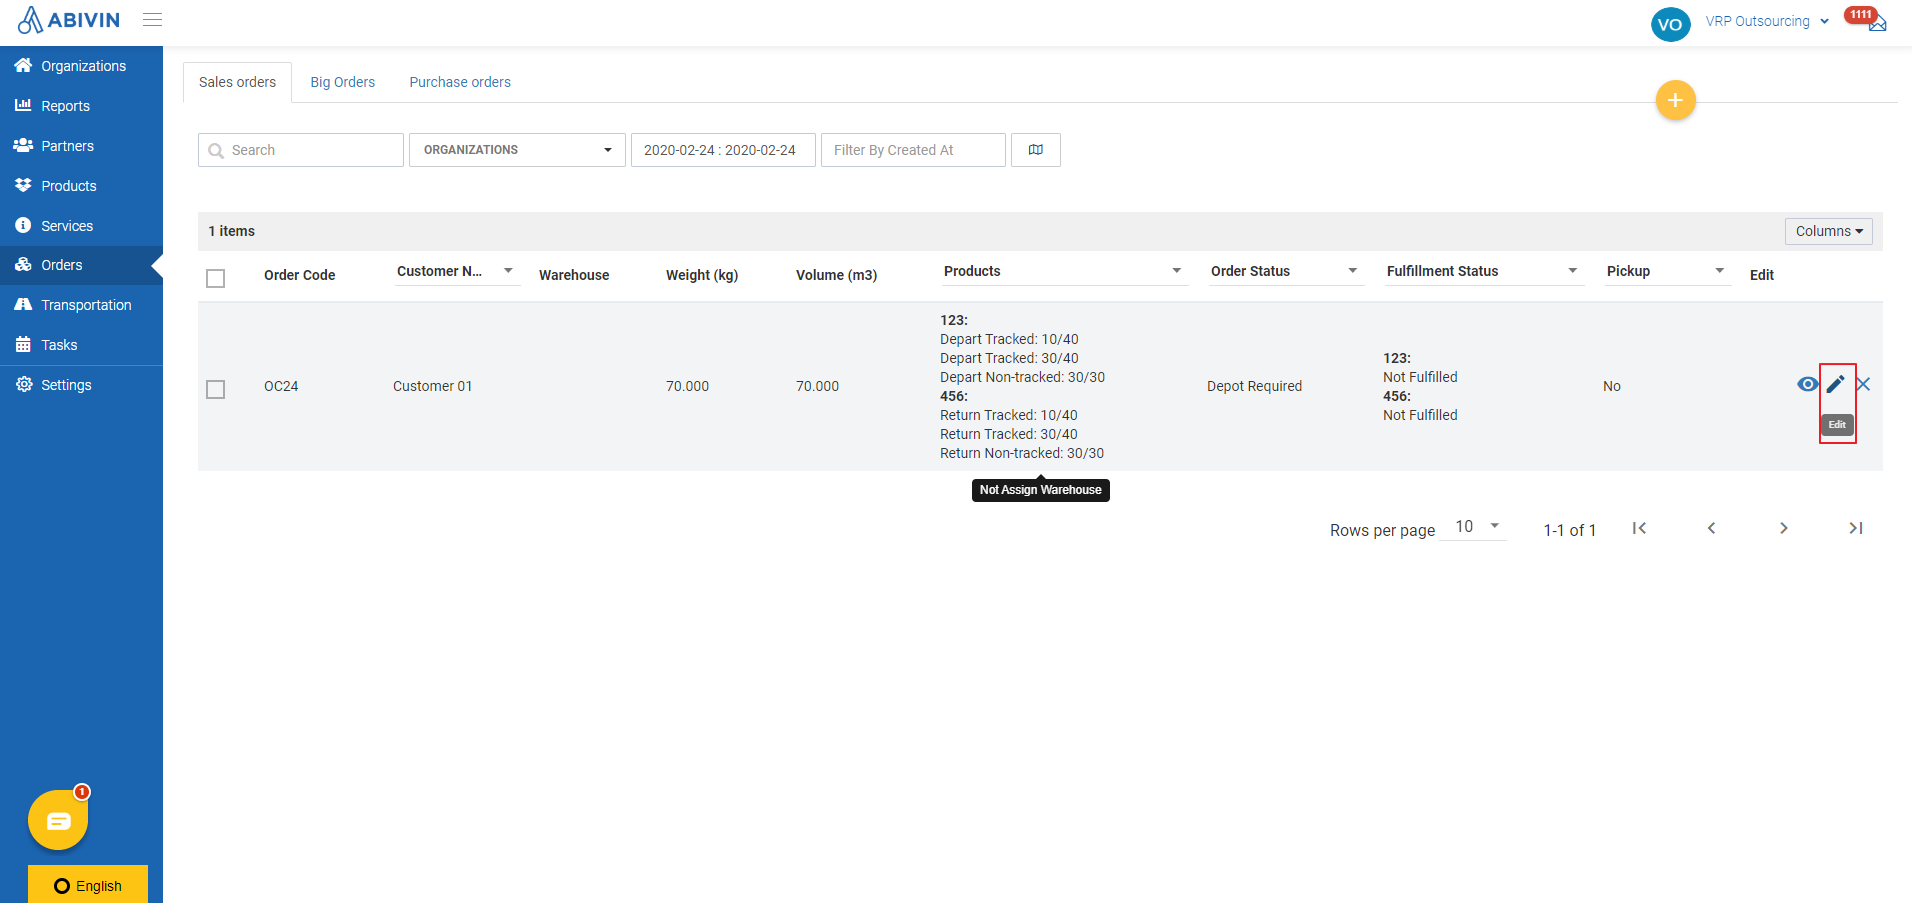
- Navigate to Orders > Sales Orders tab
- Click on Edit icon of the order you want to update
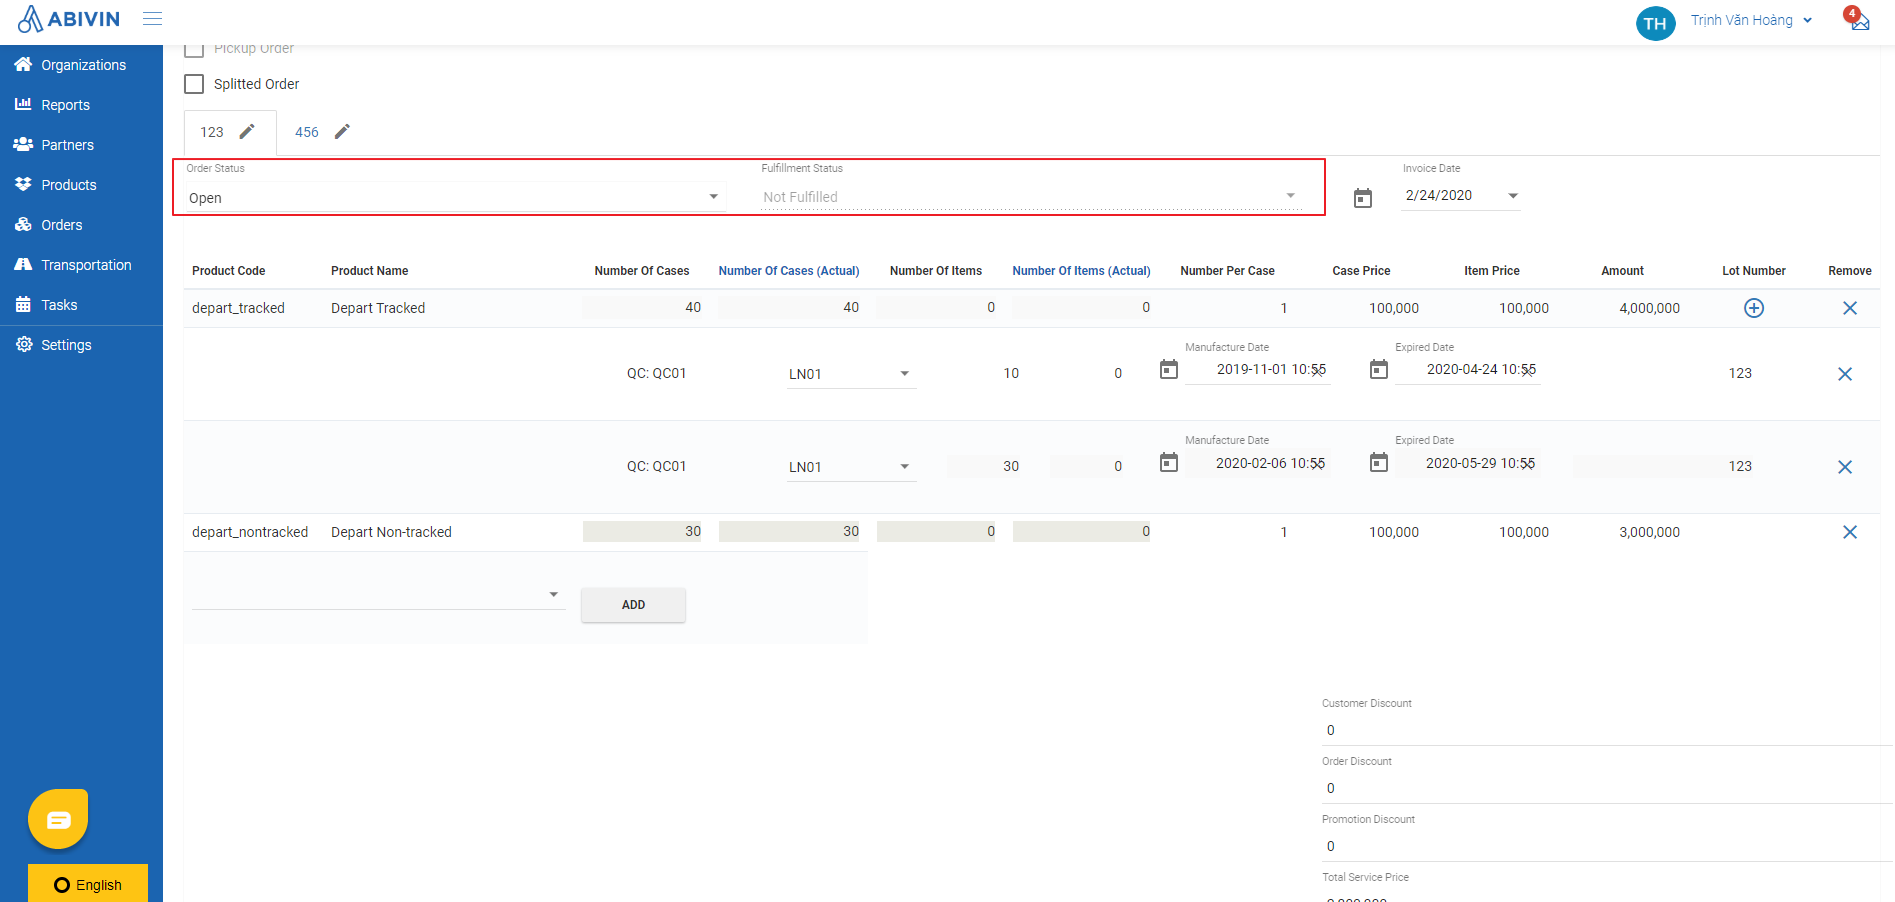
- Select appropriate Order status and Fulfillment status from the two fields Order status and Fulfillment status
- Click Save to confirm changing the status
Update status of Depart Way
Order status of Depart Way
- As the driver loads products onto the vehicle at your Depot, you need to update the Order status of Depart Way from Open to Picked & Packed
- Note: If on Abivin vRoute Web app, the current inventory of a product in the Depart Way is 0, then you will not be able to update the Order status. The inventory of that product will need to be updated to an amount larger than 0. You could inform the corporation manager to do that, or you can update by yourself
- If you want to cancel the order, you need to update the Order status of Depart Way from Open to Cancelled instead
- After the driver has delivered the products of Depart Way to the customer and submits the task on his Mobile app, the Order status of Depart Way will automatically be updated from Picked & Packed to Shipped
Fulfillment status of Depart Way
- The fulfillment status of Depart Way will be automatically updated based on the delivery result that the drive submits on the Mobile app. You will not have to do anything. There are three scenarios
- Scenario 1: The driver had delivered all product cases/items to the customer. The fulfillment status will be updated from Not Fulfilled to Fulfilled
- Scenario 2: The driver delivered some, not all product cases/items to the customer (Due to some product cases/items lost/broken during the travel, or the customer refused). The fulfillment status will be updated from Not Fulfilled to Partially Fulfilled
- Scenario 3: The driver couldn't deliver any of the product cases/items to the customer. The fulfillment status will be updated from Not Fulfilled to Unfulfilled
Update status of Returned Way
Order status of Returned Way
- After the driver has received the empty product cases/single items of Returned Way from the customer and submitted the task on his Mobile app, the Order status of Returned Way will automatically be updated from Open to Picked & Packed
- After the driver has traveled back to the manufacturing Depot, handed the returned products of Depart Way and empty product cases/single items of Returned Way to you and submitted his tasks on Mobile app, you will need to update the Order status of Returned Way from Picked & Packed to Shipped
Fulfillment status of Returned Way
- As you update the Order status of Returned Way from Picked & Packed to Shipped, the Fulfillment status will automatically be updated from Unfulfilled to Fulfilled
- However, if during the journey back to the manufacturing Depot, some empty product cases/single items are broken or lost, and the actual empty product cases/single items quantity that the driver handed to you are less than what he received from the customer, then you need to click on the Fulfillment status field and select the value Partially Fulfilled instead
- On the product table, as you select the Fulfillment status as Partially Fulfilled, two additional information fields will appear: Number of Cases delivered; Number of Items delivered. You will have to specify the actual empty product case/single items received by inputting the quantity values into those fields
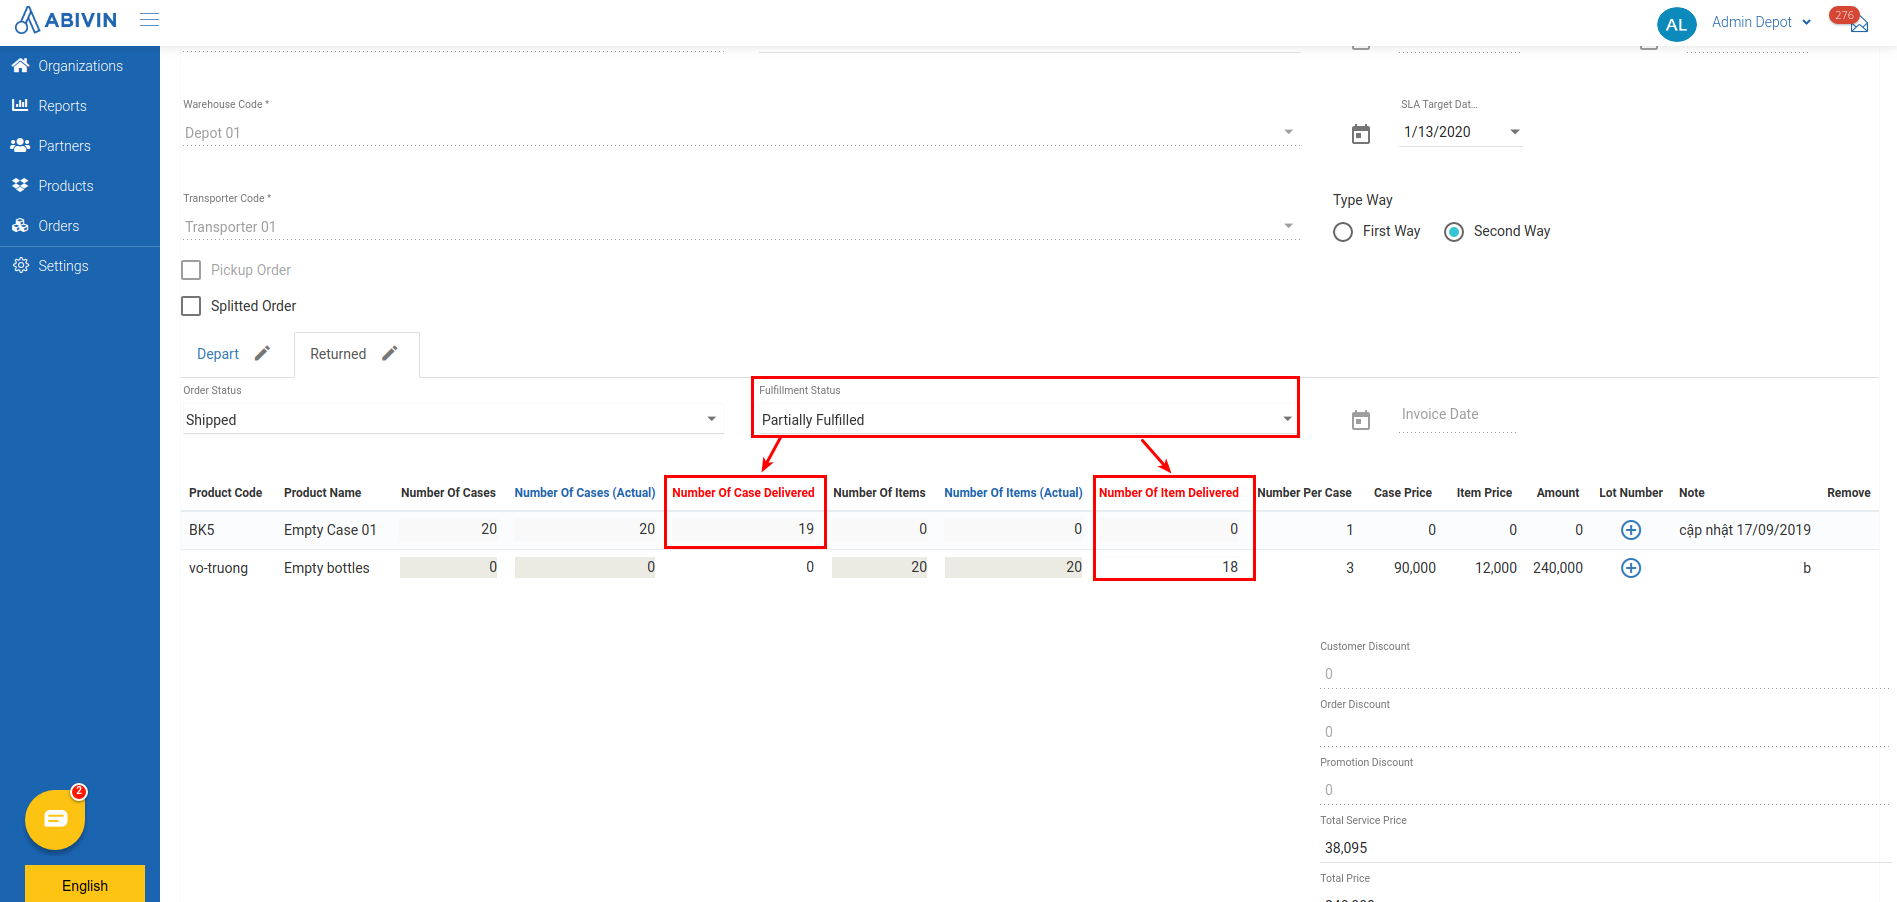
- For example: The driver received ninety empty product cases and one hundred empty single items from the customer. On the journey back to the manufacturing Depot, five empty product cases and ten empty single items were broken/lost. That means there were actually only eighty five empty product cases and ninety empty single items being handed back to you. Therefore, you will have to input the value 85 into Number of Cases delivered* field and 90 into Number of Items delivered fields
- If the customer did not opened, and the driver couldn't bring any empty product case/item back to the manufacturing Depot, then you will have to select the value Unfulfilled
- During this process, you can also add the products of which product codes have the prefix #_. Data of products like these will not be pushed to the external resource management system
Updated about 2 months ago
