Manage Actions
Error with Excel templateAt the moment, there is an error with the method of creating Action Codes using Excel template. Therefore, please use the Web form to create Action Codes instead. We will get this problem resolved soon!
Create actions
- Navigate to Tasks > Action List tab
Delete pre-generated action codes
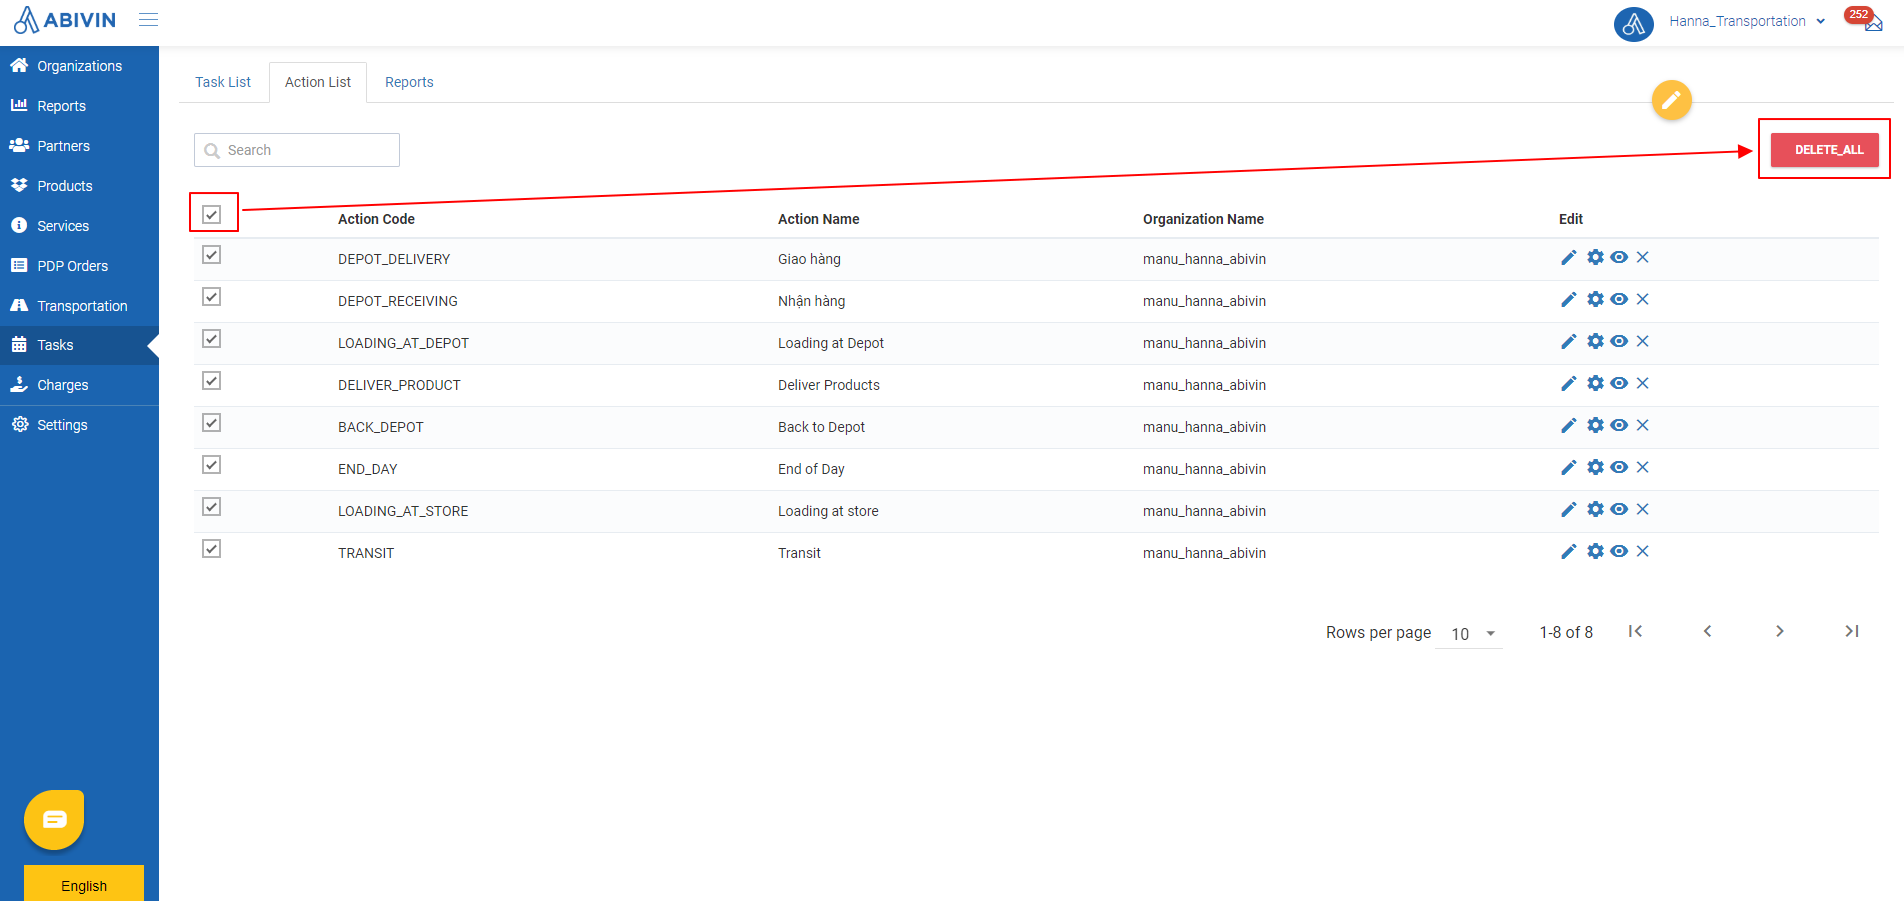
- You will notice that a set of actions has been automatically created. These are the default action codes for VRP model
- You would need to delete those pre-generated actions by clicking on the icon on the toolbar, then click on the button Delete All
Create actions for PDP - Outsourcing Fleet Model
- After you have deleted those actions, you need to create the actions for this model, using Web form or Excel template
- Please refer to the CRUD functions article to know the general steps about creating multiple objects using Excel template
- Below are the information fields of the actions of this model:
Action Code (Compulsory) | Action Name (Can be changed) | Organization Code | Action Description |
|---|---|---|---|
DEPOT_DELIVERY | Origin Depot Delivers | Always input the Organization Code of the Manufacturer | Warehouseman of the Origin Depot hands products to the Transporter's driver |
DEPOT_RECEIVING | Destination Depot Receives | Always input the Organization Code of the Manufacturer | Warehouseman of the Destination Depot receives products from the Transporter's driver |
LOADING_AT_DEPOT | Driver Checks in at Destination Depot | Always input the Organization Code of the Manufacturer | Transporter's driver checks in at the Destination Depot |
DELIVER_PRODUCT | Driver Delivers Product | Always input the Organization Code of the Manufacturer | Transporter's driver hands the products to the Warehouseman of the Destination Depot |
BACK_DEPOT | Driver Back to Depot | Always input the Organization Code of the Manufacturer | Transporter's driver checks in at the Transporter garage upon returning |
END_DAY | Driver Ends Day | Always input the Organization Code of the Manufacturer | Transporter's driver ends working day at the Transporter garage |
TRANSIT | Driver Transits | Always input the Organization Code of the Manufacturer | Transporter's driver rests for 8 hours after working 24 hours (Including driving, loading/unloading products) |
LOADING_AT_STORE | Driver Loads Products at Origin Depot | Always input the Organization Code of the Manufacturer | Transporter's driver loads products at the Origin Depot |
Create forms for actions
General steps
- Hover on the Action code for which you want to create form, then click on Form Builder icon

- You will be directed to the Form Builder screen, where you can start creating form for that Action code
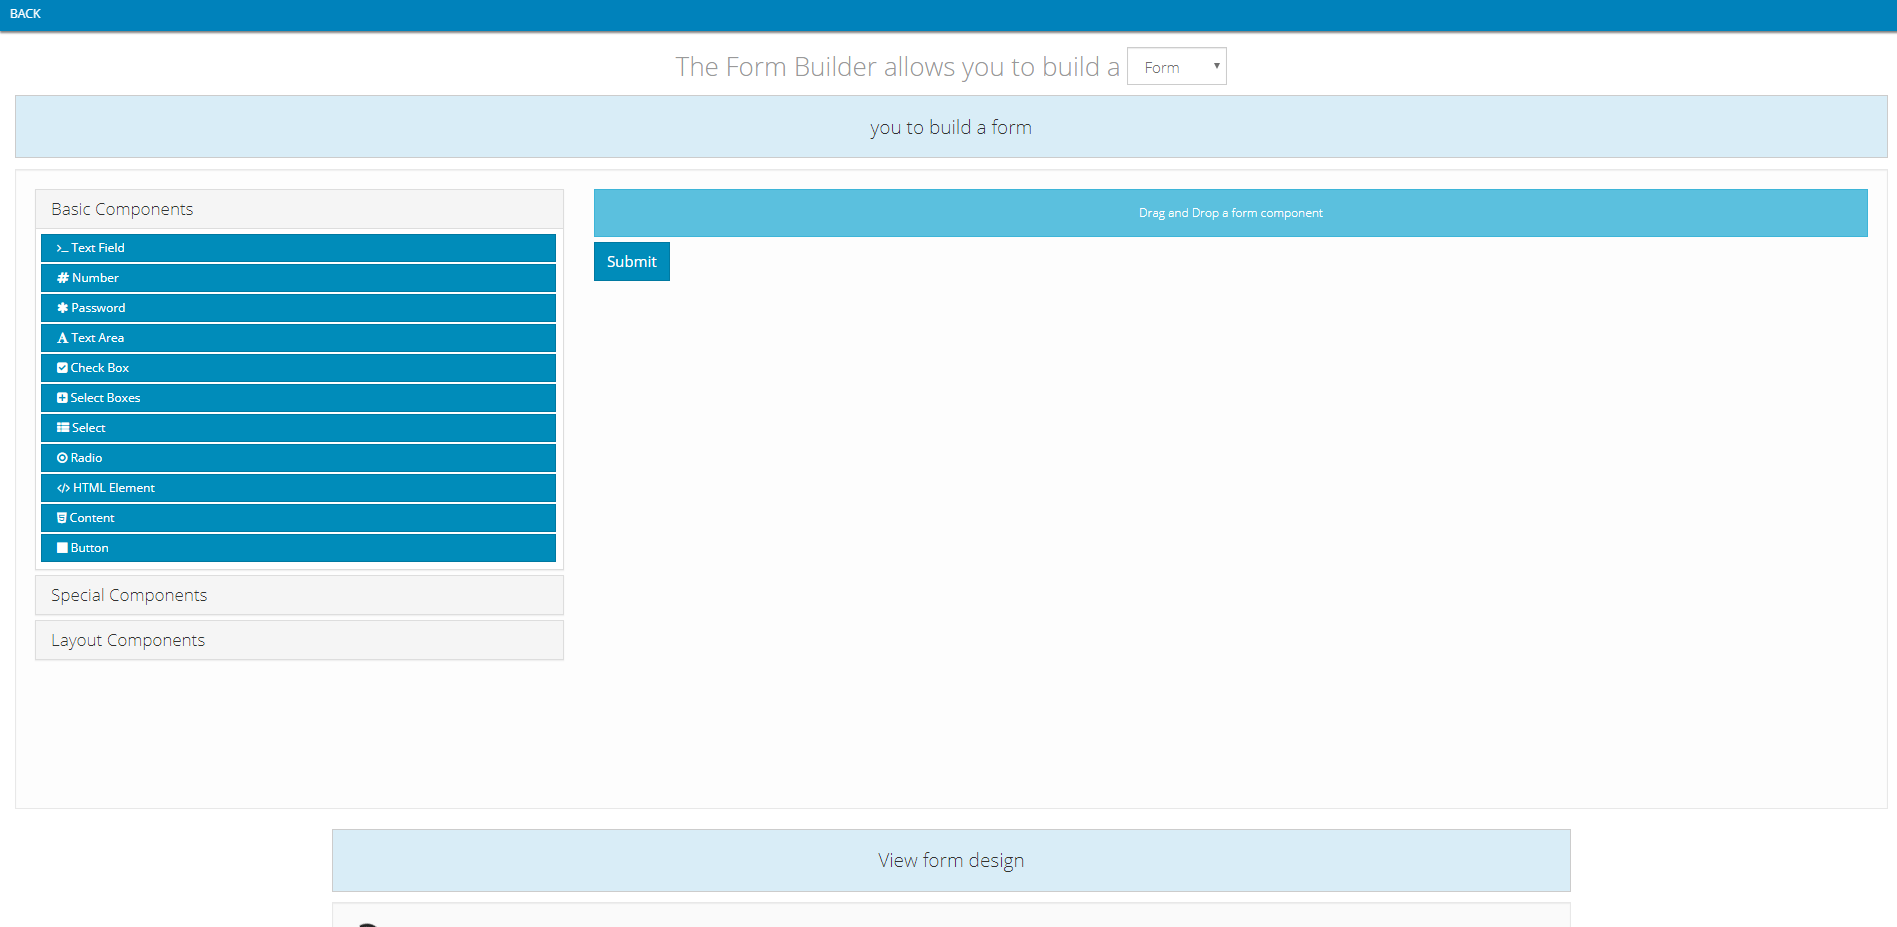
- You will see a blue Submit button. You need to remove it by hovering your mouse over it, then click on the red icon at the far right
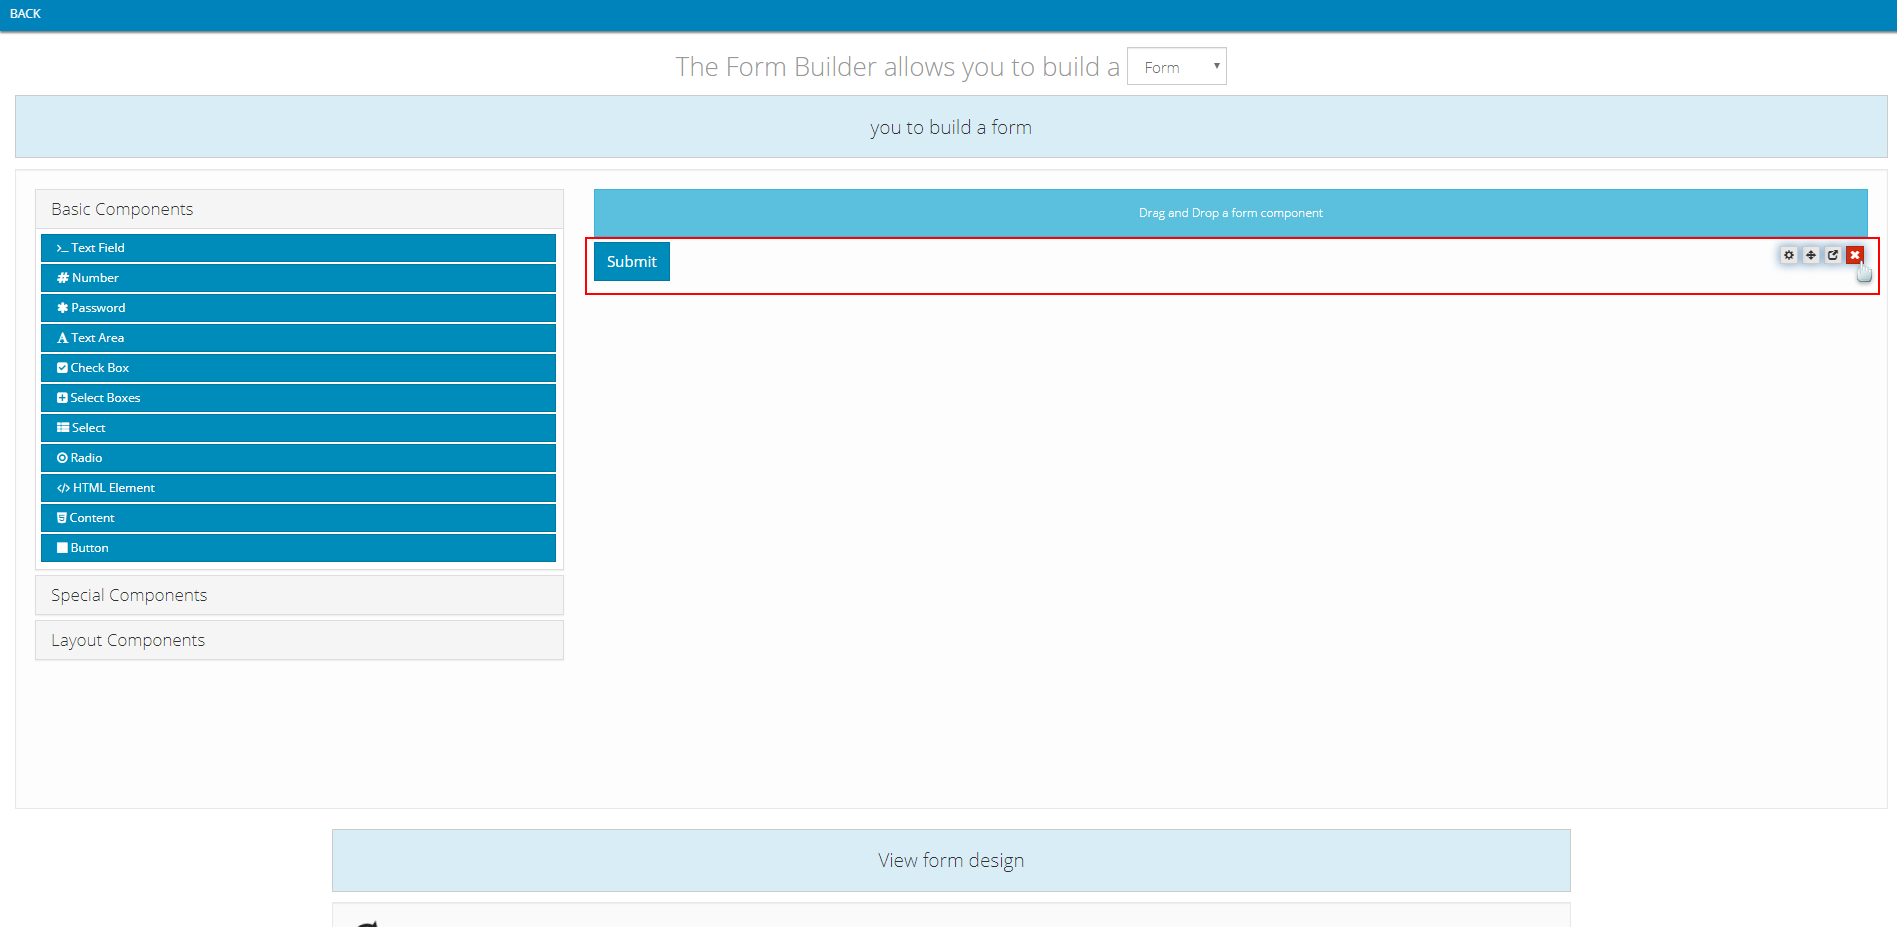
- Now you can begin to create form for the Action code, by dragging the appropriate component on the left side to the right side
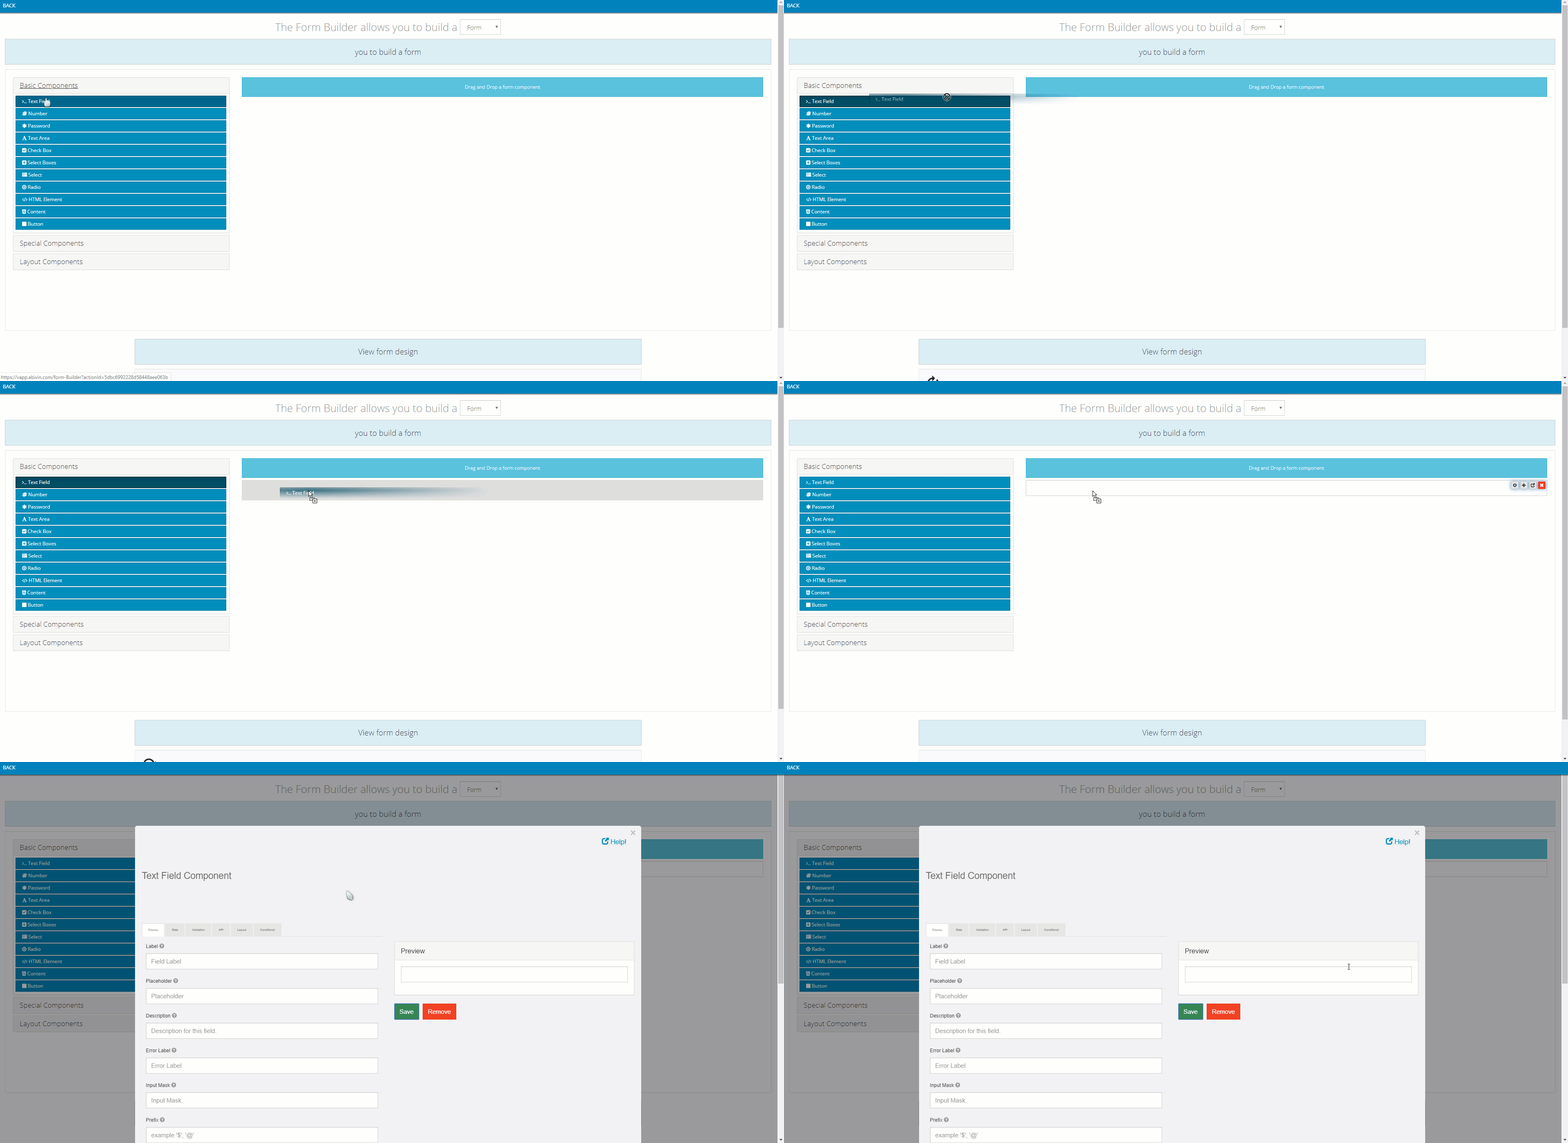
- The set up form of the component will appear. Input data into that form, then click Save
- We will specify the detail for each component below
All data must be input exactly as shown on images, both lowercase and uppercase letters, unless otherwise specified
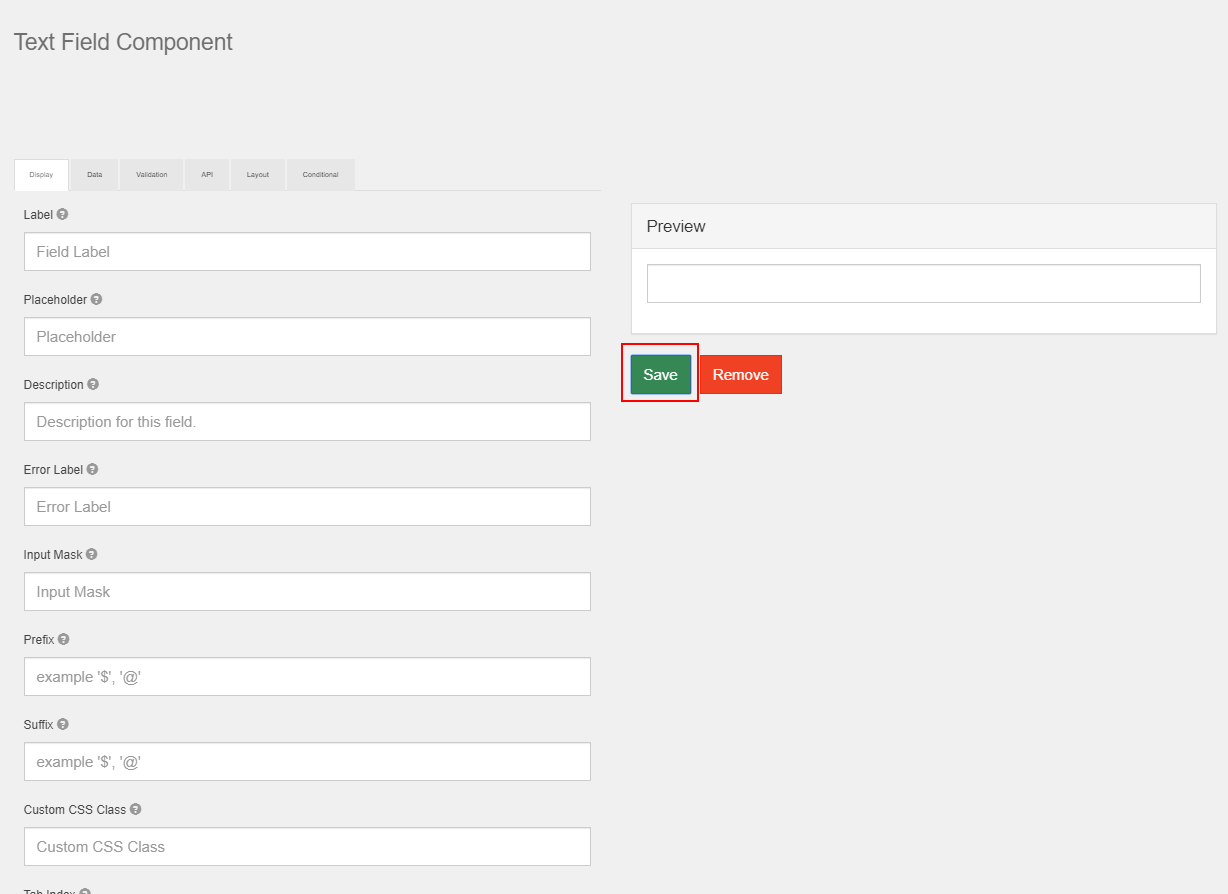
- Note: For some special components, you can drag other components inside them
- After you have finished configuring all components, scroll down the Form Builder screen, then click on Save View to finish creating the form for the Action code
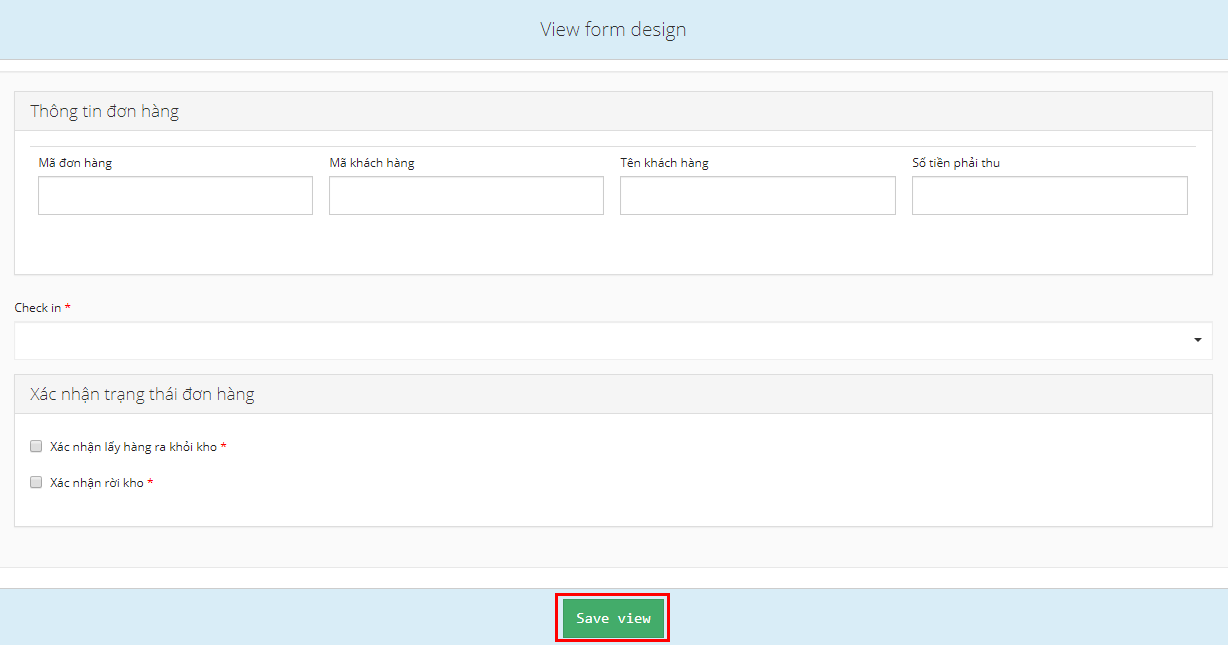
- A pop up will appear to let you know you have succeeded creating the form

- Click on Back to get back to the Action list tab. You can continue to create forms for other Action codes
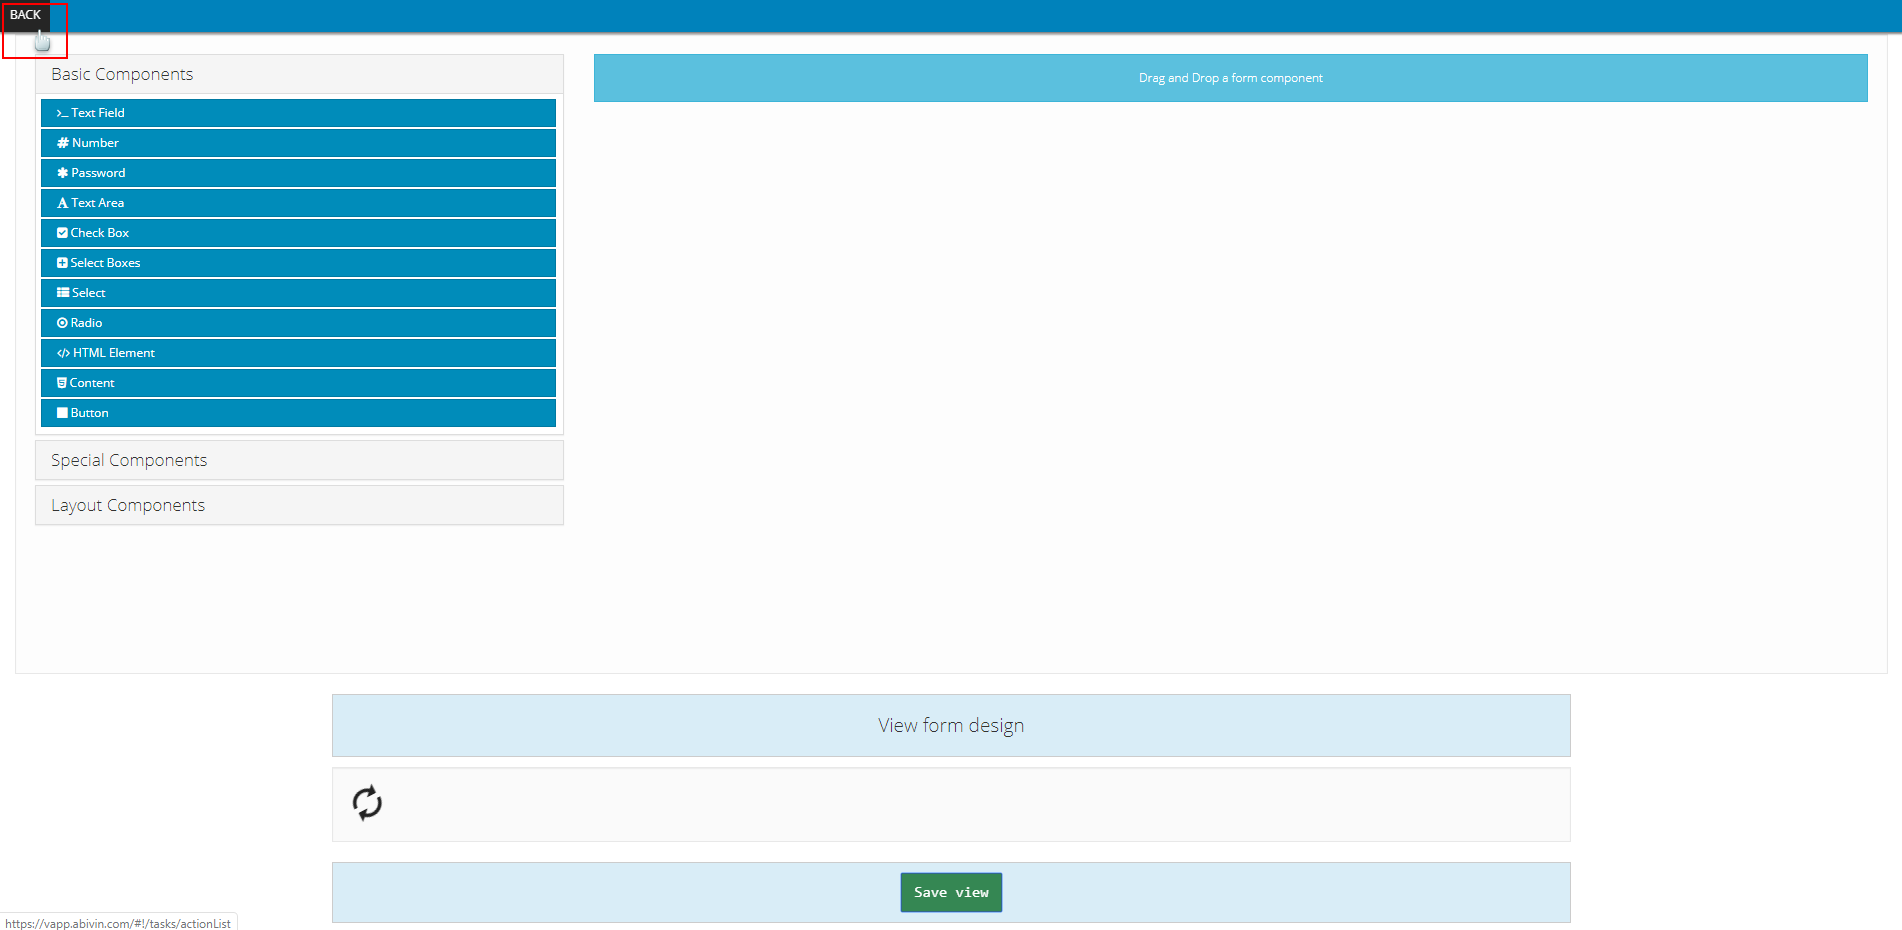
- We will now move on to create form for each action code
DEPOT_DELIVERY; DEPOT_RECEIVING action codes
1.1 Shipping Information Panel
- Component used: Layout Components > Panel
- Position: On top
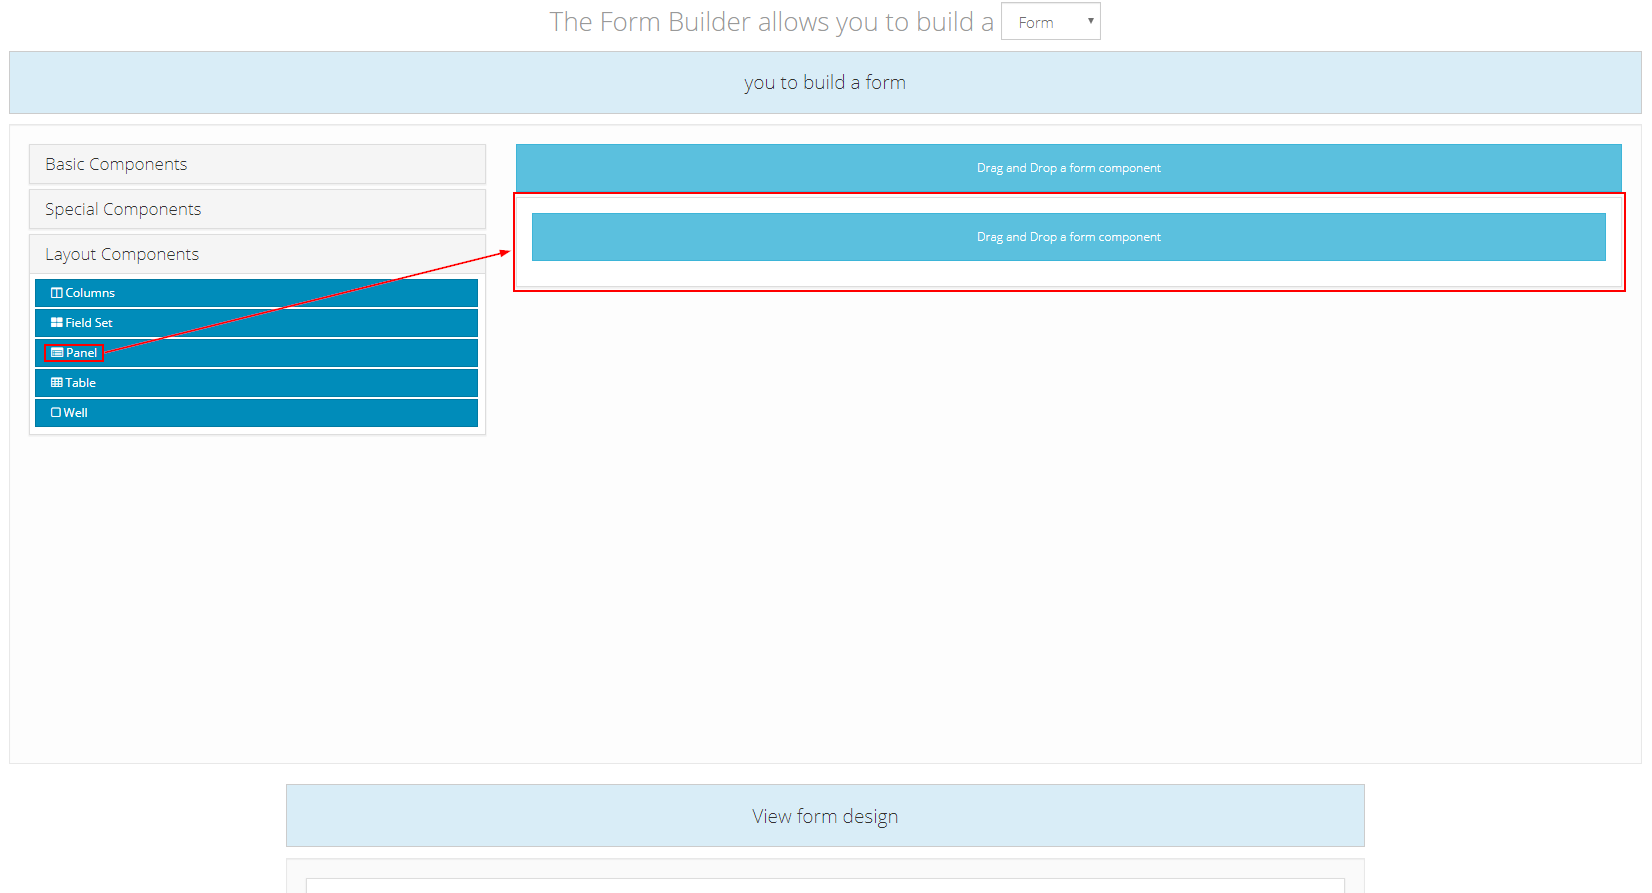
- Component content:
- Note: The value input into Title field can be changed freely

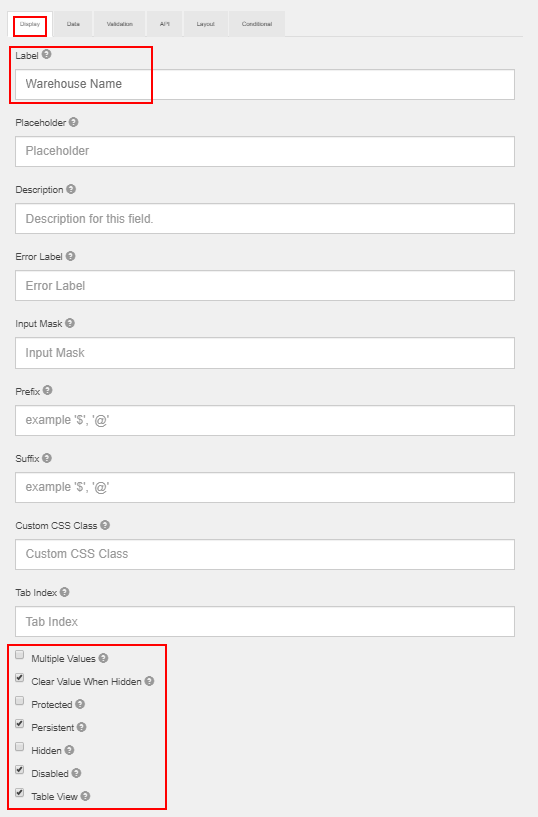
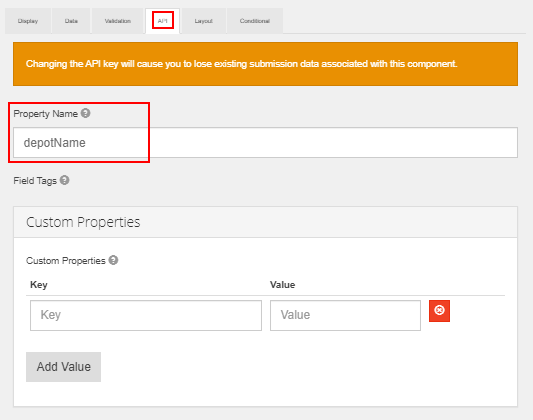
1.2 Warehouse Name Panel
- Component used: Basic Components > Text Field
- Position: Inside Shipping Information panel

- Component content:
- Note: The value input into Title field can be changed freely
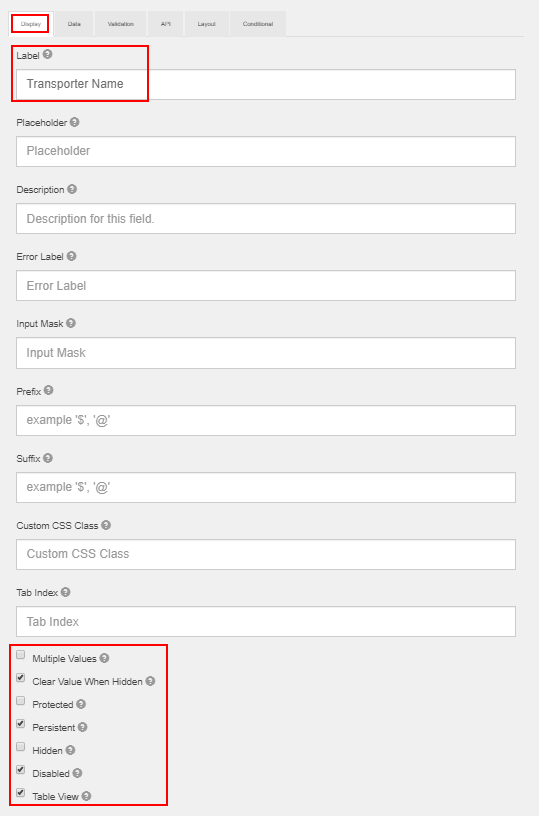
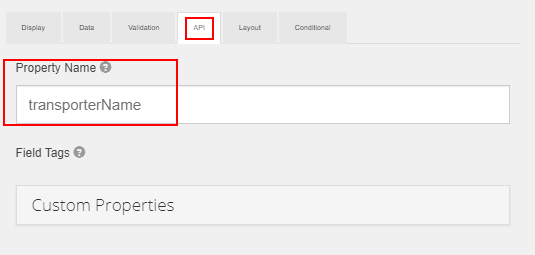
1.3 Transporter Name Panel
- Component used: Basic Components > Text Field
- Position: Inside Shipping Information panel, below Warehouse Name panel

- Component content:
- Note: The value input into Label field can be changed freely
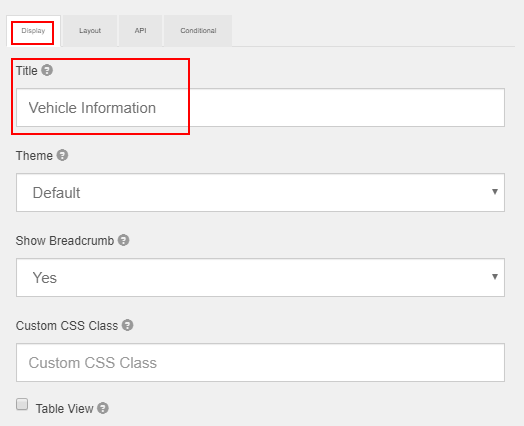
1.4 Vehicle Information Panel
- Component used: Layout Components > Panel
- Position: Below Shipping Information panel

- Component content:
- Note: The value input into Title field can be changed freely
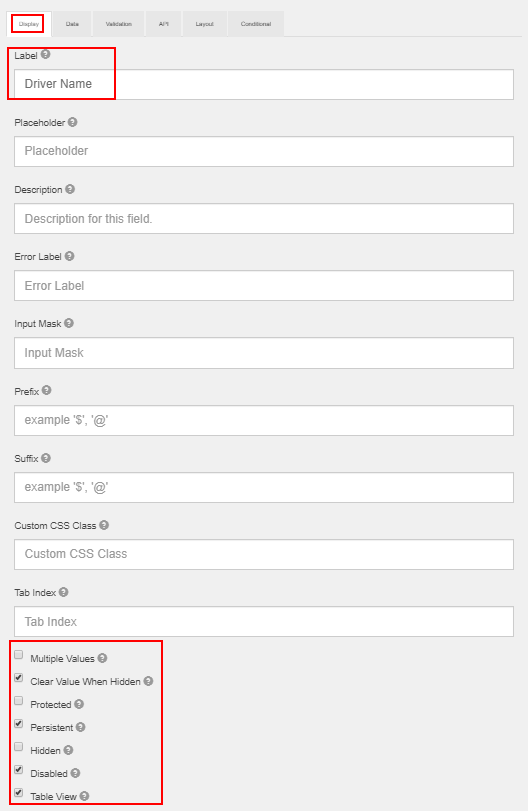
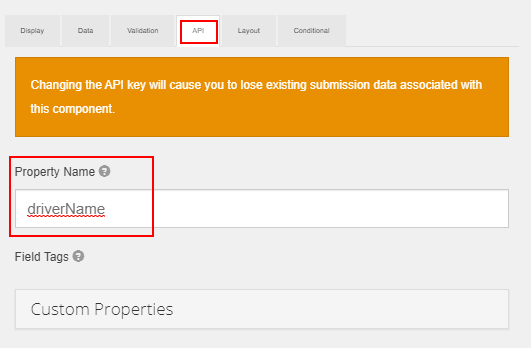
1.5 Driver Name Panel
- Component used: Basic Components > Text Field
- Position: Inside Vehicle Information panel

- Component content:
- Note: The value input into Label field can be changed freely
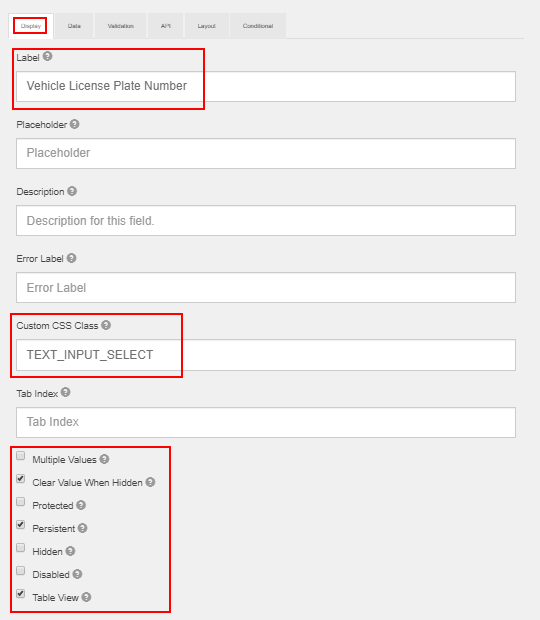
1.6 Vehicle License Plate Number Panel
- Component used: Basic Components > Select
- Position: Inside Vehicle Information panel, below Driver Name panel

- Component content:
- Note: The value input into Label field can be changed freely
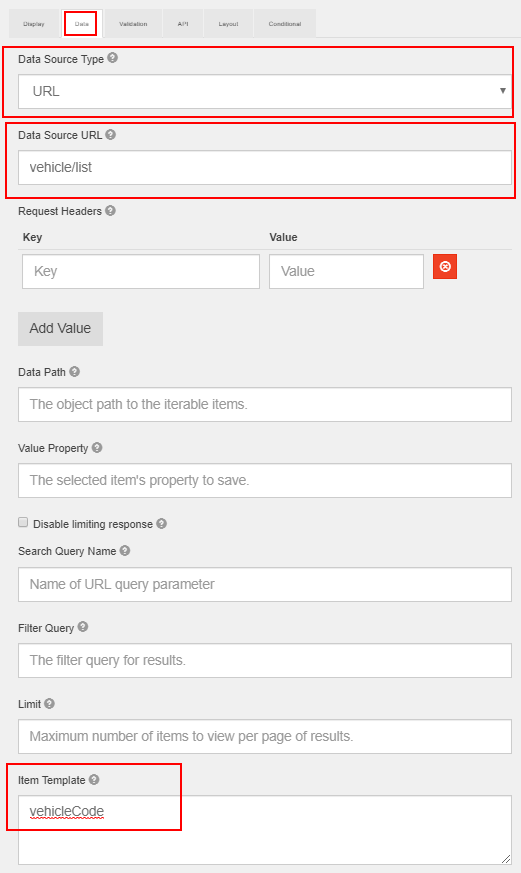
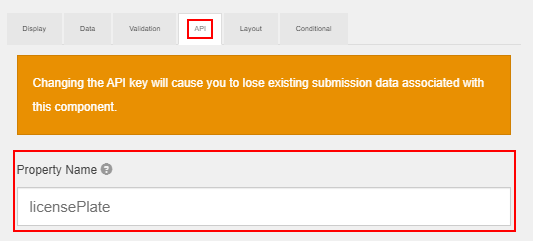
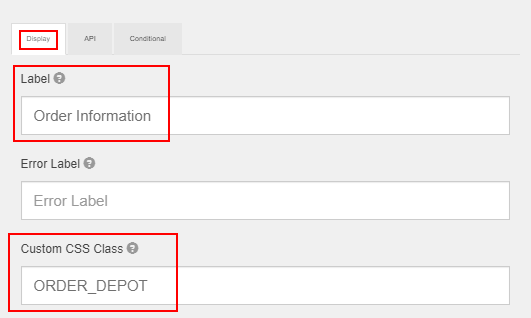
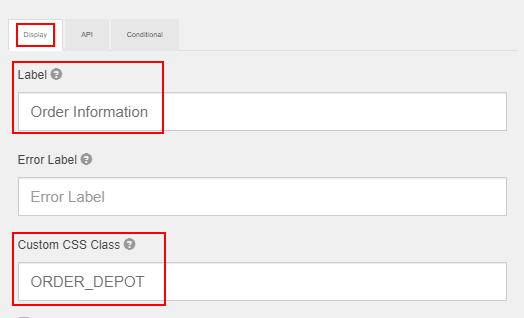
1.7 Order Information Panel
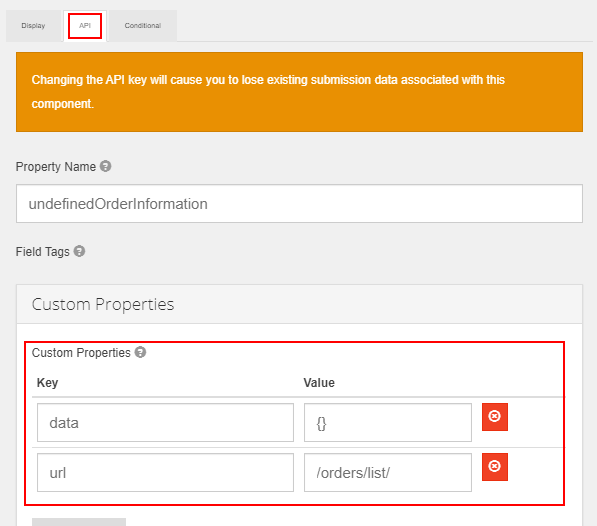
- Component used: Special Components > Container
- Position: Below Vehicle Information panel
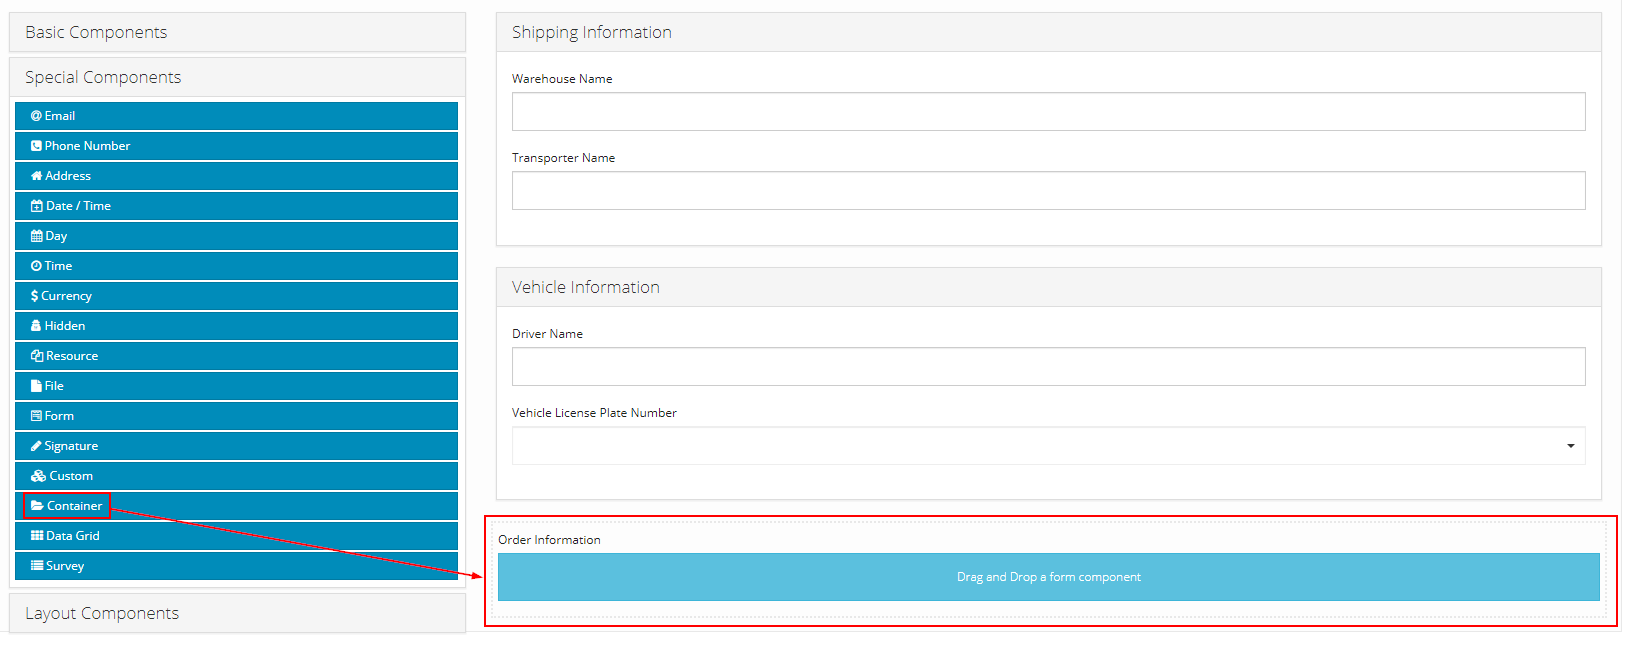
- Component content:
- Note: The value input into Label field can be changed freely
1.8 Check In Panel
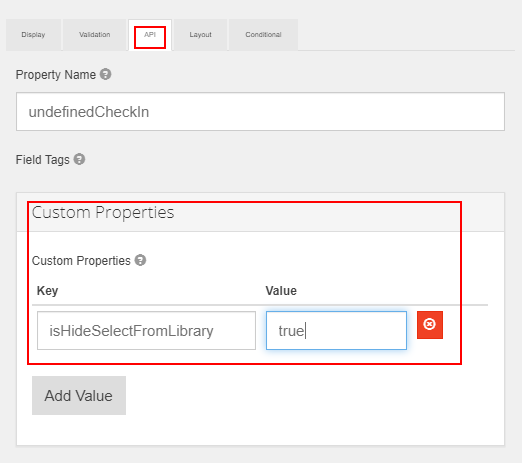
- Component used: Special Components > File
- Position: Below Order Information panel
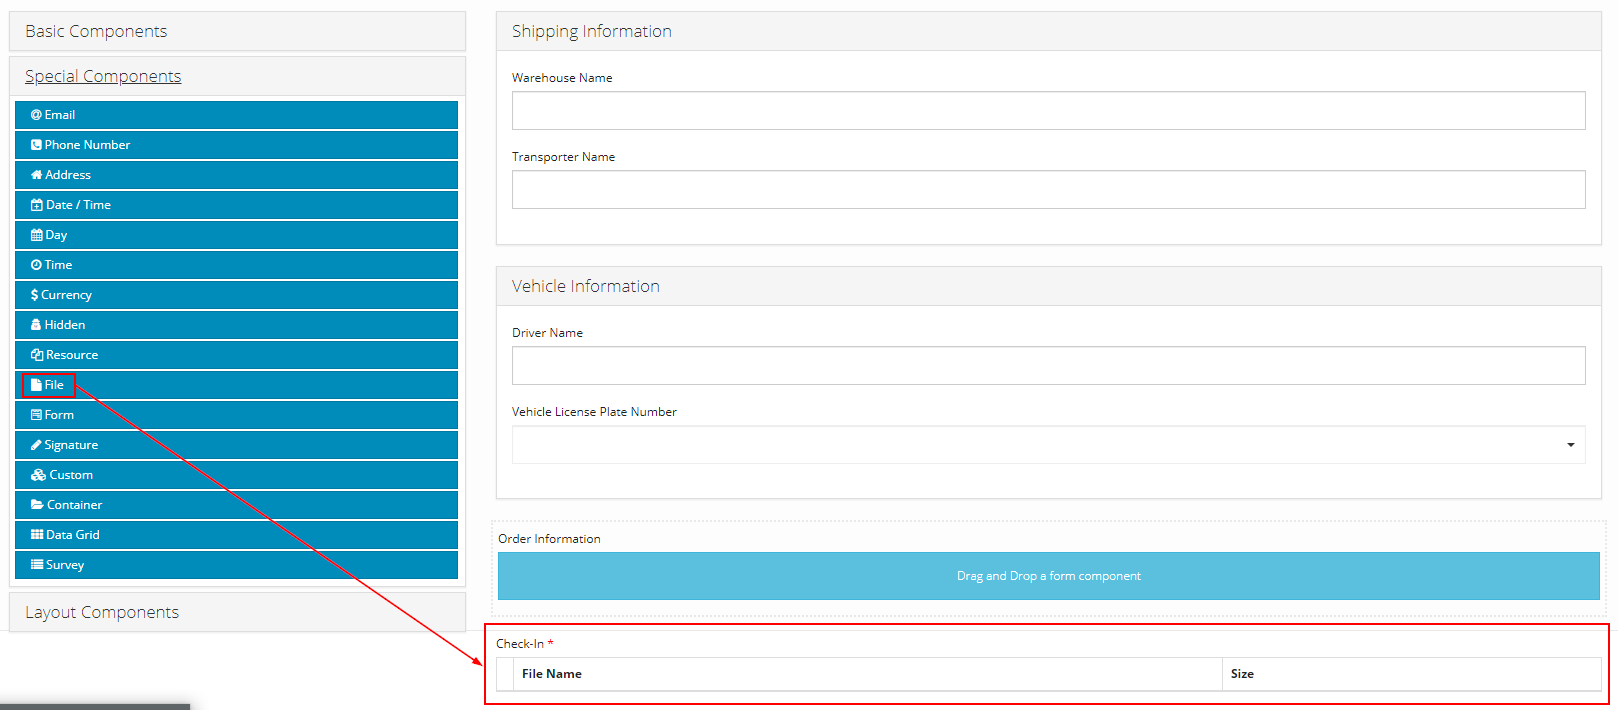
- Component content:
- Note: The value input into Label field can be changed freely


TRANSIT action code
2.1 Check In Panel
- Component used: Special Components > File
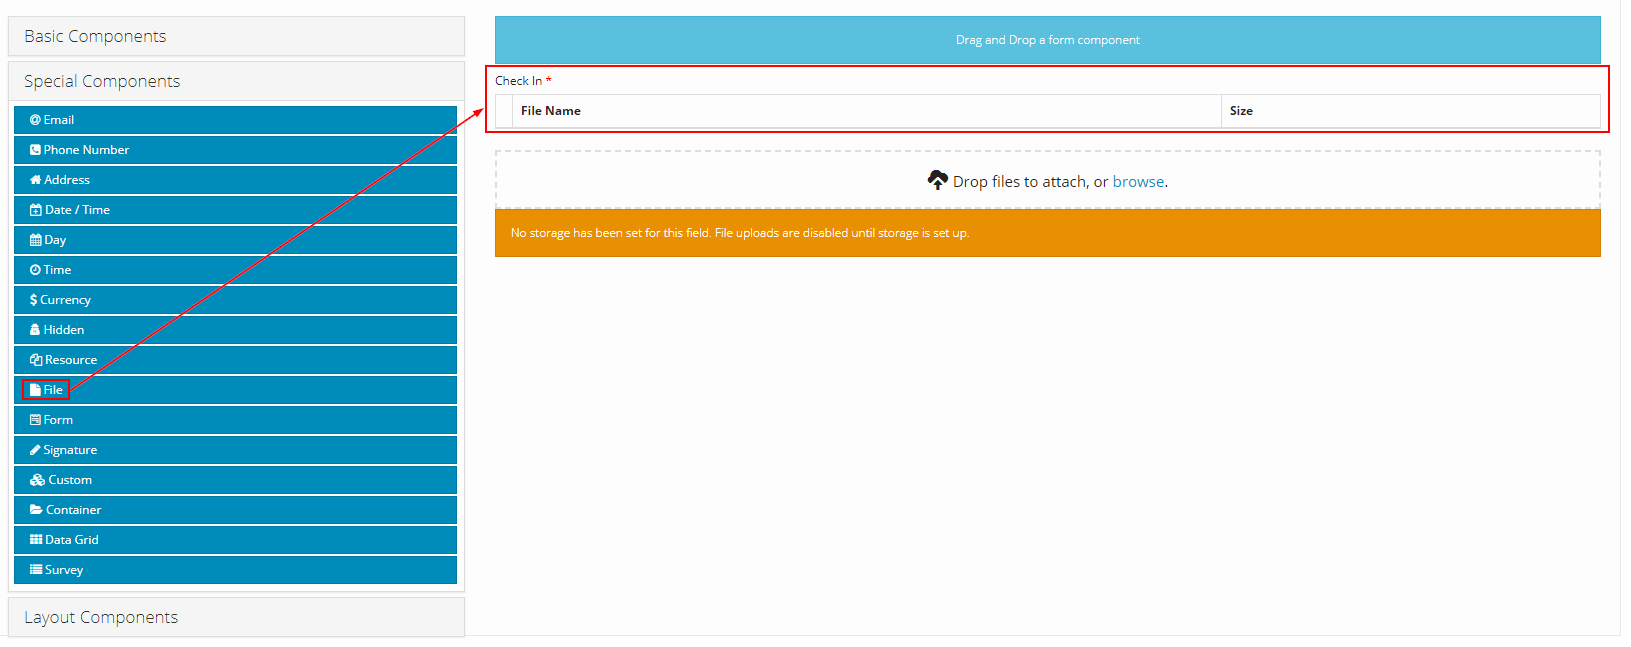
- Component content:
- Similar as Check In Panel described above
LOADING_AT_STORE action code
3.1 Order Information Panel
- Component used: Special Components > Container
- Position: On top
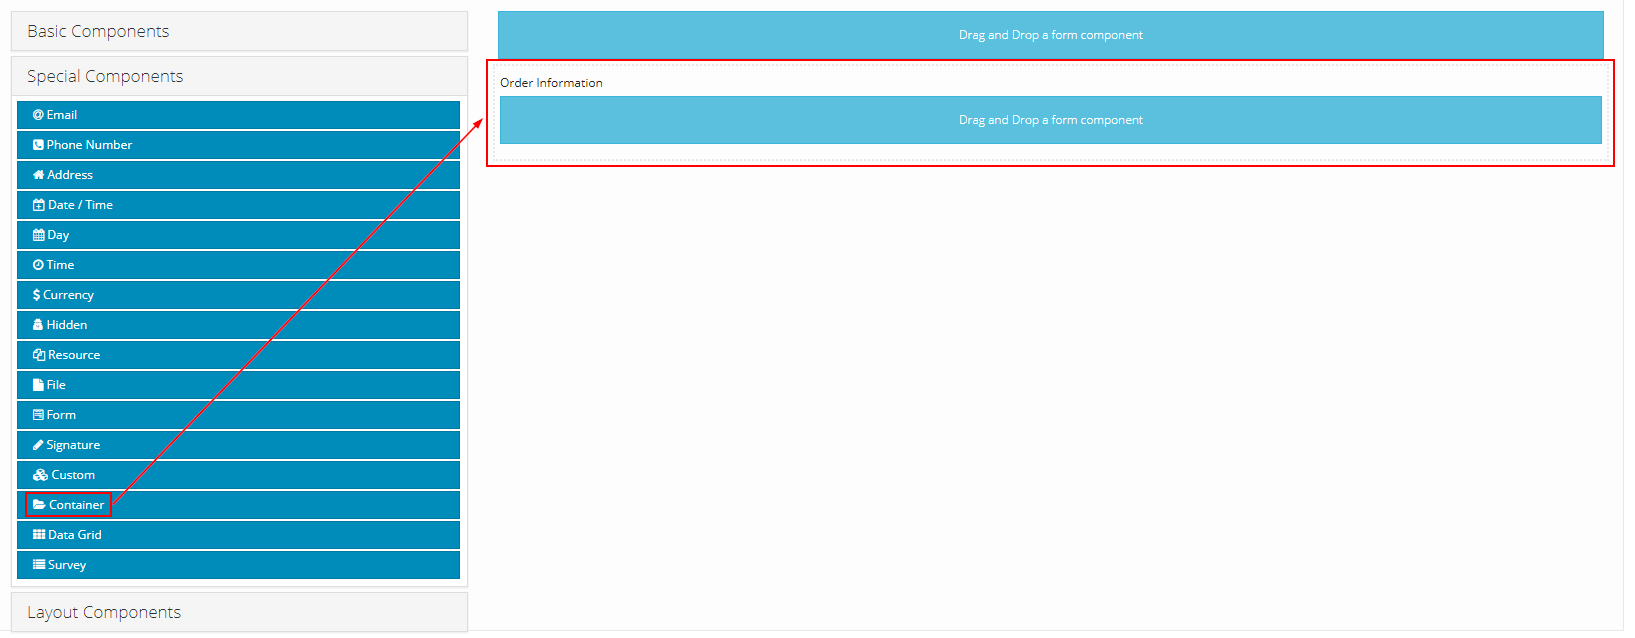
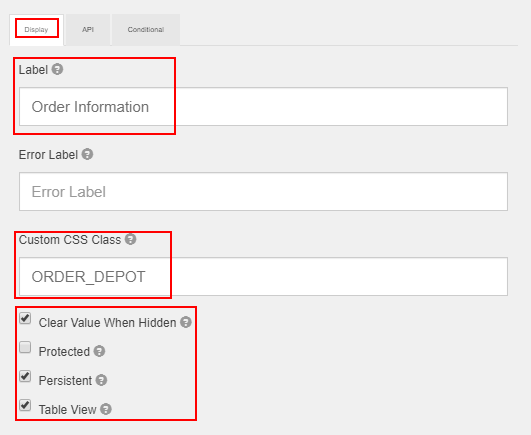
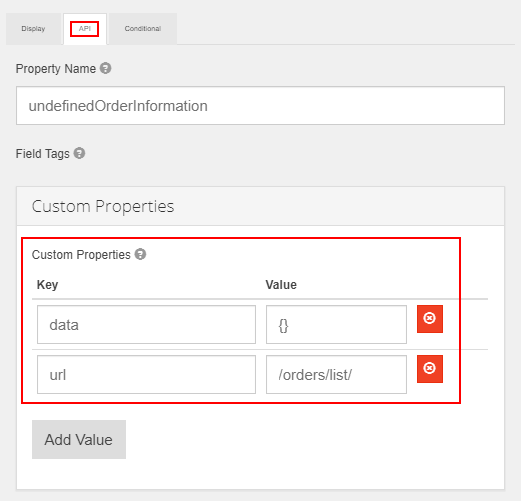
- Component content:
- Note: The value input into Label field can be changed freely
3.2 Check In Panel
- Component used: Special Components > File
- Position: Below Order Information panel
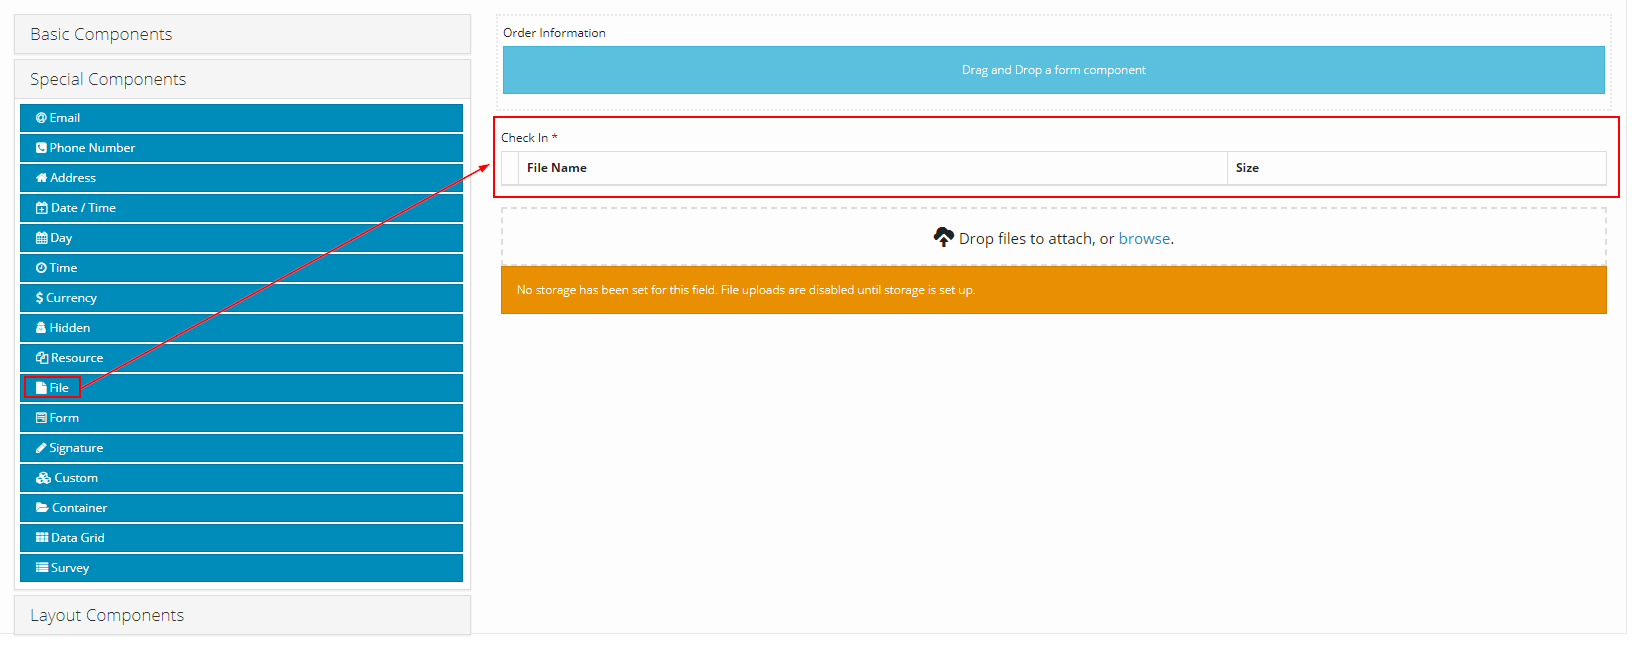
- Component content:
- Similar as Check In Panel described above
LOADING_AT_DEPOT; END_DAY action codes
4.1 Order Information Panel
- Component used: Layout Components > Panel
- Position: On top

- Component content:
- Note: The value input into Title field can be changed freely

4.2 Order Table Panel
- Component used: Layout Components > Table
- Position: Inside Order Information panel

- Component content:
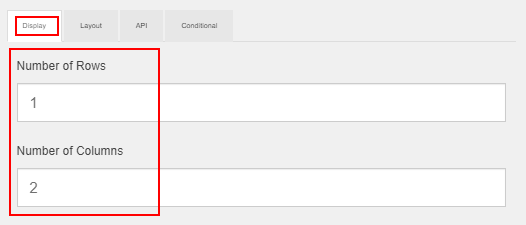
4.3 Order Code Panel
- Position: Inside Order Table panel

- Component content:
- Note: The value input into Label field can be changed freely


4.4 Total Order Weight Panel
- Component used: Basic Components > Text Field
- Position: Inside Order Table panel, to the right of Order Code panel

- Component content:
- Note: The value input into Label field can be changed freely


4.5 Check In Panel
- Component used: Special Components > File
- Position: Below Order Information panel
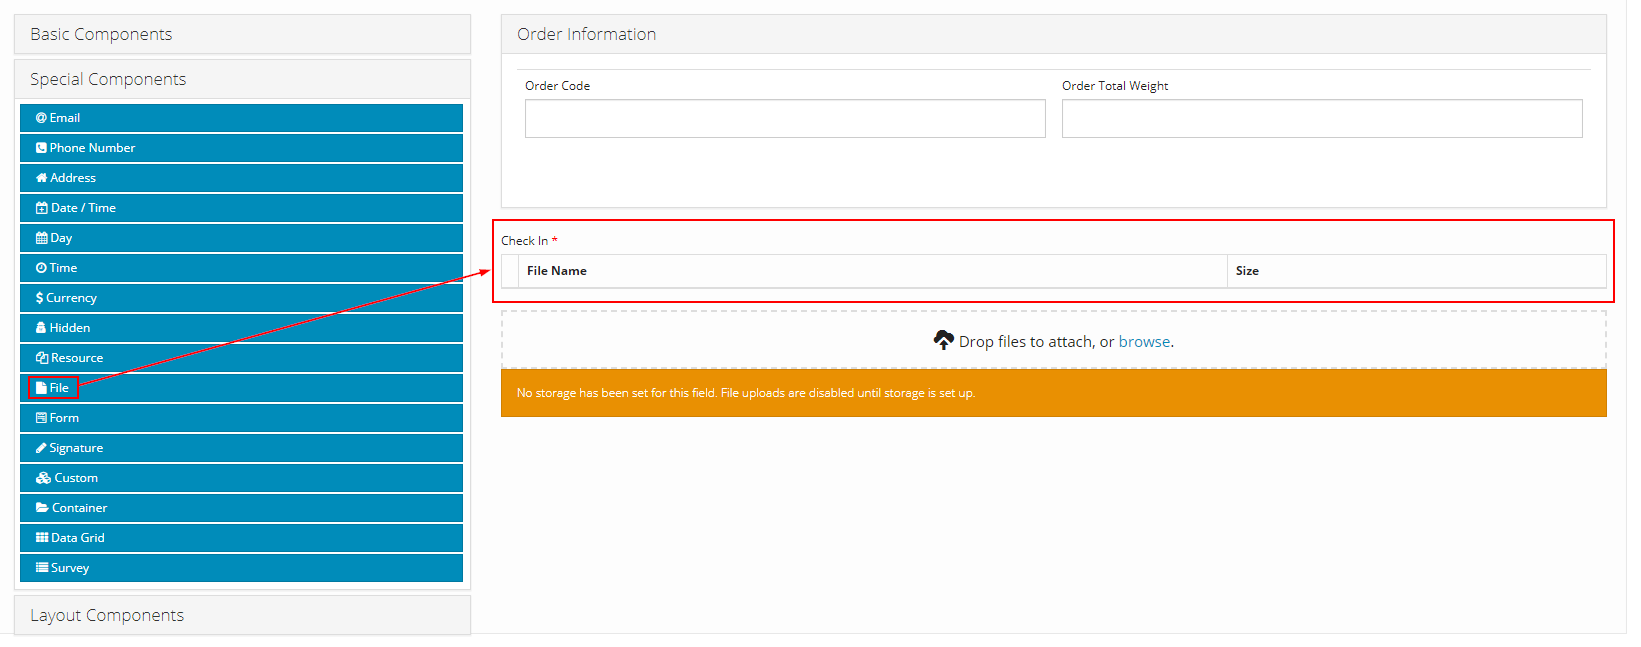
- Component content:
- Similar as Check In Panel described above
DELIVER_PRODUCT; BACK_DEPOT action codes
5.1 Order Information Panel
- Component used: Special Components > Container
- Position: On top
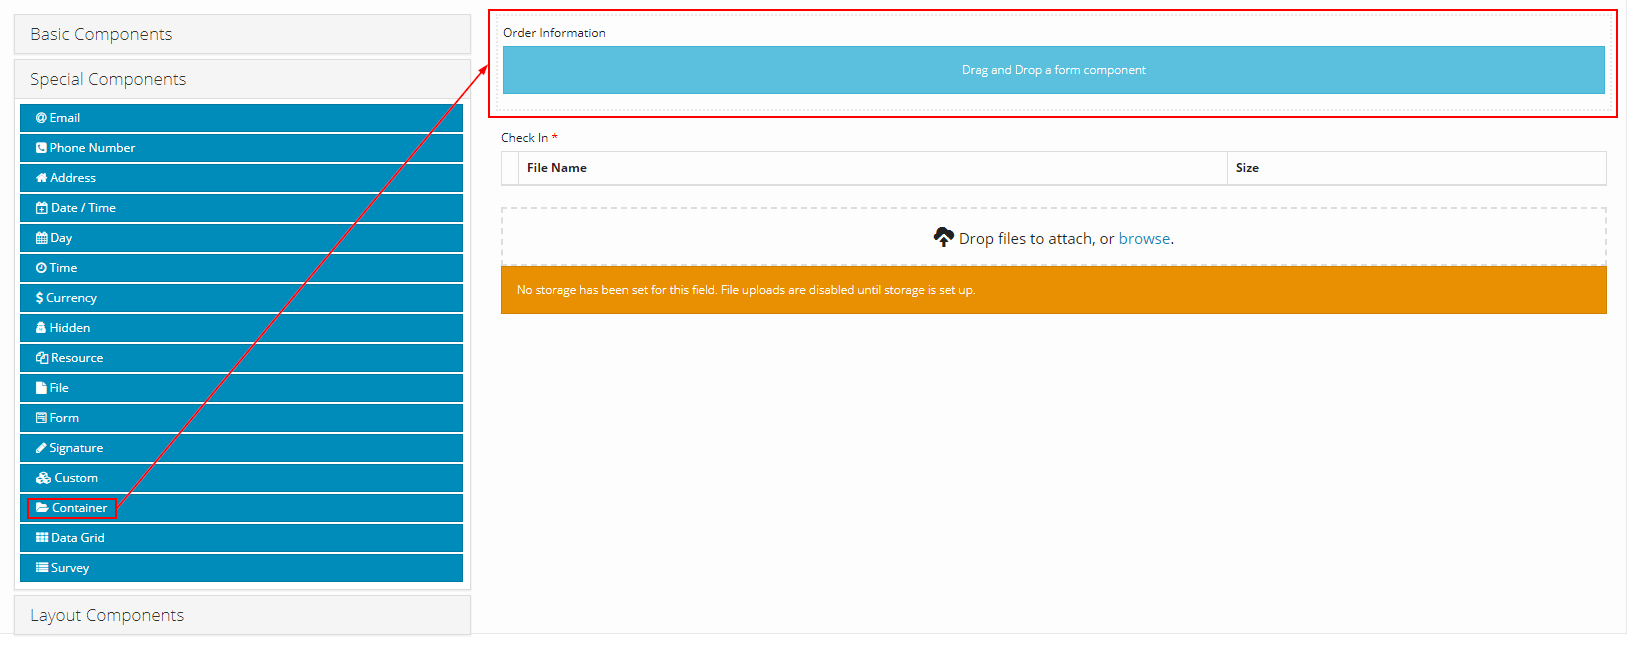
- Component content:
- Note: The value input into Label field can be changed freely
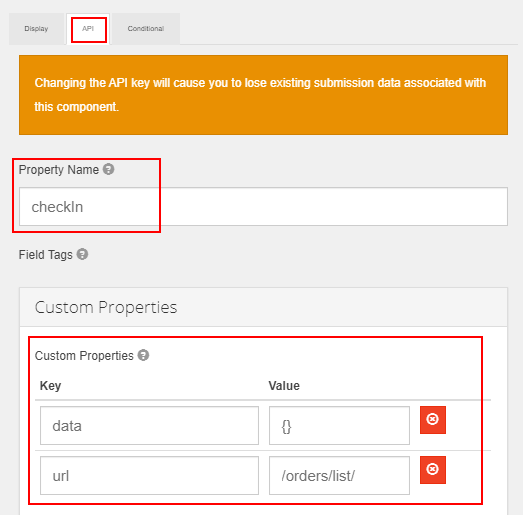
5.2 Check In Panel
- Component used: Special Components > File
- Position: Below Order Information panel
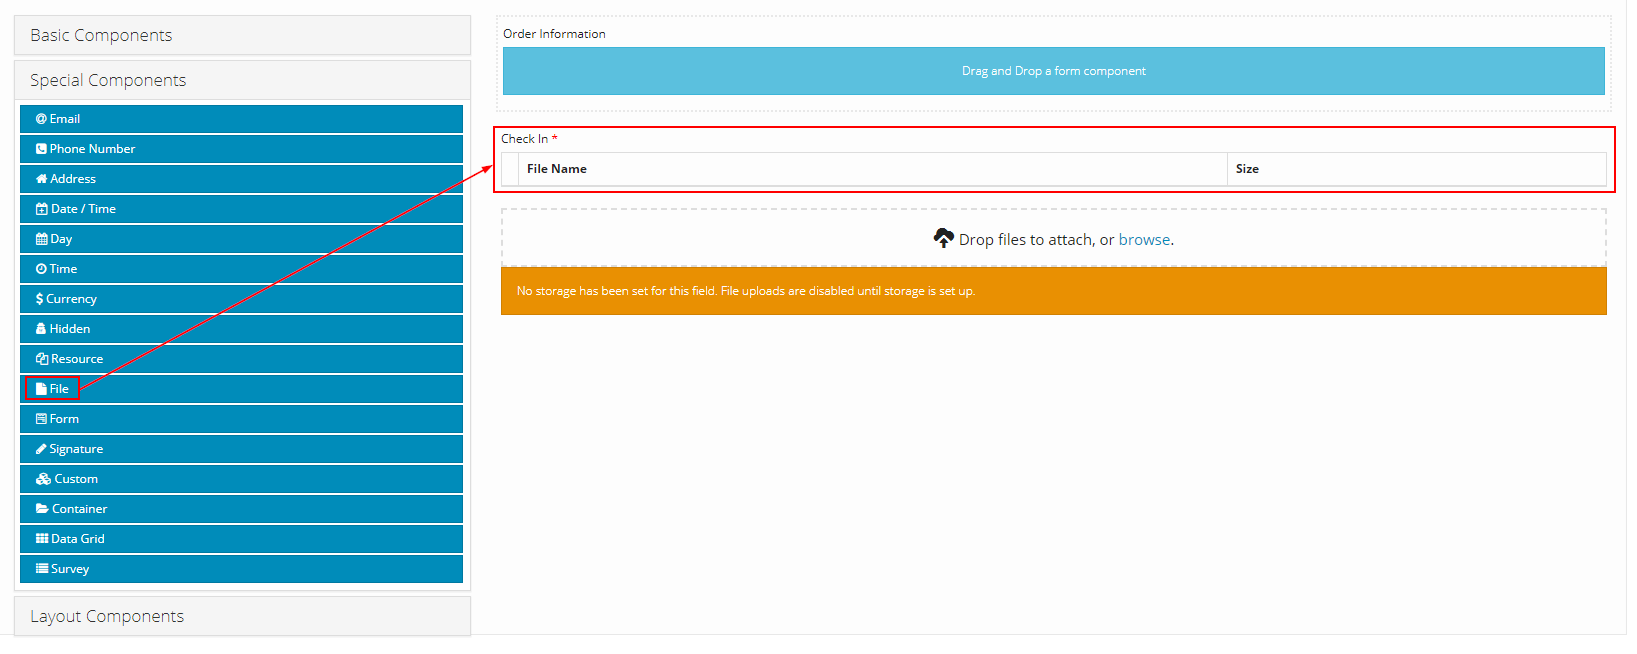
- Component content:
- Similar as Check In Panel described above
Updated about 1 month ago
