Configurations by Organization type
- This article will act as a handbook, listing all configurations that can be enabled to provide you with additional functions beside the default functions provided by this model
Except for the configurations mentioned below, other configurations are not meant for this model even if they can be enabled
Process to enable/disable configurations
- Navigate to Organizations > Organization List tab
- Click on the icon Edit of the appropriate Organization
- The Web form Edit Organization will appear. Navigate to the tab More Configuration by clicking on its title
- The configurations are categorized by sections such as Model; Systems etc. Click on the section title to open that section
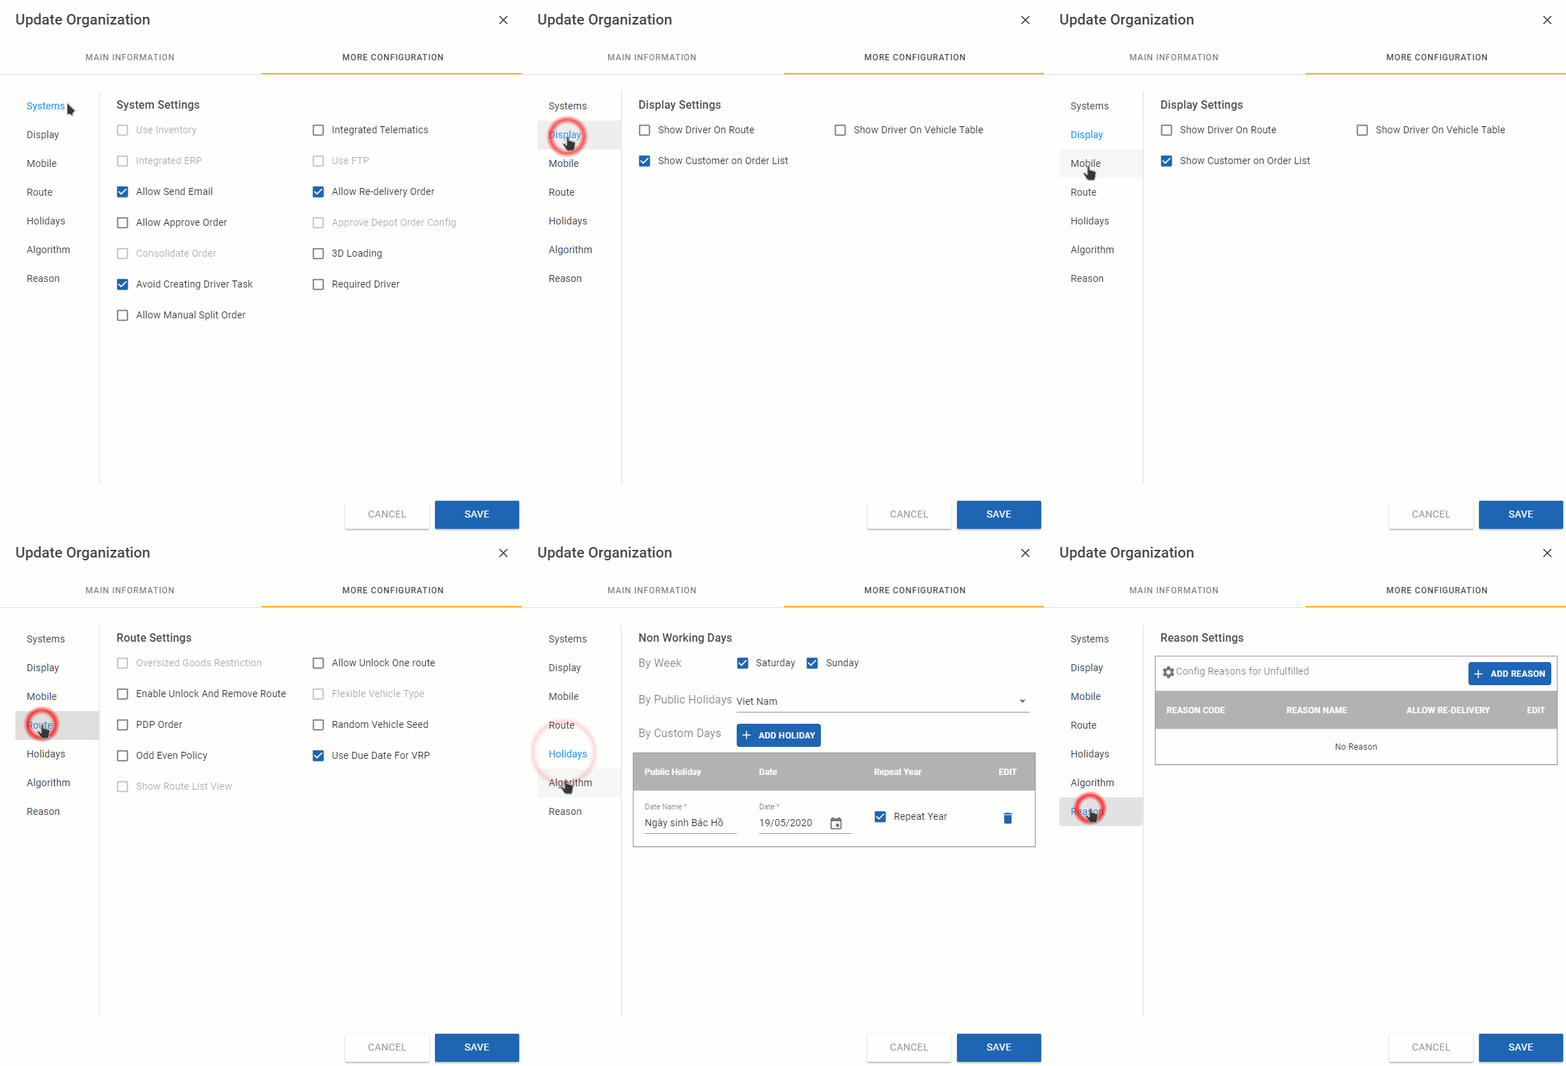
Illustration GIF (English)
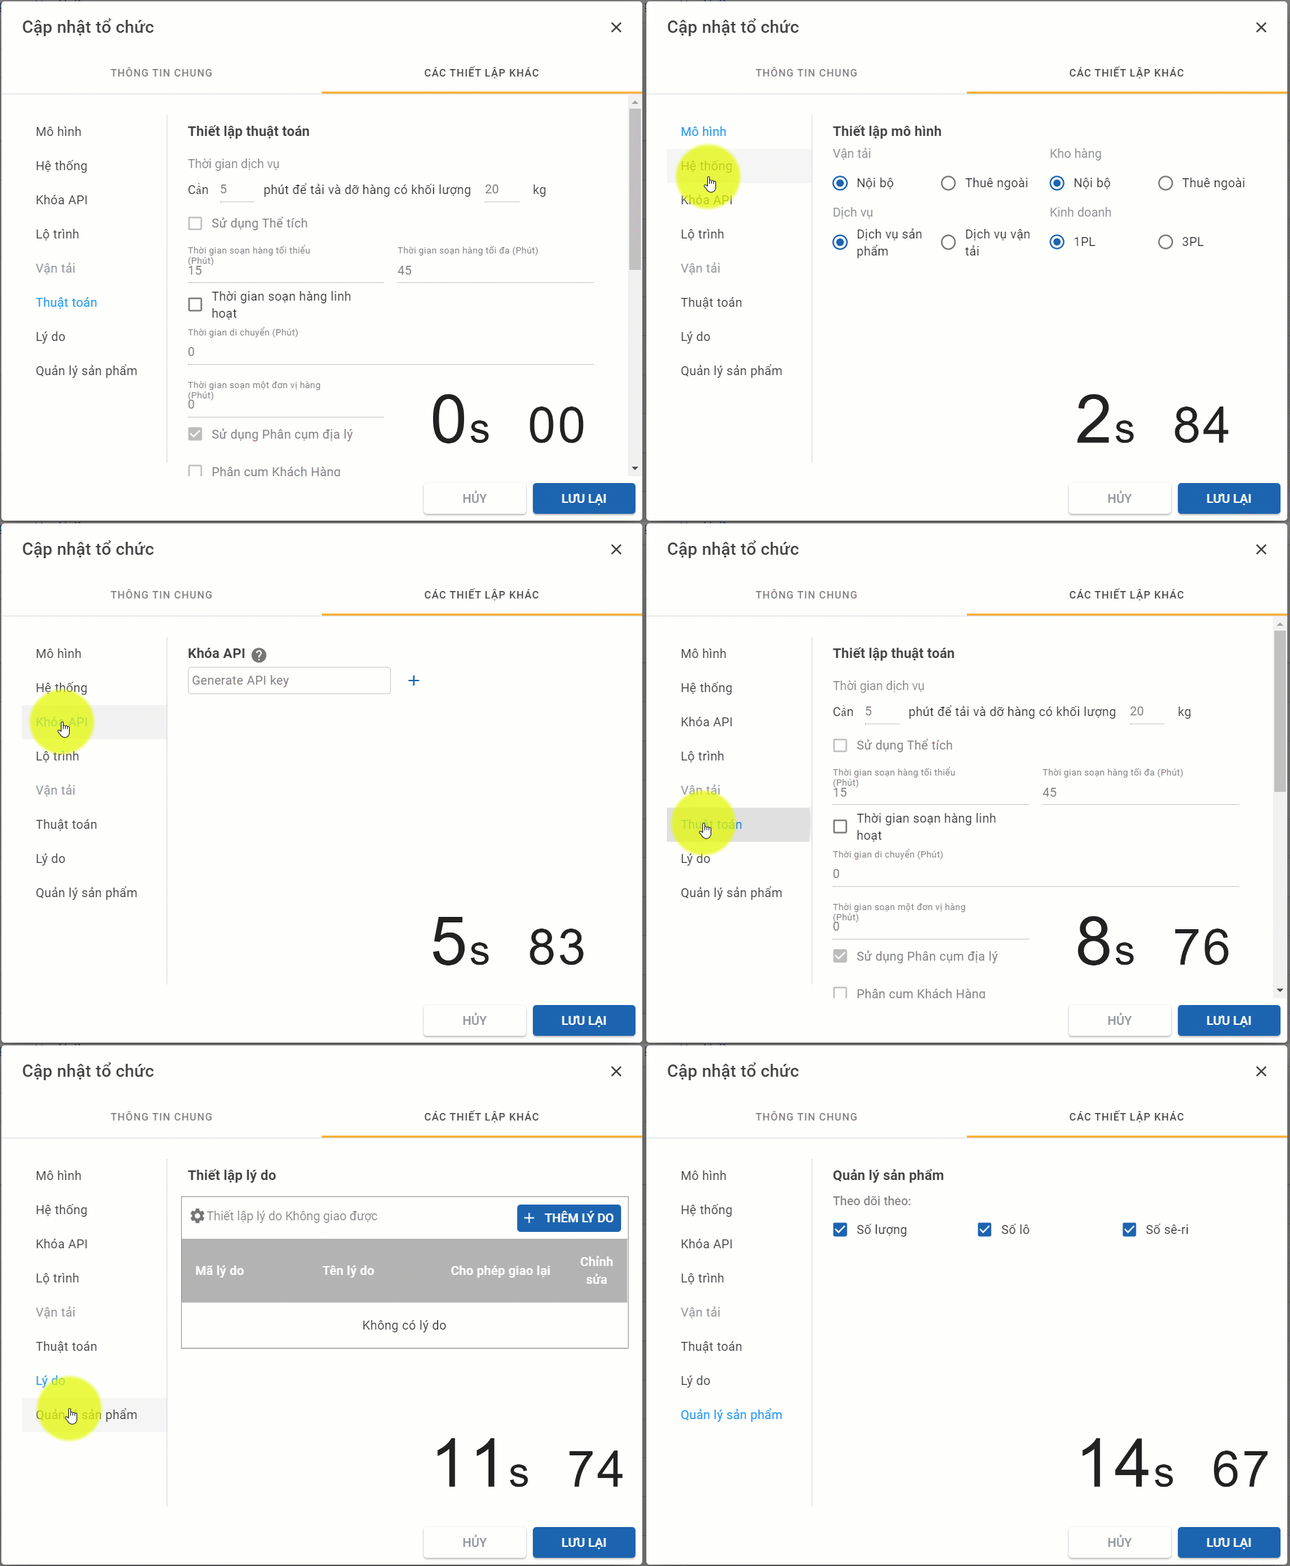
Illustration GIF (Vietnamese)
- To enable a configuration, click on its respective checkbox or radio button , or inputting in its information fields. Then, click Save to save the changes
- Note: For the configuration to take effect (Especially configurations of the Manufacturer Organization type), you might have to log out of your account then log in again
- Below are the list of configurations used by each Organization type of this Model. Configurations not mentioned are used in other Models
Configurations for Manufacturer
Transportation
Warehouse
- Section: Model
- For this model, always select the radio button Inhouse. Do not select Outsourcing
- Section: Model
- For this model, always select the radio button Inhouse. Do not select Outsourcing
Services
- Section: Model
- This configuration is currently not used for this Model. It is used for VRP - Transporters to Create Routes and PDP - Manufacturers to Select Transporters Models
Business
- Section: Model
- This configuration will determine the Organization Type which will directly manage the Product Categories and Product general information. There are two options
1PL
- Product Categories and Product general information will be directly managed solely by the Manufacturer
3PL
- Product Categories and Product general information will be directly managed by each Organization, instead of uniting at the Manufacturer
- Read more about this at the following article: Manage Product Categories and Manage Products
Integrated ERP
This configuration is only required for certain user accounts, and is used in conjunction with the following configuration: Order Consolidation
- Section: Systems
- Enable the integration between Abivin vRoute with the external FTP server
- Read more about this configuration at the following article: FTP Server
Flexible Vehicle Type
- Section: Route
- Enable the customers to accept more vehicle types, not only limited to the default vehicle types of this model (Truck; Semi-truck; Motorbike)
- Read more about this configuration at the following article: Site-Dependent Constraint
Allow Approve Order
- Section: Systems
- Enable the function to let the Dispatchers approve orders submitted from the Delivery Mobile app (By the Salesmen) and Consumer Mobile app (By the Consumers) on Web app
- Read more about this configuration at the following article: Salesmen & Consumers Orders Approval
Allow Manual Split Order
- Section: Systems
- Enable the function to let the dispatchers manually split Sales Order
- Read more at the following article: Manage Sales Orders
Show Route List View
- Section: Route
- Enable the Route Plan (List View) feature, besides the default Route Plan (Map View). The Route Plan will be presented in a list form. Read more about this configuration at the following article: Route Plan (List View)
Reports
- Section: Algorithm
- Enable the Reports > Reports and Reports > Dashboard tabs
- Read more about this configuration at the following articles: Reports and Dashboards
API Key
- Section: API Key
- Generate API keys to enable the connection between Abivin vRoute with external systems
Use FTP
- Section: Systems
- Enable the connection between Abivin vRoute database with the external FTP server
- Read more about this configuration at the following article: FTP Server
Configurations for Distributor
Consolidate Order
This configuration is only required for certain user accounts, and is used in conjunction with Use FTP configuration
- Section: Systems
- This configuration will consolidate orders from second-level Branches and pull to the first-level Distributor
- Read more about this configuration at the following article: FTP Server
Configurations for Branch
Allow Send Email
- Section: Systems
- Enable the function to send emails enclosed with Electornic Proof of Delivery (ePOD) to the customers
- Read more about this configuration at the following article: Electronic Proof of Delivery
Avoid Creating Driver Task
- Section: Systems
- Stop generating tasks on the Mobile app of the drivers after the Delivery Routes are locked
Required Driver
- Section: Systems
- If enabled, during the Route Plan Optimization process, the system will inspect all vehicles which have been assigned Delivery Routes. If there exists vehicles which has not been assigned default drivers, the system will prevent you from locking the Delivery Routes
- The relationship between the configurations Avoid Creating Driver Task and Required Driver are
Configuration | Scenario 1 | Scenario 2 | Scenario 3 | Scenario 4 |
|---|---|---|---|---|
Required Driver | Ticked | Unticked | Ticked | Unticked |
Avoid Creating Driver Task | Ticked | Unticked | Unticked | Ticked |
Scenario Result | Prevent locking Delivery Routes if there are vehicles which have not been assigned drivers | Allow locking Delivery Routes even if there are vehicles which have not been assigned drivers | Prevent locking Delivery Routes if there are vehicles which have not been assigned drivers | Allow locking Delivery Routes even if there are vehicles which have not been assigned drivers |
3D Loading
This configuration is currently a subfeature of the configuration Show Route List View
- Section: Systems
- This configuration will generate a 3D projection of the products inside the delivery vehicle's storage space (container) during the Route Plan Optimization process
- Read more at the following article: 3D Loading
Integrated Telematics
This configuration is only used for certain user accounts, and requires tokens in order to establish connections with the telematics devices
- Section: Systems
- Record information taken from the telematics devices equipped on the Delivery vehicles
Allow Re-delivery Order
- Section: Systems
- Enable the function to retrieve Missing orders (Orders that could not be put into the optimal Delivery routes in their original Order dates) and Failed orders (Orders that were successfully put into the optimal Delivery routes but were failed to be delivered to the customers) from selected past dates, then attemp to put them into the Route optimization process on selected future dates
- Read more about this configuration at the following article: Retrieve Missing Orders & Failed Orders from past dates
Show Driver On Route
This configuration is only effective for certain user accounts
- Section: Display
- Display usernames of drivers (Instead of vehicle codes) on route map screen during the route optimization process
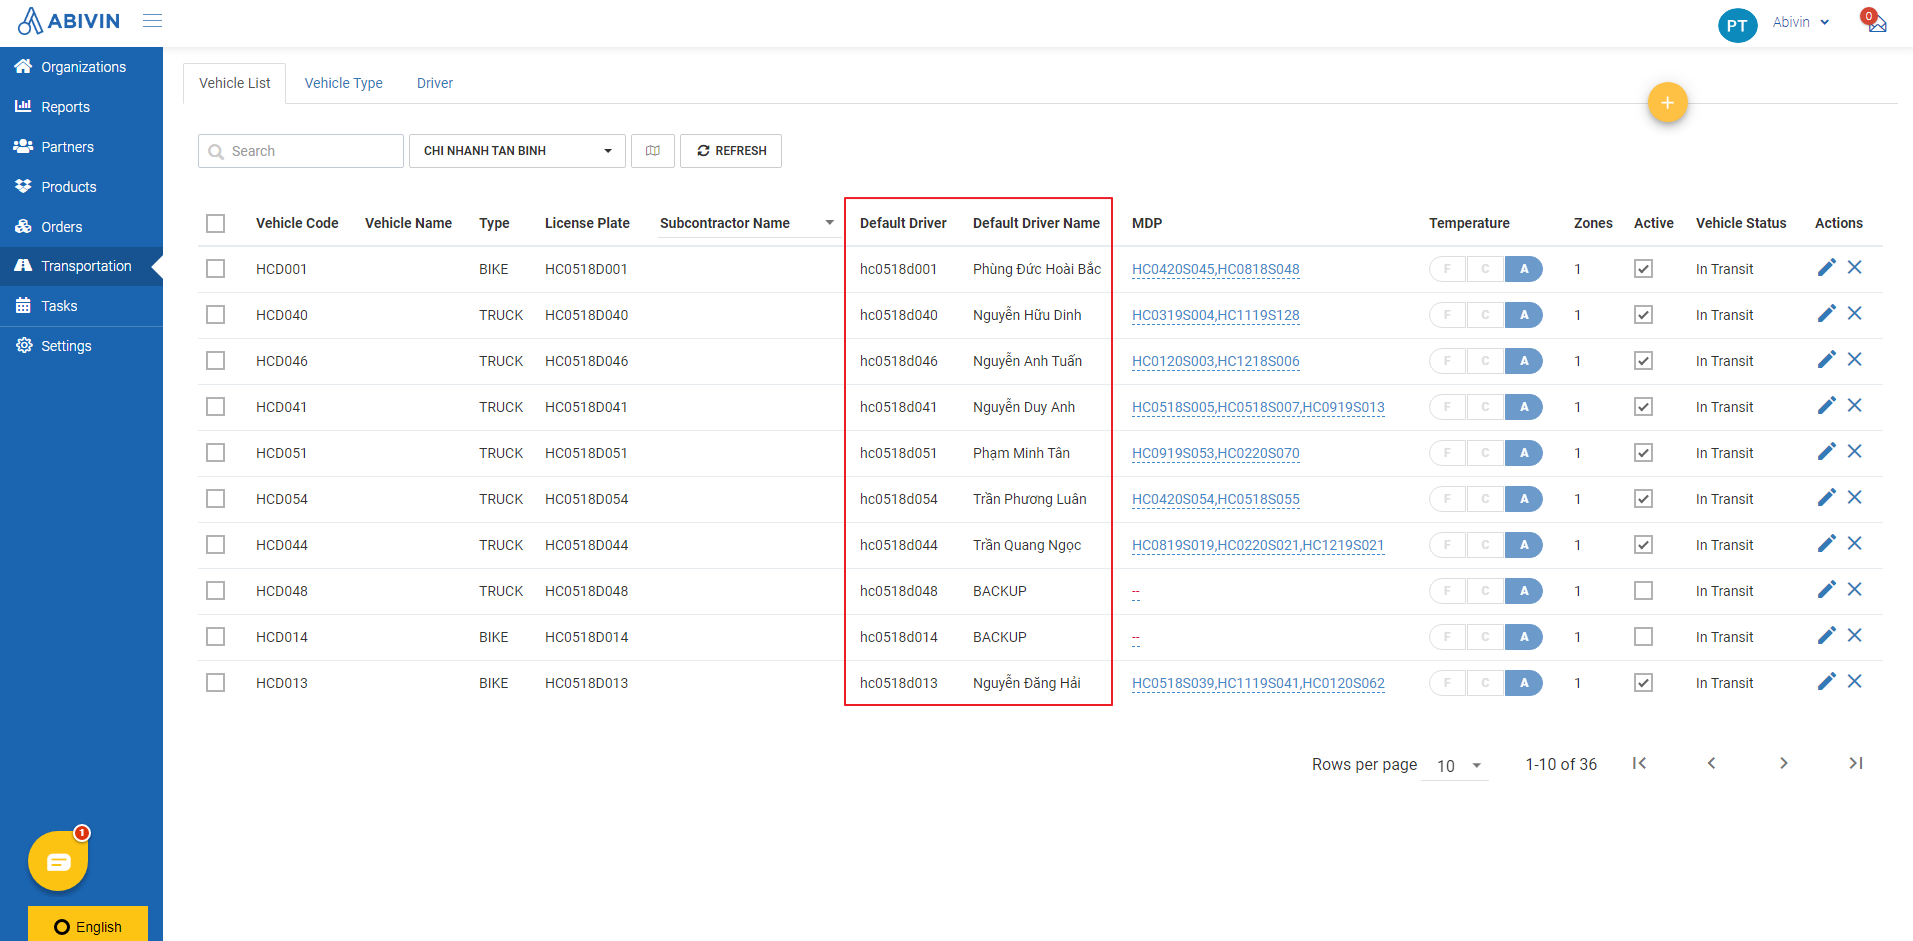
Show Driver On Vehicle Table
This configuration is only effective for certain user accounts
- Section: Display
- Display usernames of drivers on Transportation > Vehicle List tab
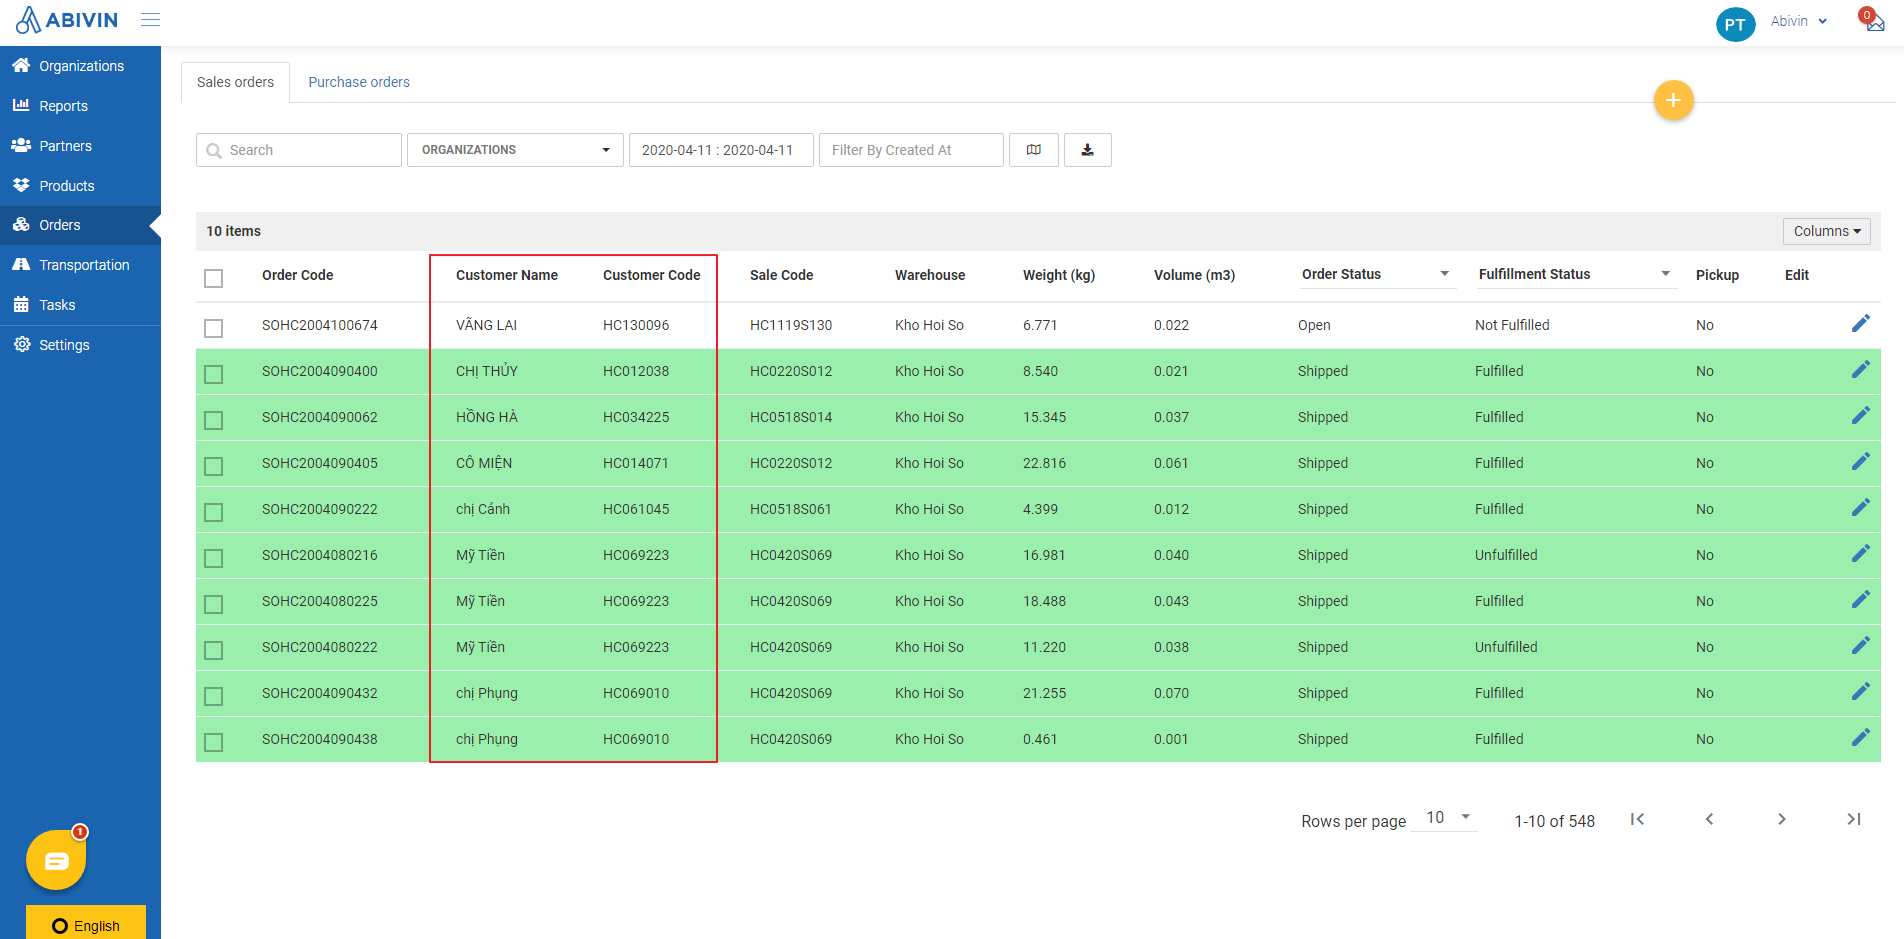
Show Customer on Order List
- Section: Display
- Display Customer Name & Customer Code on Orders > Sales Orders tab
Dynamic Loading Time
At the moment, this configuration is only usable for certain user accounts
This configuration is used in conjunction with the following configurations:
- Section: Algorithm
- Enable a specific loading/unloading time calculation algorithm, instead of using the default loading/unloading time calculation algorithm
- Read more at the following article:
Use Due Date For VRP
This configuration is only required for certain User accounts
- Section: Route
- When enabled, the system will force the vehicles to deliver Orders to the customers exactly on the Due Dates mentioned in the Orders
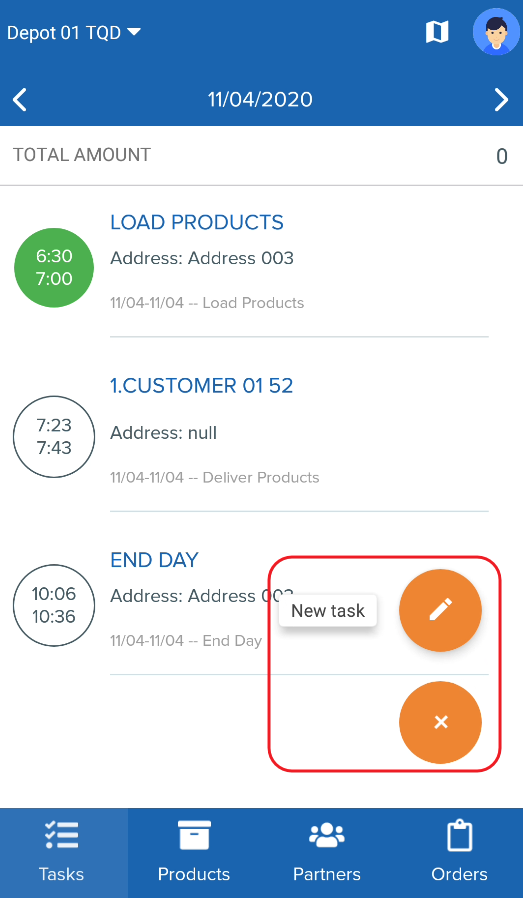
Allow Driver Create Extra Task
- Section: Mobile
- Allow the Drivers (Deliverymen) to actively create extra tasks on the Delivery Mobile app
Shift Start Time
- Section: Route
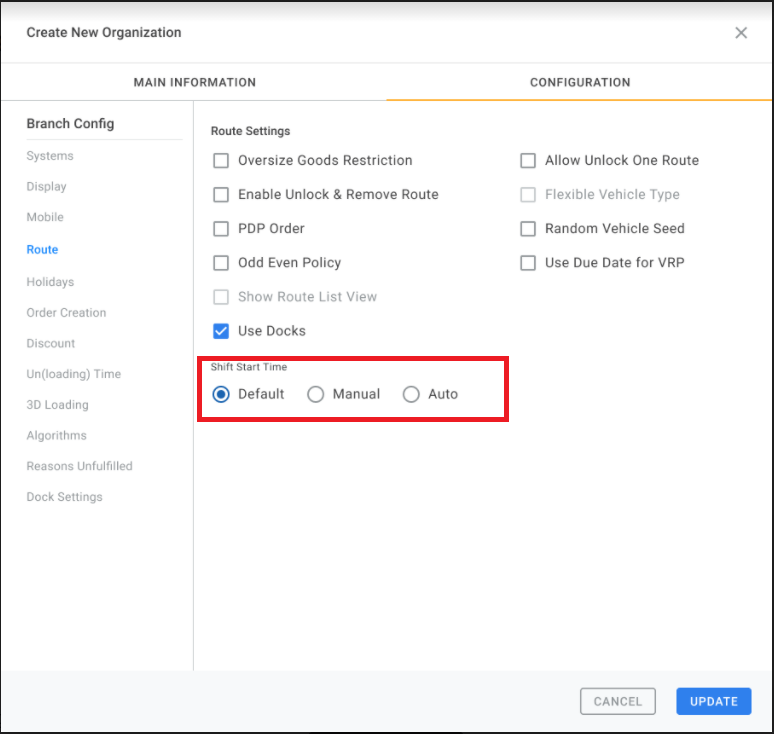
- Allow users to configure the Shift Start Time of Vehicles with the following options:
- Default: The system will compare the Open time of the Depot and Working time of the Vehicle to suggest the Shift Start Time during the Route Optimization process.
- Manual: Before the Route Optimization process, a pop-up will appear for users to manually input the Shift Start Time.
- Auto: The system will suggest the Shift Start Time that minimizes the waiting time of Driver during the Route Optimization process.
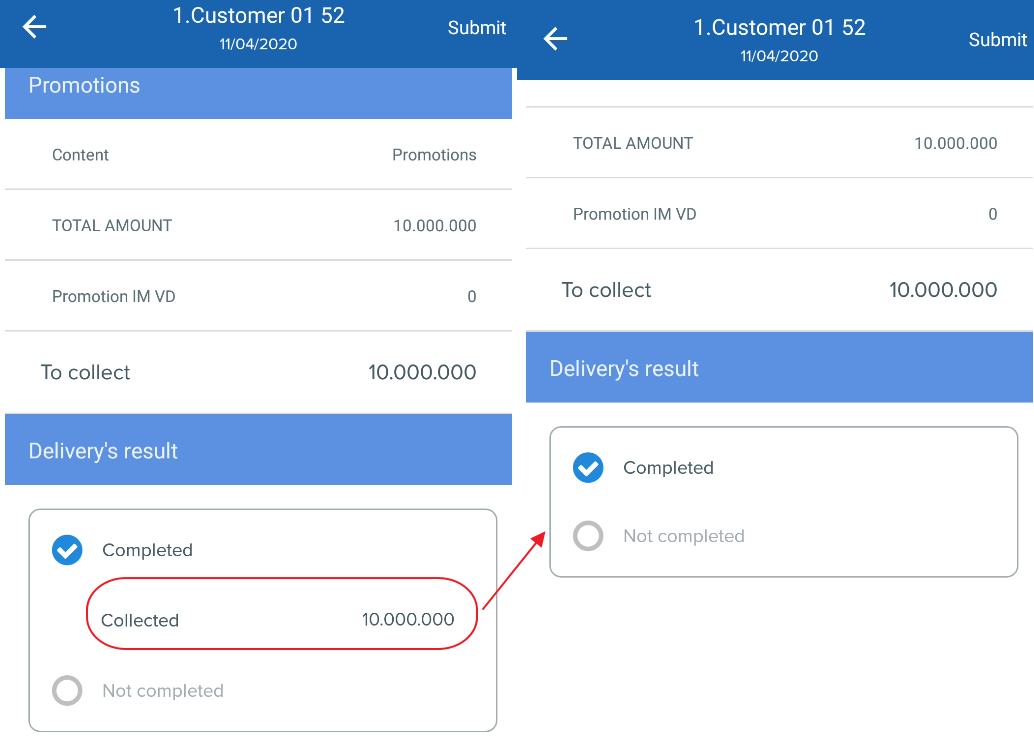
Hide Number Collected
- Section: Mobile
- Hide the field to input the money amount collected from the customers on the Delivery Mobile app
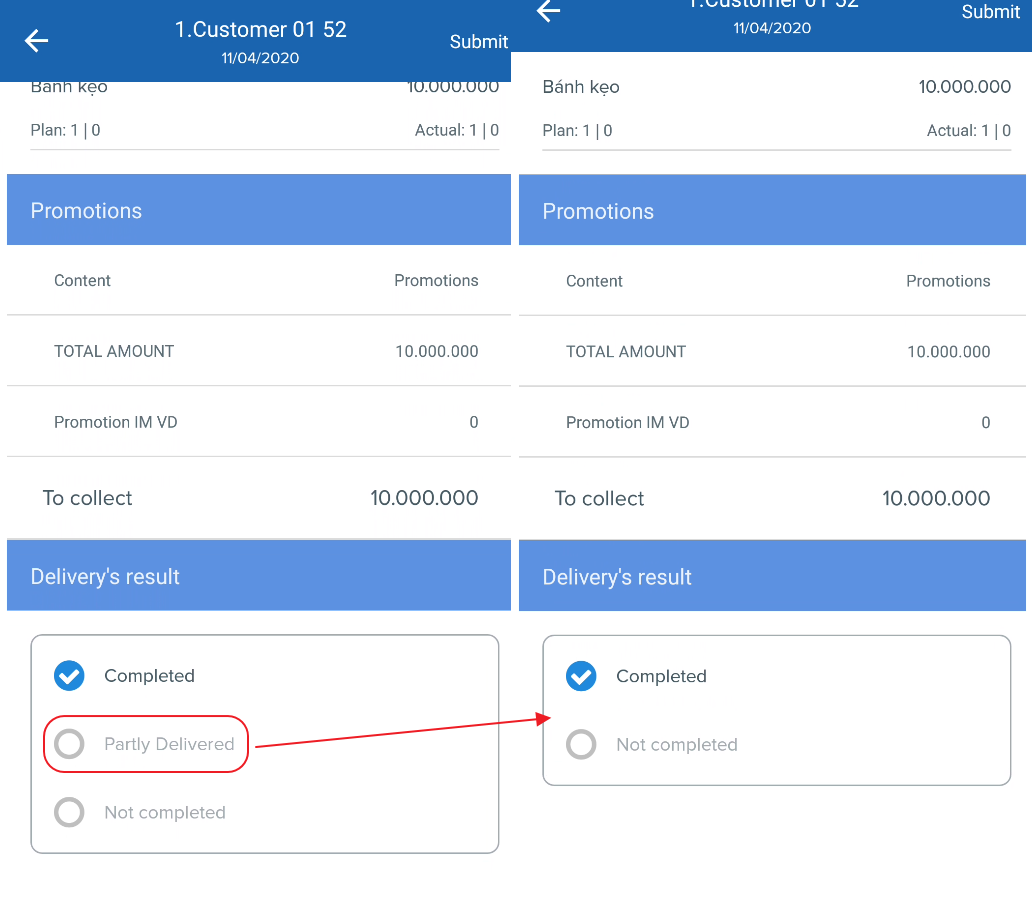
Hide Partially Delivery
- Section: Mobile
- Hide the option Partly Delivered from the Delivery results on the Delivery Mobile app
Prevent Re-Submit Task
- Section: Mobile
- Prevent the Drivers (Deliverymen) from resubmitting tasks that have already been submitted on the Delivery Mobile app
Allow Submit Task Over Date
- Section: Mobile
- Allow the Drivers (Deliverymen) to submit overdue tasks (By date) on the Delivery Mobile app
- For example: A task is planned to be performed no later than 10:00 on 10/04/2020. With this configuration enabled, the Drivers (Deliverymen) will still be able to submit that task at a later time point than that time point
Prevent submit task over
This configuration will not be visible if the configuration Allow Submit Task Over Date is enabled
- Section: Mobile
- Prevent the Drivers (Deliverymen) from submitting overdue tasks on the Delivery Mobile app. There are two options:
Date and time
- Tasks that are overdue by the planned time point will not be submittable
- For example: A task is planned to be performed no later than 10:00 on 10/04/2020. The Drivers (Deliverymen) will not be able to submit that task after 10:00 on 10/04/2020
Date
- Tasks that are overdue by the planned date will not be submittable
- For example: A task is planned to be performed no later than 10:00 on 10/04/2020. The Drivers (Deliverymen) will still be able to submit that task as long as the current date is earlier or equals to 10/04/2020, but will not be able to submit if the current date is a later date (For example 11/04/2020)
Enable Unlock And Remove Route
- Section: Route
- Enable the function to unlock all locked Delivery Shifts on the current Route Plan at once
- Read more about this configuration at the following article: Unlock most recently locked Delivery shifts of all vehicles
Allow Unlock One Route
- Section: Route
- Enable the function to unlock only some selected locked Delivery Shifts on the current Route Plan
- Read more about this configuration at the following article: Unlock locked Delivery routes of only selected vehicles
Random Vehicle Seed
- Section: Route
- By default, during the Route optimization process, the system will select the vehicles from a static vehicle list. Over time, this will lead to the situation in which certain vehicles will likely get selected more than other vehicles
- When enabled, this configuration will generate a random vehicle list for each Route optimization attempt, which will prevent the above phenomenon from happening
Services Time
- Section: Algorithm
- Specify the Base Service time of the Branch, in order to automatically calculate the Service time (Loading and Unloading time) of all Depots and Customers under that Branch
- Read more about this configuration at the following article: Planned Service Time Calculation
Use Familiarity
- Section: Algorithm
- Enable the Familiarity Constraint
- Read more about this configuration at the following article: Familiarity Constraint
Use Clustering
- Section: Algorithm
- Enable the Geographic Clustering routing algorithm
- Read more about this configuration at the following article: Geographic Clustering
Clustering By District
- Enable the Geographic Clustering (By District) routing algorithm
- Read more about this configuration at the following article:
Lunch Time
- Enable the delivery vehicle to have lunch break time
- Read more about this configuration at the following article: Vehicle Lunch Break
Odd Even Policy
- Enable traffic policy by odd and even vehicle license plate numbers
- Read more about this configuration at the following article: Road constraint based on Vehicle license plate number
Time Balancing
- Make the working time of the delivery vehicles to be as balanced as possible
- Read more about this configuration at the following article:
Use Cold Chain
- Enable temperature-controlled supply chain feature
- Read more about this configuration at the following article: Cold Chain
Split Delivery
- Enable the function to automatically assign multiple Sales Orders that are placed by the same customer to multiple vehicles, without having to enable the configuration Separate Vehicle for each of those Orders during the Order creation process
- Read more about this configuration at the following article:
Use Service Time
- Use the service time of the orders (Unloading time at the customers' warehouses/stores) that have been manually input in the Order Excel template instead of the automatically calculated service time during the route optimization process
- Read more about this configuration at the following article: Manual Customer Service time
Use WMS
This configuration is only used for some user accounts
- Enable the integration between Abivin vRoute with the external Warehouse management system, in order to pull data (Orders, Customers etc.) to Abivin vRoute
- Read more about this configuration at the following article:
Hard Time Windows
- Enable the Hard time windows constraint
- Read more about this configuration at the following article: Hard Time Window Constraint
Open Route
- Allow the delivery vehicles to not travel back to the manufacturing warehouses after completing all assigned delivery tasks
- Read more about this configuration at the following article: Open Route

Reason settings
- Specify the reasons for Failed orders, so that the Drivers (Deliverymen) can select on the Delivery Mobile app
- Read more about this configuration at the following article: Failed Orders
Un(loading) Time
- When you enable this configuration, you could use these two configurations: Loading Time at Depot and Customer Unloading Time. The only organization type that could enable this configuration is Branch.
Configurations for Depot
The configurations for Depot will also apply to Sun & Crossdock if mentioned
Loading Min Time & Loading Max Time
On Excel template, these fields are called Min Time and Max Time
Also applies to Sun & Crossdock
- The minimum and maximum loading time period (In minutes) that the Depot/Sun/Crossdock being created imposes on every vehicle when loading products
- Read more about this configuration at the following article: Planned Service Time Calculation
Global Customer
-
Section: Systems
-
This configuration allows the user to create a global customer. A global customer is a customer that can be used in any branch and depot in the organization.
-
When enabling this configuration:
-
Customer's organization must be Manufacture when creating customer (by manual or import files)
-
Old customer maybe update or not
-
When disabling this configuration:
-
User checks if there is any customer that its organization is Manufacture. Then, the user must update the organization of those customers as Depot
-
When the user disables this configuration, the system will warn and list all the customers that have not updated yet
-
Steps to use this configuration:
-
Step 1: Enable the configuration: The user edits the Manufacture org and then selects MORE CONFIGURATIONS tab, in the System section
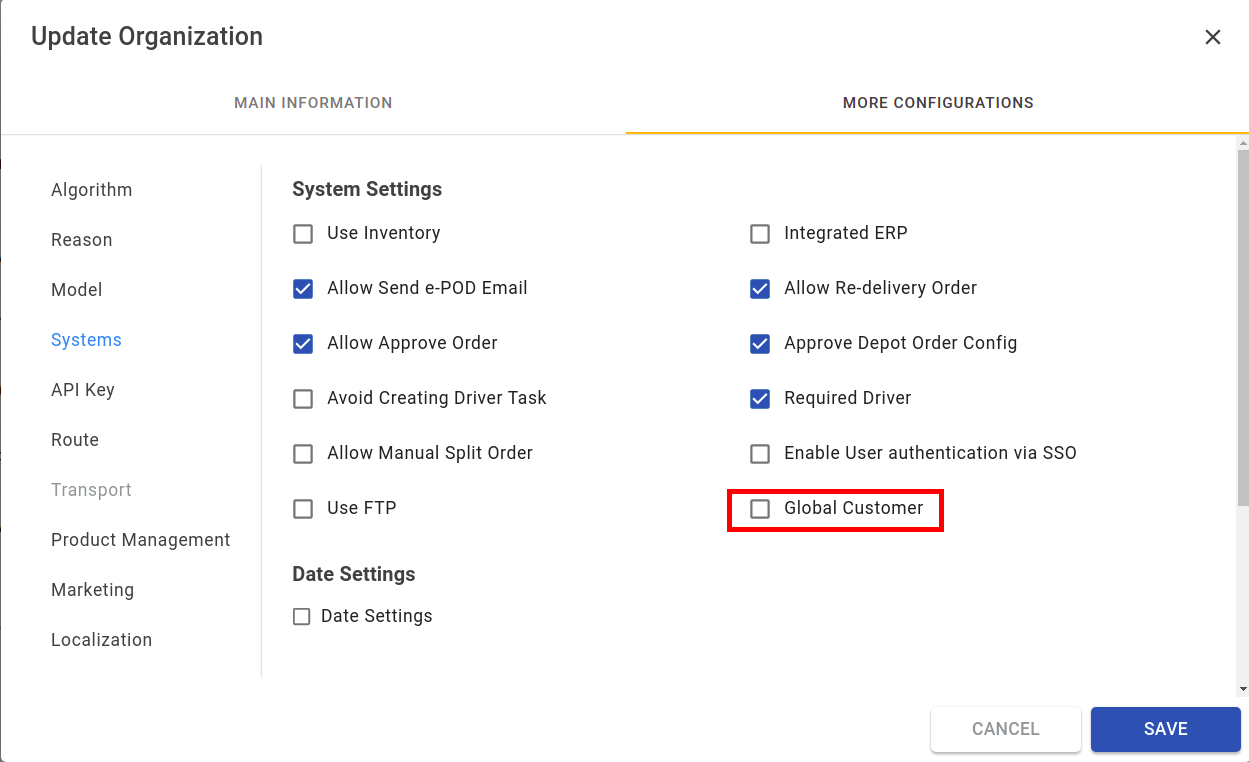
Global customer config
- Step 2: In the Organizations > User Groups tab, create new User Group.
- New User Group must have View All permission for Organizations resource, and All permission for Customer resource. The group should contain permissions as below:
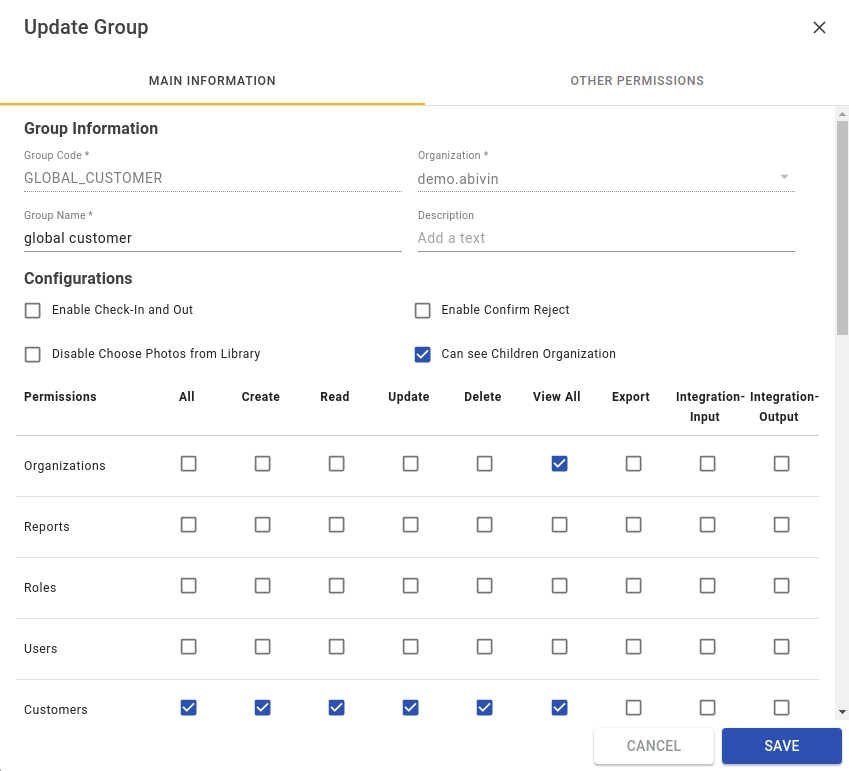
New User Group
- Step 3: Assign a new User Group to a specific User
- In the Organizations > User tab, edit the User you want to have permission to manage Global Customer
- Add the Manufacture to the user's Organization
- Add a new User Group to user's Groups

User's fields need to update
- Step 4: Create Orders: The user can select Global Customer when creating Order
- Note: In each route plan, all orders delivered to the same customer should be created from the same depot
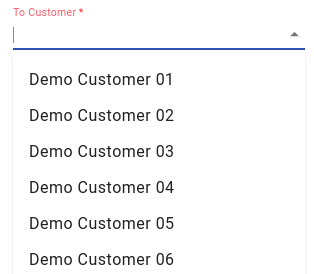
Global Customer will be listed
Updated about 2 months ago
