3D Loading Plan
* At the moment, 3D Loading is a subfeature of the Route Plan (List View). You will not be able to access this feature from the Route Plan (Map View)* This feature has only been developed for certain User accounts. It might not be optimized for other User accounts
3D Loading Plan Definition
- Loading plan refers to the process of arranging Products to maximize the capacity of the Vehicle cargo area
- In Abivin vRoute, 3D Loading Plan is a feature that is integrated into the Route Plan optimization process. When a Route Plan is being optimized, the system will also generate a three-dimensional visualization of the Products inside the Vehicle cargo area
Compulsory Configurations
Enable 3D Loading Plan Configuration
- Firstly, you must enable the 3D Loading configuration at the Branch
- To do this, follow the steps below:
- Navigate to the Organizations > Organizations tab
- Click the Edit icon of the Branch
- On the Update Organization form, navigate to the More Configurations > 3D Loading sub-tab. On this sub-tab, tick the Use 3D Loading checkbox
- Upon ticking this checkbox, several configurations will appear below
- 1 - During Routing. This configuration will tell the system to run the advanced 3D Loading algorithms and regenerate the 3D Loading Plan each time a Delivery Stop is added to the Route Plan. If you enable this configuration, the Route Plan optimization process might take longer than usual
- Upon enabling this configuration, a sub-configuration, Initialize 3D loading only when vehicle fill rate reaches[ ] % of volume will appear below. This sub-configuration will tell the system to only run the advanced 3D Loading algorithms when the Vehicle fill rate reaches a certain percentage
- Do note that even if you don't enable the During Routing configuration, the system will still generate the 3D Loading Plan, just that the advanced 3D Loading algorithms will not be run
- 2 - Prioritize products descending by. This configuration section lets you set up the Product placement priority inside the Vehicle cargo area according to several metrics:
- Density: The density of the Product case, calculated by dividing the weight of the Product case by its volume (kilogram/cubic meter, or kg/m3)
- Weight: The weight (In kilogram, kg) of the Products case
- Volume: The volume (In cubic meter, m3) of the Products case
- At the moment, this feature is only usable for products that have only one single item per whole case (The attribute Items per Case of those products have the value 1). The dimensions (Length, width, height) of a whole case therefore equal to the dimensions of a single item
- The products must have correct data of the following attributes: Volume, Weight, Length, Width, Height, Number of Layers, Facets (Refer to the article Manage Products for the definitions of these attributes)
- The vehicles must have correct data of the following attributes: Volume, Weight, Cargo Area Length, Cargo Area Width, Cargo Area Height (Refer to the article Manage Vehicles for the definitions of these attributes)
Access 3D Loading
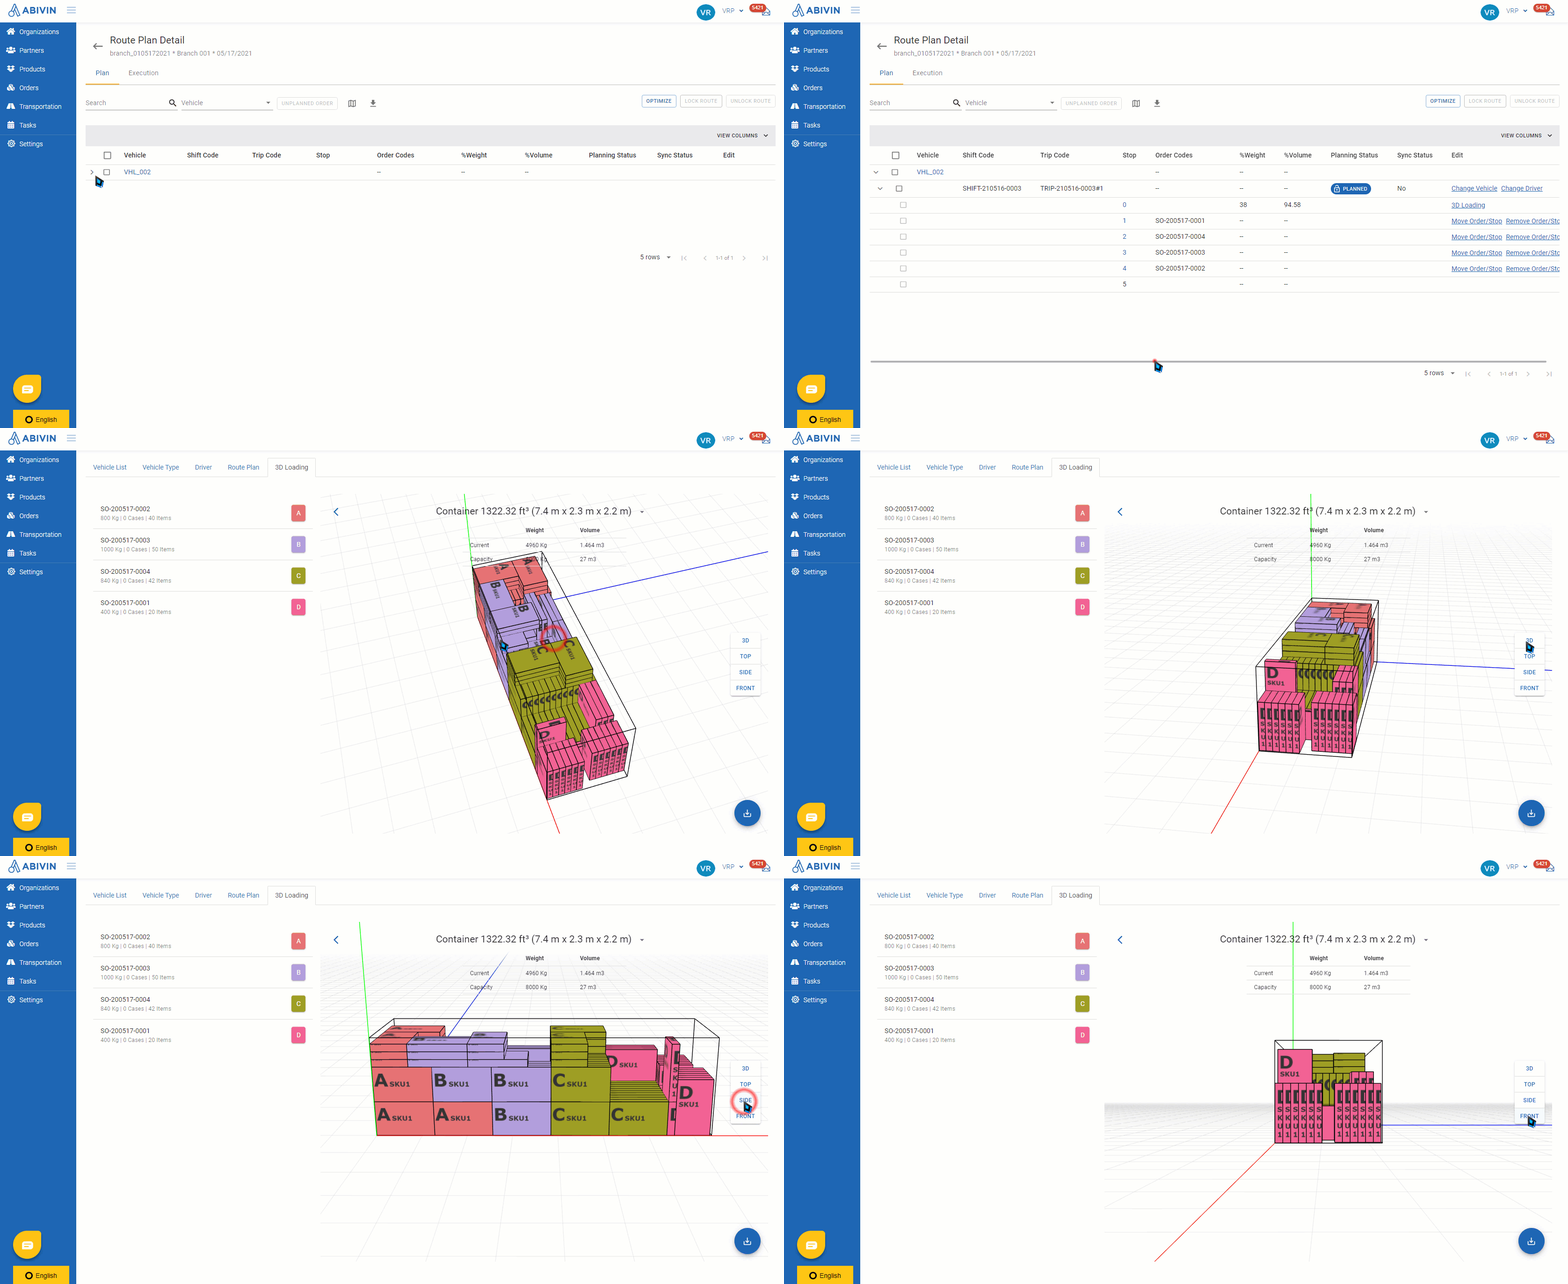
- First, navigate to the tab Transportation > Route Plan
- Click on the text Detail (Under the column Edit) of the Route Plan
- On the screen Route Plan Details, click on the right angle icon on the row containing the Vehicle Code to display the Delivery Routes assigned to that vehicle. Continue to click on the right angle icon on the row containing the Delivery Route code to display the Delivery Trips inside those Delivery Routes
- Next, scroll the horizontal scrollbar to the far right of the screen until you see the column Edit. Click on the text 3D Loading of a Delivery Trip
- You will be directed to the tab Transportation > 3D Loading
- On this tab, you can view how the products of the Delivery Trip are loaded in the vehicle container in a simulated three-dimensional environment
- On the right side of the screen, you can select four viewpoints: 3D view, Top view, Side view; Front view
- You can also left click on a random point on the screen and, with the left mouse button still pressed, move around to see the 3D view from multiple angles. You can also use the middle scroll button on your mouse to zoom in and out the 3D view
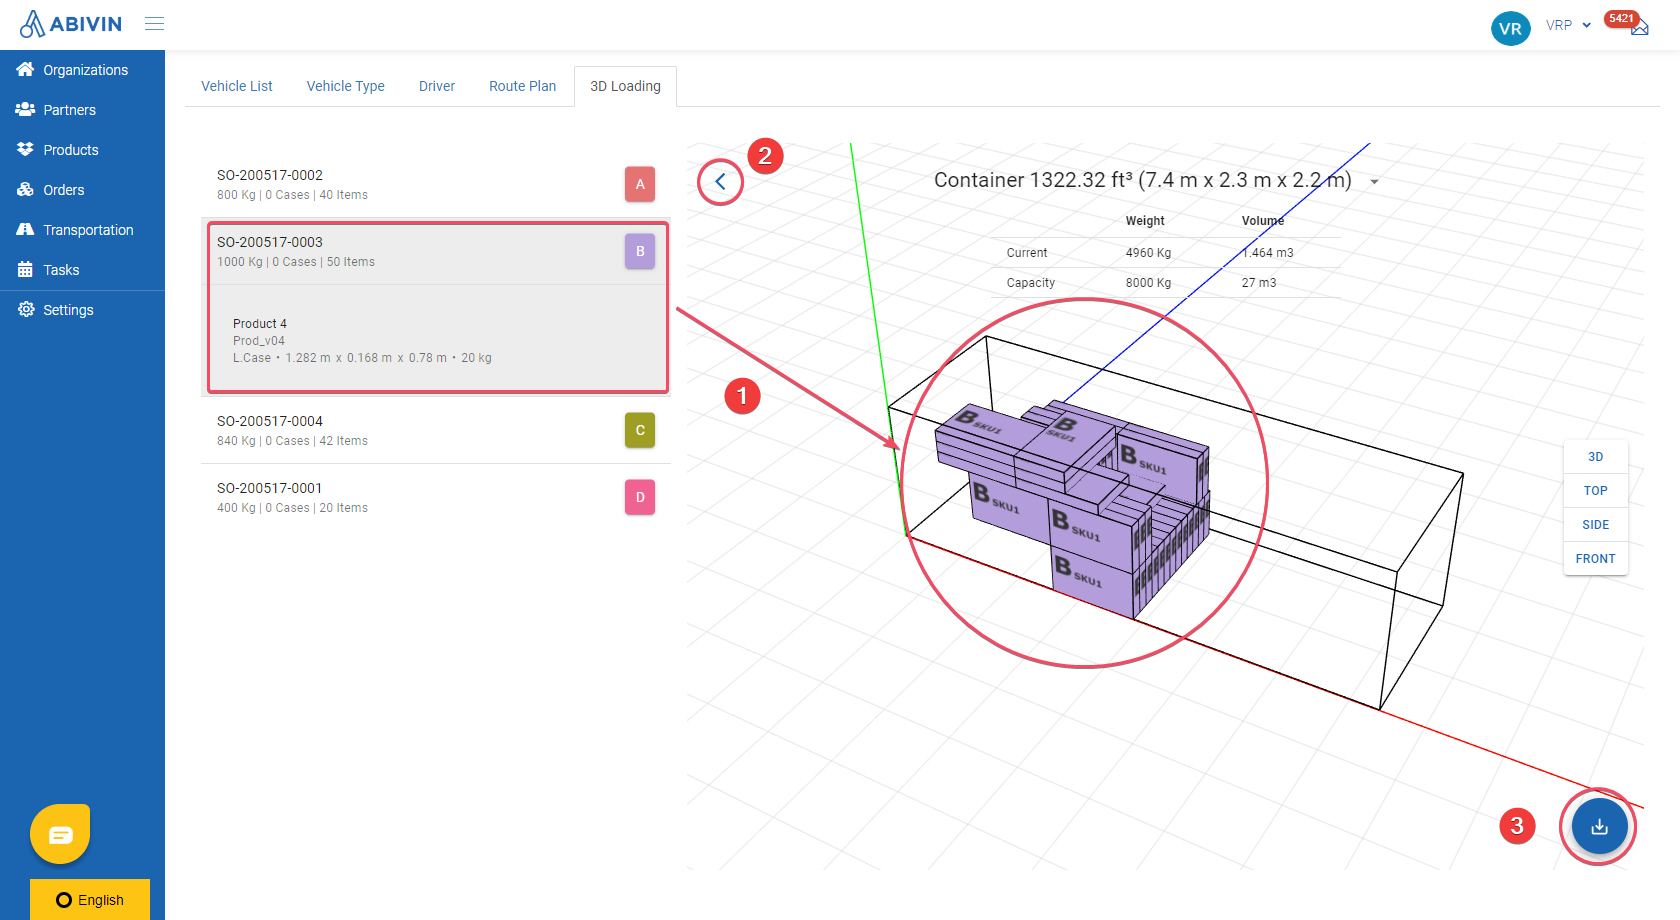
- To view the details of a particular Order, click on the respective Order Code on the panel. Details of that Order will appear. The 3D projection will also show only the products of that Order (1)
- You can collapse the Order panel by clicking on the left angle button on the top left corner of the 3d projection (2)
- To download the current 3D loading plan of the vehicle, click on the Download button at the bottom right of the screen. After a few moments, an Excel spreadsheet will be generated (3)
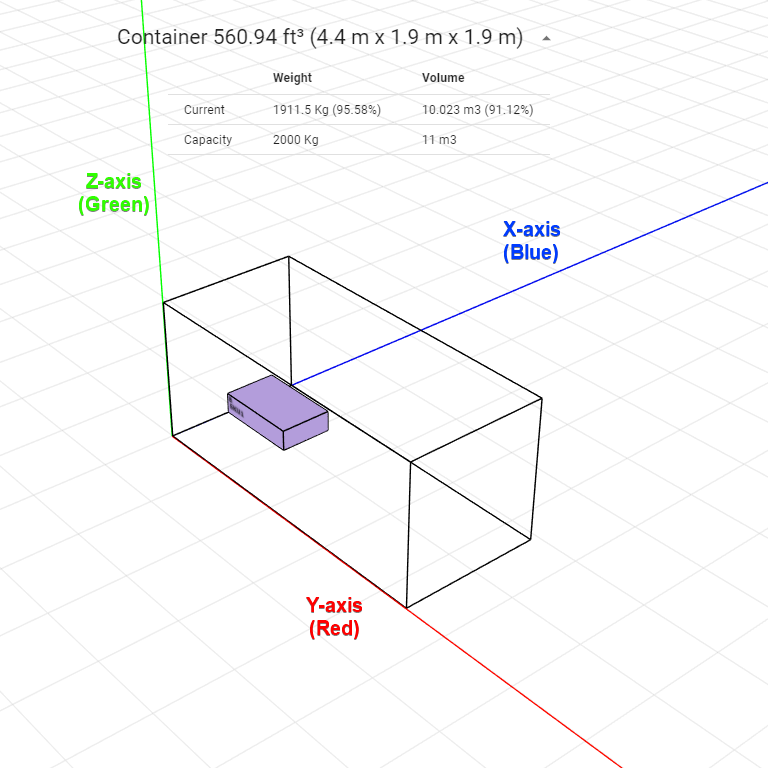
- Below are the axes of the vehicle container: The blue line represents the X-axis; the red line represents the Y-axis; and the green line represents the Z-axis
3D loading plan Excel spreadsheet
- Below are the information fields in the 3D loading plan Excel spreadsheet
Information field | Description |
|---|---|
"No" | Numerical index |
"Order Code" | Order Code |
"Product Code" | Product Code |
"Length" | The length attribute of the product |
"Width" | The width attribute of the product |
"Height" | The height attribute of the product |
"Ox" | The placement position of the product along the X-axis |
"Oy" | The placement position of the product along the Y-axis |
"Oz" | The placement position of the product along the Z-axis |
"X" | Indicates how much the product fills the X-axis |
"Y" | Indicates how much the product fills the Y-axis |
"Z" | Indicates how much the product fills the Z-axis |
Notes when using 3D Loading
- It should be mentioned that during the Route Plan optimization process, the system will not check the attributes Length, Width, Height, Number of Layers, Facets of the Products against the attributes Length, Width, Height of the Vehicles’ container. These attributes would only be checked when generating 3D Loading projection
- Therefore, there may happen two scenarios when the item dimensions exceed the vehicle container's dimensions
Scenario 1. Single product item's dimensions exceeds vehicle container's dimensions
- For example: A single item of a product has the (Length, Width, Height) dimensions to be (10, 3, 3) meter
- The vehicle's container has the (Length, Width, Height) dimensions to be (6, 3, 3) meter
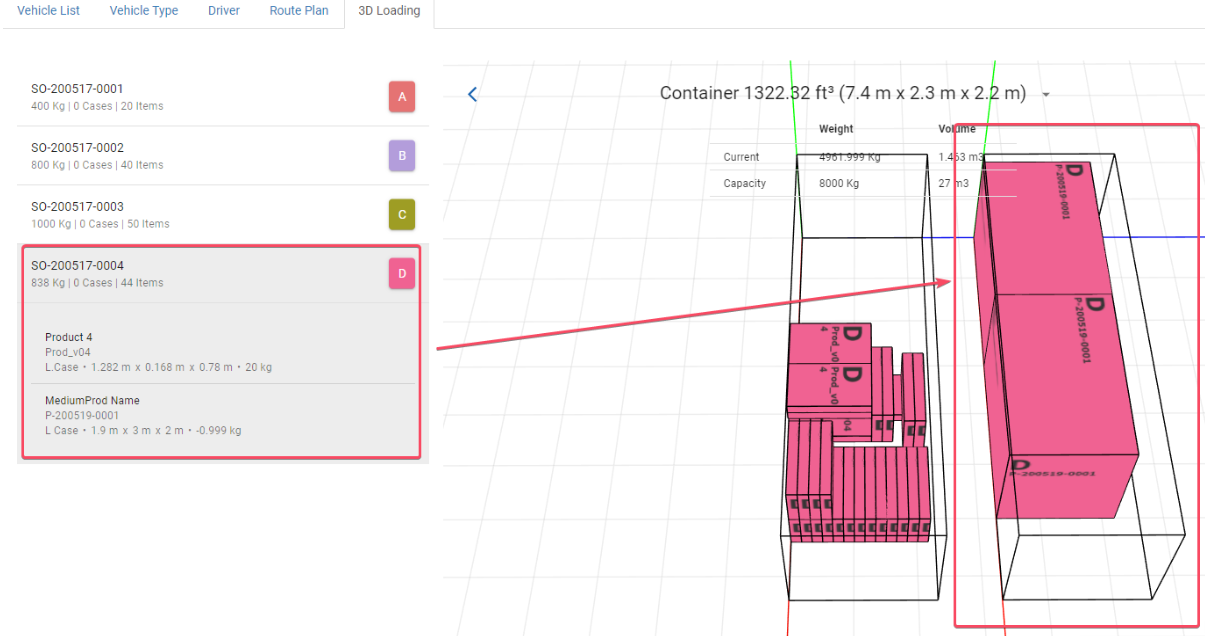
- In this scenario, that product item is oversized in comparison with the vehicle's container. On the 3D projection, the oversized product items will be placed on the left side of the vehicle's container. On the Order panel, the Order code containing the oversized product items will have an orange warning sign
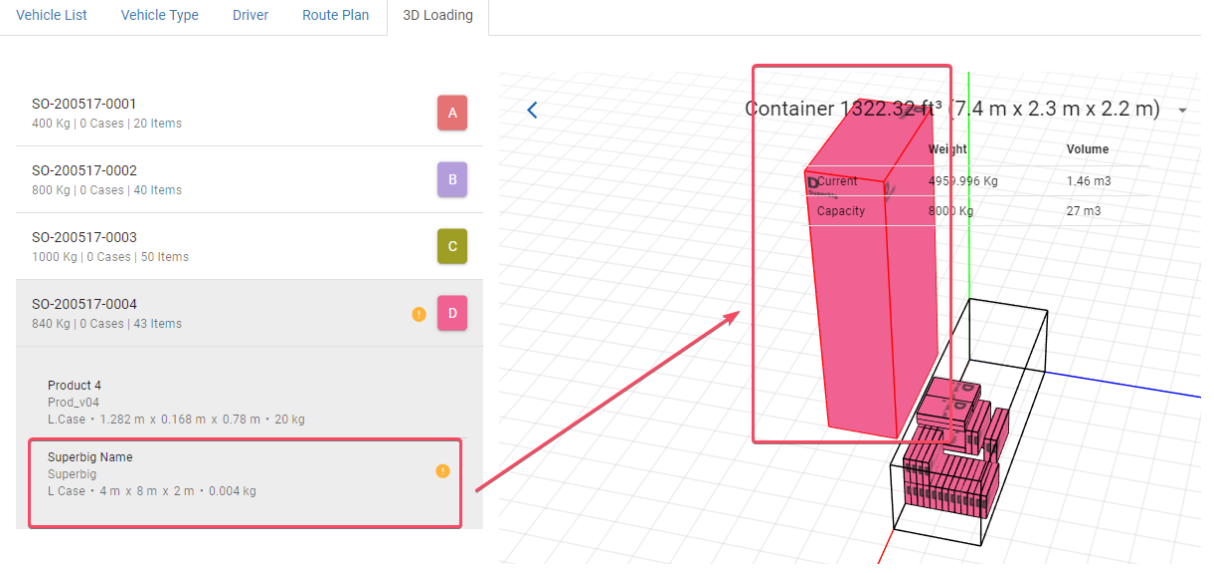
Scenario 2: Total product items' dimensions exceeds vehicle container's dimensions
- For example: A single item of a product has the (Length, Width, Height) dimensions to be (4, 3, 3) meter
- The vehicle's container has the (Length, Width, Height) dimensions to be (6, 3, 3) meter
- In this scenario, the vehicle can carry only one single item of the above product. If the vehicle is assigned to carry multiple single items of that product, the remaining items will be placed into fake containers, located to the right of the vehicle’s real container on the 3D projection. This will help you see the size of the exceeding product items, so that you can make appropriate adjustments to the Orders and/or the vehicle's container dimensions in order to successfully load all items
Updated about 2 months ago
